
WordPress Dashboard → Classified Listing → Settings → Listing Details Page
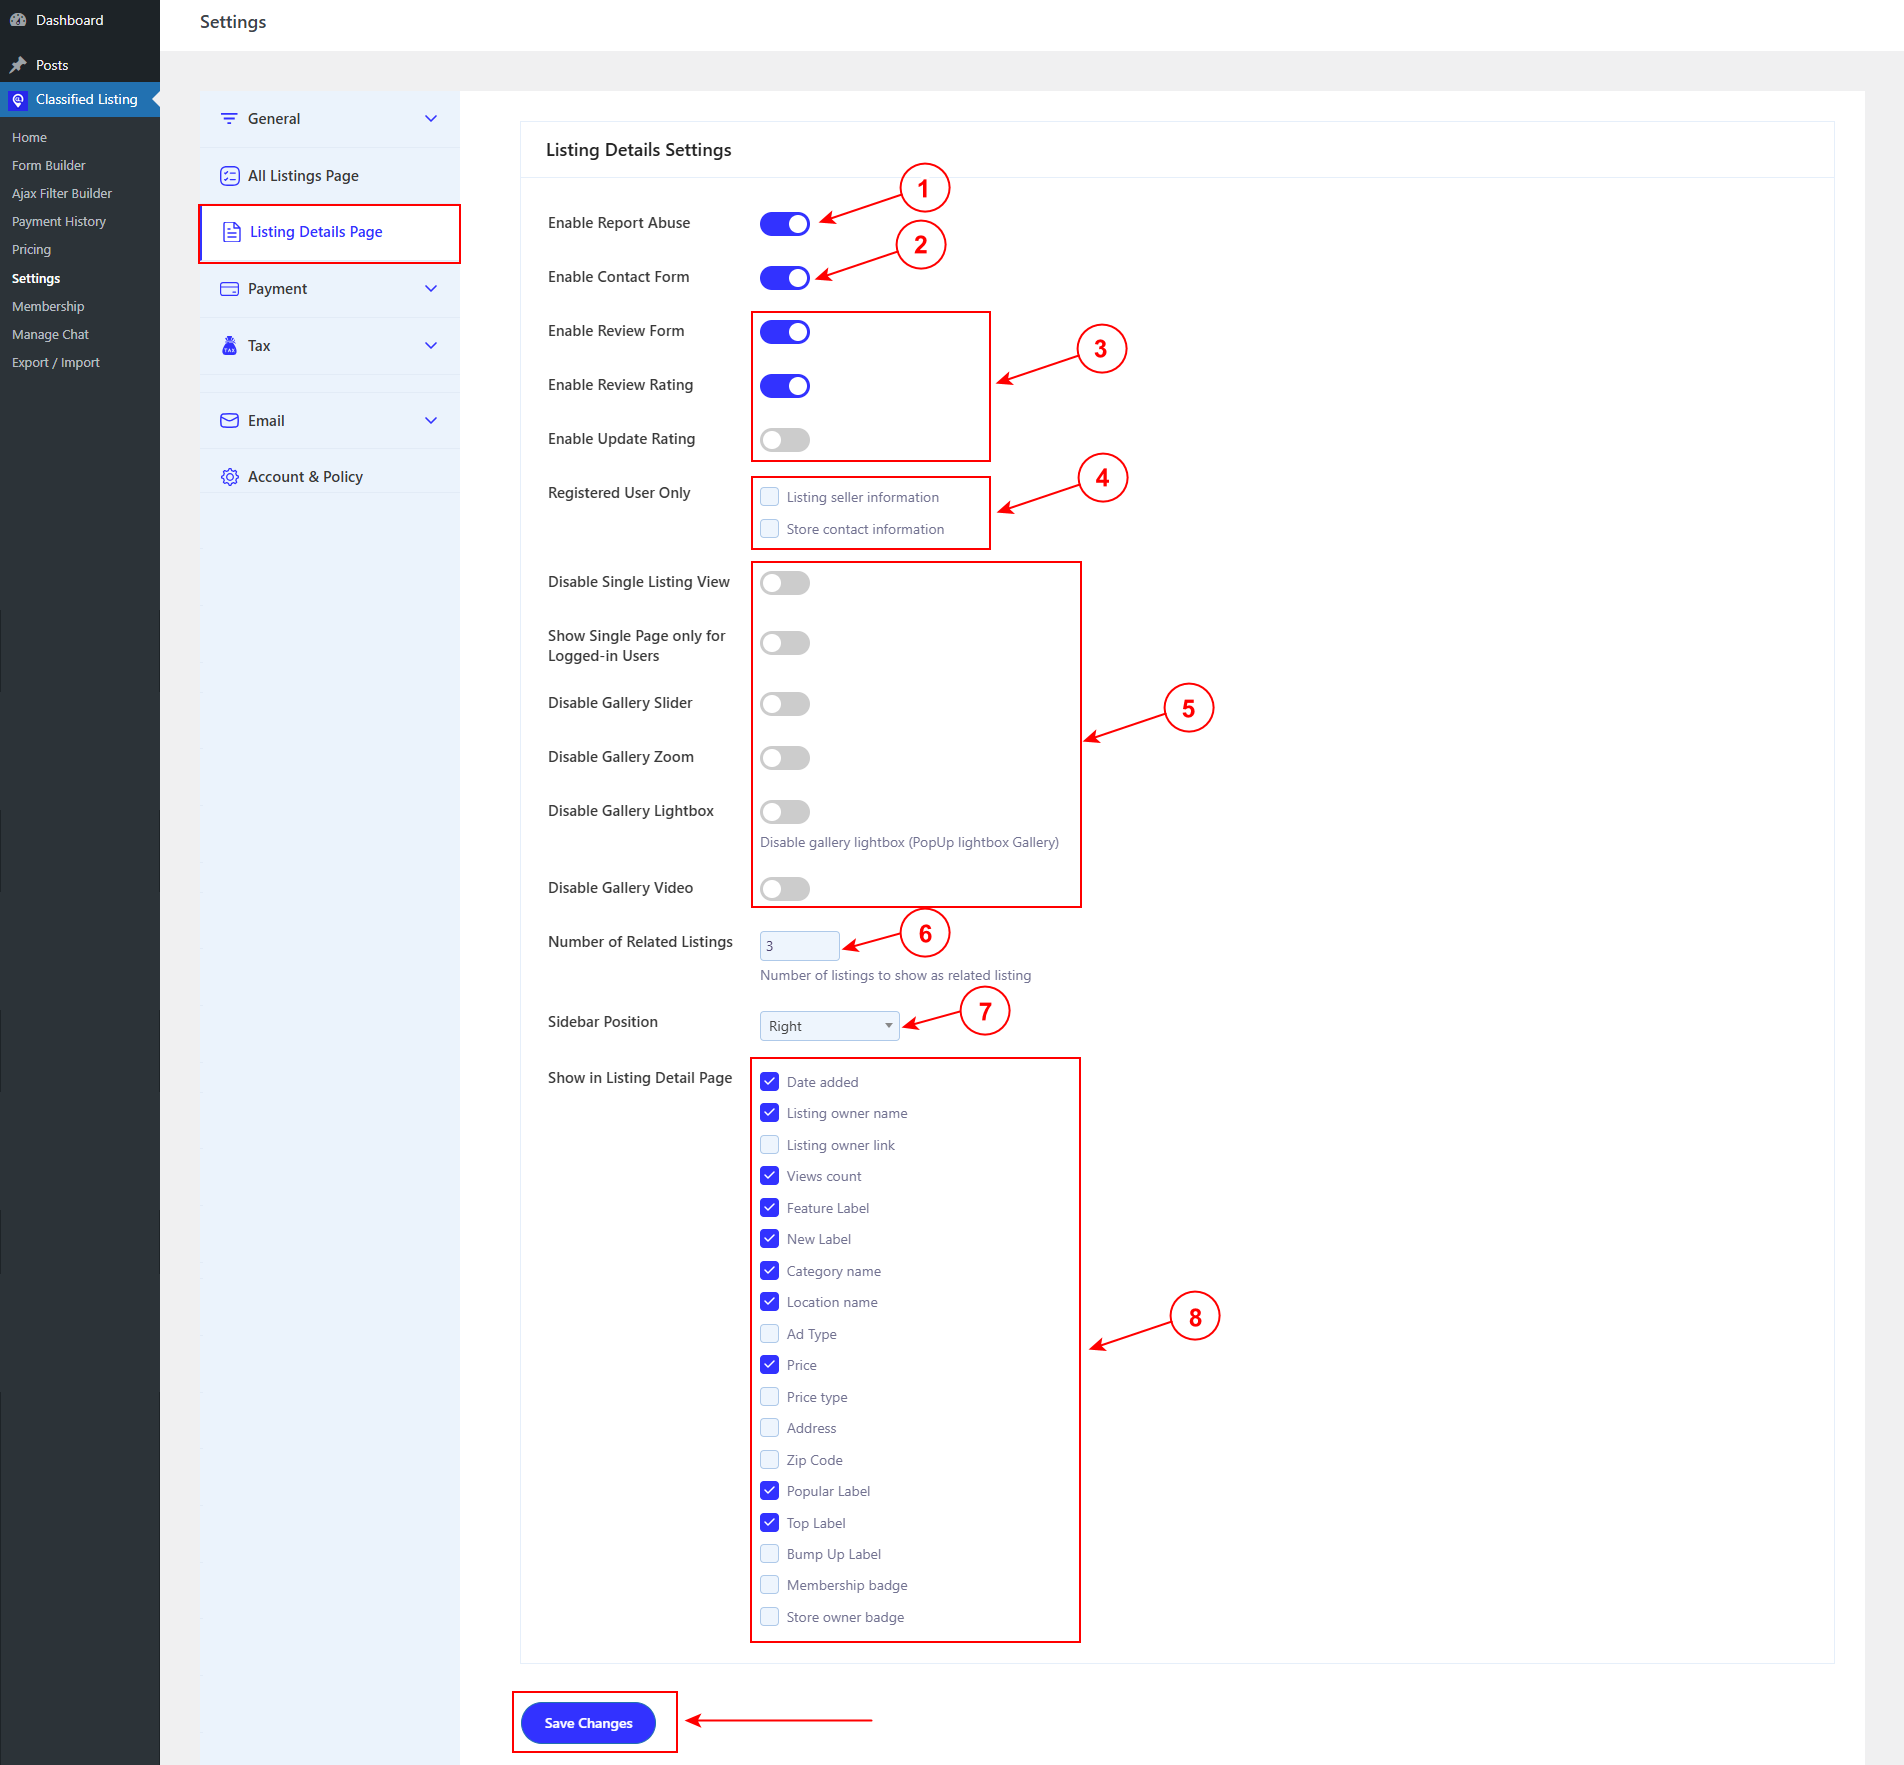
1. Enable Report Abuse #
When enabled, a Report Abuse button appears on every listing detail page. Logged-in visitors can use it to flag a listing for inappropriate content, spam, fraud, or policy violations. Reports are sent to the site administrator for review.
Enable this on any public-facing marketplace where sellers post content without prior admin approval. It creates a community-moderated safety layer that complements admin moderation and reduces your workload on large directories.
ℹ️ Note Report Abuse only flags the listing — it does not automatically unpublish it. Admins must review and act on reports manually from the listings admin screen.
2. Enable Contact Form #
When enabled, a contact form appears on the listing detail page allowing potential buyers to send a message directly to the listing seller without exposing the seller’s email address publicly. The message is delivered to the seller’s registered email via the plugin’s email system.
This is one of the most important conversion elements on the detail page. Disabling it forces buyers to find contact details elsewhere, which creates friction and reduces enquiries. Keep this enabled unless your site model uses a different contact mechanism (e.g., in-app chat).
💡 Tip If you have the Chat add-on enabled, you may prefer to rely on real-time chat for buyer-seller communication and disable the contact form to keep the detail page focused. Configure Chat under Settings → Chat Settings.
3. Reviews & Ratings #
Three independent toggles control the review system on listing detail pages. They can be mixed and matched to suit your trust model:
| Toggle | What It Does | Enable When… |
|---|---|---|
| Enable Review Form | Shows a review submission form below the listing so buyers can leave written feedback. | You want qualitative buyer feedback visible on listings (marketplace, service directory). |
| Enable Review Rating | Adds a star-rating input (1–5 stars) to the review form and displays the aggregate star rating on the page. | Numerical ratings help buyers compare sellers quickly — recommended for all marketplaces. |
| Enable Update Rating | Allows a reviewer to edit or update their previously submitted rating and review text. | You want to allow reviewers to revise opinions after a dispute is resolved or service improved. |
ℹ️ Note You can enable the Review Form without enabling Review Rating (written reviews only, no stars). However, enabling Review Rating without enabling the Review Form has no visible effect — the rating input is part of the form.
💡 Tip Reviews are moderated via the standard WordPress comment system. Set comment moderation rules under WordPress Settings → Discussion to control whether reviews appear immediately or require admin approval.
4. Registered User Only #
Two independent checkboxes gate specific contact information behind a login wall. Each checkbox acts independently — you can protect one without protecting the other:
| Checkbox | What It Protects | Use Case |
|---|---|---|
| Listing seller information | The seller’s phone number, email, and any contact details entered on the listing form. | Prevent scraping of seller contact data. Common on job boards and professional service directories. |
| Store contact information | The Store’s address, phone, and contact details (Store add-on required). | Protect verified store data from spam bots while still showing it to registered buyers. |
Visitors who are not logged in and try to access gated contact information will see a prompt to register or log in. This also incentivises user registration, which grows your database of buyers for email marketing and retargeting.
💡 Tip Gating all contact info behind login can reduce spontaneous enquiries from casual browsers. Consider only gating the phone number (highest-abuse field) while leaving the contact form open to all visitors to balance protection and conversion.
5. Single Listing View & Gallery Settings #
This group of six toggles controls the detail page view and the image gallery behaviour. All six are disabled (off) by default, meaning all features are active. Toggle a switch on to disable that feature.
⚠️ Important These toggles follow a ‘disable’ pattern — the switch being ON means the feature is TURNED OFF. This is the opposite of most settings panels. Read each label carefully before saving.
| Toggle | Default State | Effect When Enabled (ON) |
|---|---|---|
| Disable Single Listing View | OFF (view active) | Hides the dedicated single listing detail page entirely. Visitors clicking a listing card go nowhere or are redirected. Use only if you have a custom detail page implementation. |
| Show Single Page only for Logged-in Users | OFF (public access) | Makes the entire listing detail page visible only to registered, logged-in users. Non-logged-in visitors see a login prompt instead. Useful for lead-generation directories where content access is the incentive to register. |
| Disable Gallery Slider | OFF (slider active) | Removes the horizontal image slider from the gallery and shows images in a static grid instead. Use if your theme’s layout works better with a flat image display. |
| Disable Gallery Zoom | OFF (zoom active) | Turns off the hover-to-zoom feature on gallery images. Useful for listings with small or low-resolution images where zoom would degrade UX. |
| Disable Gallery Lightbox | OFF (lightbox active) | Disables the pop-up lightbox (full-screen overlay) when a gallery image is clicked. Images open in a new tab or not at all depending on your theme. |
| Disable Gallery Video | OFF (video active) | Hides the video embed tab/section in the gallery even if a seller has uploaded or linked a video. Use if videos cause layout issues or you want a photo-only gallery. |
6. Number of Related Listings #
Sets how many listings appear in the “Related Listings” block at the bottom of each detail page. The plugin selects related listings based on shared category and location. The default value shown in the settings panel is 3.
| Value | Recommended For |
|---|---|
| 0 | Hide the related listings block entirely (e.g., single-niche sites where all listings are in one category). |
| 3 | Default — one row of three cards. Clean, low visual weight. |
| 4–6 | Sites with rich inventory where cross-selling within categories is a priority. |
| 6–9 | High-volume marketplaces where keeping buyers browsing longer is the goal. |
💡 Tip Related listings increase time-on-site and reduce bounce rate on the detail page. If your inventory is small and many listings would repeat in the related block, set this to 0 to avoid showing the same listings repeatedly.
7. Sidebar Position
Controls where the sidebar widget area renders relative to the main listing content. Three positions are available from the dropdown:
| Position | Layout Effect | Best For |
| Right | Sidebar renders in a right-hand column alongside the listing body. | Standard western reading patterns. Default for most themes. Contact form and seller details show prominently. |
| Left | Sidebar renders in a left-hand column alongside the listing body. | Sites where navigation or filter widgets in the sidebar benefit from left placement. |
| Bottom | Sidebar renders below the full-width listing content. | Mobile-first designs where a sidebar column would stack awkwardly, or editorial-style listings with long descriptions. |
ℹ️ Note The sidebar typically contains the Contact Form widget, the Seller Info widget, and any custom widgets you’ve added in WordPress Appearance → Widgets. On mobile, all positions collapse to a single column regardless of this setting.
8. Show in Listing Detail Page #
These checkboxes control which metadata fields and badge labels are visible on the single listing detail page. The screenshot shows the full list of available fields. Checked items are shown; unchecked items are hidden.
The following fields are checked (enabled) by default in a fresh installation, based on what the settings screenshot confirms:
| Field (Default ON) | What It Displays |
|---|---|
| Date added | The date the listing was published. Signals freshness to buyers. |
| Listing owner name | The display name of the seller/poster. Builds seller identity. |
| Views count | Total number of times the detail page has been viewed. Social proof signal. |
| Feature Label | The ‘Featured’ badge if the listing has Featured status. |
| New Label | The ‘New’ badge if the listing was posted within the threshold period set in General Settings. |
| Category name | The category the listing belongs to (e.g., Vehicles, Electronics). |
| Location name | The listing’s location (city/region or GEO address). |
| Price | The listed price. Critical for transactional marketplaces. |
| Popular Label | The ‘Popular’ badge if the listing exceeds the view-count threshold. |
| Top Label | The ‘Top’ badge if the listing has Top placement status. |
The following fields are unchecked (hidden) by default. Enable them based on your site’s needs:
| Field (Default OFF) | What It Displays | Enable When… |
|---|---|---|
| Listing owner link | A clickable link to the seller’s public profile page. | You have seller profile pages enabled and want buyers to explore seller history. |
| Ad Type | The listing type (e.g., For Sale, Wanted, Service). | Your directory uses multiple ad types and the type is meaningful to buyers. |
| Price type | The price qualifier (e.g., Fixed, Negotiable, Free). | Price type is relevant to buyer decision-making in your niche. |
| Address | The full street address entered by the seller. | Physical location is important (real estate, local services, vehicles). |
| Zip Code | The postcode/ZIP of the listing. | Zip-level location precision matters to buyers (delivery radius, local search). |
| Bump Up Label | A ‘Bump Up’ badge when a seller has bumped their listing to the top. | You sell Bump Up as a paid feature and want it visible to reward sellers. |
| Membership badge | A badge showing the seller’s membership tier. | You use the Membership (Store add-on) and want to signal premium seller status. |
| Store owner badge | A badge identifying the seller as a verified Store owner. | You have the Store add-on active and want to visually differentiate store sellers. |
💡 Tip Show only the fields that are genuinely useful to a buyer making a decision. Every extra field adds visual noise. A focused detail page with 6–8 key data points converts better than one cluttered with 15+ metadata items.
Frequently Asked Questions #
Q: The Contact Form is enabled but visitors don’t receive replies from sellers — why?
A: The contact form sends messages through WordPress’s wp_mail() function. If emails are not delivered, your server’s default mail may be blocked. Install an SMTP plugin (e.g., WP Mail SMTP) and configure it with a transactional email service such as SendGrid, Mailgun, or Amazon SES.
Q: Can I allow guest reviews without requiring users to register?
A: By default, the review system uses WordPress comments, which can be configured to allow guest comments under WordPress Settings → Discussion → ‘Users must be registered and logged in to comment’. Uncheck this to allow guest reviews. Note: this may increase spam reviews.
Q: ‘Show Single Page only for Logged-in Users’ is on but logged-out users still see the page.
A: Check whether a caching plugin (e.g., WP Rocket, LiteSpeed Cache) is serving a cached version of the page to logged-out users. Add the listing detail page URL pattern to your cache exclusion list, or enable separate caching for logged-in vs logged-out users.
Q: The Gallery Lightbox is disabled but images still open in a lightbox.
A: A theme or third-party plugin (e.g., WooCommerce, Jetpack) may be injecting its own lightbox script that overrides the plugin setting. Dequeue the conflicting lightbox script from your child theme’s functions.php or contact your theme developer.
Q: I enabled ‘Listing owner link’ but clicking it shows a 404 page.
A: The seller profile page URL is built from the author’s username slug. Ensure your permalink structure is set to Post Name (Settings → Permalinks) and flush rewrite rules by visiting that page after saving. If the 404 persists, check that the user account still exists.
Q: The Membership badge and Store owner badge options don’t appear in my settings.
A: These fields are only available when the Store add-on or Membership add-on is installed and active. Install the relevant add-on from your RadiusTheme account and the checkboxes will appear.


