
• Classified Listing Docs
    • Classified Listing Plugin
    • Classified Listing All Addons
    • Classified Listing Mobile App
    • Classima Mobile APP
    • Listygo Mobile App
    • Homlisti Mobile App
  • Woocommerce Plugins Docs
    • ShopBuilder Elementor Addon
    • Woo Variation Swatches
    • Woo Variation Gallery
    • Zilly Mobile App
  • General Plugins Docs
    • The Post Grid
    • Testimonial Slider
    • Team Members
    • Food Menu
    • Review & Schema
    • Portfolio
    • Business Review
  • Our Plugins
    • The Post Grid
    • Classified Listing
    • ShopBuilder
    • Food Menu
    • Team
    • Portfolio
    • Testimonial Slider
    • Review & Schema
    • See All Plugins
×
  • Classified Listing Docs
    • Classified Listing Plugin
    • Classified Listing All Addons
    • Classified Listing Mobile App
    • Classima Mobile APP
    • Listygo Mobile App
    • Homlisti Mobile App
  • Woocommerce Plugins Docs
    • ShopBuilder Elementor Addon
    • Woo Variation Swatches
    • Woo Variation Gallery
    • Zilly Mobile App
  • General Plugins Docs
    • The Post Grid
    • Testimonial Slider
    • Team Members
    • Food Menu
    • Review & Schema
    • Portfolio
    • Business Review
  • Our Plugins
    • The Post Grid
    • Classified Listing
    • ShopBuilder
    • Food Menu
    • Team
    • Portfolio
    • Testimonial Slider
    • Review & Schema
    • See All Plugins

Getting Started

4
  • System Requirements
  • Installation
  • Permalink Settings
  • How to use(video)

Main Settings

15
  • Overview
  • General Settings
  • All Listings Page
  • Listing Details Page
  • Payments
  • Tax
  • Email
  • Account & Policy
  • Style
  • MISC Settings
  • Chat Settings Pro
  • Page Setup & Permalink
  • Tools
  • App Settings
  • Membership [Store addon] Pro

Email Settings

3
  • General Settings
  • Email Template
  • Video (How to Use)

Developer Docs

1
  • Developer Docs

Listing Management [Admin]

9
  • Admin End Ads View
  • Category
  • Locations
  • Listing Type
  • Pricing
  • Payment History
  • Export & Import Settings
  • Default Import [XML]
  • Stores [store addon]

AI Integration

5
  • Create Form with AI
  • Frontend AI Integration
  • AI Integration Settings
  • AI Semantic Search
  • AI Image Enhancement

Radius Booking Integration

10
  • How to Use (Video)
  • Integration with Radius Booking
  • Radius Booking Field in Form Builder
  • Enable Radius Booking on Existing Listing
  • Payout Settings
  • Payout Request from Front End Dashboard
  • Payout Request on Admin Panel
  • Commission Overview — Admin Panel
  • My Account – Booking
  • Appointments – Admin Panel

Theming

4
  • Add theme support for plugin templates
  • Override Ad Submission Form
  • Override ad detail page
  • Theming

REST API

54
  • Form Builder Image Sort REST API
  • Form Builder Image Delete REST API
  • Form Builder File Delete REST API
  • Form Builder File Upload REST API
  • Create Listing via Form Builder REST API
  • Email Store Owner REST API
  • Get Single Store REST API
  • Get Store Listings REST API
  • Get Stores REST API
  • Upload My Store Banner REST API
  • Upload My Store Logo REST API
  • My Store REST API
  • My Store REST API
  • Report Listing REST API
  • Update Subscription Payment Method API
  • Cancel Subscription REST API
  • Get Pricing Plans REST API
  • Get Single Payment / Order Details REST API
  • Get Payment History REST API
  • Get Checkout Data REST API
  • Create New Tag REST API
  • Change Order Status REST API
  • Manage Orders REST API
  • Mark Message as Read REST API
  • Chat Message REST API
  • Check Conversation by Listing REST API
  • Start New Conversation API
  • Get Conversation Messages API
  • My Chat List REST API
  • Toggle a favourite listing REST API
  • Get My Favourite Listings REST API
  • Upload My Profile Image REST API
  • Update My Account REST API
  • Get My Account Info REST API
  • Mark Listing as Sold REST API
  • Change Listing Status REST API
  • Renew Listing REST API
  • Delete My Listings REST API
  • Get My Listings REST API
  • Get Single Listing API
  • Create a listing API
  • User Sign Up REST API
  • Login REST API
  • Logout REST API
  • Account Delete REST API
  • Reset Password REST API
  • Contact REST API
  • Configuration API
  • Locations API
  • Categories API
  • Listing Types API
  • Email Seller API
  • Listings API
  • General

Code Snippets

18
  • Mask more digits
  • Change Business Hour Start and End Time
  • Add Price Unit
  • Trim zero from payment price
  • Show mark as sold listing in the search
  • Remove required attribute for phone field
  • Remove Price Type
  • Modify listing submission success message
  • Modify checkout form fields
  • Display listing image in media library
  • Change radius unit and distance
  • Change Price Type
  • Change Favourites to Favorites
  • Change Excerpt Limit
  • Change Currency Symbol
  • Change archive page listing column
  • Add New Price Type
  • Code Snippets

Filter Hooks

15
  • rtcl_countries_all_countries
  • rtcl_checkout_fields
  • Checkout
  • rtcl_my_account_endpoint
  • rtcl_account_menu_items
  • My Account
  • rtcl_listing_pricing_types
  • Listing Form
  • rtcl_social_profiles_list
  • rtcl_registration_redirect
  • rtcl_listing_seller_contact_form_data
  • rtcl_listing_query_meta_query
  • rtcl_get_base_location
  • General
  • Filter Hooks

Action Hooks

14
  • Email
  • rtcl_payment_receipt
  • rtcl_checkout_process_success
  • Checkout
  • rtcl_account_{$menu_key}_endpoint
  • My Account
  • rtcl_listing_form_before_category_retrieve
  • rtcl_listing_form_after_save_or_update
  • Listing Form
  • rtcl_new_user_created
  • rtcl_listing_loop_item
  • rtcl_after_author_meta
  • General
  • Action Hooks

Payment

8
  • Checkout Option
  • Offline Payment
  • Paypal
  • Authorize.net [PRO]
  • Stripe [PRO]
  • WooCommerce [PRO]
  • Payfast [Addon]
  • Paystack [Addon]

Elementor Addons

11
  • Elementor Addons
  • Listing Category
  • Listing Category Slider
  • All Location
  • Single Location
  • Listings
  • Listing Slider
  • Listing Store
  • Pricing Table
  • Search Form
  • Header Button

WPML Addon

3
  • System Requirements
  • Location Translations
  • WPML Settings

AJAX Filter Builder

2
  • Add Filter Items
  • Filter Widget

Frequently Asked Questions (Faq’s)

29
  • Frequently Asked Questions(Faq’s)
  • Fix taxonomy page listing sorting issue
  • Disallow query string and specific URL [SEO]
  • Enable New Dashboard [Canvas]
  • Custom Fields for Listview
  • Custom Fields for Filter
  • Pay Per Ad
  • Admin Menu Access
  • How to change listing archive category description position
  • Category & Location Menu Link
  • Add Re-Captcha
  • Add Google Map
  • Rank Math SEO Settings
  • Enable Chat
  • Renew listing process
  • How to set Local Time for Business Hour
  • Enable WooCommerce Payment
  • Fix Custom Field Save Issue
  • Enable Mark as Sold
  • How to add Compare
  • How to clear plugin cache?
  • Change Archive Page Title
  • User don’t get Registration & Verification Email?
  • How to change custom fields order?
  • How to add Watermark
  • How to separate login and registration page?
  • How to hide contact information for non logged in users?
  • Enable Social Login
  • Enable User Registration

Listing Management [Front End]

3
  • Front End View
  • Front End Submission
  • My Account Menu

Shortcodes

9
  • Shortcodes
  • Categories Display
  • Checkout Page
  • Listing Submission Form
  • My Account Page
  • Store List
  • Location Wise Display
  • Category Wise Display
  • Listing Filter

Drag & Drop Form Builder (New)

13
  • Multi-Category Selection
  • Enable Form Builder
  • Form List
  • Add New Form
  • Preset Fields
  • Custom Fields
  • Single Listing Layout Builder New
  • Enable Multiple Forms
  • Enable Conditional Logic
  • Add Bulk Options Pro
  • Smart Dependency Pro
  • SEO-Friendly Slug Builder
  • Image Crop Feature

Gutenberg Block

10
  • Gutenberg Block
  • Listing Category
  • Listing Category Slider
  • All Location
  • Single Location
  • Listings
  • Listing Slider
  • Listing Search
  • Pricing Table
  • Stores
  • Home
  • Docs
  • Main Settings
  • Chat Settings Pro
View Categories

Chat Settings Pro

3 min read

To enable Chat, go to Classified Listing => Settings => Chat

This feature enables real-time messaging between buyers and sellers directly on your site — no need for either party to share personal contact details. Once enabled, a Chat option becomes available in the user’s My Account dashboard, letting them message each other about specific listings.

  1. Chat Settings
  2. Pusher Integration

1. Chat Settings #

1.1) Regenerate Chat Table
A one-click action that rebuilds the chat database table from scratch.

Caution: This will permanently delete all existing chat history across your entire site. Only use this if you’re troubleshooting a serious issue with the chat system — there’s no way to recover deleted conversations afterward.
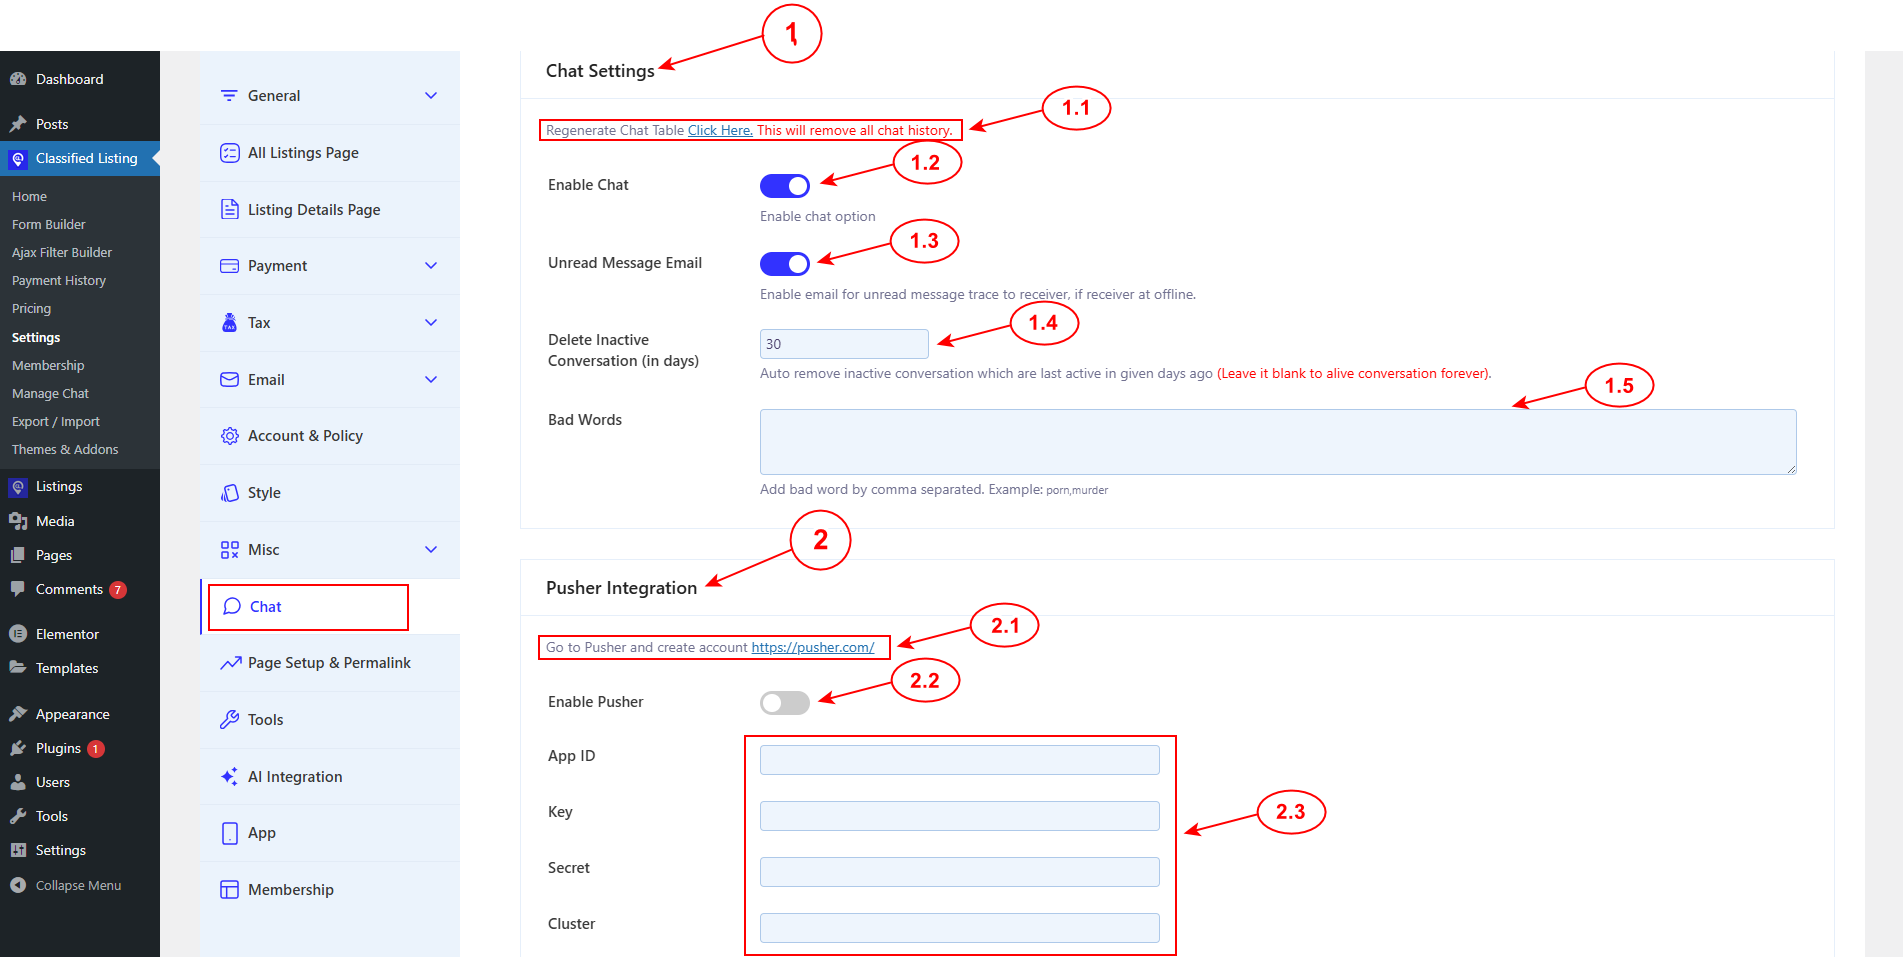
1.2) Chat
The master switch for the whole feature. Check this box to turn on buyer–seller chat and reveal the Chat menu item in the frontend user dashboard.

1.3) Unread Message Email
When enabled, users will receive an email notification the moment they get a new, unread message — helpful for making sure conversations don’t go unnoticed.

1.4) Delete Inactive Conversation
Automatically cleans up old conversations. Enter a number of days of inactivity, and any conversation that’s been silent for that long will be automatically removed.

Note: Leave this field blank if you’d prefer to keep all conversations stored indefinitely, with no automatic deletion.

2. Pusher Integration #

Classified Listing uses a third-party service called Pusher to power real-time chat delivery — this is what makes messages appear instantly without the page needing to refresh.

2.1) Get App Data
Before you can use live chat, you’ll need to create a free account on the Pusher website and set up an “app” to get your credentials (App ID, Key, Secret, and Cluster).

2.2) Enable Pusher
Check this box to activate the Pusher-powered real-time messaging.

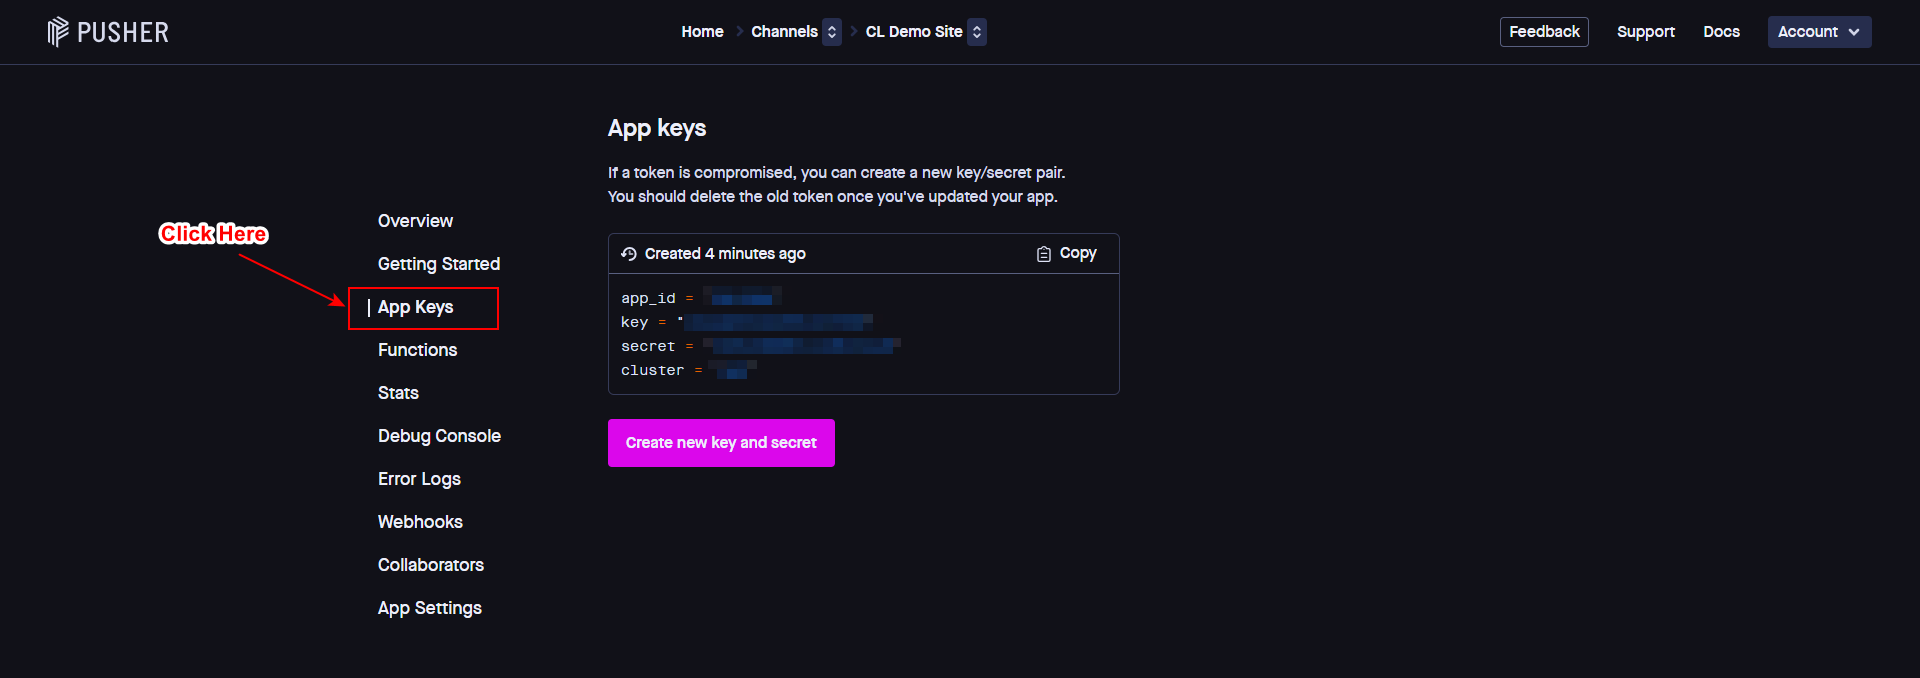
2.3) App ID / Key / Secret / Cluster
Enter the four credentials you obtained from your Pusher dashboard here.

Note: All four fields must be filled in correctly for chat to work in real time. If any field is missing or incorrect, messages may fail to send or appear.

How to get the Pusher APP ID? #

1) Sign up at pusher.com and verify your email address. Once verified, you’ll be logged into your Pusher dashboard.

2) Now, click the “Get Started” button.

3) Enter the app name. You can keep the rest of the settings as they are. Click on the “Create App” button. 
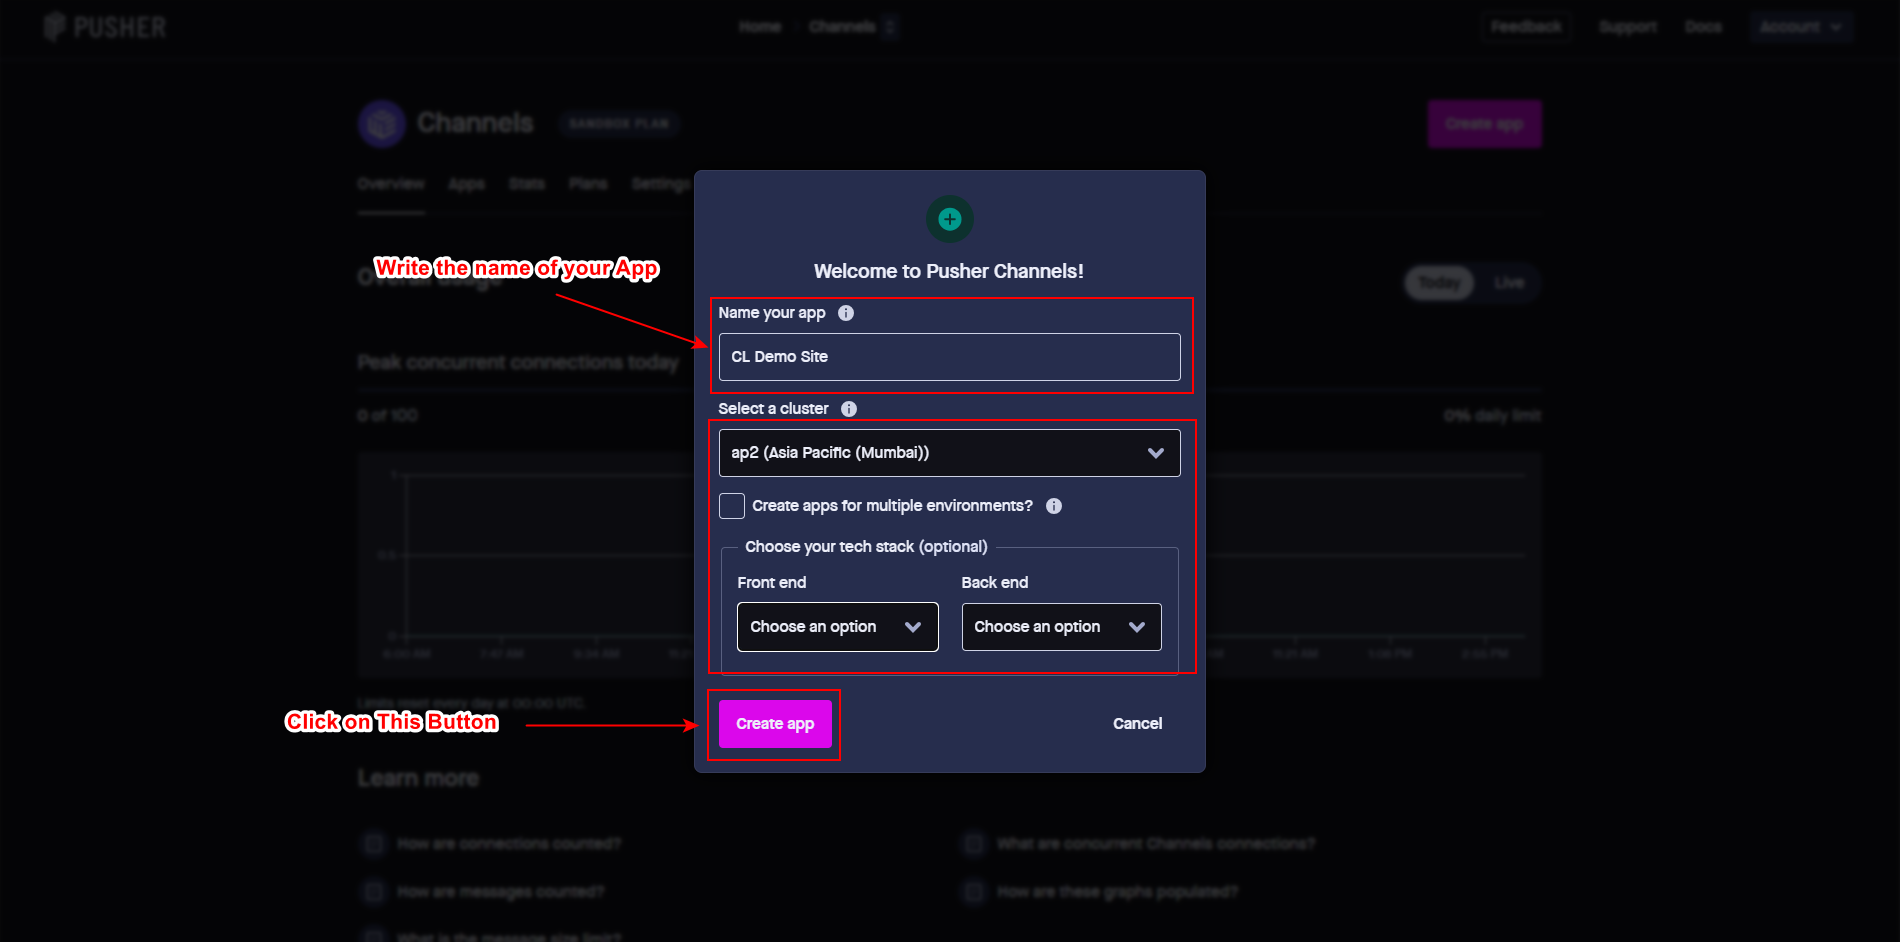
4) Now, after clicking the “Create App” button, you will get the following screen.
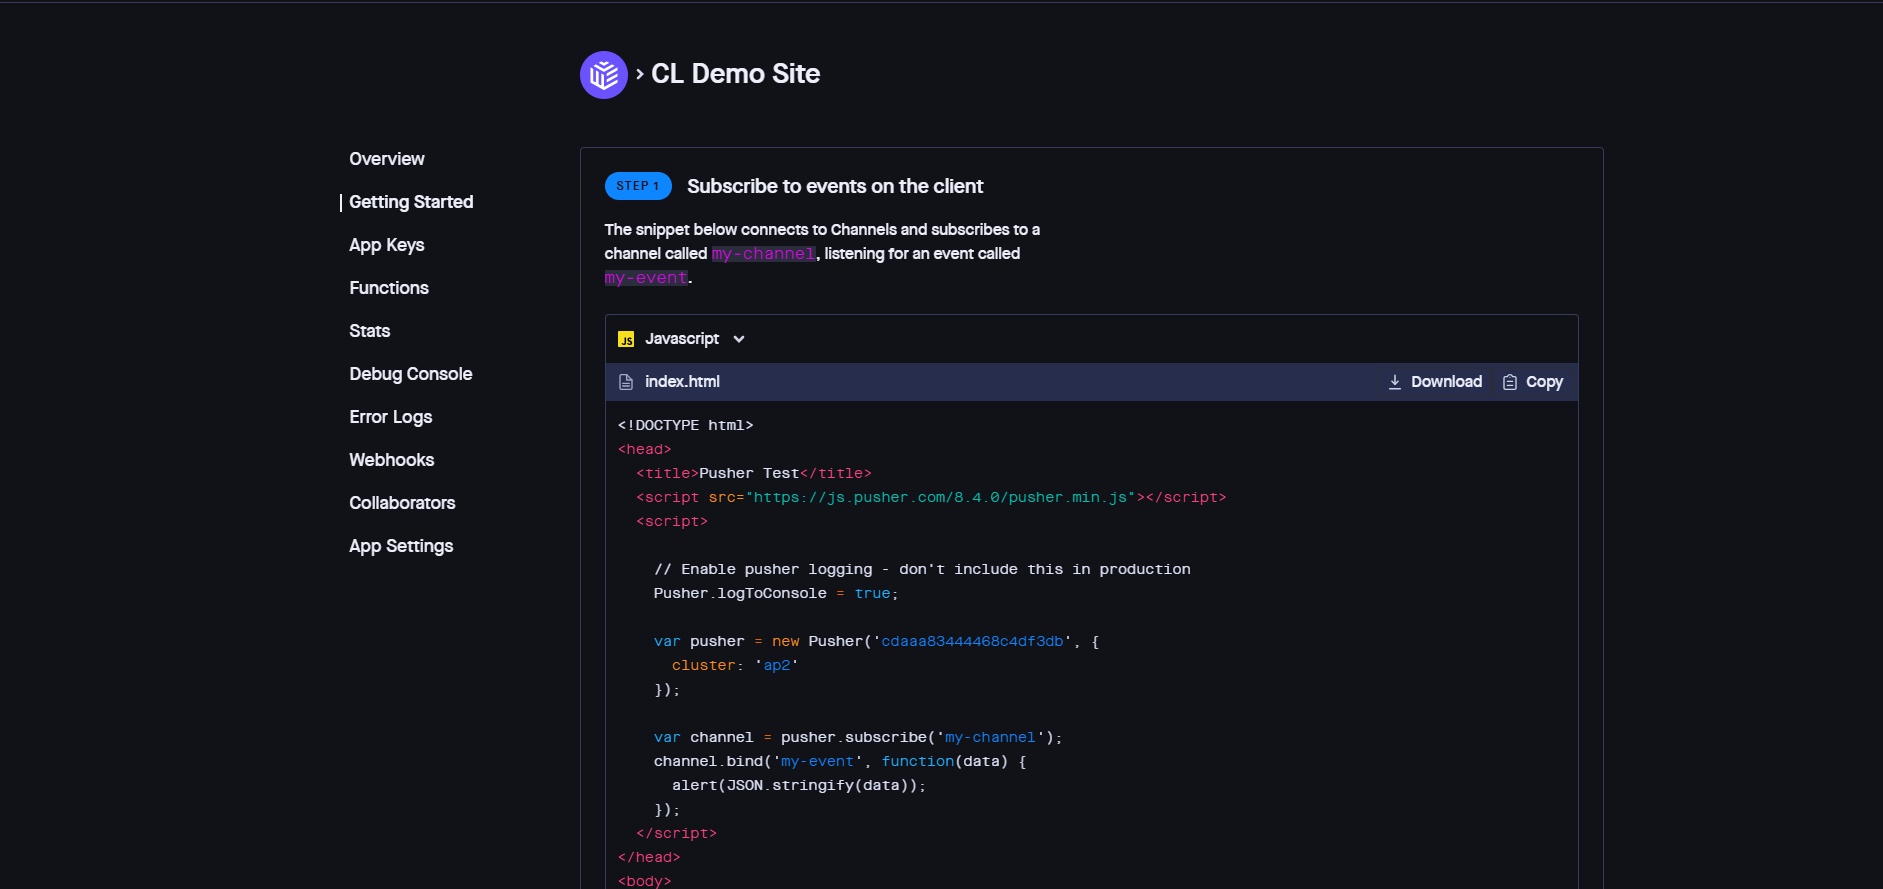
5. Now, click the “App Keys” menu from the left menu bar. You will get the app information.
Troubleshooting: Chat Not Saving or Displaying Data #

In rare cases, the required database tables may fail to be created properly, causing chat data to not save or display in the dashboard. If this happens:

Reactivate the Classified Listing plugin — this will regenerate the tables correctly.

Back up your database first — this process involves deleting tables, so a backup is essential before proceeding.

Open phpMyAdmin (or your database management tool) and delete these two tables:

wp_rtcl_conversations

wp_rtcl_conversation_messages

Deactivate the Classified Listing plugin.

Caution: This troubleshooting step deletes all existing chat data. Only use it if chat is genuinely broken, and always back up your database beforehand.

What are your Feelings

Share This Article :

  • Facebook
  • X
  • LinkedIn
  • Pinterest
Still stuck? How can we help?

How can we help?

Updated on August 20, 2026
MISC SettingsPage Setup & Permalink
Table of Contents
  • 1. Chat Settings
  • 2. Pusher Integration
    • How to get the Pusher APP ID?
      • Troubleshooting: Chat Not Saving or Displaying Data
Copyright© 2026 RadiusDocs by RadiusTheme