

On This Page
Key Takeaways
- You can build a full eCommerce store in WordPress without writing any code.
- WooCommerce is the best free plugin to power your WordPress online store.
- Choosing the right hosting and theme at the start saves time and money later.
- SBMart by ShopBuilder is a free, fast, and beginner-friendly WooCommerce theme built by RadiusTheme.
- Setting up payments, shipping, and SEO are the final steps before you launch.
- A well-structured product page with clear images and descriptions converts more visitors into buyers.
You want to sell online. WordPress makes it possible without a big budget or coding skills.
WordPress powers over 43% of all websites on the internet. It is flexible, open-source, and supported by thousands of developers. Pair it with WooCommerce, and you have one of the most powerful eCommerce setups available today.
The best part? You are in full control. You own your store. You set your rules. No monthly platform fees eating into your margins.
This guide walks you through every step. From picking a domain name to launching your first product. We keep things simple and actionable.
Why Do You Need to Build an eCommerce Website?
Online shopping is no longer a habit reserved for tech-savvy buyers. It is how the world shops today.
Global ecommerce sales are forecast to hit $6.4 trillion worldwide in 2026. By 2027, that figure climbs to $8 trillion.
Right now, 2.77 billion people shop online globally. That is 33% of the entire world’s population. In the US alone, 44% of Americans buy something online at least once a week.
And mobile is driving it all. 59% of global eCommerce sales in 2025 come from mobile devices. If your store is not online, it simply does not exist for these buyers.
Beyond reach, an online store works 24/7. It cuts your overhead costs. It gives you customer data that a physical shop never could. And it lets you sell to anyone, anywhere, at any time.
Your competitors already have online stores. Every day without one is a day of lost sales.
Building an eCommerce website is not a luxury. It is a business necessity.
What You Need Before You Start
Before diving into the steps, gather these basics:
- A domain name – Your store’s web address (example: yourshop.com)
- Web hosting – A server to host your WordPress site
- SSL certificate – Keeps your store secure (most hosts include this free)
- A clear niche or product idea – Know what you are selling before you build
That is it. You do not need to know how to code. Let’s get started.
Steps To Create eCommerce Website In WordPress
STEP 1: Choose a Domain Name and Web Hosting

Your domain name is your store’s identity. Pick something short, easy to spell, and related to your niche. Avoid hyphens and numbers if you can.
Tips for Picking a Good Domain Name
- Use a .com extension when possible.
- Keep it under 15 characters.
- Make it easy to remember and type.
- Avoid trademarked names.
Which Hosting Should You Choose?
Your hosting provider affects your store’s speed, uptime, and security. For WooCommerce stores, look for:
- Good page speed – Faster stores sell more.
- One-click WordPress install – Saves setup time.
- Free SSL certificate – Required for any store handling payments.
- 24/7 support – Essential when something breaks.
Popular options include SiteGround, Bluehost, and Hostinger. Many offer managed WooCommerce hosting plans that include a free domain and SSL.
If you want to explore hosting performance benchmarks, check out our guide on best hosting for eCommerce and classified websites.
STEP 2: Install WordPress

Once you have hosting, installing WordPress is simple. Most hosts offer a one-click installer in their control panel.
Steps to Install WordPress
- Log in to your hosting control panel (cPanel or similar)
- Find the WordPress installer (often called Softaculous or similar)
- Enter your site name, admin username, and password
- Click Install and wait a minute or two
Log in to your new WordPress dashboard at yourdomain.com/wp-admin
You now have a blank WordPress site. The next steps will turn it into a real online store.
Need a local testing environment first? Read our guide on local WordPress development tools.
STEP 3: Install WooCommerce

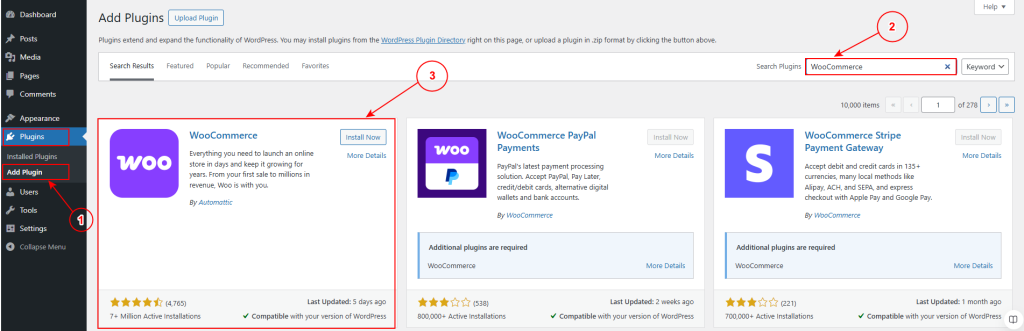
WooCommerce is the plugin that turns your WordPress site into an eCommerce store. It is free, powerful, and widely supported.
How to Install WooCommerce
- Go to your WordPress dashboard
- Click Plugins in the left menu
- Click Add New
- Search for WooCommerce
- Click Install Now and then Activate
After activation, WooCommerce launches a Setup Wizard. This walks you through the core settings.
WooCommerce Setup Wizard Covers
- Store address and country
- Industry and product types
- Payment methods
- Shipping settings
Complete each step honestly. You can always change these settings later in WooCommerce settings.
STEP 4: Choose the Right eCommerce Theme
Your theme shapes how your store looks and feels. A slow or poorly coded theme can hurt your sales and SEO. Choose wisely.
What to Look for in a WooCommerce Theme
- Fast loading speed.
- Mobile responsive design.
- Compatible with WooCommerce and Elementor.
- Pre-built demo layouts to get started quickly.
- Good support and regular updates.
Recommended Theme: SBMart by RadiusTheme
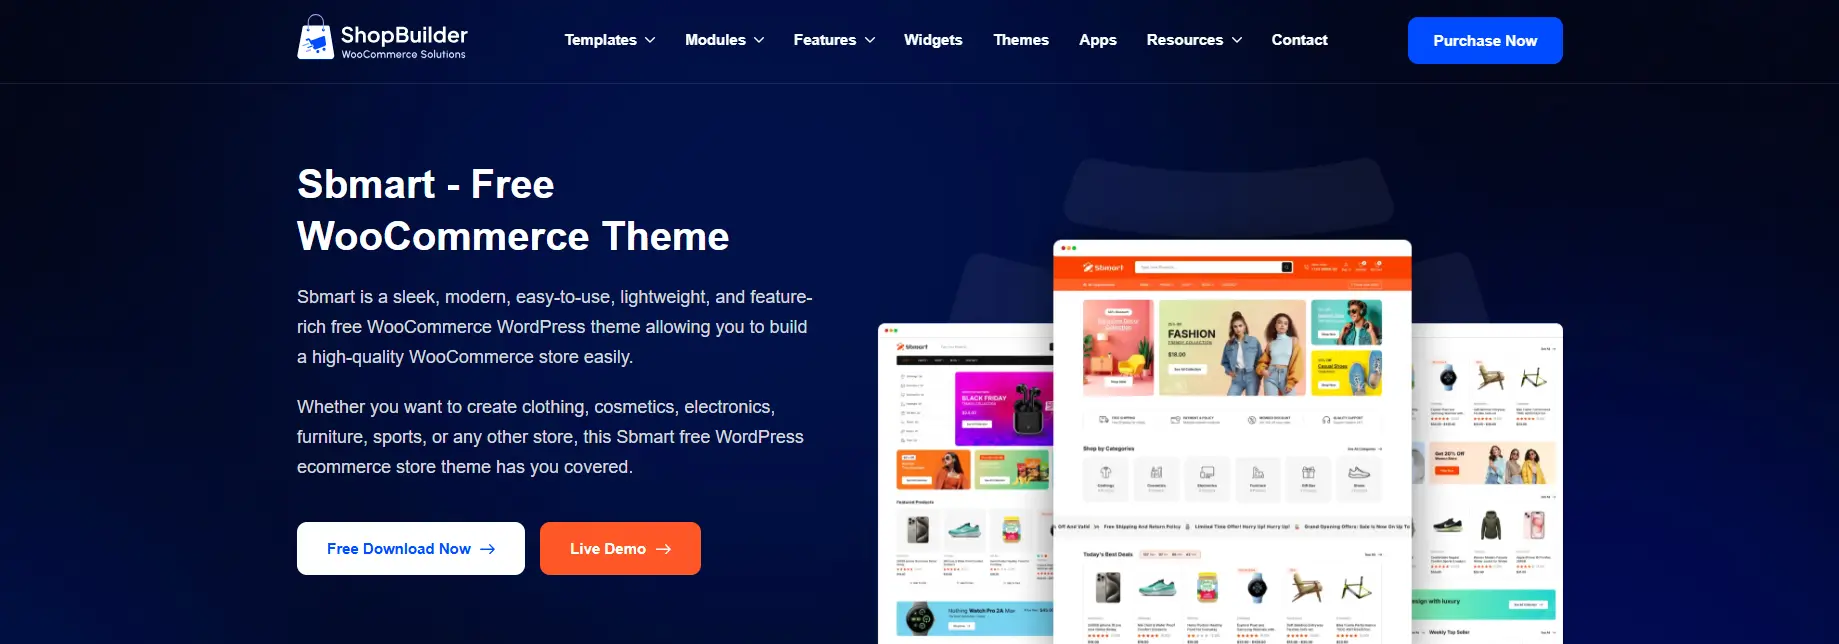
SBMart is a free WooCommerce theme built by RadiusTheme. It is lightweight, modern, and designed for high-performance online stores. You can use it to sell fashion, electronics, home goods, or almost any product category.
Here is what makes SBMart stand out:
- 15 pre-made shop and archive page layouts – No design skills required.
- 6 unique product detail page layouts – Built to boost conversions.
- Variation swatches – Lets shoppers pick colors and sizes visually.
- Product quick view – Customers browse faster.
- Wishlist and comparison features – Included for free.
- Elementor drag-and-drop builder – Customize without touching code.
- Fully responsive – Looks great on phones, tablets, and desktops.
SBMart pairs with the ShopBuilder plugin, which adds 128+ widgets and 24+ store modules. These include features like mini cart, flash sale countdown, pre-order, AJAX product filter, and multi-step checkout.
If you are comparing WooCommerce themes, also read our list of best WooCommerce themes for more options.
How to Install SBMart
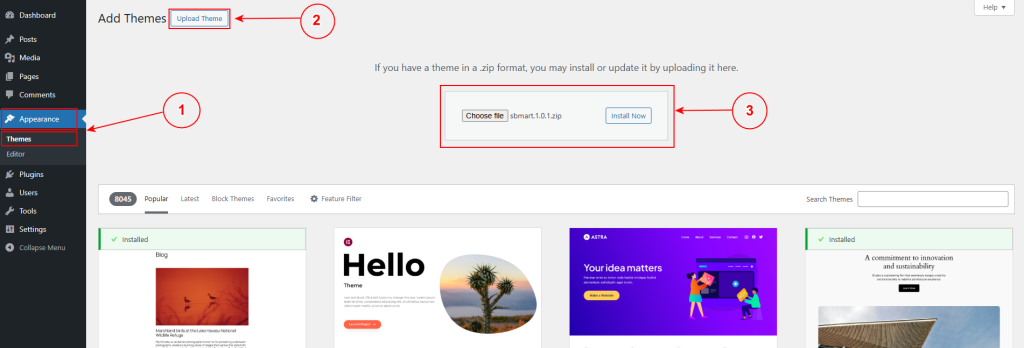
- Go to Appearance > Themes in your WordPress dashboard.
- Click Upload Theme
- Upload the ZIP file you’ve downloaded from the ShopBuilder website.
- Install and Activate
- Install the companion ShopBuilder plugin when prompted.
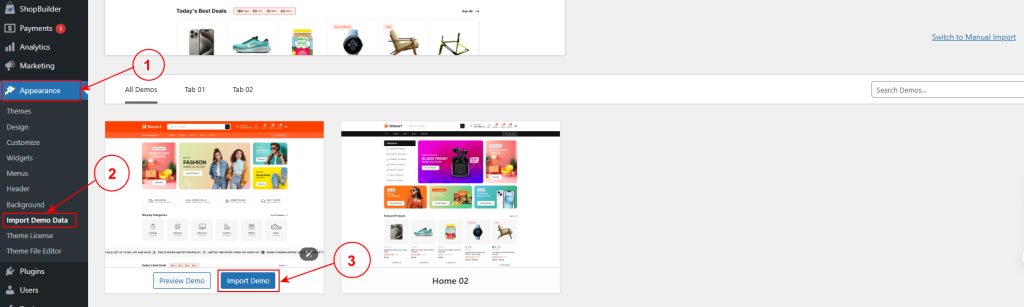
Import a pre-built demo layout and your store design is ready in minutes.
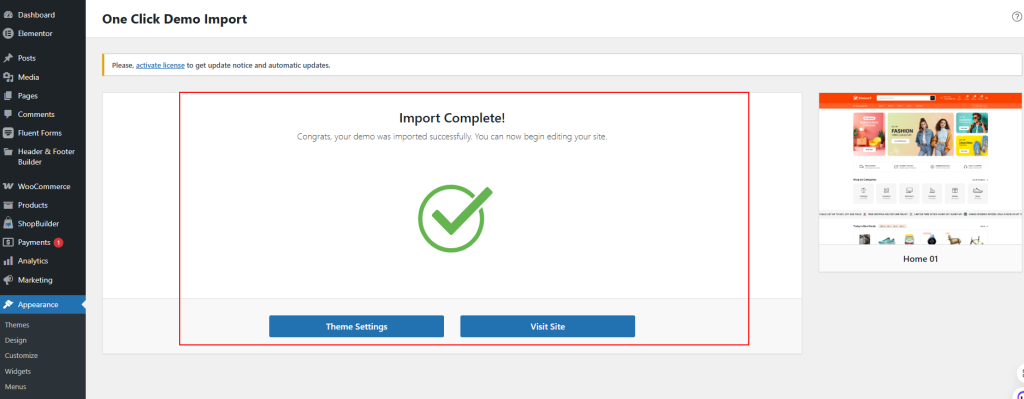
You’ve successfully imported the demo data. Now, you’ve to configure your store settings.
STEP 5: Configure Your Store Settings
Before adding products, configure your store properly. Skip this step and you may have payment or shipping issues later.
General Settings
- Go to WooCommerce > Settings > General.
- Set your store address, selling locations, and currency.
- Enable or disable tax based on your country’s requirements.
Payment Method
Your store needs a way to accept money. WooCommerce supports many payment options out of the box.
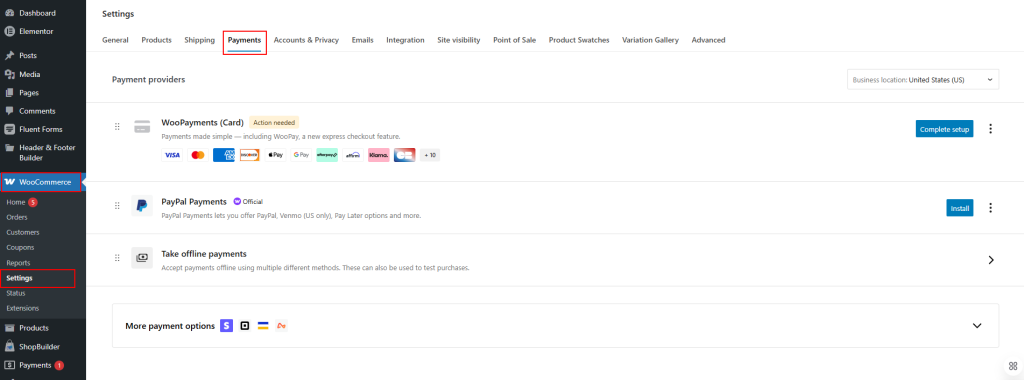
Popular Payment Options
- PayPal – Widely trusted and easy to set up.
- Stripe – Accepts credit and debit cards directly on your site.
- WooCommerce Payments – Built-in option by WooCommerce.
- Cash on delivery – Good for local businesses.
- Bank transfer – Manual option for B2B stores
How to Add a Payment Gateway
- Go to WooCommerce > Settings > Payments.
- Click Set Up next to your preferred option.
- Enter your API keys or account details.
- Save and test with a small purchase.
Always test your checkout before going live. A broken checkout means lost sales.
Configure Shipping Method
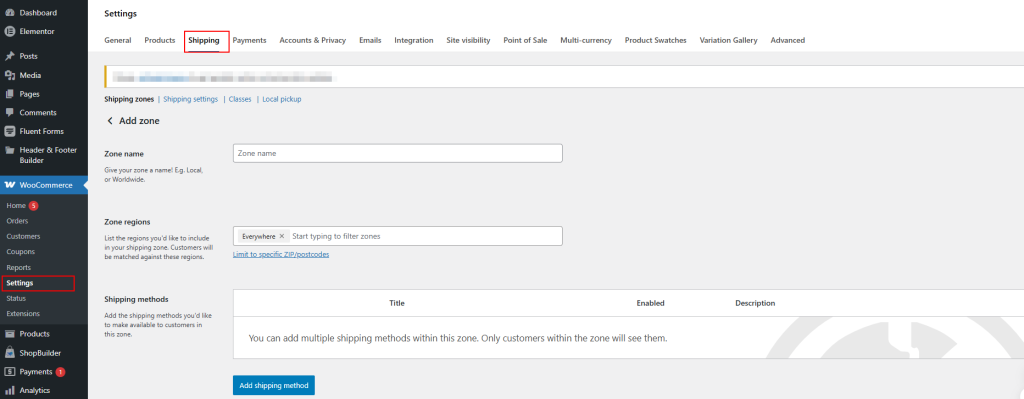
Shipping settings affect your checkout experience and customer satisfaction. Set these up before you go live.
Steps to Set Up Shipping
- Go to WooCommerce > Settings > Shipping.
- Click Add Shipping Zone.
- Name the zone and select the countries or regions it covers.
- Add shipping methods: flat rate, free shipping, or local pickup.
- Set shipping costs based on weight, price, or a flat rate.
Offer free shipping above a minimum order threshold. This is a proven tactic that increases average order value.
STEP 6: Add Category & Your Products
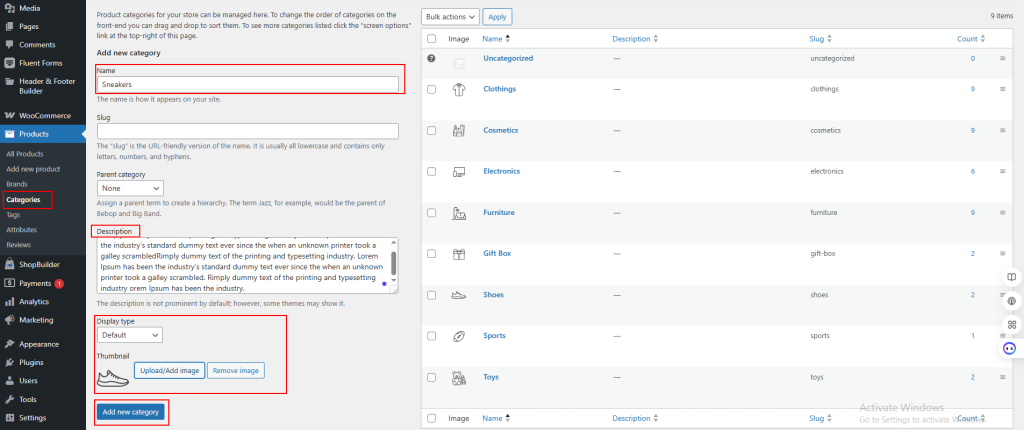
To add new categories navigate to Products > Categories.
Fill out the category name, slug, and description. You can also upload an image of the specific category.
On the right side of the screen, you’ll see all the category lists.
Now comes the exciting part. Adding products to your store.
Go to Products > Add New in your WordPress dashboard.
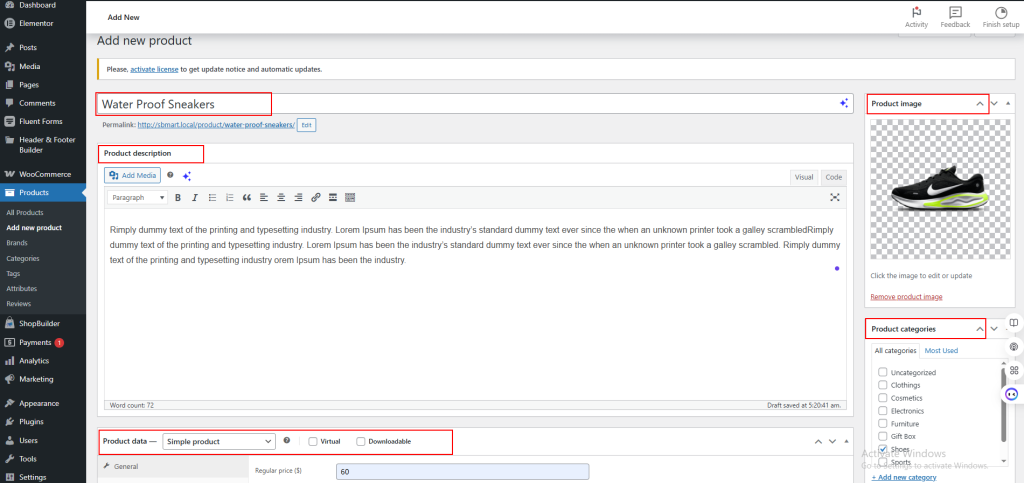
Key Product Details to Fill In
- Product name – Clear and descriptive.
- Description – Short summary above the fold, detailed text below.
- Product images – Use high quality photos on a white or clean background.
- Price – Regular price and sale price if applicable.
- Product category – Helps customers browse and improves SEO.
- Tags – Additional keywords for search.
- SKU – A unique product ID for inventory tracking.
- Stock quantity – Enable stock management to avoid overselling.
Product Types in WooCommerce

- Simple product – Single item with one price.
- Variable product – Item with options like size or color.
- Grouped product – A collection of related products.
- Digital product – Downloadable files like ebooks or software.
- External product – Links to a product sold elsewhere.
For variable products, you can use variation swatches to replace dropdown menus with color or image buttons. This improves the shopping experience and can increase conversions.
Read our guide on how to use variation swatches for WooCommerce to learn more.
STEP 7: Customize Your Store Pages
WooCommerce creates default pages for you. These include the Shop page, Cart page, Checkout page, and My Account page. Customize them to match your brand.
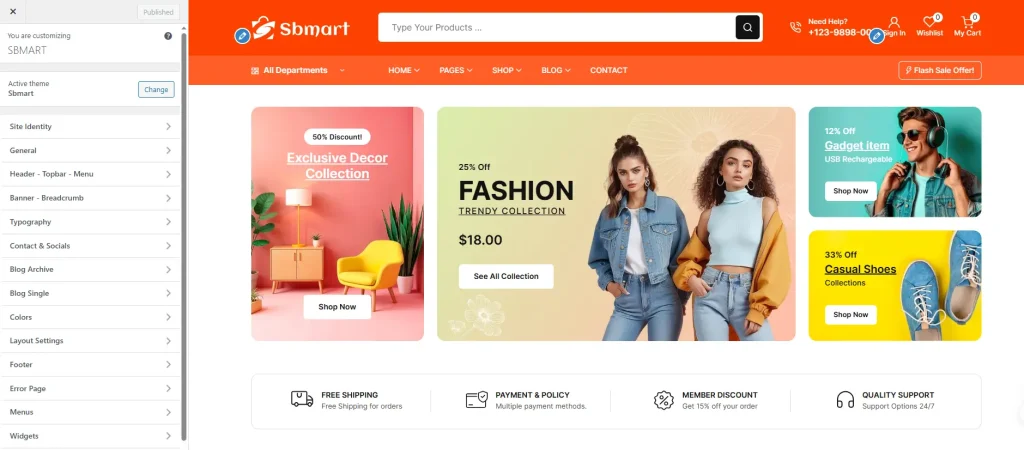
How to Customize WooCommerce Pages
- Use Elementor with the ShopBuilder plugin to drag and drop page sections.
- Add trust badges, urgency elements, and upsells on the cart page.
- Simplify your checkout page to reduce abandonment.
- Customize the My Account page for a better customer experience.
Read our full guide on how to customize the WooCommerce checkout page for detailed steps.
Also read: How to customize the WooCommerce cart page.
You can also remove unnecessary fields from your checkout. Read our guide on how to remove fields from the WooCommerce checkout page.
STEP 8: Add Essential Plugins
Plugins extend what your store can do. Do not install too many. Focus on plugins that solve a specific problem or add clear value.
Must-Have Plugins for a WooCommerce Store
| Plugin | Purpose |
|---|---|
| Yoast SEO or Rank Math | Optimize your store for search engines |
| ShopBuilder (by RadiusTheme) | Customize all WooCommerce pages with Elementor |
| WooCommerce Variation Swatches | Replace dropdowns with visual color and size buttons |
| A backup plugin | Protect your store data automatically |
| A security plugin | Block malicious traffic and brute force attacks |
| A cache plugin | Speed up your store for better performance and SEO |
| A review plugin | Collect and display customer reviews to build trust |
For a curated list, read the best WooCommerce plugins for your store.
Also check out our guide on best WordPress backup plugins and best WordPress security plugins.
STEP 9: Optimize for SEO
Your store will not get traffic unless search engines can find it. SEO is not optional for eCommerce success.
Basic eCommerce SEO Steps
- Install an SEO plugin like Yoast or Rank Math.
- Write unique meta titles and descriptions for every product page.
- Use your target keyword in the product name, URL, and description.
- Add alt text to all product images.
- Build internal links between related products and categories.
- Add an XML sitemap and submit it to Google Search Console.
Add Schema Markup
Schema markup helps search engines understand your product data. It can display star ratings, prices, and stock status directly in search results. This increases click-through rates.
Read our guide on how to add schema markup in WordPress for step-by-step instructions. Also see our list of best schema markup plugins for WordPress.
Add Meta Descriptions
Every product and category page needs a unique meta description. This is the short summary that appears under your page title in Google search results.
Read: How to add meta description in WordPress.
STEP 10: Test Your Store Before Launch
Testing is the step most beginners skip. It leads to frustrated customers and lost orders.
What to Test
- Place a test order using a test payment mode.
- Check that confirmation emails are sent correctly.
- Test on mobile devices including iOS and Android.
- Check all links on product and checkout pages.
- Test the cart and remove items to check for errors.
- Verify that tax and shipping calculations are correct.
- Test the contact form and account creation process.
Fix any issues before you send traffic to your store.
Launch and Promote Your eCommerce Store
Your store is ready. Now bring in customers.
Launch Checklist
- Remove any coming soon or maintenance mode plugin.
- Submit your sitemap to Google Search Console.
- Set up Google Analytics to track visitor behavior.
- Share your store on social media.
- Consider running a launch promotion or discount.
Drive Traffic to Your Store
- Content marketing – Write blog posts targeting your niche keywords.
- Email marketing – Build a list from day one with a newsletter signup.
- Social media – Post product photos on Instagram, Pinterest, and Facebook.
- Paid ads – Run Google Shopping or Facebook ads for faster results.
SEO – Target long-tail keywords to rank organically over time.
Bottom Line
Creating an eCommerce website in WordPress is more accessible than most people think. You do not need a big budget or a developer on speed dial.
Start with solid hosting. Install WordPress and WooCommerce. Choose a well-coded theme like SBMart. Add your products. Set up payments and shipping. Then focus on SEO and traffic.
Take it one step at a time. Each step builds on the last. And once your store is live, the real work begins: serving your customers well.
Freequently Asking Question
What is the best plugin to add eCommerce functionality to a WordPress website?
WooCommerce is the best plugin to add eCommerce functionality to a WordPress website. It has more than four million active installations and offers ease of use, editability, and user-friendliness. The plugin is free to install, though some extensions may require payment.
Should I use shared or dedicated hosting for my WordPress eCommerce store?
Dedicated hosting is strongly recommended for an eCommerce store. Shared hosting makes your site vulnerable to breaches and hacking when the security of another site on the same server is compromised. Since eCommerce stores handle sensitive data like credit card details, dedicated hosting provides fully managed servers, dedicated support, and daily backups.
How do I install WordPress on my hosting account?
There are two ways to install WordPress: the one-click automatic installation and manual installation. The easiest method is the one-click installation, offered by hosting providers like Bluehost — simply log into your hosting dashboard and click the ‘Install WordPress’ button. If your host doesn’t offer one-click installation, you can manually download WordPress to your computer and then upload it to your hosting dashboard.
What payment methods can I accept in my WooCommerce store?
During the WooCommerce setup wizard, you can choose the payment methods your store will accept. Some of the most popular options include Stripe and PayPal. You can set these up immediately during configuration or return to configure them at a later time.
What types of products can I add to a WooCommerce shop?
WooCommerce supports several types of products including simple, grouped, external or affiliate, variable, downloadable, and virtual products. To add products, go to your WordPress dashboard, click on ‘Products’, then ‘Add Product’. You can add the product name, price, main image, product description, and category for each product.



