


On This Page
Suddenly noticed an increased cart abandonment rate on your WooCommerce store?
A lengthy, cluttered checkout page can be the primary reason. Many shoppers abandon their carts due to a long or complicated checkout page.
So, optimize your checkout page to boost conversions. Redesign it and remove unnecessary fields. Do you know how to remove field in WooCommerce checkout page?
This article will show two easy ways to remove checkout fields in WooCommerce. Let’s read on.
Why Should You Remove Unnecessary Checkout Fields from Your Store?
The straightforward answer to this question is to reduce the cart abandonment rate and increase sales. According to recent research by Baymard Institute, the average cart abandonment rate is 70.19%!
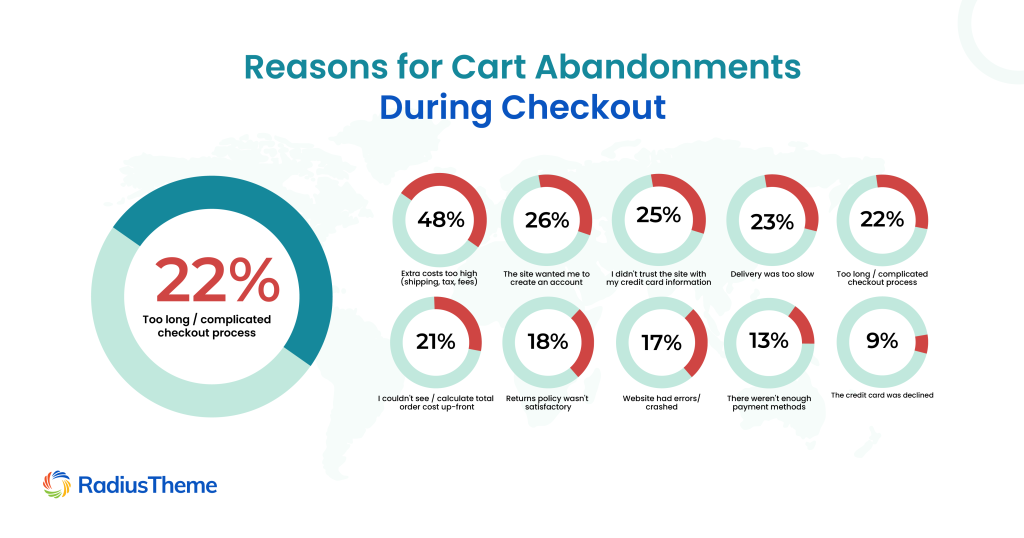
“22% of this huge percentage abandon their online shopping carts due to too long or arduous checkout processes.”
The lengthy checkout process causes many people to abandon their carts. Let’s imagine ourselves in their shoes.
Imagine visiting an online shop and being ready to purchase an item you’ve been eyeing. You add the item to your cart and proceed to the checkout page.
Then, you notice that this shop’s checkout page contains many irrelevant form fields, such as your fax number, company details, SSN, and more.
You will be angry at first glance, won’t you?
You may leave that store out of anger or frustration and seek alternative stores. Other shoppers do this when they notice they need to fill in a long form with so many details to buy a product.
Therefore, to ensure a hassle-free shopping experience, your store’s checkout page should not feature unnecessary fields.
Take a Look at the Default WooCommerce Checkout Fields
Here are some fields that WooCommerce displays on the checkout page by default.
- First and last name
- Shipping Address (Town/City, Country, District, Postcode/ZIP, Apartment, etc.)
- Phone number
- Email address
- Order notes
These are the fields WooCommerce shows customers on the checkout page. However, not everyone or every business needs all these default checkout fields.
For example, apartment details fields under the shipping address are unnecessary. Hence, you can remove those fields to let customers quickly place orders.
That said, we’ll now discuss how to remove WooCommerce checkout fields.
How to Remove Field in WooCommerce Checkout Page
We’ll show you two methods to remove the checkout fields. The first is easy, and the second method is SUPER EASY. Here are those methods –
- With WooCommerce Customizer
- With ShopBuilder (A Fantastic WooCommerce Store Builder)
Method 1 – Remove Field in WooCommerce Checkout Page without Plugin
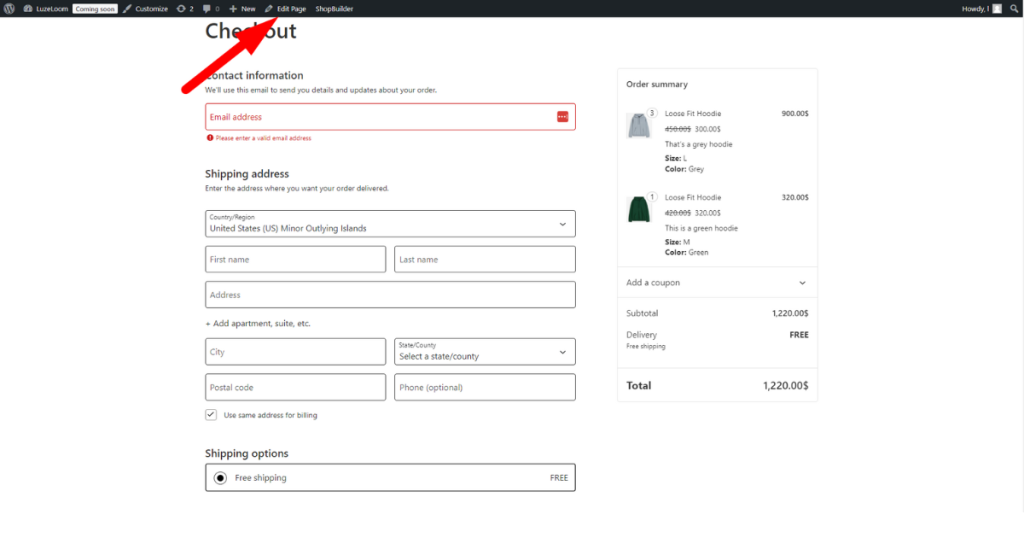
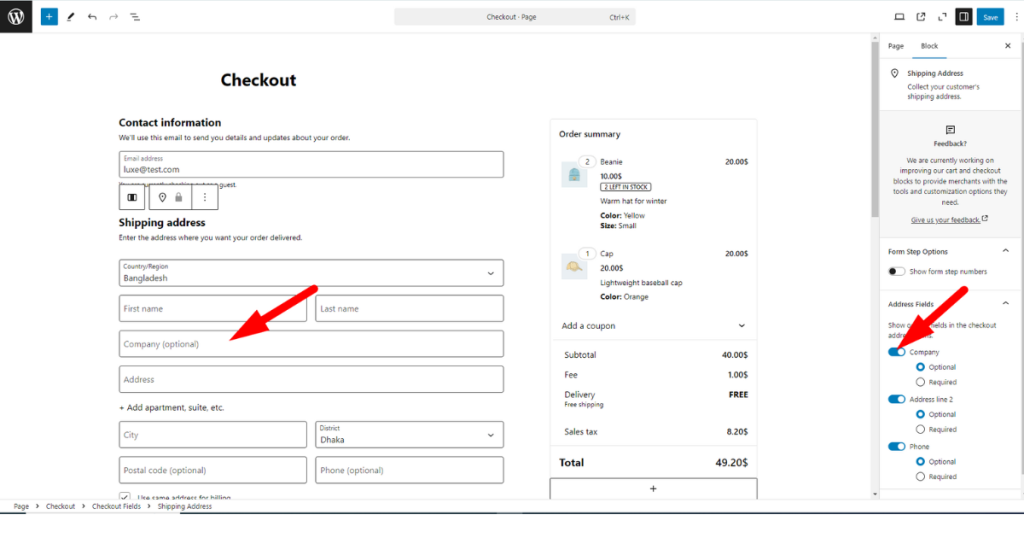
Visit your checkout page and click the “Edit Page” pencil icon on the top.
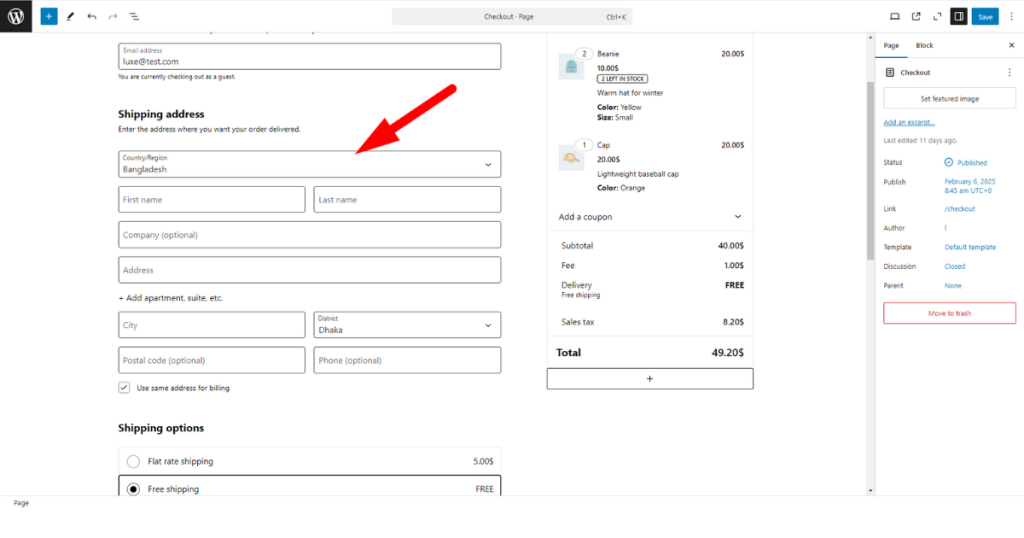
Afterward, click on the “Shipping address” block.
Now, navigate to the “Address Fields” on the right side under the ‘Block’ section.
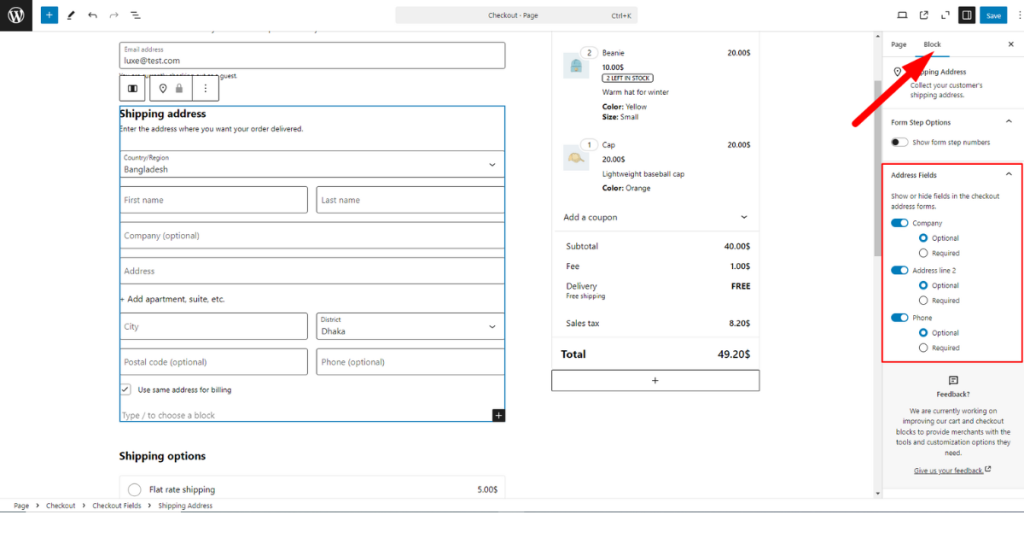
As you can see, here are three field names with toggle switches: Company, Address Line 2, and Phone. Choose any one of these field names you want to hide and toggle the switch button off.
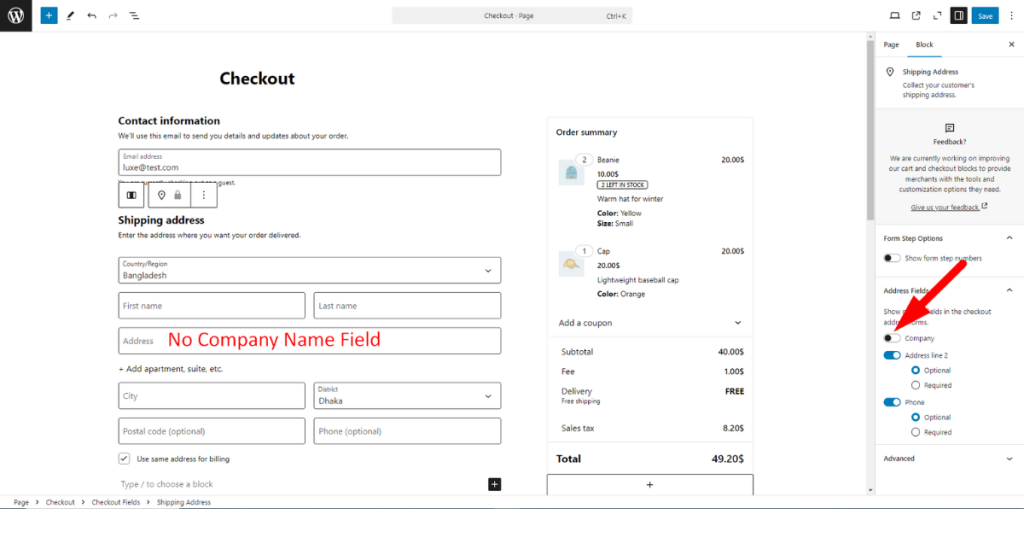
We’ll hide the Company field from the checkout. So, we’ll toggle the Company name switch off.
Now, see the screenshot below. You won’t see the Company name field on the WooCommerce checkout page.
This is how you can hide any of these three checkout fields mentioned above. But how can you remove other checkout fields?
Unfortunately, you can’t remove any other fields except those mentioned when using the WooCommerce Customizer. However, that doesn’t mean you can’t remove any field from the checkout page.
Follow the second method to add, customize, and remove any field on the checkout page.
Method 2 – Add, Customize, or Remove Checkout Page Fields in WooCommerce with ShopBuilder
We now need to install a plugin: ShopBuilder. It’s an excellent WooCommerce page builder that supports Elementor and lets you create stunning WooCommerce stores.
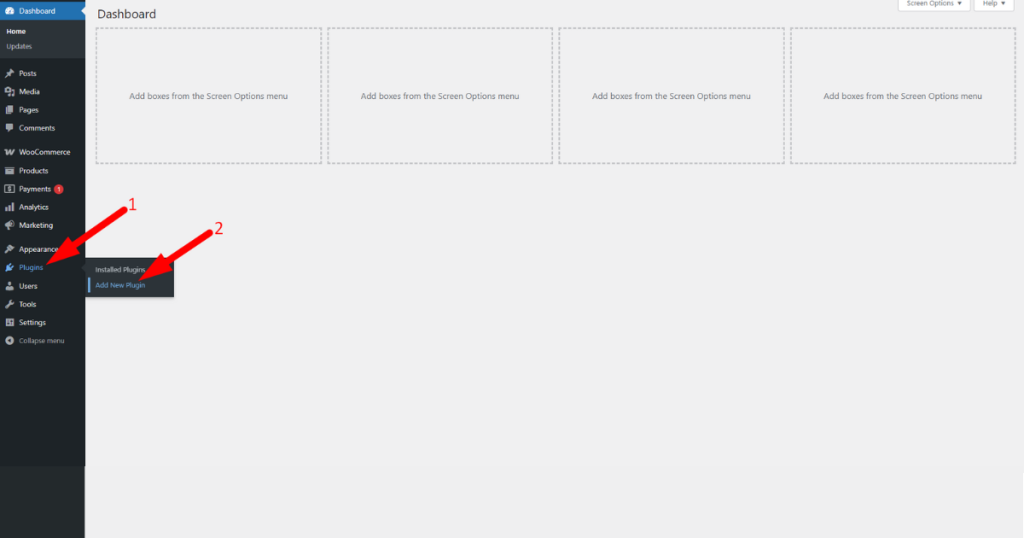
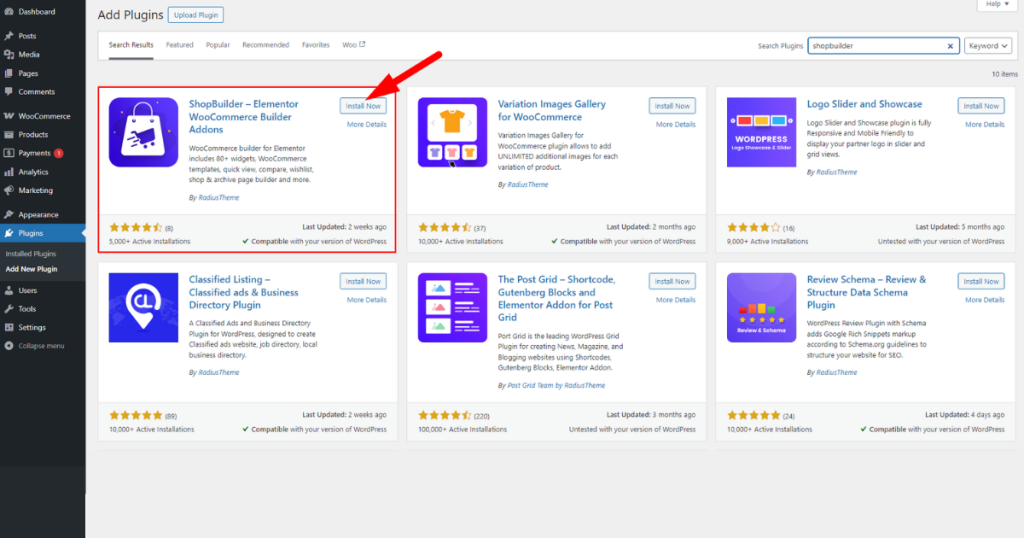
Thus, to install and activate it, go to the WordPress Admin Dashboard > Plugins > Add New Plugin.
Now, write ‘ShopBuilder’ in the plugin search field.
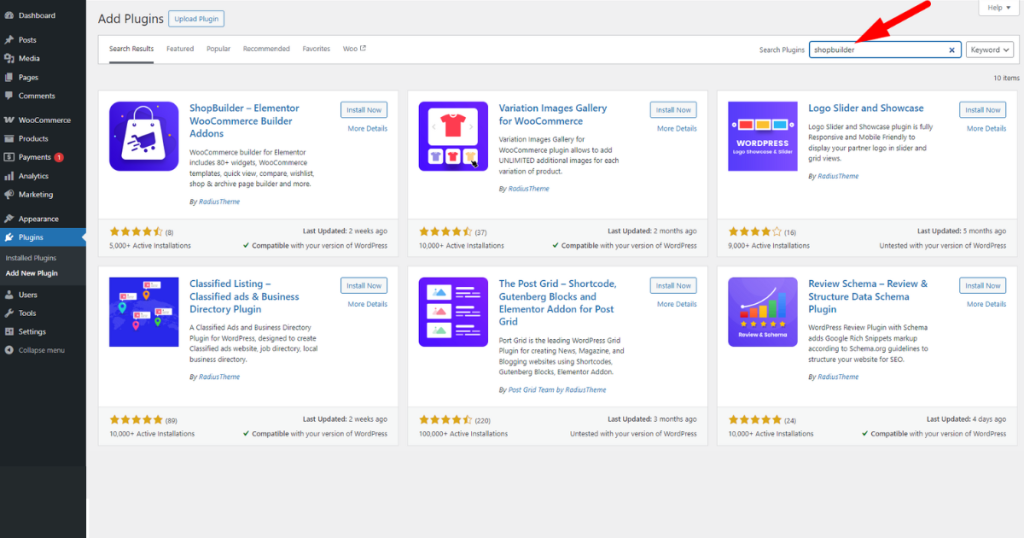
Click on the “Install Now” button of the marked plugin in the screenshot below.
After that, hit the ‘Activate’ button.
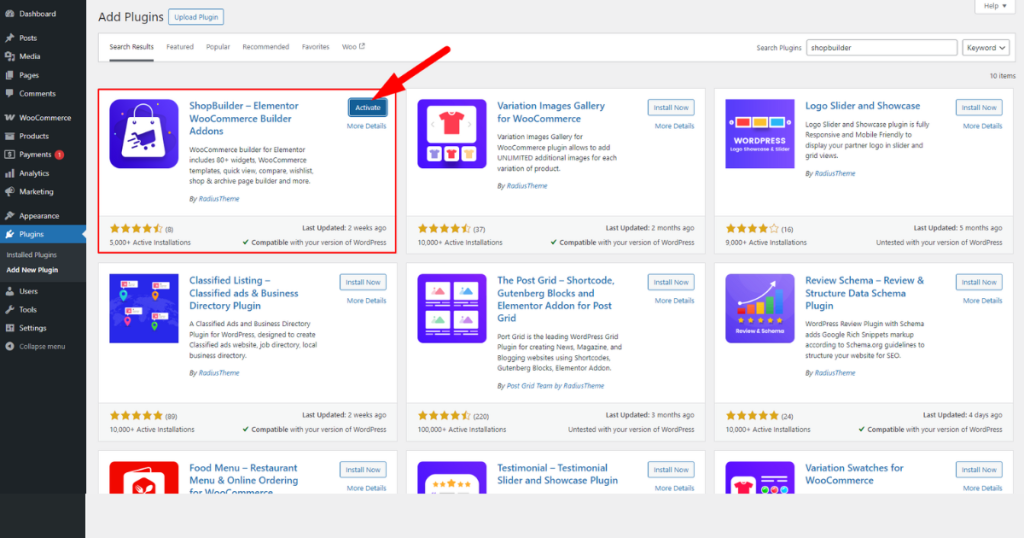
You’ve just installed and activated the plugin. Let’s utilize it now.
Enable the Checkout Fields Editor Module and Customize Checkout Fields
Okay, you now have to enable the “Checkout Fields Editor” to start customizing the fields on the checkout page. Follow these steps to enable it.
- Navigate to the WordPress Admin Panel > ShopBuilder > Settings.
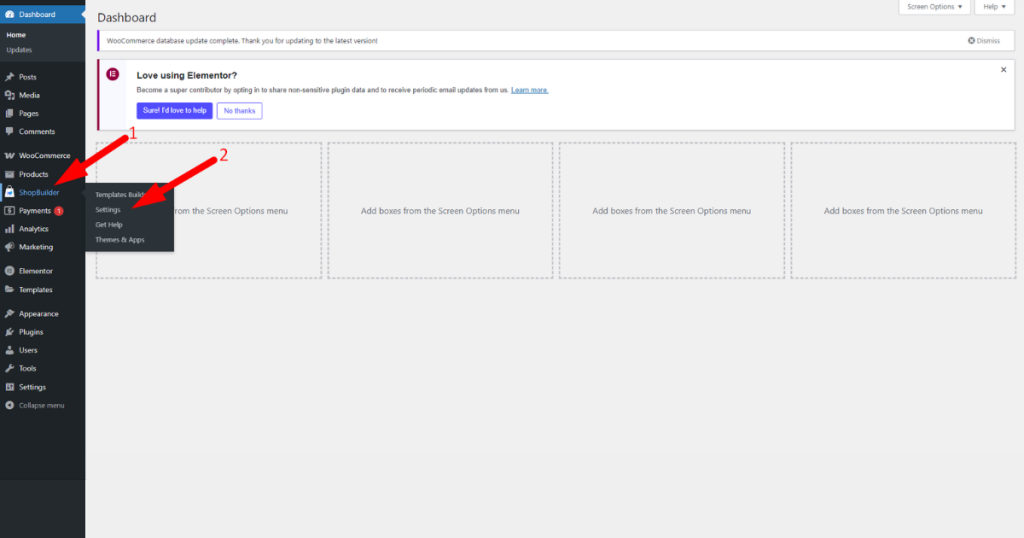
- Now, click the ‘Modules’ tab and hit the “Checkout Fields Editor” module.
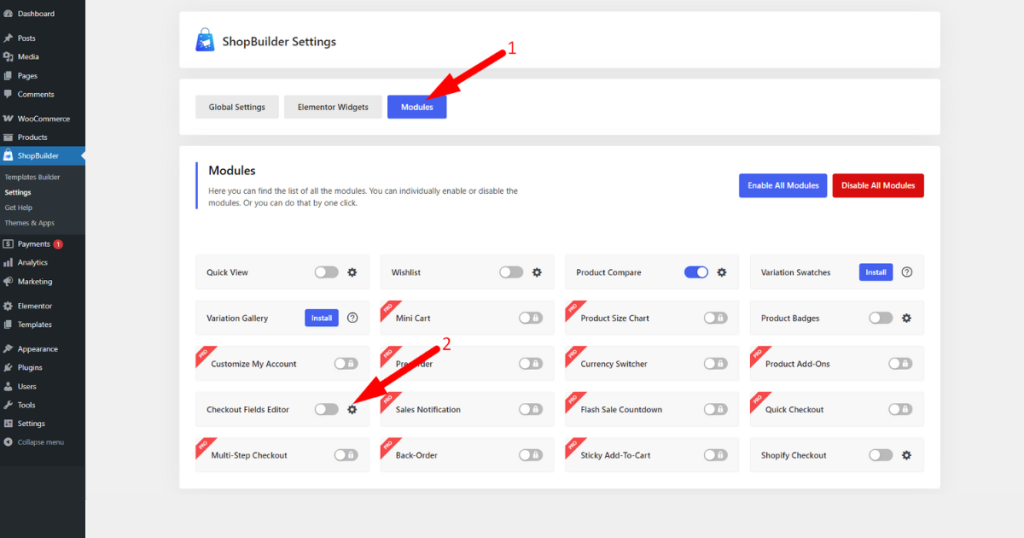
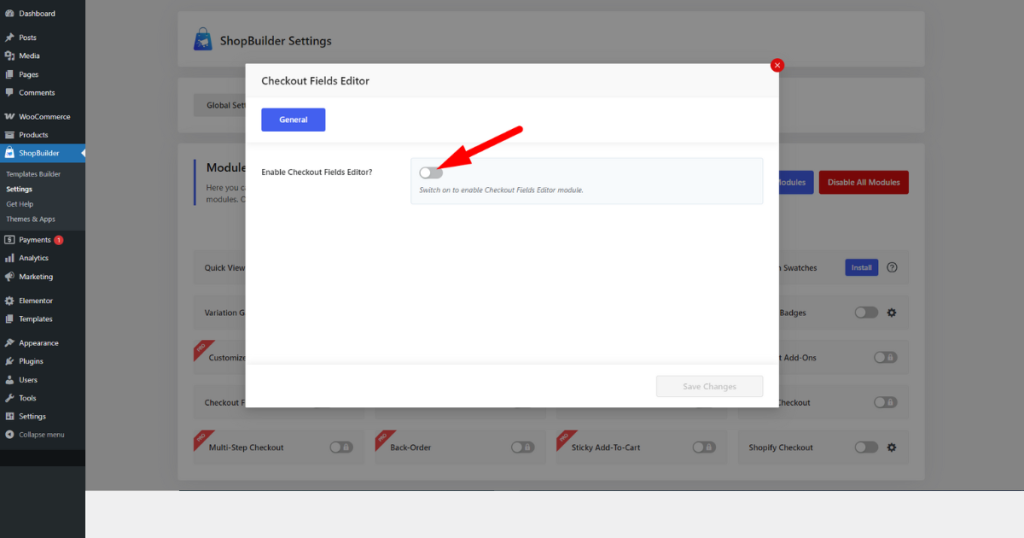
- You’ll now notice a pop-up. Toggle on the “Enable Checkout Fields Editor?” option.
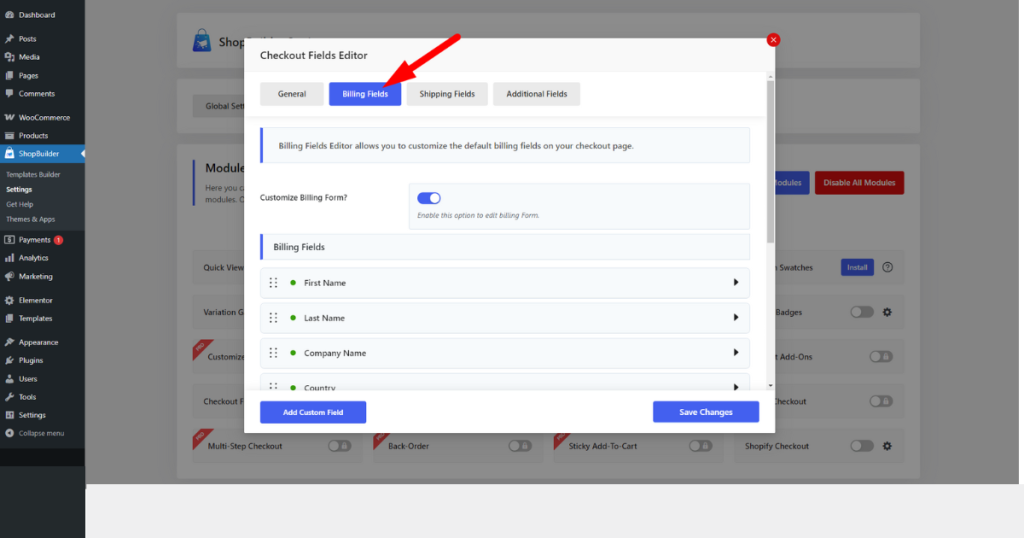
- At this point, you’ll see three new tabs on that pop-up: Billing Fields, Shipping Fields, and Additional Fields. Click each tab to customize and remove its corresponding fields. For instance, click the “Billing Fields” tab to see its fields.
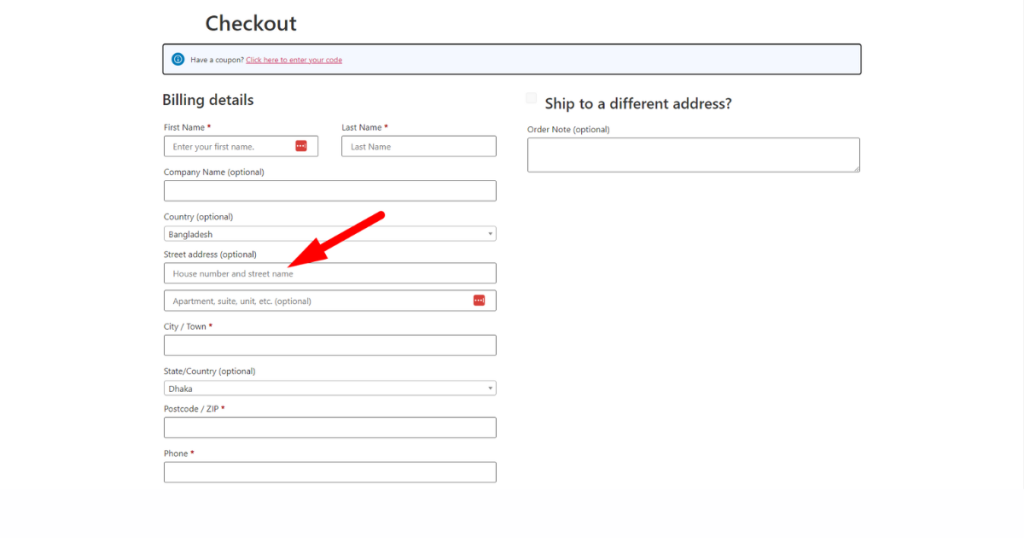
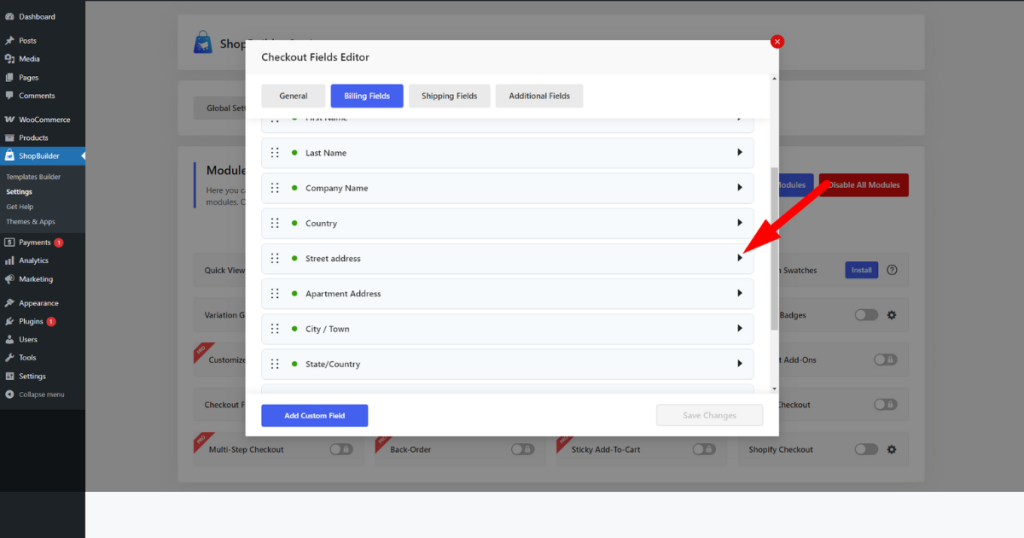
- Head to a billing field tab you want to customize or remove. Let’s say you want to remove the “Street address” field from the checkout page.
- To do that, find the “Street address” option under “Billing Fields” in the Checkout Fields Editor module.
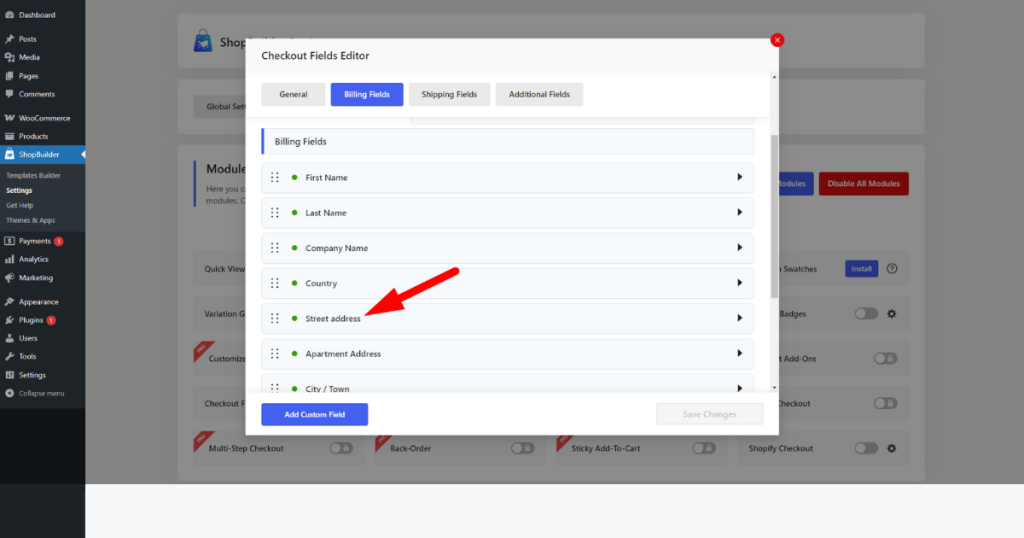
- Click on the triangle icon, and many options will slide open.
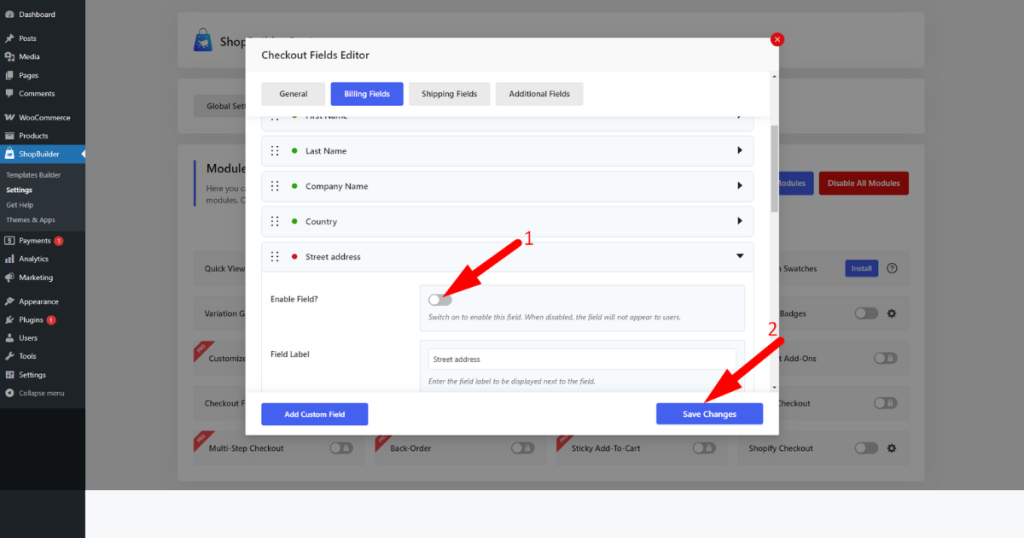
- Toggle off the “Enable Field?” option and hit the “Save Changes” button.
You and your customers will no longer see this “Street address” field on the checkout page.
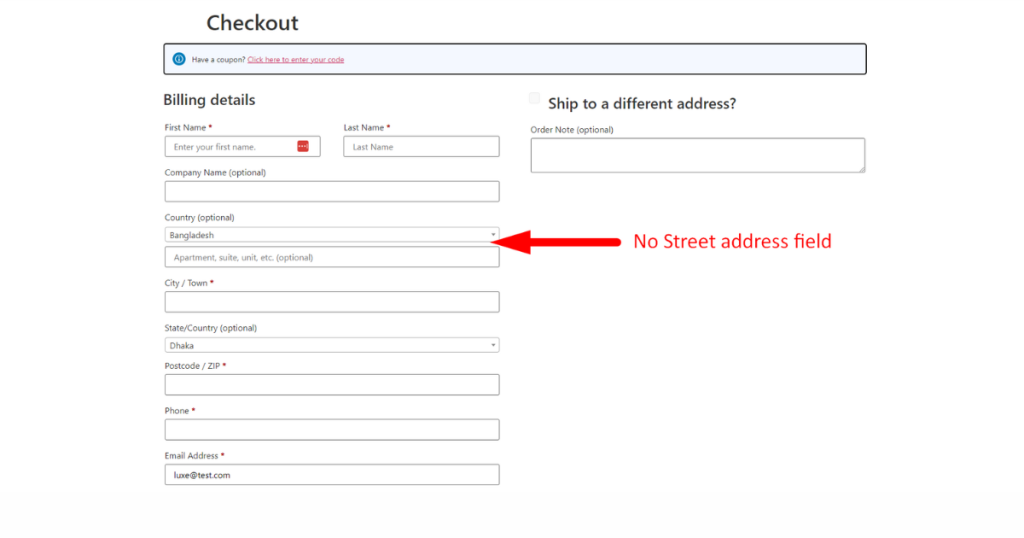
See how easy it was to remove a field from the checkout page using the ShopBuilder plugin. So, use it to customize or remove as many checkout fields as you need.
Best Practices for Removing Checkout Fields in WooCommerce
You already know how beneficial an optimized checkout page can be for your online business. It offers customers a fast, hassle-free shopping experience and boosts your overall conversion rate.
But the question is how to optimize your checkout page. The answer is simple: customize the fields and remove unnecessary fields and steps.
While doing these, adhere to the factors shared below.
1. Keep the Essential Information Field Intact
It’s essential to keep the necessary fields as they are to enable customers to complete the purchase quickly. Let essential fields like name, email, phone number, and payment information stay on the checkout page.
As you know, customers can’t place orders without these essential fields. So, avoid customizing or removing them from the checkout page.
2. Always Test the Checkout Form
After customizing some fields and removing unnecessary ones, test the functionality of your newly optimized checkout form. See if the checkout process works correctly and smoothly.
Ensure it has no hidden bugs or issues that can prevent customers from placing orders. Lastly, make sure customers can visit the checkout page using diverse devices and complete purchases smoothly.
3. Utilize Custom Fields That Add Value
Sometimes, you may need to create custom fields on your WooCommerce store’s checkout page. For example, you want customers’ WhatsApp numbers to deliver digital goods through WhatsApp.
Hence, in this case, you need to create a custom field on the checkout page. When creating a custom field, ensure it adds value and smoothes the purchasing process instead of making it a hassle.
4. Update the Checkout Fields According to User Feedback
Customer feedback is all-important for optimizing the checkout page and the entire process. Monitor your customers’ interactions with the checkout page and discover why they abandon carts. Then, solve that problem and increase your sales.
Suppose shoppers frequently abandon carts in your store when they reach optional fields like Company Name or additional Shipping Address fields. Thus, consider removing those checkout fields to reduce cart abandonment.
Regularly update the checkout page based on customers’ interactions and feedback and boost conversion.
5. Use These Quick Tips
Follow these expert tips to give customers a smooth shopping experience in your WooCommerce store.
- If you sell digital products in your store, consider removing shipping fields like address, zip code, city, and such to simplify the checkout process.
- Integrate Google Address Autocomplete with your checkout page to autofill shoppers’ addresses and provide them with a faster shopping experience.
- Show only one address option (billing or shipping) to keep the checkout page simple.
- Merge multiple fields into a single one to save space and time. For instance, to input a name, you can keep only one “Full Name” field instead of three separate fields (first, middle, and last names).
- Add a buy now button for instant purchases. Enable ShopBuilder’s “Quick Checkout” module to speed up the buying process.
These are all the best practices that can help you significantly enhance the checkout experience and boost sales.
👉Related Post: 10 of the Best Checkout Page Examples
Now Remove Fields from Your Checkout Page
As you know, your checkout page is a vital component of your business. It plays a key role in getting you more sales. Therefore, you need to design and optimize it carefully.
Rewrite each field name of the checkout according to your business to give customers a unique shopping experience. Also, remove unnecessary checkout fields. Follow this guide on how to remove field in WooCommerce checkout page.
This guide will help you easily accomplish this job. So, read it thoroughly and take action accordingly to create a high-converting checkout page and reduce cart abandonment.



