


On This Page
If you’re looking for a step-by-step guide on how to set up pre-orders on WooCommerce, you’ve come to the right place.
You can implement several strategies to boost conversions and sales on your online shop. For instance, you can run discounts and limited-time offers.
Once you gain some customers, build suspense for upcoming product launches and restocks of old products. But how do you do that?
It’s simple: Enable the pre-order functionality on your store. To learn more about the setup, read this article.
What Does Pre Order Mean on a Website?
A Pre-order on a website indicates that a customer can buy a product (which is set on pre-order) before it gets officially available for sale. Basically, a pre-order refers to reserving a copy of a product in advance.
Imagine you are a customer who pre-orders a product on a website. You will receive it when the retailer releases or restocks your chosen item.
You now understand what a pre-order is. Let’s now discuss why businesses set some products on pre-orders. They do it since it lets customers secure a product that may sell out quickly.
Businesses also keep some products on pre-order to gauge demand by monitoring the number of pre-orders they receive.
Benefits of Having WooCommerce Pre-Orders

Here are the different ways in which WooCommerce pre-orders can help you when appropriately executed:
- Gauge Interest in New Products: Pre-orders allow you to test the market, gauge customer interest, and reduce the risk of a new product launch before fully committing to production.
- Improve Cash Flow: By accepting pre-orders, you can generate revenue before the product is even available. This can help cover production costs.
- Create Buzz and Excitement: Pre-orders can create a sense of anticipation and exclusivity around your product launch. Customers who pre-order are more likely to share their excitement with others, hence further marketing your product.
- Better Inventory Management: Knowing how many pre-orders you have can help you plan your inventory more accurately so you don’t overproduce.
- Customer Loyalty: Offering pre-orders can help build customer loyalty. Customers who pre-order are more likely to return for future purchases, especially if they have a positive experience.
- Early Feedback: Pre-orders can provide valuable customer feedback before the full launch, allowing you to adjust your marketing strategy.
These are the benefits that you get when you set products on pre-orders. Hence, prioritize getting a preorder function for your WooCommerce shop. Now, let’s see exactly how to set up pre orders on WooCommerce.
How to Set Up Pre-Orders on WooCommerce
Setting up pre-orders on WooCommerce is SUPER simple if you follow all the steps below. Let’s set it up and place products on pre-orders.
Step 1: Choose the Best Pre-Order Plugin for WooCommerce
The first step is to select the best pre-order plugin for WooCommerce. But how do you choose one? What should you consider when picking such a plugin?
Make sure your chosen plugin matches the following criteria.
- It should allow you to customize the pre-order button
- Lets you prominently display the expected product availability date on the product page
- Allows you to show a countdown timer to create urgency for pre-orders
- Sends customers notifications upon product availability
- Sends automated pre-order confirmation emails
- Lets you customize notifications/emails as you wish
- Notifies you when customers place or cancel pre-orders
- Enables you to set pre-order quantity limits
- Automatically converts products on pre-orders to standard products when they are available for sale
- Works seamlessly with the latest WooComemrce version
- Compatible with your theme
- Ensures regular updates and excellent customer support
After checking these facts, pick the best pre-order plugin for WooCommerce. Need recommendations? Go with ShopBuilder, a high-quality WooCommerce page builder that works with Elementor to help you build high-converting WooCommerce stores.
It has 19+ modules, including the Pre-Order Module. Although this store builder has a free version, you need to get its pro version to reap the benefits of the Pre-Order Module.
Step 2: Install and Activate ShopBuilder Plugin
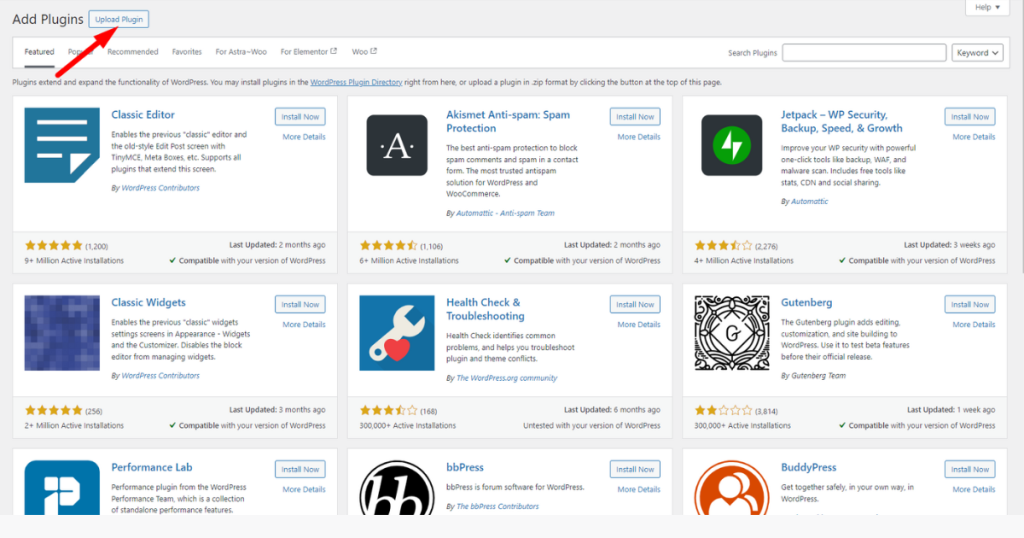
After purchasing the plugin, go to your WordPress Admin Panel > Plugins > Add New Plugin.

Now, click the “Upload Plugin” button.
After that, hit the “Choose File” button to upload the ShopBuilder zip file (you received through purchase) and click the “Install Now” button.
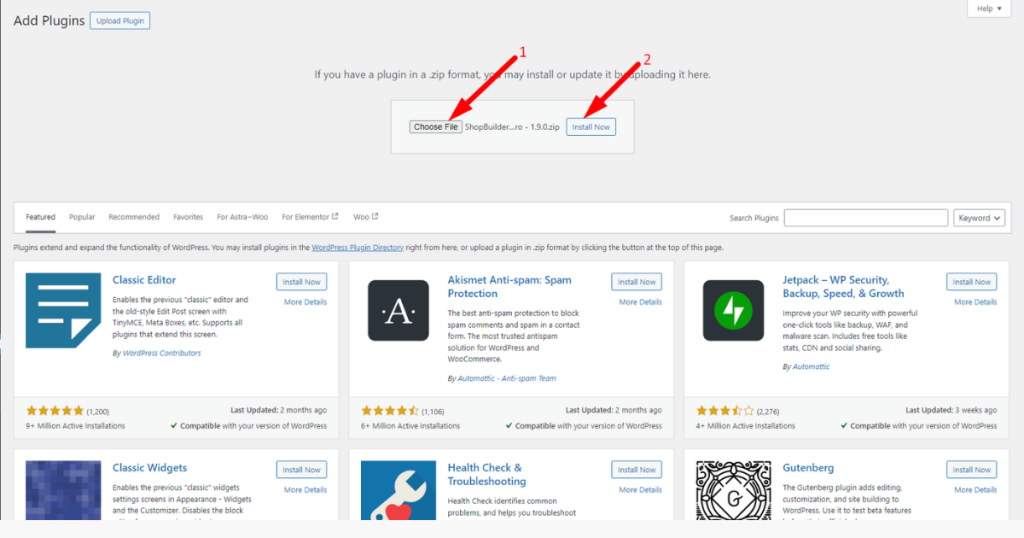
Upload and install ShopBuilder
Wait a while. This plugin will be installed.
Now, navigate to WordPress Admin Dashboard > ShopBuilder > License.

Then, enter your license and hit the “Activate License” button.
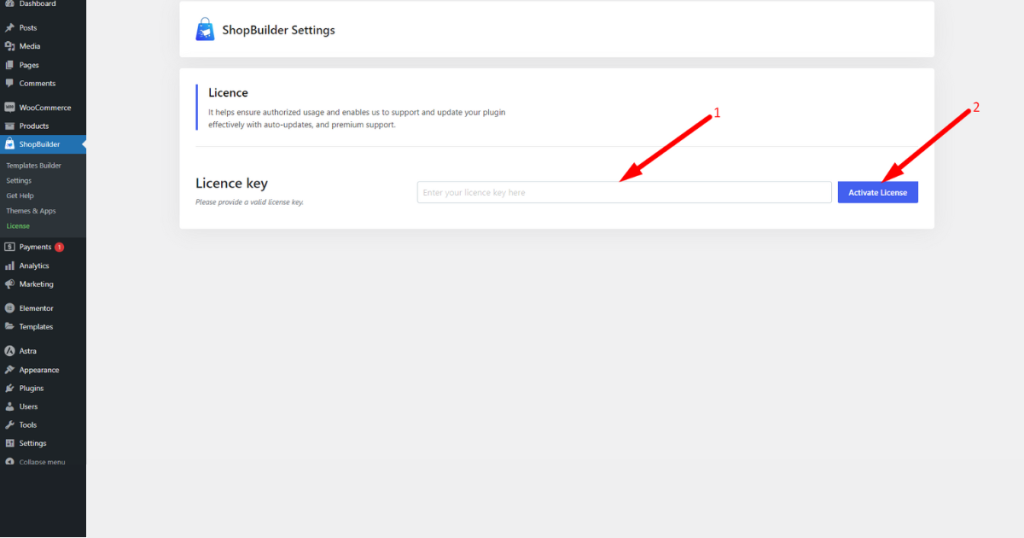
That’s it. You are now all set to enable the pre-order function on your WooCommerce store.
Step 3: Enable Pre-Order Module on Your Store
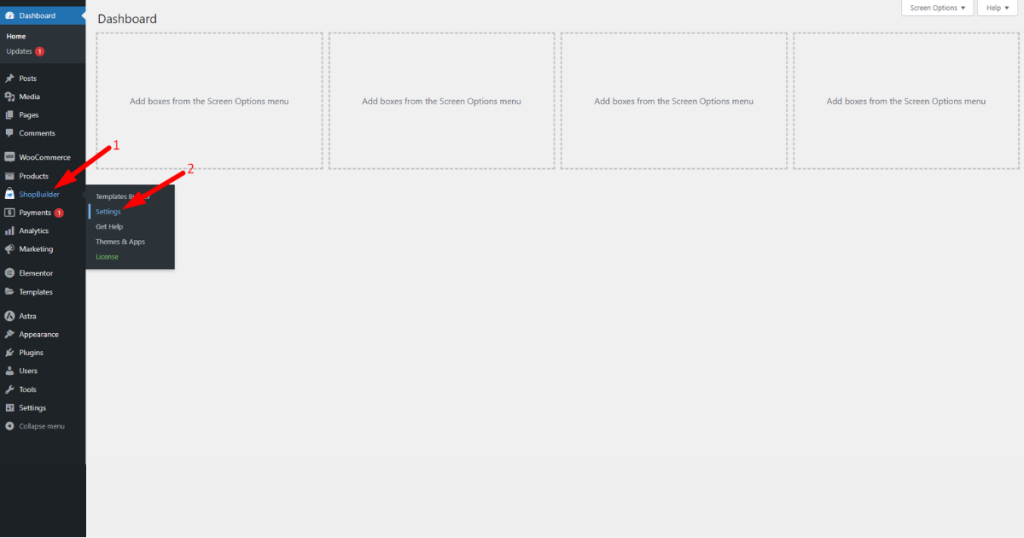
It’s time to enable the pre-order function on your WooCommerce store. Here’s how to do it: head to the WordPress Admin Dashboard > ShopBuilder > Settings.
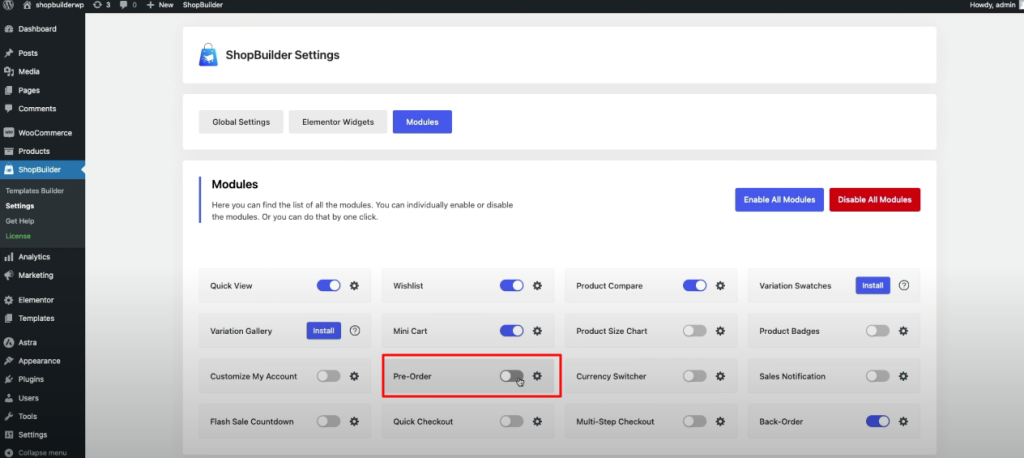
After that, find the “Pre-Order” module under the “Modules” tab. Click on it.
You’ll now notice a pop-up.

Toggle on the “Enable Pre-Order?” option and click the “Save Changes” button.

That’s it. You’ve just set up pre-orders on WooCommerce.
Step 4: Set a Product on Pre-Order
Go to the Admin Panel > Products > All Products to set a product on pre-order.

Choose a product and open it in the product editor. Afterward, head to the “Product data –” area and click the ‘Inventory’ menu. Now, click the “Stock status” dropdown menu.

Select “On Pre-Order” from the drop-down menu.

You’ll then see Pre-Order Settings with options like Pre-Order Limit, Availability Date, and Pricing Options.

Utilize each option to set pre-order limits, product release/arrival dates, and product pricing. Also, ensure the “Auto Convert Product” is checkmarked. Otherwise, your product won’t convert to a standard product when you make it available for sale.
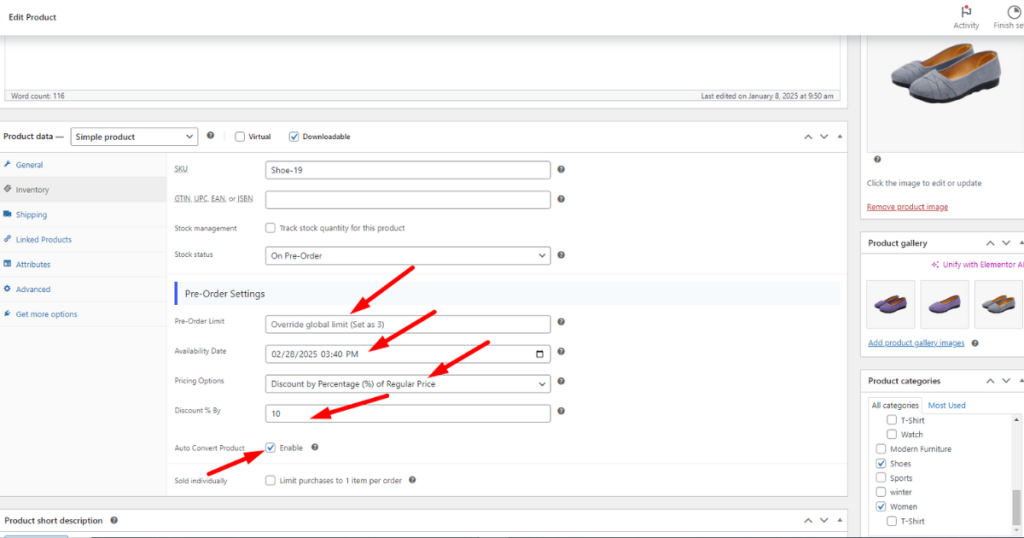
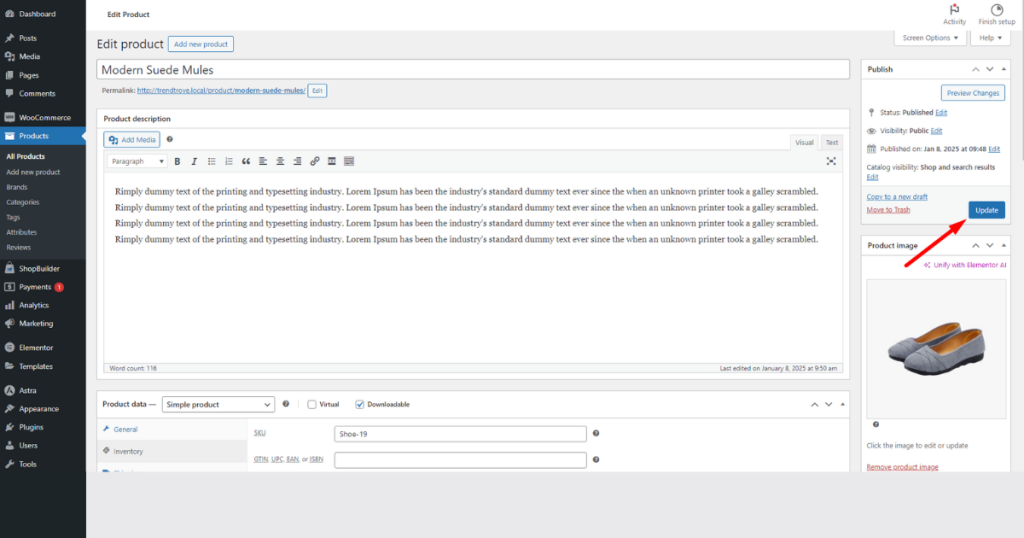
Lastly, scroll up and click the ‘Update’ button (You will see a ‘Publish’ button if you set the pre-order on a new product).
Boom! It’s showtime. Let’s visit the product page of the product we set on pre-order.
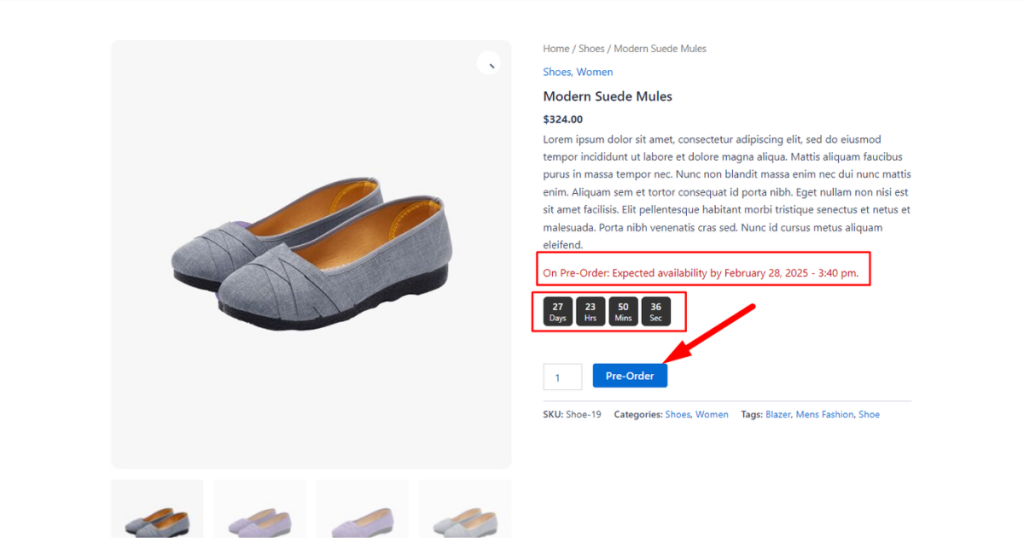
Pro Tip: Familiarize Yourself with All Pre-Order Module’s Features
Although we can set pre-orders on our preferred products just after enabling the ShopBuilder’s Pre-Order Module, it’ll be wise to learn about this module’s features for further customization.
Let’s start with the General setting. When you toggle on the Pre-Order Module, you get various options under this setting, including “Add to Cart Button Label,” “Pre-Order Closed Text,” “Checkout ‘Place Order’ Button Label,” “General Availability Message (with availability date),” and “General Availability Message (if no availability date).”
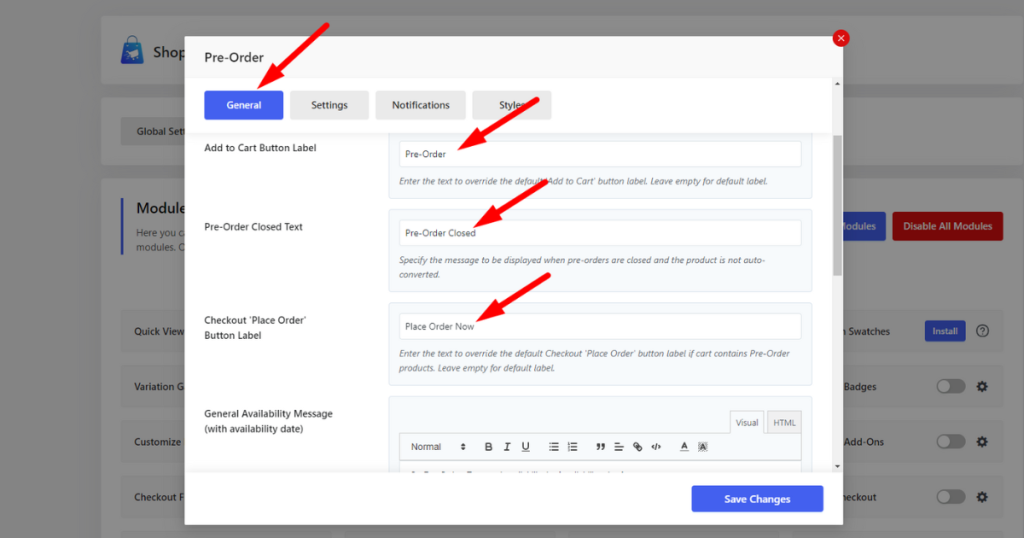
Add to Cart Button Label: Type your preferred text to personalize the pre-order button.
Pre-Order Closed Text: Type the message you want to be displayed when pre-orders close, and products aren’t auto-converted to standard products.
Checkout ‘Place Order’ Button Label: This option allows you to change the default Checkout ‘Place Order’ button label (text).
General Availability Message (with availability date): Use this option to write personalized messages with an availability date (which will change dynamically) that will be visible for pre-ordered items.
General Availability Message (if there is no availability date): Use this setting field to write general messages without an availability date, which will be visible for pre-ordered items.
Now, let’s learn about some options in the ‘Settings’ tab of this “Pre-Order Module.”
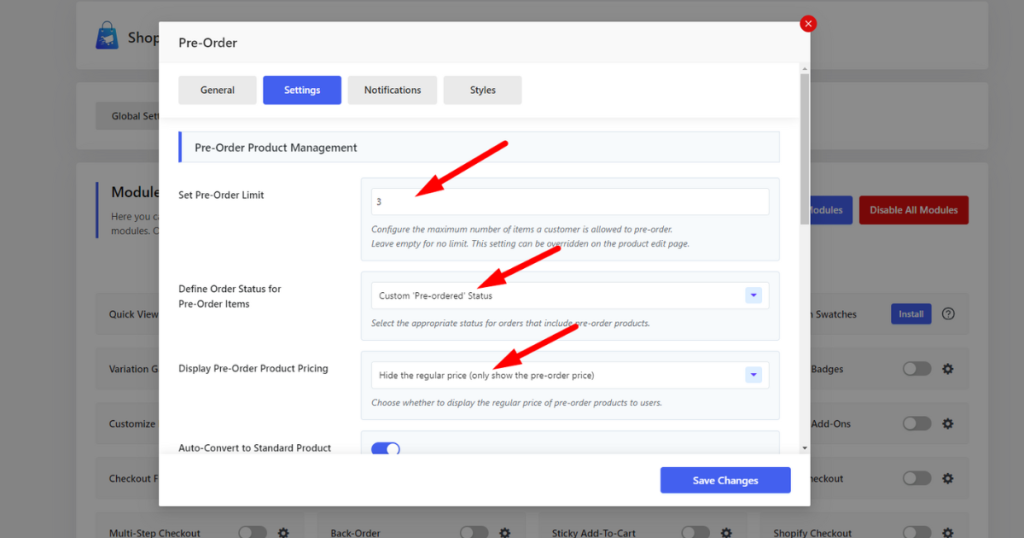
Under the Settings tab, you can set the maximum number of pre-order items, the order status to the default or custom type, and hide and display the product’s (set on pre-order) regular price.
In addition, you can customize User Access and Permissions, including user eligibility for pre-ordering and hiding pre-order pricing for guest users.
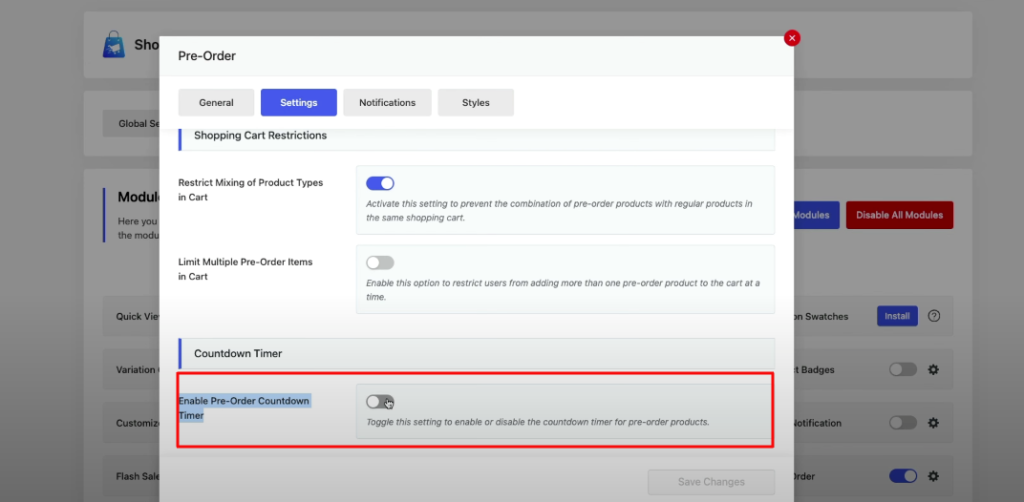
Under Shopping Cart Restrictions, you can activate Restrict Mixing of Product Types in Cart, which will separate items for pre-orders from regular products. Also, you can Limit Multiple Pre-Order Items in Cart and enable the Countdown Timer. Save your progress.
Now, let’s discuss the settings under the Notifications tab.

Here, you can turn various notification options on and off. For example, you can turn on the Pre-Order Confirmation Email option to send customers emails when they place pre-order product orders.
The module has many other features that you can explore independently. You can also read our documentation and watch the module video to understand its features better.
Final Thoughts
From now on, you won’t be wondering how to set up pre-orders on WooCommerce anymore. You can easily accomplish this task by following all the steps discussed in this article.
Remember, there are different ways to do the job. However, using the ShopBuilder Pre-Orders Module is the easiest. We wish you all the best as you follow our tutorial to make your online shop more appealing and productive.



