


On This Page
For anyone with an ecommerce store, an organized and optimized shop page is essential.
People with stores built on WordPress can easily customize their shop pages for better conversions. They follow a few steps regarding how to customize shop page in WooCommerce to get their job done.
Want to know what steps they follow? Read this helpful article and explore all the steps outlined here. Also, take action to organize your shop page and maximize conversion rates.
What is a WooCommerce Shop Page?
The shop page is the backbone of your store. This page is essentially your online showroom where you store and display all your products.
This page lets web visitors/shoppers view your catalog. WooCommerce creates this page by default once you install and activate this plugin. A shop page showcases a list of products in a grid format with product prices and images.
This page is necessary to attract customers, and customizing it is even more essential to keeping their attention and making them buy products.
Benefits of Shop Page Customization
Customizing your shop page has immense benefits. Once you make it visually appealing and attention-grabbing, you can effortlessly convince potential customers to purchase products from your WooCommerce store.
Also, you will get a significant advantage over your competitors by improving your shop design. You can enhance the overall user experience besides increasing your sales, eventually leading your store to become a brand.
Aside from all these, you’ll get SEO benefits by creating an SEO-optimized shop page. You can include keyword-rich content while customizing the page. Therefore, this page may rank on Google, and you will receive organic visitors.
As you know, many WooCommerce stores come with identical/similar designs. Hence, you can stand out from competitors by customizing the shop page.
Now that you know the benefits of customizing the shop page. It’s time to learn how to accomplish this job. Let’s get started.
How to Customize Shop Page in WooCommerce
We’ll now show you all the practical steps to customize and improve your shop page. These steps can help you refine the shop page and any other page you want.
Hence, if you wonder how to fully customize WooCommerce product, checkout, and order pages, follow what we’ll share below.
Step 1: Install and Activate Elementor
First, you need to install and activate the Elementor plugin. This is one of the most popular free page builders, allowing you to create web pages by dragging and dropping elements.
Here’s how to install and activate this page builder plugin.
- Navigate to the WordPress Admin Dashboard > Plugins > Add New Plugin.

- Type ‘Elementor’ in the plugin search field on the right side.
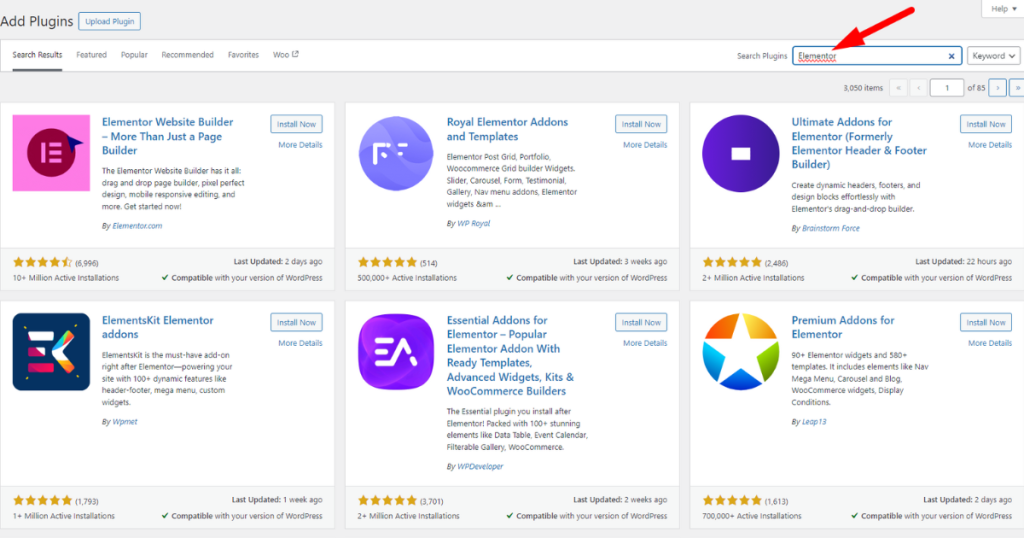
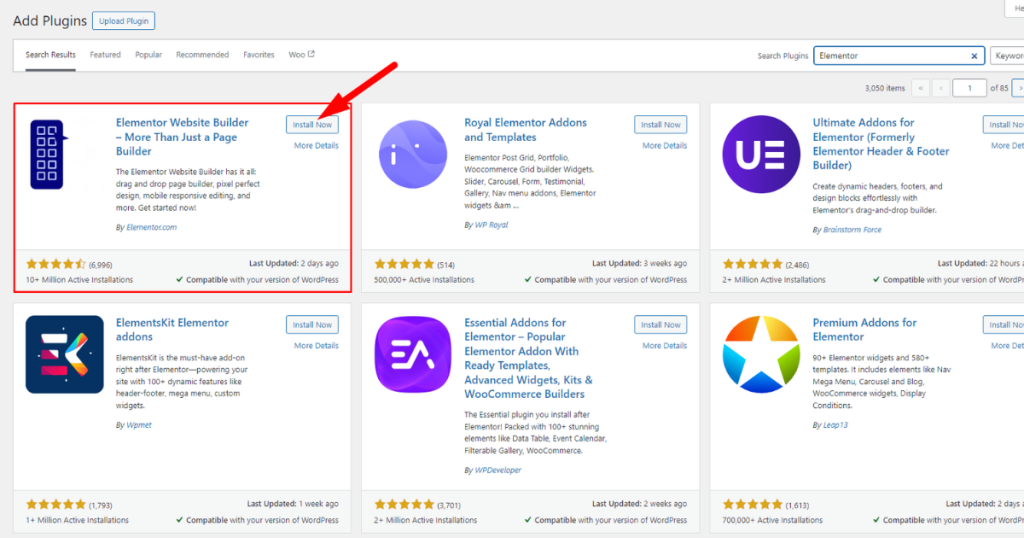
- Click the “Install Now” button.
- Now, hit the ‘Activate’ button.
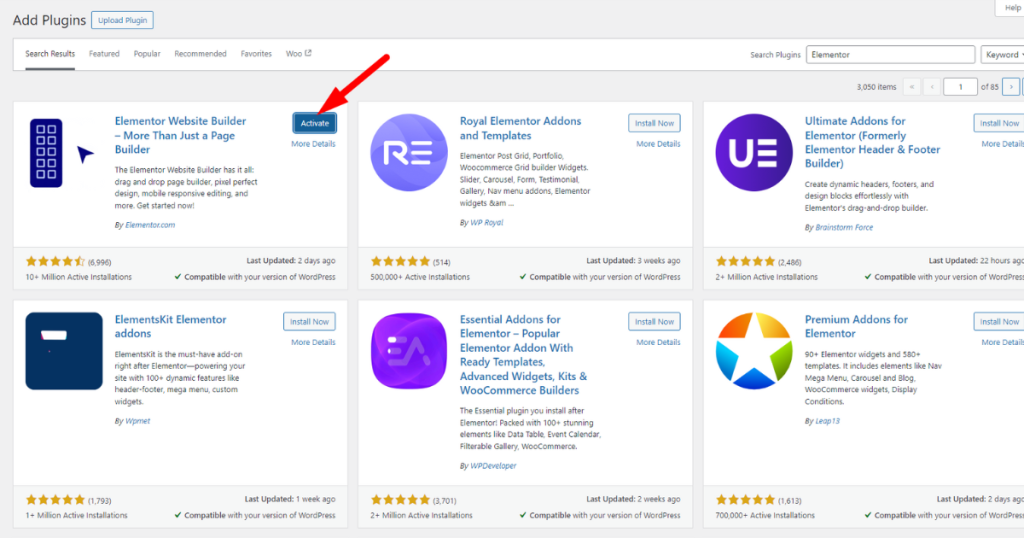
That’s how you install and activate Elementor. In the same way, you need to install and activate ShopBuilder.
It’s another excellent WooCommerce page builder that works with Elementor. It helps you easily create eye-catching, high-converting WooCommerce stores.
Step 2: Install and Activate ShopBuilder
Go to the WordPress Admin Panel 🡪 Plugins 🡪 Add New. Then, search with the keyphrase ‘ShopBuilder’ in the search field on the right side.
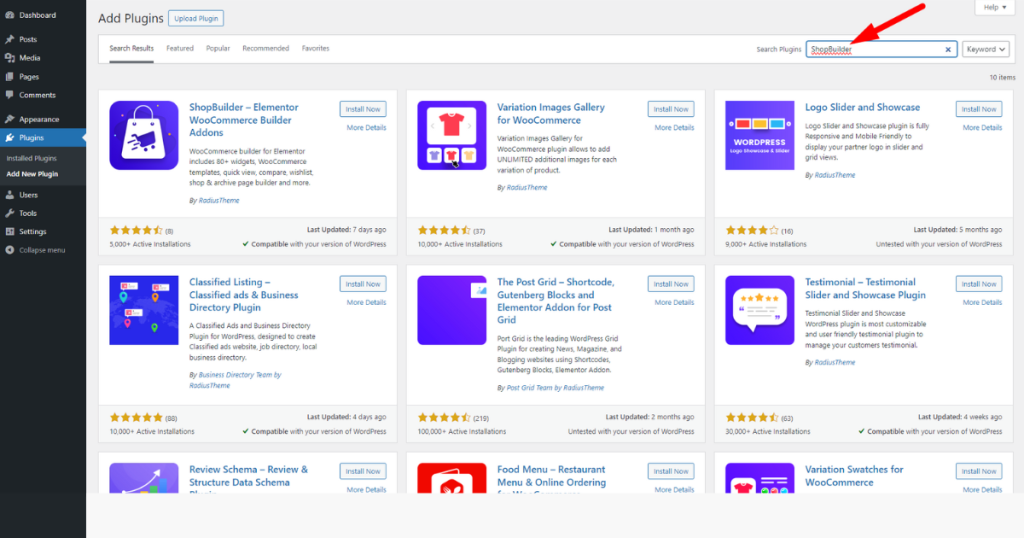
Afterward, install and activate the plugin, as marked in the screenshot below.
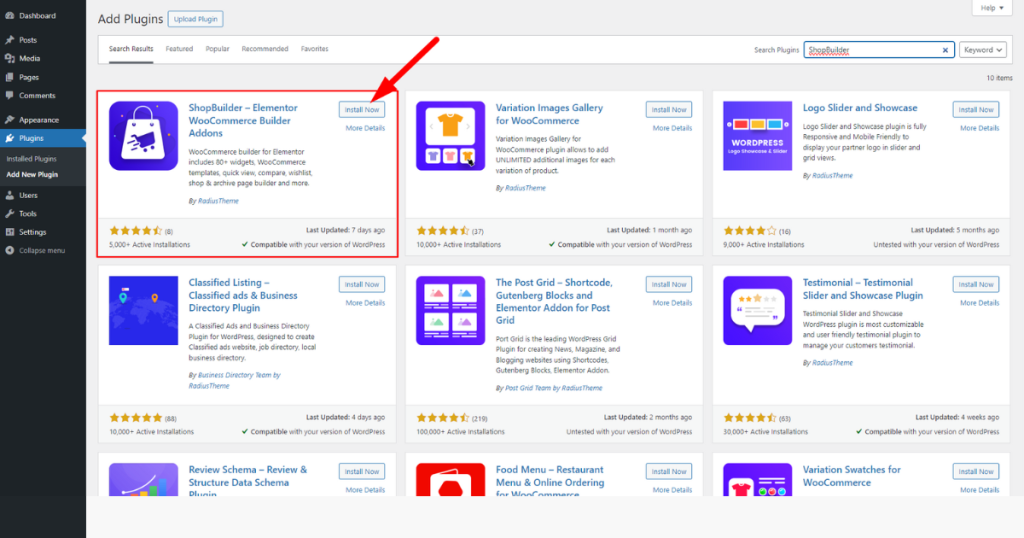
N:B: ShopBuilder works with Elementor and WooCommerce. Hence, your WordPress store must have these two essential plugins installed.
Step 3: Customize Your Shop Page Using ShopBuilder
After installing and activating ShopBuilder, head to the WordPress Admin Panel 🡪 ShopBuilder 🡪 Templates Builder.

Then, click on the “Add New Page” button.
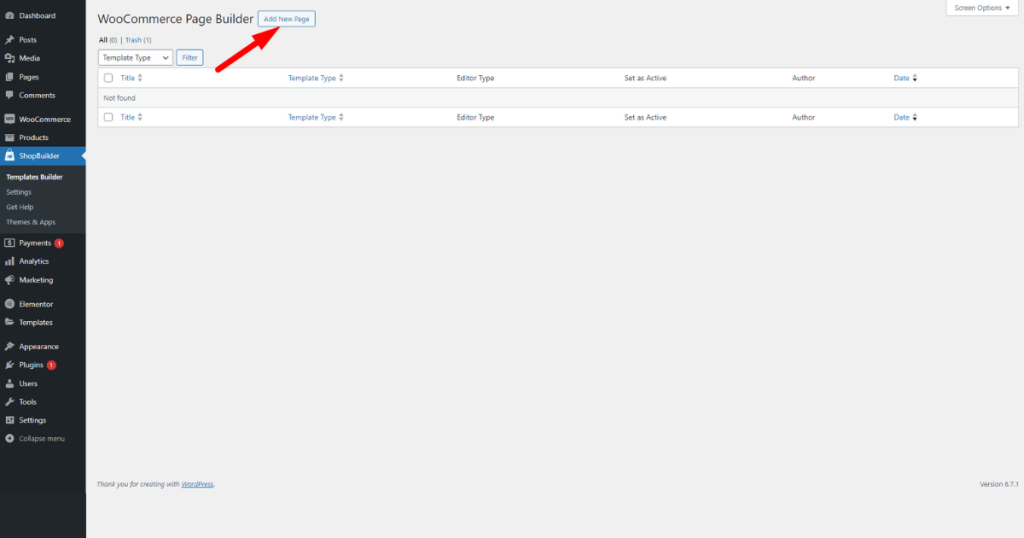
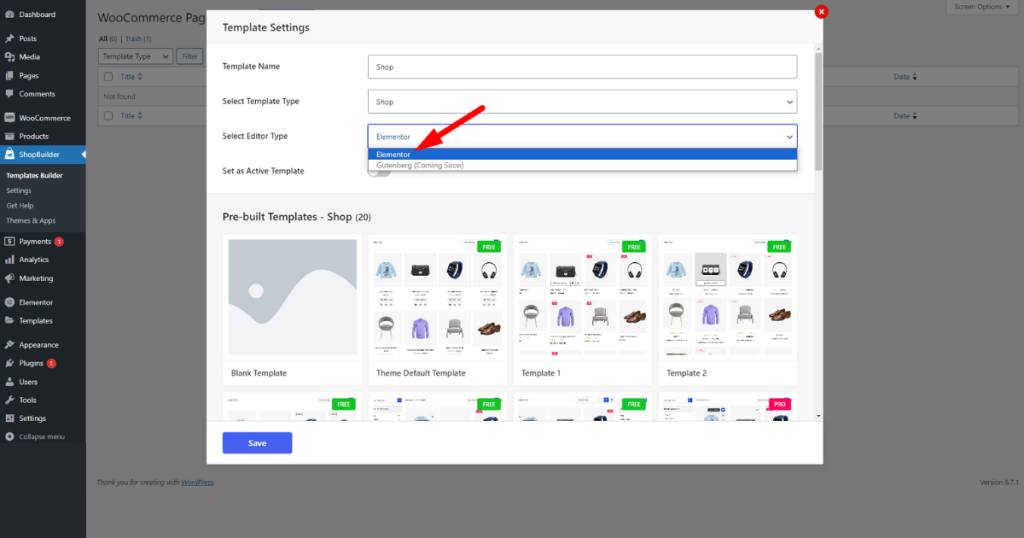
You’ll now see a pop-up featuring template settings and some pre-built templates. In the “Template Name” field, type a template name and select your template type from the “Select Template Type” drop-down menu.

After that, choose a page editor type from the “Select Editor Type” drop-down menu. We recommend you select ‘Elementor’ as your page editor.
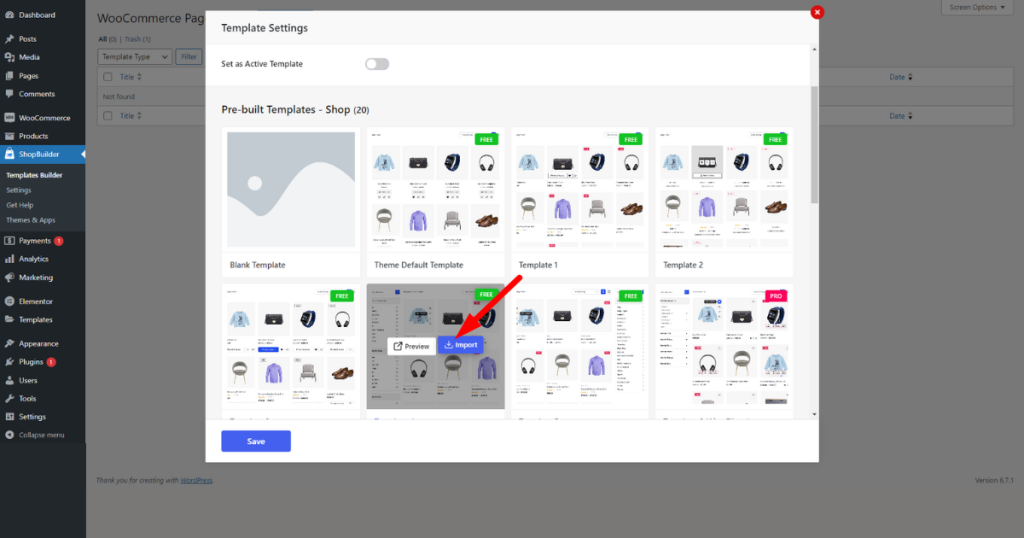
Now select a template you like (you may either choose a free or pro template) and click the ‘Import’ button.
Then, hit the “Edit With Elementor” button.

You’ll then visit the shop page and notice the Elementor editor with ShopBuilder’s widget.
As you can see in the screenshot below, our shop page looks professional, thanks to the template we chose. Your one will also appear visually appealing.

That means it doesn’t require much customization. You may still redesign this page if you aren’t happy with its outlook.
ShopBuilder offers multiple widgets that help you work on the appearance and functions of the shop page. You can customize each widget element according to the freedom it offers and your preferences.
Some Significant ShopBuilder Widgets
Archive Title: This widget will showcase the archive title. This widget comes with three tabs for customization purposes.
The Content tab offers title tags and alignment settings, while the Style tab provides controls for the style of different elements.
Lastly, the Advanced tab allows you to modify the layout, add motion effects, and more.
Archive Description: Archive Description is a simple widget for archive descriptions. It has only two tabs: Content and Advanced.
Result Count: This widget displays the total number of items on the shop and archive pages.
View Mode: The View Mode widget lets you display products in both grid and list formats. Users can select their preferred viewing mode by clicking the grid and list icons.
Products Ordering: The Products Ordering widget offers users a sorting option to view, organize, and prioritize products based on their specific needs.
Ajax Product Filters (PRO) is a revolutionary widget that helps users explore products by implementing diverse filters, such as filtering by categories, tags, popularity, and sales.
See the ShopBuilder’s Widget in Action
We’ve seen what ShopBuilder’s Template Builder can do and learned about some of its fantastic widgets that work with Elementor.
It’s time to see how these widgets help you customize a shop page in WooCommerce like a pro. So, check the animation below.

If you need guidance on how to customize checkout page in WooCommerce with ShopBuilder, watch this video.
What Else Can I Do to Level Up My WooCommerce Shop Page?
Here are some more ways to enhance your WooCommerce Shop page.
Pay Attention to the Add to Cart
Allow impulse buyers to purchase products quickly by enabling them to add items to their carts directly from the shop page. Also, ensure that they immediately visit the cart page after adding products to their carts from the shop page.
Include a Custom Product Placeholder Image
Do you know that WooCommerce uses a default placeholder image when it doesn’t find an image for one of your SKUs? This automatic insertion of images can be bland or irrelevant to your actual products, leading potential customers to leave your store.
Therefore, continually update the placeholder image and use a custom graphic like your store logo. This will help you stay professional even though some of your products appear without their corresponding images.
Improve Your Store Speed
A one-second delay in mobile page load can reduce conversion rates by 20%. Therefore, you need to optimize your stores for mobile users and ensure they load fast on diverse screens.
Now Customize Your Shop and Attract Visitors
Your shop page is more than a list of products; it’s an interactive space that can influence buying decisions. You can transform it into a visually appealing and user-friendly hub that captivates visitors by customizing it.
This guide on how to customize shop page in WooCommerce focuses on leveraging the ShopBuilder plugin and the popular Elementor page builder to revitalize your WooCommerce shop page.
Whether you’re a beginner or a professional WordPress user, this step-by-step tutorial will benefit you and help you enhance your shop page.



