


On This Page
Want to know how to make restaurant website in WordPress? It’s not as difficult as it seems. You just need to pick a domain, connect it with a hosting provider, install WordPress, and use a restaurant-friendly theme and a plugin.
Then, customize the website according to your needs, and your site will be ready. It’s that simple. We encourage you to keep reading this article to learn in-depth about all these steps and other relevant factors regarding how to create a restaurant website in WordPress for free.
Essential Features of a Restaurant Website
A good restaurant website attracts prospects, informs them about the restaurant, makes them explore the site, and encourages them to dine eventually. Here’s what makes a restaurant website attractive, engaging, and high-converting.
A Food Menu Page
While building a restaurant website, ensure it has a lucrative food menu page. This page should clearly display the food items you serve at your restaurant. Additionally, make sure your food menu page highlights high-quality images of the food and its short description.
Online Reservation System
Alongside displaying mouth-watering dishes on your restaurant website, you can allow customers to book their tables online. Display chairs and tables on your website to help diners easily make reservations.
Contact Forms and Map
Every website, especially those selling products or services, must have a dedicated contact page. Therefore, customers can easily contact you.
Also, the contact page should display the location of the business. That said, here’s what a contact page of a restaurant site should contain.
- Opening and closing hours
- Detailed address information
- Map displaying the restaurant’s location
- Contact form
- Social media profiles
Once you create a contact page and include the information above, it’ll enhance the user experience.
Social Media
Social media profiles help your business gain more visibility. With these profiles on your website, your targeted customers can easily connect with you, ask for essential information, share their experiences or food images, and more.
Social profiles let customers engage with your brand. Thus, include icons of diverse social media platforms on your website with links to your restaurant’s social profiles.
Social Proof and Reviews
Social proof helps a restaurant gain customer trust. Prospects develop a good first impression of your restaurant when your restaurant gets positive reviews on places like Google, Facebook, Yelp, and elsewhere.
Then, they visit your restaurant website and see the real story of people who had amazing experiences with your restaurant on the site. Hence, prospects start to consider your restaurant to have their next meals.
Responsiveness
How many mobile users are there in the US? Based on the Pew Research Center data, approximately 98% of the population own some mobile phone type, and 91% are smartphone users.

That means a significant number of your targeted customers are mobile phone users. Thus, you need to make sure your restaurant website is responsive and loads well across different screen sizes.
Site Load Speed
Prospects might immediately leave your website if they need to wait longer than usual to browse it. Therefore, you need to make sure your restaurant website loads fast and offers a seamless browsing experience.
How to Make Restaurant Website in WordPress Free
Here are the easy steps regarding how to create a restaurant website in WordPress free. Ensure you follow them properly to build a welcoming and high-converting restaurant website.
Step 1: Select a Domain for Your Restaurant Business
The first step in creating a good restaurant website is selecting the perfect domain name. A domain name should describe your brand well while remaining memorable.
It should be easy to spell and write. Your domain name shouldn’t contain uncommon words, phrases, or special characters.
It should be short and feature your business-related keywords for SEO benefits. Lastly, ensure the domain name is free from trademark issues and has the correct extensions (e.g., .com).
We recommend you use a few domain name generators to gather domain name ideas and pick a suitable one that aligns with your restaurant business. After that, check its availability and copyright issues. Then, register it using one of the popular domain name registrars, like Namecheap, GoDaddy, etc.
Step 2: Choose a Hosting Provider for Your Restaurant Site
Once you secure a domain name for your business, you need to select a hosting provider and connect the domain. Doing so allows you to store essential site data like images, texts, infographics, videos, and others on the web and let people access your website.
So, selecting a hosting provider is a crucial step. Choose one carefully by considering the criteria below.
- Make sure your selected hosting provider guarantees at least 99.99% uptime
- It should ensure fast loading
- It must come with reliable customer support
- Your chosen hosting provider must offer automatic backups
- It should provide SSL certificates and unparalleled protection against online threats
- Consider your storage needs
- Check customer testimonials
- It should provide an easy migration facility
- Compare pricing with other hosting providers
Go after a hosting provider that meets the criteria mentioned above. However, select one of these famous hosting providers, SiteGround and Hostinger, if you need recommendations.
Step 3: Install WordPress and a Restaurant Theme
After connecting a domain with a hosting provider, you need to install WordPress. Some hosting providers offer one-click installation, while others require you to follow a series of steps to install WordPress.
Refer to your hosting provider and seek support if you need anything while installing WordPress on your restaurant website.
After that, you need to install and activate a theme for your restaurant site. But which theme will you choose since there are a variety of options? Consider these factors when selecting a theme.
- Make sure the theme works on all screen sizes
- Choose an SEO-optimized restaurant theme
- Select a lightweight theme
- Pick a theme with restaurant-specific features like image galleries, booking systems, etc.
- Ensure your chosen theme is compatible with other essential plugins
- Examine the theme’s demo content
- Select a theme with comprehensive documentation and reliable customer support
After considering these facts, you need to select a theme for your WordPress restaurant site. However, if you can invest a little, we recommend a premium theme instead of a free one.
It’s because a premium theme helps your website appear appealing. Plus, it reduces the hassle of creating a restaurant website from scratch. You just install and activate it, and your website is ready (Work a little on some pages).
So, select a premium theme like FoodCart, RedChilli, or Panpie and easily create a restaurant website.
Step 4: Design Site Pages
Now that you’ve installed and activated a restaurant theme, you need to design all the pages of your website. Start with the homepage. Replace the theme logo with your restaurant logo. Create navigation menus for header and footer areas. Work on the hero section and cautiously design the rest of the homepage sections.
Remember to select primary and secondary colors and typography for your restaurant
site. Check other restaurant website examples for inspiration. Once you’ve designed the homepage, create and customize the food menu page.
You need to create and design a dedicated food menu page to display your restaurant’s food items. Ensure you include high-quality images and descriptions of your food items on that food menu page.
Afterward, create a catering service page if you offer catering services. Include menus, contact information, and catering policies on that page. Now, build other essential pages, including About Us, Contact Us, Reviews, and more.
You may watch this tutorial below to learn how you can easily customize a web page and build a restaurant website.
Step 5: Include Food Items
Okay, you’ve built and designed the necessary pages; it’s time to add some photos and descriptions of flavorful food items in your restaurant. Before you do so, decide whether you only want to display food items or enable visitors to order food online.
If you prefer both, you need to install a plugin, Food Menu . Why this plugin?
It’s free to use and offers a complete online restaurant management solution. Whether you want to display food items, collect orders online, integrate pick and delivery with your website, or set up an online reservation system, this plugin has it all. Thus, let’s get it.
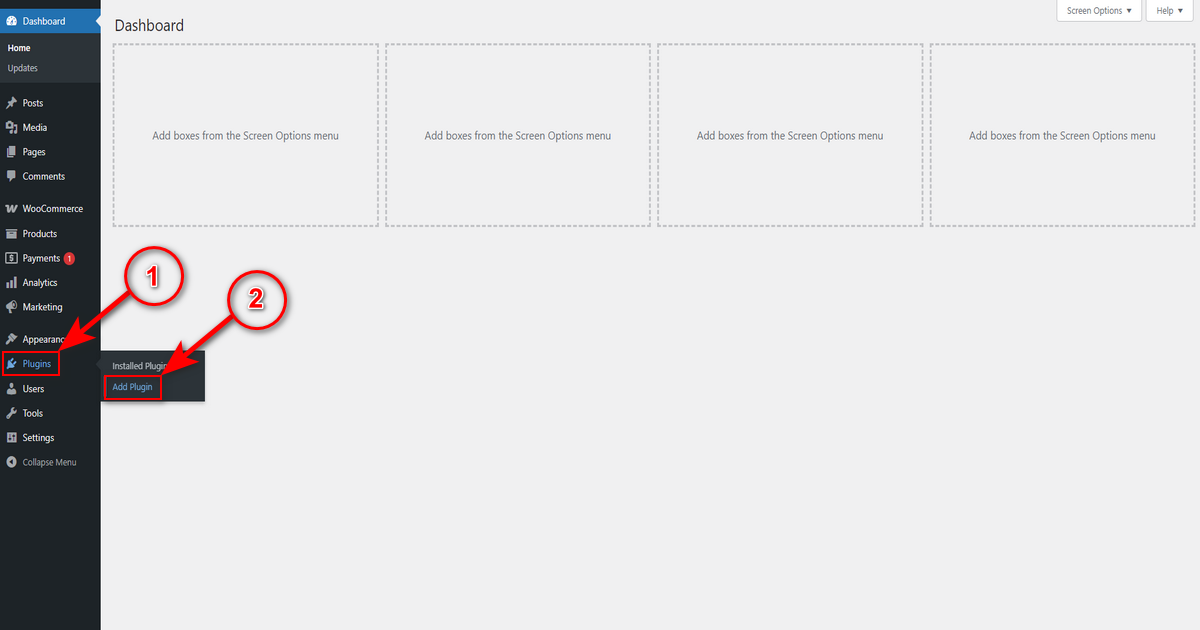
First, head to your WordPress Admin Panel and navigate to Plugins > Add Plugin.
Then, search for the “Food Menu By RadiusTheme” plugin on the search field on the top right and hit “Install Now” button of the marked plugin in the screenshot below.

Finally, press ‘Activate’ button of the “Food Menu” plugin.

That’s all. Note that your restaurant website must have “WooCommerce” plugin pre-installed to get “Food Menu” to work successfully.
Add Food Items
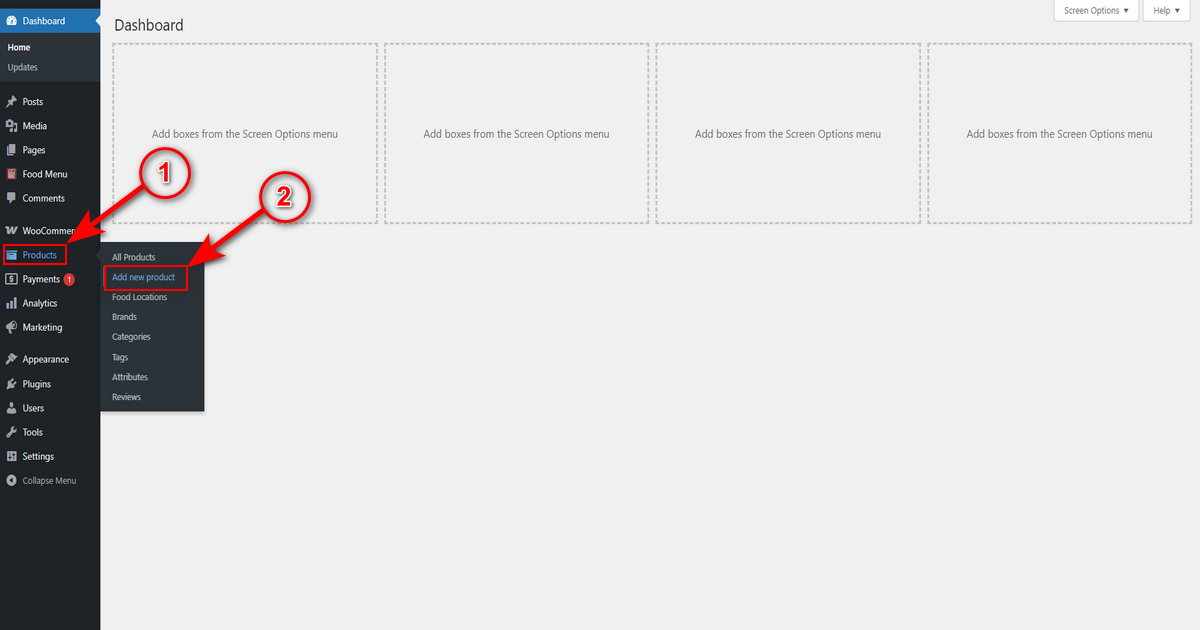
Once you install and activate the Food Menu and WooCommerce plugins, go to Products > Add new product.
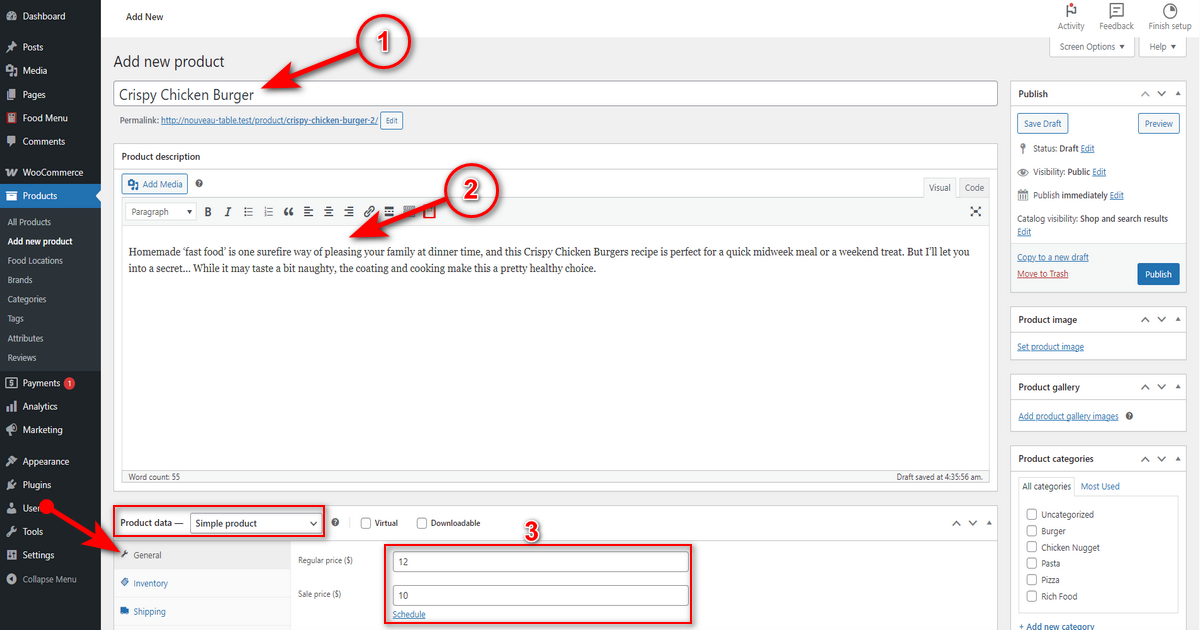
Then, write your food item title in the “Add new product” field and write its description in the “Product description” box. Now, navigate to the “Product data –” drop-down menu and make sure “Simple product” is chosen.
Afterward, stay on the ‘General’ tab and write your food item’s regular and sale prices in corresponding fields.
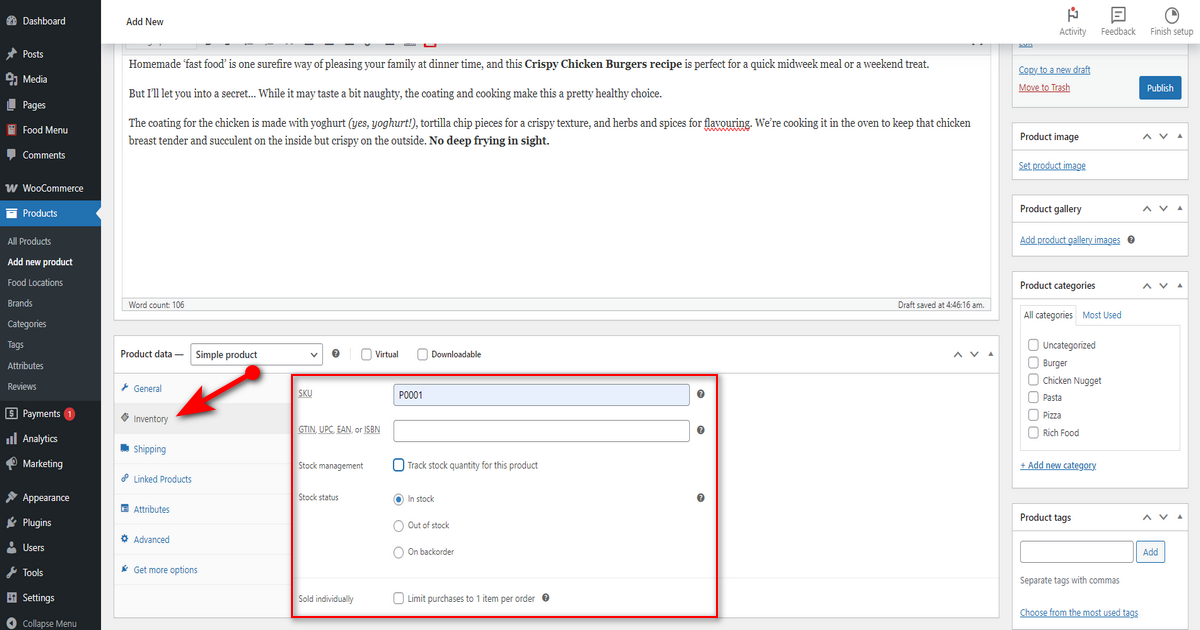
Press the ‘Inventory’ tab and write down your food item’s SKU and GTIN, UPC, EAN, or ISBN. Additionally, check other inventory settings.
Now, click the ‘Shipping’ tab to provide information about the dimensions of your food item. Then, head to “Product short description” box and include a short description of the food item. Afterward, look at the right side and add food item brands, food locations, and product tags.
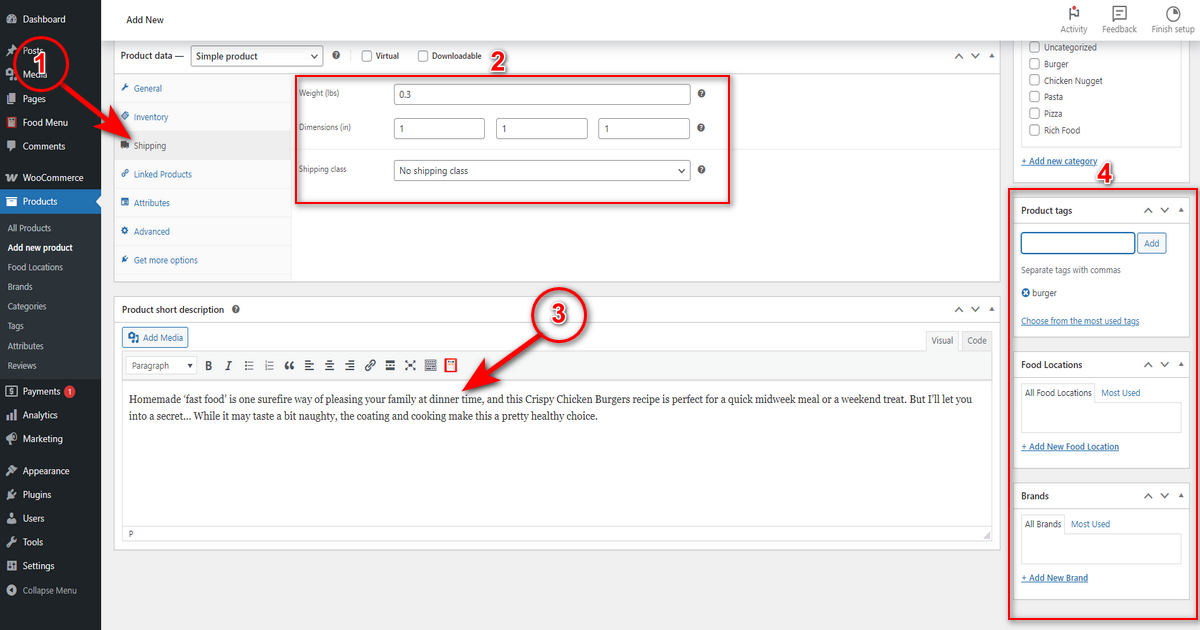
Now, scroll up a little and stay on the right side to add product tags, main images, and gallery images. Lastly, check everything again and press the ‘Publish’ button.

That’s how you add a food item to your restaurant website. Follow these steps every time you want to include a food item.
Display Food for Online Ordering
Once you include all the food items by following the steps in the above section, you need to generate a shortcode and embed it into the Food Menu page you created and designed earlier. Here’s how:
Generate a Shortcode
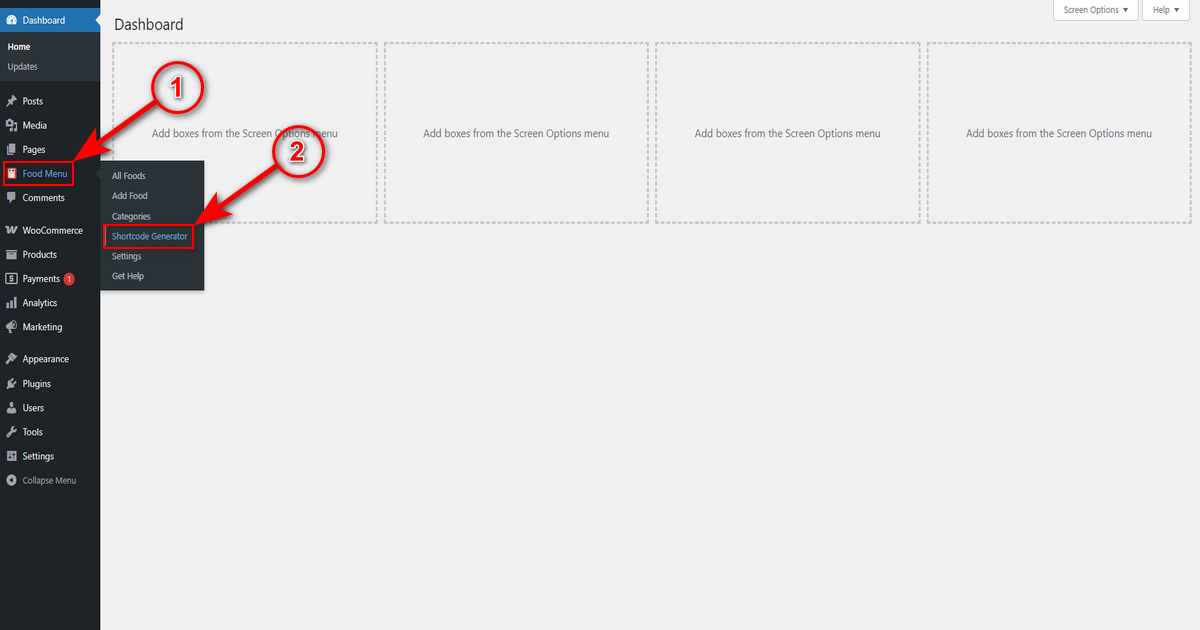
Navigate to WP Admin Dashboard > Food Menu > Shortcode Generator.
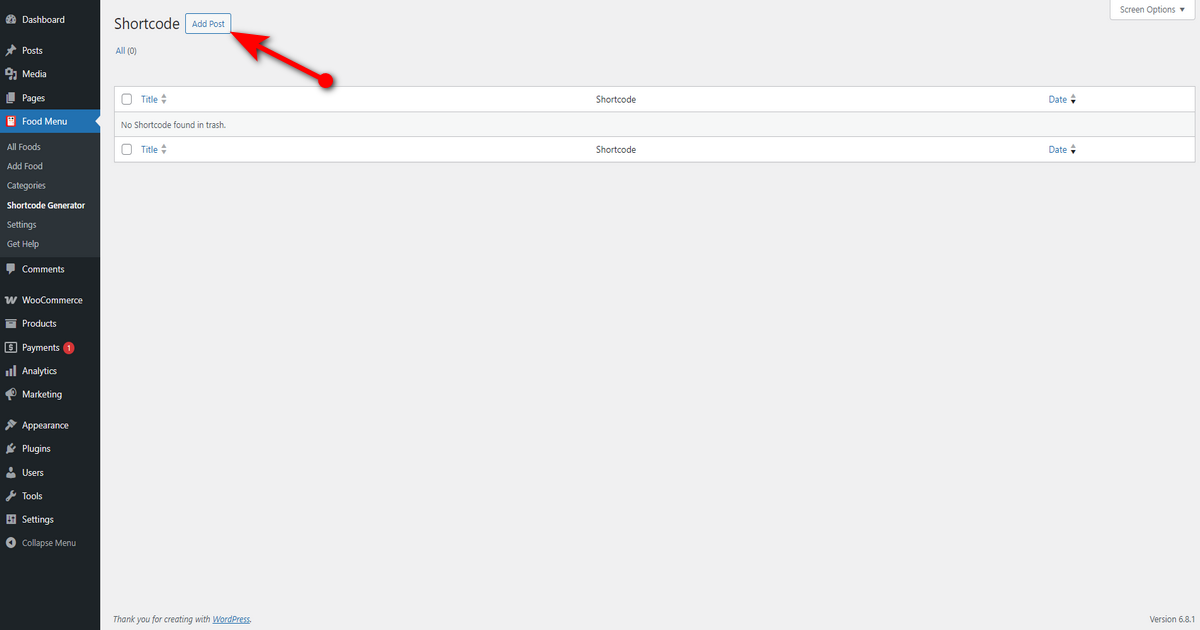
Press “Add Post” button.
Now, write a shortcode name in the “Add Post” field. Then, scroll down to the “Short Code Generator” section and make sure ‘Layout’ tab is selected. Now, select the layout type and style according to your preferences.
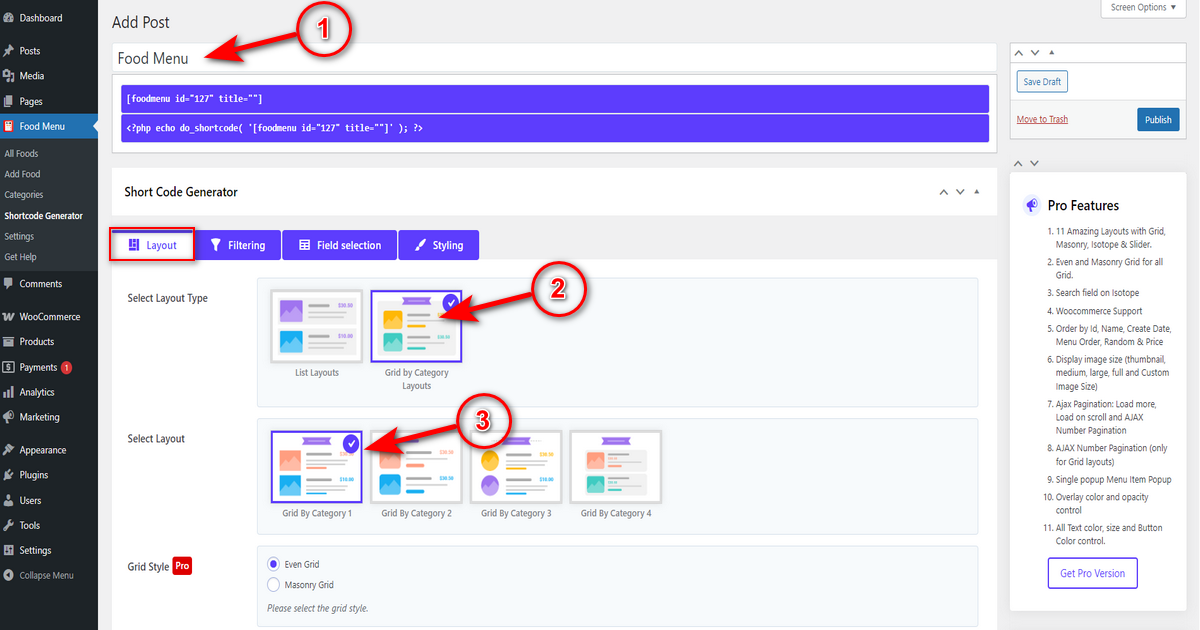
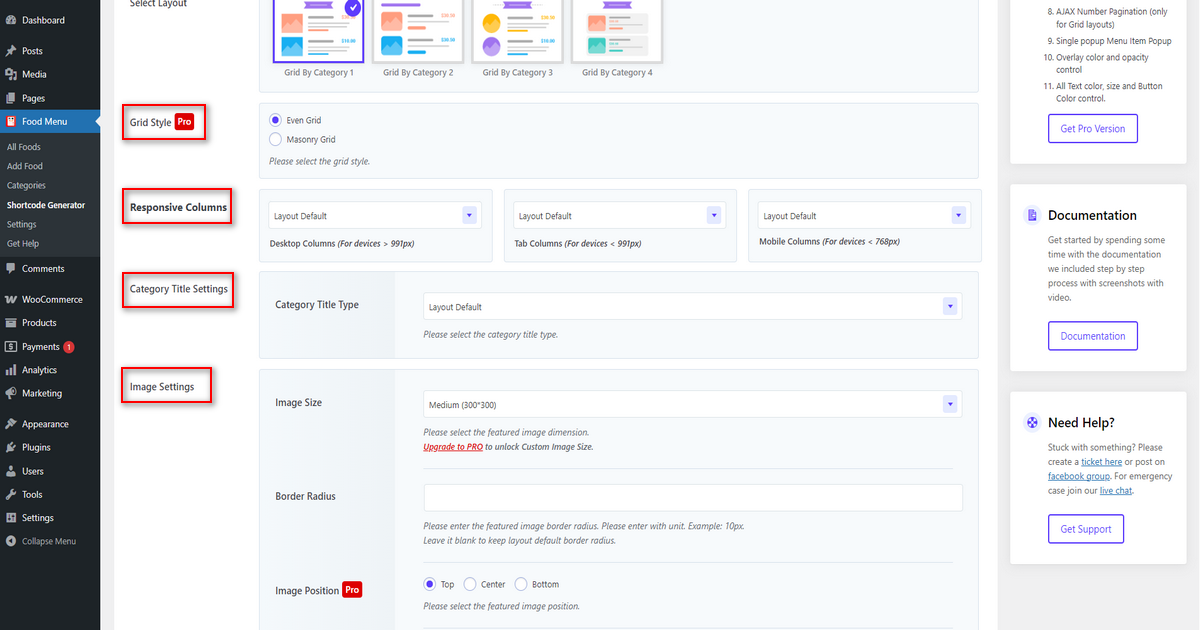
Scroll down and explore other layout settings. For example, you can select the grid style (which comes in the pro version of the plugin).
Additionally, choose column numbers to display across diverse devices. You can select the category title layout, work on image settings, and more. You might refer to Food Menu Layout documentation for help with these settings.
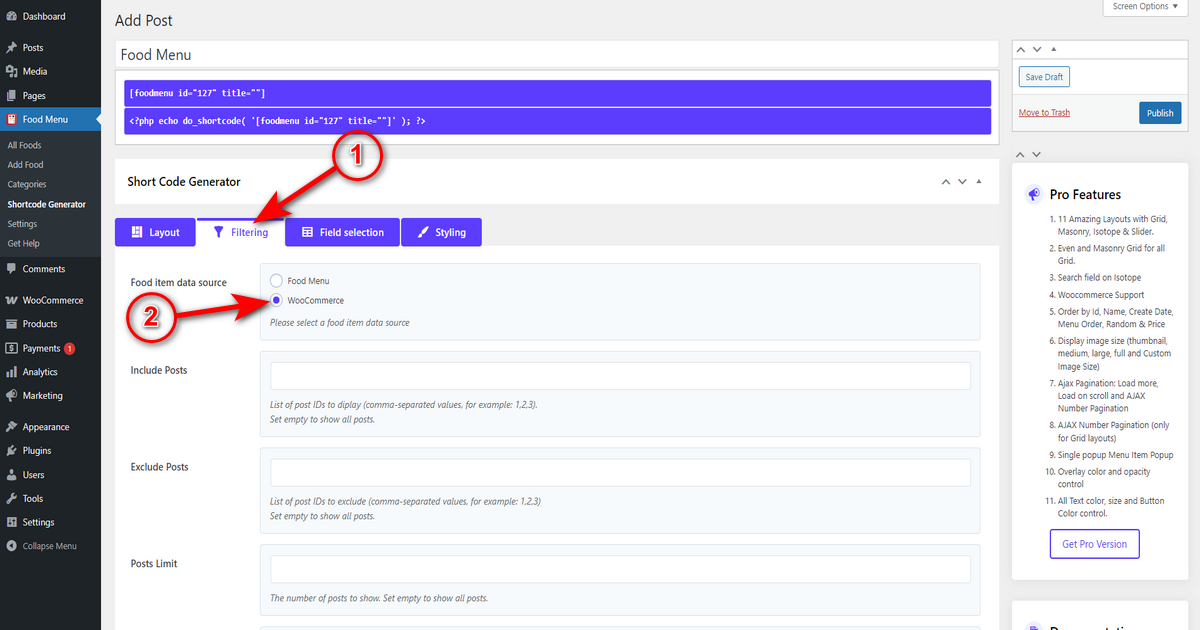
After that, scroll up and press ‘Filtering’ tab, and select ‘WooCommerce’ as the “Food item data source.” Note that this is a crucial step; otherwise, your targeted customers can’t place orders.
Then, you might explore other settings of this tab or work on other tabs’ settings. You can watch this tutorial to learn better. Finally, hit ‘Publish’ button.
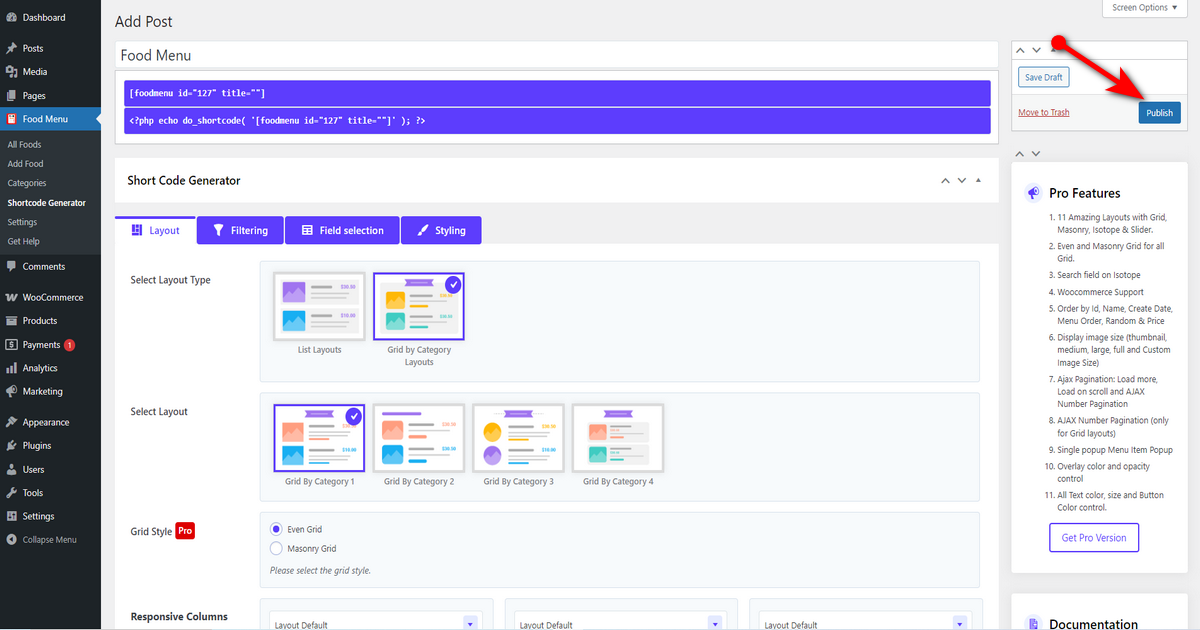
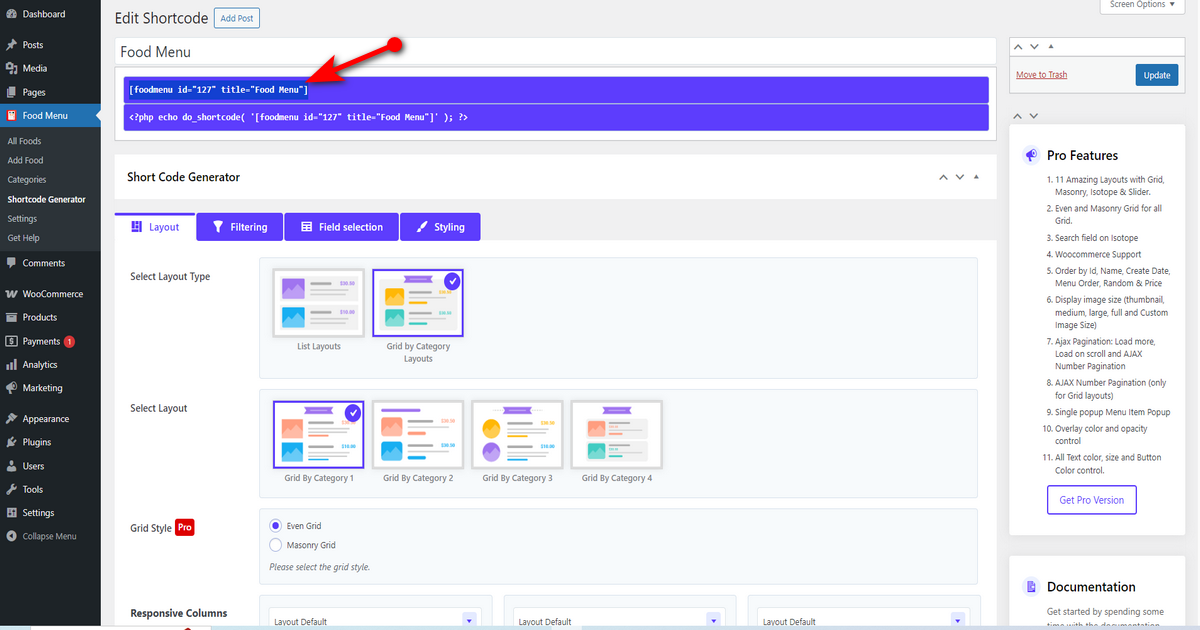
Congrats! You’ve generated a shortcode. Now copy this shortcode (save it somewhere for later use) to embed it into the Food Menu page.
Embed a Shortcode
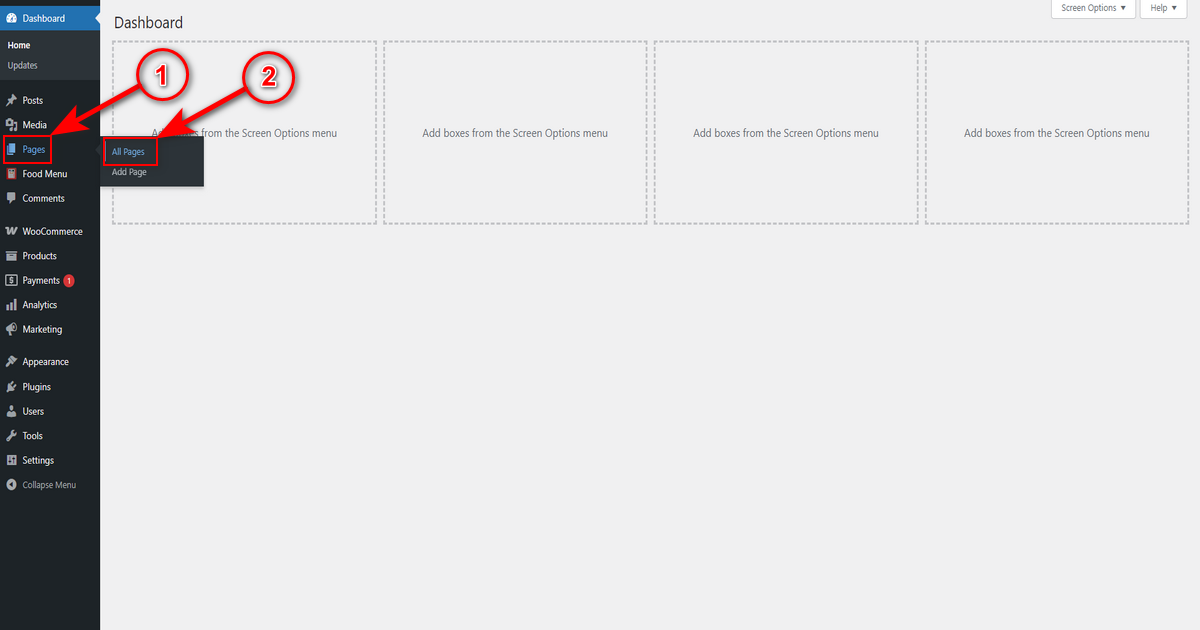
In order to embed a shortcode to the Food Menu page or your preferred page, go to WordPress Admin Panel > Pages > All Pages.
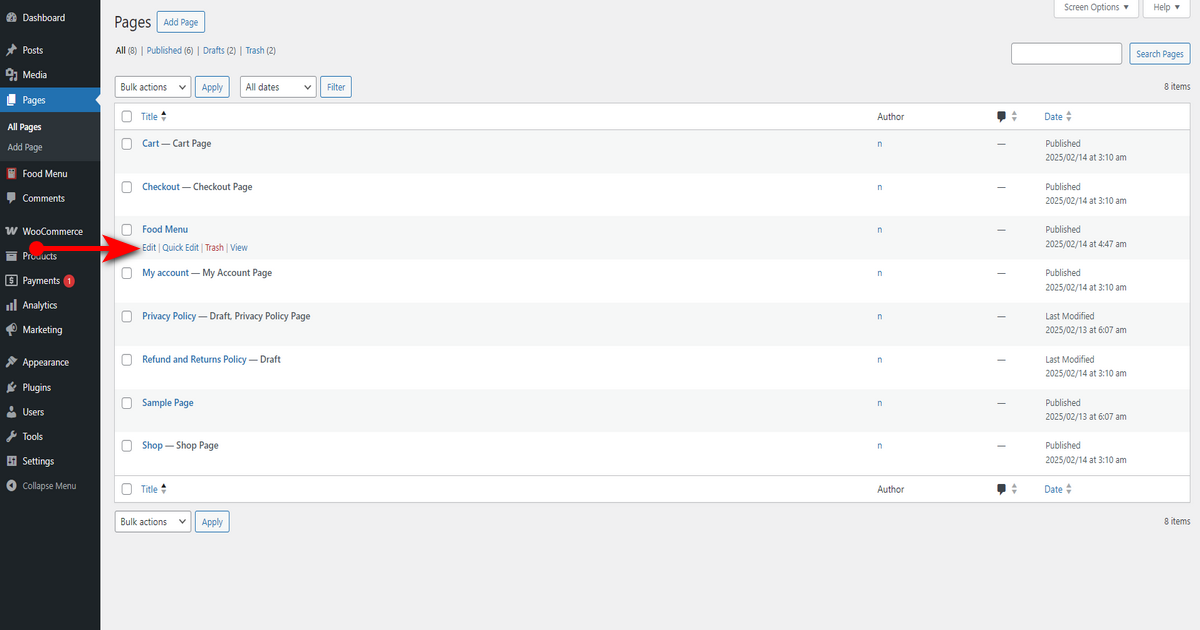
Now, hover the mouse pointer over a page and click on its ‘Edit’ link.
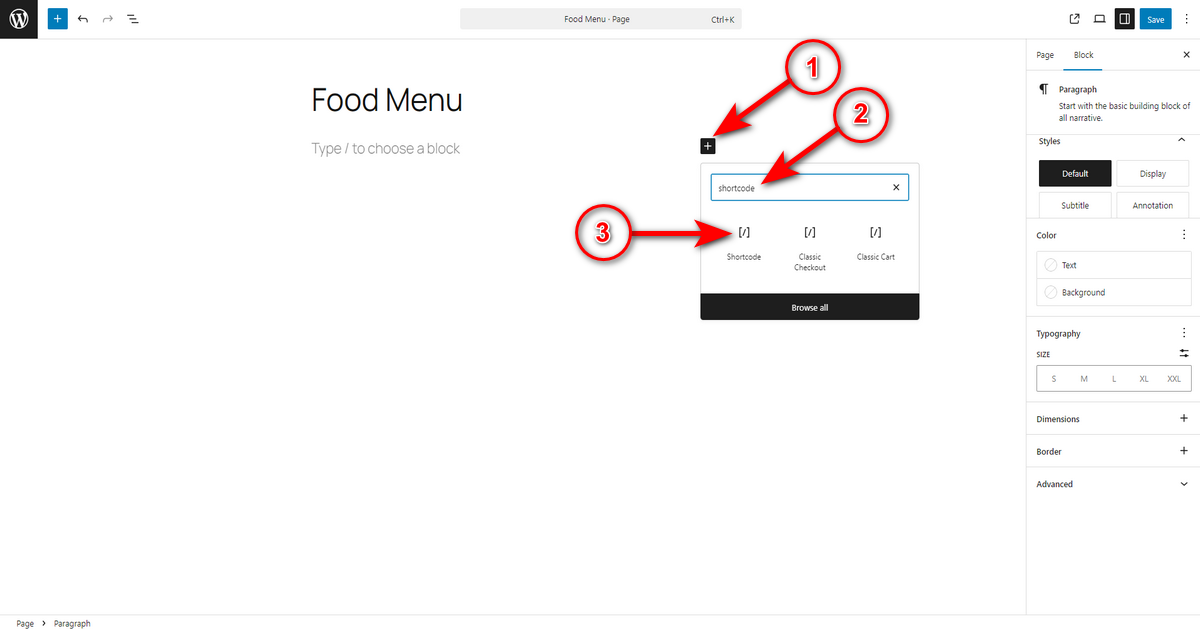
At this point, press the ‘+’ symbol inside the Gutenberg block editor, and a block inserter will appear. Now, write ‘Shortcode’ in that block inserter and choose the ‘Shortcode’ block.
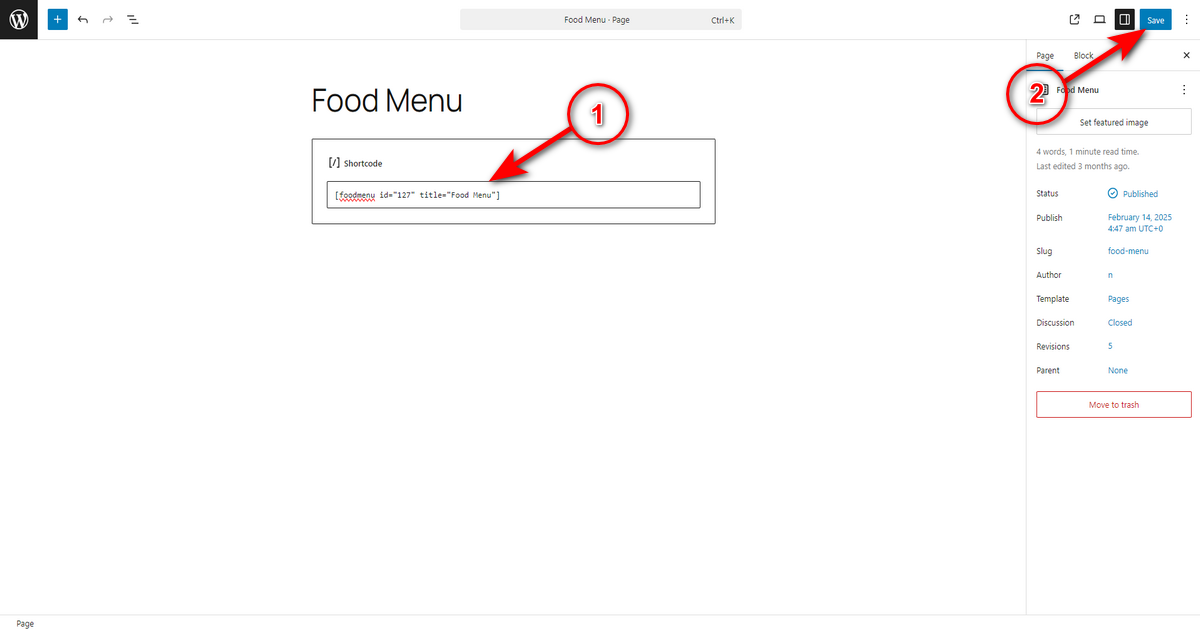
Finally, you need to paste the shortcode you generated a while ago using the Food Menu plugin into the shortcode block and click ‘Save’ button on the Food Menu page.
That’s it. Now, visit the page to view the result. So, from now on, you won’t wonder anymore about these questions: “How do I add a restaurant menu to my WordPress site? And How do I add a menu to a specific page in WordPress?”

Step 6: Set Up an Online Restaurant Reservation System
Now that you’ve displayed your best food items to sell online, it’ll be better if you can set up a restaurant reservation system. For your information, you can easily add a reservation system to your restaurant website with the Food Menu plugin we used in this article.
However, you need to utilize the pro version of this plugin to get that benefit. So, consider purchasing it. Now, let’s enable the restaurant reservation system.
Enable the Restaurant Reservation System
Visit WP Admin Dashboard > Food Menu > Settings.

After that, ensure you’re on the ‘General’ tab and turn on “Enable Reservation ?” switch.
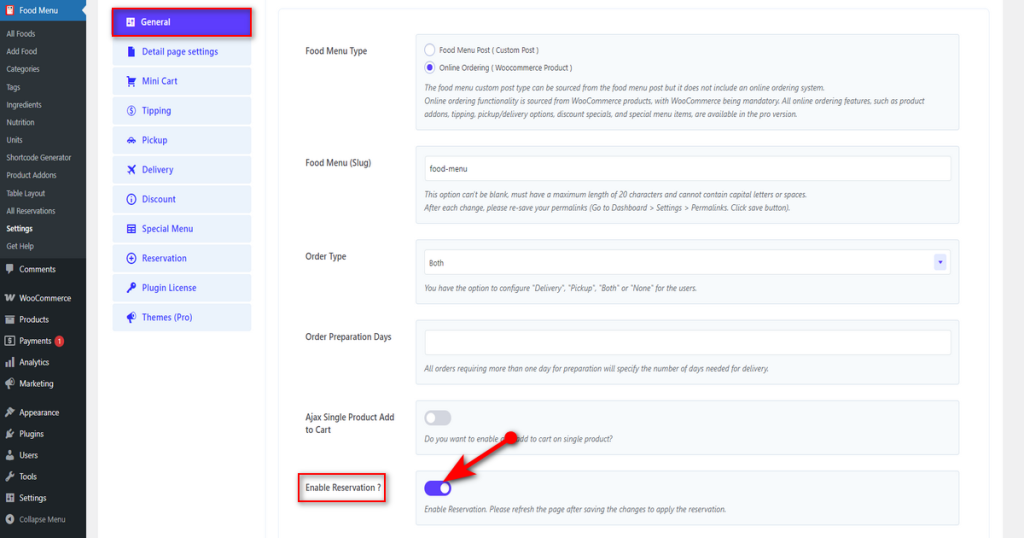
Then, scroll down and hit “Save Changes” button of the Food Menu plugin.

Now, click ‘Reservation’ tab, work with all or some settings under ‘General’ tab, and scroll down to hit “Save Changes” button.
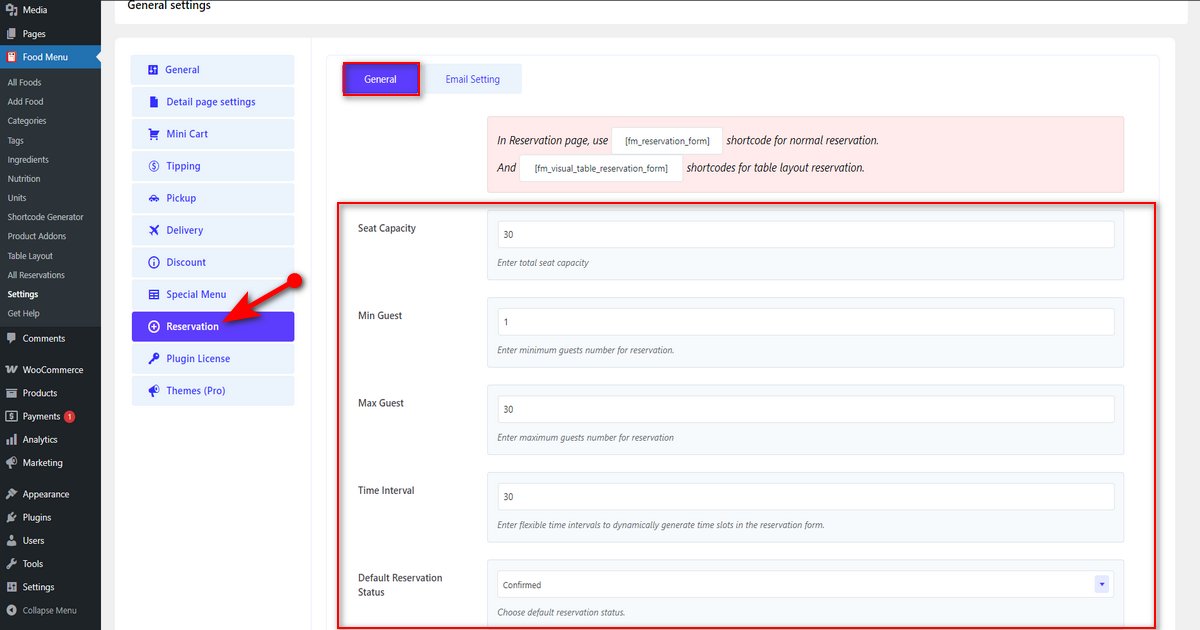
Read the Food Menu reservation documentation if you need assistance working with these settings.
Once you’re done with the ‘General’ tab, click “Email Setting” tab under the ‘Reservation’ tab and work with email settings. Lastly, don’t forget to smash that “Save Changes” button.
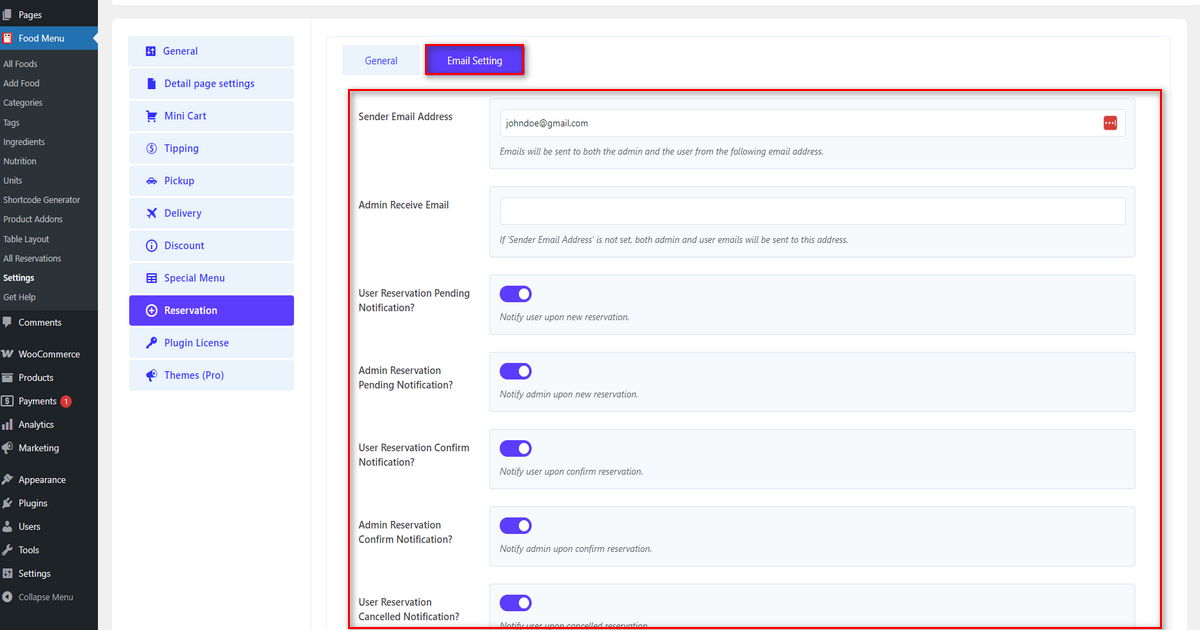
After that, navigate to WP Admin Panel > Food Menu > Table Layout.

You might be thinking why we are demonstrating the table layout. Well, it lets you create a visual restaurant reservation interface.
You can include tables and chairs based on your restaurant’s seating capacity. Then, you can display that to diners and allow them to book available tables and chairs online. Now, watch the animation below to see how we create a reservation interface.

After building the table layout, copy the shortcode highlighted in the screenshot below.

Now, embed this shortcode into your site’s reservation page (follow the same steps you followed to display the food menu using the shortcode).
Boom! You’ve just enabled an online restaurant reservation system. Your targeted customers can now reserve available tables and chairs online. See the front-end view of the restaurant reservation system in the animation below.

Step 7: Include a Map in Your Contact Page
Although we’ve already told you to create and design a professional contact page in the “Design Site Pages” section of this article, we felt the urge to emphasize more on adding an interactive map to this contact page.
That’s why we added a separate section on this content. So, follow the steps below to embed Google Maps into your restaurant website in WordPress.
N:B: You must have a Google My Business profile featuring your restaurant address and other information to appear in Google Maps.
- Go to Google Maps.
- Now, type your restaurant’s street address or geographic location in the search field and press ‘Share’ button.
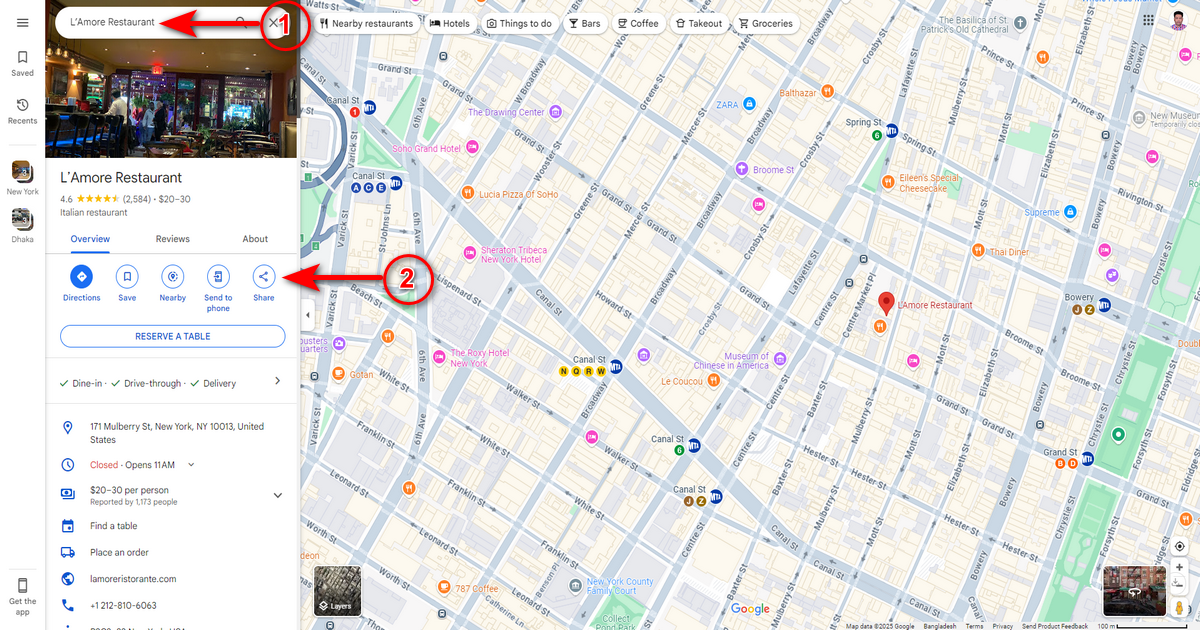
- You’ll then see a pop-up. Click “Embed a map” tab and press “COPY HTML” button.

- Open the Contact page in the Gutenberg editor, click ‘+’ symbol, type “Custom HTML” in the block inserter, and select “Custom HTML” block.
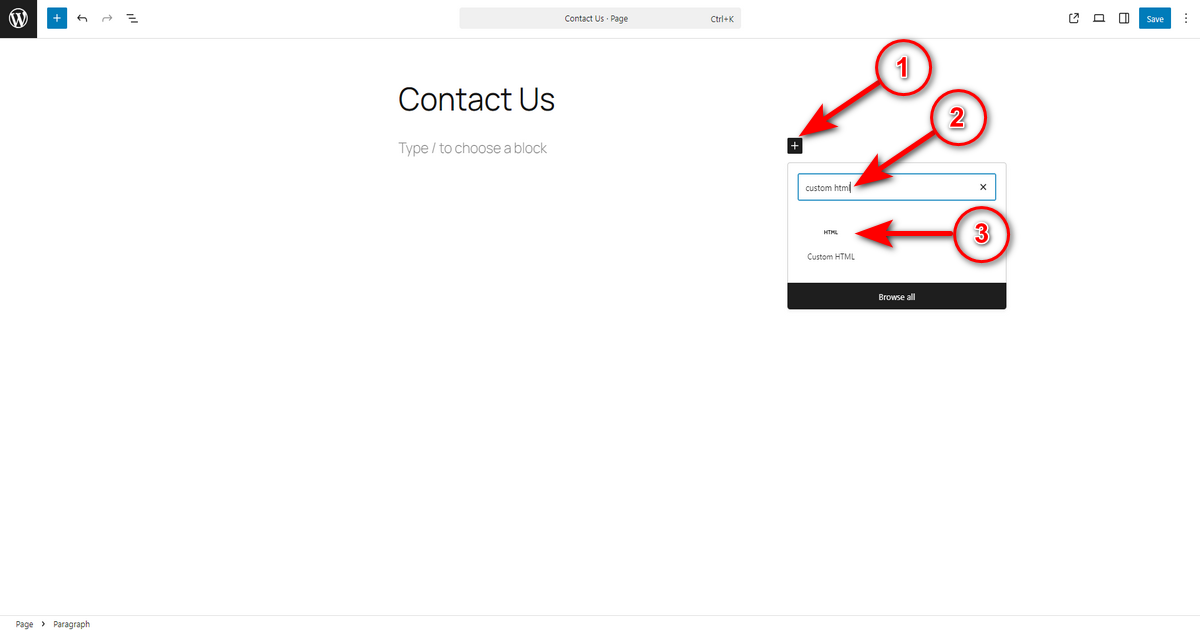
- Finally, paste the Google Maps embed code into that block and click ‘Save’ button on the contact page.
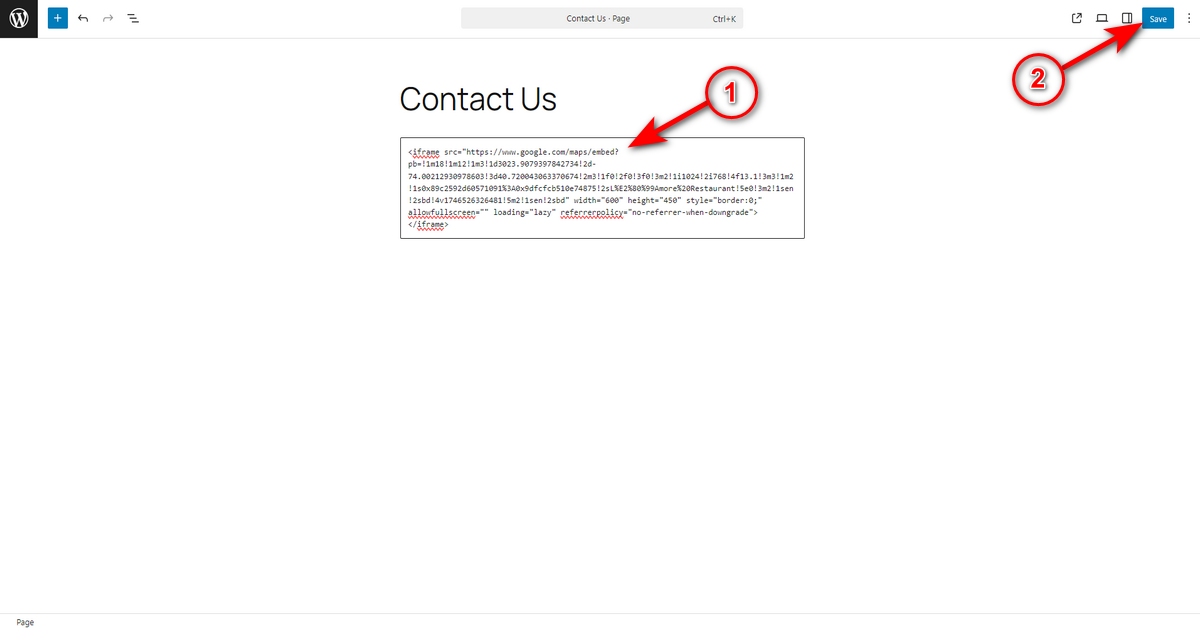
That’s how you include a map on your restaurant website’s contact page.
Step 8: Add Social Proof
To gain potential diners’ trust and to increase sales, you should prioritize including the following forms of social proof on a separate page. Also, add a few SUPER Positive reviews to a section of your Homepage and Food Menu page.
Customer Reviews and Ratings: Add snippets of positive comments with high ratings from Google, Yelp, or TripAdvisor to your restaurant website’s homepage and food menu page.
Testimonials: Create a collection of authentic quotes from diners about their experience and display those quotes with diners’ names and photos on the testimonial page or other page sections.
User-Generated Content: Showcase posts or customer tweets on diverse social media platforms on your testimonial page.
Awards and Certifications: Display accolades to signal quality.
Media Mentions: Include logos or quotes from food blogs, local newspapers, or magazines featuring your restaurant website.
Influencer Endorsements: Feature collaborations with local food influencers or bloggers who have dined at your restaurant.
Once you’ve worked on all these steps, recheck everything – ask others to review your restaurant site and publish the website.
Frequently Asked Questions (FAQs)
Do Restaurants Need a Website?
Absolutely, restaurants need a website. It’s essential for branding, customer convenience, and marketing success. A website lets restaurants display their brand, menus, and services, helping potential customers find them and make informed decisions.
Is WordPress Good for a Restaurant Website?
Yes, WordPress is a good platform for building and managing a restaurant website. WordPress provides customizable themes and plugins that make website creation and management a breeze – even for beginners!
How Much Does a Restaurant Website Cost?
Depending on the complexity, features, and development approach, it can cost anywhere from $100 to $5,000 or even more. A simple website built on WordPress with a free theme and a plugin won’t usually cost more than $100. In contrast, you need to spend over $5,000 to build a complex restaurant website.
Our Concluding Thoughts
When you have no web design or development experience, you might initially feel overwhelmed while building a restaurant website. However, you must have a restaurant site since today’s patrons utilize the internet to determine where they will eat.
Therefore, build one by following the guidelines shared in this article. Once you read it and follow all the steps, you won’t wonder anymore how to create restaurant website in WordPress free. That’s all with this article. Our best wishes will be with you on your journey to website creation.



