


On This Page
As a restaurant owner, thinking of digitalizing your whole restaurant process? Make the right move now. First, you need a dynamic website with an online table reservation system.
You may not know how to add online table reservation system for restaurant.
Any restaurant must have an online table reservation system. Customers can easily book tables during rush hour without making any phone calls.
In this article, we will briefly discuss implementing a restaurant reservation system on a website.
Bonus point: you will know the process of developing a dynamic restaurant website.
Now, let’s get started.
What is an Online Table Reservation System?

An online table reservation system is a dynamic tool. It operates 24/7. So, customers can easily book at their convenience. They do not need to call or use the manual reservation process.
Additionally, you can manage and organize all reservation data in a centralized way.
An Open table reservation plugin allows restaurant owners to accept and manage table bookings from their website.
This online table reservation system has two main purposes:
On the front end, it provides a user-friendly booking interface for customers. Visitors can choose their preferred date, time, number of guests, and other necessary details to make a reservation, without needing to call or wait.
On the back end, it gives restaurant owners, managers, and staff full control over the reservation system. This includes tracking availability, managing upcoming bookings, and making real-time adjustments.
It is a super-fast, easy, and innovative process. It decreases wait time and increases customer satisfaction.
Strengthening customer experience is one of the most powerful priorities for restaurants. The online table reservation process will boost it more precisely.
How Does an Online Reservation System Work?
The online table reservation process is simple and structured. It is convenient to manage reservations for both customers and restaurant owners.
The process begins when a customer visits your website. They notice the reservation option.
It is usually placed on the navigation menu or the homepage. After clicking, they will be instructed to fill out the reservation form.
Customers can select guest numbers and preferred seats. They can see table availability and the restaurant’s schedule.
This process ensures avoid overbooking. It maintains organized seat planning.
After choosing the desired seats, customers need to enter their personal details. This includes name, phone number, email addresses, etc. This information is necessary for confirmation and communication. The forms are easy to fill up and very user-friendly.

After clicking the confirmation button, the booking is finalized. The system saves the data securely and updates the restaurant’s owners. Most system allows setting booking limits.
The restaurant will receive booking confirmation via email or the admin dashboard. Meanwhile, the system will send a notification via mail or email to the customers. It will assure them that their seat is reserved.
In some cases, customers can modify and even cancel their reservations. This makes the whole process more flexible.
This is a win-win process. It reduces staff workload during rush hours. So, you can focus on the main thing- running the restaurant successfully.
Usefulness of Adding an Online Restaurant Reservation System to WordPress Website
An online table reservation system is a game-changer for modern restaurants. There are several reasons to invest in restaurant reservation features. We will discuss some of them below:
1. Time Saver: Manual handling of reservations requires effort and time. Staff need to answer calls, look over availability, and confirm bookings. With an online system, it only takes a few clicks. This is a time-saving process for both staff and customers.
2. Operates 24/7: Your restaurant may close at night, but your website never sleeps. Online bookings are always open. Customers can open a table anytime, even during holidays or off-hours.
3. Minimizes No-Shows: Reservation systems include automatic SMS reminders or emails. This decreases the possibility of customers forgetting their reservations. Some tools also have an advanced payment system to secure bookings.
4. Enhances Customer Experience: In this digital era, customers want fast and convenient services. Online reservations deliver a seamless experience from the start. It creates a modern and professional feel to your restaurant’s image.
5. Better Table Management: You’ll always be aware of how many tables are booked and when. This real-time view assists staff in managing the tables more efficiently and lowers double-booking mistakes.
6. Gathers Customer Data: You can easily collect names, details, and booking information from the reservations. This data is important in tracking records and sending offers in the future.
7. Useful for Marketing Opportunities: You can use booking information to run campaigns, loyalty offers, or email newsletters. It will help you to re-target your special customers.
8. Supports Smooth Operations and Safety: Online reservations maintain restaurant flow, reduce overcrowding, and enhance safety during busy hours or special events.
9. Lowers Human Error: Manual bookings can cause mistakes. Online reservation systems minimize these risks. It generates automatic confirmations and tracks availability accurately.
Things You Need to Develop a Restaurant Website
Building a professional website for a restaurant is a smart move. We will break down all the essentials in some simple steps.
Step 1 – Select Domain Name: The domain name is your restaurant’s address on the internet. You need to select a short, precise name. You can purchase a domain from Namecheap, GoDaddy, and Google Domains.
Step 2 – Set Web Hosting: This is the place where your website files will be present. Some Good hosting providers are: Bluehost (beginner-friendly), SiteGround (fast and reliable), Hostinger (affordable), and WP Engine (premium managed hosting).
Special Tip: Make sure your host supports SSL (for security) and regular backups.
Step 3 – WordPress Installation: Install WordPress once you set up the domain and hosting. Most hosts have a 1-click WordPress installation. WordPress is easy, beginner-friendly, and suitable for restaurants.
Step 4 – Get a Dynamic Restaurant Theme: To make your restaurant website stand out, you need a professional and visually appealing look. Whether you are designing from scratch or using a pre-made theme, consider these key features:
Responsive Design: The website must look good on desktop, tablet, and mobile. Customers mainly use mobiles for bookings and menu browsing. So, the website must contain a mobile-responsive design.
Supports Online Table Reservation Plugin: Nowadays, customers visit a restaurant’s website only to look for booking options. It is a key element for a restaurant website. Visitors wish to experience a seamless and hassle-free booking process.
Versatile Food Menu Designs: The Food menu acts as the heart of the restaurant’s website. It is the main attraction for the customers. It should contain clean, readable, and appealing food pictures.
Online Ordering Process: Ordering directly from the website is a powerful feature. Restaurants can offer delivery, pick-up, and gift cards to customers.
SEO Optimized Structure: SEO optimized theme helps to build a user-friendly and search-friendly website. It helps to appear your restaurant’s website in search results.
In a nutshell, you are now aware of the important features of a restaurant theme. There are a few themes that support all of the characteristics mentioned above.
Here’s where RadiusTheme comes in. They have stylish, functional, and user-friendly themes tailored for restaurant businesses. These themes have a built-in online table reservation plugin.
They also support WooCommerce if you wish to add food menu online ordering. Suggested themes are Panpie – Restaurant WordPress Theme and Redchili.
Both of these themes are user-friendly and SEO-optimized.
Step 5 – Research and Choose Essential Plugins
For the smooth functioning of restaurant websites, you need to install the right plugins.
To design your website, use Elementor. It is a drag-and-drop page builder plugin. It does not require any coding skills.
One of the most crucial features is the online table reservation system. You will also need a stylish, responsive food menu to pair with your reservation system.
Now, let’s talk about the features to search for in an online table reservation plugin.
Easy Booking Process: The plugin needs to have an easy and user-friendly form for customers. Customers can easily select dates, times, and guest numbers.
Real-Time Availability: It should avoid double bookings by showing real-time table availability. Already booked seats will automatically be blocked out.
Booking Rules Customization: Owners can customize booking times and slots. They can show the holidays and closures in the reservation system.
Admin Dashboard: Restaurant owners can view all the reservation data in the dashboard.
Capacity Control and Table Management: Owners can assign a specific table for a reservation. They can limit the numbers for booking per time slot or table.
If you are looking for a powerful and stylish plugin, we’ll recommend the most suitable one.
RadiusTheme offers a simple restaurant menu display plugin with a WooCommerce online ordering feature.
Below, we have briefly discussed the plugin.
How to Add Online Table Reservation System for Restaurant?
To digitize a restaurant, you need a professional website with stunning features. One crucial feature is the online table reservation system. It streamlines bookings and enhances the customer experience.
Step 1: Choose the Right Reservation Plugin
Choose a reliable reservation plugin. As we mentioned above, a great option is the Food Menu WordPress Plugin. It is easy, effective, and suitable for any restaurant. Other good choices include WP Restaurant Booking and OpenTable integration.
Through this plugin, you can set up and customize your reservation system easily.
Why is this plugin vital for you to purchase? Food Menu is an exceptional plugin that offers various features for a restaurant’s website. The Pro version contains some advanced features.
Online table reservation can be used to add a reservation system to your WordPress restaurant website. This module is available on FoodMenu Pro. This is the reason you need to purchase this plugin.
Step 2: Install and Activate the Plugin
Once you’ve selected your preferred plugin, you can start the installation process.
Log in to your WordPress dashboard. Go to Plugins > Add New Plugin. Type the name of your desired plugin in the search bar.

“Food Menu Pro” plugin is a zip file. When you purchase the Pro version, you will receive a download link in your purchase receipt email.
From this mail, you can get the plugin files. If not, you can log in to RadiusTheme. After that, move to Purchase History and get it from there.
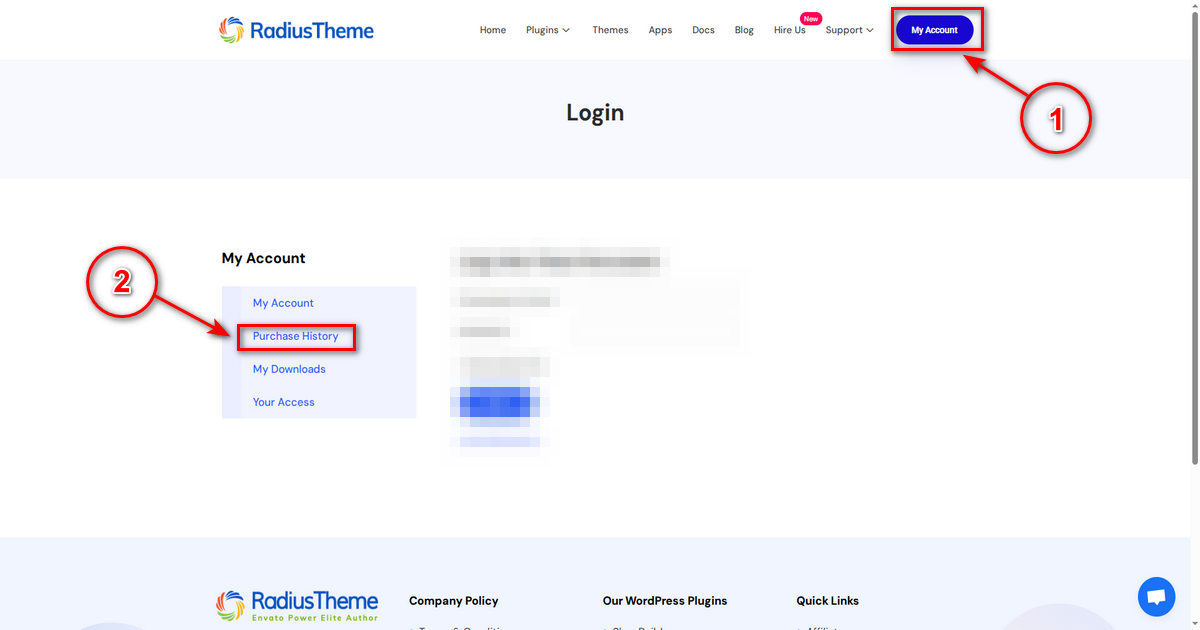
After the download, you’ll find the files in the zip folder on your computer. You then need to install the “food-menu-pro.zip”. Once you download the zip file. Please follow the following steps to install the “Food Menu – Restaurant Menu & Online Ordering for WooCommerce” Pro version.
Note: Need the active free version to function pro version. Without the free version, Pro version 5.2.0 will not activate.
Go to your WordPress website Dashboard. Navigate to Plugins > Add New. Now, check the options on the top right beside “Add Plugins” for the “Upload Plugins” option. Click on this.
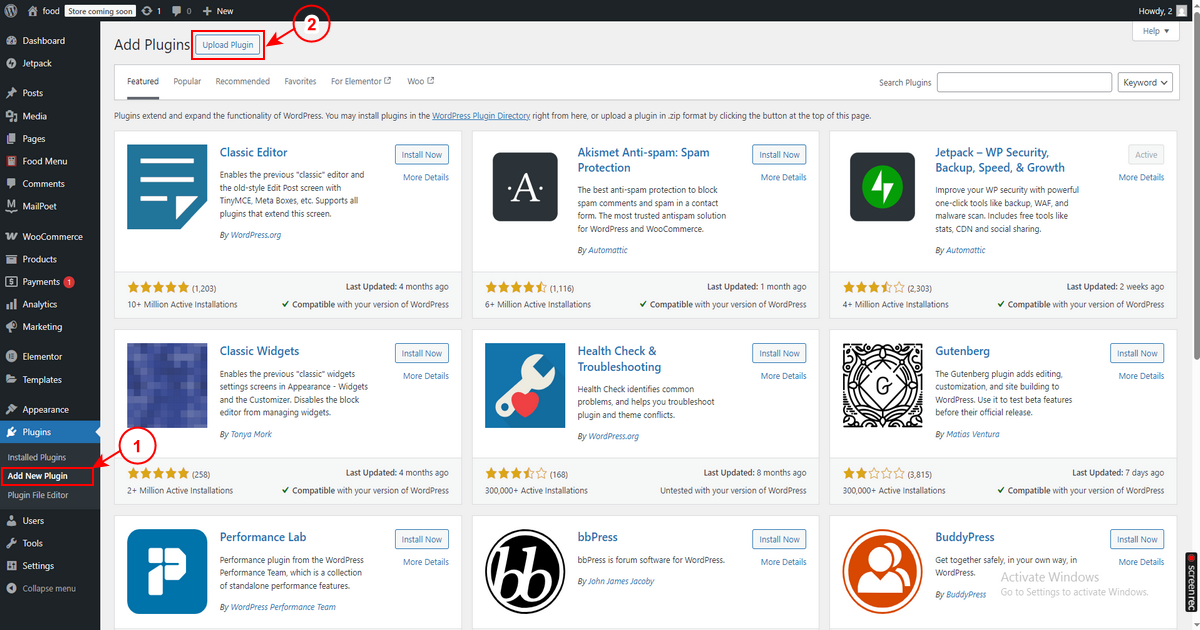
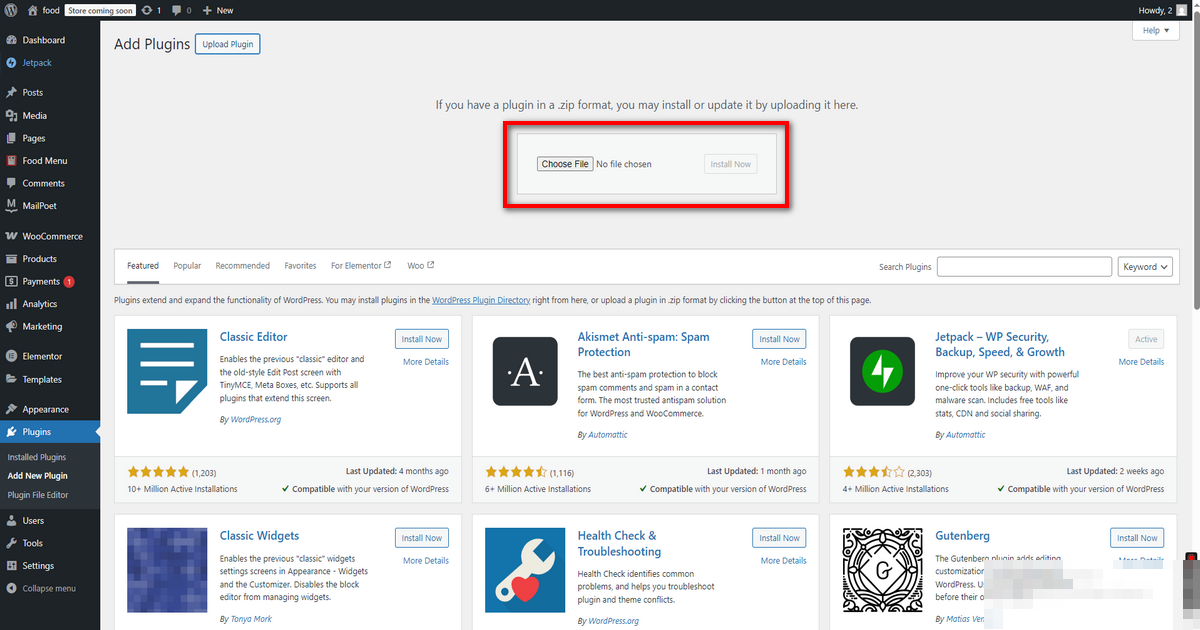
Once you click the “Upload Plugin” button, you will get the plugin upload option from your computer. Now select the “food-menu-pro.zip” file from your computer and click on the “Install Now” button.
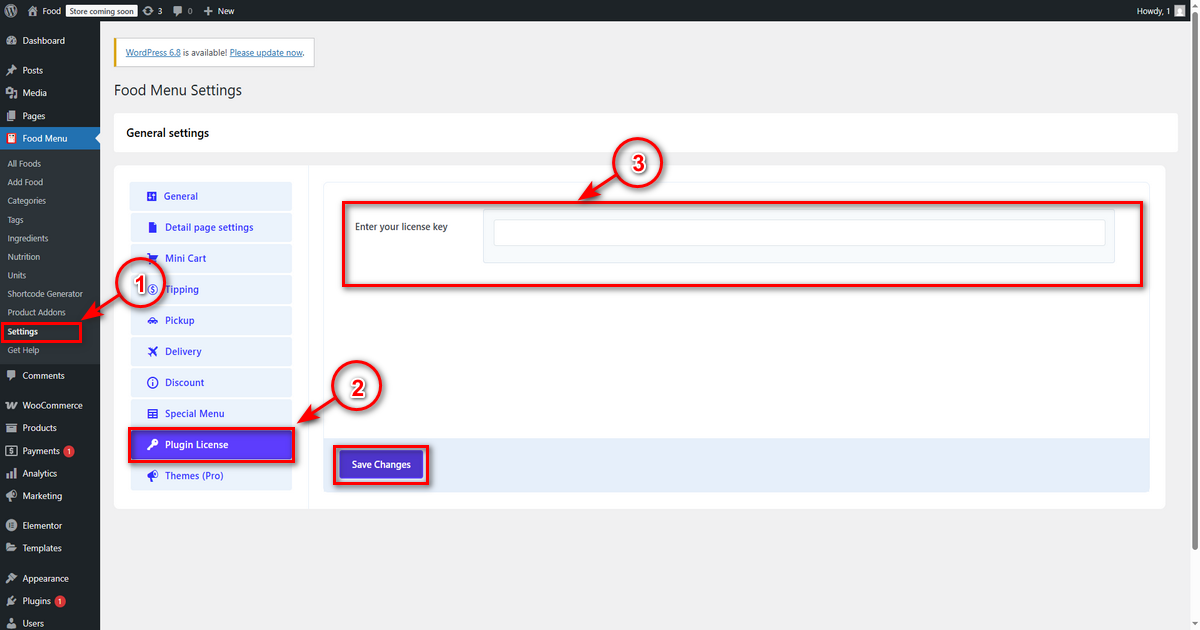
After activating the plugin, you need to activate the plugin again using the license key. You will get the license key in your “Purchase Email”.
Move to Setting > Plugin License. Enter your license key and hit the save button.
Step 3: Configure Plugin Settings
Move to the Food Menu > Settings > General page.
Enable the options for Reservations. After activation, the reservation section will appear in the settings tab on the left side.

Step 4: Customize Reservation Settings
Next, set up the reservation form. Go to the Food Menu > Settings > Reservation > General section.
You can use [fm_reservation_form] shortcode for normal reservation, in the Reservation page.
You can also insert [fm_visual_table_reservation_form] shortcodes for table layout reservation.
Modify seat capacity, minimum, and maximum guest numbers. Customize intervals between bookings.

Choose the default reservation status. There are four different options: Pending, Confirmed, Cancelled, and Completed.
You can modify the weekly reservation schedule for multiple days or just one day. This will allow you to show the start and end times. Additionally, you can establish weekly holidays for reservations as needed.
You can permit customers to cancel their reservations through a dedicated cancellation form. Hit save after completing the settings.

Step 5: Set Reservation Emails
Move to the Food Menu > Settings > Reservation > Email Setting section.
Insert an email address. Both the admin and the user will receive emails from the following email address.
If “Sender Email Address” is not fixed, both admin and user emails will be delivered to this address.
You can activate these options to inform users and admins about pending, confirmed, and cancelled reservations.

Enter the reservation pending message text. Example: Thank you for your booking. Your reservation is currently pending. We will notify you once it has been confirmed.
Customize the confirmed message text. Example: Thank you for your booking. Your reservation has been successfully confirmed.
Write the cancellation message text. Example: Your cancellation request has been successfully processed.
These emails make customers feel confident about their booking.

Now, click on the “Save Changes” button to update all the settings.
Step 6: Modification of Table Layouts
This is a modern and up-to-date setting. Table layouts are only dedicated to reservation settings. To start building the room layout, head over to Food Menu > Table Layout from the left menu side on your dashboard.
You can customize the chair, table, and text fill color. Define the colors for the selection and the booked option.

Insert the room width and height. You will also get the option to upload a room background image.

Constructing a visual reservation layout for your restaurant is very simple. With this exceptional builder, you can design your dining area exactly as it appears in real life.
Important: To maintain proper table-chair relationships, please check that all the chairs are inserted in the tables. (Check the screenshot below.)
The layout will be fully interactive after completion. It will permit customers to choose their preferred table and chair for reservations.

Users can easily export the table layout design in txt form. If they wish to import a design from outside, they need to upload files here.
Step 7: Test The Reservation System
Testing is crucial. Run a test reservation from the user side. Check email notifications. Examine how the reservation appears in the admin panel. Trial on phones and different browsers. Fix any mistakes before going live.
Repeated testing can ensure a seamless reservation system. It will be beneficial for both customers and staff.
Step 8: Manage and Monitor Reservation System
After live, you can track all reservations on a single page.
Move to Food Menu > All reservations from the left-hand menu on your dashboard.
Use this dashboard to view and manage them. You can adjust time slots or guests if required. Update the status if needed. Keep the system running smoothly.

Focusing on customer feedback helps improve the reservation process. Implement suggestions to fix errors and make the system better. This creates a smoother experience for your customers. Satisfied customers are more likely to return.
Managing reservations perfectly also boosts efficiency. It avoids overbooking and long wait times. You can make changes based on reservation trends. This ensures your restaurant runs smoothly.
Tips to Succeed Through Online Table Reservation System
Implementing an online reservation system is a great step. But to achieve the most out of it, you need to follow some best practices. These tips will improve performance, boost reservations, and enhance customer satisfaction.
Promote It Everywhere
Make your reservation option easy to find. Put a “Book a Table” button on every page of your website. Incorporate this on your homepage, menu page, and contact page.
Also, promote your booking link on social media platforms like Instagram and Facebook.
Train Your Staff
Your team plays a key role even after the automation. Train all staff to understand how the process works. They should know how to view new bookings, manage availability, and assist walk-in customers.
Keep Your Schedule Updated
Regularly update your availability. Manage your holidays, special events, or private reservations. This avoids overbooking and disappointment for customers.
Follow Up With Guests
After a reservation, deliver a thank-you message or a feedback request. This adds a personal touch. It shows that you care about customers’ experience.
Offer Rewards and Incentives
Encourage customers to book online by offering discounts, free drinks, or loyalty points. Customers will feel valued and can turn into regulars.
With these simple tips, your online reservation system can elevate your restaurant business growth.
Frequently Asked Questions (FAQ)
Does WordPress Come With a Reservation System?
WordPress lacks a default reservation system. You can implement a third-party booking app’s code. Otherwise, you can use a reservation plugin.
How do I manage reservations once set up?
Use a plugin dashboard to track and update reservations. You can modify availability and send confirmations. It keeps everything organized.
Can I add a reservation system to my WordPress site?
Yes, you can use plugins like Food Menu. It’s easy to install and set up. No coding skills are required.
Final Thoughts
Now, you can know the process of how to add online table reservation system for restaurant.
In the age of digital dining, you need to be tech-savvy.
An online table reservation system is a must-have feature. Customers always prefer convenience. Prioritize this feature if you are building or updating your restaurant website..
Over time, this feature will save your time, reduce stress, and boost customer satisfaction.
Don’t wait—add an online table reservation system today.



