


On This Page
Key Takeaways
- You can build a Locanto-style classified ads website using WordPress without coding.
- The CLClassified theme gives your site a professional, modern layout from day one.
- The Classified Listing plugin handles ad submissions, categories, payments, and user accounts.
- Free listing + paid upgrade model is the most proven way to monetize a site like Locanto.
- Adding location search, category filters, and a clean UX is essential to compete.
- You do NOT need expensive custom development to launch a fully working classified site.
Have you ever visited Locanto and thought: I could build something like this?
That thought is more achievable than you think.
The global classified ads market was worth $26.86 billion in 2024. It is growing at 9.23% every year.
Locanto alone carries over 7.8 million active ads across 60 countries. The demand is real. The money is real.
But here is the truth. You do not need a big budget with a development team. You just need WordPress, a Classified theme, and a Classified Listing plugin.
This guide shows you exactly how to build a classified ads website like Locanto. Step by step. No coding required.
What Is Locanto and Why Should You Build a Similar Site?
Locanto is a global classified ads platform. It launched in 2006 and now operates in over 60 countries. Users post ads for free under categories like jobs, cars, real estate, services, and community.
The platform earns money by charging for featured or premium listings. This is called the freemium model. It works incredibly well for classified sites because it lowers the barrier for new users while generating revenue from power users.
Here is why building a similar site makes good business sense:
- Classified websites have low operating costs after setup.
- You can target a niche or local market that Locanto ignores.
- WordPress makes it faster and cheaper to launch than custom development.
- You own your platform. No dependency on third-party marketplaces.
- Revenue potential through premium listings, ads, and subscriptions.
Quick Fact: According to SimilarWeb, Locanto receives over 7 million visits per month globally. Niche classified sites targeting specific cities or industries can capture meaningful traffic much faster than going general.
Tools You Need to Build a Locanto-Like Website
You need three core things. A domain name, a hosting plan, and WordPress with the right theme and plugin.
1. Domain Name and Web Hosting
Pick a domain name that reflects your niche or city. For example, classifiedsnyc.com or localadsuk.com. Keep it short and easy to remember.
For hosting, choose a reliable WordPress hosting provider. Your site needs good uptime and fast loading speed. Slow sites lose users fast. Look for managed WordPress hosting plans with SSD storage and CDN support.
Read our guide on best hosting for classified websites to pick the right plan for your budget.
2. WordPress
WordPress powers over 43% of all websites on the internet. It is free, flexible, and has thousands of plugins and themes.
Installing WordPress takes less than 5 minutes through most hosting providers. Most hosts offer one-click WordPress installation from the control panel.
3. Classified Theme
This is the theme that will give your site its look and feel. There are many special themes available for classified ads websites. The chosen theme should be clean, fast, and built to convert visitors into active users.
4. Classified Listing Plugin
The Classified Listing plugin handles all backend classified ads functionality. This is what makes your WordPress site work like Locanto. It brings features like front-end ad submission, category management, location filters, user dashboards, and payment packages.
You can learn more about this plugin in our dedicated WordPress directory plugins guide.
Benefits of Creating a Website Like Locanto
Starting your own classified ads website is a real business opportunity. Many people underestimate how rewarding it can be. Here are the key benefits you get when you build a Locanto-style site with WordPress.
1. You Own the Platform Completely
With a site like Locanto, the platform controls your data, your users, and your revenue. On your own WordPress site, you are in charge. You decide the rules. You set the fees. You keep all the profit. No algorithm changes can suddenly cut your traffic or revenue overnight.
2. Low Startup Cost, High Revenue Potential
You can launch a working classified site for as little as $50 to $200 in the first year. Domain registration, shared hosting, and a premium plugin are all you need.
Once the site has users and listings, premium listing fees and banner advertising can generate a strong monthly income.
Explore revenue strategies in our post on how to earn money from a business directory website.
3. Tap Into a Proven Business Model
Classified ads websites have been profitable for decades. Craigslist, OLX, Gumtree, and Locanto all prove the model works at scale. You do not need to invent anything new. You just need to target the right niche or location and execute well.
4. Serve a Niche or Local Market Nobody Else Covers
Big platforms like Locanto try to serve everyone. That means they serve no one particularly well. A niche classified site focused on, say, vintage furniture, pets, or a specific city can dominate search results and build a loyal community much faster.
Read about choosing the right online business directory niches for your site.
5. Build Long-Term SEO Value
Every listing posted on your site is a new page that search engines can index. More listings mean more organic traffic over time. A well-structured classified site with clear categories and location pages can rank for hundreds of long-tail keywords without any paid advertising.
6. Grow a Local Community Around Your Brand
A classified site is not just a transaction tool. It becomes a community hub. Regular users bookmark your site. They recommend it to friends. Local businesses start advertising on it. Over time, your platform becomes the go-to destination for your target audience.
Step-by-Step: How to Create a Website Like Locanto in WordPress
Step 1: Choose a CLClassified Theme
The theme you choose sets the entire look and feel of your site. For a Locanto-style classified site, you need a theme built specifically for this purpose.
The CLClassified theme by RadiusTheme is the best fit. It comes with a homepage layout that includes a search bar, category grid, featured listings section, and call-to-action areas. Everything a classified site needs is already in place.
Go to the RadiusTheme website and find the CLClassified theme product page. Review the demo before purchasing. The demo shows you the full site layout including the listing detail page, search results page, and user dashboard.
Key features to confirm before you confirm classified theme:
- Clean homepage with hero search bar and category grid.
- Dedicated listing detail page with image gallery and contact form.
- User dashboard for managing submitted listings.
- Elementor compatibility for drag and drop customization.
- Mobile responsive on all screen sizes.
- Compatible with the Classified Listing plugin.
Compare more options in our list of best classified WordPress themes before you decide.
Step 2: Install the CLClassified Theme (Free)
The CLClassified theme is designed specifically for classified ads websites. It pairs perfectly with the Classified Listing plugin and gives you a professional Locanto-style layout completely free.
Let’s see how to install the theme from your WordPress dashboard:
1. Log in to your WordPress admin dashboard.
2. Move to Appearance → Themes in the left sidebar.
3. Check the “Add New” button at the top of the page.
4. In the search box, type “CL Classified” and click Enter.
5. You’ll see the theme appears in the search result, click “Install“.
6. After successful installation, press “Activate“.
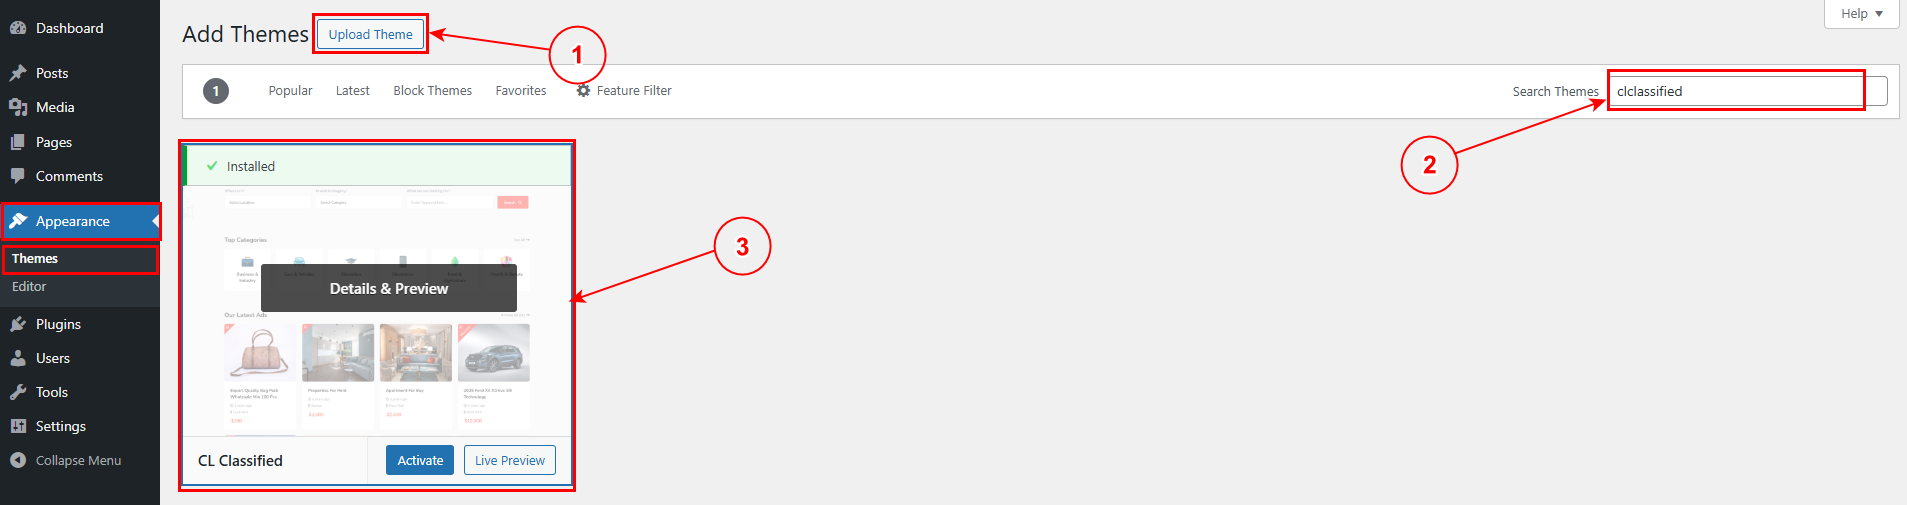
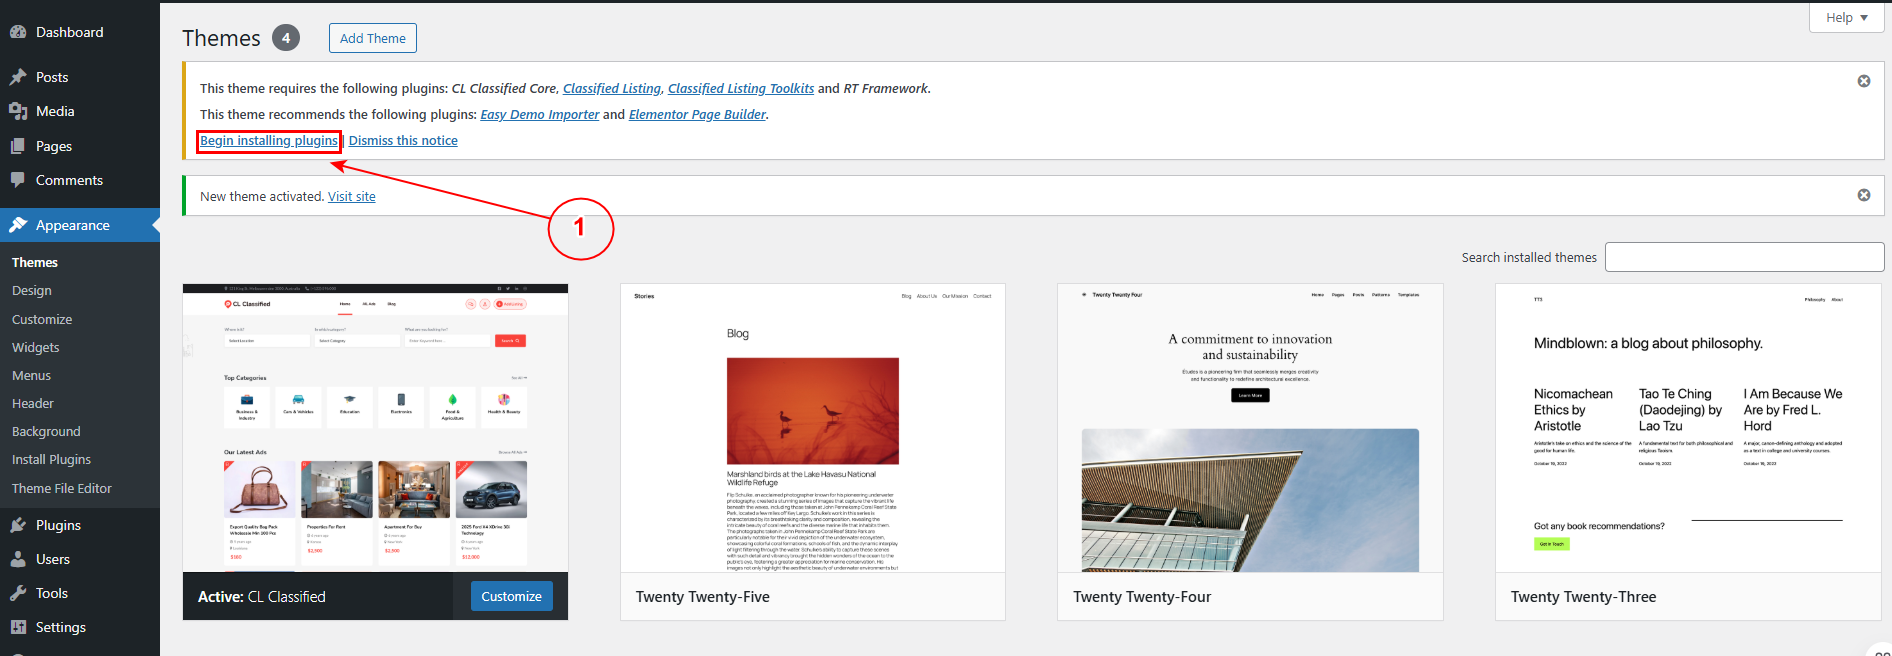
After activation, WordPress will show a notice at the top of the screen asking you to install required plugins along with Classified Listing plugin. Click Begin Installing Plugins. Check all plugins in the list and click Install.
These plugins are needed for the theme to function correctly.
Click the prompt to install it. You’ll get all the listing features, search filters, user submissions, and more.
Alternative Way: You can also download the theme directly from wordpress.org/themes/cl-classified/ and upload it manually in your website via Appearance → Themes → Add New → Upload Theme.
Step 3: Import Demo Content
The CLClassified theme comes with full demo content. Importing it gives your site a complete working layout instantly. You get a pre-built homepage, sample listings, category pages, and all inner pages. This saves hours of manual setup.
Go to Appearance > Import Demo Data in your WordPress dashboard. This option only appears after the CLClassified theme is activated.
On the demo import screen, you will see one demo preview. There is a thumbnail of the homepage layout. Click on the main demo to select it. Then click the Import button.
The import process takes 1 to 3 minutes. Do not close the tab while it runs. When it finishes, you will see a success message. Click Visit Site to see your newly imported homepage.
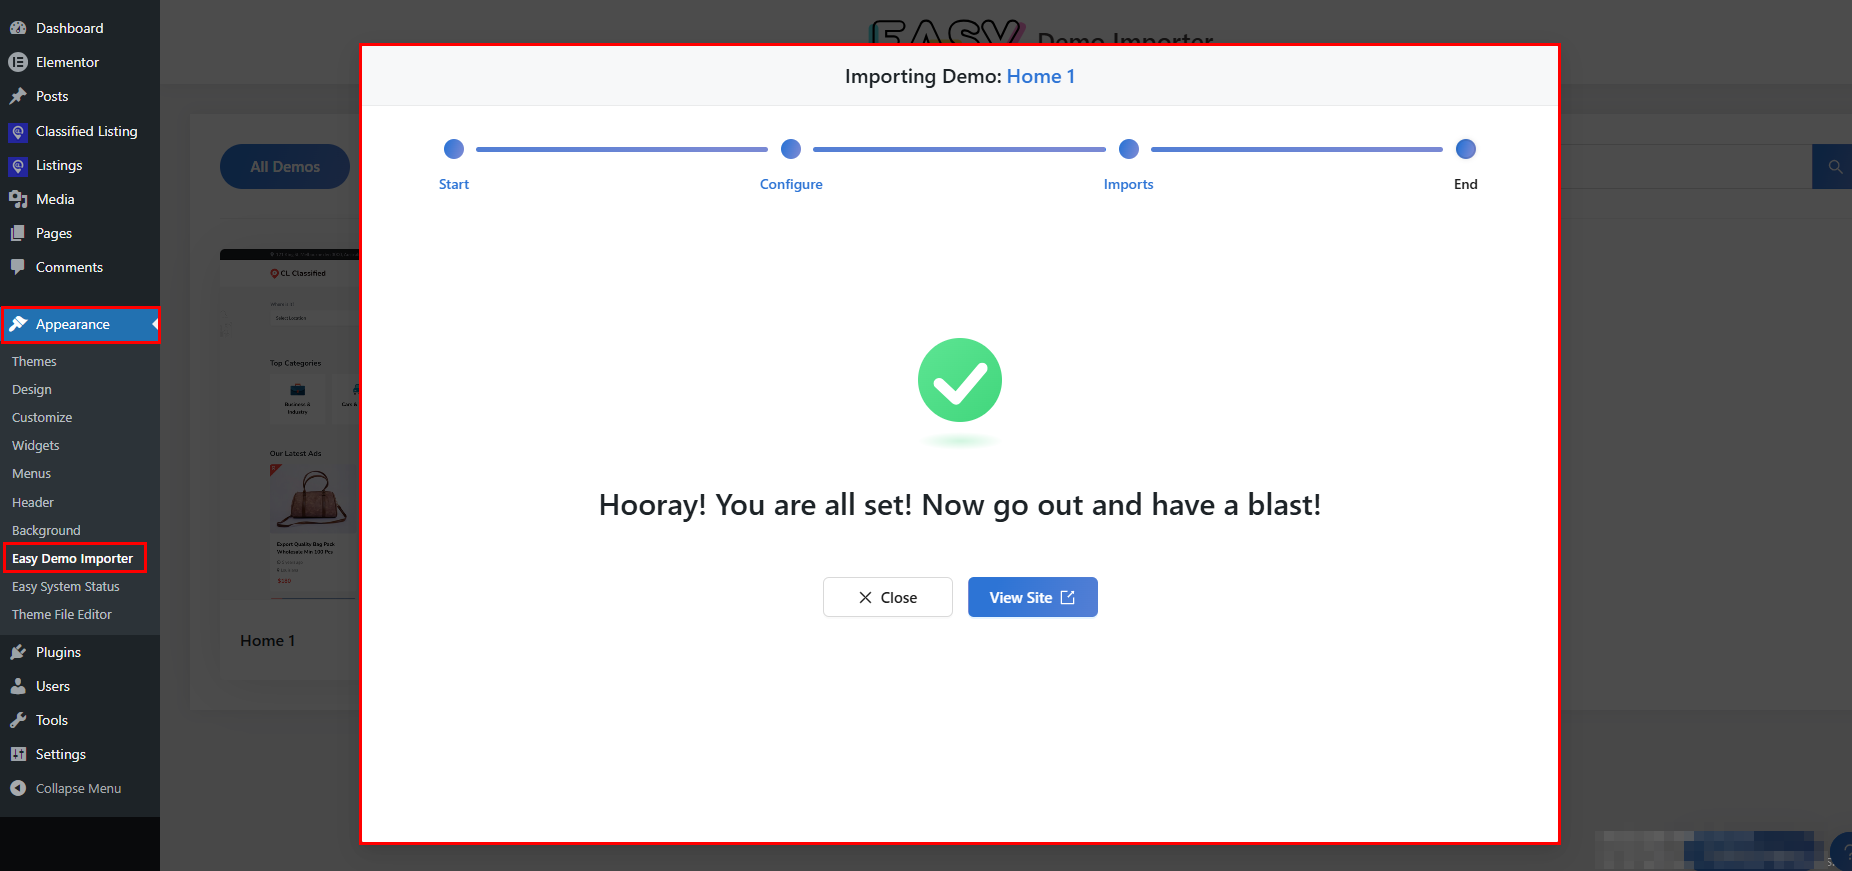
After the import, your site looks exactly like the demo. All pages, menus, and sections are in place. Your job from here is to replace the demo content with your own categories, locations, and listings.
Step 4: Add Locations and Categories
Locations and categories are the two pillars of a classified site. They help users browse and filter ads quickly. Setting them up correctly also helps your site rank well in local search results.
Adding Categories
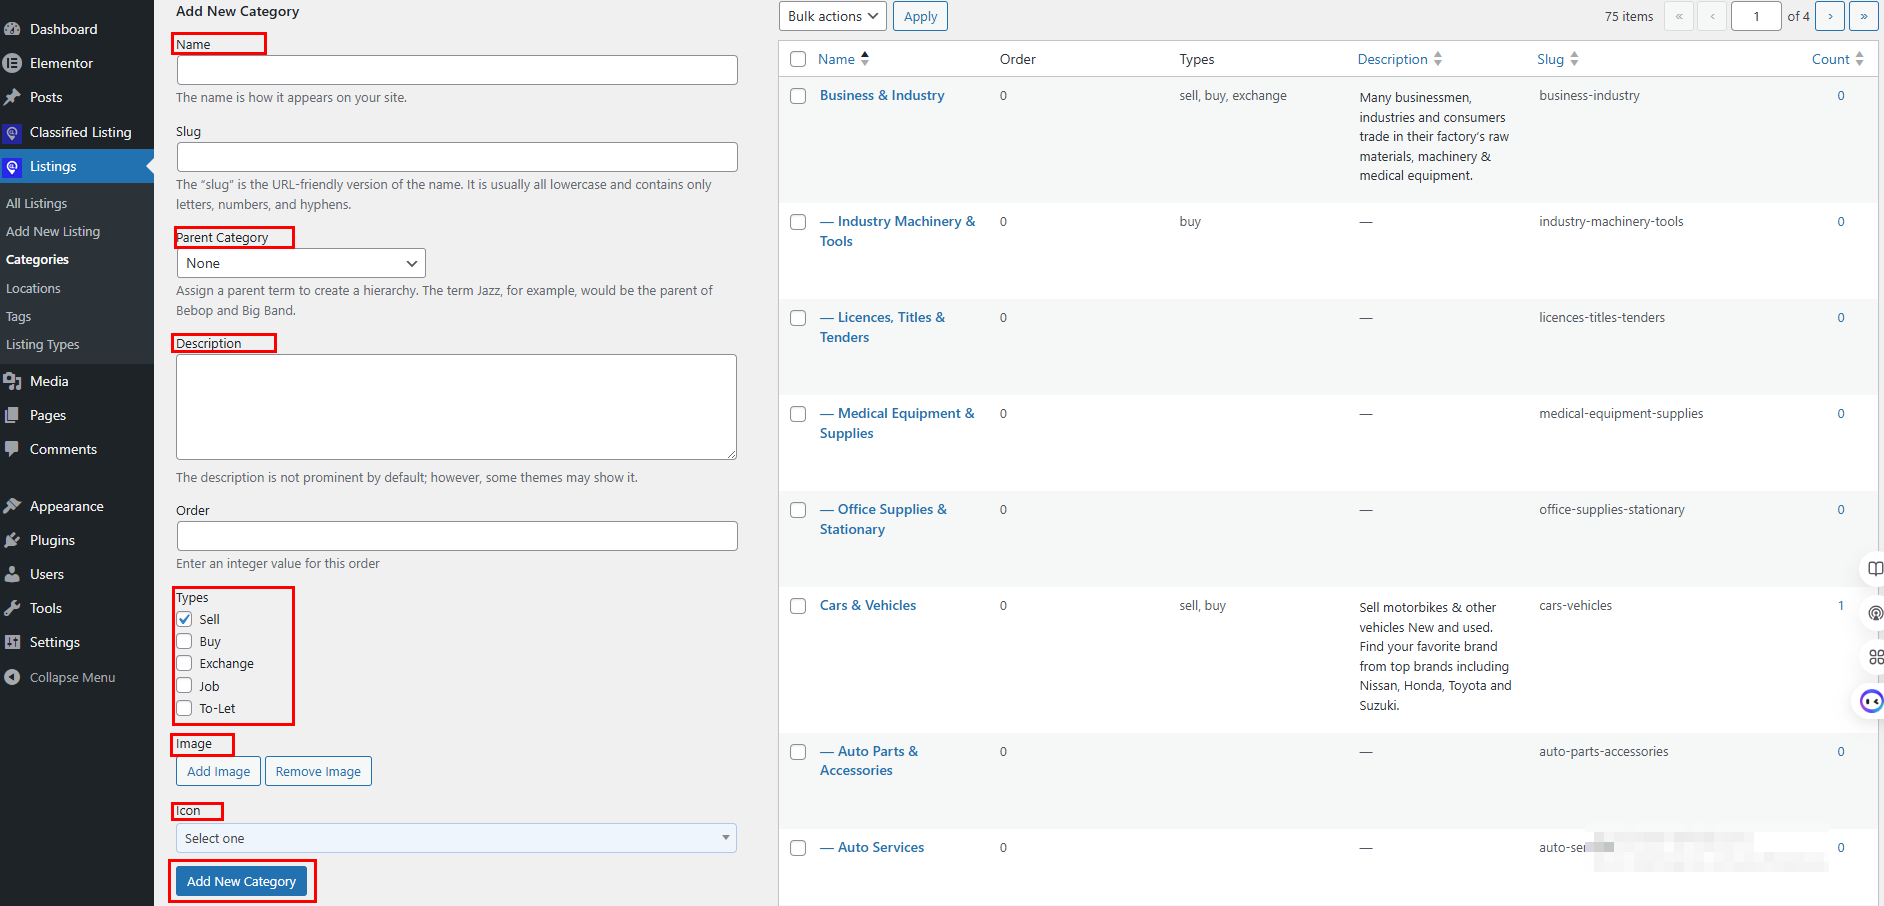
Go to Listing > Categories in your WordPress dashboard. You will see the category management screen with an Add New Category form on the left and a list of existing categories on the right.
To add a new category:
- Type the category name in the Name field. Example: Real Estate.
- Add a short description in the Description field. This text helps with SEO.
- Upload a category icon or image. This shows on the homepage category grid.
- Leave the Parent Category set to None for top-level categories.
- Set the type of category Sell, Buy, Exchange, Job, or To-Let.
- Click the Add New Category button.
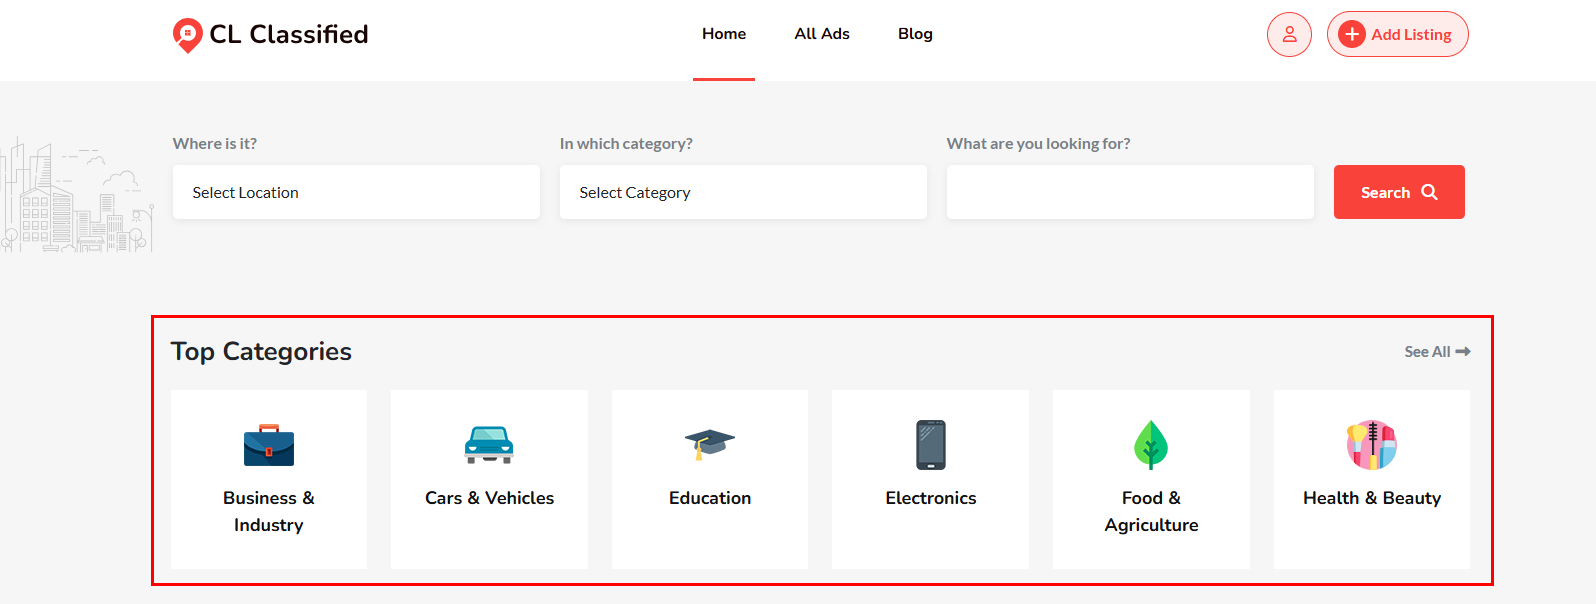
This is how your website homepage will look after adding the new categories in the listing.
Repeat this for each main category. Common categories for a Locanto-style site include Jobs, Real Estate, Vehicles, Services, Electronics, and Community.
To add a subcategory, go through the same steps but select a parent category from the Parent Category dropdown.
Adding Locations
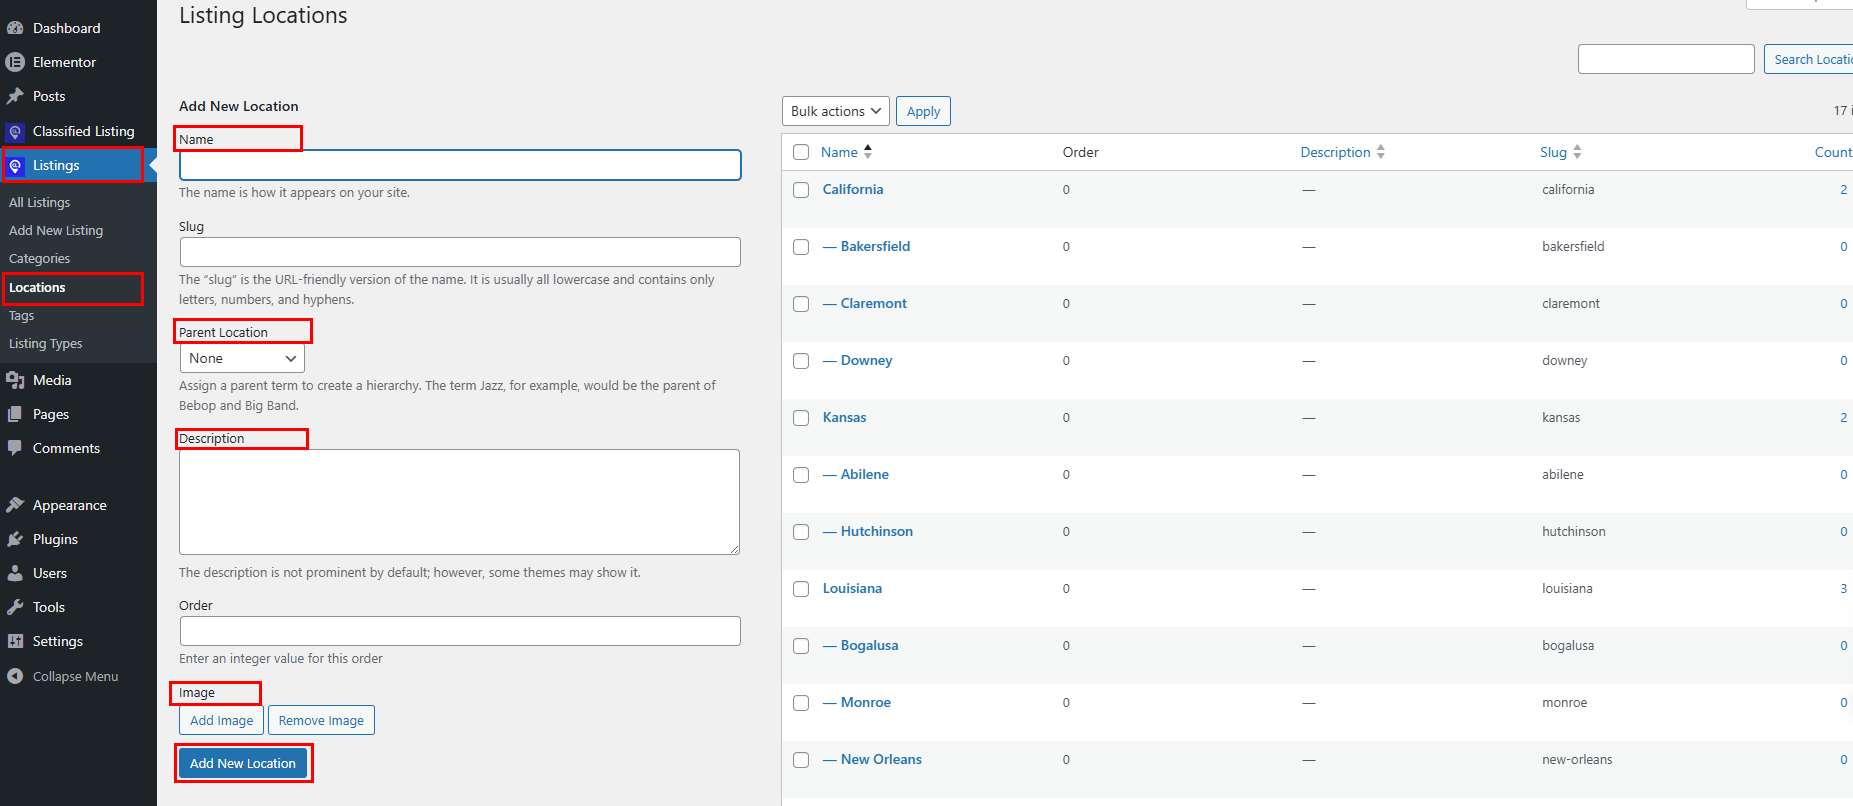
Go to Listing > Locations. The screen works the same way as categories. Add locations in a hierarchy: Country first, then State or Region, then City.
- Enter the location name (e.g., “United States”)
- Leave “Parent Location” empty for top-level (country), or select a parent to create a city/state under it.
- Optionally you can add a short description of the location.
- You can also add a location icon or image.
- Click “Add Location“.
Now repeat the same process for all your target regions.
Step 5: Create the Listing Submission Form
The submission form is what users fill out when they post an ad. It needs to collect the right information without overwhelming people. A long or confusing form drives users away. Keep it focused on essential fields.
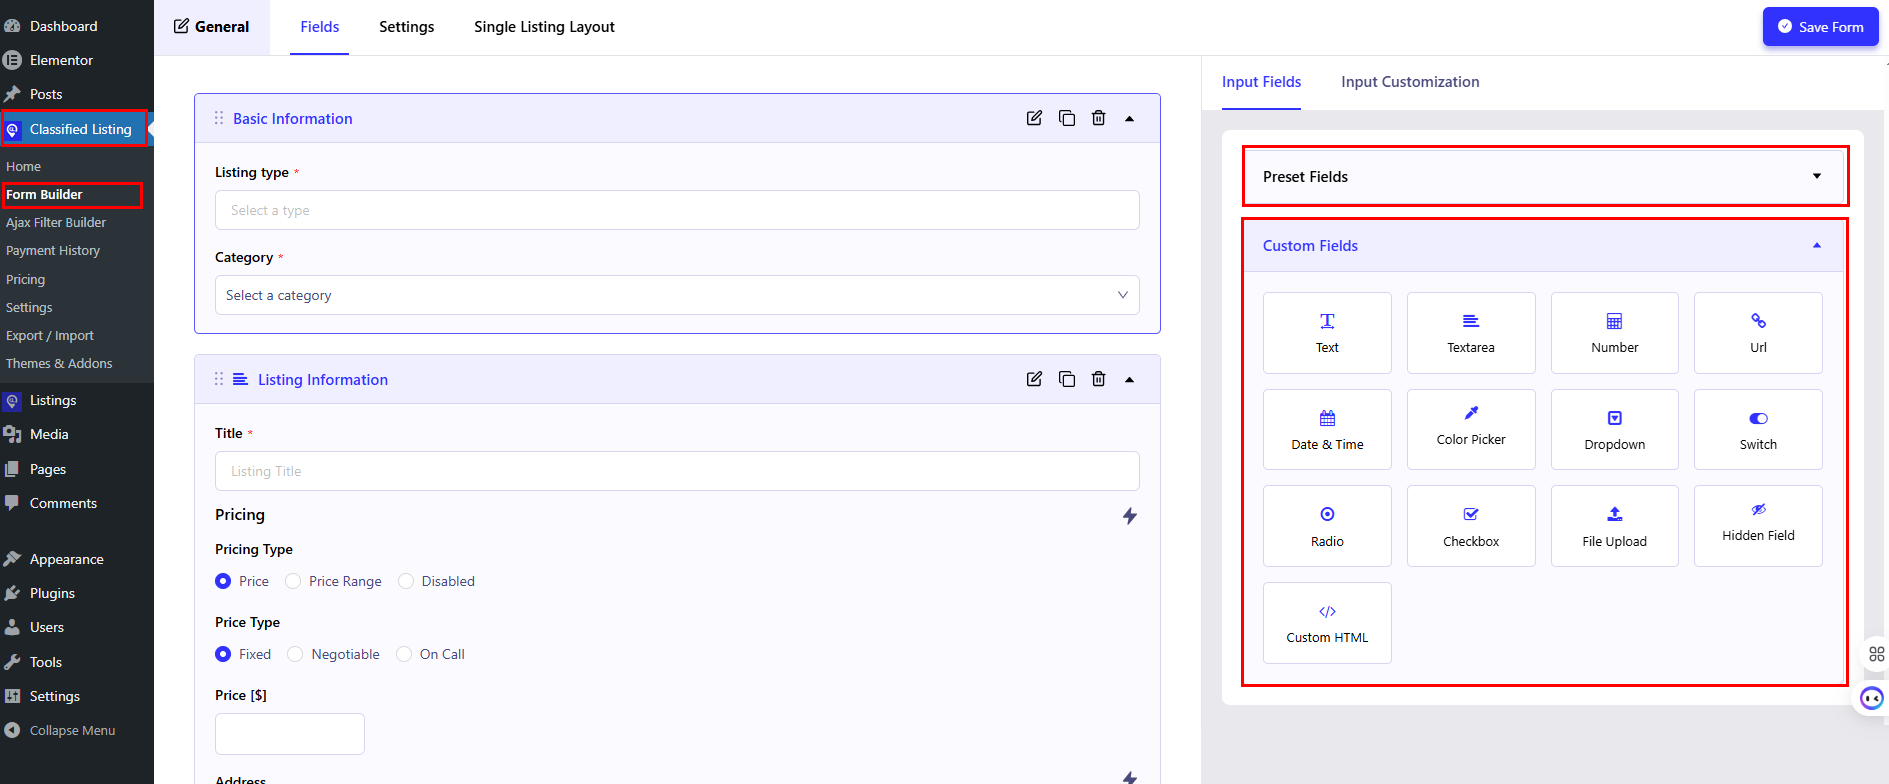
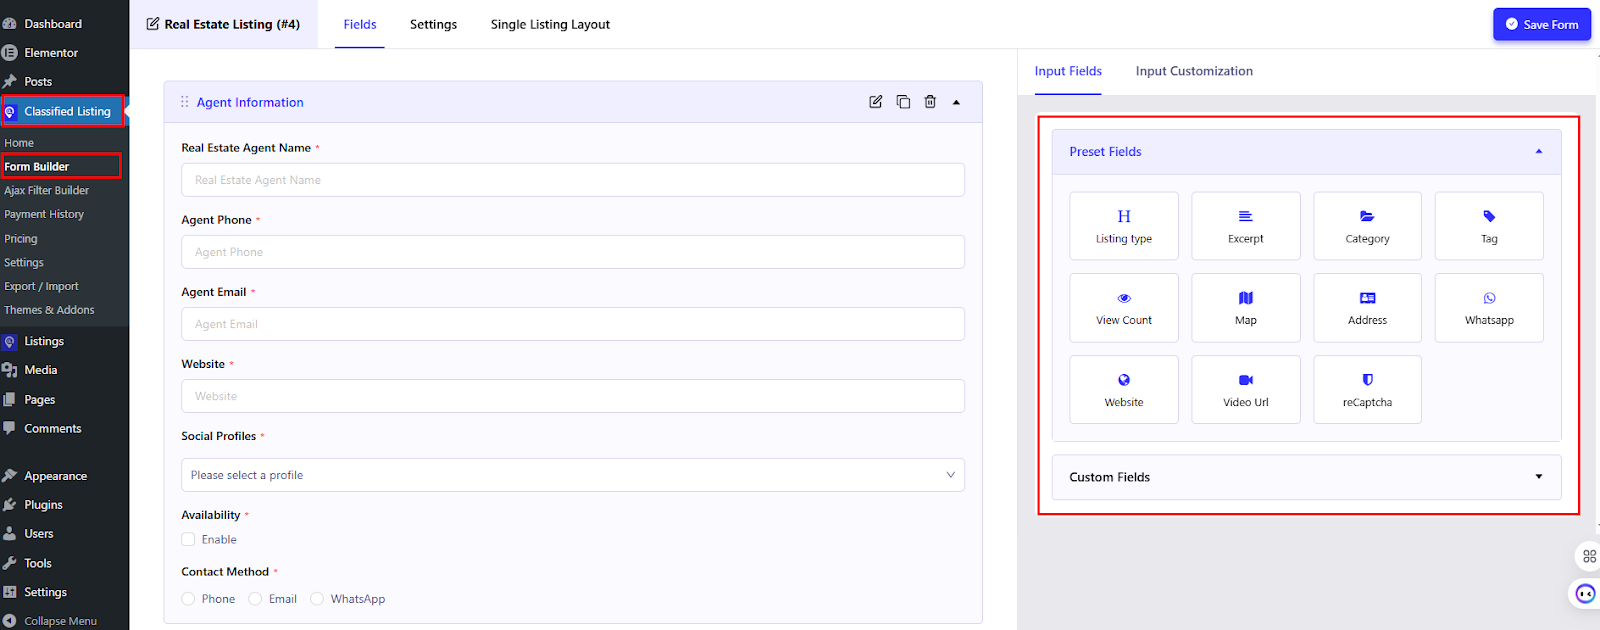
Go to Classified Listing > Form Builder. You will see a list of available fields with toggles next to each one.
How to build your submission form:
- Click “Add New Form” and name the form. Or you can customize the existing General form builder.
- Utilize the drag-and-drop system to add fields from the left panel. You can choose from text, number, select, checkbox, radio, textarea, image upload, URL, and more.
- Customize each field: set the label, placeholder, and whether it is required
- Drag fields to reorder them the way you want them to appear to the user
- Click “Save” when done
- Assign the form to your relevant categories in the category settings
Create form with AI
You can create a fully functional submission form with the help of AI.
When you click the ‘Add New Form’ button, a pop-up will appear. From the pop-up click on ‘Create Form With AI’ option.
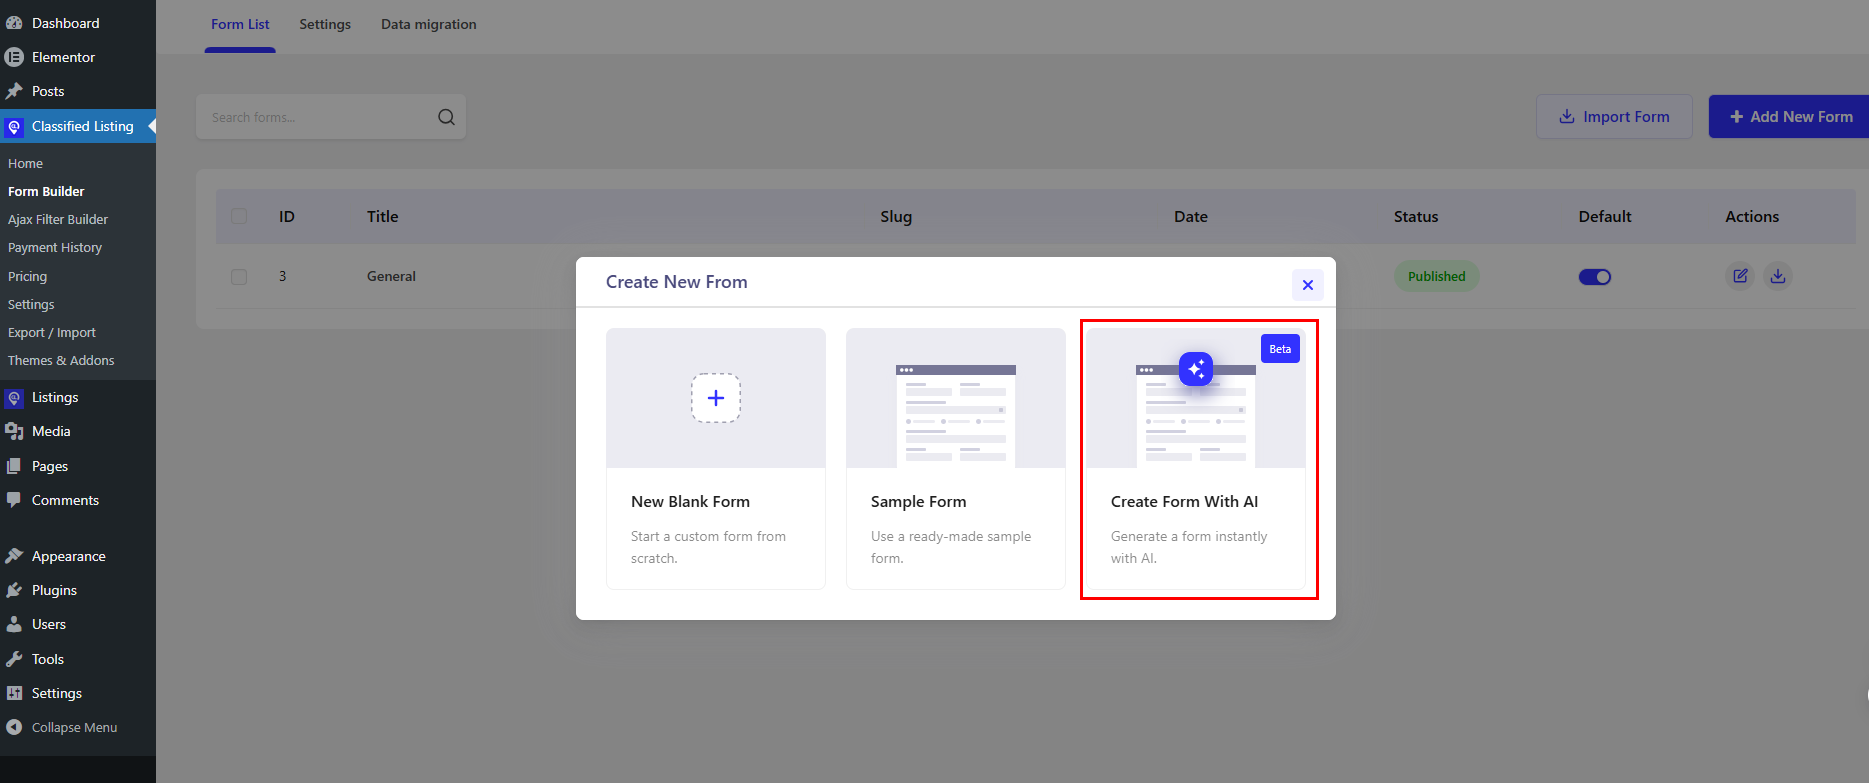
After that you need to input the form name, type, details, and keywords accordingly.
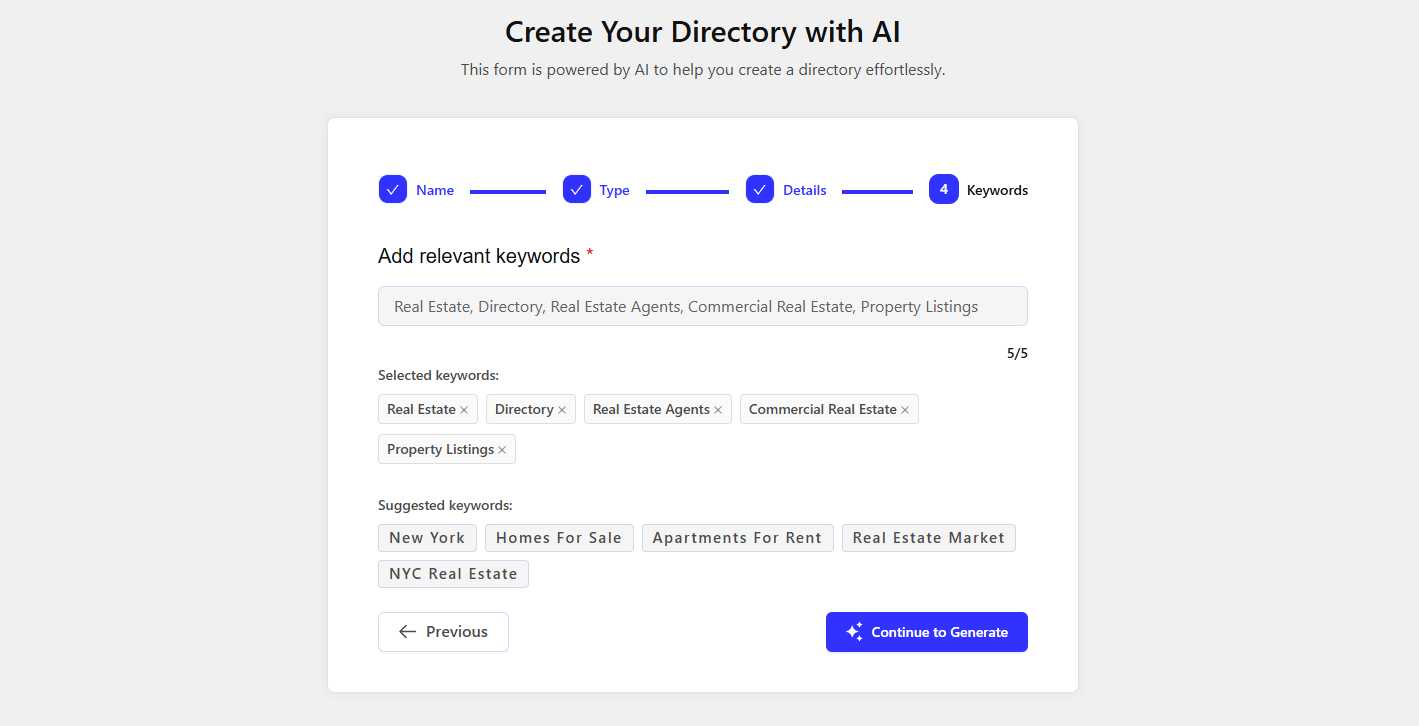
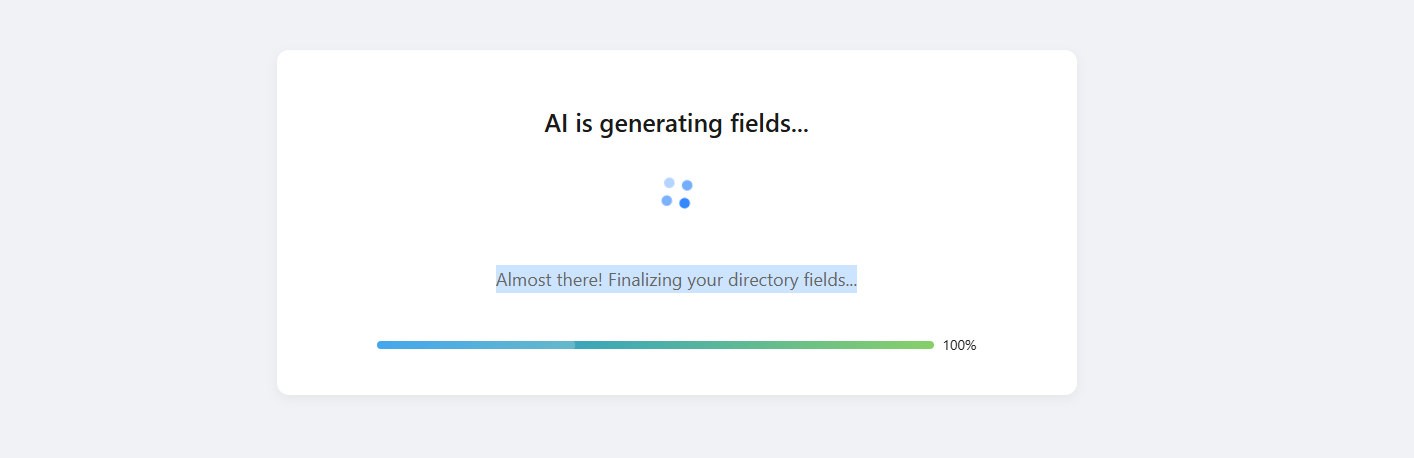
After successful command, AI will generate the fields and form accurately.
Lastly, you’ll get a fully functional AI-built submission form generated within seconds. You can further customize the form set-up according to your preferences.
The user will see the ‘Add Listing’ button form the frontend of your site.
Step 5: Configure Your Classified Website Settings
The Classified Listing plugin has a settings panel that controls how your site behaves. Spend time here before you go live. Getting these settings right prevents problems later.
Go to Classified Listing > Settings. Work through each tab one by one.
Key Settings to Configure
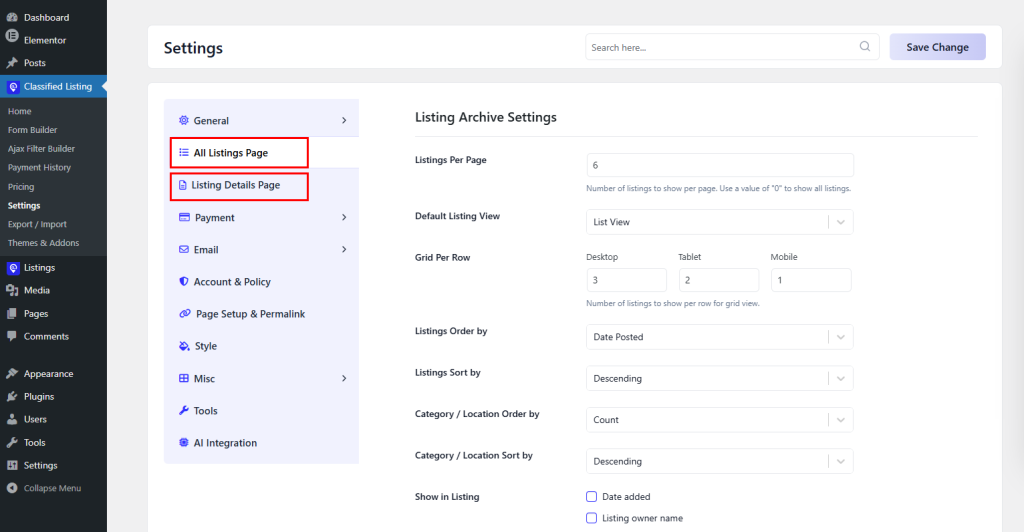
General Settings: Customize your site’s currency, date format, and default country. These appear across the entire site wherever prices and dates are displayed.
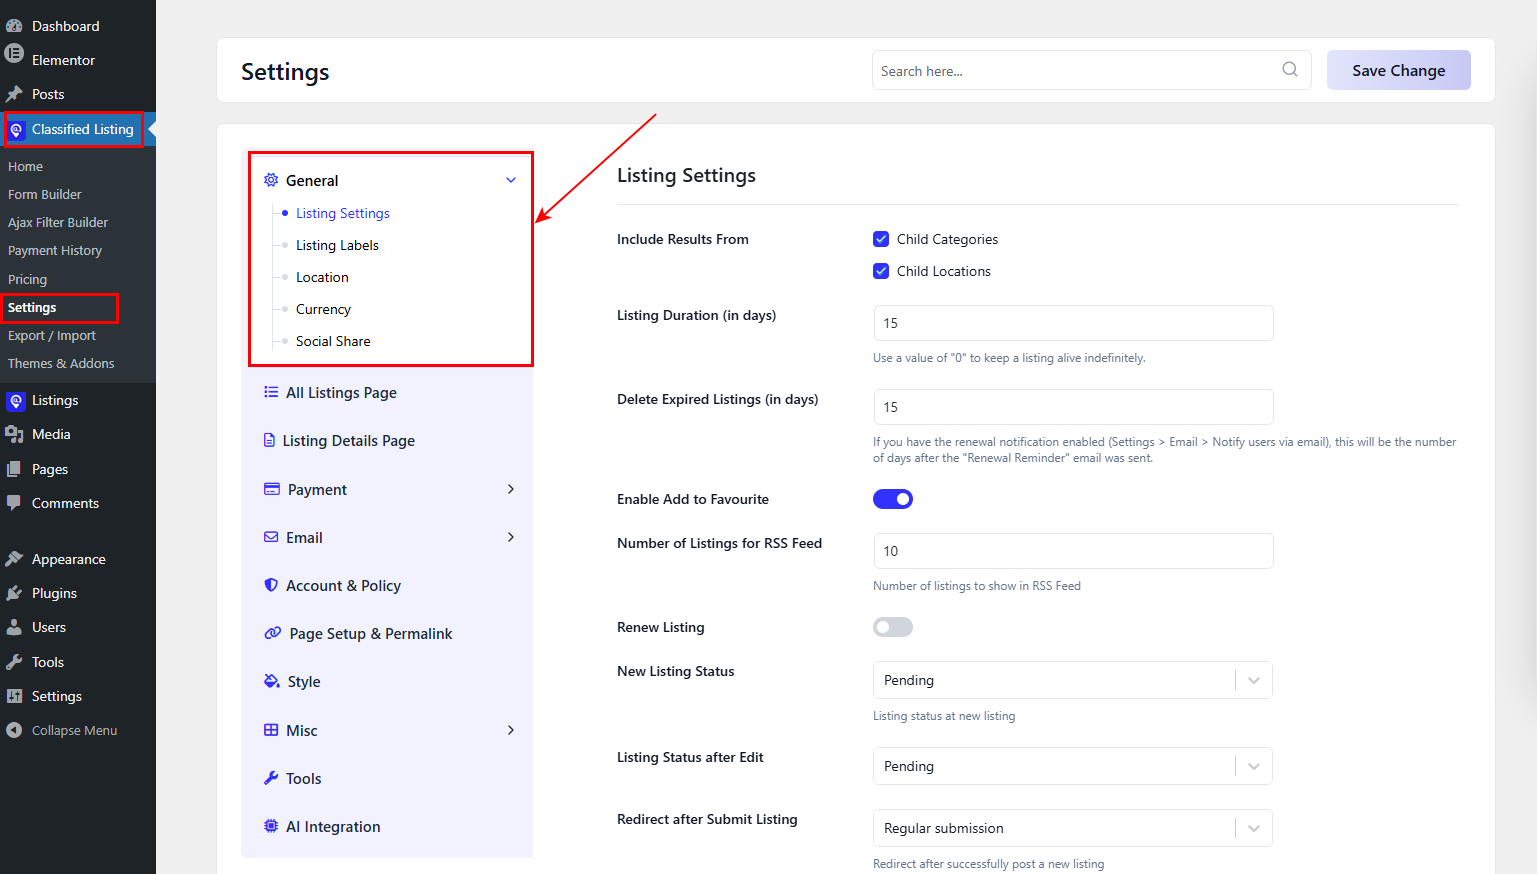
Listing Settings: Set whether listings need admin approval before going live, how many photos users can upload, listing expiry period, and whether guests (non-registered users) can post ads.
Also manage the listing pages visibility to the users.
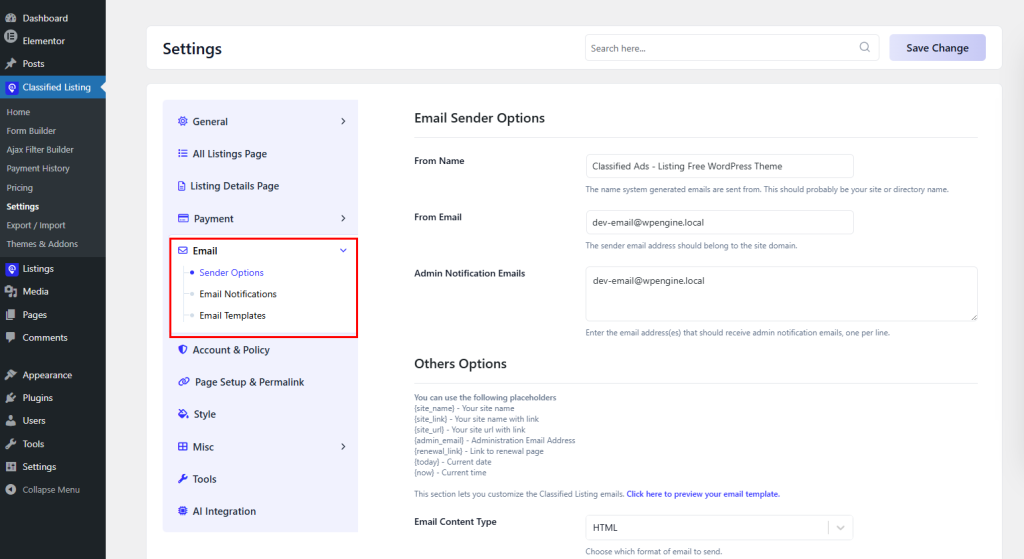
Email Settings: Personalize automated emails sent to users.These include ad posted confirmation, approval notification, expiry reminders, and contact messages. You can customize the email templates here.
Step 6: Create Listing Packages and Set Up Payments
Listing packages control what users can do on your site. They are also your primary revenue tool. The freemium model works exactly like Locanto. Free listings for everyone. Paid upgrades for more visibility, more photos, and featured placement.
Create Paid Packages
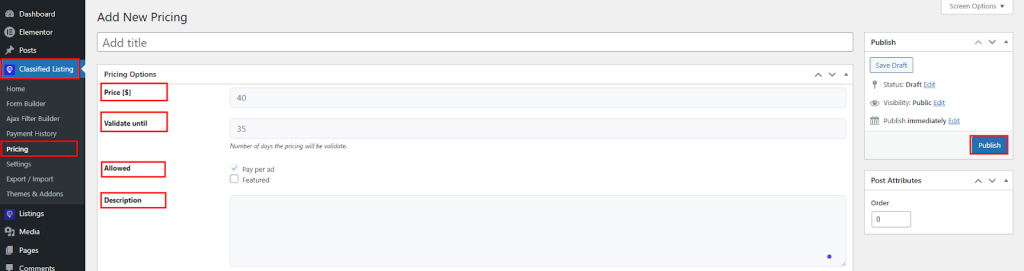
1. Move to Classified Listing → Pricing.
2. Click “Add New Pricing“.
3. Determine the pricing name (e.g., “Basic Free”, “Pro — $9/month”, “Business — $29/month”).
4. Set the price and validate date
5. Choose package type Pay Per Ad or Featured.
6. You can add a short description of the pricing. HTML is allowed.
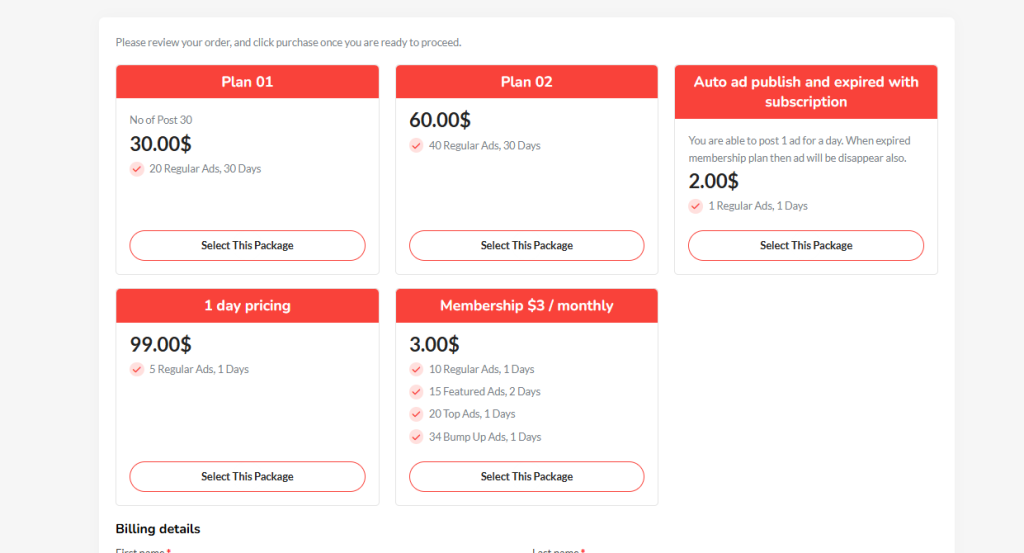
This is how the users will view the pricing plans from the frontend.
Step 7: Customize Your Website with Brand Colors
Now that the site is functional, it is time to make it yours. Applying your brand colors and typography turns the demo into a unique platform that users remember.
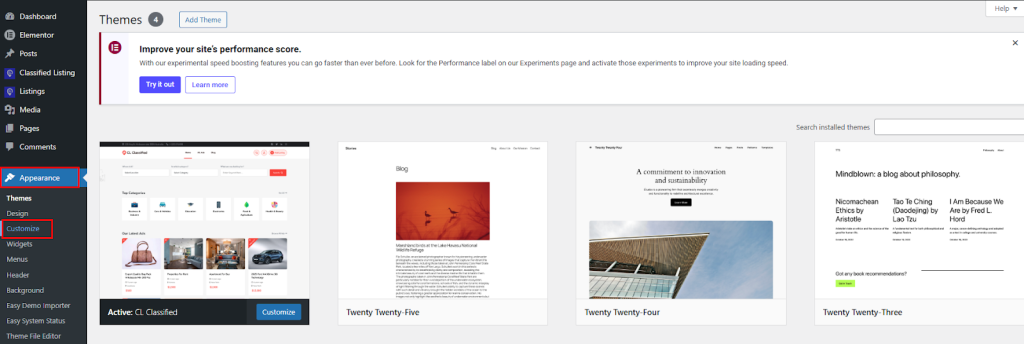
Go to Appearance > Customize in your WordPress dashboard. The live customizer opens with your site preview on the right and the settings panel on the left.
Set Your Primary Brand Color
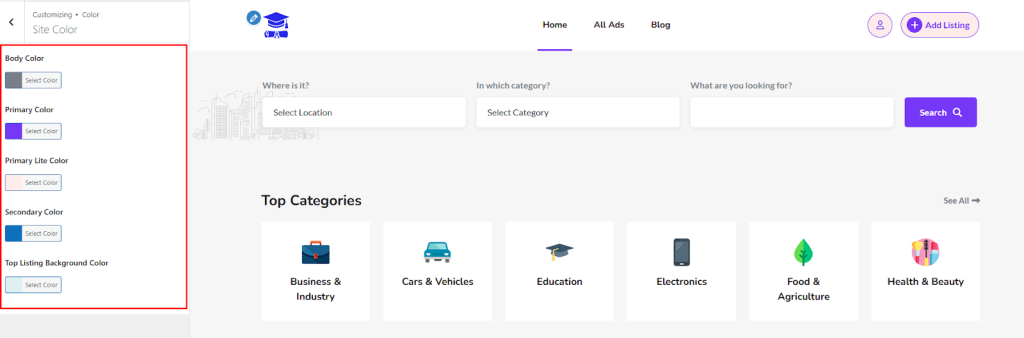
Click on Colors and Typography in the customizer panel. This section controls your site’s main color scheme. Find the Primary Color or Accent Color setting.
Click on the color swatch and enter your brand hex code. Every button, link, icon, and highlight on the site updates instantly in the preview.
Upload Your Logo
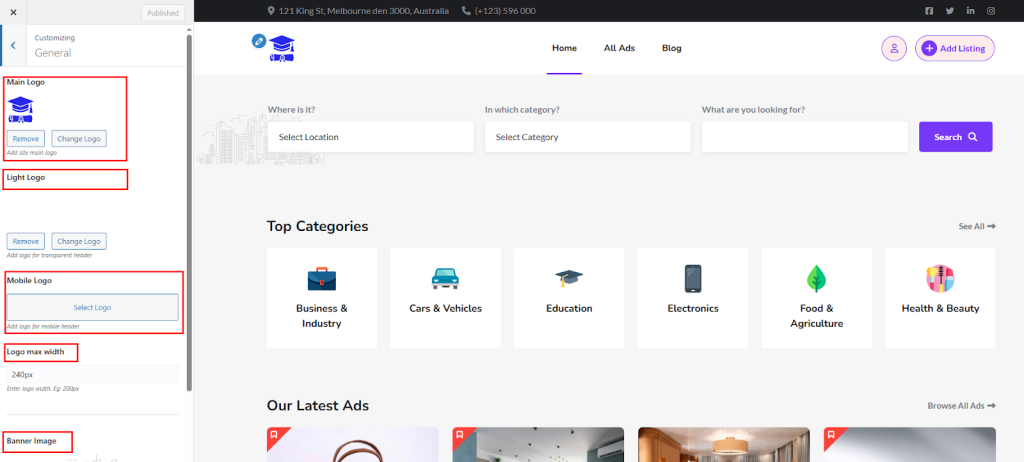
Go to Site Identity in the customizer panel. Click the Logo area. Click Select Image and upload your logo file. Use a PNG with a transparent background for the best result. Adjust the logo width if it looks too large or too small in the header.
When you are happy with all your customizations, click the Publish button at the top of the customizer panel. Your changes are now live on your site.
Tips to Grow Your Classified Site After Launch
Focus on a Local Market First: Do not try to compete with Locanto globally from day one. Pick one city or region. Build a strong community there first. Local SEO is also easier to rank for than national or global terms.
Use Content Marketing: Write blog posts about topics your target audience searches for. For example, ‘How to sell your car in [city]’ or ‘Best neighbourhoods to rent in [city]’. This brings organic traffic and builds authority.
Check out our guide on content marketing strategies for online directories.
Offer Free Listings at Launch: When starting out, make all listings free. Your goal is to build inventory and attract users. Once you have enough listings and active users, introduce paid tiers. Empty listing pages kill new sites fast.
Get Social Media Traffic: Create a Facebook page and local groups for your niche. Share new listings. Engage with local communities. Social signals also help SEO over time. Facebook groups are especially powerful for local classified sites.
Use QR Codes for Offline Promotion: Print flyers and put QR codes on them. Place them at community boards, local shops, and events. Offline promotion is often overlooked but works very well for local directory sites.
Read our post on how to use QR codes to promote your directory website for actionable ideas.
How to Monetize Your Locanto-Like Website
Revenue is what keeps your site alive. Here are the most effective monetization strategies for classified sites:
- Featured Listings: Charge users to pin their ads to the top of search results.
- Premium Packages: Monthly subscriptions for power users who post many ads.
- Banner Advertising: Sell ad space to businesses in your niche or area.
- Sponsored Categories: Let businesses sponsor a category page for visibility.
- Affiliate Revenue: Recommend related products like insurance or moving services.
For a full breakdown of revenue strategies, read our post on earning money from a directory website.
Final Thoughts
Building a website like Locanto in WordPress is completely achievable. You do not need a massive budget or technical expertise. You just need a plan, the right tools, and the willingness to put in the initial setup work.
Start with a domain and hosting. Install WordPress. Set up the CLClassified theme for a polished, professional look. Add the Classified Listing plugin to handle ads, users, and payments. Then focus on a local or niche market to build momentum quickly.
The classified ads space has plenty of room for new players, especially ones that focus on specific communities or industries. Locanto covers the general market. Your site can own a niche.
Take the first step today. Your classified ads platform is closer than you think.
Frequently Asked Questions (FAQs)
How much does it cost to build a website like Locanto?
The basic setup costs between $50 to $200 for the first year. This includes domain registration, shared hosting, and a premium theme or plugin. Custom development would cost thousands more, which is why WordPress is the best choice for most people.
Do I need coding skills to build a classified site like Locanto?
No. The CLClassified theme and Classified Listing plugin are both beginner-friendly. You can set up a working classified site without writing a single line of code. Most settings are managed through the visual dashboard.
How long does it take to launch a classified site like Locanto?
With the right tools, you can go from zero to live site in one weekend. Installing WordPress takes 5 minutes. Setting up the theme and plugin takes a few hours. Customizing your homepage and categories might take another day.
Can I add a mobile app to my classified site?
Yes. RadiusTheme offers a classified ads Android app template that connects to the Classified Listing plugin. This lets you offer a native app experience to your users without building an app from scratch.
What is the difference between a classified site and a business directory?
A classified site focuses on user-posted ads that are usually temporary and transactional. A business directory lists permanent business profiles. The two models serve different purposes — classified sites are better for individual sellers and buyers, while directories suit long-term business listings.
Related Posts You Might Find Useful
• How to Create a Classified Website with WordPress
• Best Classified WordPress Themes
• How to Build a Website Like Craigslist
• How to Build a Website Like Dubizzle



