


On This Page
The benefits of building a classified website are immense. Knowing these benefits, you might have decided to create such a website on WordPress. But do you know how to create a classified website with WordPress?
It’s pretty easy if you follow the correct steps, which include selecting a domain, a hosting provider, a site builder, a plugin, and a theme. Then, connect all these to make a functional classified website.
Keep reading to learn more about these steps and easily build a classified website on WordPress.
How to Create a Classified Website with WordPress
Follow all these easy steps to make a classified ads website on WordPress in no time.
Step 1: Select a Domain Name

The first thing you should do is select a domain name for your classified ads website. In case you need more information about a domain, here you go: it’s basically a unique, easy-to-remember name that identifies a website or email address online.
For example, look at this URL – https://www.radiustheme.com. Here, radiustheme is our domain name, and ‘.com’ is the domain extension. Hope you now understand better what a domain is.
Now, Let’s discuss what you should consider when choosing a domain name to build a classified ads website. Here are all the factors to take into account.
- Use a domain name generator to generate domain name ideas
- Check if the domain is available
- Check the domain’s previous registration history
- Include relevant keywords for your niche (e.g., cars, real estate, jobs)
- Avoid using numbers and special characters in the domain
- Ensure the domain name isn’t a trademark
- Keep the domain name short and easy to remember, pronounce, and spell
- Check if the corresponding social media handles are available
- Choose the correct domain extension (e.g., .com, directory, .online)
- Consider registering domains with different extensions and domain variations to prevent others from using similar names
After determining a domain name, register it with one of the best domain name registrars. We recommend you go with GoDaddy or Namecheap to register your domain.
Step 2: Choose a Web Host and a Hosting Plan

The next step is to pick a hosting provider. Why? It’s necessary for your websites to go online and store all its data. Therefore, choose the best hosting for classified website if you want users to browse and use your website smoothly.
That said, here are the criteria to consider while selecting the best hosting provider for your classified ads website.
- Determine the hosting type (Shared, VPS, Dedicated, Cloud, WordPress, etc.)
- Ensure the hosting provider offers excellent bandwidth and storage
- Make sure your selected hosting guarantees at least 99.9% uptime
- Your hosting provider should offer regular and automatic backup
- Check if the hosting comes with security features like DDoS protection, LetsEncrypt SSL, RAID, etc.
- Make sure the hosting provider provides an easy-to-use control panel
- Your chosen hosting provider needs to ensure 24/7 dedicated customer support
- Compare packages and hosting prices of your selected hosting providers with others
- Check additional features such as website builders, integrated SEO tools, emails, and more
- Read customer reviews before choosing any plan from a hosting provider
- Consider your budget
After considering the above mentioned factors, you need to pick a hosting provider. If you want to skip the hassle of remembering all these factors while choosing a hosting provider and need a recommendation, pick Hostinger.
It offers everything a top-class hosting provider provides and meets virtually all the above mentioned criteria.
Step 3: Choose WordPress as the Content Management System for Building your Website
Once you choose a domain and connect it with a top-notch hosting provider, probably with Hostinger, it’s time to select a website builder. As you know from the article’s title, we’ll choose WordPress as our preferred website builder.
But the question is why we’re selecting this platform. According to W3Techs, WordPress powers up around 43.6% of websites on the web, and it leads with a market share of 62.0%.
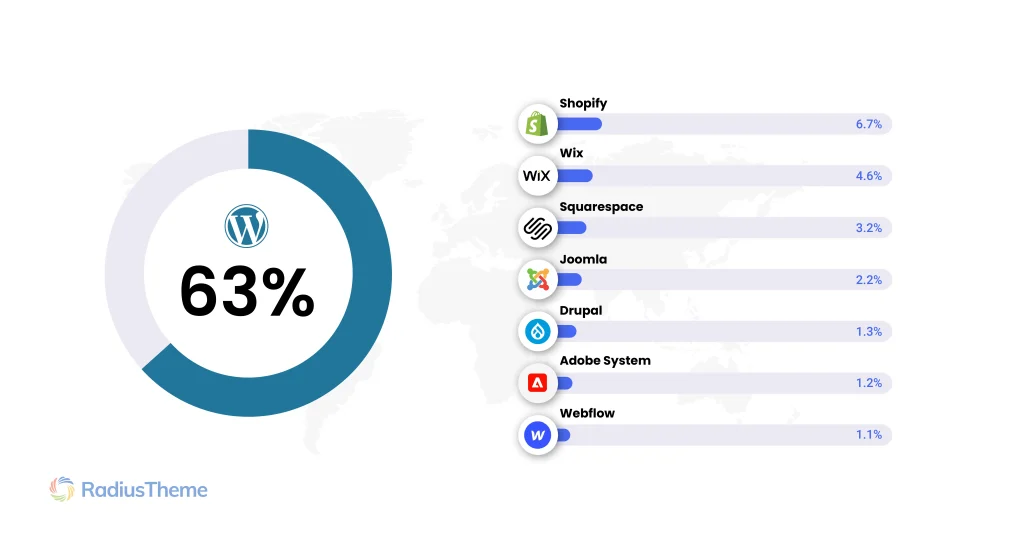
Not only this, but this content management system also features a rich plugin directory boasting over 59,000+ free plugins. This open-source platform offers over 13,000 free themes to help you build stunning websites hassle-free. These are some primary reasons why WordPress has gained so much popularity and trust. You can install WordPress on your chosen hosting platform and build a powerful classified ads website.
Step 4: Install the Best WordPress Classified Plugin
After installing WordPress, log in to your WordPress Admin Dashboard. Then, you need to pick the best WordPress classified plugin to build a classified website.
But here’s a catch. Since the WordPress plugin repository has several classified plugins, you’ll easily become confused about which one to choose.
Nonetheless, you can avoid this confusion and quickly pick a plugin if you consider the following criteria.
- Ensure your chosen plugin has an easy-to-use interface
- Make sure it’s got a robust search functionality
- The plugin can create a well-structured category system
- The plugin should let you upload high-quality images and videos for listings
- It should have an option to include geographic location for listings
- Your chosen plugin must ensure listings display correctly on various devices
- Ensure the developer actively updates the plugin and offers the necessary customer support
- Make sure your selected plugin doesn’t impact your website’s loading speed
- Ensure the plugin works seamlessly with your current WordPress theme and other plugins
- Lastly, check ratings, read user reviews, and compare pricing ( if it’s not free) with other similar plugins
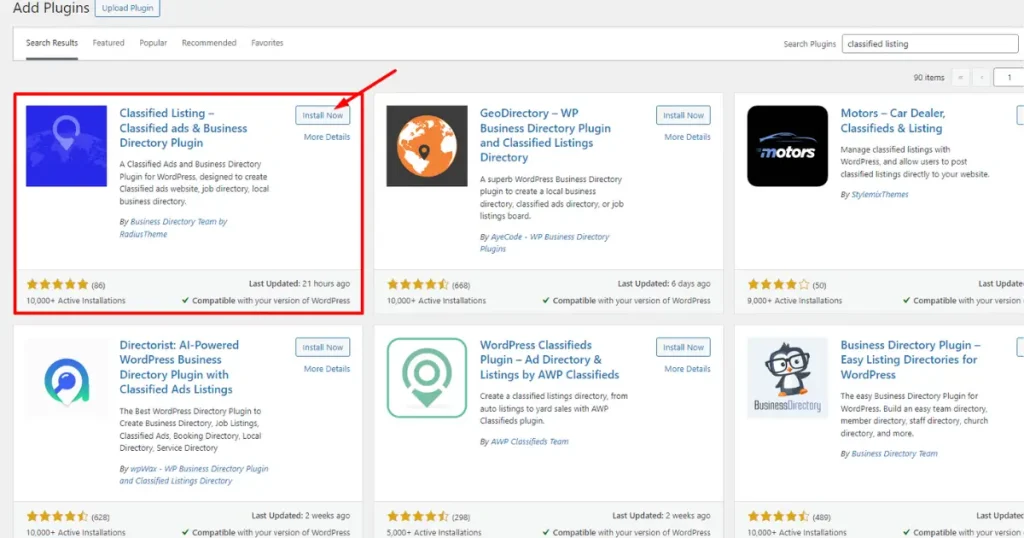
After considering all these factors, choose a WordPress classified plugin. If you need recommendations, go with Classified Listing – Classified ads & Business Directory Plugin.
It’s one of the best WordPress classified plugins that you can use to create a fully functional classified ads website in minutes. Here’s how to install and activate it.
Install and Activate Classified Listing WordPress Plugin
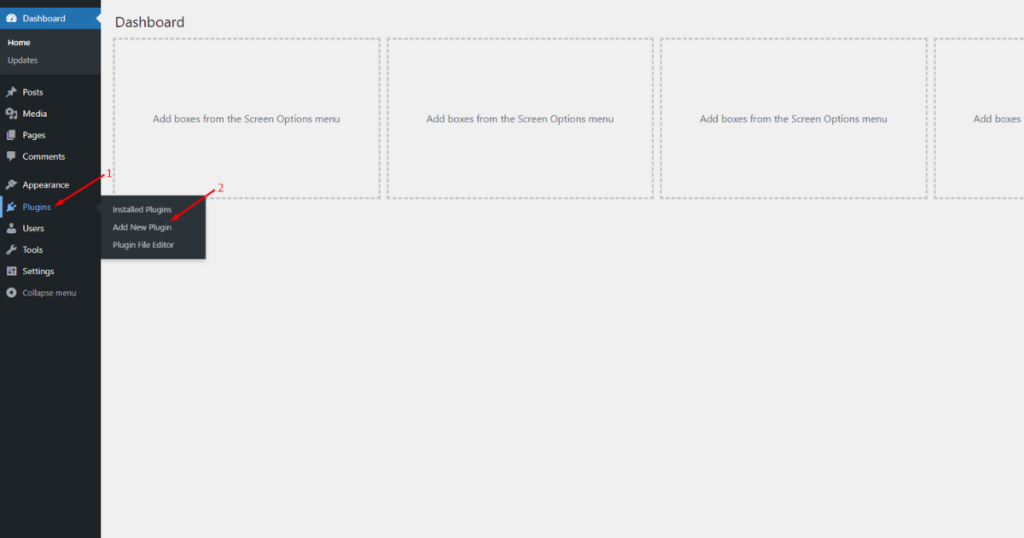
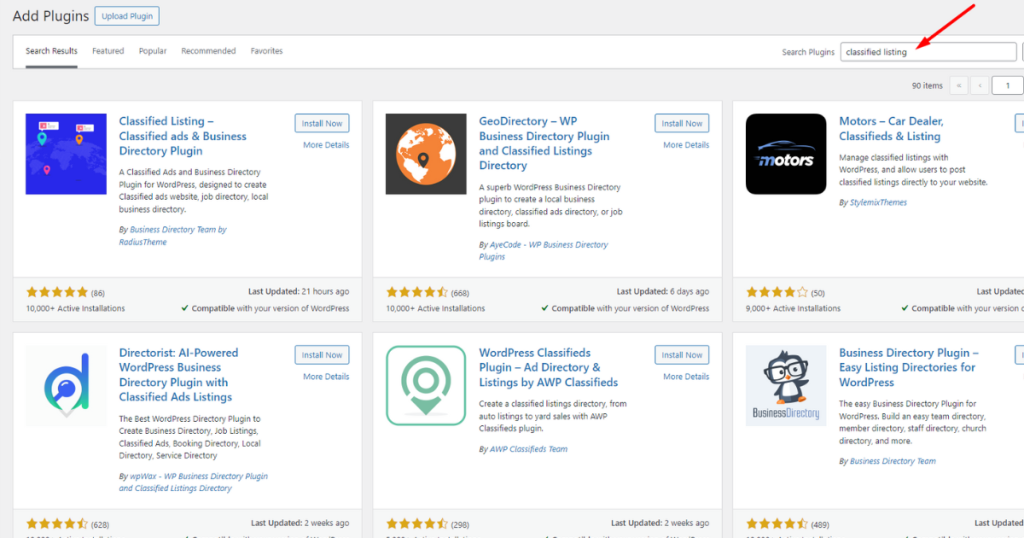
Now, type in “Classified Listing” in the plugin search field at the top right.
At this stage, click the “Install Now” button of the marked plugin in the screenshot below.
Finally, hit the ‘Activate’ button.
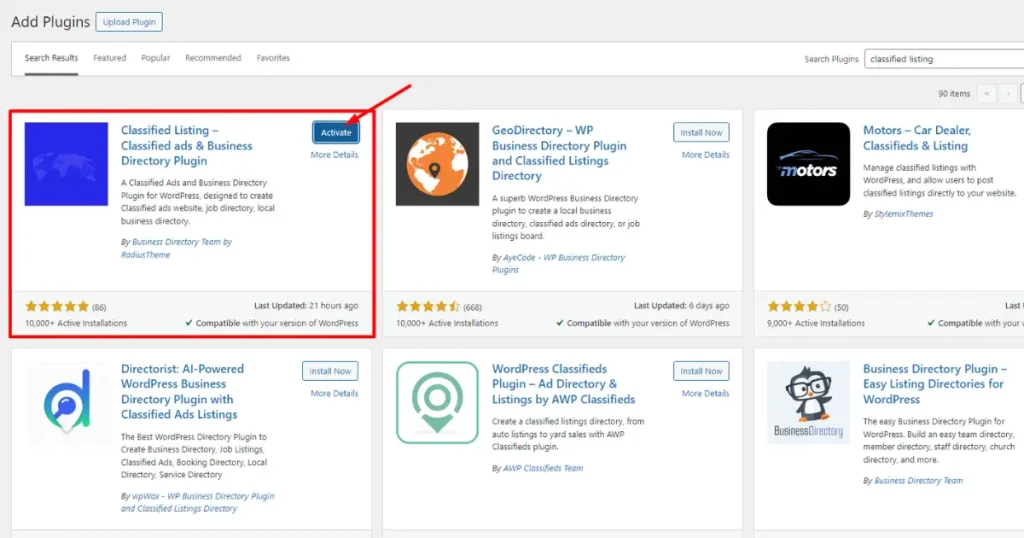
💣 Boom! That’s it. You’ve just created a classified website with WordPress.
Step 5: How to Make a Classified Website – Tweak Some Plugin Settings
Okay, we’ve installed and activated the plugin. We should be able to create ads on our website now. Yes, we can, but before doing so, we need to configure some settings in the plugin.
First, we’ll work with the form builder to add or remove features based on the ads we’ll list on our classified website. Let’s begin.
- Go to the WordPress Admin Panel.
- Navigate to Classified Listing > Form Builder.
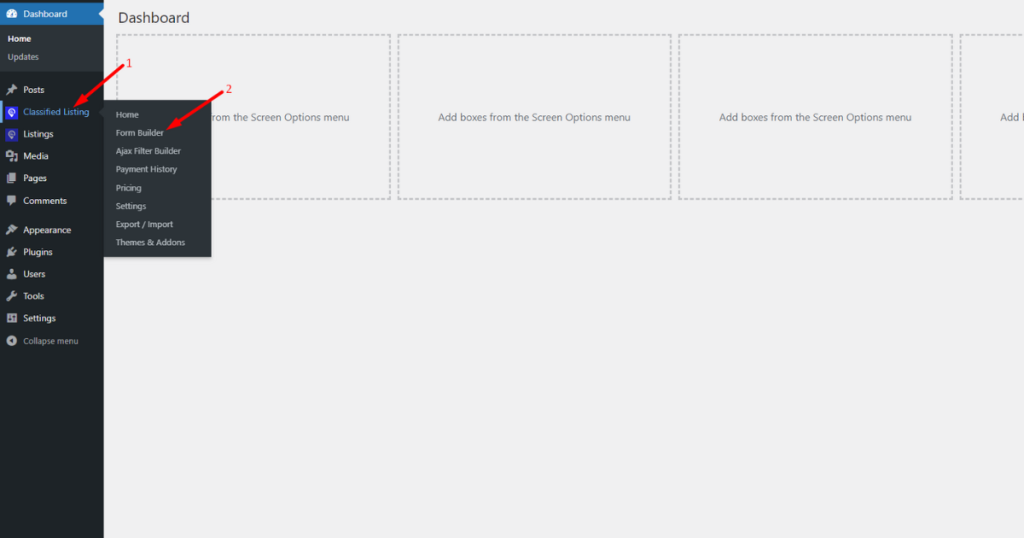
- You’ll now notice a “Form List’’ window with a “Sample Form” automatically created for you. You can either edit this pre-built form or build a new one.
To create a new form, you need to hit the “+ Add New Form” button. However, we’ll edit the existing listing form. So, we’ll click on the pencil icon.
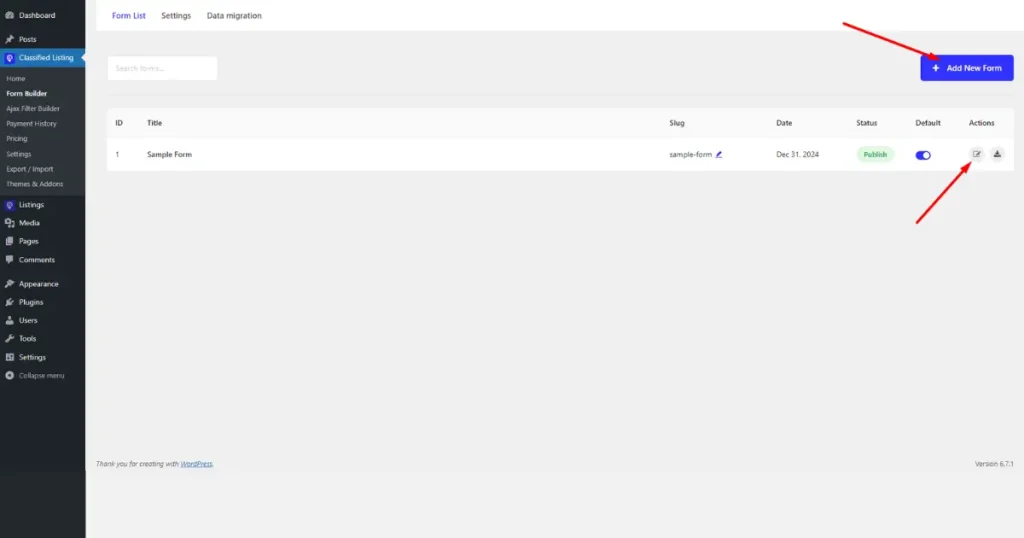
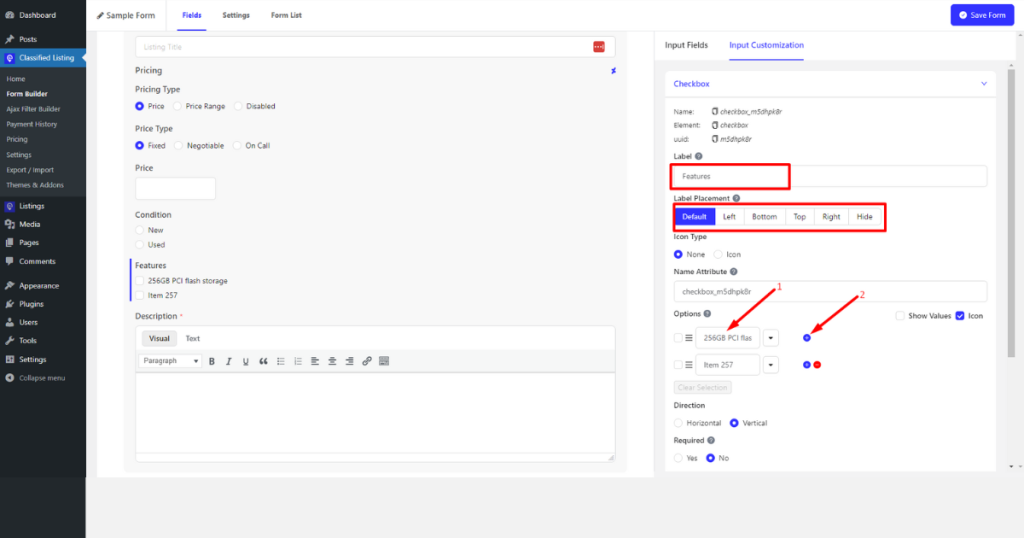
4. You can now customize the form fields as you wish. We’ll edit the feature checkboxes so that they align with the products/services we’ll be posting.
Therefore, scroll down to the feature section and hover the mouse pointer over a feature. Then, you’ll see an input field customization bar. Click the pencil icon on that bar.
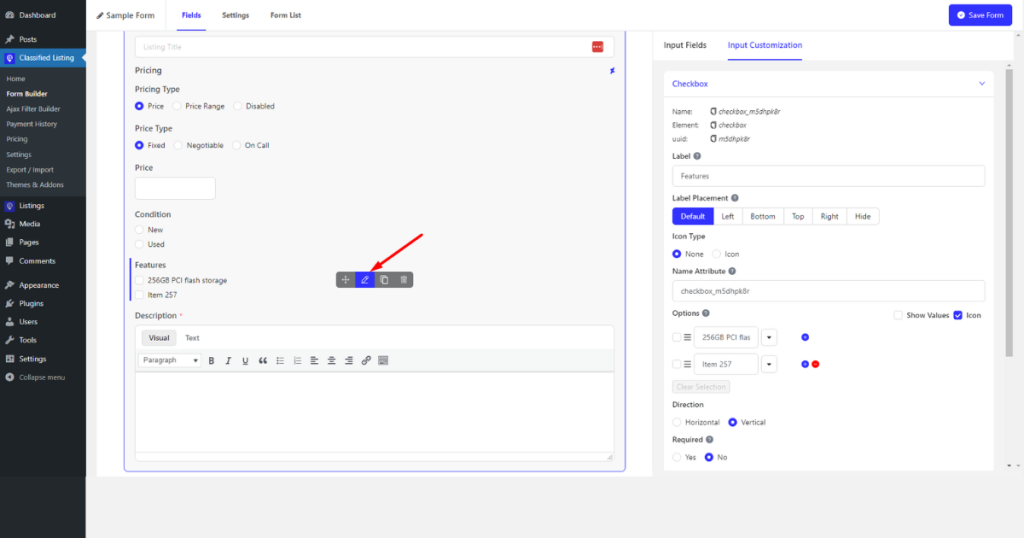
5. Now, look at the right side, and you’ll see options for customizing form fields. Change the label name and label’s position, include or exclude feature fields, and name those feature fields according to your preferences. Read our documentation to learn more about this plugin.
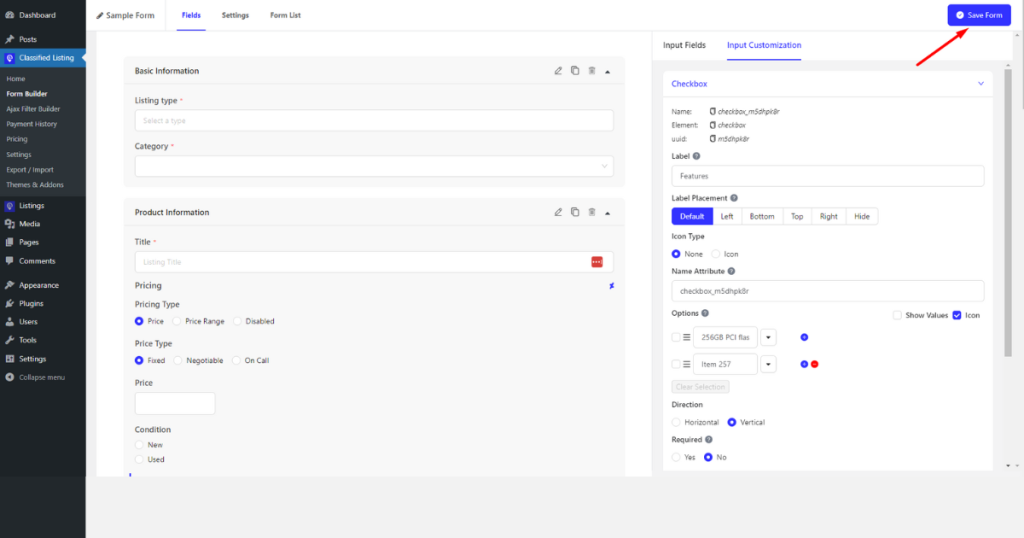
6. After customizing form fields, hit the “Save Form” button.
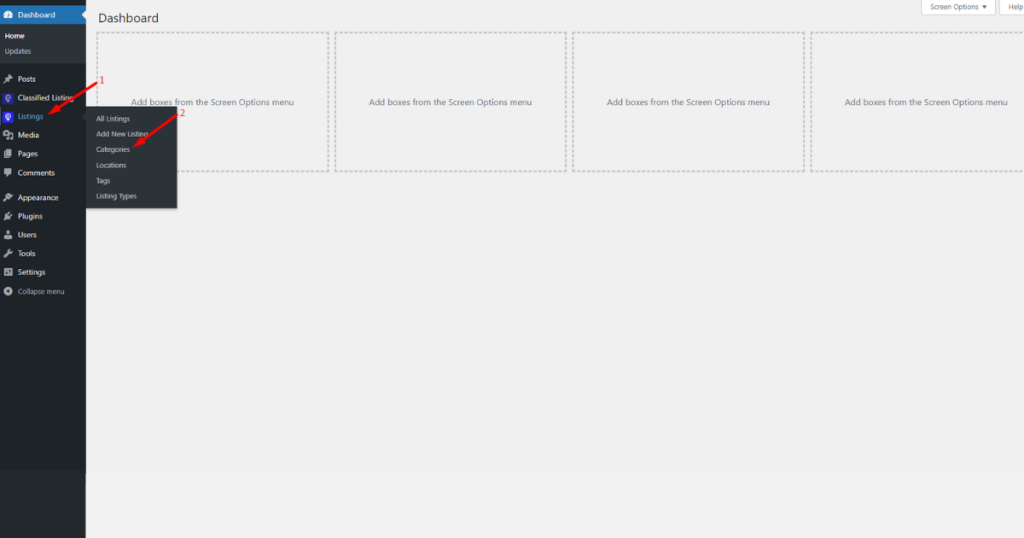
Create Categories and Locations for Listings
Once you customize the Form Builder, create categories and locations for your ads. To do so, go to the WordPress Admin Panel. Afterward, head to Listings > Categories.
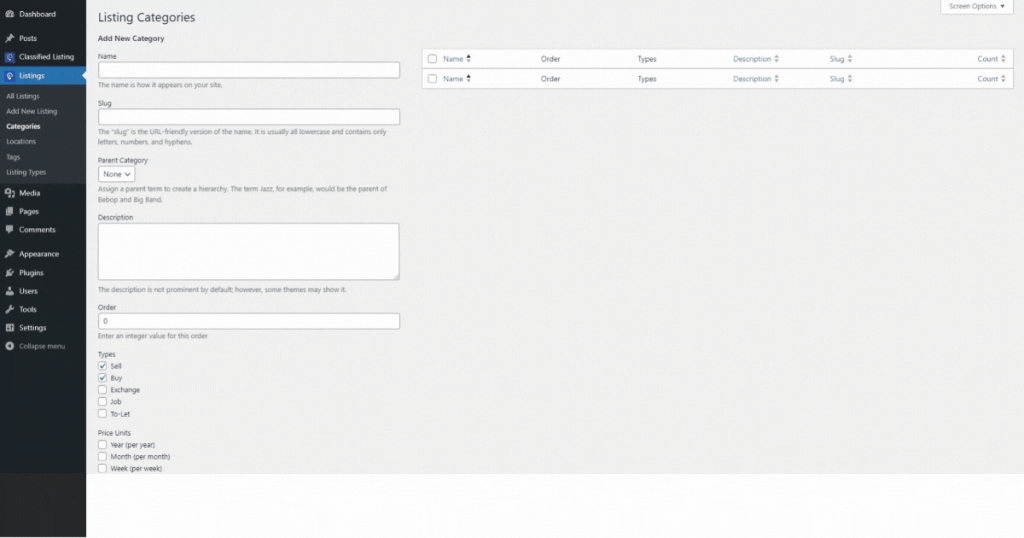
Now, fill in the necessary fields with the required information and click the “Add New Category” button to create a category. You may see the animation below to learn more about listing category creation.
In the same way, you can build locations for listing. Just head to WordPress Admin Panel > Listings > Locations. Then, type a location name in the ‘Name’ field and hit the “Add New Location” button.
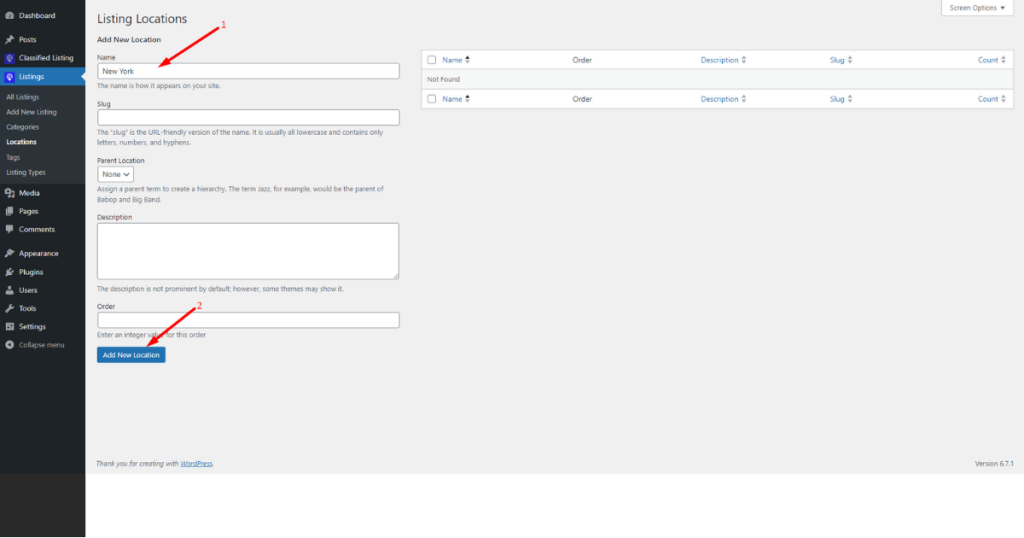
That’s how you create categories and locations with Classified Listing. Okay, we are almost there to create our first post. But before doing that, let’s set the product/service currency.
Set Listing Currency
Navigate to the WordPress Admin Dashboard > Classified Listing > Settings.
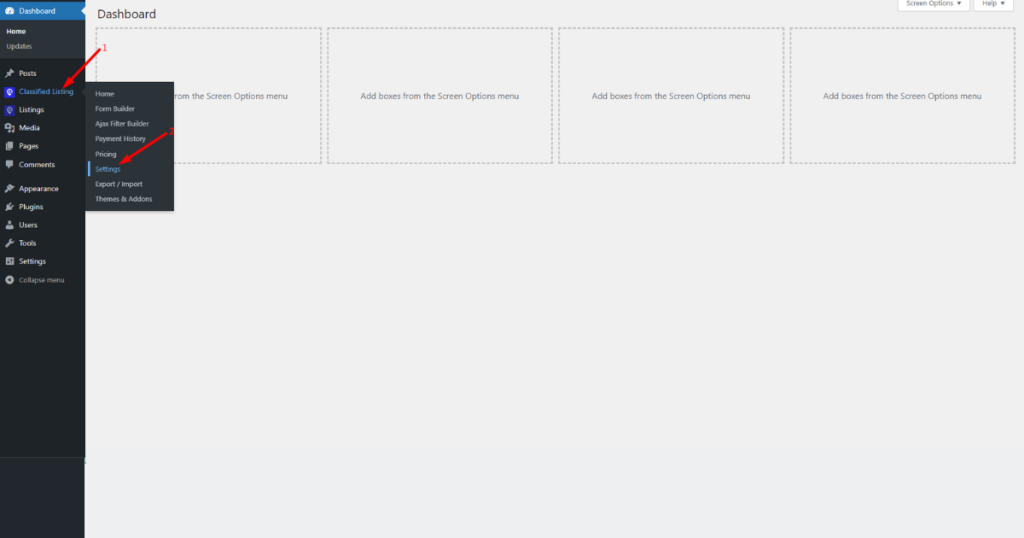
Now ensure you are on the ‘General’ tab, scroll down to the “Currency Options” section, and hit the “Save Changes” button.
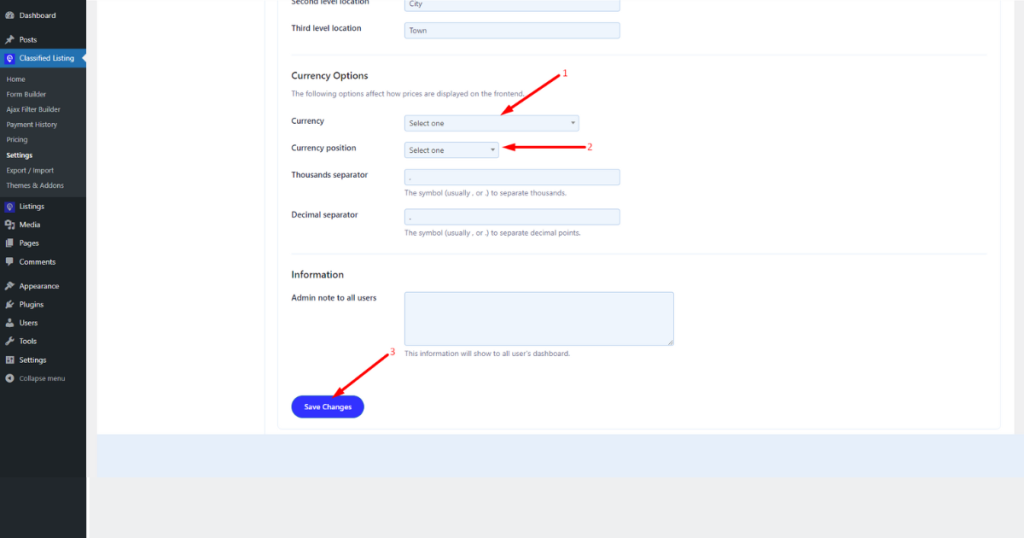
Okay, we are all set to create our first listing. Let’s now prepare and post a listing.
Step 6: How to Build a Classified Website – Create Your First Listing
You can follow two methods to prepare and publish classified ads. One is to utilize the WordPress Admin Dashboard, and the other is to use the “Listing Form” menu on your website’s front end.
We’ll show you the easy way, however. Visit your classified ads website and click the “Listing Form” menu.
If you wonder where this menu comes from, let’s tell you that the Classified Listing plugin automatically generates this menu and page along with several others when you install and activate this plugin.
Let’s go back to creating a listing. After clicking the “Listing Form” menu, fill in the form fields with the essential information and images/videos and hit the ‘Submit’ button. Voila! You’ve just posted your first classified ads.
You may see the animation below to understand better how to create a listing with the Classified Listing.

After submitting the listing, you need to publish it from the backend. To do so, go to your WordPress Admin Panel and then head to Listings.
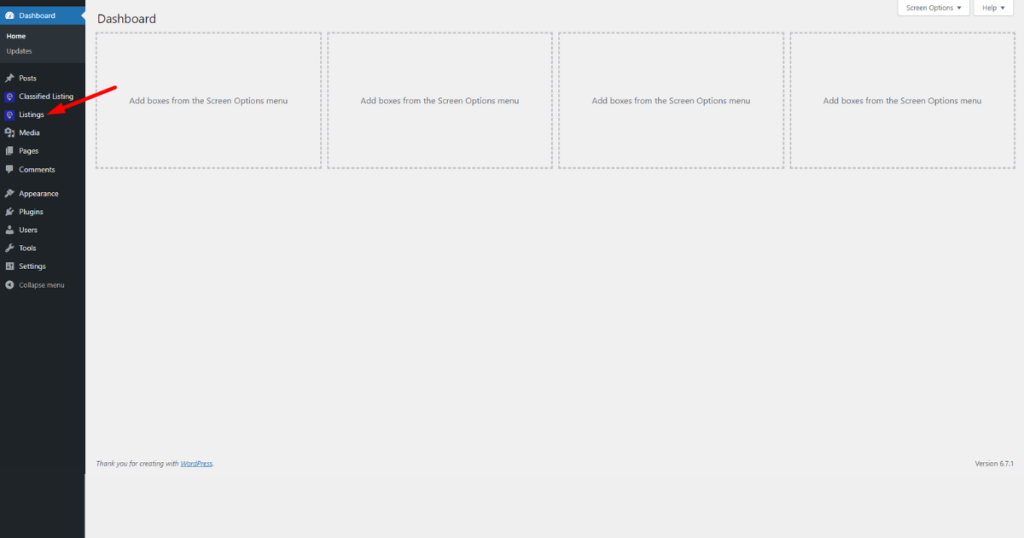
Afterward, click on the listing you’ve just created.

Now, change the listing status from ‘Pending’ to ‘Published.’
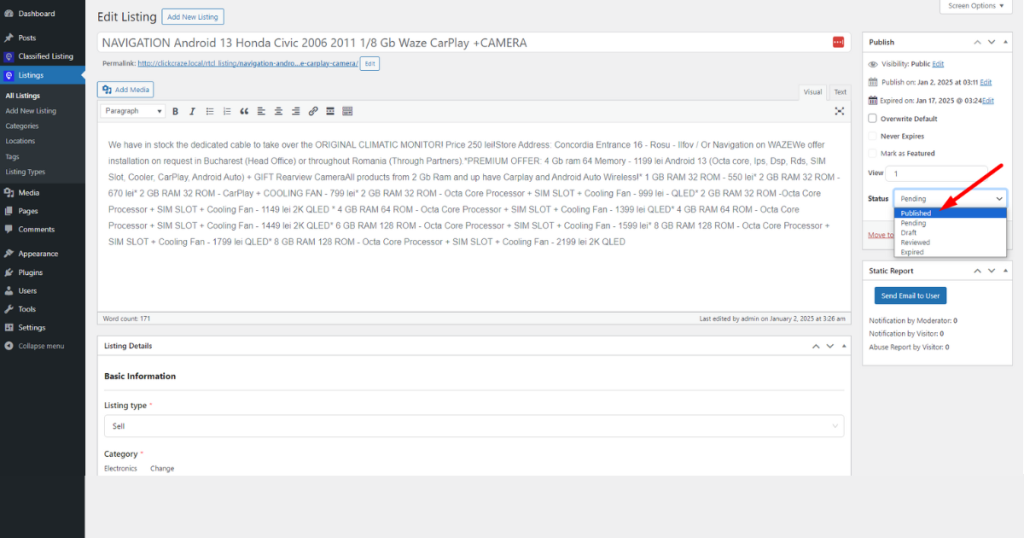
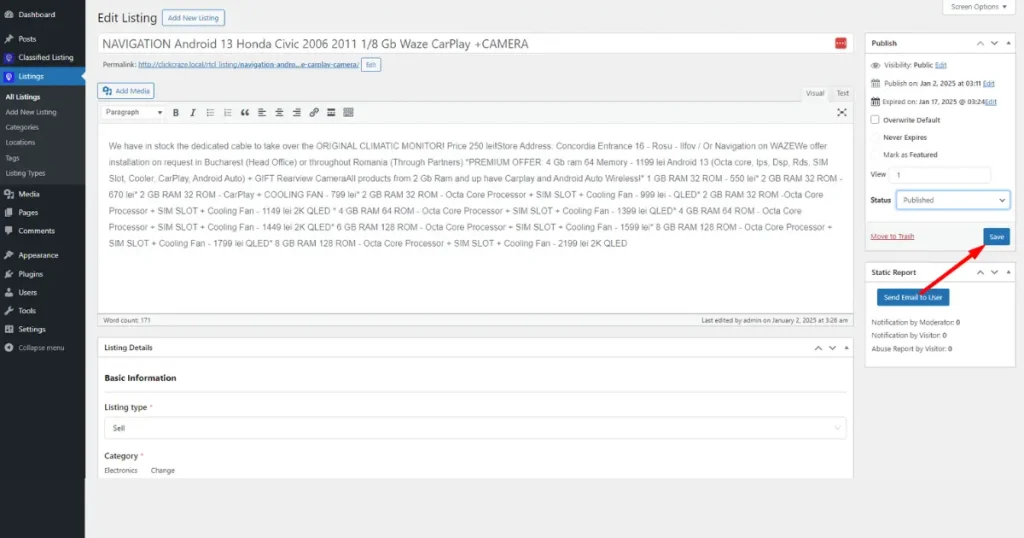
Next, click on the ‘Save’ button.
Finally, visit your classified ads website and click the ‘Listings’ menu to view your listings.
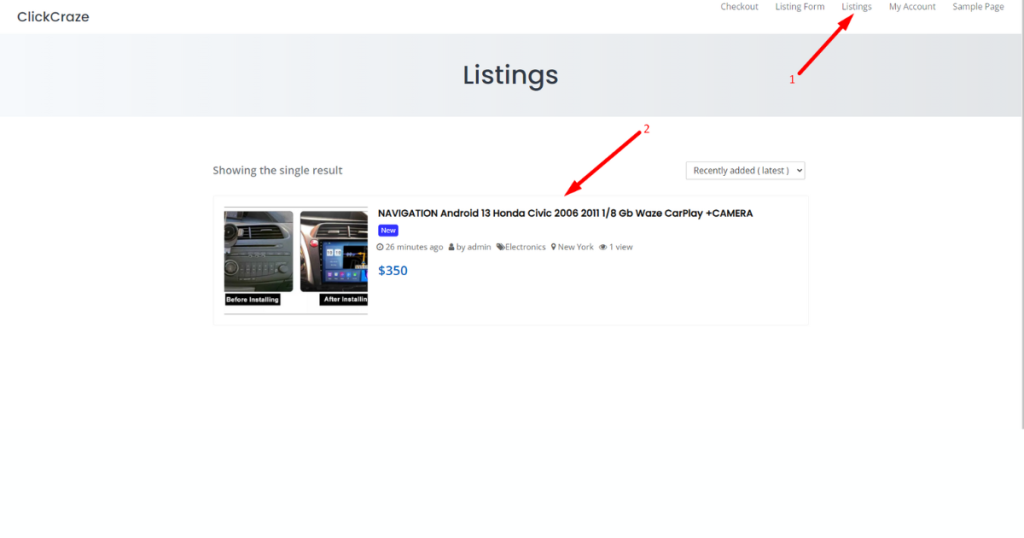
That’s how you build a classified website with WordPress and easily publish your first listing.
As you can see, we’ve built a basic classified ads website. We’ll now level it up by using a professional theme and upgrading the plugin to its pro version. Why?
We need to appear professional, so we’ll use a high-quality theme. We also want to use the pro plugin to utilize advanced listing features and monetization options. Let’s begin.
Step 7: Install the Best Classified Ads WordPress Theme (Free and Paid)
To stylize your classified ads website and make it professional, you need to install a superior-quality WordPress theme for your classified site. But the question is which one to use.
Well, here we’ve curated a list of the best free and paid WordPress themes for your favorite classified ads website.
1. CL Classified

It’s a free, user-friendly, lightweight, and high-quality WordPress theme you can install on your classified website. It’s ideal for entrepreneurs who run pet shops, fitness studios, hotels, restaurants, or people who want to dive into the music industry.
2. Radius Directory
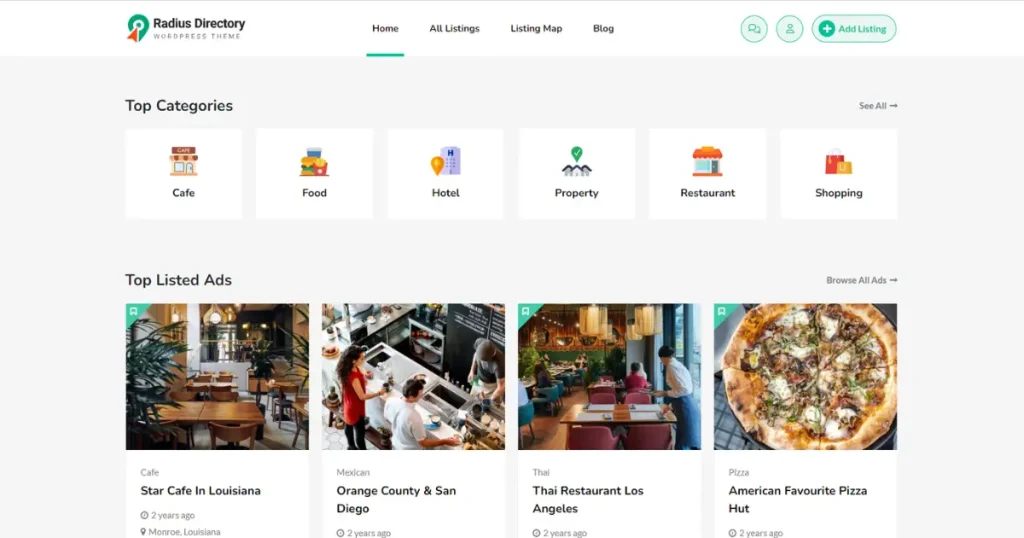
It’s a popular free directory theme. Users love this WordPress theme for its clean layout and several outstanding features. You may install this theme to build a listing website that oozes people.
3. Classima
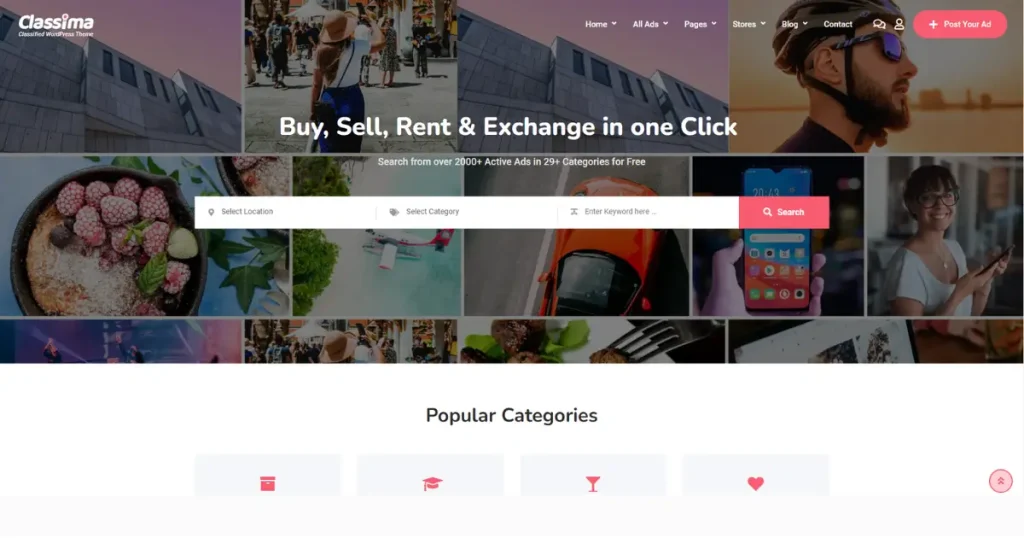
Classima is a fully responsive, feature-rich, lightweight WordPress theme for classified websites. It has all the features and elements you need for your website, including pages and shop functions.
It also has six different homepages, each with a unique design to impress your users. Thus, you can use it to create a top-notch classified website in WordPress.
4. CL Property
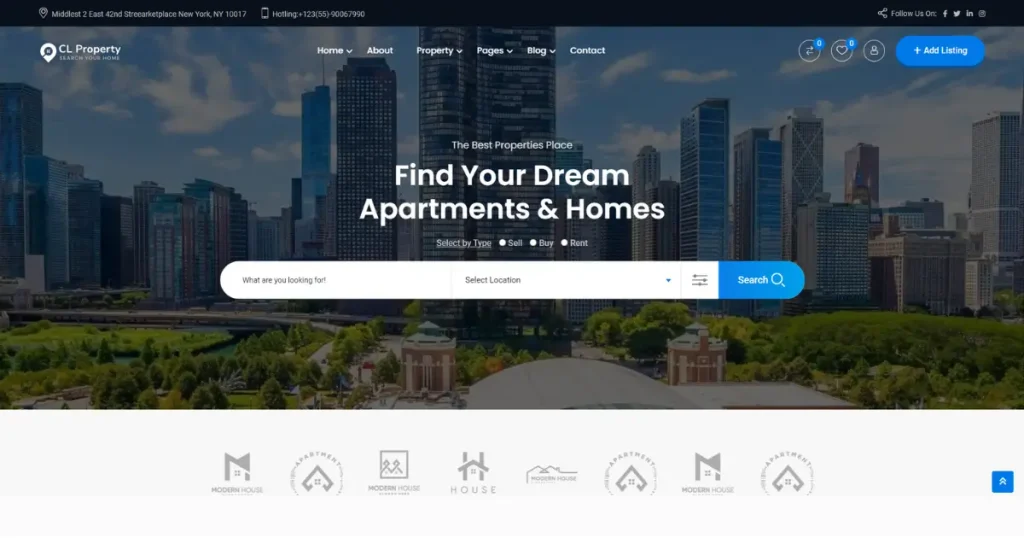
CLProperty is a solid WordPress theme designed to build stunning and highly functional real estate websites. It’s SUPER EASY to install and use.
5. CLDirectory
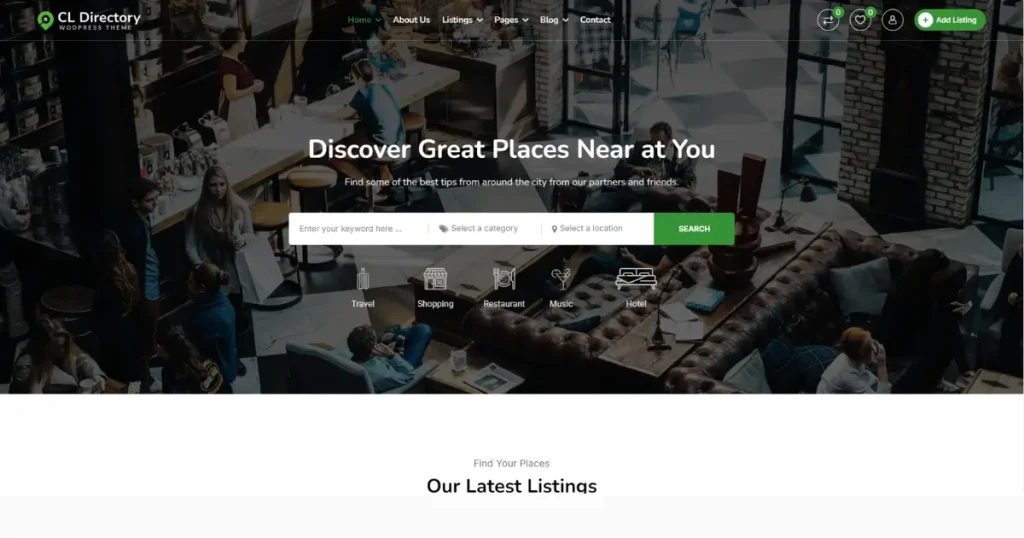
CLDirectory is an elegant, powerful WordPress Theme suitable for building multipurpose business directory websites in domains such as hotels and restaurants, medical, tourism, music, and more.
Other Notable WordPress Themes for Classified Websites
Here are a few more recommendations other than the top five ones listed above.
CL Car: Ideal for people in the automotive industry who want to build classified ads websites in this niche.
CL Restaurant: Suitable for individuals in restaurants, food, and catering businesses who prefer to create websites targeting this niche.
CLDoctor: A perfect theme with excellent layouts and elements to help you build a medical directory website.
ClassiList: It’s ideal for creating any kind of classified ads website, thanks to its eye-catching layouts and valuable elements.
Homlisti: A clean, modern, feature-packed, and powerful WordPress theme to build listing and directory websites.
We encourage you to read this blog post on Free & Premium Classified Ads WordPress Theme if you need more recommendations about themes for developing your classified ads website.
Once you’ve chosen a theme, download it or search it in the WordPress Theme Directory as you did for the plugin search. Then, install and activate it.
Step 8: Integrate a Payment System with Your Classified Ads Website
A payment system is quintessential for a classified ads website since you want to charge users for posting diverse ads, upgrading their listings, or accessing premium features.
With our Classified Listing plugin, you can effortlessly integrate multiple payment gateways with your classified ads website. For example, you can integrate PayPal with your website with our free plugin.
You can reap the benefits of Stripe and Authorize.net if you use the pro version of this plugin. Besides this, you’ll enjoy several other benefits with this pro plugin, which we’ll discuss in the monetization section of this article.
For now, let’s go back to configuring a payment system. Here’s how.
- Visit the WordPress Admin Panel.
- Head to Classified Listing > Settings.
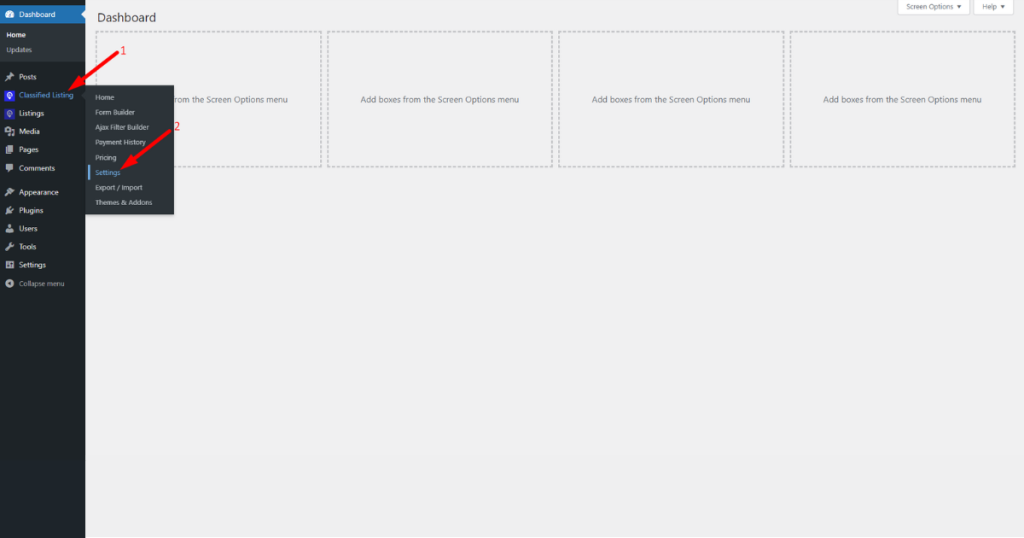
- After that, click the ‘Payment’ tab.
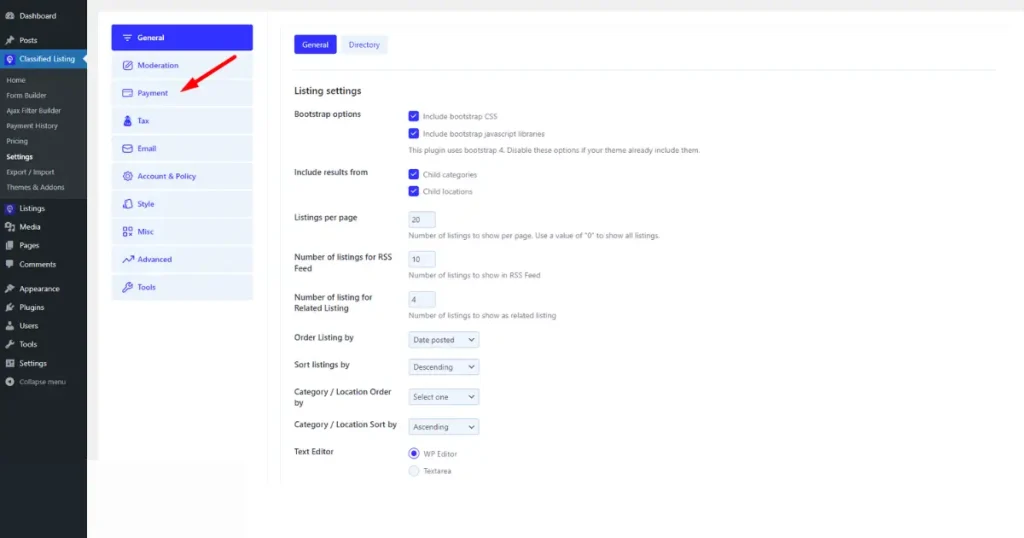
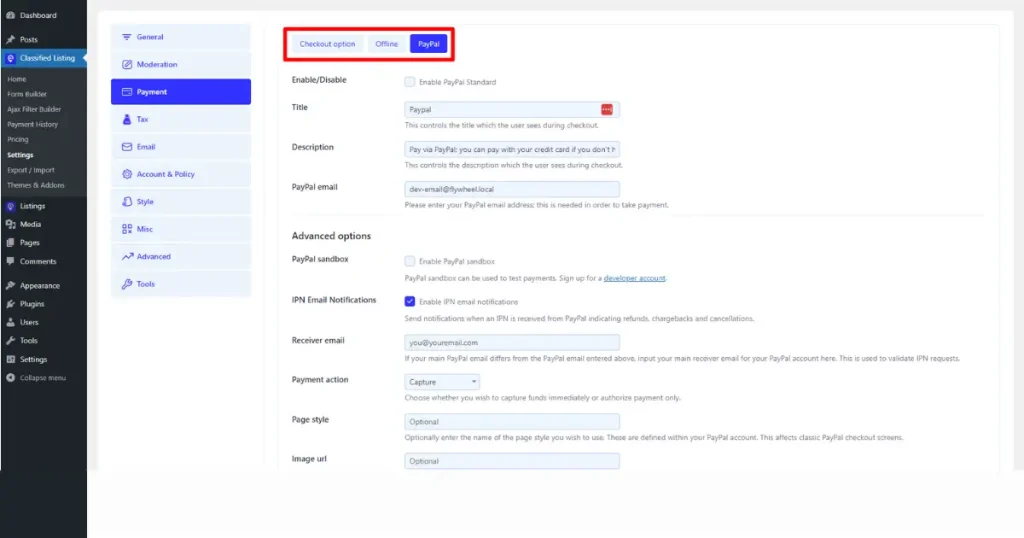
- Now, choose your preferred payment gateway and fill out the necessary fields with the information and API credentials.
- Lastly, hit the “Save Changes” button.
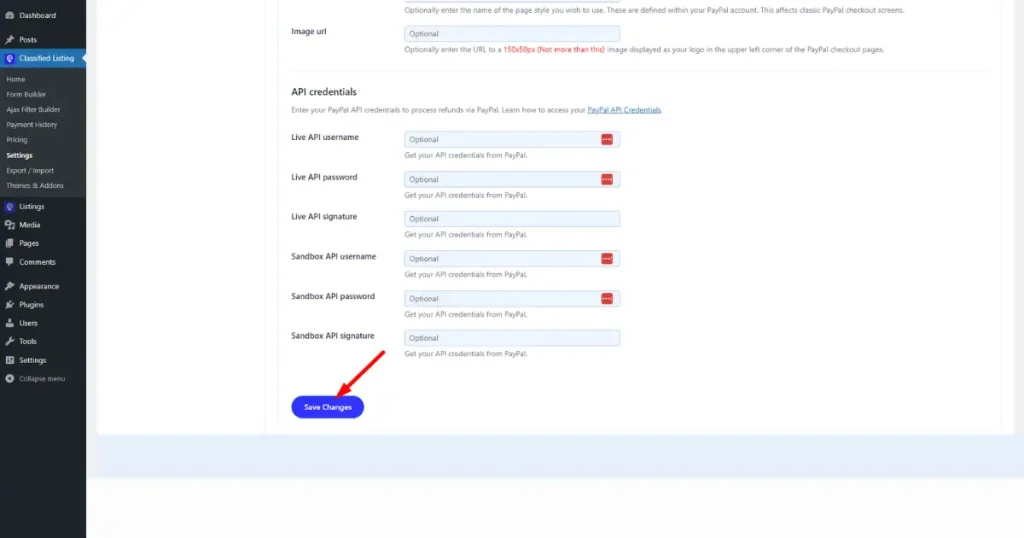
That’s how you integrate a payment system with your classified website using this plugin.
Step 9: Promote Your Classified Ads Website
After professionally creating a classified website on WordPress, you need to promote your site to attract web visitors and convert them into paid users. But how do you promote your website?
Follow these marketing strategies:
Social Media Marketing: Start by creating Facebook, Instagram, Twitter, and other social accounts to link your site with these social media platforms. Plus, regularly make valuable and informative social media posts and reply with solutions to your target audience’s comments.
Doing so helps you promote your website free of cost. However, utilize paid ads to capture potential customers if you have no budget strain.
Email Marketing: Email marketing is a powerful way to promote your classified website and increase sales. We recommend collecting potential emails using various tactics. Then, develop a robust email marketing strategy and start promoting your site.
SEO: Search engine optimization can help you gain a lot of organic traffic. But for that, you need to know how it works. Invest time in learning SEO and crafting helpful content. With time, you’ll learn to rank your classified website on Google and other search engines and eventually attract prospects.
These are some primary marketing strategies to follow to promote your classified website.
Step 10: Monetize Your Classified Website
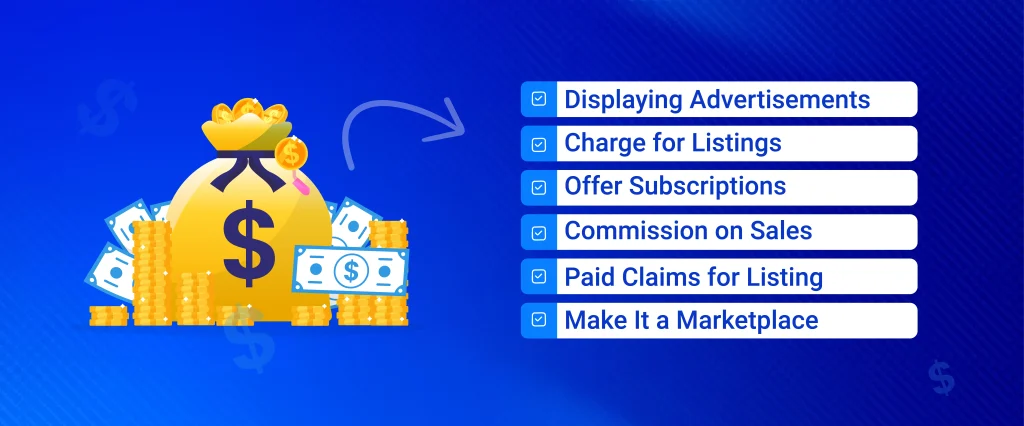
After gaining a considerable amount of web visitors, you can monetize them in various ways. Here are some practical methods to monetize your classified ads website.
- Displaying Advertisements: You can display ads from other businesses on your website and earn money from clicks or impressions. Also, you can earn money through Google Ads.
- Charge for Listings: You can charge users for posting their classified ads on your website. You can charge for top ads, featured ads, bump-up ads, and more.
- Offer Subscriptions: You can offer a paid subscription service that provides users with additional benefits, such as more visibility and unlimited listings.
- Commission on Sales: If your classified ads website focuses on selling goods and services, you can earn a commission on each sale made through your platform.
- Paid Claims for Listing: This strategy allows business owners to claim their listings in exchange for money. It is useful when your website has many visitors who post ads and keep their listings for a prolonged time.
- Make It a Marketplace: Use our Classified Listing Store & Membership addon to convert your classified site into a marketplace and earn money from buyers and sellers.
Apart from all these, you can utilize more earning opportunities with a classified ads website.
Therefore, build one today, and remember to check out our bundle package if you want to create a high-quality, professional classified ads website on WordPress.
Frequently Asked Questions (FAQs)
What is a Classified Website?
It’s an online platform where web visitors congregate to post advertisements to buy, sell, or exchange products/services. A classified ads website is distinctly different from an online marketplace.
Unlike marketplaces, a classified ads website enables everyone to post advertisements, whereas most online marketplaces only allow professional sellers to post advertisements.
Are Classified Ads Websites Profitable?
Indeed, classified ads websites are profitable if you build them around profitable niches and professionally market them. Also, implement diverse revenue models like paid listings, featured listings, premium memberships, and others discussed in this article’s monetization section.
How Much Does It Cost to Build a Classified Website?
You may need to spend anywhere from a hundred to several thousand dollars to build a classified website. How much money you will spend depends on your requirements, the site’s design, features, and complexity.
To give you an idea of how much money you’ll need, here’s a cost breakdown:
- Domain: Around $10 – $20 per year
- Web hosting: $5 – $10 per month (based on the plan)
- WordPress theme and classified plugin: $50 – $300, or more
Final Thoughts
You now know how to create a classified website with WordPress. We believe from now on, you won’t struggle to build such websites.
If you are still confused, we recommend that you watch this video tutorial on how to create a Free Classified Website in WordPress.Also, read this guide on How to Make a Website Like Craigslist. We wish you good luck on your journey of making classified websites on WordPress.



