


On This Page
Perhaps you have a print magazine and want to distribute it to a wider audience. That’s why you decided to create a magazine like blog online. You may have many questions about digital publishing.
We’ll cover everything in this article, from how to create a magazine-style blog to how to promote it to gain some traction. Regardless of your motive, this guide will let you achieve your goals with a little effort. So, keep reading it.
TL;DR
- To create a magazine-style blog, set up a WordPress site with a suitable theme, then install and use The Post Grid plugin.
- This plugin lets you easily import pre-made, grid-based layouts to build a professional-looking homepage.
- After building other essential pages (such as About, Author, and Contact), complete a final checklist and launch your site. Then, focus on SEO to attract readers.
Step 1: Select a Domain for Your Magazine-Style Blog
The first step to creating your blog is to determine a name for it. Mainly, you need to choose a domain for your blog that people will type in their web browsers to access your blog. Therefore, select one and consider the factors below when choosing a domain name.
- Select a short, easy-to-write, spell, pronounce, and remember name
- Avoid using hyphens, numbers, or other special characters in the domain name
- Check social media availability
- Choose a name that covers a broad niche
- Select a creative, non-literal name
- Determine the right domain name extension, like “.com”
- Check for trademarks
- Check domain name availability
- Check previous registration history and spam score
- Use the best domain name registrar to register the domain
Step 2: Connect It to a Host and Install WordPress
After selecting a domain name for your magazine-style blog, you need to connect it with a host to store essential files, such as images, videos, text, infographics, and others, on the web. So, select the best hosting provider to host your magazine-style blog.
Here’s what you should consider when selecting a hosting provider.
- Prioritize speed, scalability, and robust media handling when choosing a host
- Learn about different hosting types (e.g., managed, VPS, cloud, etc.) before selecting one
- Get a host that uses SSD storage and features a CDN to help your website load faster
- Select a hosting provider that offers server-level and application-side caching
- It’ll be better if your host has a built-in image optimization system
- Look for a host that ensures a high uptime guarantee
- Make sure your chosen host offers automatic backups and robust security (SSL certificates, DDoS protection, etc.)
- Get a hosting provider that guarantees 24/7 technical support
- Lastly, your chosen host should offer easy migration and upgradation
After selecting a host that meets the criteria above, connect your domain with the help of the technical support team at your chosen host. Then, install WordPress in your cPanel. Now, follow the steps in the next section.
Step 3: Install a Theme
Once you select a domain, connect it to a host, and install WordPress, it’s time to install a magazine WordPress theme to give your blog a professional and lucrative appearance.
You’ll find many themes in the WordPress theme repository. However, the question is which is the best magazine WordPress theme. To find it out, consider the following key pointers:
- Prioritize visual appeal while selecting a theme
- Ensure it offers grid-based layouts
- Make sure it comes with multiple category sections
- It should have featured content options
- It needs to be light, fast, responsive, and SEO-optimized
- It must offer customization freedom
- It’ll be great if it comes with custom widgets
- Ensure the theme is compatible with the latest version of WordPress and other essential plugins for a blog
- Make sure the theme gets regular updates
- Check other users’ reviews
Finally, pick a free or paid WordPress theme. If you need recommendations, you may try Neeon, Barta, or Blogxer themes. All these charge a small fee and are ideal for developing news or magazine-style blogs.
Step 4: Create Some Posts
At this stage, you need to create some demo blog posts. We know we’ve just installed a WordPress theme, and we’re supposed to design our website first. But we are creating some blog posts.
Yes, that’s true. We need to publish some demo posts to attractively design our magazine-style blog using a template. For now, you can either manually or automatically create some blog posts using your preferred demo content generator plugin.
Step 5: Install The Post Grid WordPress Plugin
Now the fun part begins. We’ll start building our magazine-style blog from now on. The development begins with installing the Post Grid plugin.
This plugin has 80+ sections and 20 page layouts to help you build professional blogs across diverse niches, including news, magazine, food, travel, fashion, and more. So, let’s install it.
To do so, head to Plugins >> Add Plugin from your WordPress Admin Panel.

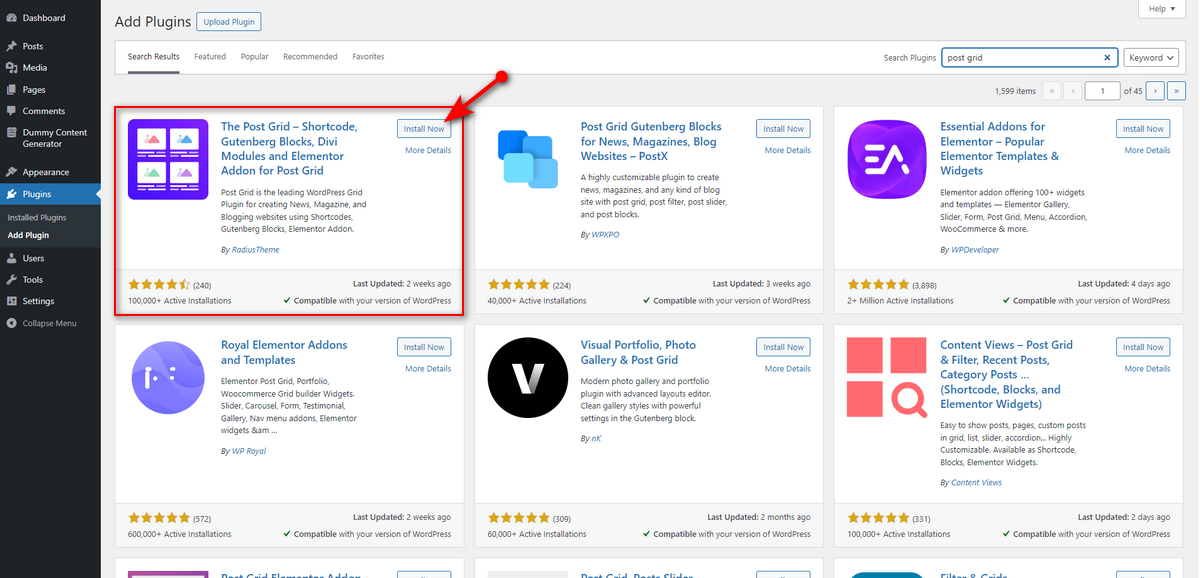
Now search for The Post Grid plugin using the search field on the top right.

Click Install Now button of The Post Grid plugin marked in the screenshot below.
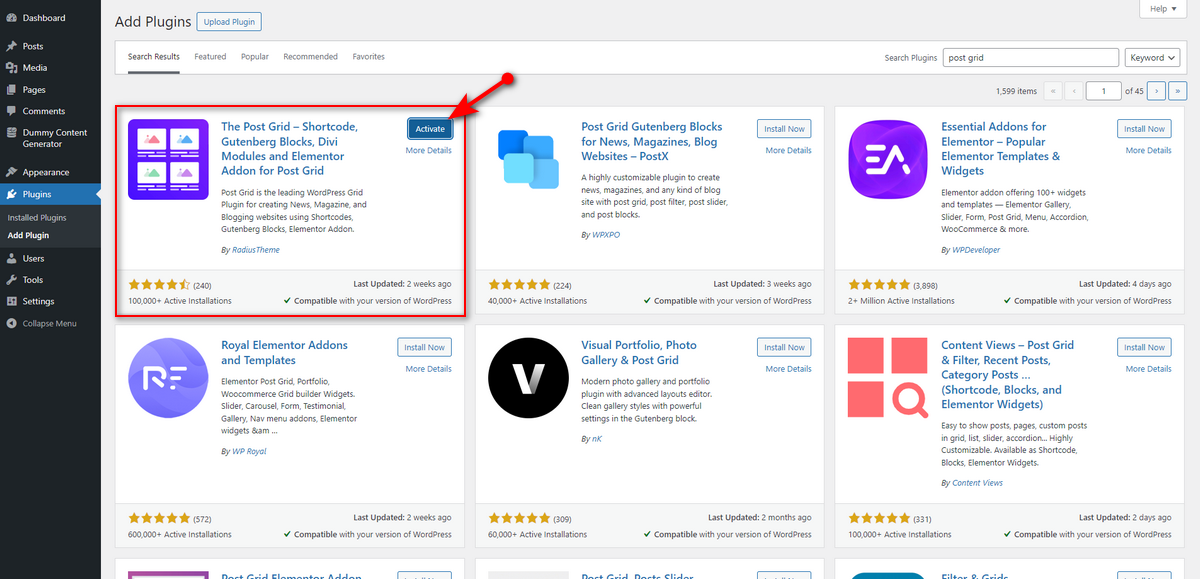
Finally, press Activate button of The Post Grid plugin.
Okay, you’ve installed and activated the free version of The Post Grid plugin. We recommend you get the pro version of this plugin to reap unparalleled benefits.
Step 6: Customize the Homepage
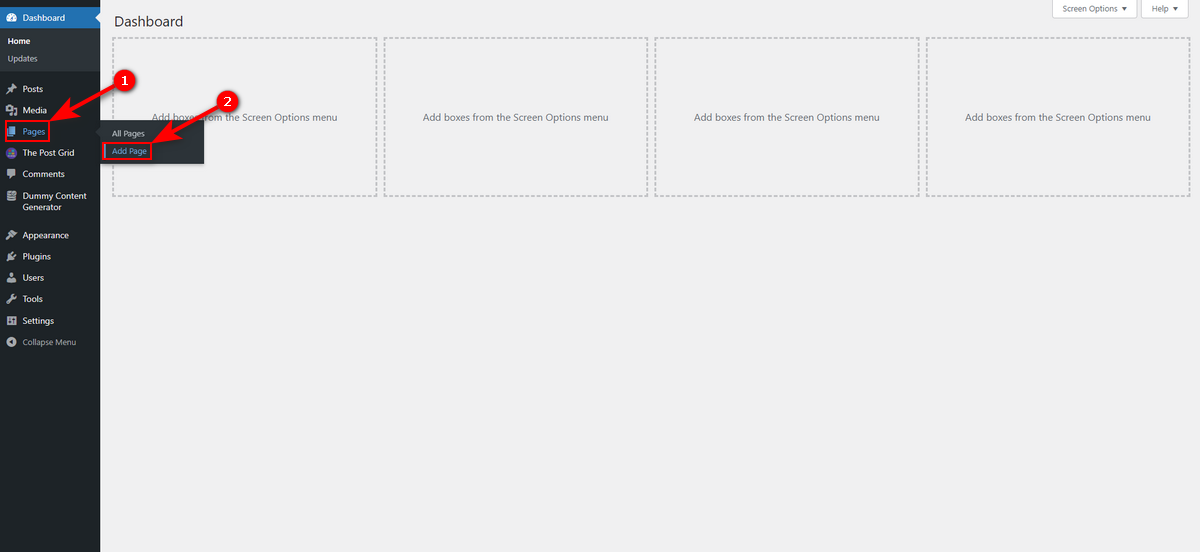
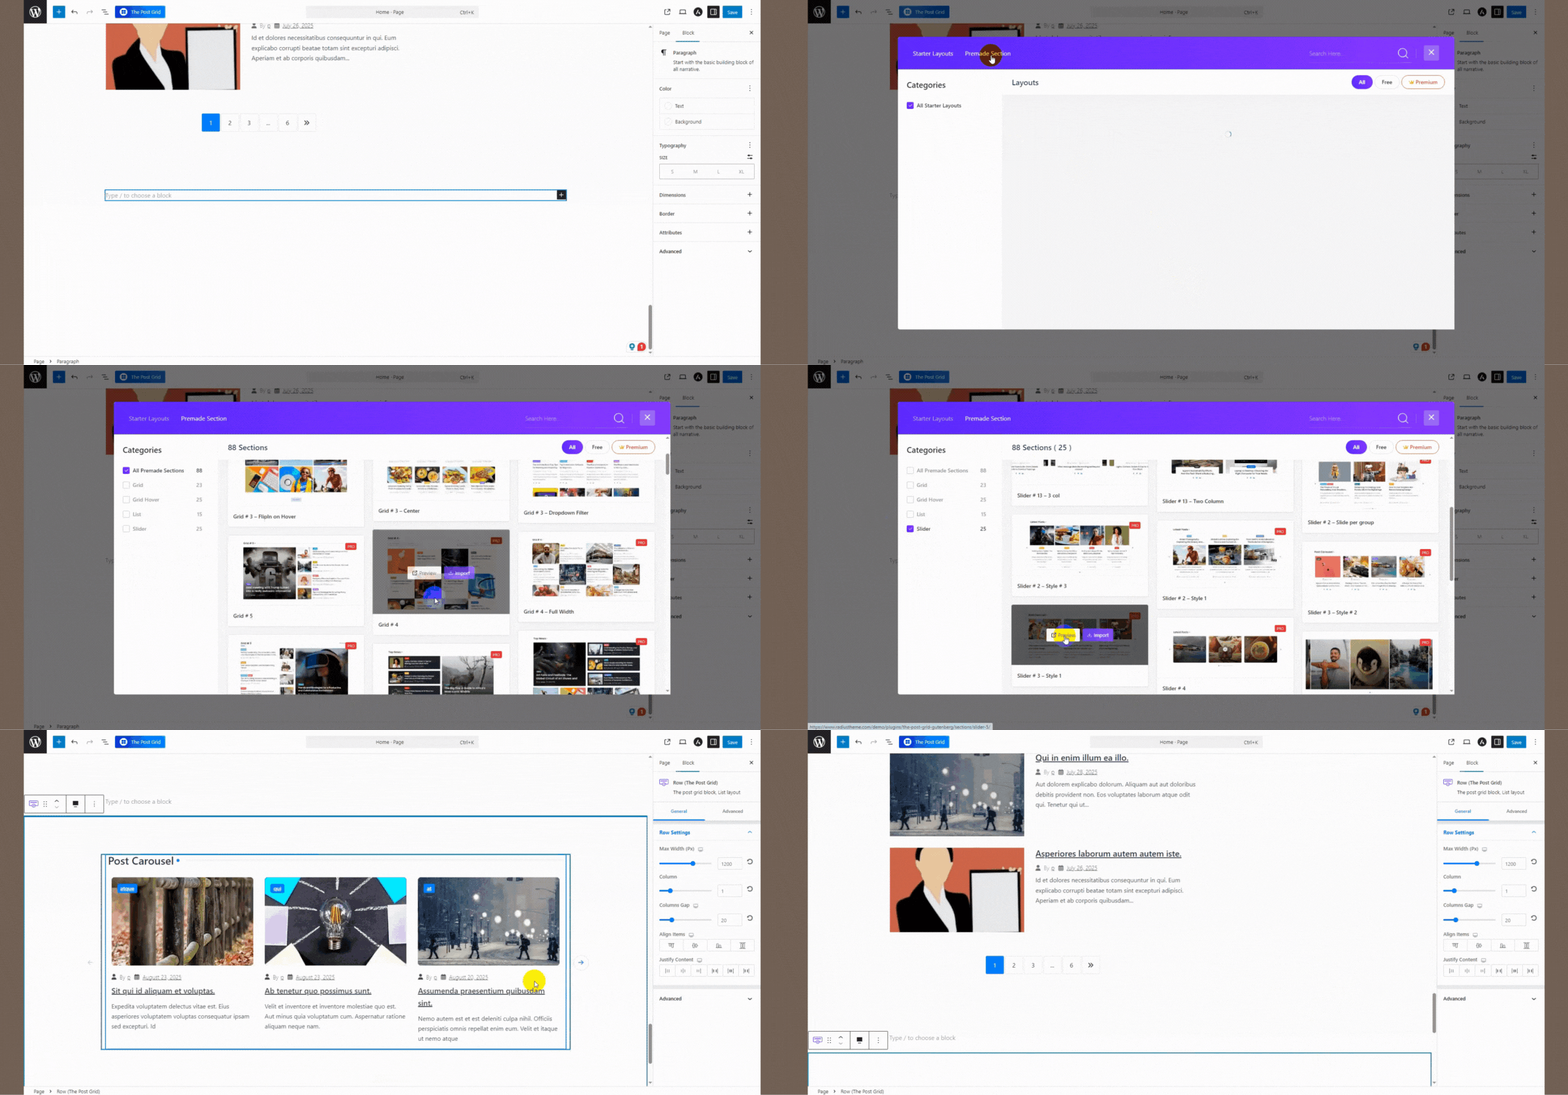
We’ll now build and customize the homepage of our magazine-style blog. So, first, create a homepage. Go to Pages >> Add page from your WordPress Admin Panel.
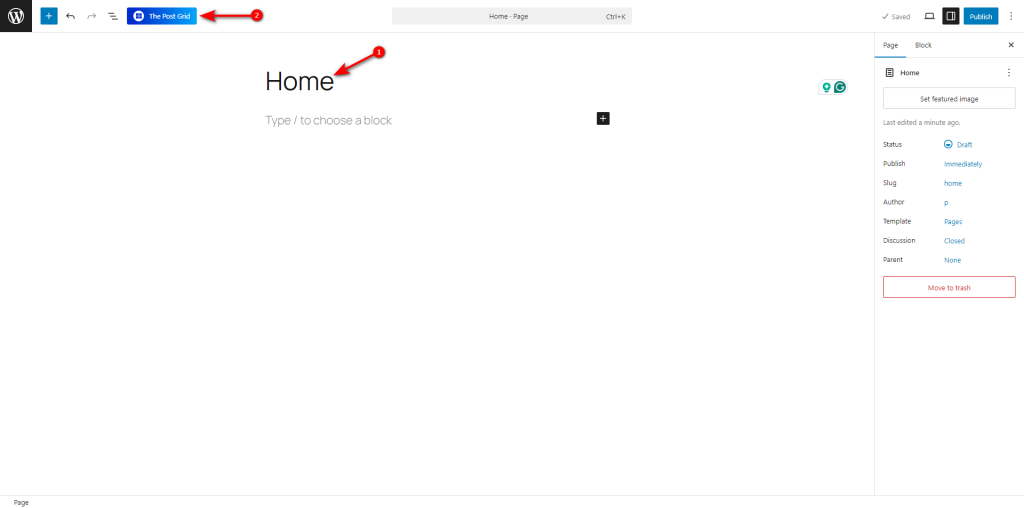
Now, write your page title and click The Post Grid button at the top left.
You’ll now notice a pop-up with Starter Layouts and Premade Sections.
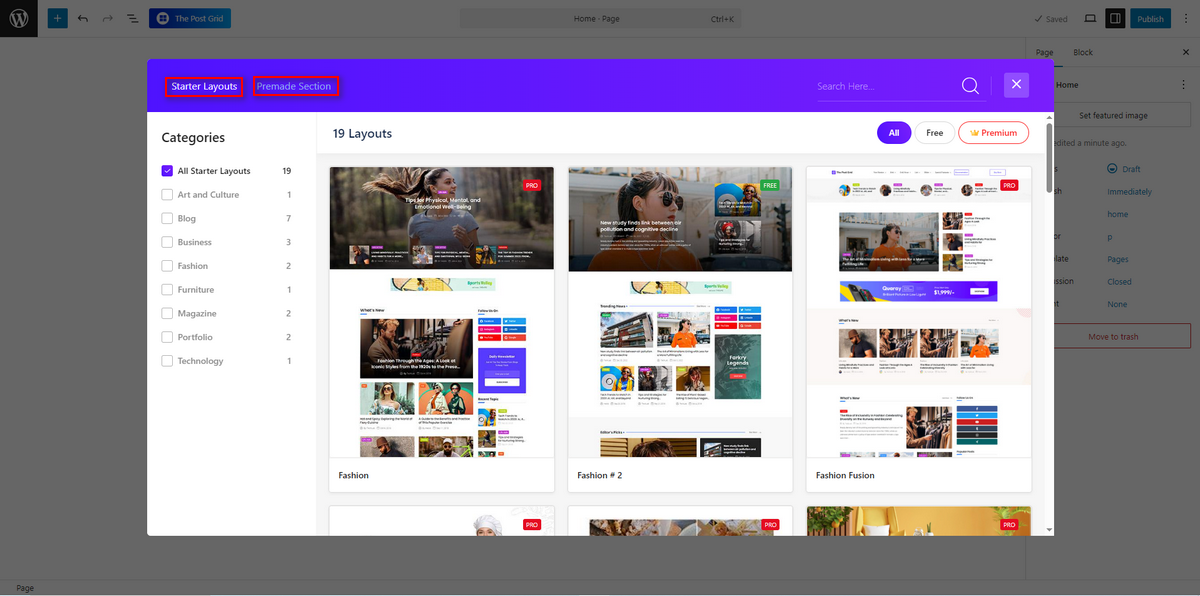
Click the Magazine category on your left side, choose a template, hover your mouse pointer over that template, and hit the Import button.
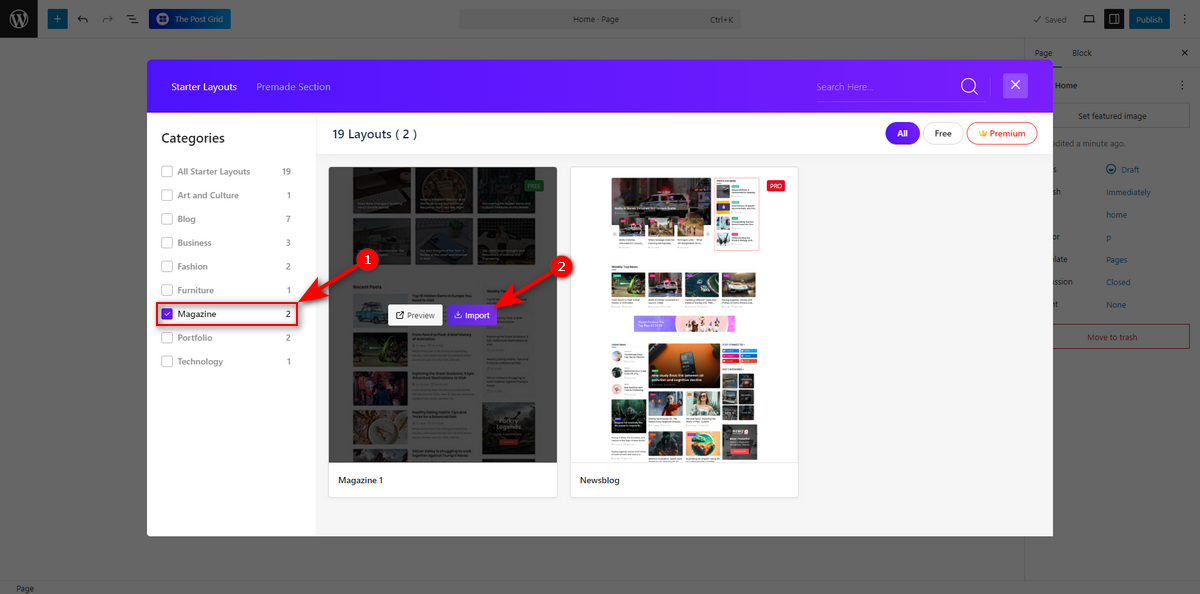
The template will be inserted in the Gutenberg editor. You can now select a parent block and see customization options for that block on the right side.
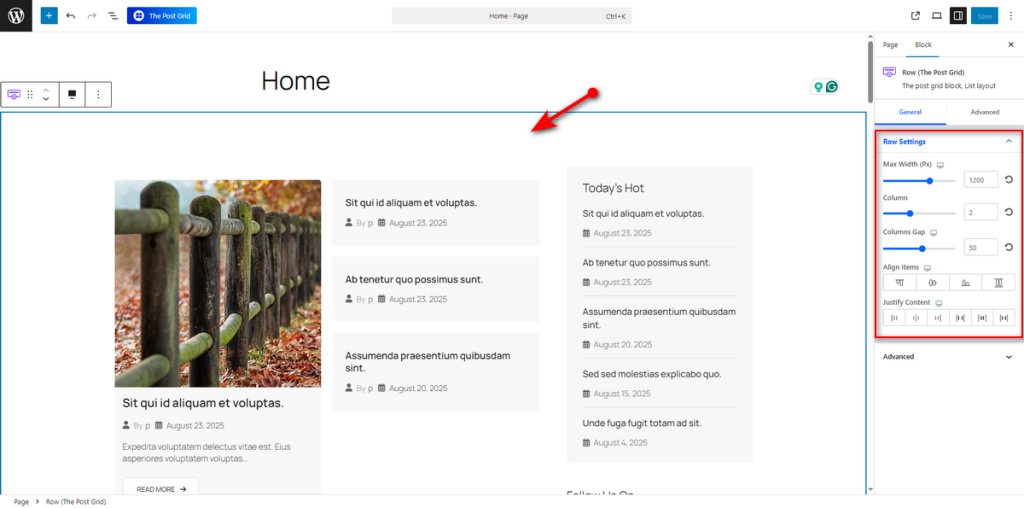
Let’s change the layout of a parent block. To do so, click the parent block you want to work on. On the right side, you’ll notice two options: Page and Block.
Click on Block and ensure you are on the Content tab. Here you’ll see a couple of pre-made layouts under the Layout section. Select one layout you like.

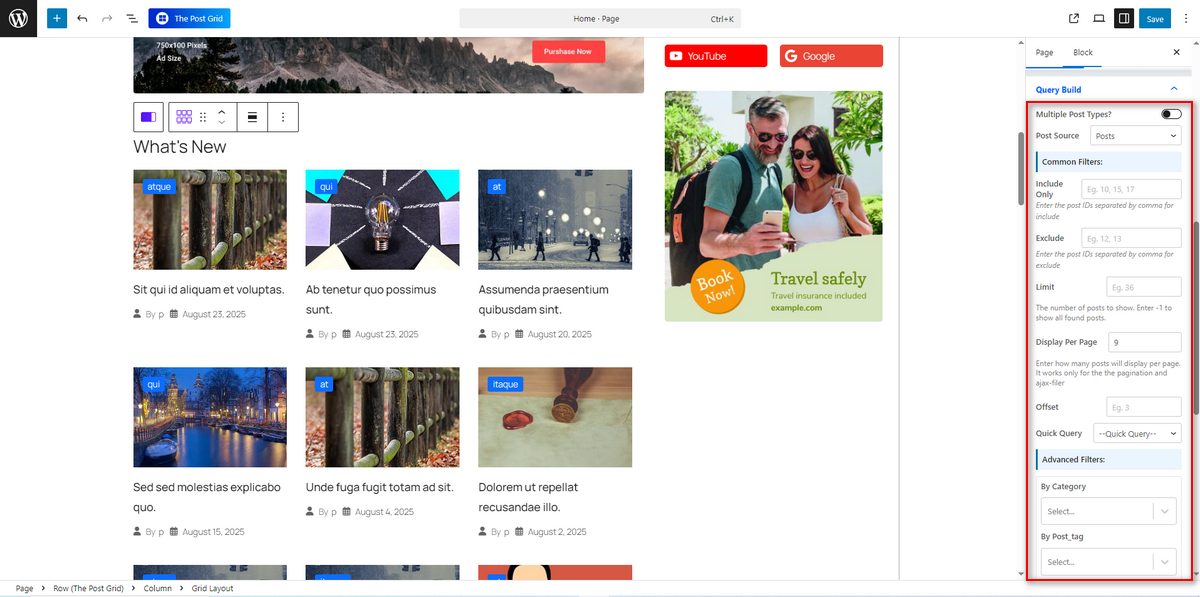
After that, we encourage you to explore other options for editing the homepage. For example, you want to show multiple post types on the homepage.
You can do that by enabling the Multiple Post Types? switch under the Query Build section. You can even select the post source as Posts, Pages, or Current Query.
That’s not all, you can include or exclude certain posts by ID from the homepage. You can determine the number of posts you want to display on this page as well. You can showcase posts of a category or an author.
If you need more options, we recommend you add a new block to your preferred area on the homepage. Then, click the Post Grid button again on the top left, select Premade Section, choose a section, and click the Import button to insert it into that block.
Once you’re happy with the customization, publish the page and see the changes.
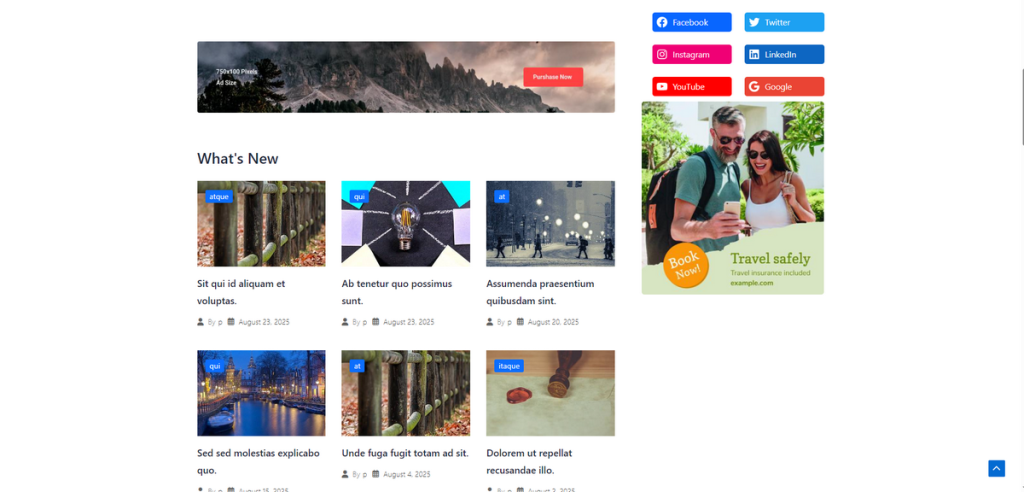
We’ve built the homepage of our magazine-style website.
Note that we skipped showing you the customization of the header and footer to keep the content compact.
You can easily customize these sections using your theme’s customizer. So keep editing.
Step 7: Build Other Essential Pages
After designing your homepage and single post layout beautifully, it’s time to create the other essential pages that every professional magazine blog needs. Here are the key pages you should consider building:
- About Page: An About page is crucial for a magazine-style blog, as people tend to trust you more after learning about yourself. So, create a professional-looking page.
- Author Page: Author page is a non-negotiable element of a magazine-style blog. This page helps build trust and credibility with readers by displaying the author’s expertise and personality.
Additionally, an author page helps with SEO. It enables a magazine-style blog to establish authority and rank high on search engine result pages.
- Contact Page: After the Author page, you should create a Contact page to facilitate easy contact with you for collaboration or other purposes.
While creating this page, provide a clear and easy way for readers, collaborators, and potential advertisers to get in touch.
You can use the standard Gutenberg editor to add your contact details, social media links, and a contact form.
- Category Pages: For a magazine-style blog, category pages are crucial. They act as curated hubs for different topics (e.g., “Fashion,” “Travel,” “Tech”).
You can use The Post Grid’s Template Builder (Pro version) to design these archive pages, just as you did with the single post layout. - Privacy Policy: A Privacy Policy page is legally required in many regions, particularly when collecting user data through comments, contact forms, or analytics. Thus, build one, and you might use a free online generator to create a basic policy for your site.
- Lastly, ensure that all your blog posts appear clearly and in an easy-to-read format before the eyes of your target readers. So, don’t forget to design your post details page. You can use the Post Grid’s Template Builder to easily create an alluring, SEO-friendly, and convincing author page.
This plugin also has features to give you the ability to allow guest users to collaborate on the growth of your blog. You can create a My Account page and allow people to make posts on your magazine blog without accessing the WordPress dashboard!
However, once you build these pages, you need to add them to your site’s navigation menu, which we’ll cover in the next step.
Step 8: Publish Your Magazine-Style Blog
You are so close to launching your magazine-style blog. Before you do so, it’ll be wise to run through a final pre-launch checklist to ensure everything is perfect.
Hence, follow these final steps:
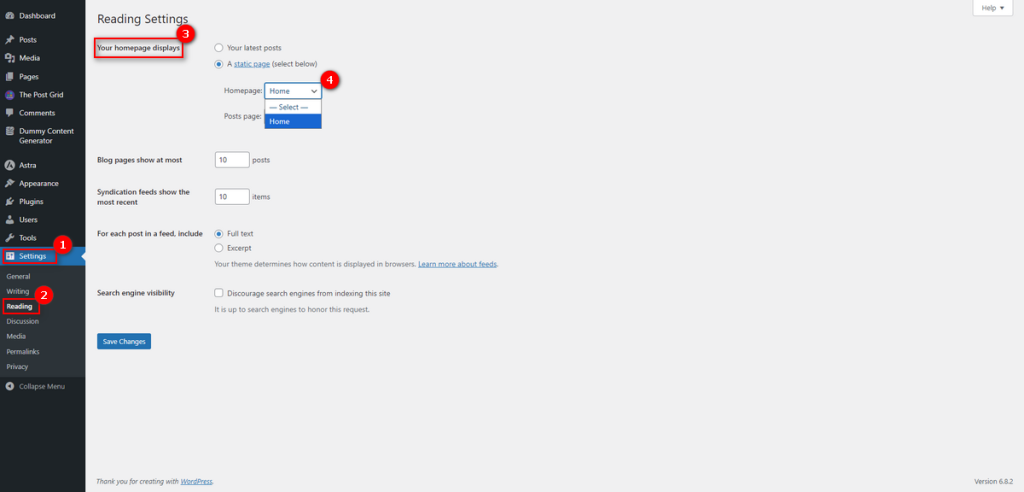
- Set Your Homepage: WordPress shows your latest blog posts on the front page by default. Since you’ve designed a custom homepage, you need to tell WordPress to use it.
Go to Settings >> Reading from your WP Admin Panel. Under “Your homepage displays,” select “A static page.”
Then, from the Homepage dropdown menu, choose the page you created in Step 6.
- Configure Your Navigation Menu: A website without a menu is like a magazine without a table of contents.
Go to Appearance >> Menus. Create a new menu, give it a name (such as “Main Menu”), and then add your newly created pages (e.g., Homepage, About, Contact) and categories to it.
Assign this menu to the “Primary Menu” location (or a similar name, depending on your theme).
- Review Your Blog: Now, click through every page and post on your site. Check for typos, grammatical errors, and broken links. Ensure that all your images load correctly and your grid layouts appear visually appealing.
- Check for Responsiveness: Use your browser’s developer tools to see how your site looks on different devices (desktops, tablets, and smartphones).
Remember that a responsive design is quintessential, as a large portion of your readers will likely visit from a mobile device.
- Remove Demo Content: Remember those demo posts you created in Step 4? Now is the time to delete them.
Navigate to Posts >> All Posts, select the demo content, and move it to the trash.
- Hit Publish! Once everything is checked and double-checked, you’re ready. It’s time to start writing your real content and sharing your new magazine-style blog with the world!
Step 9: Optimize for SEO
Your blog is live and looks fantastic, but the journey doesn’t end here. Now, you need to ensure that people can find it. But how do you do so?
Try Search Engine Optimization (SEO). It’s the process of making your site more visible on search engines like Google.
Here’s a basic roadmap to get you started with SEO:
- Install an SEO Plugin: The easiest way to manage your blog’s SEO is with a dedicated plugin. Popular choices like Yoast SEO or Rank Math are excellent.
They will guide you through optimizing each post and page with focus keywords, meta descriptions, and readable content analysis. - Submit a Sitemap: A sitemap is a file that lists all the pages on your website, making it easier for search engines to crawl and index your content.
Your chosen SEO plugin will automatically generate one for you. You’ll need to submit this sitemap URL to Google Search Console, a free tool that helps you monitor your site’s performance in Google search.
- Focus on On-Page SEO: For every article you publish, pay attention to on-page SEO basics. This includes:
- Use your target keyword in the post title, headings (H1, H2, etc.), and the first paragraph.
- Write a compelling meta description to encourage clicks from search results.
- Optimize your images by using descriptive file names and adding “alt text.”
- Utilize internal links to connect your new articles to other relevant posts on your blog.
- Use your target keyword in the post title, headings (H1, H2, etc.), and the first paragraph.
- Prioritize Quality Content: Ultimately, the most important SEO factor is high-quality, valuable content. Write articles that answer your readers’ questions, solve their problems, and provide unique insights.
A well-designed, magazine-style layout combined with excellent content is the ultimate formula for success.
Step 10: Monetize Your Magazine Blog
After building and promoting your magazine blog, once you gain a significant amount of traffic, you can monetize your blog. You can implement some or all of the earning methods outlined below.
Advertising: You can join ad networks like Google AdSense and place banner ads on your website to make money from ad views.
Sponsored Content: Partner with brands to generate money by creating paid content, social media posts, and more.
Affiliate Marketing: You can join diverse affiliate networks and promote various products and services to earn a commission for every sale made through your unique affiliate links on your magazine blog.
Subscriptions & Memberships: Offer membership packages on your magazine website, promoting exclusive content, bonus articles, and a private community for paying subscribers.
Digital Products: You can create ebooks, online courses, magazine templates, or any other digital products relevant to your blog’s niche and sell them on your website.
Consultation: You can monetize your expertise to earn money. For example, offer freelance writing services or blog audits for clients through your magazine blog.
Bonus: Explore a Few Magazine-Style Blogs for Inspiration
This section covers some popular magazine-style blogs, which you can explore before you start building your blog.
1. Vogue

Vogue brings its iconic print legacy into a dynamic digital presence. Its website design is clean and visually driven. Vogue prioritizes bold imagery and adequate white space on the website to immediately immerse the viewer in an editorial world.
It utilizes a sophisticated and minimalist color palette, enabling the vibrant fashion photography to capture attention. As you are aware, typography plays a crucial role in making a website visually appealing. Vogue masterfully employs classic typography for headlines.
Vogue’s website layout is fluid, and it has a grid-based structure that seamlessly blends text and multimedia. Such a structure creates a compelling visual hierarchy, ensuring the website feels modern, luxurious, and fast.
2. Openhouse

The Openhouse Magazine website is a beautiful extension of its print counterpart, embracing a minimalist and art-driven aesthetic. It feels both spacious and intimate.
The design is clean and uncluttered, relying heavily on a grid-based layout. This layout places a strong emphasis on stunning, high-resolution photography. Ample white space is used throughout, creating a sense of calm and allowing the visual narratives to breathe.
The typography is simple and elegant, with a focus on readable sans-serif fonts that complement the imagery without competing with it.
This deliberate and restrained approach to design builds a sophisticated, gallery-like experience. The website effectively translates the tangible, tactile qualities of a print magazine into a digital format.
3. The Zoe Report

The Zoe Report’s website design successfully captures the essence of a high-end fashion and lifestyle magazine.
The aesthetic is modern, clean, and aspirational, with a strong emphasis on large, high-quality visuals and a sophisticated, yet approachable, tone.
Like a print magazine, the website is image-driven. Articles are introduced with large, captivating photos, and content is broken up with visually appealing graphics and product shots. This creates a highly visual and engaging experience for the user.
The typography is clean and modern, with a mix of bold headlines and easy-to-read body text. This creates a clear hierarchy and guides the reader through the content.
The Zoe Report’s website design is a successful example of how to translate the magazine experience to a digital platform.
4. TechCrunch

TechCrunch’s website has a sleek, modern magazine-style design. Its clean layout features a bold typography that ensures readability across devices.
Its homepage is structured like a digital newsstand, featuring a dynamic hero section that spotlights top stories and a grid-based layout for easy navigation through categories.
The visual hierarchy is expertly crafted, utilizing large, high-quality images and concise headlines to draw readers in. The design balances dense content with ample white space, avoiding clutter while promoting discoverability.
Overall, this design enhances user engagement and the site delivers timely, impactful tech news to a global audience.
5. Gizmodo
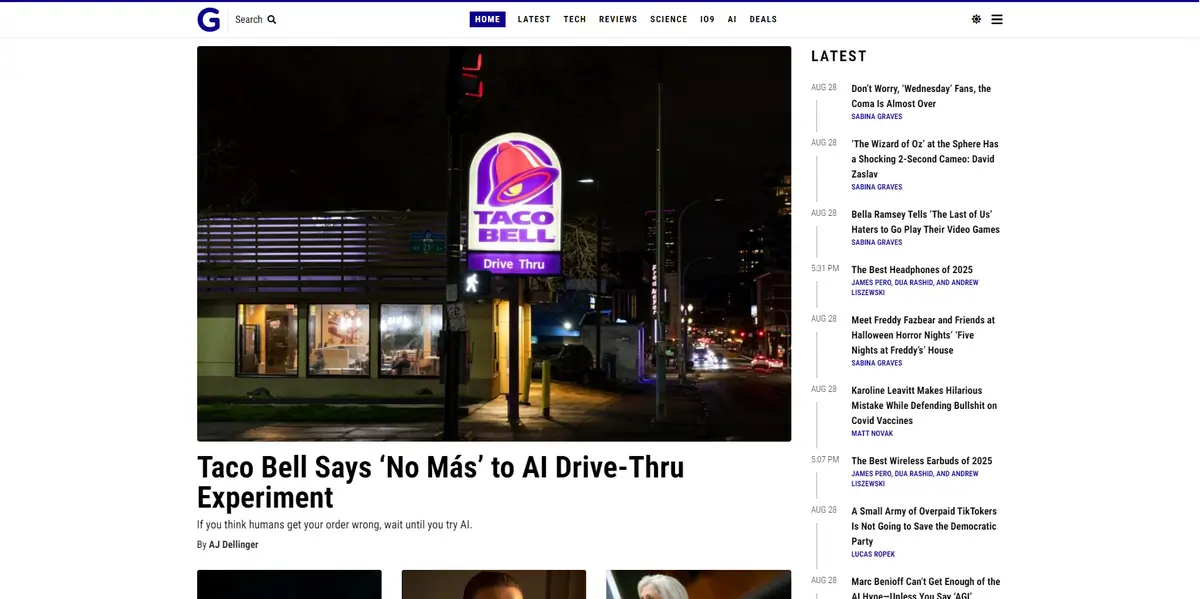
Gizmodo’s website delivers a bold, immersive magazine-style experience. Its design embraces a futuristic aesthetic with a dark-themed interface.
Its homepage is a dynamic editorial canvas, featuring a prominent hero section with striking visuals and punchy headlines that grab attention.
A grid layout organizes content into intuitive categories, ensuring easy navigation and organization. Clean, modern typography paired with high-resolution images creates a polished, engaging look, while strategic white space prevents visual overload.
Interactive elements promote user connection. Gizmodo’s blend of sleek visuals and accessible structure makes it a compelling website for forward-thinking readers.
Wrapping Up
That’s all with the content on how to create a magazine-style blog using Post Grid plugin. We shared an easy-to-follow guide to help you build a professional blog like magazine on WordPress.
Additionally, we shared tips to help you gain organic traffic and provided some blog examples to inspire you and gather design ideas before creating your website. We think you found this article promising and will share it with others in appreciation of our efforts.



