
On This Page
Almost nobody asks a friend for a dentist recommendation anymore. They open Google, type “dentist near me,” and start comparing — reviews first, then whether the practice takes their insurance, then whether they can book without calling.
That gap between “I need a dentist” and “I have an appointment” is where a dentist directory lives. And dental is one of the strongest niches in the entire local directory market, because dental patients are searching with money already in hand and practices are used to paying to be found.
This tutorial walks you through building a dentist directory WordPress site from planning to launch, using the CL Doctor theme. No coding required. More importantly, it covers the part most tutorials skip: the dental-specific data model that separates a directory patients actually use from a generic list of names and phone numbers.
Key info at a glance
| Question | Short answer |
|---|---|
| What you’re building | A searchable directory of dentists and dental clinics, with profiles, reviews and online booking |
| Time to launch | A weekend for the site; the real work is gathering listings |
| Coding needed | None — drag-and-drop forms and Elementor |
| Core tools | WordPress hosting, CL Doctor theme, Google Maps or OpenStreetMap, Stripe or PayPal |
| Typical cost to start | Theme from $34/year (or $41 one-time) plus hosting and a domain |
| How it earns | Paid and featured listings, memberships, listing claims, booking fees, ads |
| Hardest part | Getting your first 50 real listings and keeping insurance data accurate |
What is a dentist directory website?
A dentist directory website is a searchable database of dental providers where patients can filter by location, specialty, insurance accepted and availability, view a full practice profile, read verified reviews, and — on modern platforms — book an appointment directly.
It’s a two-sided business. Patients supply the demand and pay nothing. Dentists supply the listings and pay for visibility, leads or bookings. Your job is to make the patient side so useful that the dentist side has no choice but to be on it.
Why dental is a smart directory niche
If you’re still weighing niches, dental has a set of advantages that most local verticals don’t:
- High-value, repeat searches. A single implant, aligner case or crown is worth thousands to a practice. That makes a lead from your site genuinely valuable, which makes paid listings an easy sell.
- Practices already buy marketing. Dental is one of the most competitive local ad markets in existence. You’re not teaching a market to spend — you’re offering a cheaper channel.
- Real filters that patients care about. Insurance, emergency availability, sedation options, evening hours. Filters give you page depth and long-tail rankings that a thin directory can never build.
- Specialties multiply your content. Orthodontists, pediatric dentists, oral surgeons, endodontists, periodontists and cosmetic dentists each deserve their own landing page in every city you cover.
- Anxiety is a content moat. A large share of patients avoid the dentist out of fear. Content and filters built around gentle care, sedation and first-visit expectations serve a need no insurance portal addresses.
If you haven’t settled the niche question yet, it’s worth reading general directory vs niche directory before you build. Narrow almost always wins at the start.
What makes a dental directory different from a doctor directory
This is the section to actually pay attention to. Most people build a dentist directory by installing a directory theme, renaming “doctor” to “dentist,” and wondering why nobody uses it.
Dental patients make decisions on a specific set of criteria, and those criteria have to exist as fields and filters in your database — not as paragraphs buried in a profile description.
| What dental patients decide on | What it needs to be on your site |
|---|---|
| “Do they take my insurance?” | A multi-select insurance field, filterable — plus dental savings plans, which many patients use instead |
| “What will this cost me?” | Per-procedure price ranges or “free consultation” flags; dental work is often paid out of pocket |
| “Can I be seen today?” | An emergency and same-day availability toggle, and real appointment slots |
| “Will it hurt?” | Sedation and anxiety-friendly care fields — nitrous, oral sedation, IV |
| “Do they do the specific thing I need?” | A treatments field: implants, aligners, root canal, whitening, veneers, extractions, braces |
| “Is this right for my kid / my parent?” | Pediatric and geriatric care flags, plus wheelchair access |
| “Can I get there after work?” | Structured business hours including evenings and weekends |
| “Will they understand me?” | Languages spoken |
| “Are they legitimate?” | License or registration number, graduation year, association membership |
Build these as real structured fields and three things happen at once: patients get filters that work, dentists get profiles that convert, and search engines get the structured data that earns rich results and AI Overview citations.
What you need before you start
- A domain. Prefer something location-plus-category and readable:
brightsmilefinder.com,dentistsnearleeds.co.uk. Avoid hyphen stacks. - WordPress hosting. Any decent managed host. Directories are database-heavy, so don’t buy the cheapest tier you find.
- The CL Doctor theme. It’s built on the Classified Listing Pro engine, so the directory machinery — custom fields, AJAX filters, submission forms, payments, dashboards — is already there rather than bolted on.
- A map provider. Google Maps for Street View and premium imagery, or OpenStreetMap free with no API key.
- A payment gateway. Stripe or PayPal, for paid listings and booking payments.
- A listing plan. Decide before launch how you’ll get your first 50 dentists. This matters more than any setting in this tutorial.
Step 1: Define your scope and your directory types
Resist the urge to cover a whole country on day one. A directory with 400 dentists in one metro area is useful. The same 400 spread across a nation is useless, and Google treats it accordingly.
Pick one city or region, then decide what you’re listing. In CL Doctor’s multi-directory setup you can run several listing types from one install:
- Dentists — individual practitioners with their own profiles
- Dental clinics and practices — locations, with multiple dentists attached
- Optionally dental labs, orthodontic centres or emergency clinics
Listing individuals and practices is the right call for dental. Patients search both ways: some want “a dentist named Dr. Rahman,” others want “a clinic in Banani that’s open Saturday.”
Then map your specialty taxonomy — general dentistry, orthodontics, pediatric dentistry, oral surgery, endodontics, periodontics, prosthodontics, cosmetic dentistry, implantology — and your location taxonomy down to neighbourhood level. Neighbourhoods are where the easy long-tail traffic is.
👉 Good Read: How to Get Your First 100 Listings for a New Directory Website
Step 2: Install WordPress and the CL Doctor theme
Standard WordPress work, and quick:
- Install WordPress on your hosting.
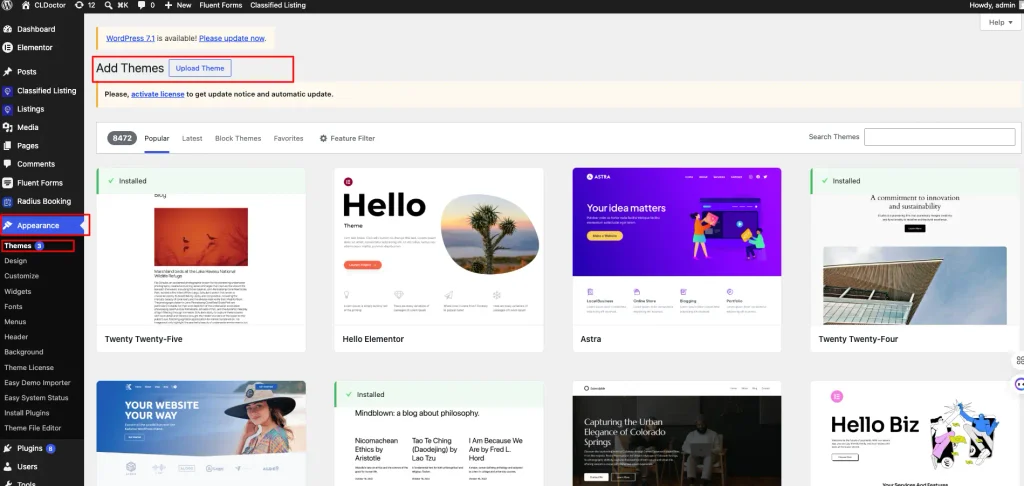
- In the dashboard, go to Appearance → Themes → Add New → Upload Theme and upload the CL Doctor
.zip. - Activate the theme, then install the bundled plugins it prompts you for — Classified Listing Pro, Classified Listing Store, Elementor and SchemaEngine.
- Activate your license so you get updates.
If WordPress itself is new to you, our guide to installing a WordPress plugin covers the basics.
Step 3: Import a demo and make it yours
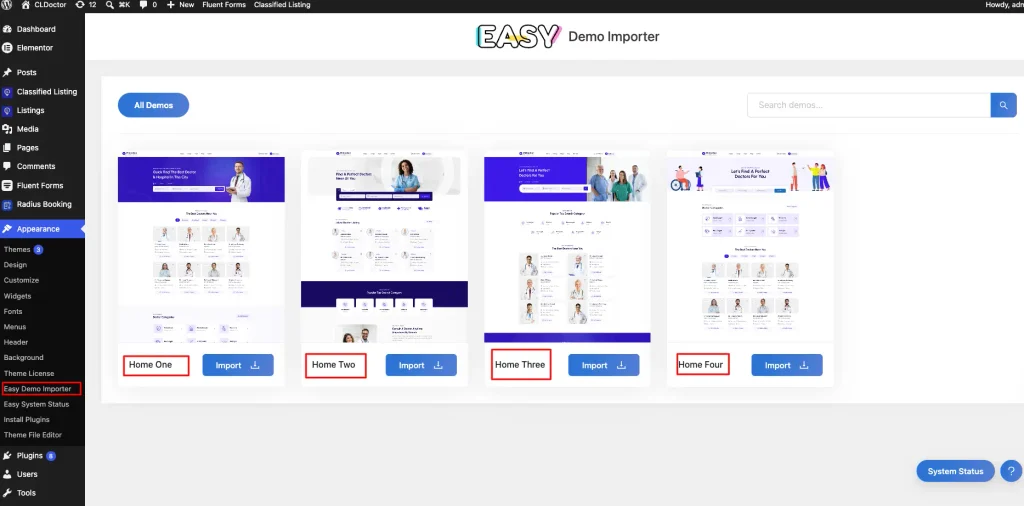
Use one-click demo import to get a working site rather than a blank one. CL Doctor ships with four homepage demos; pick the one closest to what you want and import it.
You’ll get pre-built pages, menus, a submission flow and sample listings. Then:
- Swap the logo and set your brand colours in the theme options.
- Rewrite the homepage headline in patient language, not industry language. “Find a dentist who takes your insurance” beats “Premier Dental Provider Network.”
- Delete the demo listings once your real ones are in. Fake listings destroy trust faster than an empty category.
Step 4: Build the dentist submission form — the step that matters most
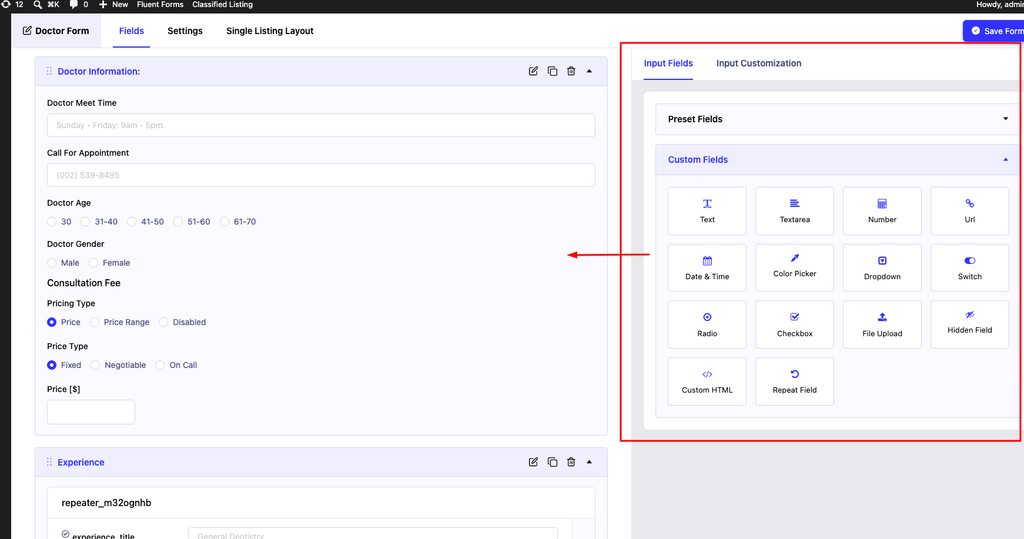
This is where your directory is actually made. Everything in the table above becomes a field here.
Open the drag-and-drop form builder and construct the dentist form. CL Doctor gives you 37 field types with conditional logic, so you can build a genuinely dental form:
Identity and credentials
- Full name, professional title, profile photo
- License or registration number (text)
- Qualifications and graduation year
- Years in practice (number)
- Association memberships (checkbox)
Clinical
- Specialty (select, from your taxonomy)
- Treatments offered (multi-checkbox — this drives your most valuable filter)
- Sedation options available (checkbox)
- Accepts pediatric patients (toggle)
Practical
- Clinic address with map location
- Business hours (use the dedicated business-hours field, not free text)
- Emergency / same-day appointments (toggle)
- Languages spoken (multi-select)
- Wheelchair accessible (toggle)
Money
- Insurance plans accepted (multi-checkbox)
- Dental savings plans accepted (multi-checkbox)
- Consultation fee or price range
- Payment plans available (toggle)
Proof
- Photo gallery of the clinic
- Before-and-after gallery
- Website, phone, WhatsApp
Use conditional logic to keep the form short: only show the sedation detail fields when “offers sedation” is checked, only show orthodontic sub-fields for orthodontists. Long forms are the single biggest reason listing submissions get abandoned.
If building all that by hand sounds tedious, the AI form generator will draft the whole structure from a prompt like “create a dentist listing submission form with insurance, treatments and sedation fields” and you edit from there.
Step 5: Set up search and filters that mirror how patients think
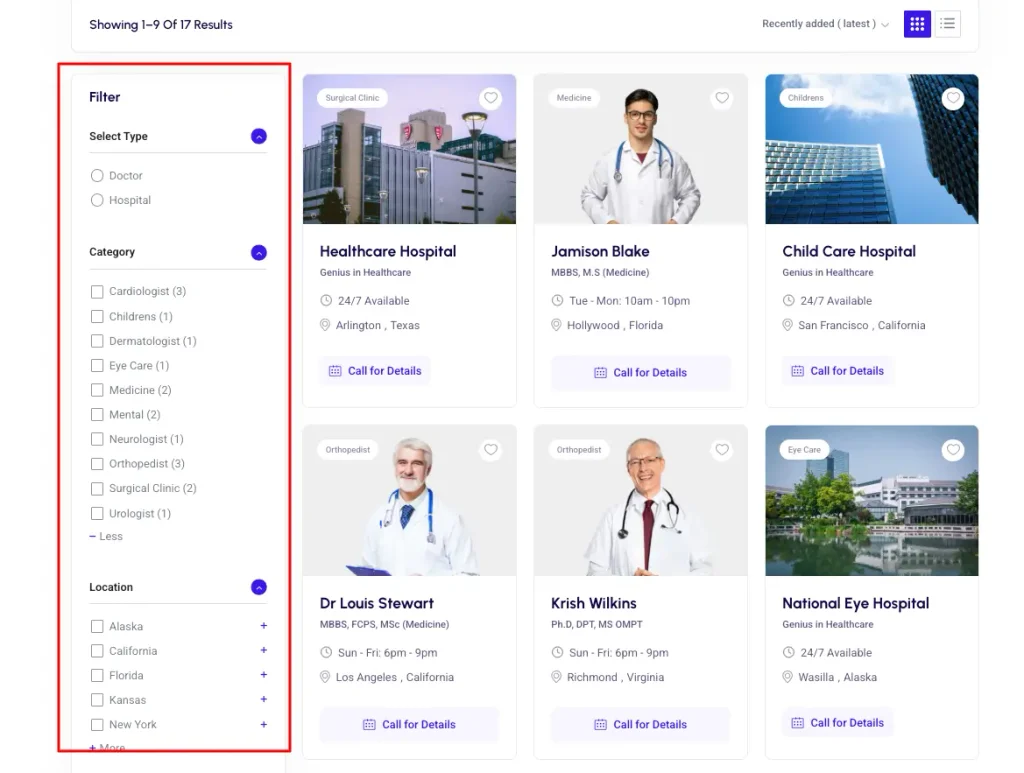
A dental directory is only as good as its filter bar. Configure the filter builder so the front page offers, in this order:
- Location — with radius search on a map, since distance genuinely decides dental visits
- Treatment needed — the entry point for most high-value searches
- Insurance accepted — for many patients this is the first filter, not the third
- Specialty
- Rating
- Open now / evenings / weekends
- Emergency availability
Turn on AJAX filtering so results update without a page reload, and enable semantic search. Semantic search matters here more than in most niches, because patients search in symptoms, not terminology — “tooth pain at night,” “chipped front tooth,” “braces for adults.” A keyword-only search returns nothing for those. A semantic one maps them to endodontics, cosmetic dentistry and orthodontics.
Step 6: Turn on appointment booking
Booking is what turns a directory into a platform. Without it you’re a phone book; with it you own the conversion.
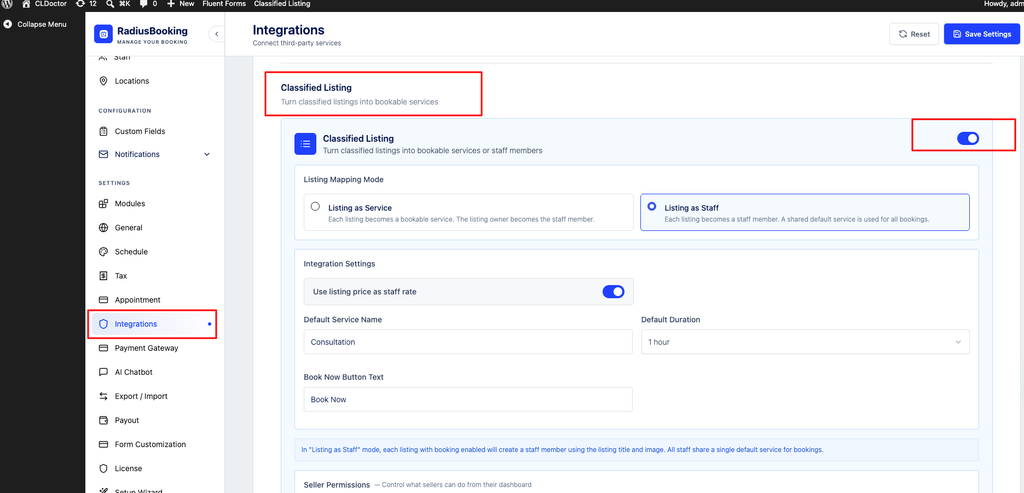
Through the RadiusBooking integration you can enable, per listing:
- Real-time availability with per-service durations — a cleaning is 30 minutes, an implant consult is 60
- Google Calendar sync so bookings land on the practice’s own calendar
- Automated email confirmations and reminders (dental no-show rates are notoriously high, and reminders are a selling point you can charge for)
- Payment or deposit collection at booking via PayPal or Stripe
- An AI booking assistant that handles plain-language requests like “I need a cleaning next Tuesday afternoon”
One practical warning: don’t force booking on every listing at launch. Many small practices won’t manage a calendar. Offer booking as the premium tier and let phone-only listings exist alongside it. Practices upgrade once they see booked appointments arriving.
Step 7: Enable reviews, ratings and schema
Reviews are the first thing dental patients look at, so treat them as core infrastructure rather than a nice extra.
- Turn on multi-criteria ratings. Generic five-star ratings tell patients little; dental-specific criteria tell them everything. Use pain management, wait time, staff friendliness, cleanliness, value for money — research on dental reviews consistently finds discomfort, wait times and pressure to buy unnecessary treatment are what patients actually write about.
- Moderate reviews before publishing. Health-adjacent reviews attract both fake positives and competitor attacks.
- Let practices reply publicly. A professional reply to a negative review builds more trust than a wall of five stars, and it’s a feature dentists will pay for.
- Leave auto-schema on. SchemaEngine generates Review and AggregateRating JSON-LD, which is what puts star ratings into search results.
Step 8: Seed real listings before you launch
No amount of theme configuration fixes an empty directory. Your options, roughly in order of effectiveness:
- Build the first batch yourself. Manually create 50–150 listings for real practices in your chosen city from public information. This is unglamorous and it’s the whole game.
- Enable listing claims. Publish an unclaimed profile, then let the practice claim and verify it. This is the classic directory growth loop, and claims are also a monetization channel.
- Bulk import. Use the CSV import tool if you have a clean data source you’re entitled to use.
- Open guest submission. Let practices submit without registering first, with moderation on.
Two things to be careful about. First, only publish factual public information — name, address, phone, specialty, hours — and give practices a clear, fast way to correct or remove their listing. Health data makes this more sensitive than a restaurant directory, so put the policy in writing before you publish; our walkthrough on writing a privacy policy for a directory website covers what to include. Second, insurance data goes stale, and stale insurance data is the number one complaint patients have about existing dental directories. Add a “last verified” date to each listing, re-verify on a schedule, and tell patients plainly to confirm network status with the practice before booking. That honesty is a competitive advantage, and it’s precisely the kind of thing Google’s helpful content guidance rewards.
Step 9: Switch on monetization
Don’t monetize an empty site — but do build with the plan in mind. CL Doctor includes eight revenue models, and here’s how they map to dental specifically:
| Model | How it works for a dentist directory | When to turn it on |
|---|---|---|
| Paid listings | Dentists pay per submission | Only once you have real patient traffic |
| Featured listings | Top-of-results placement for a city or treatment | Early — this is the reliable earner |
| Top listings / bump-up | Push a listing back to the top | After you have enough competition per city |
| Memberships | Tiered plans: basic profile, booking enabled, gallery, analytics | Your best long-term recurring revenue |
| Subscriptions | Recurring billing on those tiers | Alongside memberships |
| Listing claims | Charge to claim and verify an unclaimed profile | Excellent early revenue while you’re still seeding |
| Booking commission | A cut or flat fee per appointment booked | Once booking volume is real and traceable |
| Display ads | Dental labs, insurers, aligner brands | Only at meaningful traffic |
Featured listings and memberships are where most dental directories make their money. Start there. For the fuller picture on pricing tiers, ad placements and recurring plans, see our guide to monetizing a directory website.
Step 10: Optimize for search — including AI search
Your traffic will come overwhelmingly from local and long-tail queries, so build for them deliberately.
- Create filter landing pages. “Pediatric dentists in [neighbourhood],” “emergency dentist in [city],” “dentists accepting [insurance plan] in [city].” Each is a real page with real intent behind it.
- Use the slug builder for clean, structured URLs like
/dentists/dhaka/orthodontics/. - Write the category intros yourself. Two or three paragraphs of genuinely useful, human copy — what a root canal costs locally, what to expect at a first visit — is what separates your page from a bare listing grid.
- Keep schema clean. Review, AggregateRating and LocalBusiness markup are how you get stars in results and get quoted in AI Overviews. If you want to hand-check or extend what’s generated automatically, our guide to adding schema markup in WordPress walks through it.
- Answer questions directly. AI answer engines lift clear, self-contained answers. A short “How much does a dental cleaning cost in [city]?” block with a plain answer is more liftable than a long essay.
- Get the technical basics right. Fast mobile pages, clickable phone numbers, no layout shift on the filter bar.
Once the on-page work is done, promotion is the other half of the job — our guide to getting traffic to a directory website covers the channels that work beyond search.
Pre-launch checklist
- At least 50 real listings, spread across specialties and neighbourhoods
- All demo content deleted
- Insurance and treatment filters tested on mobile
- Radius search returning sane results
- A test booking completed end to end, confirmation email received
- Review moderation queue enabled
- Claim-your-listing flow tested as an outside user
- Schema validated in Google’s Rich Results Test
- Privacy policy, listing removal policy and a “verify insurance with the practice” notice published
- Payment gateway tested in live mode with a real card
- Google Search Console and analytics connected, sitemap submitted
Frequently asked questions
Do I need to know how to code to build a dentist directory WordPress site?
No. The form builder, filter builder and page editor are all drag-and-drop, and demo import gives you a working site in minutes. You should be comfortable installing WordPress and a theme — nothing beyond that.
How many dentists do I need before launching?
Aim for 50 as an absolute floor in one city, and 150 or more to feel genuinely useful. Depth in one area beats breadth across many. An empty category is worse than no category.
Can patients book appointments directly?
Yes, through the RadiusBooking integration — real-time availability, calendar sync, confirmation emails and payment at booking. Offer it as a premium tier rather than a requirement, so practices without calendar staff can still be listed.
Is it legal to list dentists who haven’t signed up?
Publishing factual public business information is common practice for directories, and it’s how nearly every major platform started. Keep to public facts, never imply endorsement or partnership, respond quickly to correction and removal requests, and check your local rules — data protection and healthcare advertising regulations vary by country.
How do dentist directories make money?
Mostly featured placements and tiered memberships, with listing claims providing useful early revenue and booking fees or commission arriving later. Display ads only make sense at real scale.
How is this different from just building a doctor directory?
The build process is similar; the data model isn’t. Insurance networks, specific treatments, sedation options, emergency availability and before-and-after galleries are the fields dental patients decide on. Skip them and you have a directory that technically works and nobody uses.
Can I add clinics as well as individual dentists?
Yes. Multi-directory support lets you run dentists, clinics and hospitals as separate listing types from one install, with multiple dentists attached to a clinic and bookable individually.
Start building
The technical part of a dentist directory is genuinely a weekend’s work now. What takes real effort is the judgement — choosing one city, modelling the fields patients actually filter on, gathering listings by hand, and keeping insurance data honest.
CL Doctor handles the part that used to require a development team: dental-specific submission forms with 37 field types and conditional logic, AJAX and radius search, insurance filtering, appointment booking with payments, moderated reviews with auto-generated schema, front-end dashboards, and all eight monetization models ready to switch on as you grow. Nothing to rebuild later when you’re ready to charge.