

On This Page
Key Takeaways
- Online booking reduces missed appointments and front-desk phone load at dental clinics.
- The free Radius Booking plugin is a solid starting point for any WordPress dental website.
- You can go live with a working booking form in under an hour, even without coding skills.
- Setting clear service durations and buffer times prevents double-bookings.
- Email confirmation and reminder notifications improve patient show-up rates.
- PayPal payment collection is available in the free version of Radius Booking.
Did you know that 70% of patients prefer to book a dental appointment online rather than pick up the phone? And 85% of dental appointments are still made by phone call. This means most clinics are missing a huge opportunity.
Patients today book everything online. Groceries, flights, restaurant tables. They expect the same from their dental clinic.
If your WordPress site does not offer online booking for dental clinics, they simply move on to one that does.
This step-by-step guide shows you how to set up dental appointment booking on WordPress using the free Radius Booking plugin. No coding required.
Why Dental Clinics Need Online Booking
Phone-based scheduling creates friction. Patients call during lunch or after dinner. Your front desk is often busy. Calls get missed. Appointments do not get booked.
An online dental appointment booking system works around the clock. A patient can book a dental appointment at midnight if they want. No staff member needs to be available.
Here is what clinics gain when they add online scheduling:
- Fewer no-shows: Automated reminders go out by email. Patients remember their appointment.
- Less phone traffic: Your receptionist focuses on patients in the chair rather than managing a phone queue.
- More bookings: Patients who visit your site at any hour can convert immediately.
- Better data: You see which services get booked most. You can plan staff schedules more accurately.
- Professional image: A modern booking form tells patients you take their time seriously.
Quick stat: Studies on healthcare scheduling show that up to 30% of patients prefer booking online over calling. Making your clinic available digitally directly impacts revenue.
If you are still building your dental website, check out our guide on how to create a medical website in WordPress for a solid foundation before adding booking.
What Is the Radius Booking Plugin?
The Radius Booking plugin is a free WordPress booking plugin built for service-based businesses. Dental clinics, salons, consultants, and home service providers all use it.
It covers everything a dental practice needs out of the box. You get a visual appointment calendar, staff profiles, service configuration, and automatic email notifications. The free version also supports PayPal payments.
Here is a quick overview of what the free version includes:
| Free Feature | What It Does |
| Visual calendar view | See all bookings by day, week, or month |
| Multiple services | Add checkups, cleanings, fillings, and more |
| Staff profiles | Assign dentists to specific services and time slots |
| Buffer times | Add gaps between appointments to avoid overlap |
| Email notifications | Send automatic confirmations to patient and clinic |
| PayPal payments | Collect deposits or full fees at booking |
| Shortcode embed | Place the form on any page with [radius_booking_form] |
| Gutenberg block | Drop the booking form into pages visually |
| Elementor widget | Works with Elementor page builder natively |
What You Need Before You Start
Before installing the plugin, make sure these are in place:
- A working WordPress site: Any theme works. If you do not have a site yet, read our guide on how to create a business website with WordPress.
- Admin access: You need to log in to wp-admin to install plugins.
- SSL certificate: Your site should run on HTTPS. Most hosting providers include this free. It is essential for patient trust.
- A page to host the form: Create a page called “Book an Appointment” before you start.
- PayPal account (optional): Only needed if you want to collect payments at booking.
Setting Up Online Booking for Dental Clinics: Step-by-Step WordPress Guide
Step 1: Install and Activate Radius Booking
Go to your WordPress dashboard. Click Plugins in the left menu, then click Add New Plugin.
In the search box, type Radius Booking. The plugin will appear in the results. It shows the RadiusBooking name and is published by the RadiusTheme team.
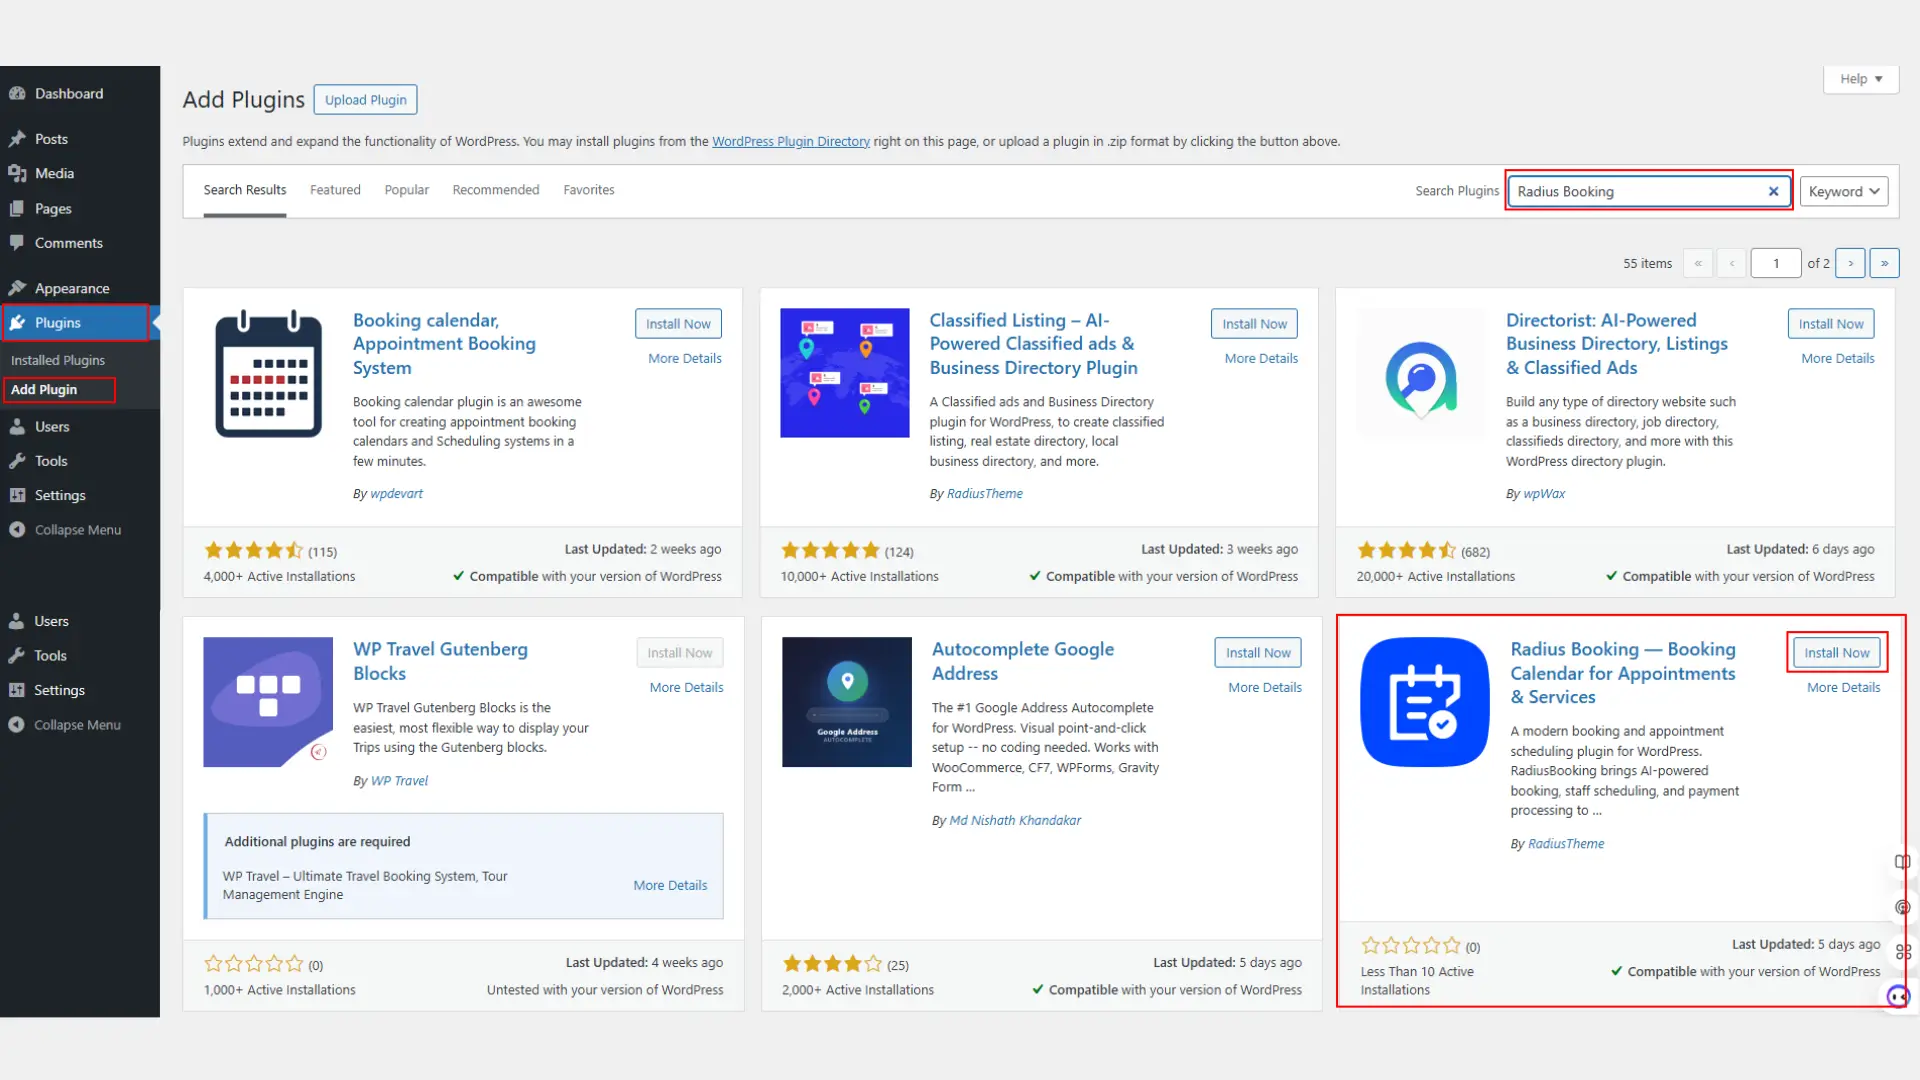
Click Install Now. Wait for the installation to finish. Then click Activate.
You will now see a Radius Booking menu item appear in your WordPress admin sidebar.
Note: If you prefer to install manually, download the ZIP file from wordpress.org/plugins/radius-booking/ and go to Plugins > Add New > Upload Plugin.
Step 2: Configure Your General Settings
Click Radius Booking in the sidebar. Then go to Settings > General.
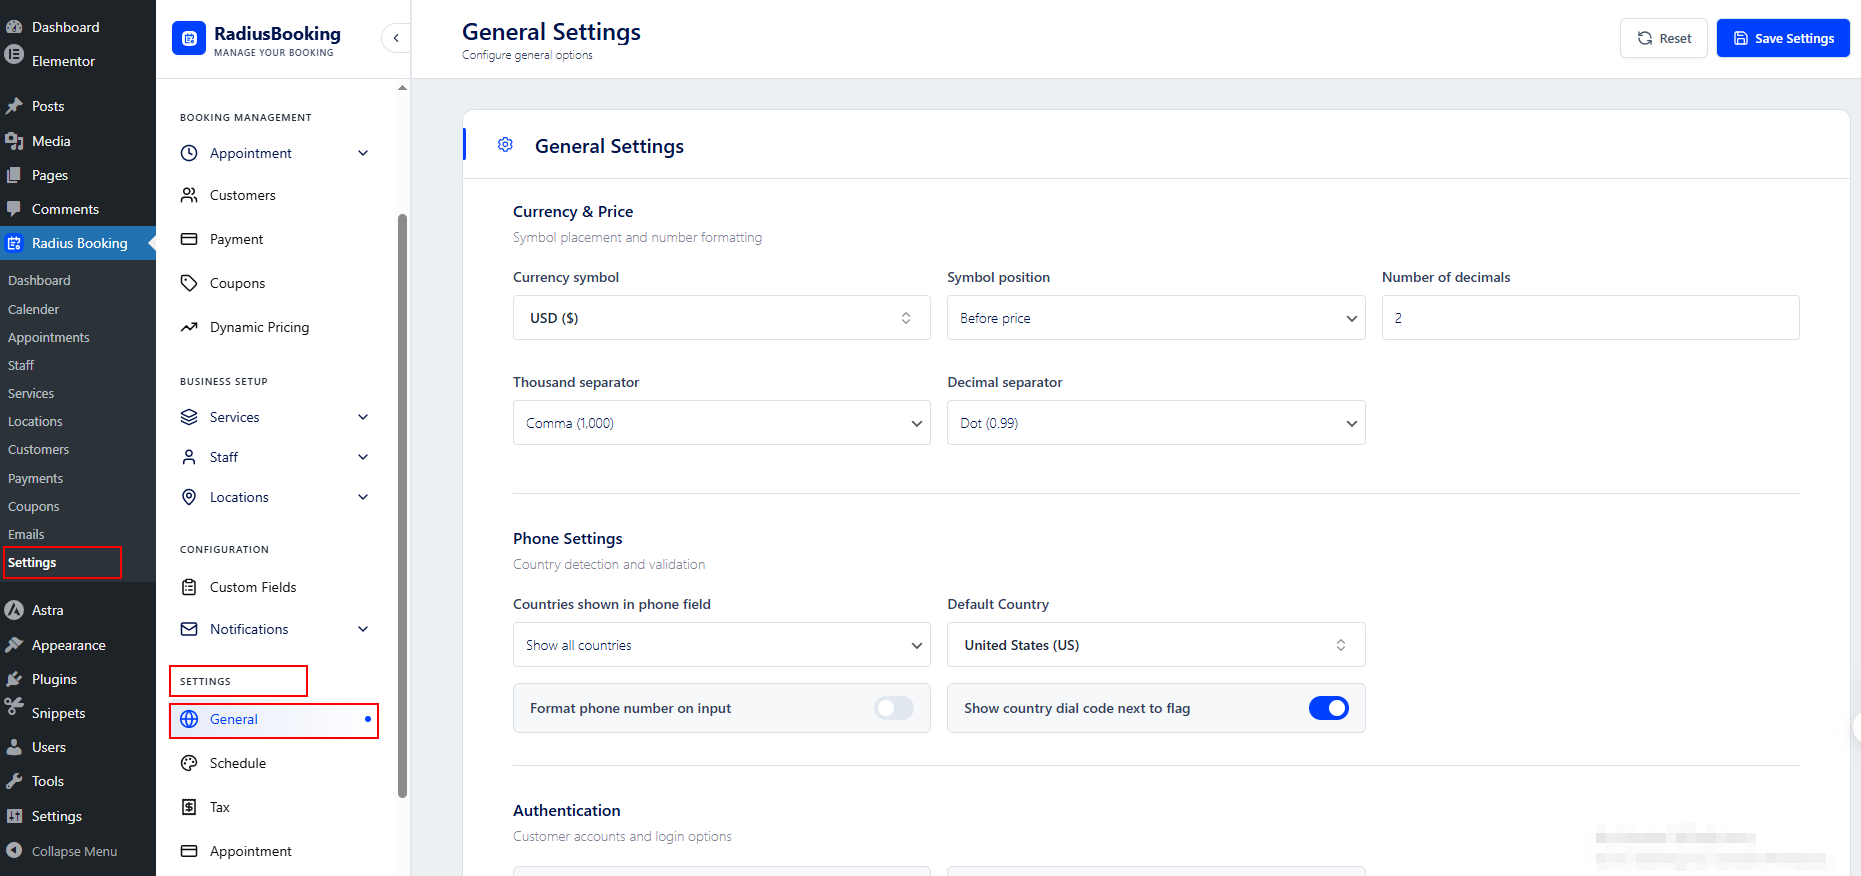
Here you set up the basics for your dental clinic:
- Currency & Price: Set this if you plan to collect payments.
- Phone Settings: Configure how phone number fields behave on the booking form.
- Authentication: Manage how customer accounts are created and accessed.
- Setup Pages: Select the pages that contain booking shortcodes.
- Business Information: Insert your dental clinic name, phone number, and address. You can also upload the company logo to display on the booking form.
- Email Settings: Configure the sender details for all outgoing emails
Save your settings before moving on.
Step 3: Set Your Clinic Hours
Head to the Schedule Settings section inside Radius Booking.
Here you define when your clinic is open. Toggle each day on or off. For open days, set the start and end time.
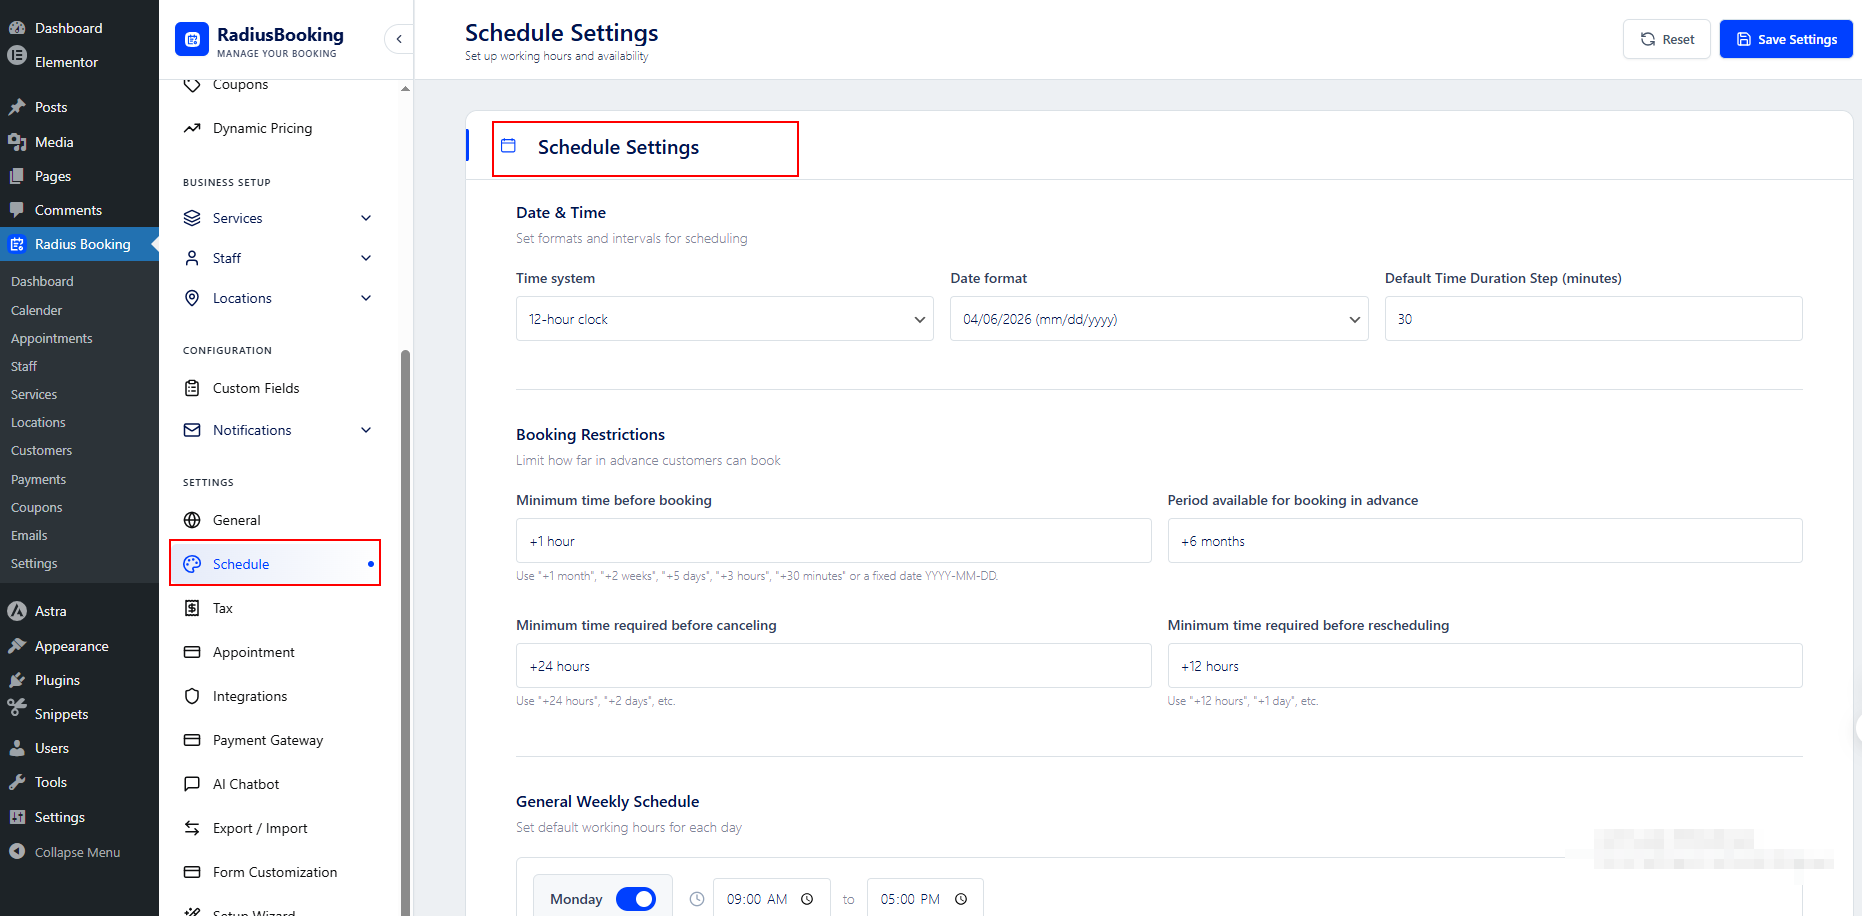
For example: Monday to Friday, 9:00 AM to 6:00 PM. Saturday, 9:00 AM to 1:00 PM. Sunday, closed.
You can also block off specific dates. Use this for public holidays or staff training days. Patients will not see any available slots on those dates.
Step 4: Add Your Dental Services
Move to Services inside the Radius Booking menu. Click Add New Service.
Create one service for each type of appointment your clinic offers. Common dental services include:
- General Check-Up: 30 minutes
- Professional Cleaning: 45 minutes
- Tooth Filling: 60 minutes
- Teeth Whitening: 90 minutes
- Root Canal Consultation: 60 minutes
- X-Ray: 20 minutes
For each service, fill in these fields:
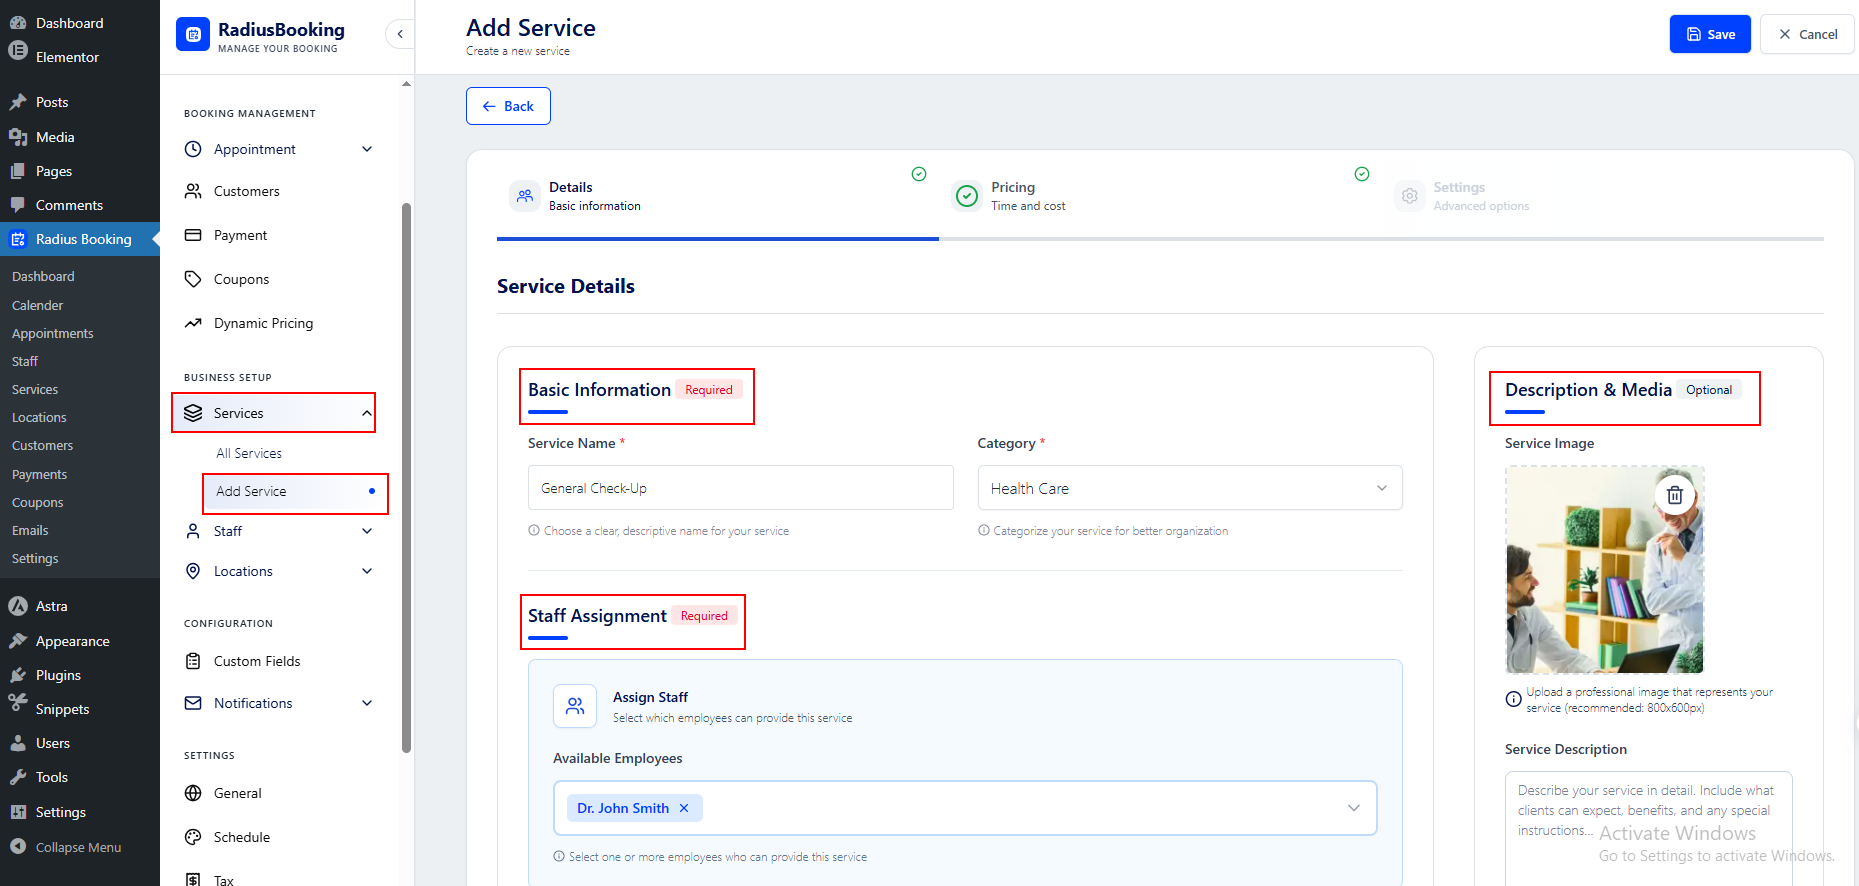
- Basic Information: Use the name patients will recognise.
- Assigned Staff: Select which dentists can provide this service.
- Description & Media: Upload an image and a short sentence explaining the service helps patients pick the right option.
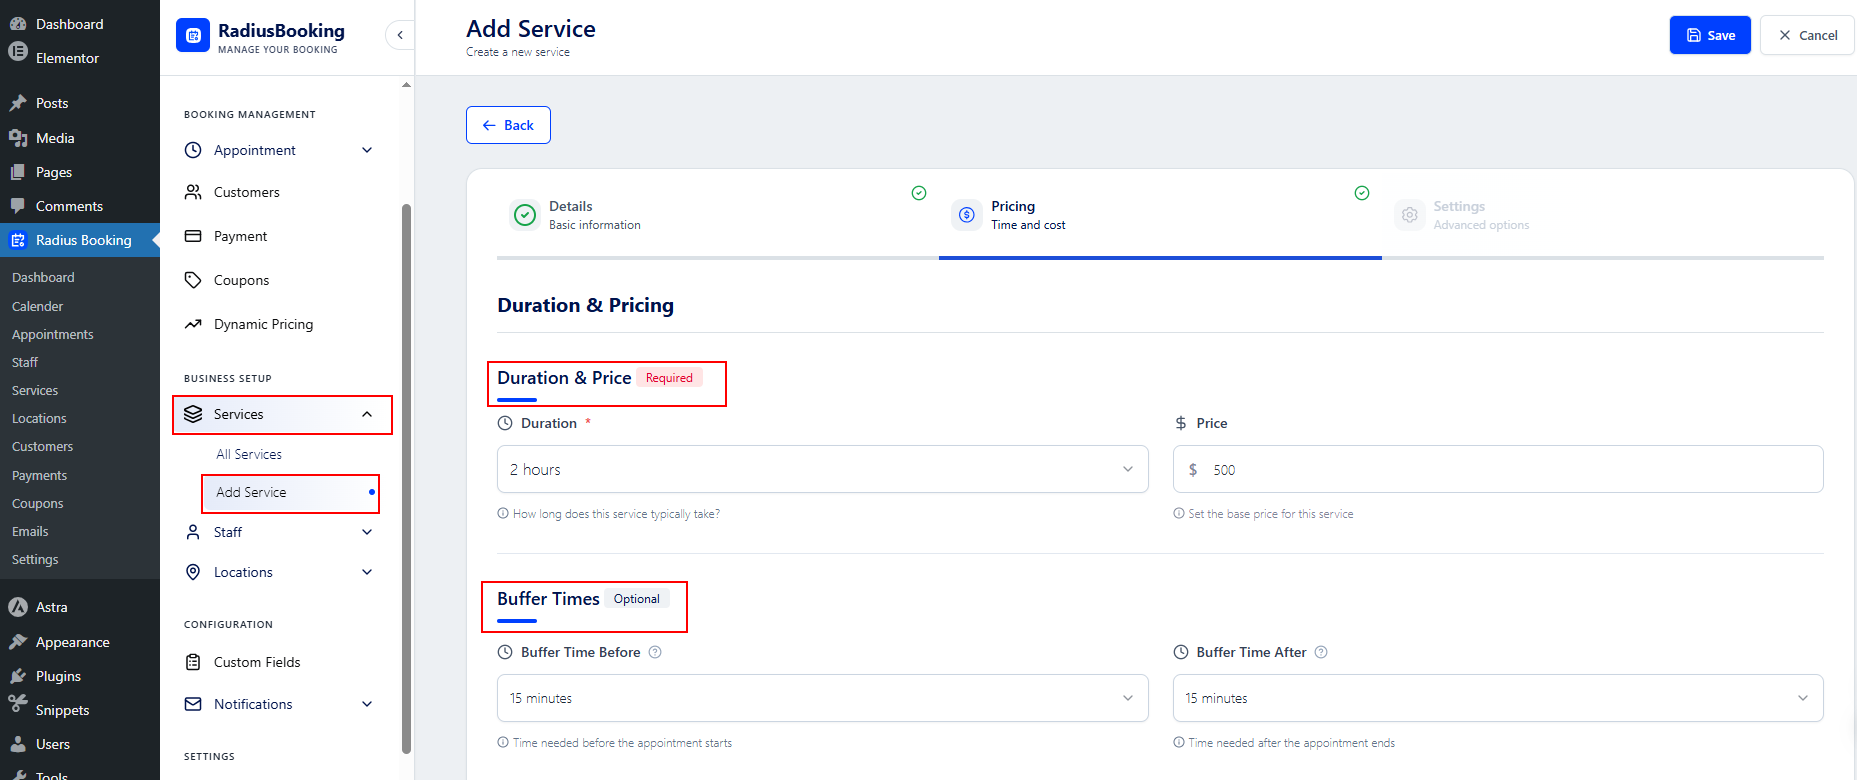
- Duration: Set the correct time. Be realistic. Add 5 to 10 minutes for patient transition.
- Price: Required. This pricing will be displayed on the booking form.
- Buffer time: Add 10 to 15 minutes after each appointment. This gives dentists time to clean up and prepare.
Save each service. Repeat for all services your clinic offers. Organize all your services like the below image.

Why buffer time matters in Dental Clinic: Without buffer time, back-to-back appointments create stress and delays. A 15-minute buffer between a filling and the next check-up is realistic for most clinics.
Step 5: Add Your Dentists as Staff
Navigate to Staff inside Radius Booking. Click Add New Staff Member.
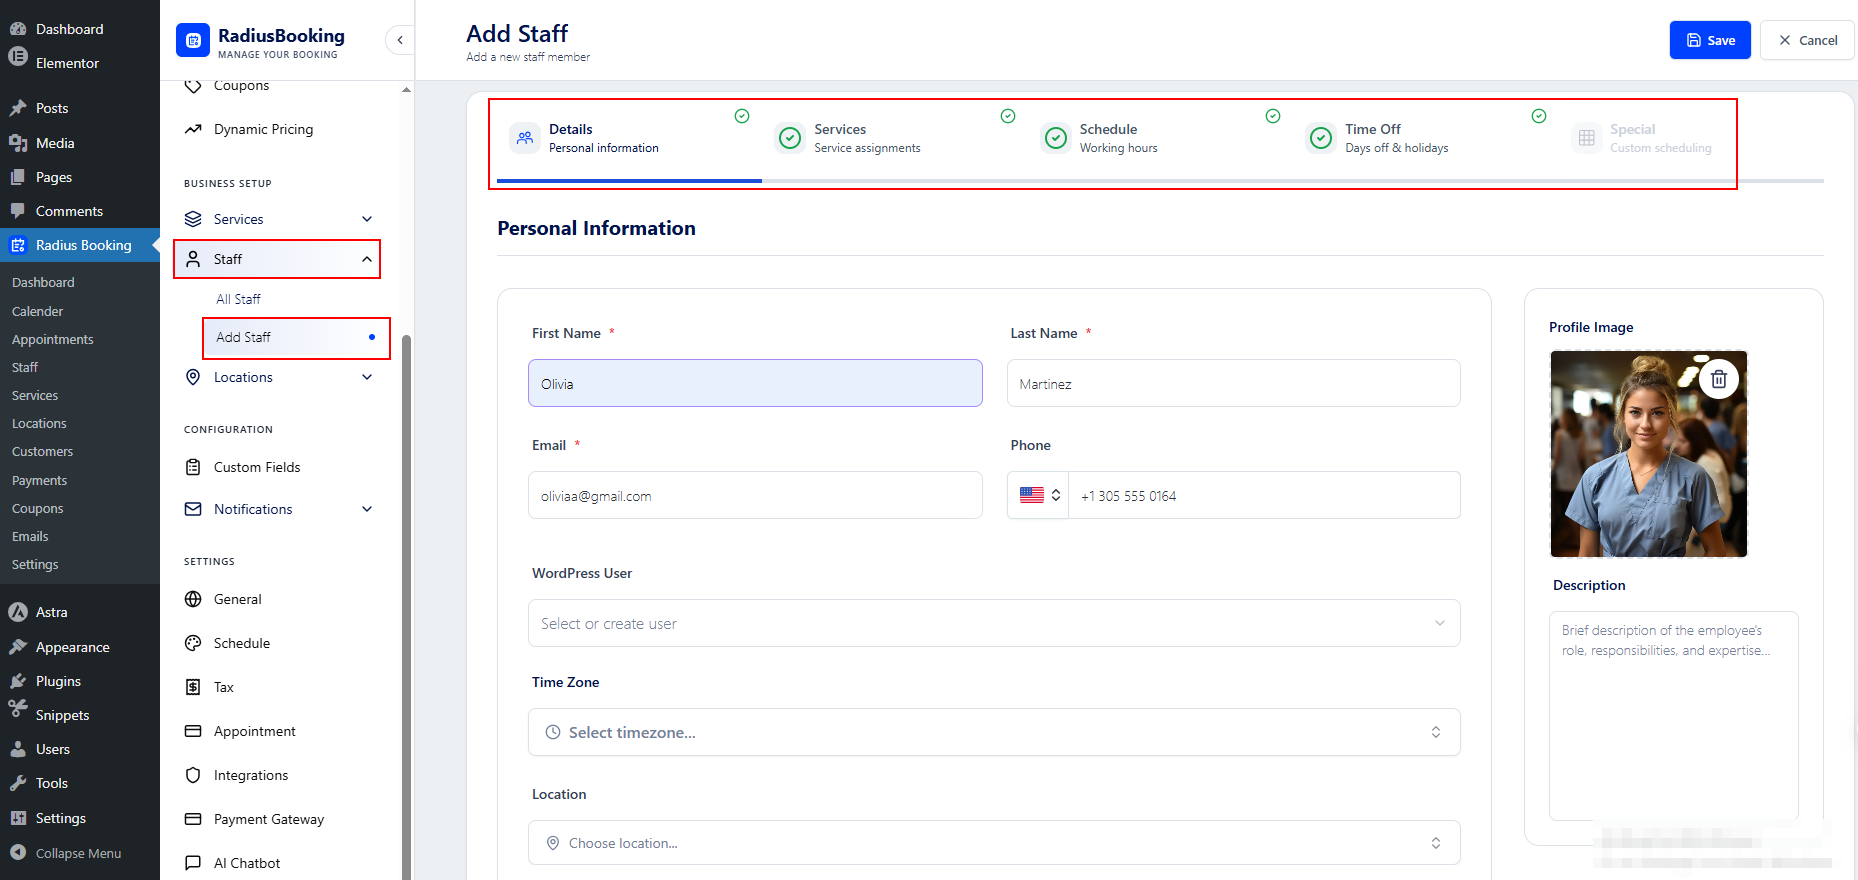
Enter the dentist’s name and upload a photo if you want. You can also add a short bio.
Assign the services this staff member provides. Not every dentist performs every service. A hygienist handles cleanings but not fillings, for example.
Set individual working hours for this staff member. These override the general clinic hours if needed. This is useful for part-time dentists or specialists who only work certain days.
Repeat this for each dentist or hygienist at your clinic.
For more on building out a professional WordPress site with team member profiles, see our guide: how to create a team page in WordPress.
Step 6: Set Up Email Notifications
Locate the Notifications > Email Settings section inside Radius Booking.
You will find three email sections. One goes to the patient when they book. One goes to you (the clinic admin). And the third one goes to the staff (dentists)
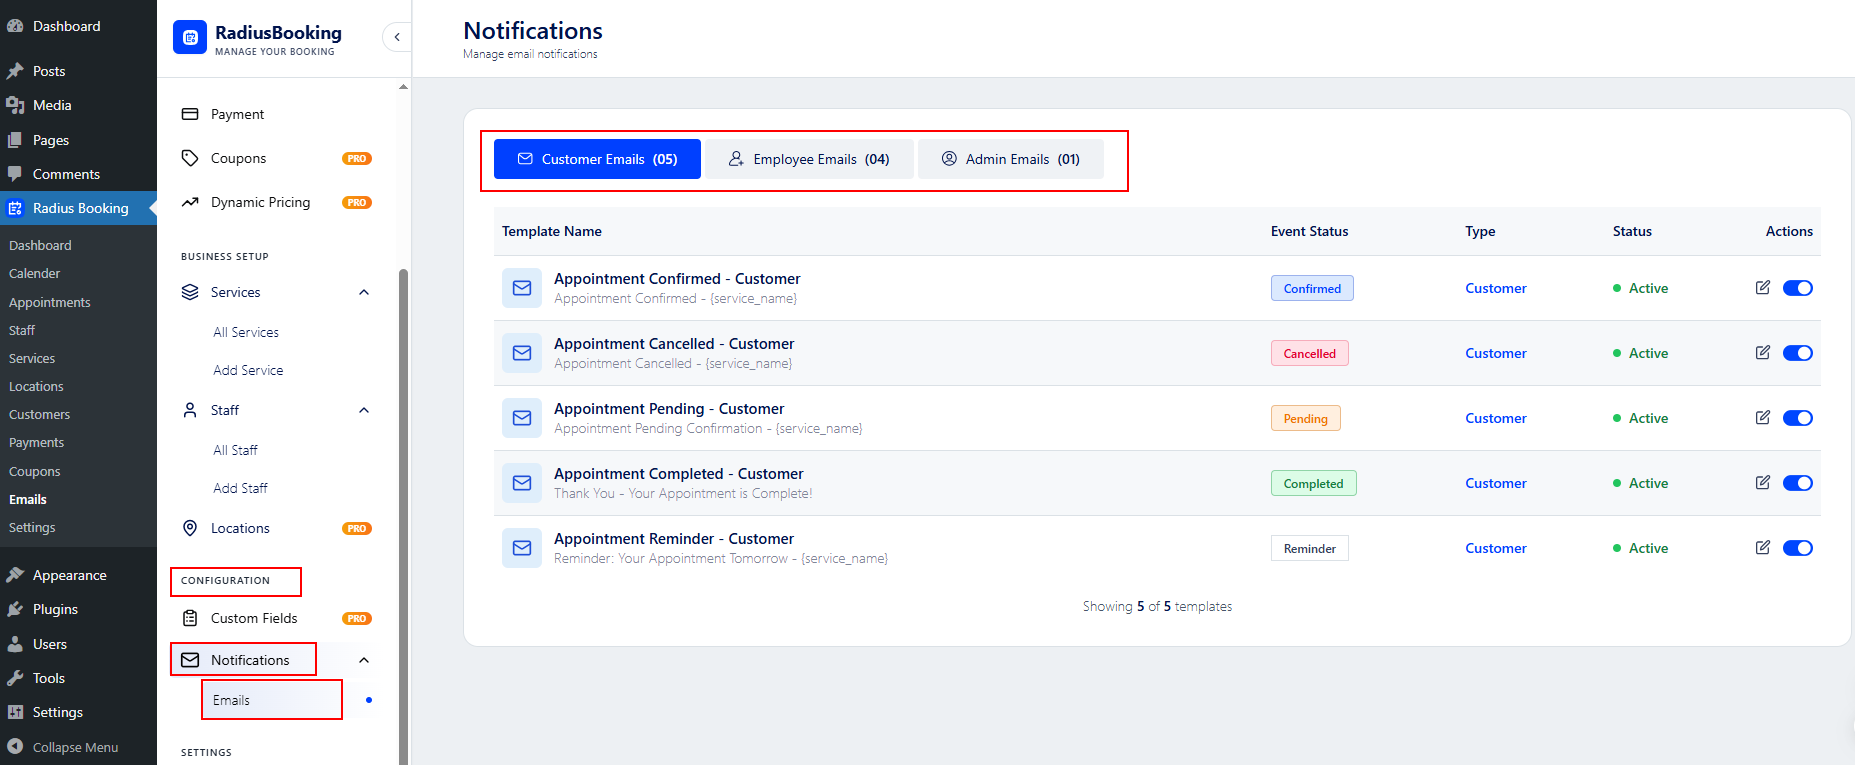
Customise the patient email to include:
- The patient’s name
- The service booked
- The date and time
- The dentist’s name
- Your clinic address and phone number
- A cancellation or rescheduling note
Keep the tone warm but professional. Patients are often anxious about dental visits. A friendly confirmation email builds reassurance.
For the admin and staff notifications, include the same details plus any internal notes or patient-provided information.
Test all emails after setup. Send a dummy booking to verify everything arrives correctly.
Step 7: Customize & Create the Booking Form Page
Locate to Radius Booking > Settings > Form Customization.
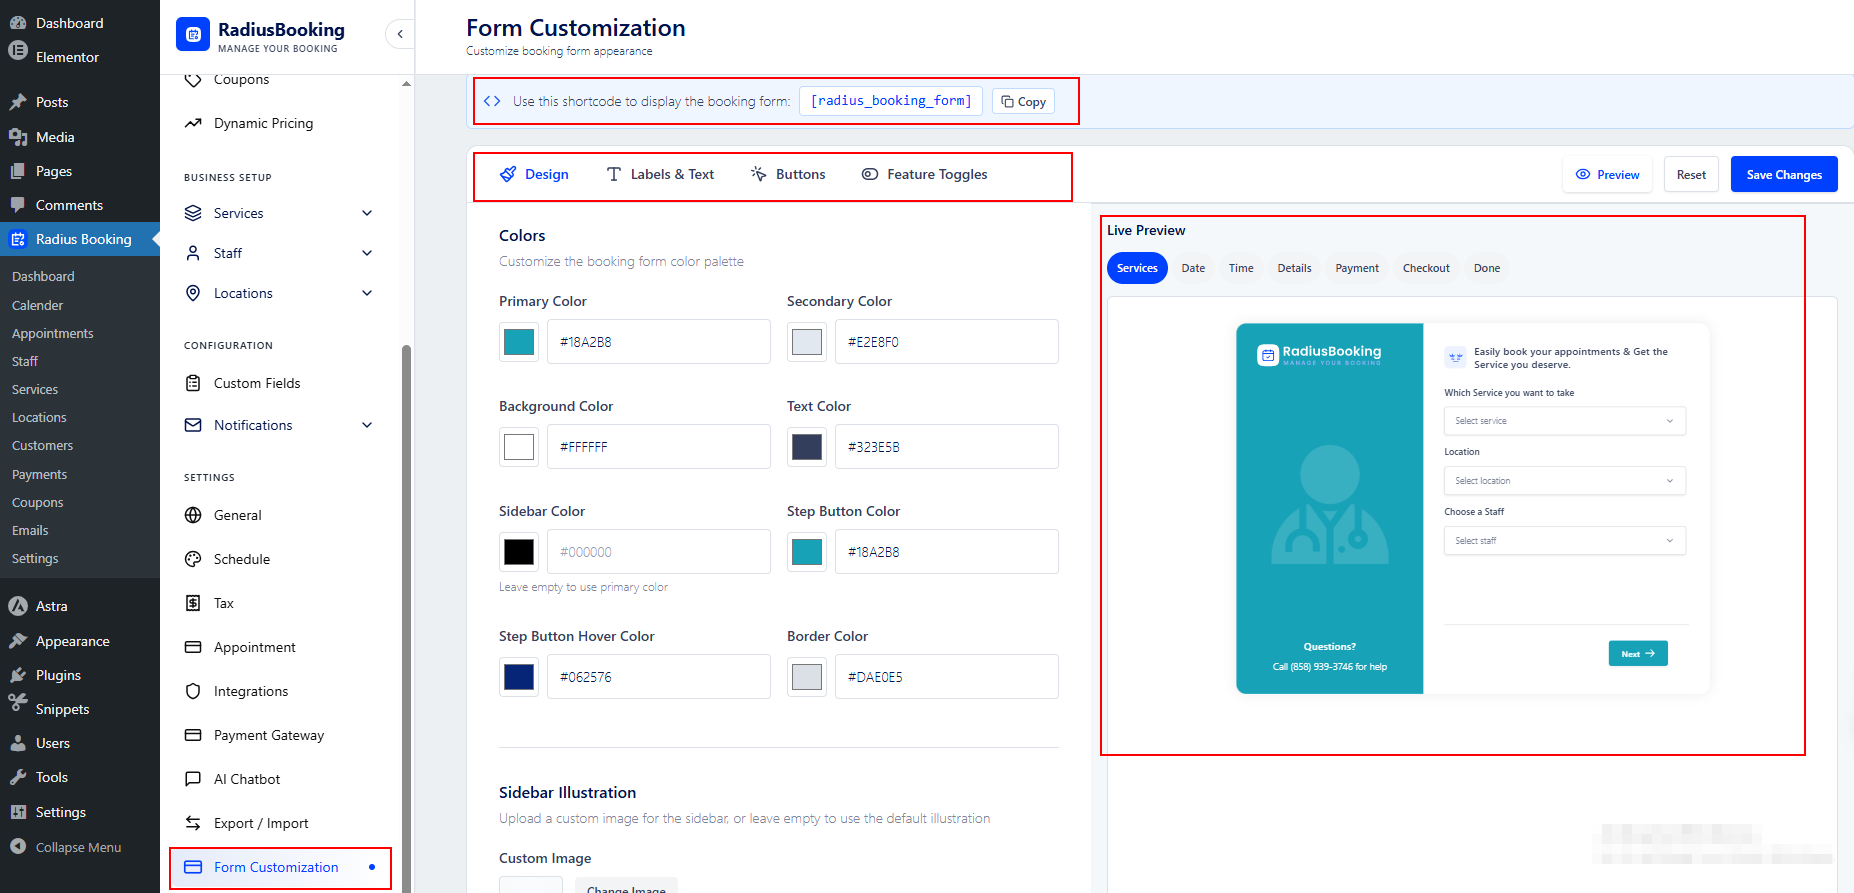
You can personalize the color scheme of the booking form to match your website brand. Adjust button colors, accent colors, and field label styles according to your preferences.
This keeps the booking form looking like it belongs on your site rather than a third-party widget.
Go to Pages in your WordPress dashboard. Click Add New.
Name the page Book an Appointment or Online Booking.
Now add the Radius Booking form to this page. You have three ways to do this:
Option A: Using the Shortcode
In the page editor, add a Shortcode block. Type this shortcode inside it:
[radius_booking_form]
That is all you need. The full booking form will appear on the page automatically.
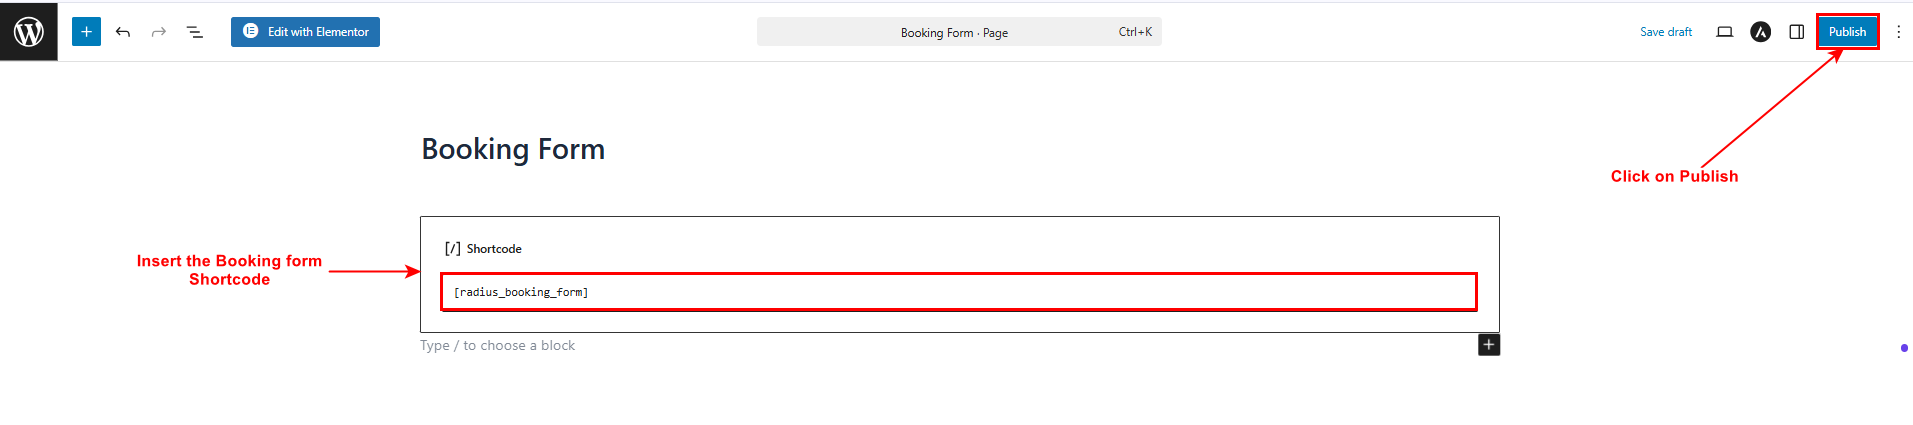
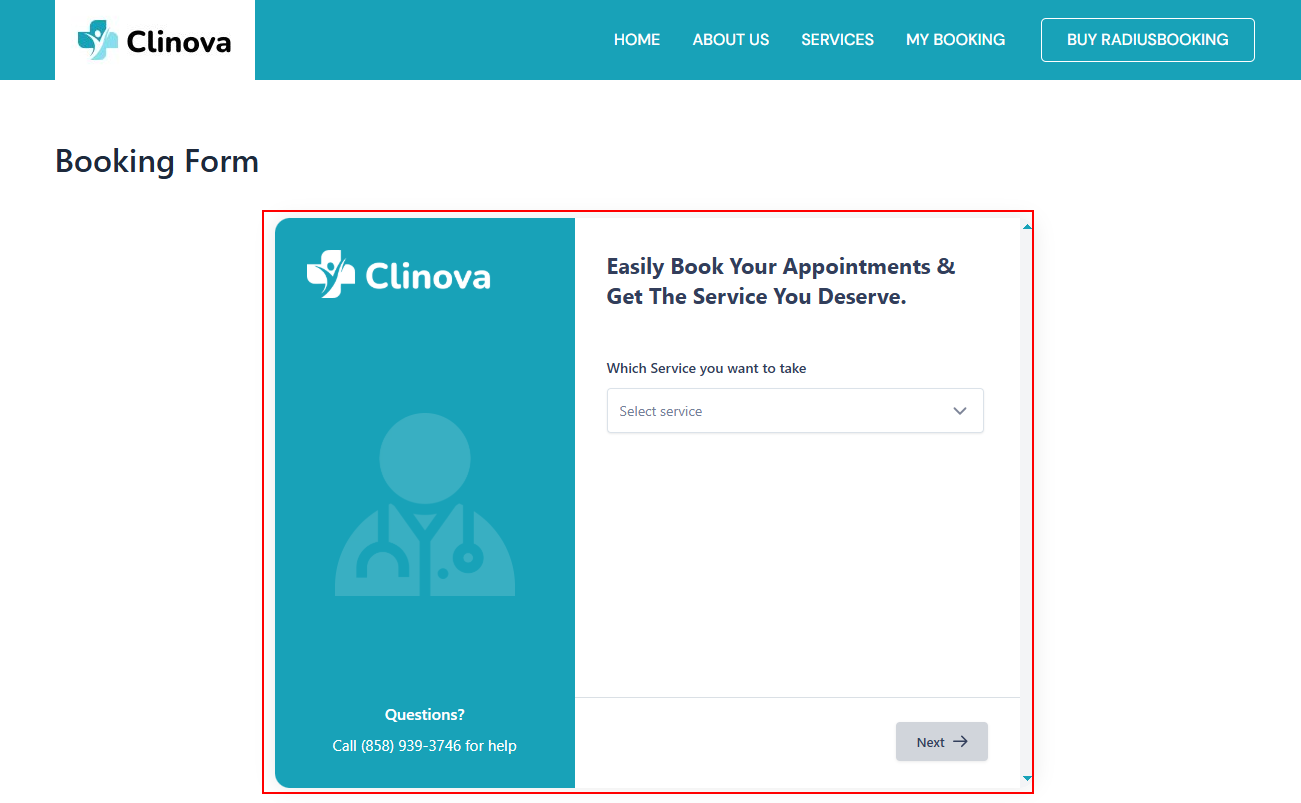
Newly Published Booking Form
Option B: Using the Gutenberg Block
Click the plus icon in the Gutenberg editor. Search for Radius Booking. Select the Radius Booking Form block. It will drop the form into your page visually.
Option C: Using Elementor
If you use Elementor, open the page in the Elementor editor. Search for the Radius Booking widget in the element panel.
Drag it onto your page. If you are using Elementor and need theme help, check out our guide on Elementor WordPress themes.
After adding the form, publish the page. Visit it in your browser to confirm the booking form loads correctly.
Common Mistakes to Avoid in Dental Clinic Booking Form
Clinics that set up booking for the first time often make a few predictable mistakes. Avoid these:
- Not setting buffer times: Without gaps between appointments, your dentists run behind schedule. Add at least 10 minutes of buffer per service.
- Using vague service names: “Appointment” is not helpful. “Routine Check-Up (30 min)” tells patients exactly what to expect.
- Forgetting mobile testing: More than half of your patients will book from a phone. Always test the booking form on a small screen before going live.
- Skipping email tests: A confirmation email that never arrives damages patient trust. Test thoroughly before launch.
- Not blocking holidays: Patients will try to book on Christmas Day if you forget to block it. Update your unavailable dates every quarter.
- Hiding the booking button: If patients cannot find the booking page within two clicks, they will not book online. Place clear calls to action everywhere.
How to Improve SEO for Your Dental Booking Page
Your booking page is also a valuable SEO asset. Optimise it so patients searching for “dental appointment near me” can find it.
- Page title: Use a title like “Book a Dental Appointment Online | [Your Clinic Name] | [Your City]”.
- Meta description: Write 150 characters that highlight ease of booking, available services, and your location.
- H1 heading: Use something like “Book Your Dental Appointment Online” as the main heading on the page.
- Schema markup: Add LocalBusiness and MedicalBusiness schema. It helps Google display your clinic in local search results.
- Google Business Profile: Add a link to your booking page in your Google Business Profile. Patients searching on Maps will see a direct book button.
For deeper SEO setup on your WordPress site, see our guide on how to add schema markup in WordPress.
Good Read: 10+ Best Free SEO Plugin for WordPress
Choosing the Right WordPress Theme for Your Dental Website
Your booking system needs a theme that looks professional and loads fast. A slow or cluttered theme will hurt conversions. Look for a theme built for health or service businesses. Our roundup of the best medical website templates gives you a wide set of options to choose from.
If you need something specifically focused on clinics, see our list of best medical WordPress themes. Many of these comes with Elementor compatibility, which makes placing the Radius Booking widget even easier.
Whatever theme you choose, verify these points:
- Mobile responsive design.
- Fast load time (test with Google PageSpeed Insights).
- Support for page builders like Elementor or Gutenberg.
- Clear typography that patients over 40 can read comfortably.
- A colour scheme that conveys cleanliness and trust.
Final Thoughts
Adding online booking to your dental clinic website is one of the highest-impact improvements you can make this year. Patients who cannot book online at 10 PM will find a competitor who lets them.
The free Radius Booking plugin gives you everything you need to get started. Install it, set up your services and staff, configure your schedule, and drop the booking form on a page.
Start with the basics. Test thoroughly. Then refine based on real patient feedback. Your appointment book will fill up faster. Your front desk will thank you.
Freequently Asking Question
How does the clinic admin confirm or reject bookings?
Radius Booking can be set to auto-confirm bookings or require manual approval. For manual approval, you receive an email. You log in to the dashboard and confirm or decline. The patient gets notified either way.
Can I show a price list on the booking form?
Yes. When you add a price to a service, it displays next to the service name on the booking form. Patients can see costs before they commit.
Does the booking form work on mobile phones?
Yes. The Radius Booking form is mobile responsive. It adjusts to fit any screen size. Always test it on your own phone after setup.
Can I add the booking form to my existing WordPress site?
Yes. The plugin works with any WordPress theme. You install it, configure your services, and paste the shortcode on any existing page. No redesign needed.
Does the free version of Radius Booking support payment collection?
Yes. The free version of Radius Booking supports PayPal payments, allowing dental clinics to collect deposits or full fees at the time of booking.



