


On This Page
Did you receive a notification that someone is trying to access your WordPress Admin Page? Has your website been targeted through brute-force attacks?
There can be other reasons that make you anxious, and you may wonder how to stop this. One way is to change the WordPress login URL. However, even after knowing the solution, the question of how to change WordPress login URL may pop into your head.
If you know how to accomplish this task, pat yourself on your back. If you don’t, keep reading this helpful content.
Should You Change WordPress Login URL?
Since WordPress is a popular content management system and virtually 43.6% of websites run on WordPress, many people know its default login pathways, such as “/wp-admin” or “/wp-login.php.”
Consequently, people with bad intentions can target your websites built with WordPress. After visiting your admin login page, they may use automated bots to guess usernames and passwords.
Besides, skilled hackers can access your sites if they easily visit the admin login pages. That’s why it will be wise to change this login URL to something unique only you and other authorized personnel know. This way, you add a layer of security to your WordPress websites.
How to Change WordPress Login URL with a Plugin
We’ll first show you the easy way to change WordPress admin login URL. Later, we’ll discuss a pretty challenging method to change this login URL. Hence, let’s start the easy procedure without wasting any more time.
Step 1: Backup Your WordPress Website
It’s essential to fully back up your website before changing the login URL. Thus, you can easily revive your site if anything goes sideways while making changes.
Once you back up your WordPress website entirely, the next step is to select a safe plugin to install on your site to change the admin login URL.
Step 2 – Install & Activate a Safe Plugin
You will find many plugins on the WordPress Plugin Repository that can help you change your site’s login URL. But as we said, some plugins can do evil rather than good to your WordPress site.
Hence, be cautious when choosing a plugin. We recommend either of these plugins: WPS Hide Login or Solid Security (Formerly iThemes Security).
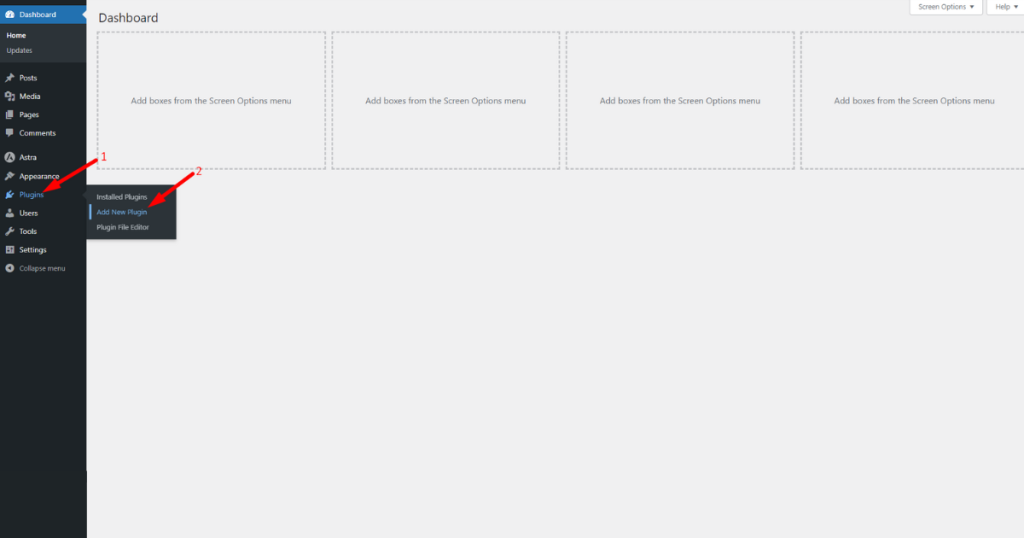
We will select the WPS Hide Login plugin, install it, and activate it. To do so, navigate to the WordPress Admin Panel > Plugins > Add New Plugin.
Then, type the keyphrase “WPS Hide Login” in the plugin search field.
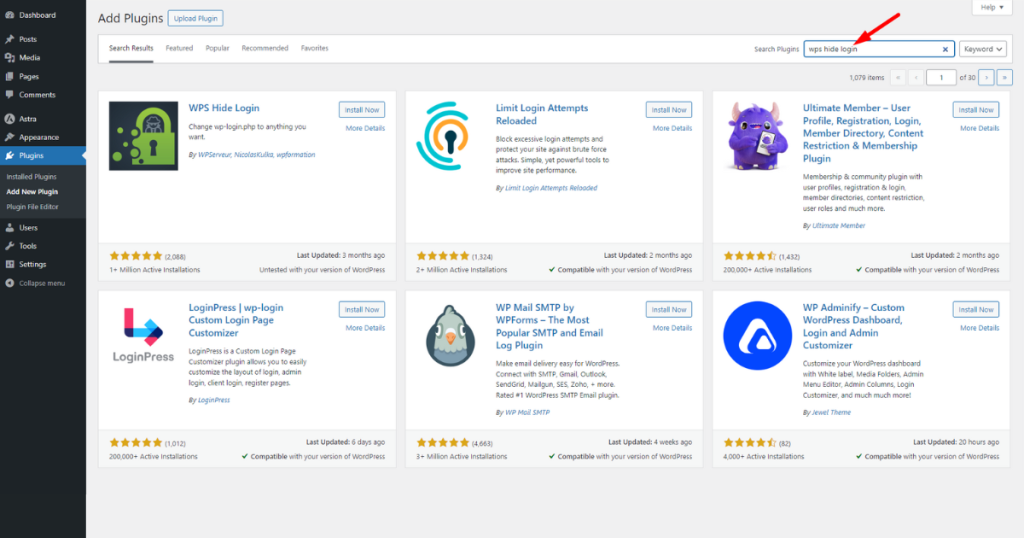
Click the “Install Now” button.

Lastly, hit the ‘Activate’ button.

That’s how you install and activate the WPS Hide Login plugin.
N.B. Follow these steps to install and activate any plugin on your WordPress website.
Step 3 – Insert Your Preferred Admin Login URL
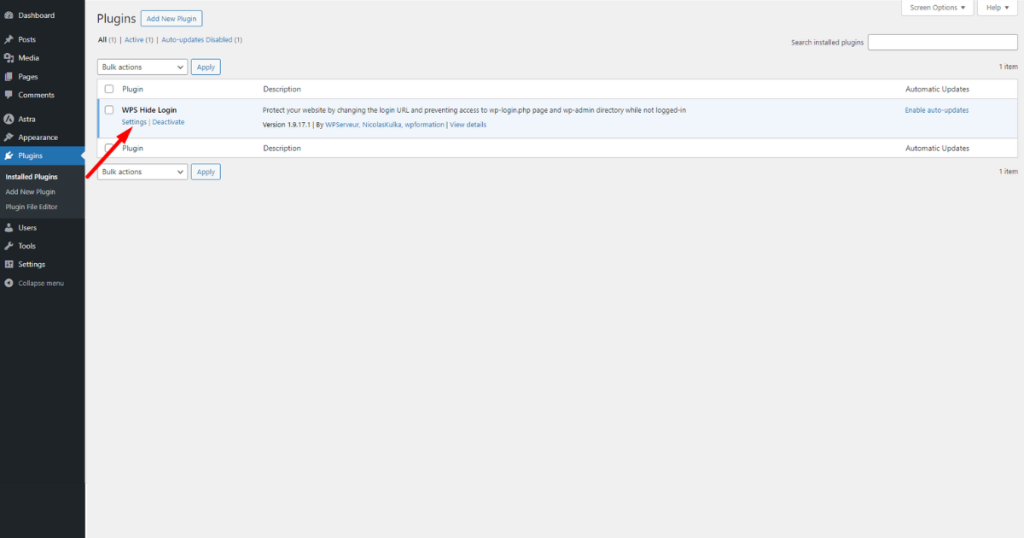
After installing and activating the WPS Hide Login, click on its Settings option. Alternatively, go directly to the WordPress Admin Dashboard > Settings > WPS Hide Login.
You’ll then notice a new “WPS Hide Login” section on the “General Settings ”page. Type your predetermined URL path in the Login URL field.

Afterward, add a redirection URL path to the Redirection URL field to redirect visitors to that page whenever they try to access your site’s admin page with the “/wp-admin” or “wp-login.php” path.

Finally, hit the “Save Changes” button.

Okay, you’ve successfully changed your website’s login URL. Now test it. We’ve tested ours, and the results are in the screenshots below.
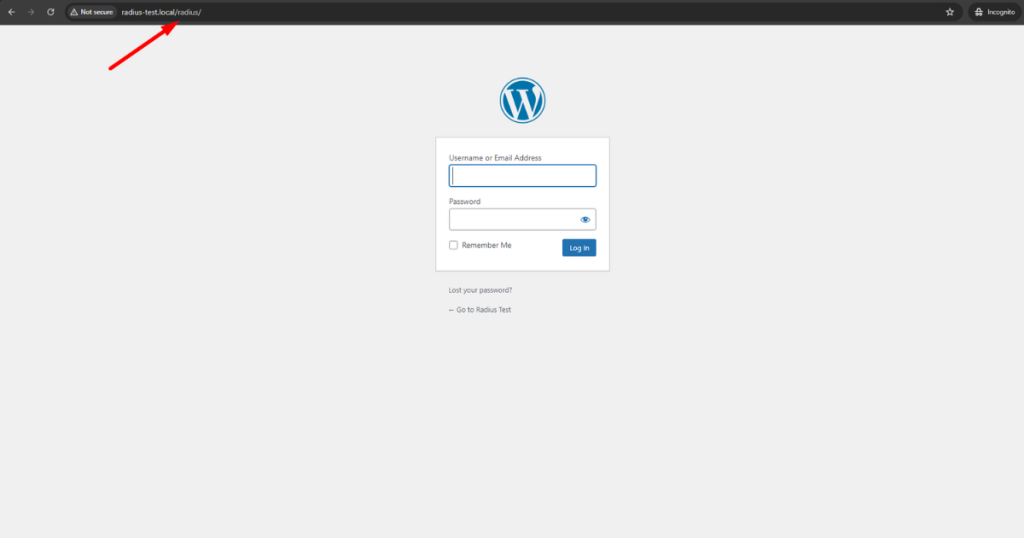
When you added “/wp-admin/” at the end of the homepage URL, we visited this 404 (error) page.

Deactivate and delete this plugin to restore your WordPress website’s default admin login URL.
How to Change Admin Login URL in WordPress Without Plugin
If you wonder, “How do I manually change my WordPress URL?” and want to avoid using any plugin, this section has you covered.
But remember that you need to be techy to follow all the steps discussed in this section of this content.
Ignore this section if you aren’t a tech nerd or uncomfortable with technical stuff. Follow the plugin method instead to change your site’s admin login URL.
Now, let’s start exploring this technical method. Before we start, know what you must have and need to know beforehand:
- A code editor to edit core WordPress files
- Know how to utilize ‘cPanel’ and access the “public_html” folder and other core WordPress files
- Know how to turn off automatic updates to prevent WordPress from reinstalling the original “wp-login.php” file
- Know how to backup WordPress website
- Know how to download and upload files to the root directory
- Know how to change file permission
- A code snippet plugin to make the job easy (optional)
** DO NOT FOLLOW ANY STEPS WITHOUT TAKING A FULL BACKUP OF YOUR WORDPRESS WEBSITE**
Step 1: Log in to cPanel
First, log in to cPanel and head to the “File Manager” section. Here, you’ll find your WordPress website’s root directory: public_html.
N.B. Don’t worry if you can’t find the root directory by this name:public_html. Sometimes, it may have other names like public, www, or your website’s name.
Once you find the root directory, you’ll notice a “wp-login.php” file inside that directory. You need to edit this file with a text editor to change your website’s login URL.
Step 2: Change the Name of the Original wp-login.php File
First, download the original “wp-login.php” file on your computer and rename it to the path name you want to use for your login URL.
For instance, we renamed it “radius.php,” and you can change the name of your site’s “wp-login.php” to your preferred path name (you can name it anything, making it as simple or obscure as you wish).
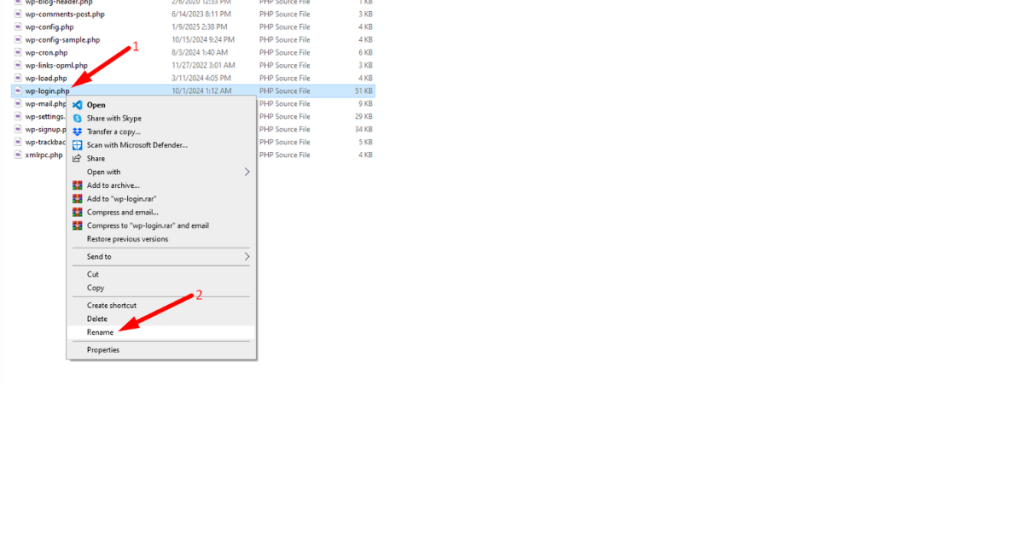
Take a look at how this file appears after renaming it.

Step 3 – Modify wp-login File
You need to modify the renamed file using a code editor. Open the file in your preferred code editor, then open the Find & Replace widgets.
Since we use Visual Studio, we press “Ctrl + F” (Windows users) or “⌘ + F” (Mac users) to open the Find Widget in the editor. Afterward, type “wp-login” in the Find field.
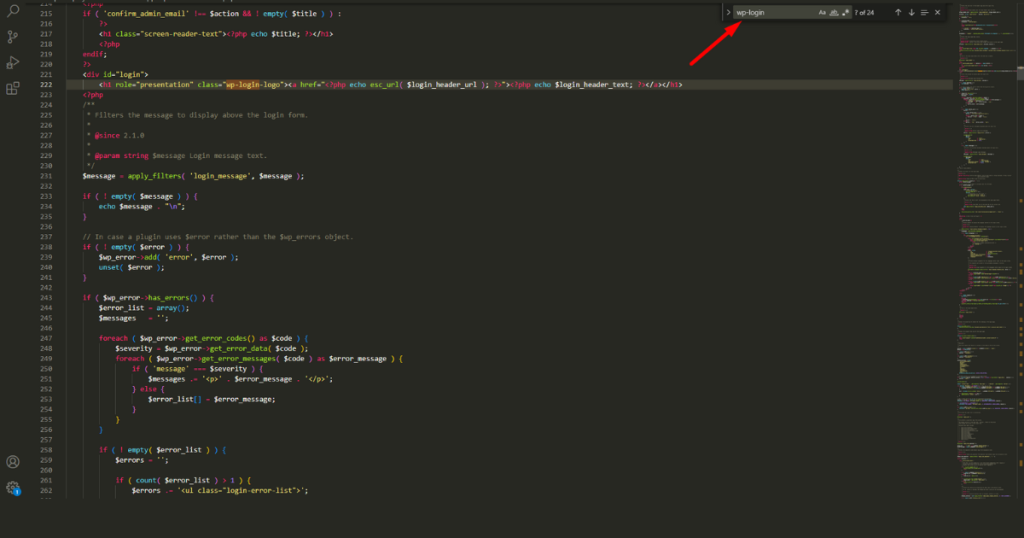
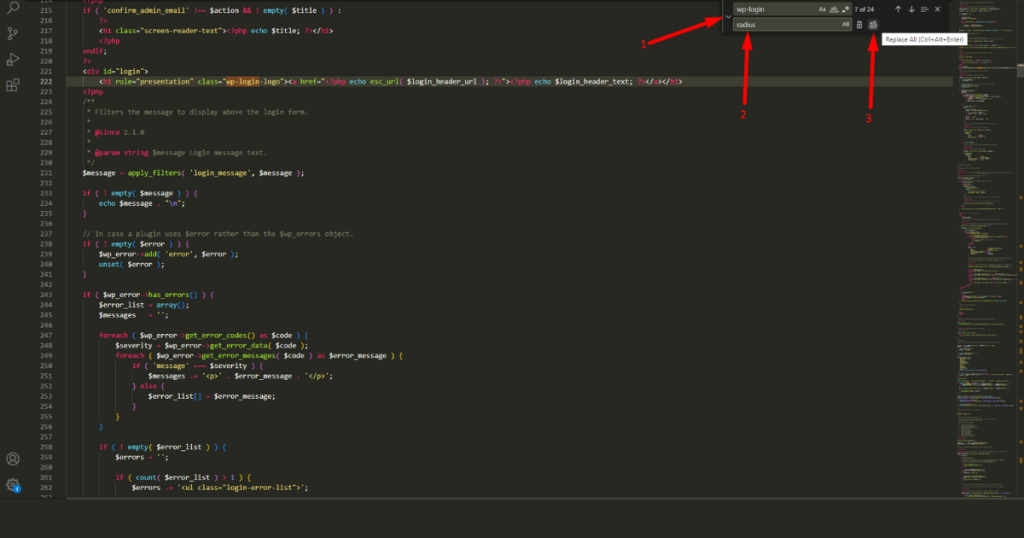
Now, press “Ctrl + H” (Windows users) or “⌥ + ⌘ + F” (Mac users) to open the Replace widget. Alternatively, toggle the Replace arrow in the Find field to open the Replace Widget.
Then, input the file name or new URL path you used to rename the “wp-login.php” file in the Replace field. Lastly, hit the Replace All icon and save the file.
Step 4: Upload the Modified File
You now need to upload the modified file to your site using the File Manager. Then, change the modified admin login file permissions to 644 or 640. Otherwise, you may not access the WordPress Admin Dashboard in the future.
Finally, delete the original “wp-login.php” file from your WordPress site (before doing this, ensure you’ve already taken a full backup of your site).
Step 5 – Include Logout and Lost Password URL Hooks into Theme’s functions.php File
Although we’ve already changed the admin login URL, we need to add logout and lost password filter hooks into the theme’s (installed on our WordPress site) functions.php file.
Why? When you log out from your site, WordPress will try to call the “wp-login.php” file we deleted. Therefore, you’ll see a 404 error. That means you can log in to your website but can’t log out.
Thus, to solve this issue, add the logout url hook and the lostpassword url hook to your theme’s functions.php file. Include these hooks to the theme you are using on your WordPress site.
But how do you do that? You can accomplish this job in two ways.
Directly edit your theme’s “functions.php” file using your site’s File Manager, following the same steps you followed to edit the “wp-login.php” file. Another way is to use a plugin. We’ll first show you the 1st method. Let’s begin.
Include Logout and Lost Password URL Hooks into functions.php Without a Plugin
First, go to your cPanel > File Manager. Then, head to public_html > wp-content > themes > your theme folder (our one is twentytwentyfive).
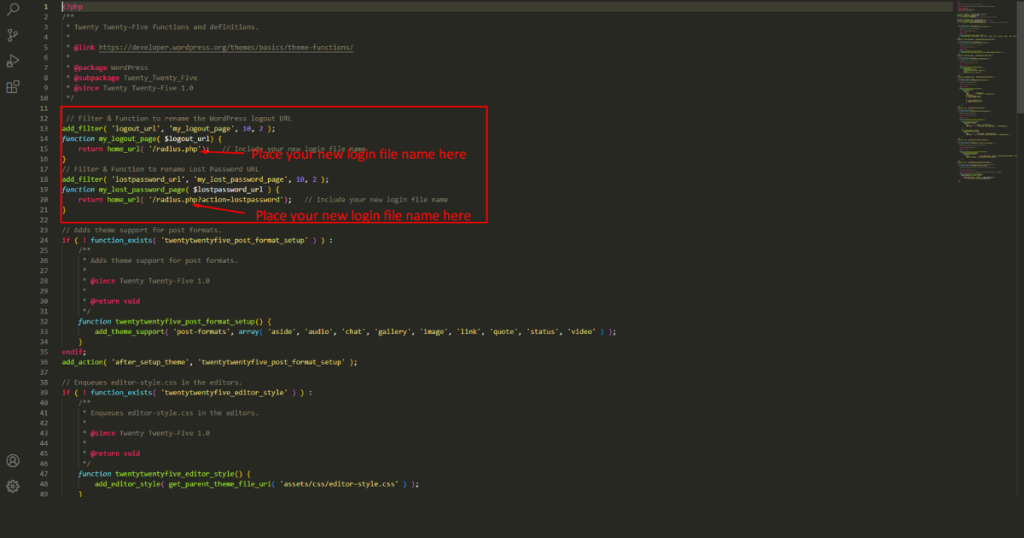
Here, you’ll see the “functions.php” file. Now open this file in the editor, copy the code we shared below, and paste it into it. Ensure you replace “radius.php” with your desired admin login path. Finally, save the “functions.php” file. That’s it.
// Codes for changing the WordPress logout URL
add_filter( 'logout_url', 'my_logout_page', 10, 2 );
function my_logout_page( $logout_url) {
    return home_url( '/radius.php');   // Include your new admin login file name
}
// Codes for changing the Lost Password URL
add_filter( 'lostpassword_url', 'my_lost_password_page', 10, 2 );
function my_lost_password_page( $lostpassword_url ) {
    return home_url( '/radius.php?action=lostpassword');   // Include your new admin login file name
}
Insert Logout and Lost Password URL Hooks into functions.php With a Plugin
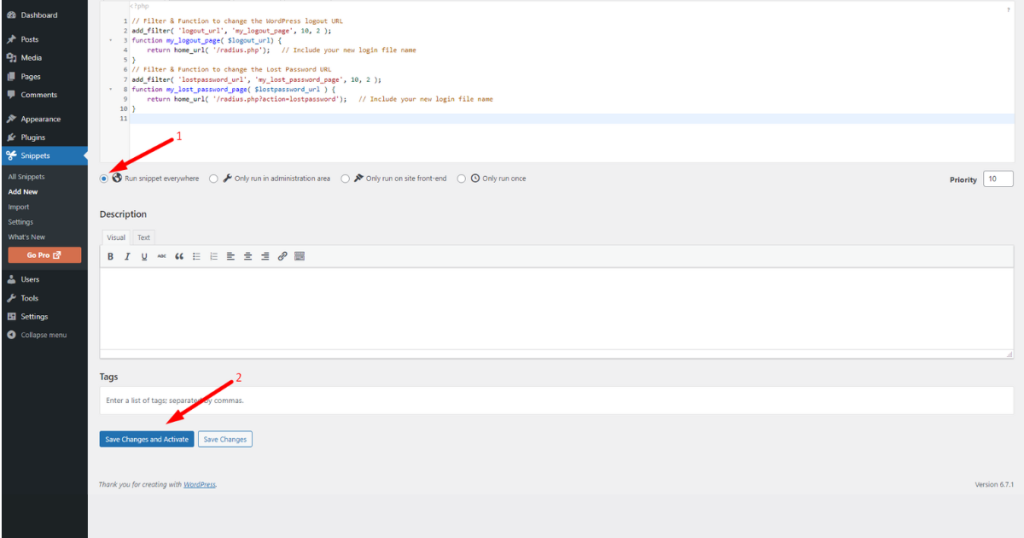
This is an easy method. Just install and activate Code Snippets (you can choose any safe and popular code insertion plugin instead of using this one). Then, head to your WordPress Admin Panel > Snippets > Add New.
Afterward, write the snippet name in the “Add New Snippet” field, ensure you are in the “Functions PHP” tab, and paste the code you copied.

Lastly, scroll down a bit to see if the “Run snippet everywhere” radio button is selected (if not, select it), then click the “Save Changes and Activate” button. Done.
Step 6 – Check Your Website with the New Admin Login URL
You can now log in and log out of your website with a new admin login URL you’ve just created if you’ve followed everything correctly.
Let’s check if you can log in and out of your site with this changed URL.
We added “/radius.php” at the end of our homepage URL and successfully logged in and out from our WordPress website.
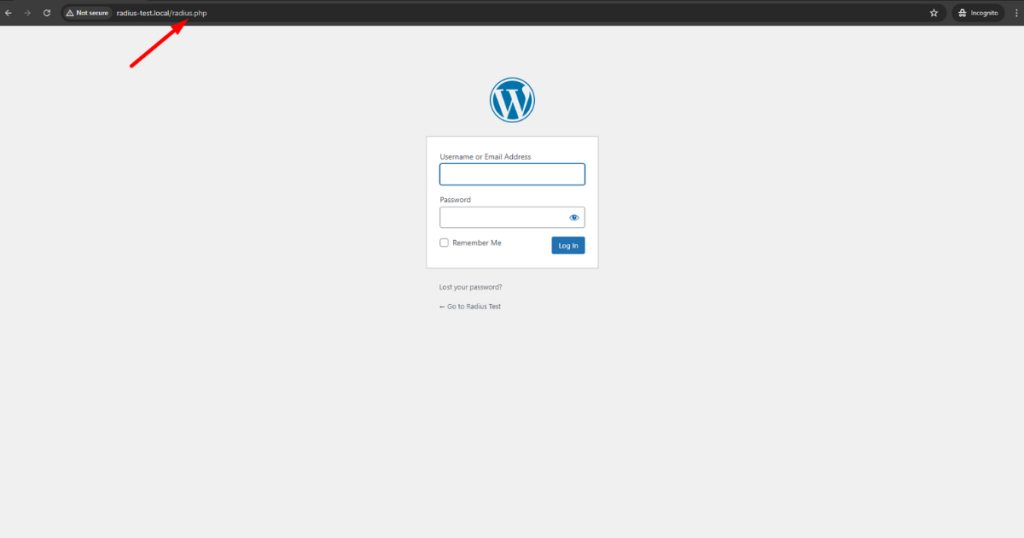
But when we included the traditional admin login path – /wp-admin – at the end of our homepage URL, we got this error screen below.

Our Concluding Thoughts
We hope this guide provides the correct information and answers your query as to how to change WordPress login URL. From now on, you can effortlessly change your WordPress website’s admin login URL by following the two methods shown in this article.
We recommend you change the admin login URL with a plugin. Why? You can easily restore your site’s previous version if something goes sideways. On the contrary, the plugin-less method is risky, and you shouldn’t try it if you are a non-techie.
Finally, remember to contact an expert while utilizing one of these two methods. We wish you good luck on your journey of enhancing your WordPress website’s security.



