


On This Page
Posts are the lifeblood of the majority of WordPress sites. They grab visitors’ attention and prevent them from leaving your website. Therefore, you need to showcase those posts perfectly.
One way to do that is by displaying posts in a slider. However, do you know how to make post slider in WordPress? It’s an easy job. Just read this article.
Here, we shared two practical methods to display posts in a slider. Select your preferred method and start showing off your WordPress posts in the least amount of time.
1st Method: How to Add WordPress Post Slider Without Plugin
We’ll first show you how to create a post slider in WordPress without a plugin. This method isn’t suitable for people without technical knowledge.
Before attempting this technique, it is essential to understand how to create and utilize a child theme, as well as how to fully back up your website. You must also have a working knowledge of PHP, HTML, CSS, and JavaScript.
Note: Take a full backup of your website in case it breaks. Also, always modify your website using a child theme so that you don’t lose your changes due to theme updates.
Step 1: Navigate to the Theme Function File
If you use a classic theme, you can access the theme function file {functions.php} by heading to WordPress Admin Panel > Appearance > Theme File Editor.
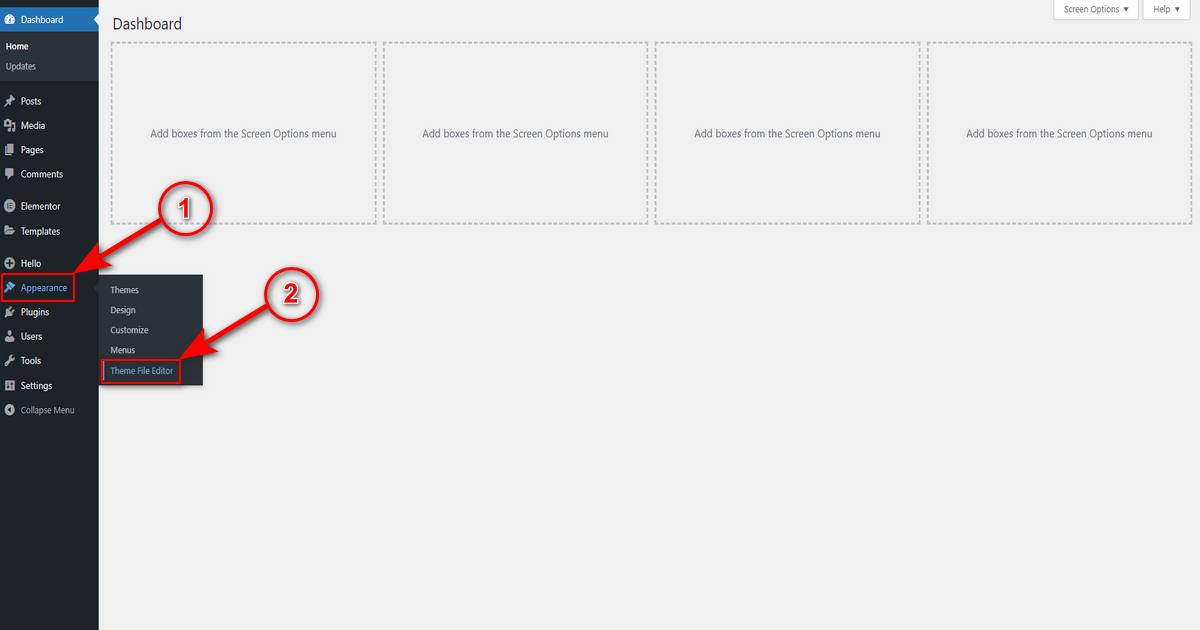
If you use a block theme, you’ll find this “Theme File Editor” submenu under the ‘Appearance‘ menu from your WordPress Admin Panel.
Once you click that submenu, you’ll visit the theme editor window. Now, click “functions.php” file on the top right.
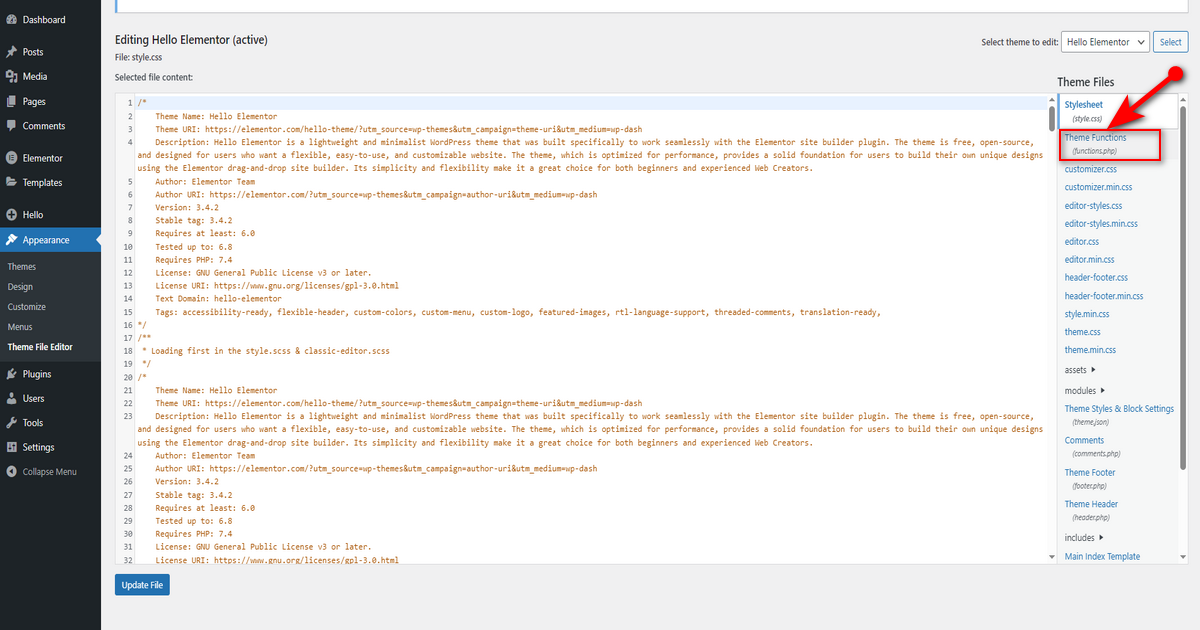
Step 2: Insert a Post Slider Code
Now, you need to insert the code snippet below and click “Update File” button.
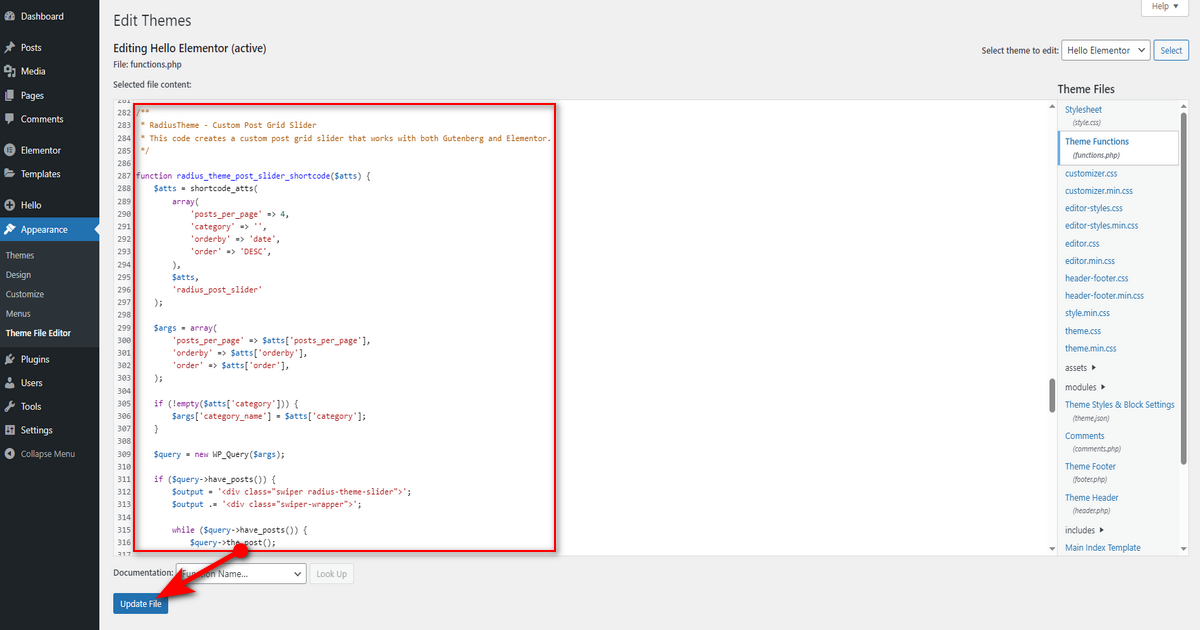
Here’s the code snippet:
/**
 * RadiusTheme - Custom Post Grid Slider
 * This code creates a custom post grid slider that works with Gutenberg and Elementor.
 */
function radius_theme_post_slider_shortcode($atts) {
    $atts = shortcode_atts(
        array(
            'posts_per_page' => 4,
            'category' => '',
            'orderby' => 'date',
            'order' => 'DESC',
        ),
        $atts,
        'radius_post_slider'
    );
    $args = array(
        'posts_per_page' => $atts['posts_per_page'],
        'orderby' => $atts['orderby'],
        'order' => $atts['order'],
    );
    if (!empty($atts['category'])) {
        $args['category_name'] = $atts['category'];
    }
    $query = new WP_Query($args);
    if ($query->have_posts()) {
        $output = '<div class="swiper radius-theme-slider">';
        $output .= '<div class="swiper-wrapper">';
        while ($query->have_posts()) {
            $query->the_post();
            $output .= '<div class="swiper-slide">';
            $output .= '<a href="' . get_permalink() . '">';
            $output .= get_the_post_thumbnail(get_the_ID(), 'medium', array('loading' => 'lazy'));
            $output .= '<h3>' . get_the_title() . '</h3>';
            $output .= '<p>' . get_the_excerpt() . '</p>';
            $output .= '</a>';
            $output .= '</div>';
        }
        $output .= '</div>';
        $output .= '<div class="swiper-pagination"></div>';
        $output .= '<div class="swiper-button-next"><i class="fa fa-arrow-right"></i></div>';
        $output .= '<div class="swiper-button-prev"><i class="fa fa-arrow-left"></i></div>';
        $output .= '</div>';
        wp_reset_postdata();
        return $output;
    } else {
        return '<p>No posts found</p>';
    }
}
add_shortcode('radius_post_slider', 'radius_theme_post_slider_shortcode');
function radius_theme_slider_scripts() {
    wp_enqueue_style('swiper-css', 'https://unpkg.com/swiper/swiper-bundle.min.css');
    wp_enqueue_script('swiper-js', 'https://unpkg.com/swiper/swiper-bundle.min.js', array('jquery'), '', true);
    // Adding inline script for Swiper initialization with autoplay and proper handling
    wp_add_inline_script('swiper-js', "
        jQuery(document).ready(function($) {
            var swiper = new Swiper('.radius-theme-slider', {
                slidesPerView: 3,        // Show 3 slides at a time
                spaceBetween: 20,        // Space between slides
                autoplay: {
                    delay: 5000,         // 5 seconds autoplay
                    disableOnInteraction: false,  // Keep autoplay even after interaction
                },
                pagination: {
                    el: '.swiper-pagination',
                    clickable: true,
                },
                navigation: {
                    nextEl: '.swiper-button-next',
                    prevEl: '.swiper-button-prev',
                },
                keyboard: {
                    enabled: true,
                    onlyInViewport: true,
                },
                touchEventsTarget: 'container',  // Enable touch swipe on mobile
                effect: 'slide',  // 'fade' is a valid string for the effect
                loop: true,  // Enable infinite loop
                breakpoints: {
                    1024: {
                        slidesPerView: 3,
                        spaceBetween: 20,
                    },
                    768: {
                        slidesPerView: 2,
                        spaceBetween: 20,
                    },
                    480: {
                        slidesPerView: 1,
                        spaceBetween: 10,
                    }
                },
                on: {
                    init: function () {
                        swiper.update();  // Ensure the Swiper is updated properly on load
                    },
                    resize: function () {
                        swiper.update();  // Recalculate Swiper on window resize
                    },
                },
            });
        });
    ");
}
add_action('wp_enqueue_scripts', 'radius_theme_slider_scripts');
function radius_theme_slider_styles() {
    ?>
    <style>
        .swiper {
            width: 100%;
            margin: 0 auto;
            position: relative;
            overflow: hidden;
        }
        .swiper-wrapper {
            display: flex;
            transition-property: transform;
            box-sizing: content-box;
        }
        .swiper-slide {
            flex-shrink: 0;
            display: flex;
            justify-content: center;  /* Center slide contents */
            align-items: center;
            text-align: center;
            width: 100%;  /* Ensure each slide takes up the full available space */
            max-width: 100%;
            box-sizing: border-box; /* Avoid any clipping of content */
            padding-left: 20px;  /* Add space on left side of slide */
            padding-right: 20px; /* Add space on right side of slide */
        }
        .swiper-slide img {
            width: 100%;
            height: auto;
            border-radius: 10px;
        }
        /* Navigation buttons */
        .swiper-button-next,
        .swiper-button-prev {
            position: absolute;
            top: 50%;
            width: 50px;
            height: 50px;
            margin-top: -25px;  /* Center the arrows vertically */
            z-index: 10;
            cursor: pointer;
            border-radius: 50%;
            background: linear-gradient(45deg, #FF5722, #FF8A00);  /* Gradient background */
            display: flex;
            justify-content: center;
            align-items: center;
            color: #fff;
            font-size: 24px;  /* Larger arrow size */
            box-shadow: 0 2px 10px rgba(0, 0, 0, 0.2);
            transition: background-color 0.3s ease, transform 0.3s ease;
        }
        /* Move the arrows further from the content */
        .swiper-button-next {
            right: 2px;  /* Increase the distance from the right edge */
        }
        .swiper-button-prev {
            left: 2px;  /* Increase the distance from the left edge */
        }
        /* Hover effect for arrows */
        .swiper-button-next:hover,
        .swiper-button-prev:hover {
            background-color: rgba(255, 255, 255, 0.9);
            transform: scale(1.1);  /* Slightly enlarge on hover */
        }
        /* Pagination style */
        .swiper-pagination {
            position: absolute;
            bottom: -20px;
            left: 0;
            right: 0;
            text-align: center;
            z-index: 5;
        }
        .swiper-pagination-bullet {
            background-color: #333;
        }
        .swiper-pagination-bullet-active {
            background-color: #FF5722;
        }
        .swiper-slide h3 {
            font-size: 18px;
            margin-top: 10px;
            font-weight: bold;
            color: #333;
        }
        .swiper-slide p {
            font-size: 14px;
            color: #666;
            margin-top: 5px;
        }
        .swiper-slide:hover .overlay {
            opacity: 1;
        }
        .swiper-slide .overlay {
            position: absolute;
            bottom: 0;
            background-color: rgba(0, 0, 0, 0.5);
            color: white;
            width: 100%;
            text-align: center;
            padding: 10px;
            opacity: 0;
            transition: opacity 0.3s ease;
        }
    </style>
    <?php
}
add_action('wp_head', 'radius_theme_slider_styles');
Okay, you now need to add a shortcode to a page or post where you want to display the post slider. Here’s that shortcode: [radius_post_slider]
Step 3: Include a Shortcode to Display Post Slider
Suppose you want to add the shortcode mentioned above to a page. So, go to WP Admin Panel > Pages > All Pages or Add Page.
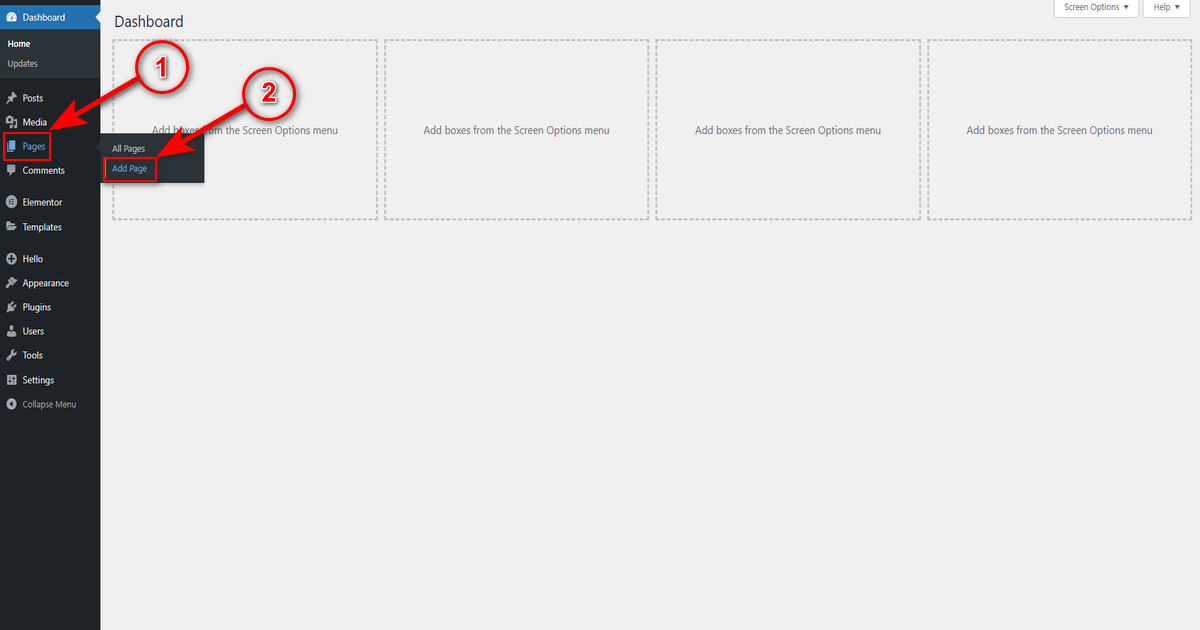
You’ll now be inside the Gutenberg editor. Write a page title and click ‘+ (Block Inserter)‘ to include a block.
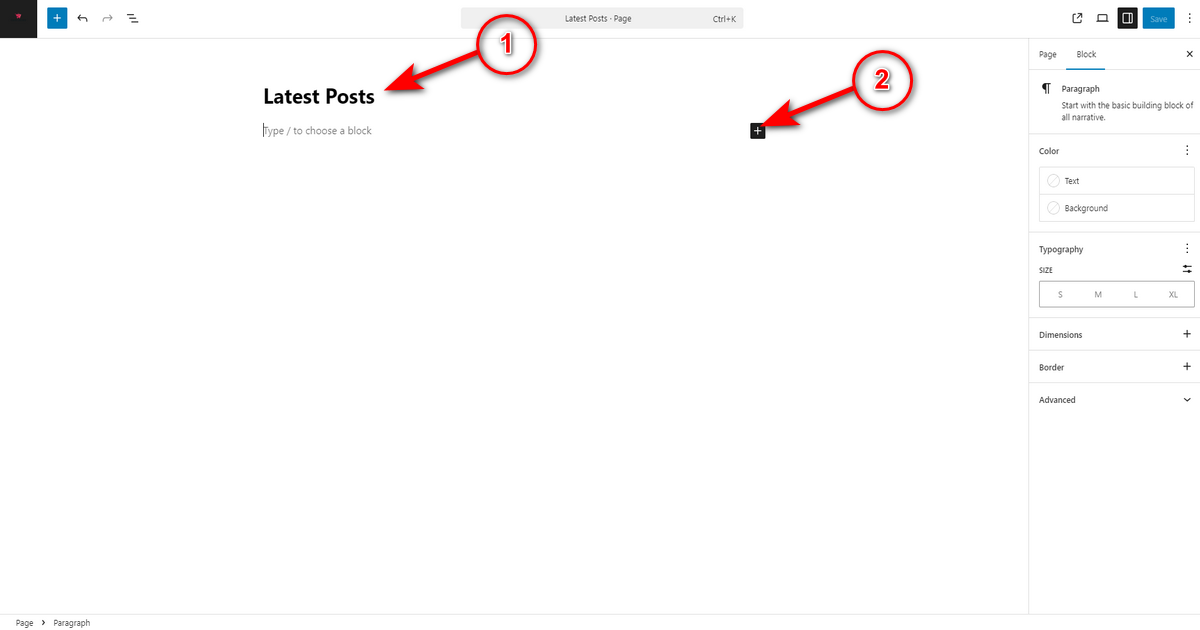
After that, type ‘Shortcode‘ in the block inserter’s search field and select the ‘Shortcode‘ block.
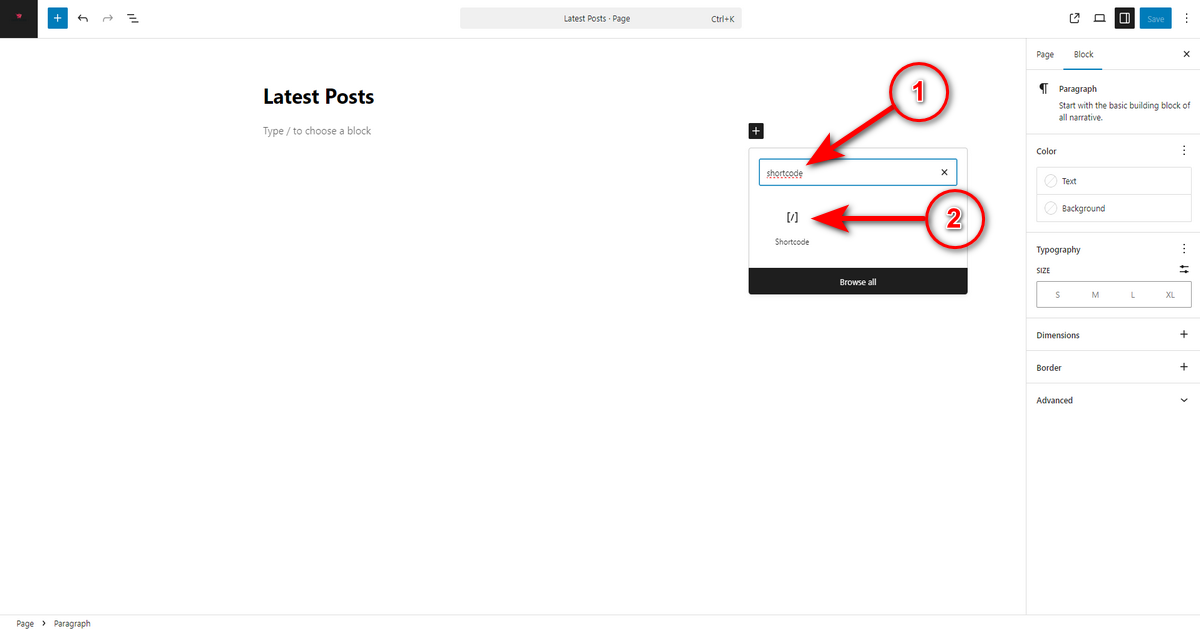
At this point, copy this shortcode – [radius_post_slider] – paste it into the shortcode block’s field and hit the ‘Publish‘ or ‘Save‘ button.
**This code snippet will also work with Elementor, a popular page builder. Just insert the Elementor shortcode widget in your preferred page and include the [radius_post_slider] shortcode to display posts in a slider.**
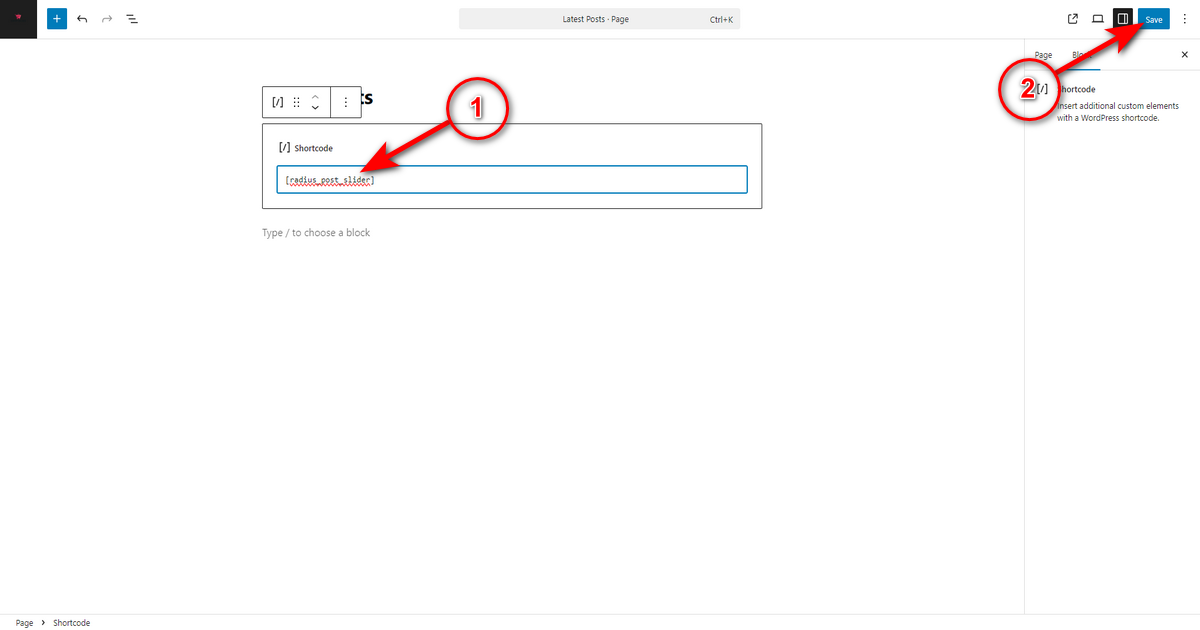
If you already have some posts published on your WordPress website, you’ll now be able to view them in a slider after visiting the page you’ve just published. See the animation below to know how our one appears.

As you can see, it’s a basic slider. If you want to add more functionalities, utilize various layouts, and take advantage of AI, follow the second method we are about to share. Let’s get started.
2nd Method: How to Make Post Slider in WordPress with a Plugin
It’s a beginner-friendly technique that anyone with a basic understanding of technology can follow. Let’s unwrap this method.
Step 1: Get the Best Post Slider Plugin for WordPress
You need to choose the best post slider plugin to display posts in a slider on your WordPress website. But how do you find the best among thousands of plugins?
Consider the criteria below to select the best post slider plugin for your website.
- Ensure the plugin comes with an intuitive drag-and-drop interface
- It must provide responsive designs
- Make sure the plugin lets you customize slider layouts
- Check if the plugin is compatible with the latest WordPress version, your theme, and other plugins
- Check for compatibility with popular page builders, such as Gutenberg and Elementor.
- Inspect customer reviews and support
- Check the developers’ reputation and ensure they regularly update the plugin
- Compare the plugin with other contenders
After checking these facts, you can select a post slider plugin. We recommend The Post Grid plugin by RadiusTheme since it meets all the above criteria. It’s available in both free and paid versions.
However, to showcase posts in a slider with this plugin, you need to opt for its pro version. That said, let’s install and activate the free one first.
Step 2: Install and Activate The Post Grid Plugin
Installation and activation are easy. Just navigate to your WordPress Admin Panel. Then, go to Plugins > Add Plugin.
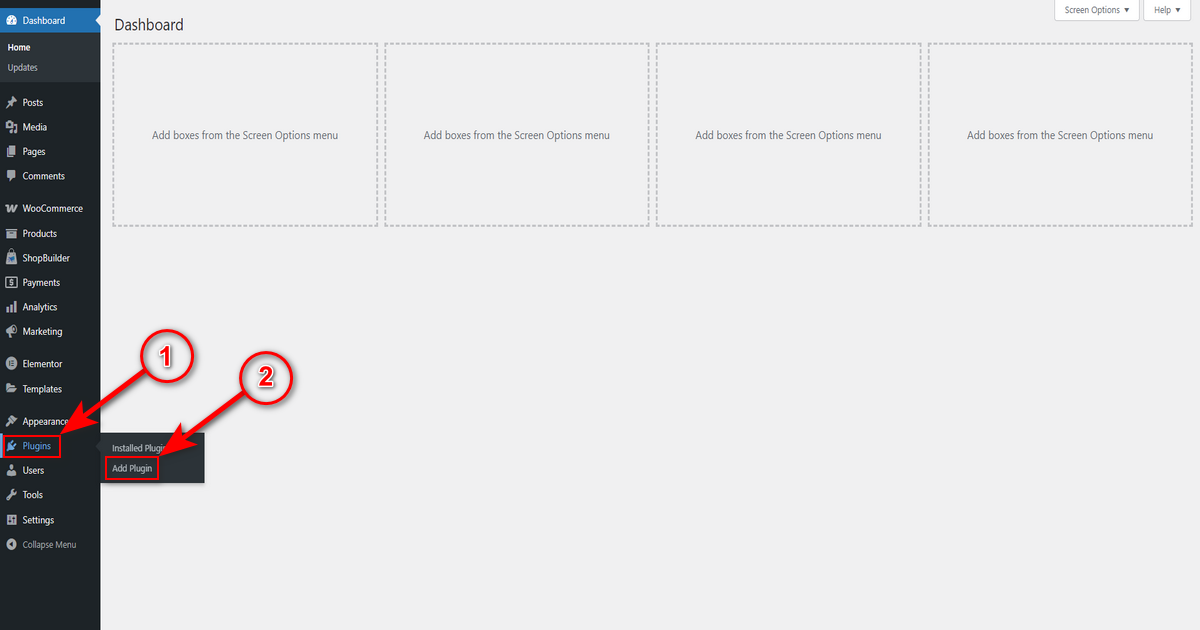
Then, search for “The Post Grid” in the plugin search field and click “Install Now” button of the marked plugin in the screenshot below.
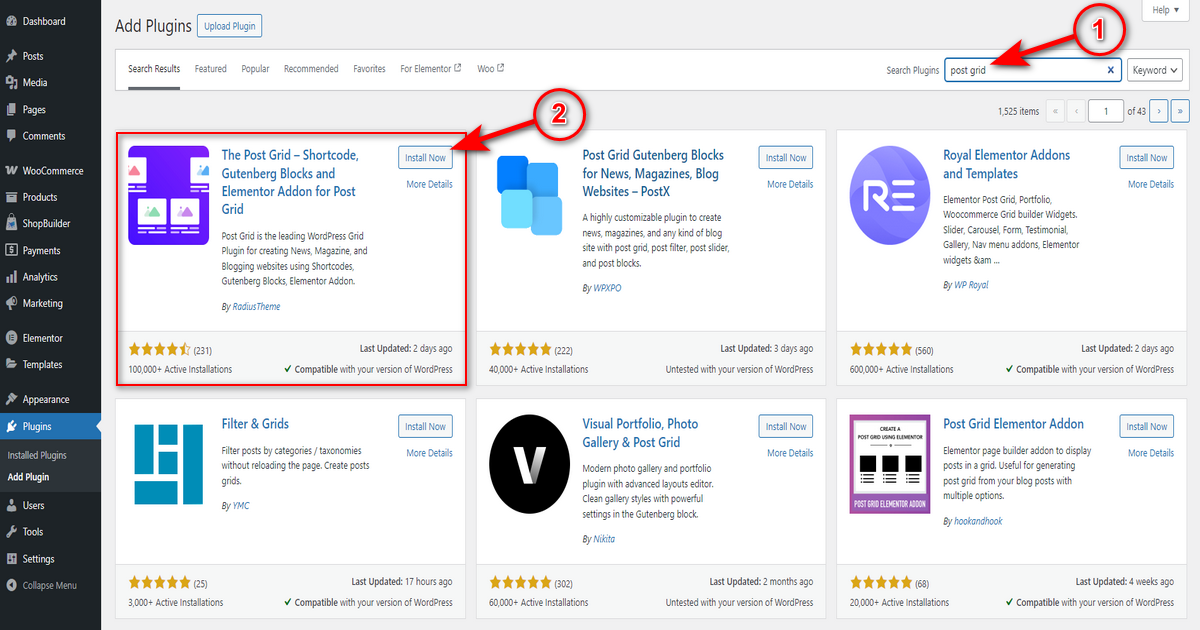
Finally, hit ‘Activate‘ button.

That’s how you install and activate the free version. Afterward, install and activate the pro version you got via email after purchasing this plugin.
Here are the steps to follow:
- Go to WordPress Admin Panel > Plugins > Add Plugin.
- Click “Upload Plugin” button.
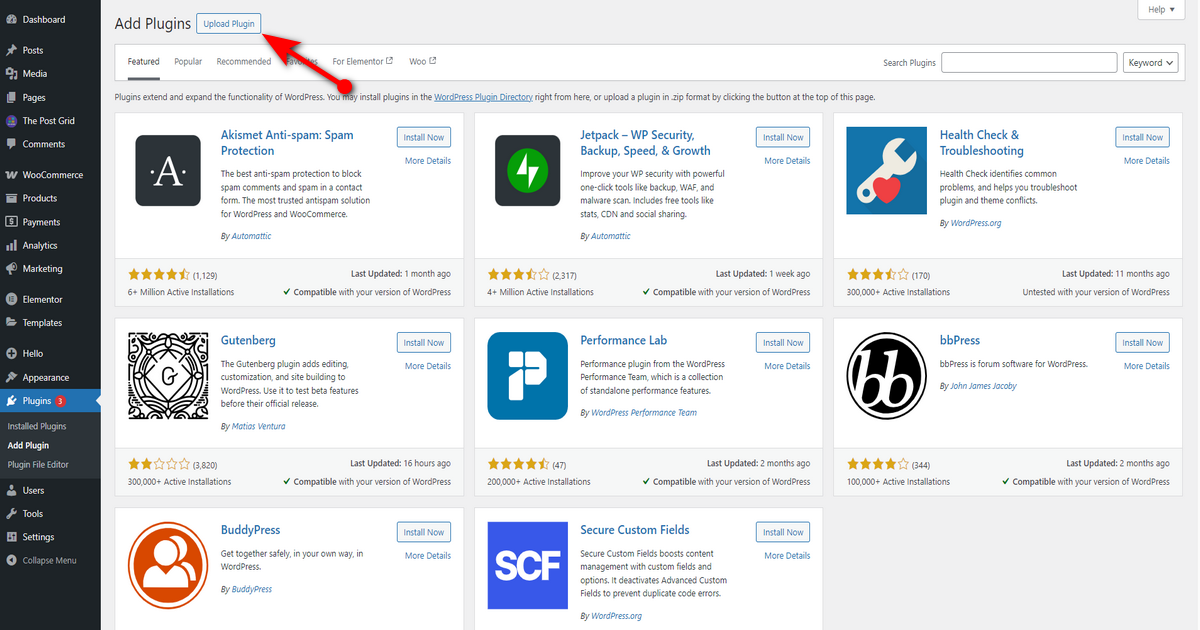
- Now, hit “Choose File” button.
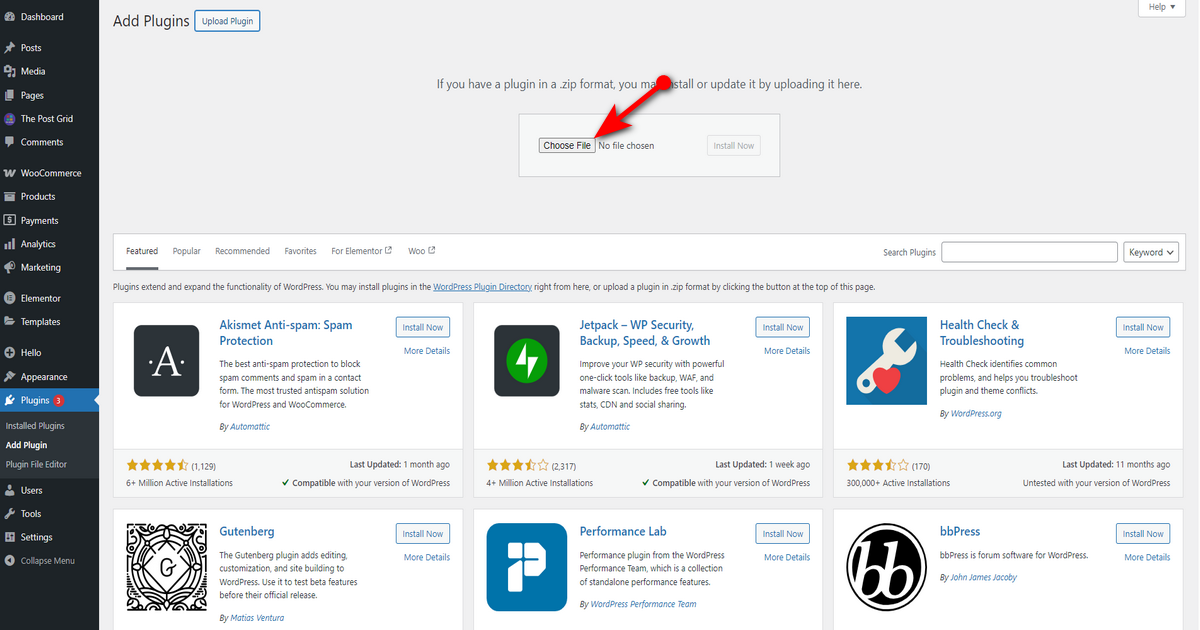
- Then, press “Install Now” button.
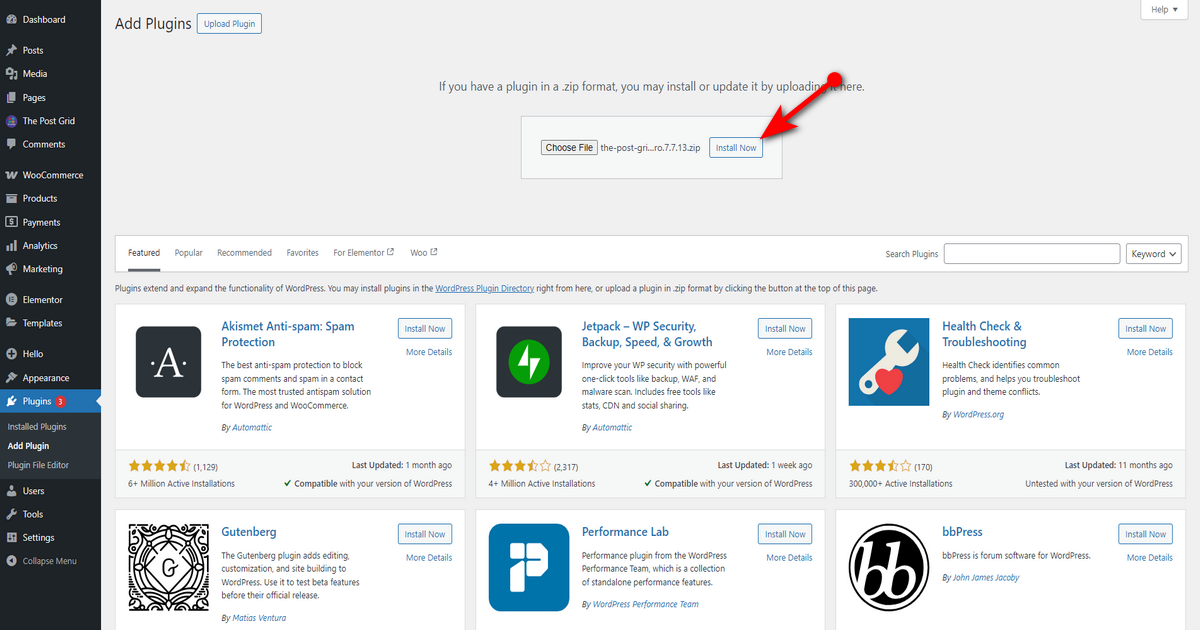
- Wait a while and press ‘Activate‘ link. That’s it.
Step 3: Customize the Post Grid Plugin
After installing and activating this plugin, you can optionally go to its ‘Settings‘ and make changes according to your needs. For instance, you can determine which editor type (e.g., Gutenberg or Elementor) you want to use to include posts.
Also, you need to work with The Post Grid’s ‘Settings‘ menu if you want to integrate AI to write posts. See the animation below to get a glance at the settings of this plugin.

Step 4: Create a Shortcode
We now need to create a shortcode with the “The Post Grid” plugin and embed that code into a post or page to display all the posts in a slider.
So, let’s head to WordPress Admin Dashboard > The Post Grid > Add New Post Grid.
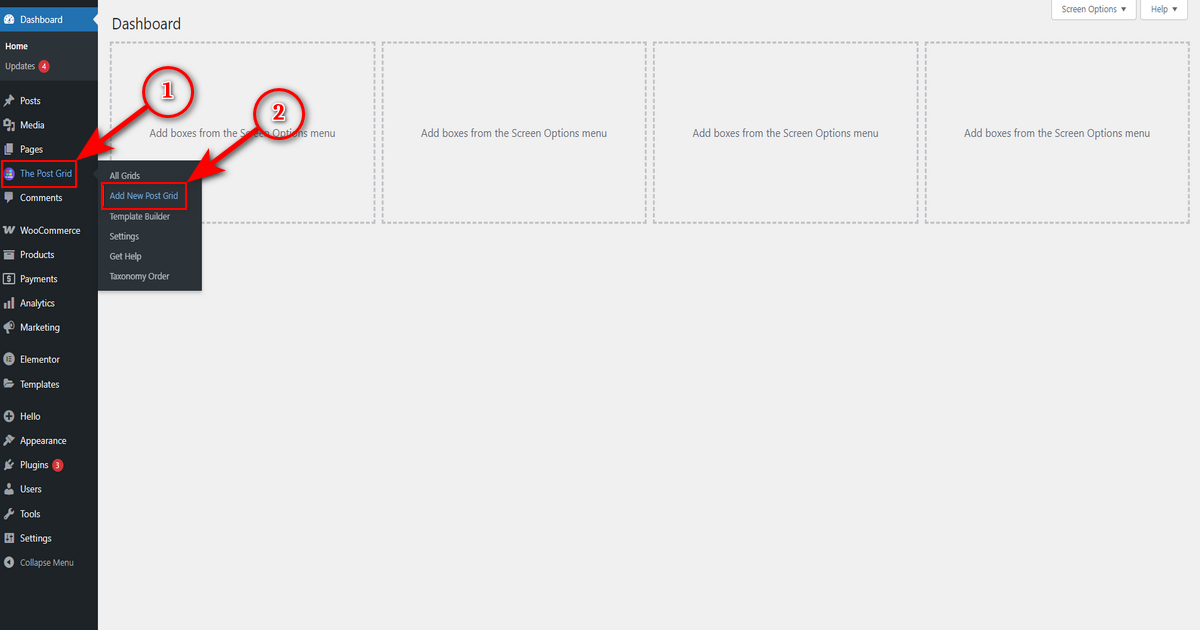
Now watch the animation to learn to create a shortcode using this plugin.

Lastly, copy and save the shortcode for later use.
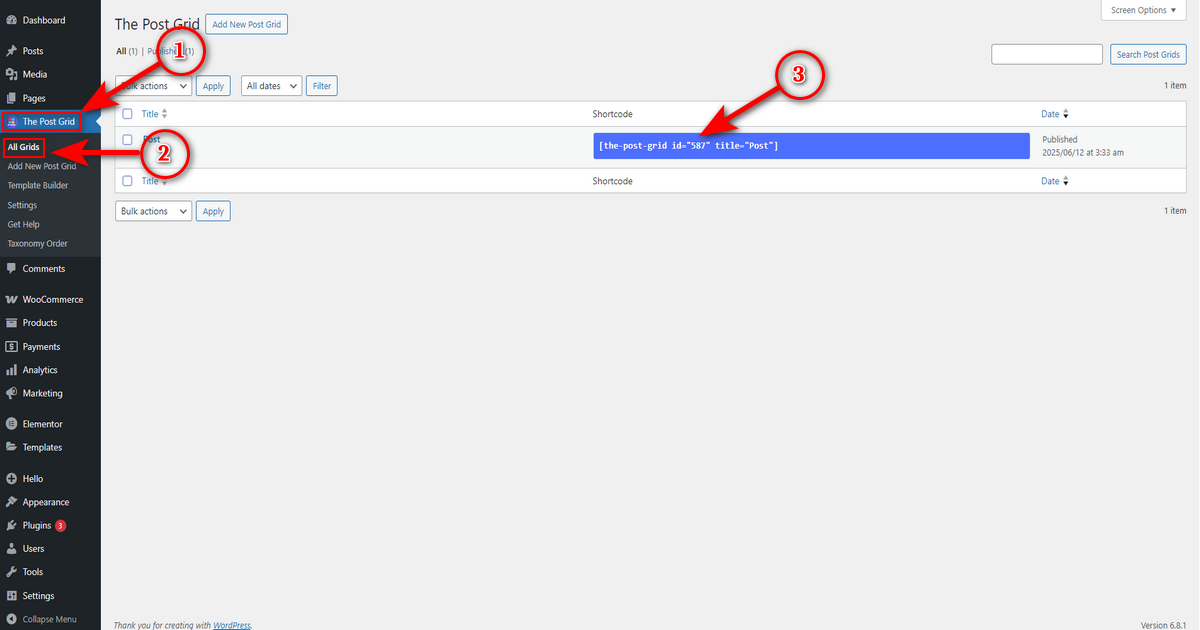
Step 5: Embed the Shortcode
You now need to embed the shortcode you copied and saved earlier into a post or a page. So, open your chosen page or post (where you want to display posts in a slider) inside the Gutenberg or Elementor editor.
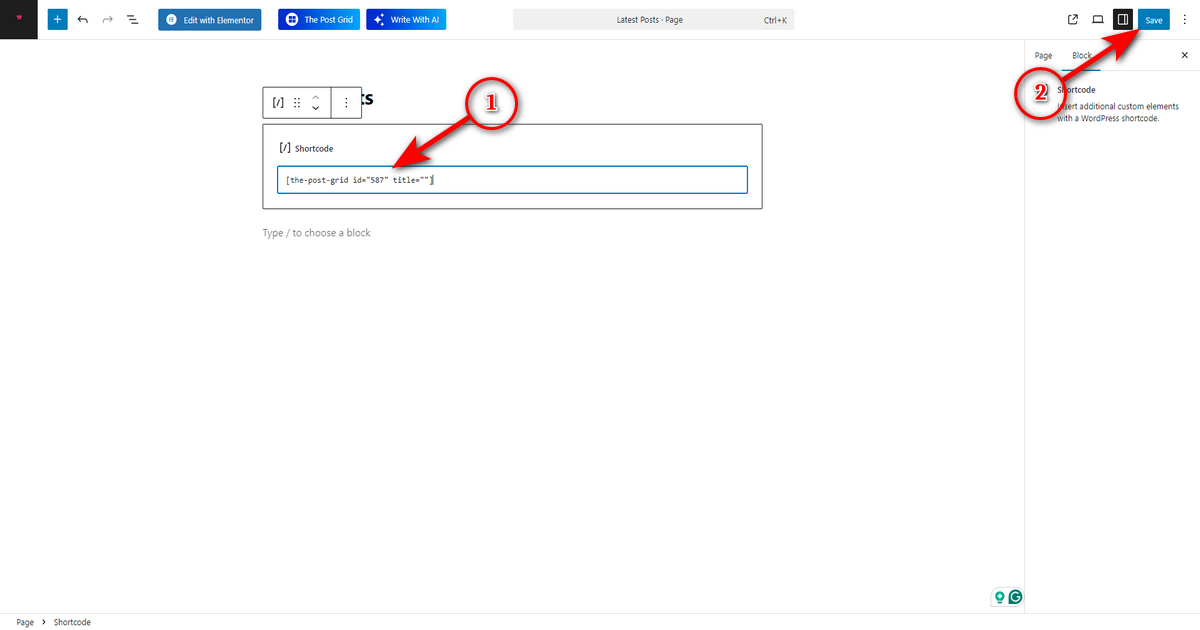
Note that you can use the shortcode block in Gutenberg and the shortcode widget in Elementor to embed the code. We’ll demonstrate using the Gutenberg editor.
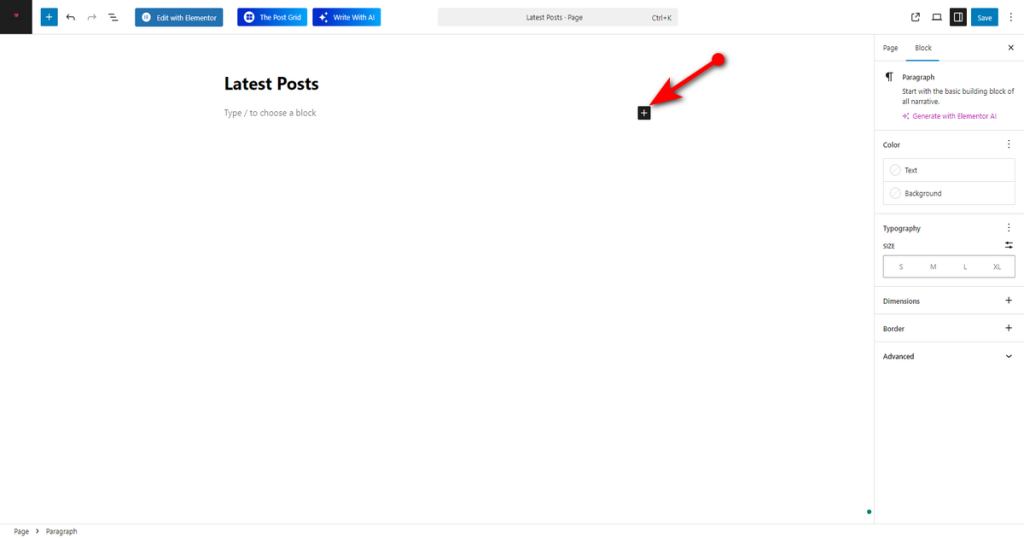
Once you open a page or post inside the Gutenberg editor, click ‘+‘ symbol.
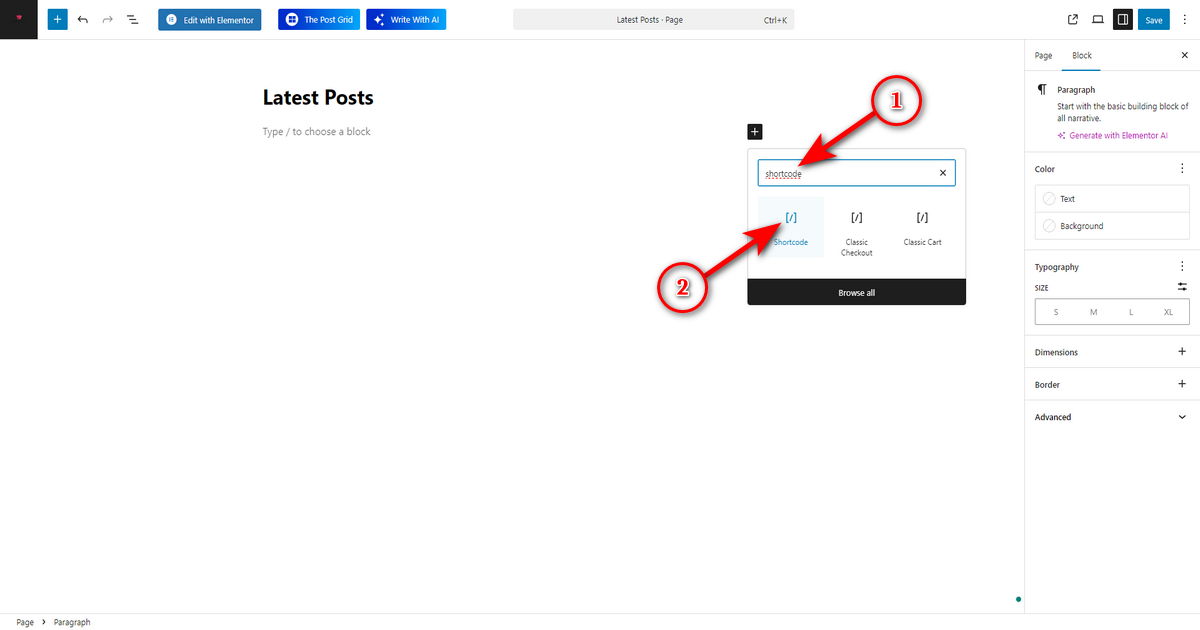
Then, write ‘Shortcode‘ inside the block inserter and click ‘Shortcode‘ block.
Include the shortcode you saved earlier inside the ‘Shortcode‘ block and press ‘Save‘ button in the top right corner to publish the post or page.
Now, visit that post or page to see all your posts in a slider.

As you can see, it is easy to make a post slider in WordPress using this plugin. We encourage you to use this plugin and explore all its features. In addition, don’t forget to read the documentation of The Post Grid if you need assistance along the way.
What’s the Difference Between A Post Slider and a Carousel?
You might think that sliders and carousels have similar features. However, the reality is that they are distinct. A slider typically contains several images, and it displays one photo at a time.
The image changes when a user interacts with the slider or a specific amount of time has passed. On the other hand, a carousel features multiple photos and displays those images simultaneously.
When a slider can showcase only one image at a time, a carousel exhibits multiple images to enhance user engagement. This is the primary difference between a slider and a carousel.
Our Concluding Thoughts
Now that we’ve looked into how to make post slider in WordPress through this comprehensive guide. You can now easily add a post slider in WordPress by following one of these two methods shown above.
Select a method that suits your preferences. We recommend using the plugin method if you lack technical knowledge and need a straightforward solution. Alternatively, you can try the first method if you’re tech-savvy and want to add a post slider for free.



