


On This Page
Do you know that a neighborhood directory website can help you connect with your neighbors and local businesses and get to know them well? This kind of website lets you stay connected, share updates, and seek help during emergencies.
So, the benefits of such a website are immense. And you want to create one. However, the problem arises when you don’t know how to create a neighborhood directory.
When there’s a problem, there’s a solution. You can easily build this website type by following all the steps we’ve shared in this article. Let’s explore those steps and act accordingly.
Explore various online business directory niches to expand your community platform and enhance local engagement.

What is a Neighborhood Directory?
A neighborhood directory is a platform that collates information about residents, local businesses, and other organizations within a particular geographic area. Such a directory can either be a printed or digital guide.
A neighborhood directory helps community members to stay connected and share information while seeking support during emergencies.
This kind of directory allows municipalities to inform neighborhoods about important events like zoning updates or cleanups, etc. Additionally, a neighborhood directory supports local businesses.
What Should a Neighborhood Directory Include?

Before you build a neighborhood directory, it’ll be wise to learn beforehand what you need to add to a neighborhood directory, especially when you plan to build a website. So, here are the elements a neighborhood directory website should feature.
Resident Contact Information: Such a directory site should feature names, phone numbers, addresses, emails, and other relevant contact information.
Business Listings: A neighborhood directory website can include names, contact details, addresses, operating hours, and short descriptions of local businesses.
Amenities and Services: It can feature information about community amenities like parks, swimming pools, and more. It can also contain details about service providers like plumbers, electricians, etc., who work within a specific geographic location.
This kind of site also hosts information about hospitals, clinics, pharmacies, mosques, churches, schools, colleges, and so on.
Community Events and Activities: A neighborhood directory can display information related to upcoming community events, like festivals, block parties, and other occasions.
Emergency Contacts and Safety Information: A comprehensive neighborhood online directory (NOD) should have information about local emergency services, such as police, ambulance, medical, fire department, etc.
A Neighborhood Job Board: This website type tends to have a job board where residents list jobs for local businesses.
Community Resources: A neighborhood directory website should feature information about local government offices and representatives. It can also showcase waste management and other community guidelines.
Council Information: Last but not least, an NOD can contain details about neighborhood associations or councils, board members or representatives, meeting schedules and locations, and more.
How Do You Collect Information for Your Neighborhood Directory?
You can collect information by conducting surveys or questionnaires online. Besides, you can host community events and create an information booth where residents can provide details.
You might utilize various social media platforms and create online groups and forums
dedicated to your neighborhood directory. Then, run an online campaign targeting those groups and forums and get them to submit their contact information and business details voluntarily.
Another way of collecting your targeted people’s information is to partner with local educational institutions, community centers, and other local organizations. Work with them to gather information about your targeted residents.
How to Create a Neighborhood Directory
Creating a neighborhood directory site is easy if you follow the correct steps. This section will show you those steps. Thus, follow them and build your directory site for free!
Step 1: Determine a Niche
First, you need to select a niche for your neighborhood directory site. While choosing, decide if your directory will prioritize residents, local businesses, community services, or a combination.
Then, identify geographic scope – determine the specific area your directory will cover, such as a single neighborhood, a group of adjacent neighborhoods, a town, or a city district.
Then, research the needs of your target area by engaging with residents, local businesses, or community leaders. Use online surveys, social media polls, or informal conversations at community events to gather insights.
You can also check for existing directories or platforms in your area to identify gaps.
Think about the demographics of your neighborhood and find the problems you can solve with your niche. Consider these criteria while selecting your niche.
Step 2: Select a Domain
Once you pick a niche for your neighborhood directory site, you need to select a domain. In case you need to know what a domain is, keep reading.
It’s a unique address that visitors use to access a website. For example, if you look at this URL: https://www.radiustheme.com, “radiustheme” is a domain and “.com” is the domain extension.
Now, let’s discuss how to select a perfect domain name. Choosing the right domain name for your business isn’t that difficult. When selecting a name, you need to ensure that some key criteria are met. And those factors are below.
- Utilize some domain name generators to generate domain name ideas
- Check if your chosen domain has any trademark issues
- Check its availability using some domain registrars like Namecheap, GoDaddy
- Go with a short, easy to type and pronounce, and memorable domain name
- Avoid selecting a domain name that contains hyphens, numbers, or other special characters
- Include keywords related to your neighborhood directory inside that domain for SEO benefits
- Also, it would be better if you could add the area’s name you are targeting to your domain
- Check the domain’s spam history and reputation
- Pick a suitable domain extension, such as .com, .info, .org, or go with a country-specific extension like .us
Remember these factors above while choosing a domain name for your neighborhood directory website.
Step 3: Connect Your Domain with a Hosting Provider
After choosing a domain name, you need to integrate it with a hosting provider. For your information, your domain needs a hosting platform to store files and data.
It’s your domain’s home where you upload various types of files that your website visitors can access. So, cautiously choose a hosting platform for your neighborhood directory. Here’s what you need to consider when selecting one.
- Inspect if the hosting provider offers a high uptime of 99.9%
- Check how well your chosen hosting provider can handle traffic spikes
- Go with a provider that ensures strong security measures like SSL certificates, firewalls, automatic and regular backups, etc.
- Make sure you choose a hosting plan with sufficient bandwidth and storage
- Ensure the provider offers responsive and reliable support
- It’ll be great if it comes with an intuitive control panel
- Lastly, check user reviews and compare pricing with other hosting providers
We recommend you to read: Best hosting for Directory website to avoid the hassle of choosing a hosting provider and need recommendations.
Step 4: Install WordPress and a Theme
At this stage, you need to install WordPress on your website. It’s a free and open-source content management system that powers up around 43.5% of websites on the internet!
It’s easy to use and has many themes and plugins to help beginners easily build websites without writing a single line of code. That’s why we recommend you install this CMS (Content Management System). You’ll find it under your cPanel of your selected hosting provider.
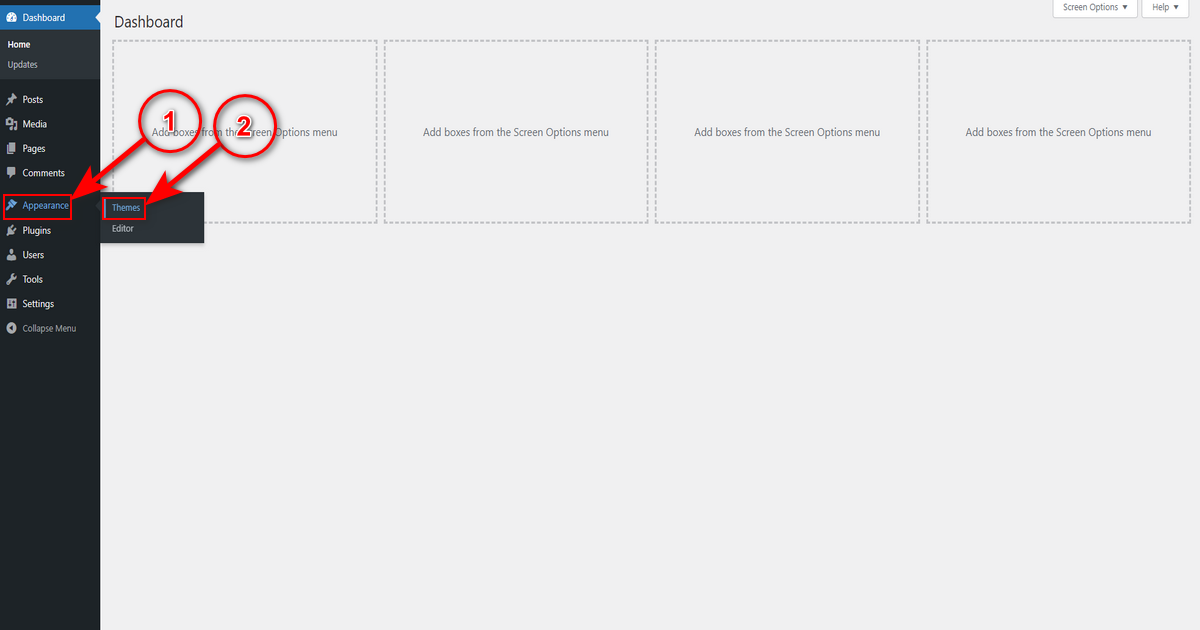
So, install it (seek your hosting provider’s help if needed) and log in to your WordPress Admin Panel. Then, follow the steps below to install a theme for your neighborhood directory site.
- Head to Appearance > Themes.
- Press “Add Theme” button.
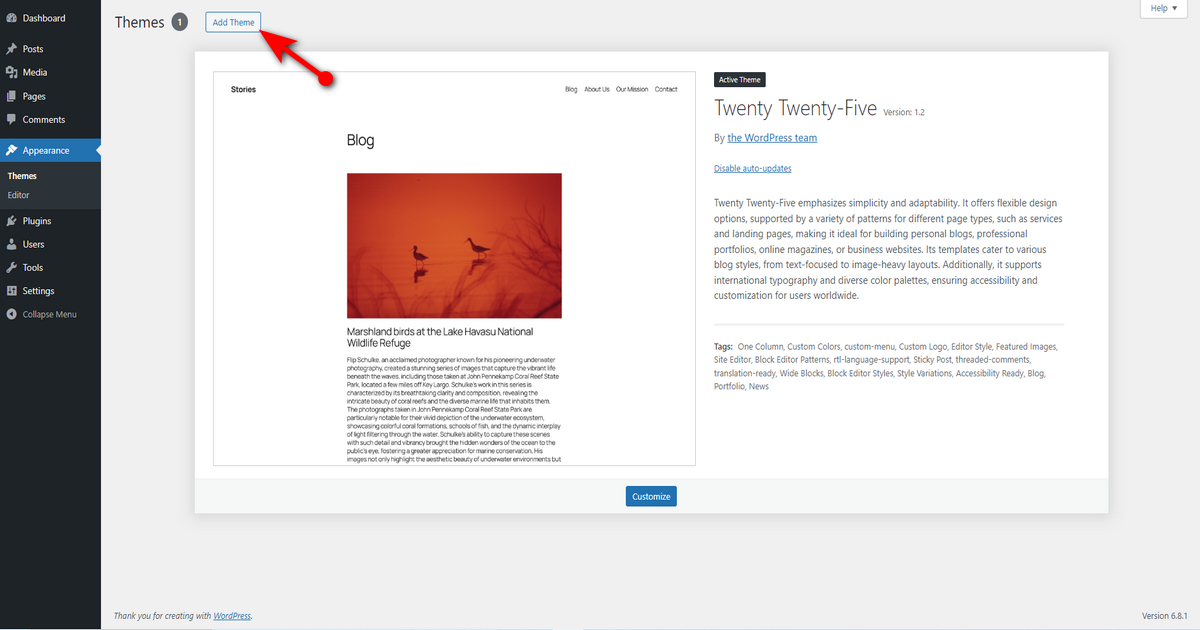
You’ll then visit the WordPress theme repository. Indeed, you’ll see many themes here, but which one is ideal for you is the big question.
We recommend you choose a free WordPress theme that lets you easily create an eye-catching directory site.
However, if you have a good budget, you should use pro themes like CLDirectory, ClassiList, etc. Otherwise, get Radius Directory it is a free business directory WordPress theme, install and activate it if you are tight on a budget.
- Once you download the Radius Directory theme from the RadiusTheme website or receive it via email, click “Upload Theme” button.

- Then, press “Choose File” to upload the theme’s zipped file.
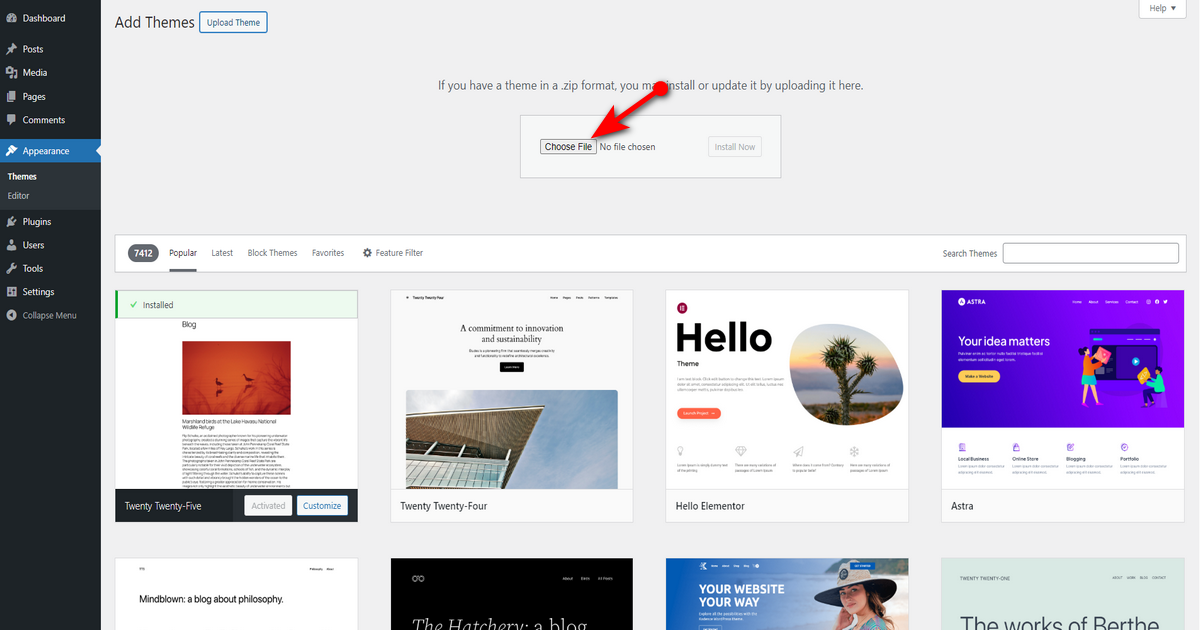
- Now, hit “Install Now” button.

- Wait a while and then click ‘Activate’ link to activate the theme.

- Okay, you’ve just installed the theme. You’ll now notice a notification to install supporting plugins at the top of the WordPress theme window. So, click “Begin installing plugins” button to install all those plugins at once.
N:B: These plugins are necessary to help you easily build a neighborhood directory website.

- Afterward, you’ll visit the “Install Required Plugins” window. Check mark the ‘Plugin’ checkbox to select all the plugins.

- Now, choose ‘Install’ option from “Bulk actions” drop-down menu and hit ‘Apply’ button.

- Wait a moment. Once the plugin installation process is complete, select all, choose ‘Activate’ from “Bulk actions” drop-down menu, and click the ‘Apply’ button.

That’s all the steps you need to follow to install and activate a theme and supporting plugins. Now, you’ll want to upload demo content to give your website a professional outlook.
Step 5: Install Demo Content
To install demo content, navigate to WP Admin Dashboard > Plugins > Installed Plugins.
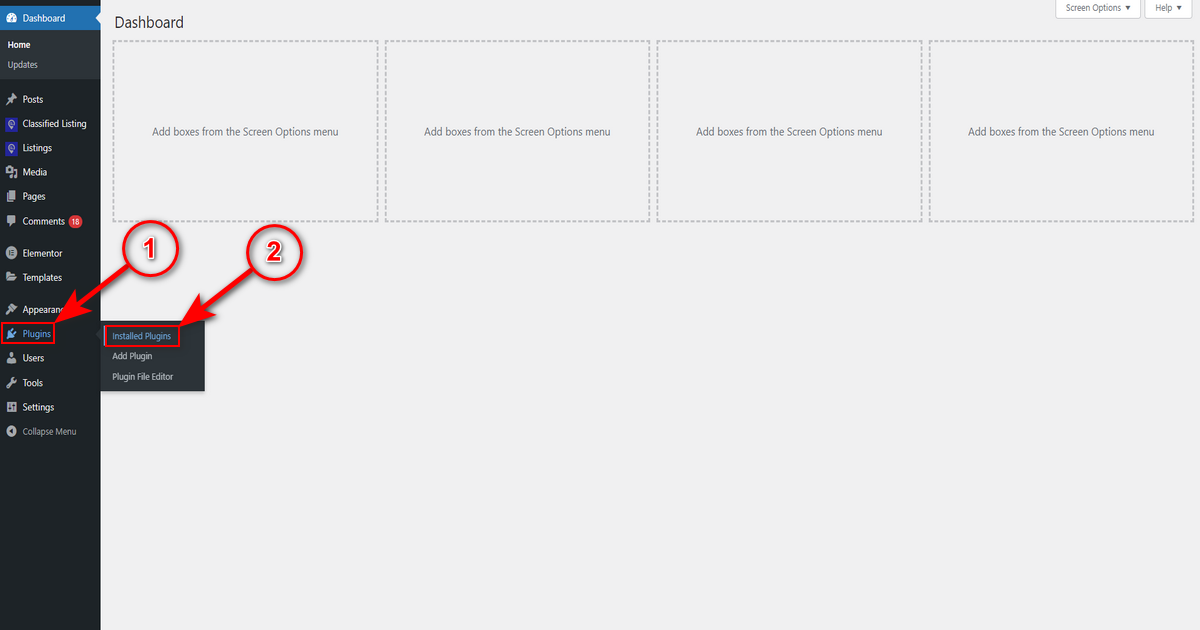
Then, head to “RT Demo Importer” and click “Install Demo Contents.”

You’ll now see demo content. Hit ‘Install’ button of demo content.
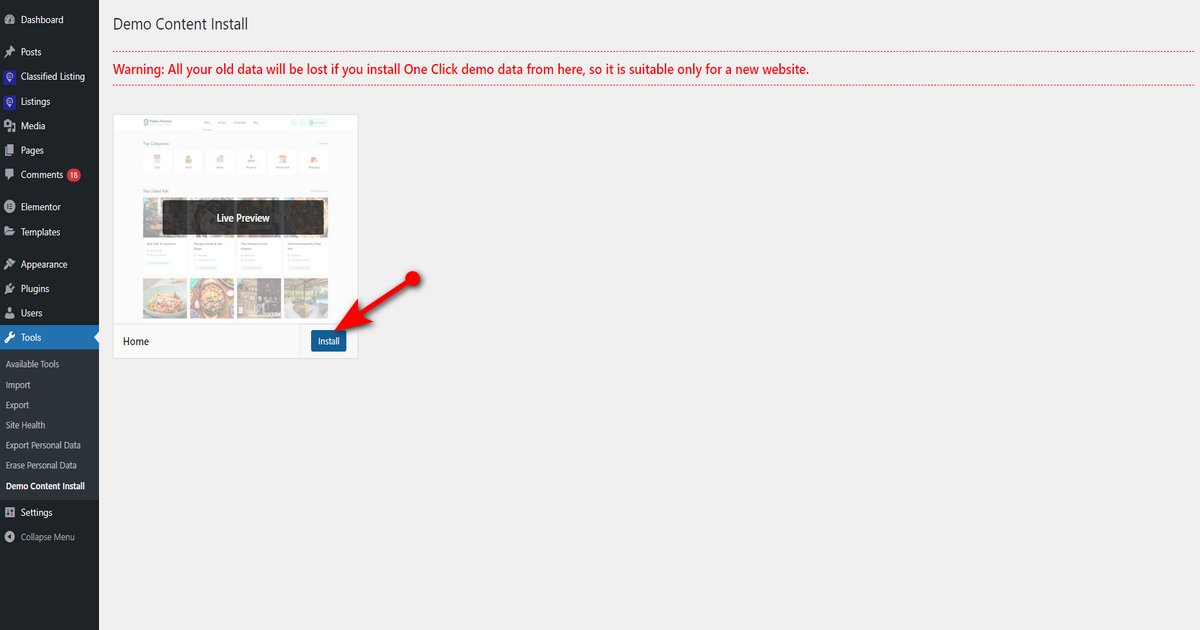
Voila! Your website is almost ready. You can visit it to check the overall outlook.
Step 6: Customize Your Neighborhood Directory Website
Although you’ve already built a neighborhood directory website for free, you need to customize it according to your needs. For instance, you can change the demo content logo and set primary, secondary, and background colors to align with your brand.
We’ll now demonstrate how to customize your neighborhood directory website with the Radius Directory theme.
Thus, visit Appearance > Customize from your WordPress admin account.
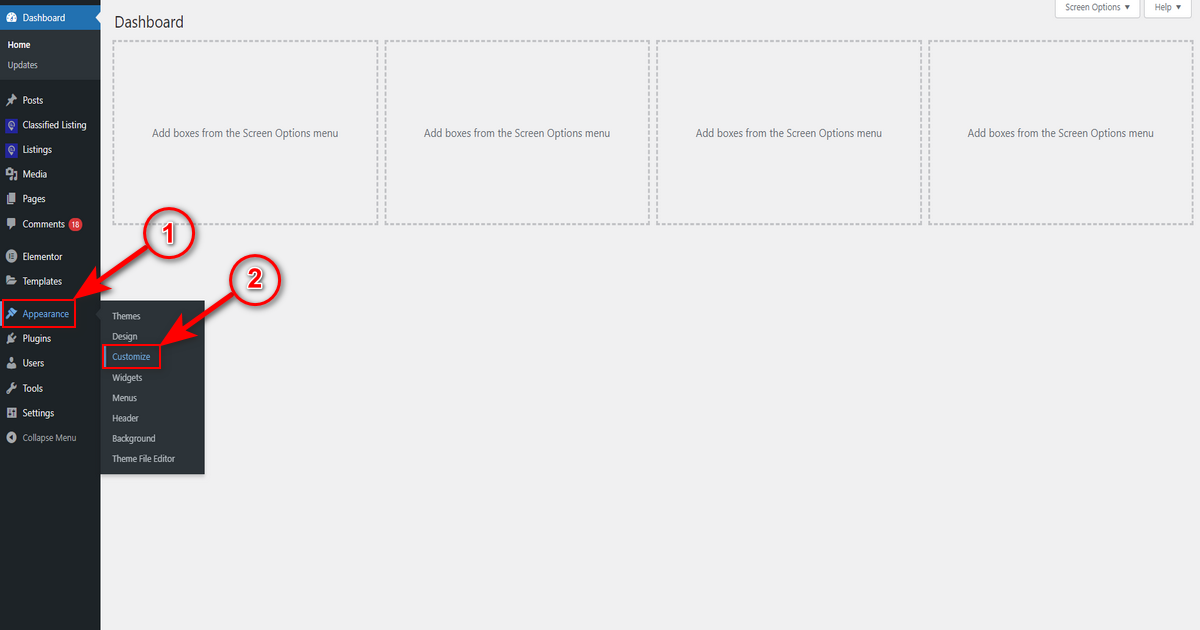
You’ll now be inside the theme customizer. Look at the left side panel and see several tabs, including ‘General,’ ‘Header,’ ‘Footer,’ ‘Typography,’ and more. We recommend you explore each tab.
We’ll click on the ‘General’ tab to change the site logo.

Then, press “Change Logo” button on the left side panel to change the default logo. You’ll also see two other sections where you can upload diverse logo types.
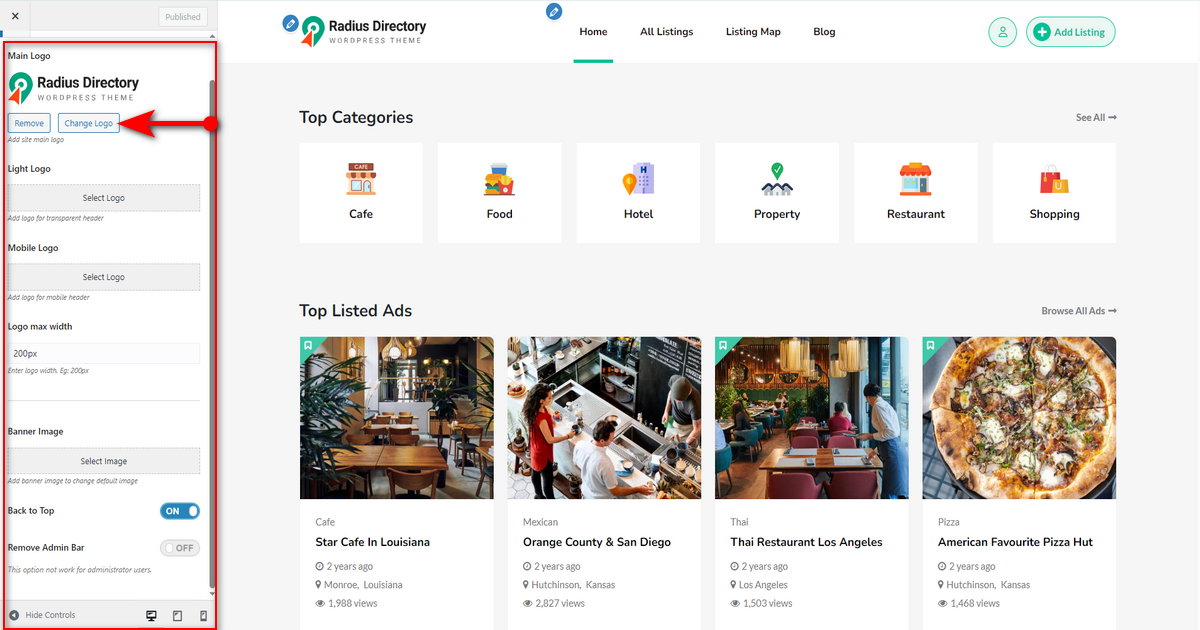
That’s how you can remove the default logo of demo content and upload your preferred one. Once you work on the ‘General’ tab, click another tab. For example, hit ‘Color’ tab to change the site’s primary and secondary colors.

After working on all/some tabs as you wish, don’t forget to press ‘Publish’ button on the top right of the left side panel.

That’s how you customize your neighborhood directory website on WordPress using the Radius Directory theme customizer.
Step 7: Structure Your Neighborhood Directory
After designing your website, you need to structure it professionally. For instance, create essential pages (some pages will automatically be made when you install the Radius Directory and its supporting plugins).
Additionally, you need to define listing categories (e.g., residents, local businesses, community services, events, etc.) and create submission forms to allow residents or admins to submit entries.
We’ll now show you how to create listing categories on your neighborhood website. Let’s get going.
Head to WP Admin Dashboard > Listings > Categories.

Note that this menu appears on your admin panel when you install and activate the “Classified Listing” plugin of the Radius Theme.
Since we’ve already installed and activated all the supporting plugins during theme installation, we get to see all the menus and settings of the Classified Listing free version.
Anyway, let’s get back to listing category creation. Once you click that ‘Categories’ menu, you’ll visit the “Listing Categories” window and see several fields, drop-down menu, buttons, checkboxes, etc.
Start working with them. First, write down your listing category name in the ‘Name’ field, then write a slug for that category in the ‘Slug’ field, and type a short description about that listing category in the ‘Description’ box.

Scroll down and click “Add Image” button under ‘Image’ area to add an image for your listing category. Then, press ‘icon’ drop-down menu to add a category icon. Lastly, hit “Add New Category” to create a category.

Follow the same steps to create subcategories. However, don’t forget to select the correct parent category while creating a subcategory.
That’s how you easily build as many categories and subcategories as possible using the “Classified Listing” plugin.
This powerful plugin also allows you to create submission forms using AI, add locations with maps, create various listing types, and do virtually everything you need to build a professional directory site on WordPress.
Step 8: Create a New Listing
At this stage, we’ll show you how you can create your first listing on your neighborhood directory site. To do so, head to WordPress Admin Panel > Listings > Add New Listing.
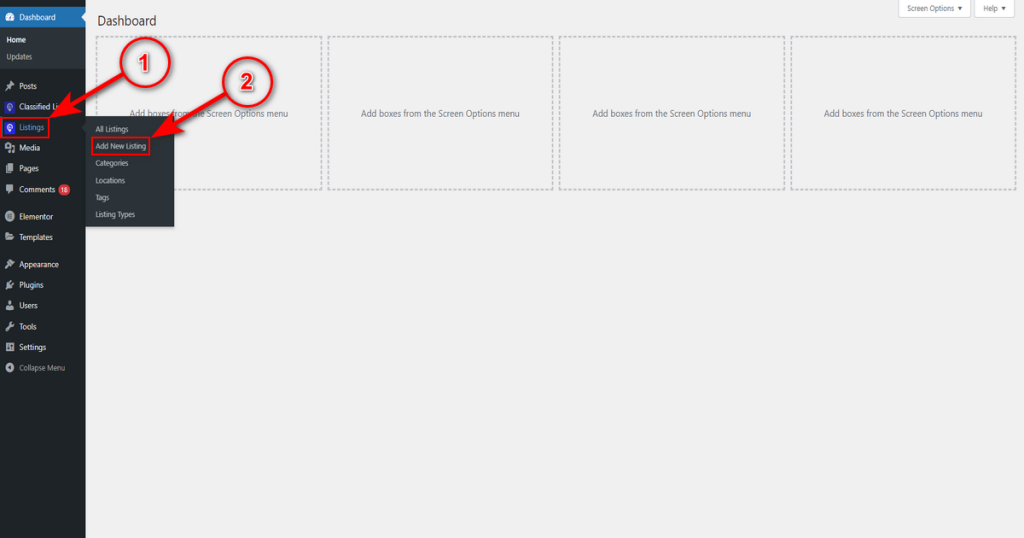
Watch the animation below to see how we utilize the listing editor and publish our first listing.

That’s how you work on the listing editor. Let’s now see the screenshot below to view the result.

Step 9: Promote Your Neighborhood Directory Site
At this step, you need to work on bringing some web visitors to your website. Here’s what you can do to promote your neighborhood directory.
Market Locally
You can follow several ways to promote your neighborhood directory locally. For instance, distribute flyers in local businesses, community centers, and other related places.
You can also collaborate with local businesses and request them to promote the directory. Try connecting with influencers in your neighborhood and make a deal with them to generate buzz or support for your website.
Utilize Social Media Platforms
Social media platforms are an excellent way to market your directory website. Build several social media accounts dedicated to your neighborhood directory. Then, regularly create and share engaging content about your website on these accounts.
After creating and sharing content, you can ask residents, businesses, and other community organizations to follow and share your social media posts. Alternatively, run social media ads to reach a wide and targeted audience.
Host Events
Collaborate with your targeted neighborhood’s management team and host events with their help. Then, encourage residents to participate in community festivals and share your directory’s features and benefits while hosting events.
Use User-Generated Content
You can ask residents to review your directory website and leave ratings regarding your services. Run campaigns where locals can share their favorite listings or success stories. Doing so will help you engage with the community and collect user-generated content.
Optimize for Local SEO
Optimize your neighborhood directory site for local SEO and enable inhabitants to find your website online easily. Create a Google Business Profile and provide your website-related information on that profile.
This helps your site attract organic traffic and increase your neighborhood directory website’s visibility.
Step 10: Monetize Your Neighborhood Website
Okay, you’ve built your directory site and promoted it. You’ve gained some regular traffic. It’s time to utilize this traffic and monetize your site. You can follow diverse monetization methods to earn revenue through your site.
For example, you can introduce a paid listing feature on your site and earn money when people publish listings. We encourage you to read how to earn money from business directory website to learn more about monetization methods.
Neighborhood Directory Website Examples for Inspiration
Here are some neighborhood directory website examples that you can explore before building your own.
1. Yelp

Yelp is a popular neighborhood directory that connects people with local businesses. It enables users to discover and engage with a variety of local businesses, including restaurants, salons, dentists, and more.
Yelp allows users to create profiles, post reviews, and access essential information about a business, including contact details, opening hours, and customer reviews.
This platform also provides tools for businesses to perform their business activities and connect with prospects.
👉Good Read: Yelp Business Model
2. Nextdoor

Nextdoor is a social networking platform. It focuses on building strong and safe local communities. It connects users based on their real-world neighborhoods.
How? This platform asks users to verify their addresses when they sign up on Nextdoor. Then, it lets users discuss a range of local topics.
People can post about upcoming events, safety alerts, lost pets, or ask for recommendations on several services.
It also includes a classifieds section where users can buy, sell, or give away items.
3. MerchantCircle

MerchantCircle is a California‑based online platform. It mainly connects small‑ to mid‑sized local businesses with each other and with nearby customers.
It operates as a business directory and social network for merchants. Business owners can claim or create a profile and use tools like blogging, coupons, newsletters, and more.
Customers, on the other hand, can leave and read reviews, while merchants engage directly with reviewers and even collaborate through referral networks.
MerchantCircle offers free basic listings alongside optional premium features. All these make it an ideal neighborhood directory.
4. Thumbtack

Thumbtack is an online service platform that connects people with local professionals for a wide range of projects. It enables users to find vetted professionals in their local area to fulfill their unique service needs, such as home improvement, tutoring, etc.
When a user submits a request on Thumbtack, the system identifies qualified professionals based on the project type, location, and budget.
Service providers can then respond with quotes or messages, allowing customers to compare prices, read reviews, and make informed decisions about hiring.
Thumbtack works as a bridge between consumers and trusted local professionals and offers transparency, convenience, and confidence to both parties.
5. Angi (formerly Angie’s List)

Angi (formerly known as Angie’s List) is a popular online platform that connects homeowners with local service professionals for home improvement, maintenance, and repair tasks.
It’s a comprehensive marketplace where users can find, compare, and hire professionals in various categories, including plumbing, landscaping, remodeling, cleaning, roofing, and many others.
Angi allows users to browse contractor profiles, read detailed customer feedback, and view ratings based on various criteria, such as punctuality, quality, and professionalism.
Alongside helping customers, Angi provides benefits to service professionals by giving them a platform to showcase their work, attract new clients, and manage job leads.
It works as a trusted digital bridge between homeowners and contractors, simplifying the process of finding reliable home services.
Wrapping Up
You now know how to create a neighborhood directory for free. In this article, we’ve shown the easy steps to accomplish this job. So, we recommend that you follow these steps correctly. Start small, gather details, create a neighborhood directory, and promote it.
Remember, you’ll face hurdles along the way. Don’t give up. Instead, search for solutions online and, if needed, seek experts’ suggestions and help. You can also contact us to address any problems regarding the directory website creation. Thus, wish you the best of luck with your journey.
To learn more about building a directory website without cost, check out our guide on How to Create a Free Directory Website



