


On This Page
Want to launch your own online directory site? That’s an incredible idea. Also, the internet users among the global population is rising rapidly (around 72.3 percent). In this situation, you can also earn money from your directory website.
Good news: you can develop a fully functional WordPress directory site within a few days. It’s possible without touching a single line of code.
The moment of truth: when a directory site succeeds, dozens of others flop. People overlooked the fundamentals of how to create a directory website with WordPress.
In this blog, we’ll show you how to create a directory website with WordPress in the right way.
Are you ready? Then, let’s get started.
What is an Online Directory Website?
A directory website is an online catalog of companies, businesses, agencies, properties, events, and classified ads for connecting them with potential clients.
Precisely, directory websites connect people looking for something online(restaurants, plumbers, apartments, events, courses, etc.) with the businesses or individuals offering it.
The best known examples include Yelp, Foursquare, Yellow Pages, Google My Business, and Local.com.
There are various directory website types that you can create to make money online. Still, some niches form better ventures due to their high traffic and profitability, among other reasons.
What Are the Best Online Directory Niches?

There are many niches to choose from when creating directory websites. Hence, popularity and profitability are our primary considerations while picking the best niche for directory websites.
Here are examples of directory niches that you can select:
🔸 Business Directories: In a business directory, you’ll find lists of businesses and specialists from different industries, like doctors, lawyers, plumbers, mechanics, and many more. You can narrow down the businesses to be more specific rather than listing all companies in one place.
🔸 Restaurant & Food Directories: Restaurant directories focus on restaurant and food businesses in a specific area, region, or country. You can add reservations, menus, reviews, and best lists on your site. You can then sell directory listings to restaurants, which you can group by location, cuisine, price range, and rating.
🔸 Real Estate & Property Directories: People list properties, flats, apartments to sell or rent on a real estate directory site. You can also upgrade your site’s functionalities by displaying real estate agencies and agents in a separate category.
🔸 Event & Ticket Directories: Event directories list the upcoming events of a particular region or area. You can pair up with event hosts and organizers to display accurate information about the events on the listing. Bonus Point: You can sell event tickets for extra commission.
🔸 Niche Job Board: General job boards are overwhelming. You can choose specific niche-based job boards ( e.g., remote tech jobs, healthcare roles, creative freelancers). These will attract highly targeted employers, and they’re ready to pay fees to get qualified candidates.
🔸 Coupon / Deals Site: Coupon and deals sites are still popular in the beauty, fitness, and home services industry. Through affiliate marketing, they get high user intent, which drives conversion and generates commissions.
What You Must Have Before Creating an Online Directory
There are some must-have items that you should prepare before jumping into the process of building a directory website.
First, you need to come up with a decision. If you want to enjoy the freedom of WordPress offerings, then choose this option. The alternative is to go with a directory website builder that guides you in creating your website.
Since WordPress comes with incredible creative options for creating your online directory, many people prefer this way. You only need a few items to build your dream directory website with WordPress. These include:
A Domain Name: You need to choose a unique name for your website on the Internet. People will know your site by this name. Keep the name short, memorable, and relevant to your specific niche. This will help in search engine optimization and brand awareness.
Reliable Hosting: Website hosting gives server space. This is the virtual address of your website. A directory site manages the database, file uploads, and other necessary information. Sometimes, it may experience traffic spikes.
So, it’s essential to choose a reliable and fast hosting provider. We have discussed various directory website hosting options to help you decide.
WordPress: The WordPress content management system is the free foundation for your directory site. Installing WordPress is a straightforward process. Some hosting providers also offer ready WordPress installations.
Directory WordPress Theme and Plugin: You need specific tools that instantly add directory functionalities to your website. For this, you can utilize a directory theme and directory plugins.
There are several top-tier directory WordPress themes whose features are perfect for various niches and purposes. Some of the themes are ListPress, Listygo, and Classima. If you’re on a tight budget, you can also choose free directory themes.
Step-by-Step Guide: Building Your Directory Website with WordPress
A lot of the heavy lifting is done once you’ve gathered the resources we’ve included above. Once you have hosting and a domain name, and you’ve already installed WordPress, the rest is super easy.
Step 1: Install Your Directory Theme/Plugin
Once you get the Radius Directory theme from the RadiusTheme Website, you should upload the theme files before activating it. You can download the theme by logging into the RadiusTheme website account or receive it via email. All the instructions for uploading, installing, and utilizing the theme are in its documentation.
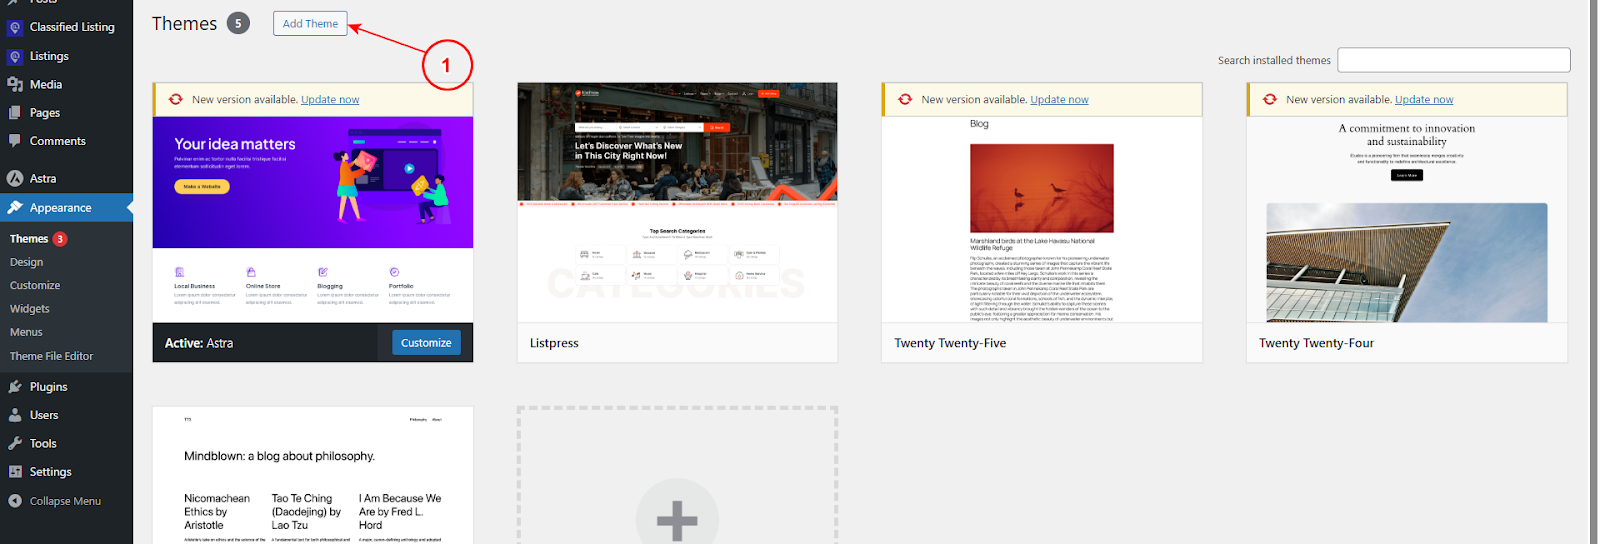
To install Radius Directory, go to Appearance 🡪 Themes.
Now, click on the ‘Add Theme’ button.
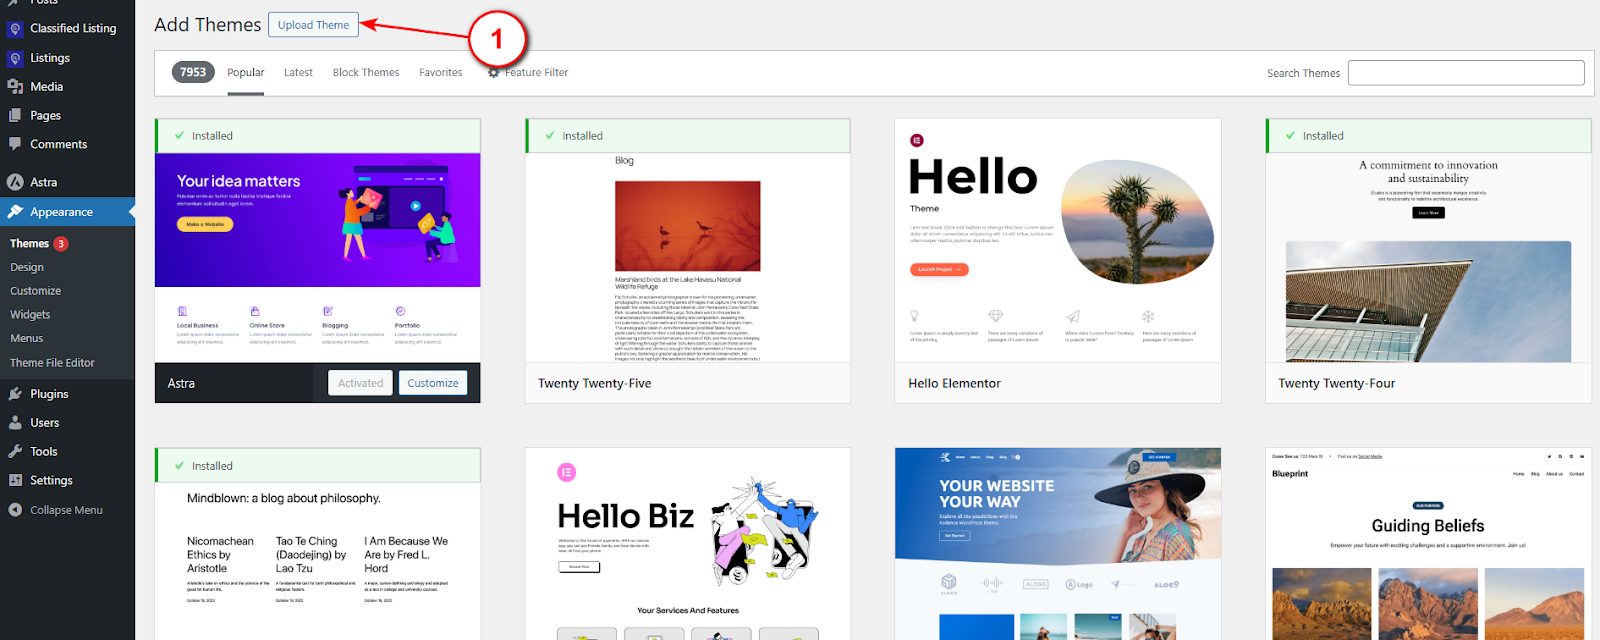
As you’ve already received the theme Zip, you need to upload it to the WordPress dashboard. Hit the “Upload Theme” button.
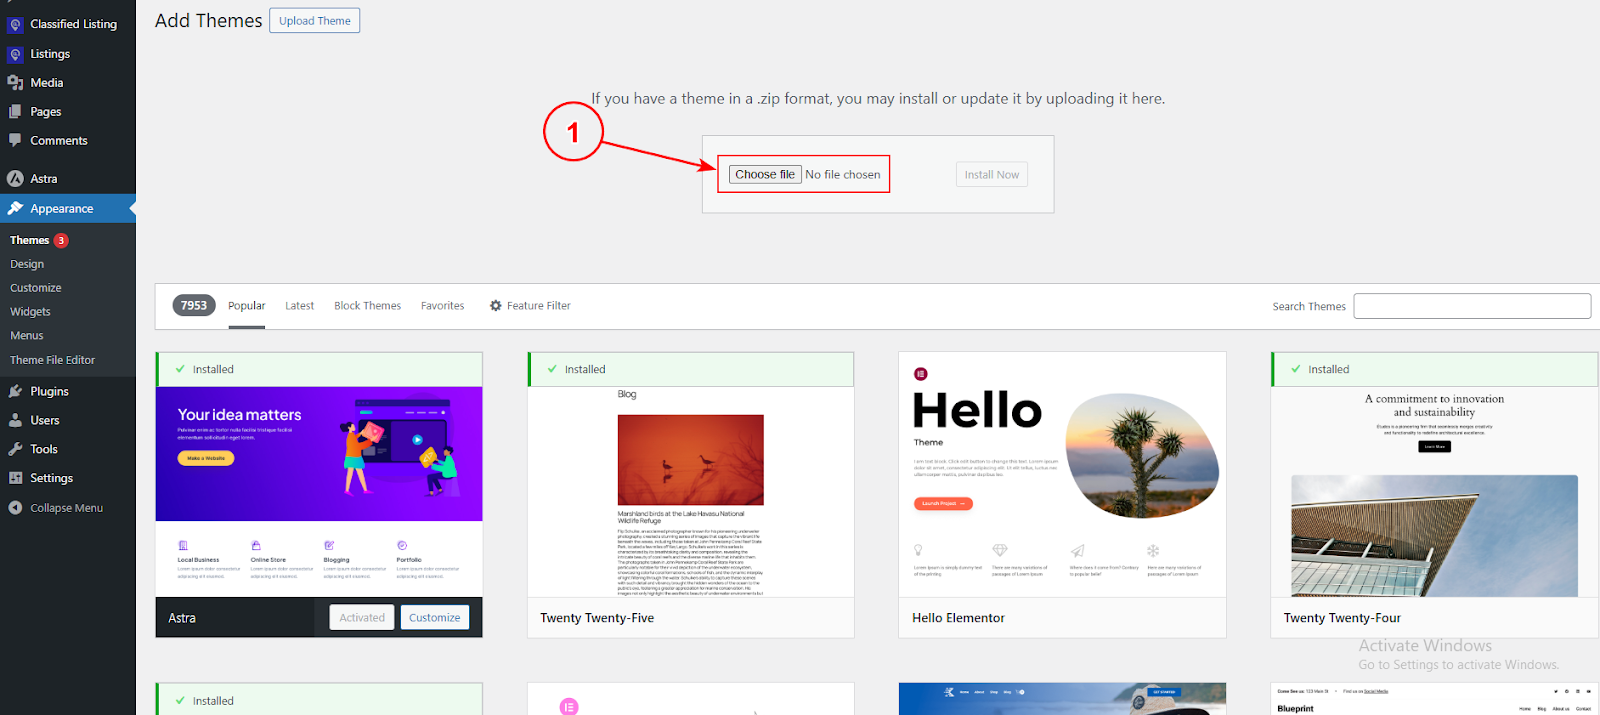
The following window reveals a box with a ‘Choose File’ button. Click on the button to upload the theme’s zipped file.
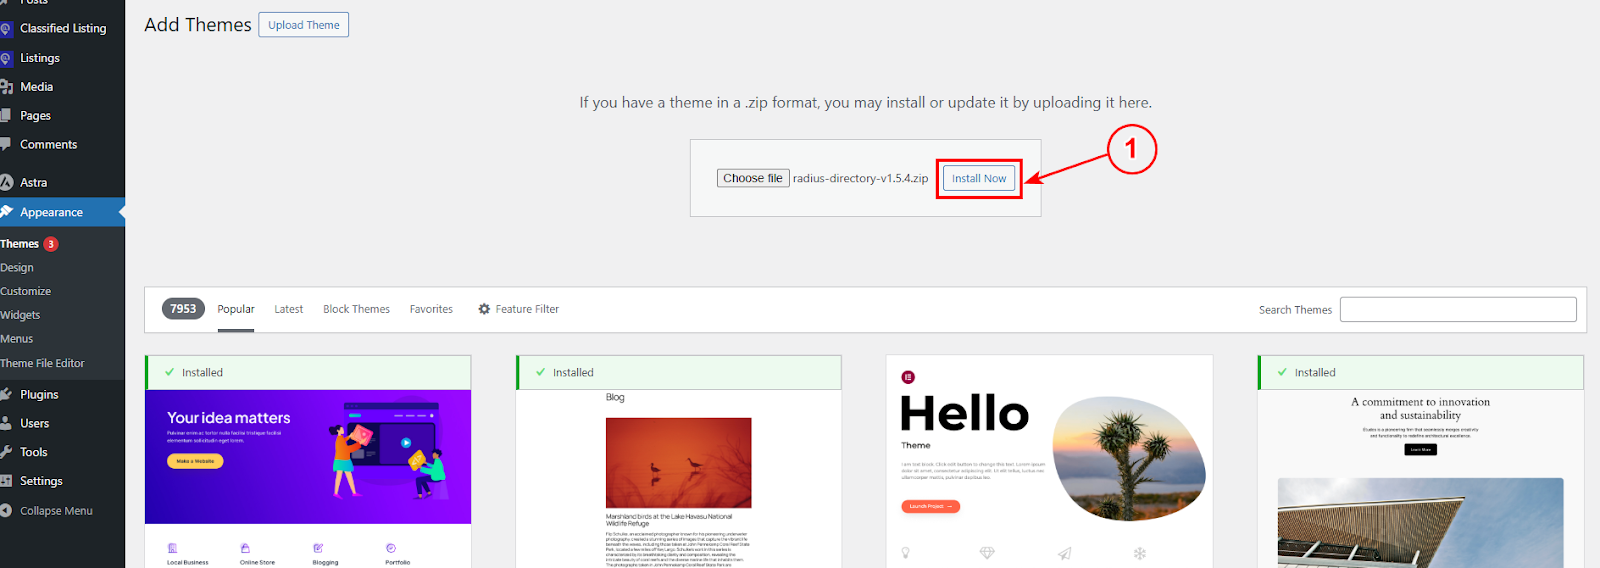
After that, press the ‘Install Now’ button.
Wait for a moment, then you’ll view a new window. From here you can activate the theme.
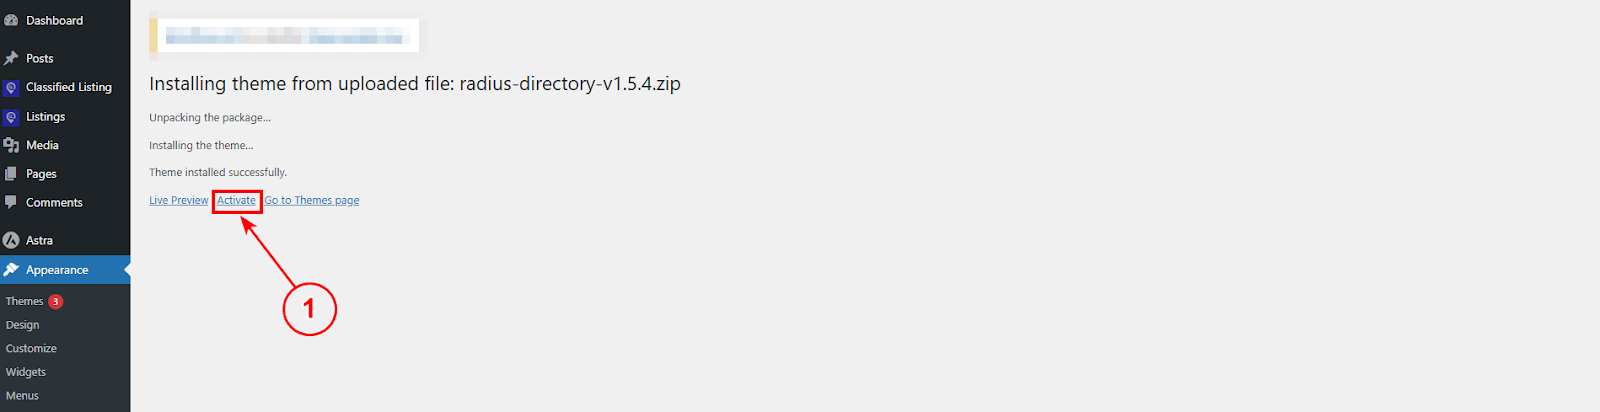
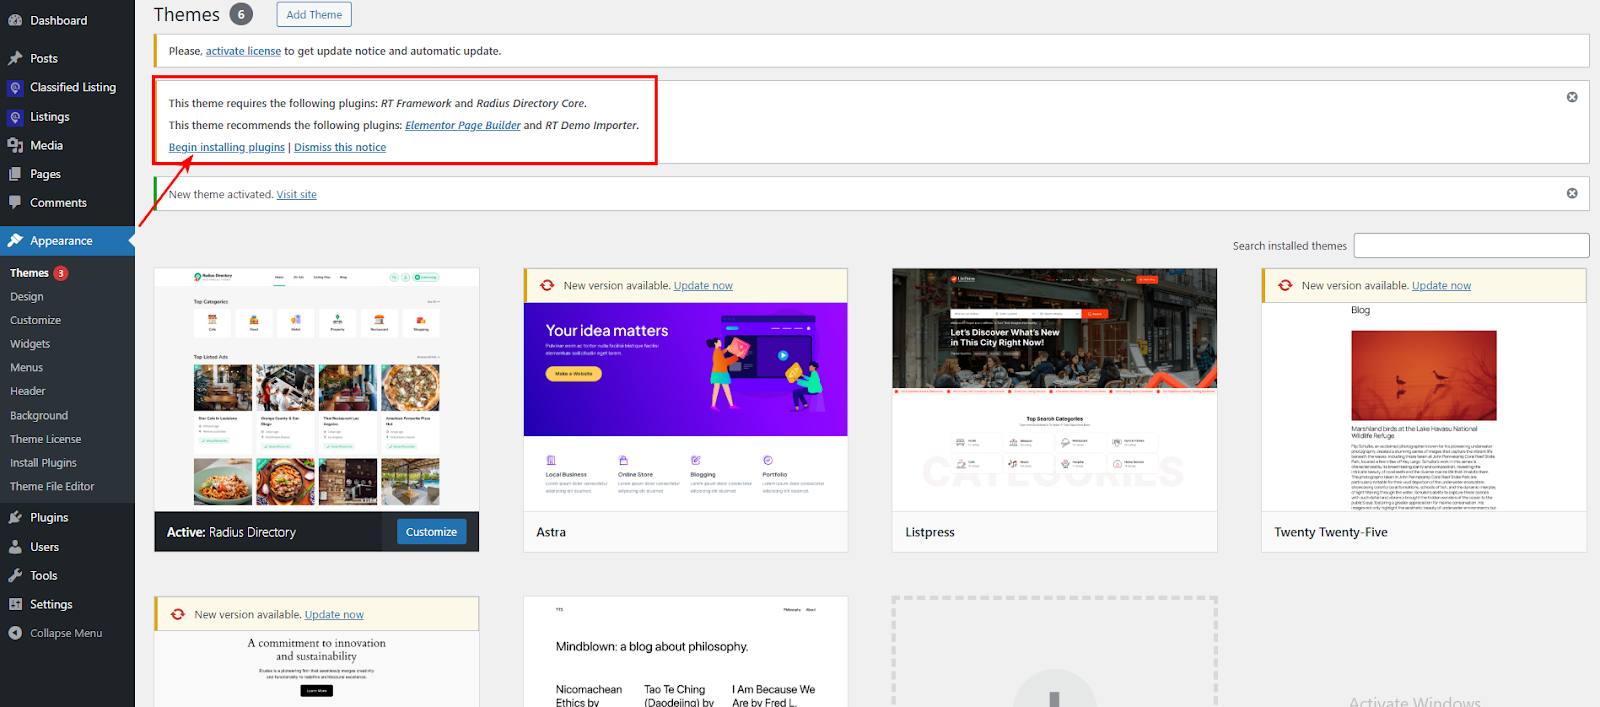
So, you’ve completed the part of installing and activating the theme. Now, you’ll view a notification to install all the supporting plugins.
This notification will be placed on top of the WordPress window. You need to hit the “Begin installing plugins” button to install all the plugins at once.
N:B: These plugins are important to assist you in developing a directory website easily.
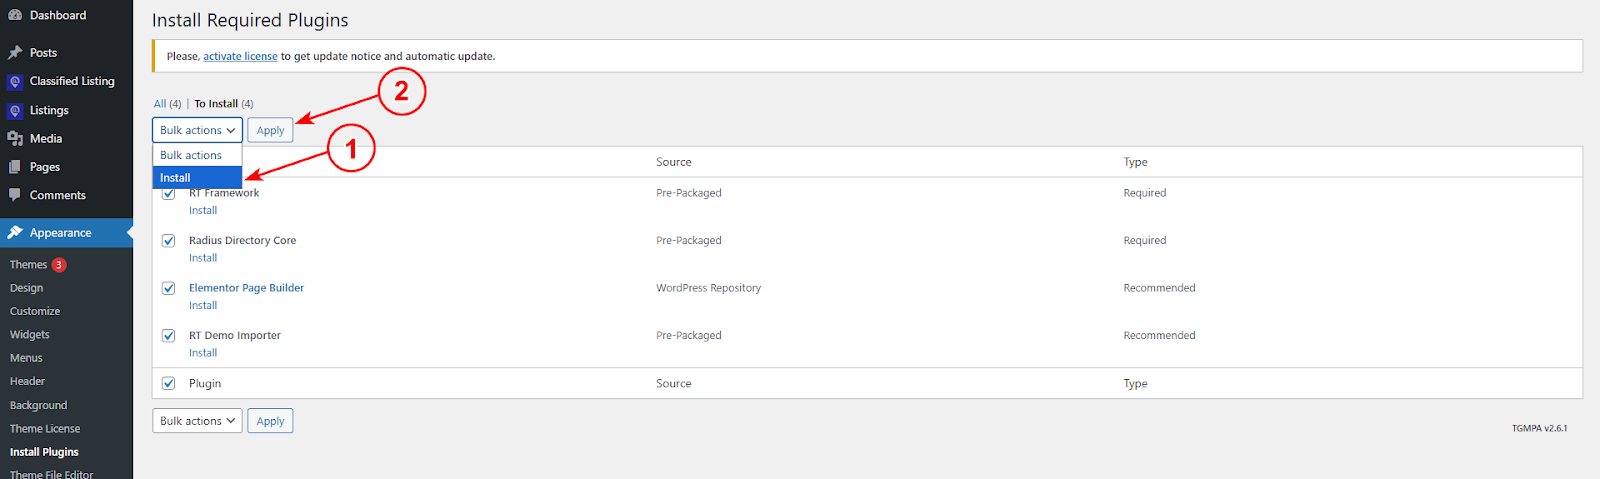
Now, you’ll land on the “Install Required Plugins” window. From the checkbox, select all plugins.
After that, choose ‘Install’ from the “Bulk actions” dropdown menu and click the ‘Apply’ button.
Give some time for the installation of all plugins. In the same way, select all and pick the ‘Activate’ option from the dropdown and hit the ‘Apply’ button.
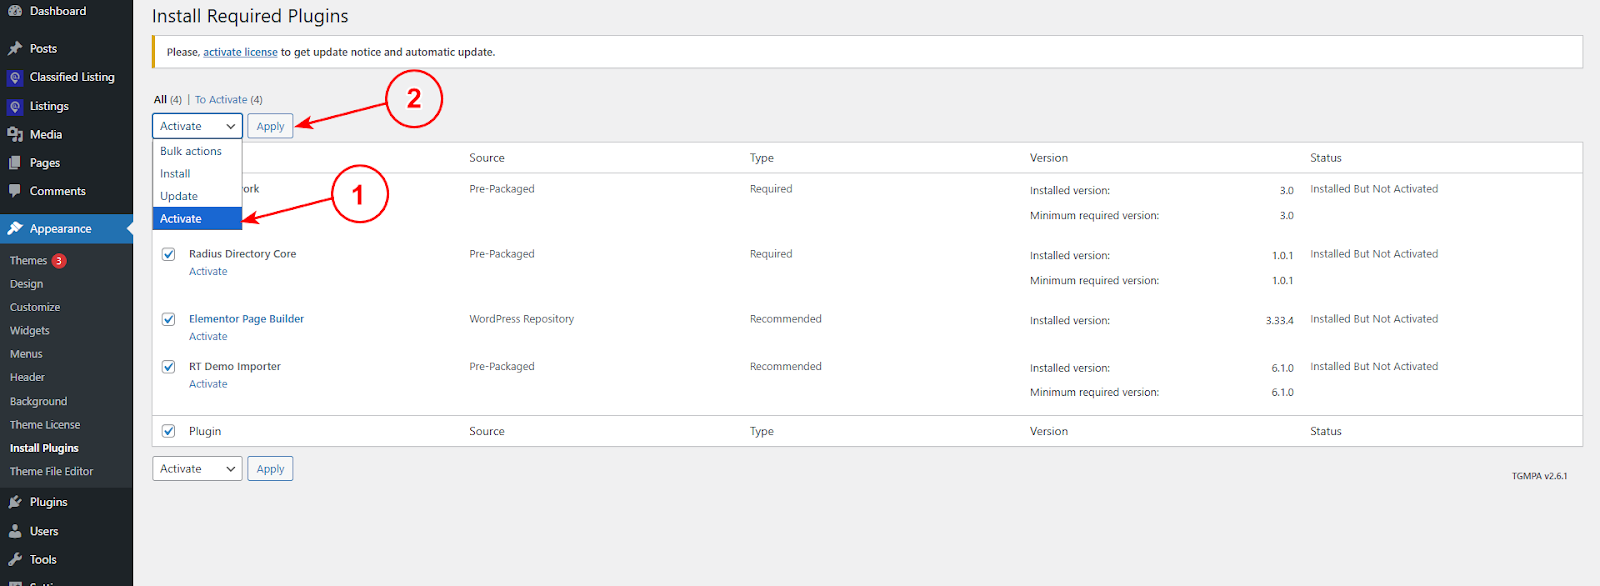
Hurray! You’ve completed all the steps of installing and activating all the supporting plugins and theme. Now, you need to upload demo content. This will give your website a professional look to give your website a professional outlook.
Step 2: Install Demo Content
To initiate demo content installation, move to WordPress Admin Dashboard > Plugins > Installed Plugins.
After that, navigate to “RT Demo Importer” and click “Install Demo Contents.”
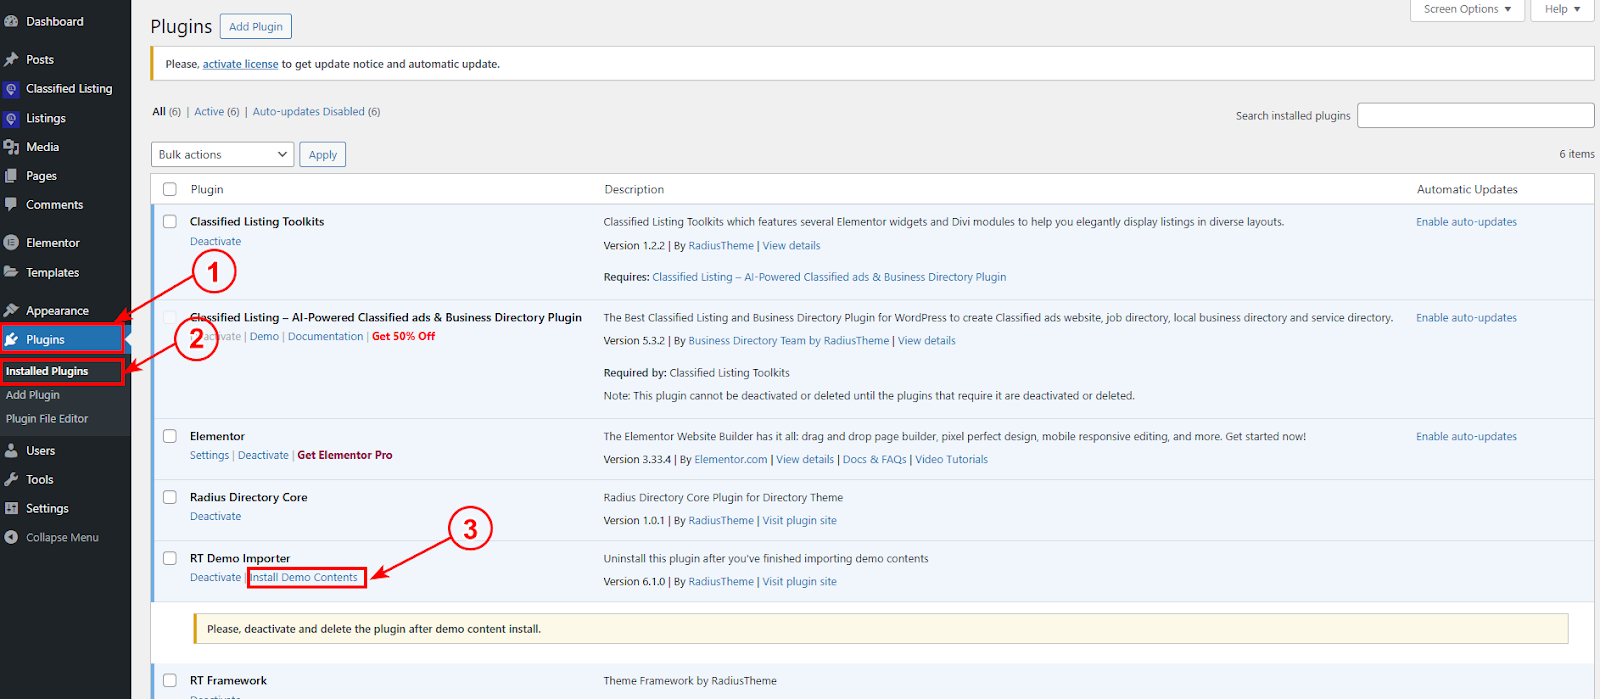
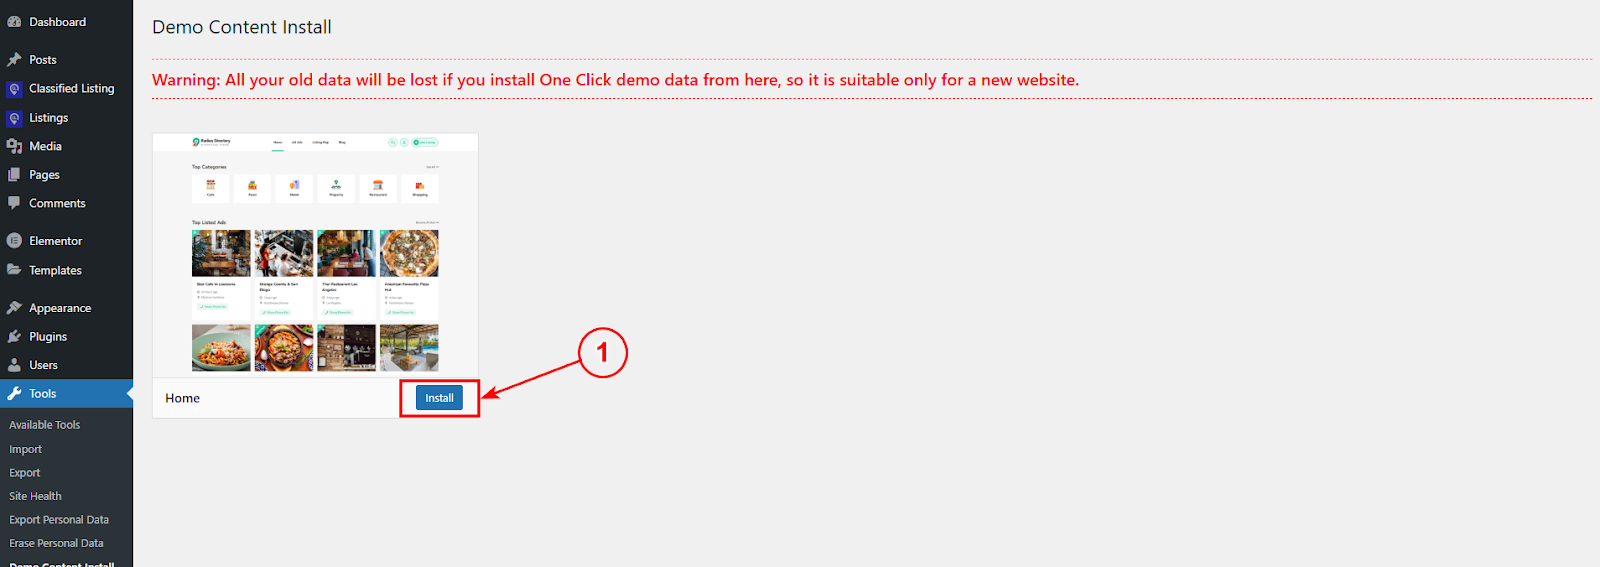
After hitting the button, you’ll land on the ‘Demo Content Install’ window. Below, you’ll see an ‘Install’ button. You need to click this button to start the demo installation process.
Step 3: Add New Category
After installing the demo content, you need to give it a professional look. For example, you need to create categories and submission forms to allow users to list their products or services.
Now, we’ll present to you how to generate listing categories for your directory site. Let’s get started.
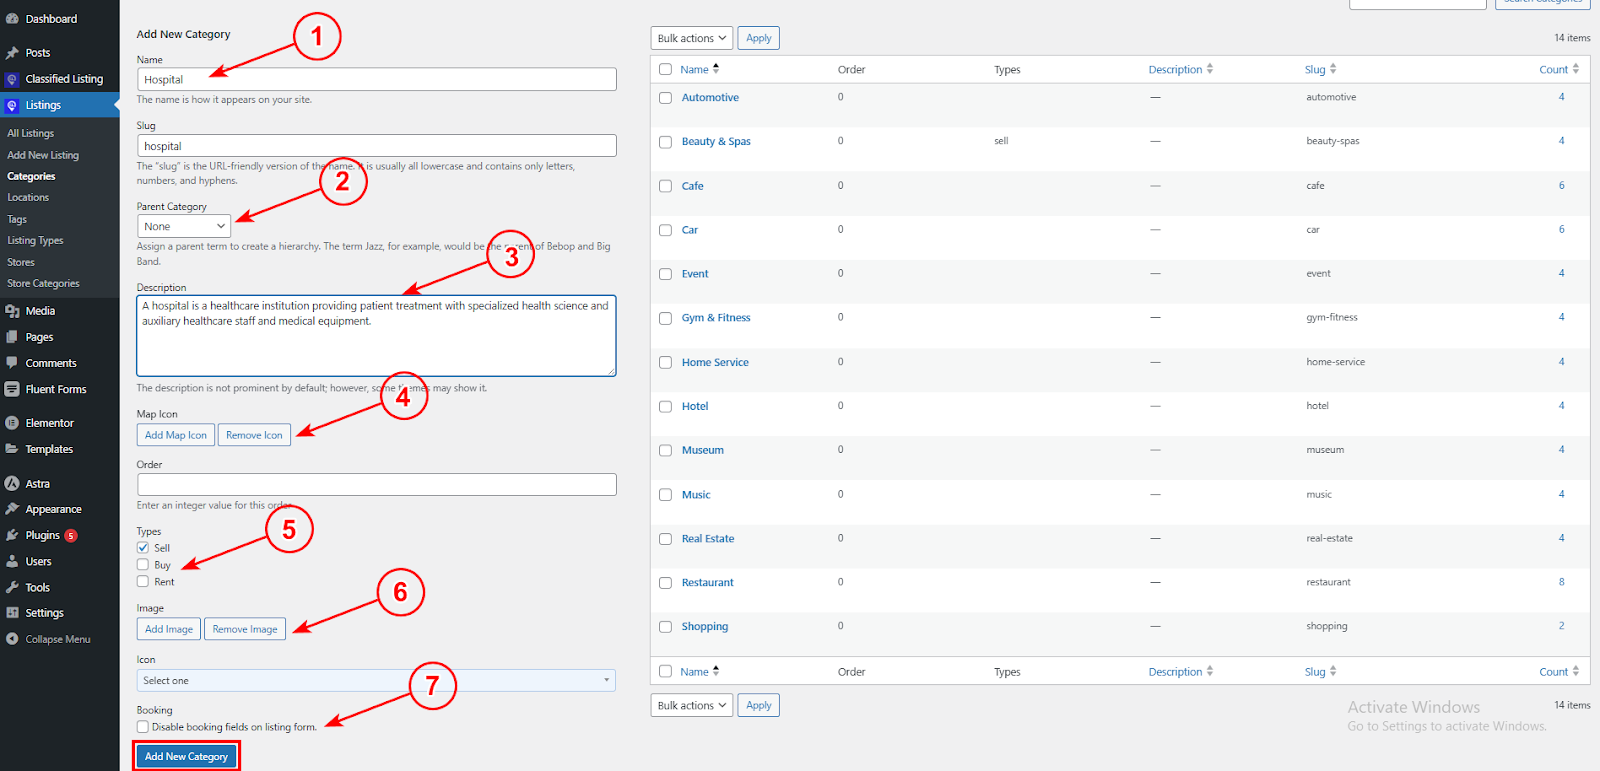
Move to WordPress Dashboard > Listings > Categories.
When you install all the required plugins of the Radius Directory Theme, you’ll get to see many menus on the left side.
The ‘Listing’ menu appears when you install and activate the ‘Classified Listing’ plugin.
Let’s go back to the category generation process. After clicking the ‘Category’ option, you’ll be redirected to the ‘Listing Category’ window. Here, you can view different fields, checkboxes, and dropdown for creating a category.
1. Firstly, you need to fill out the ‘Name’ field. If you wish, you can insert your preferred slug
2. If you want to create a subcategory, then you need to select the parent category from the dropdown.
3. You’ll also get the option to add a short description for the category.
4. You can enter ‘Map Icon’ and ‘Order’ number.
5. In the next settings, you’ll get to choose the category type. You can choose Sell, Buy, Rent individually or altogether.
6. Furthermore, you can ‘Add Image’ or choose a suitable ‘Icon’ for the newly created category.
7. Lastly, you can disable the options for booking fields on listing form.
At the end, click on the ‘Add New Category’ button to save the newly created category.
In the same way, you can create subcategories. You need to be careful in choosing the right parent category while generating a subcategory.
Step 4: Add New Location
Setting up the locations for your directory site is an important step. Adding a new location to a directory site is very essential for local search optimization, upgrading user experience, and improving traffic rate with sales.
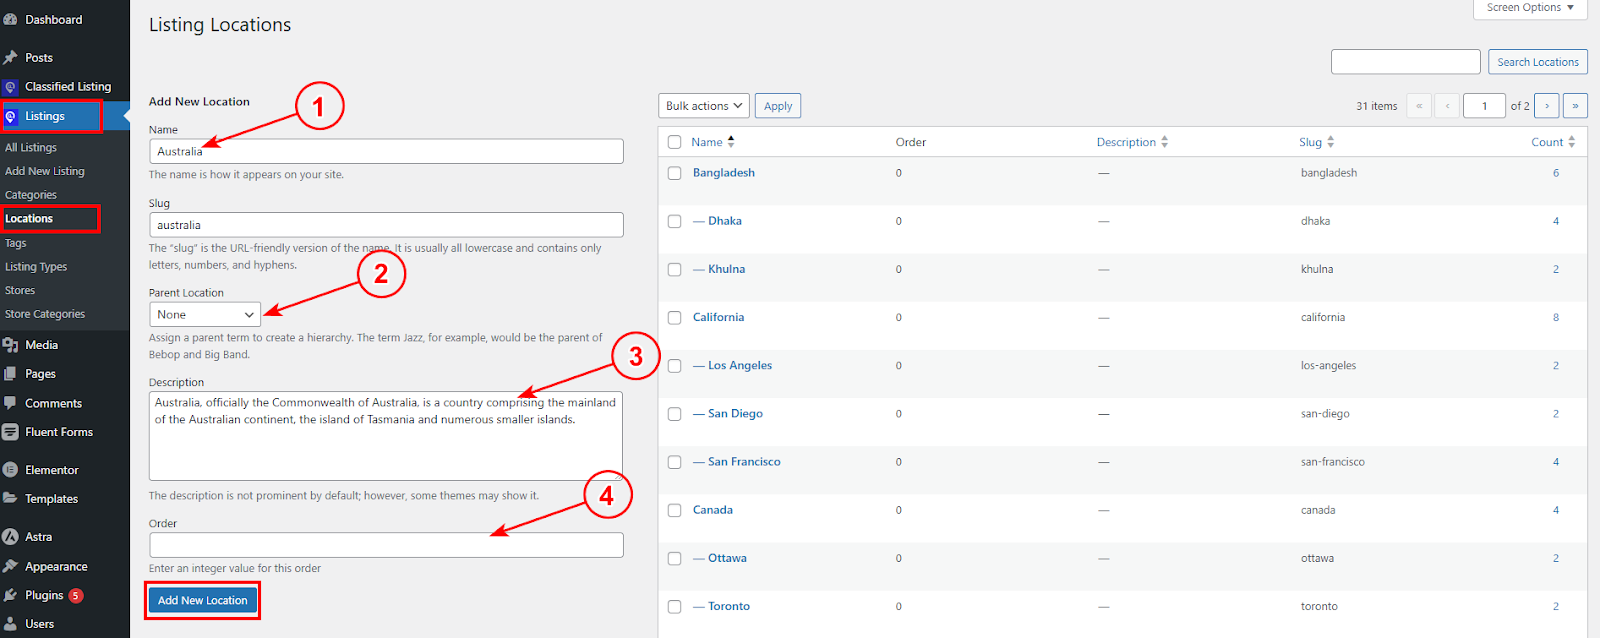
To begin with the location setup process, head to WordPress Dashboard > Listings > Locations.
1. Firstly, insert the name of the new location. You can add a slug. The “slug” is the URL-friendly version of the name.
2. You’ll get the option to assign a parent term to create a hierarchy. The country Australia, for example, would be the parent of Melbourne and Sydney.
3. If you wish, you can add a short description of the location. The description is not prominent by default; however, some themes may show it.
4. Enter an integer value for the location order.
Lastly, click on the ‘Add New Location’ button to save the newly created location.
Step 5: Create Directory listing Form
Form is the lifeblood of a directory site. It is the primary tool for collecting, managing, and displaying the user-generated listings. The Radius Directory comes with two default forms. You can freely customize them according to your choice.
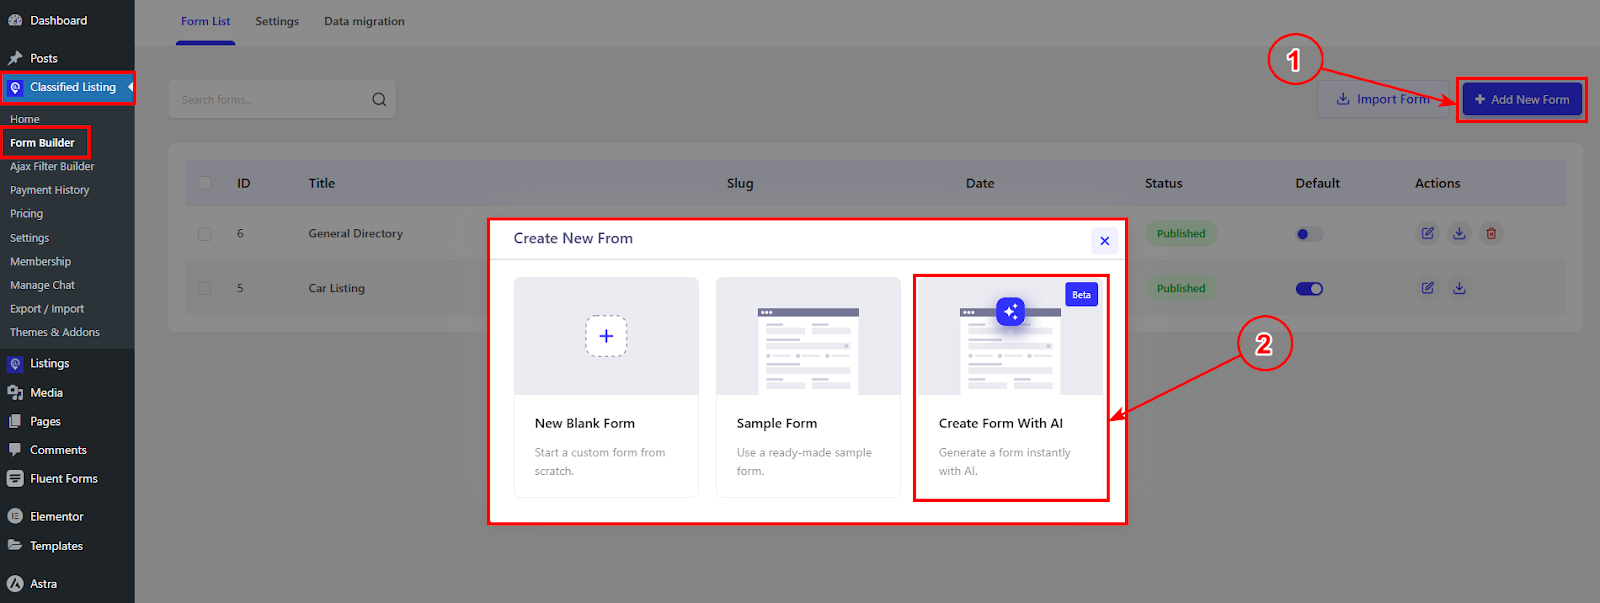
If required, you can also import form or create a brand new form. To perform this action navigate to Classified Listing > Form Builder > Add New Form.
After clicking ‘Add New Form’, three different options will popup in front of your window. You can start from a Blank Form, use a ready made Sample Form, or generate a form instantly with AI.
To save your time and effort, we’ll show you how to generate forms using AI.
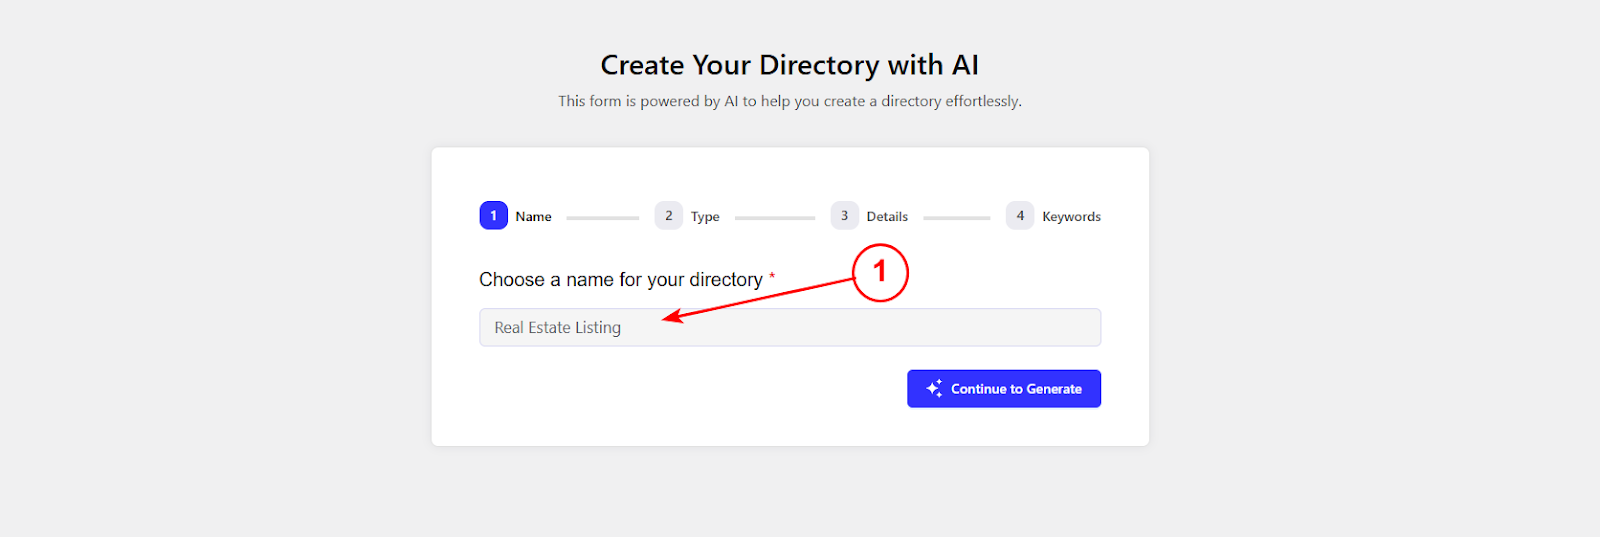
At first, you need to insert the form directory name to identify it easily. Then click on the ‘Continue to Generate’ button.
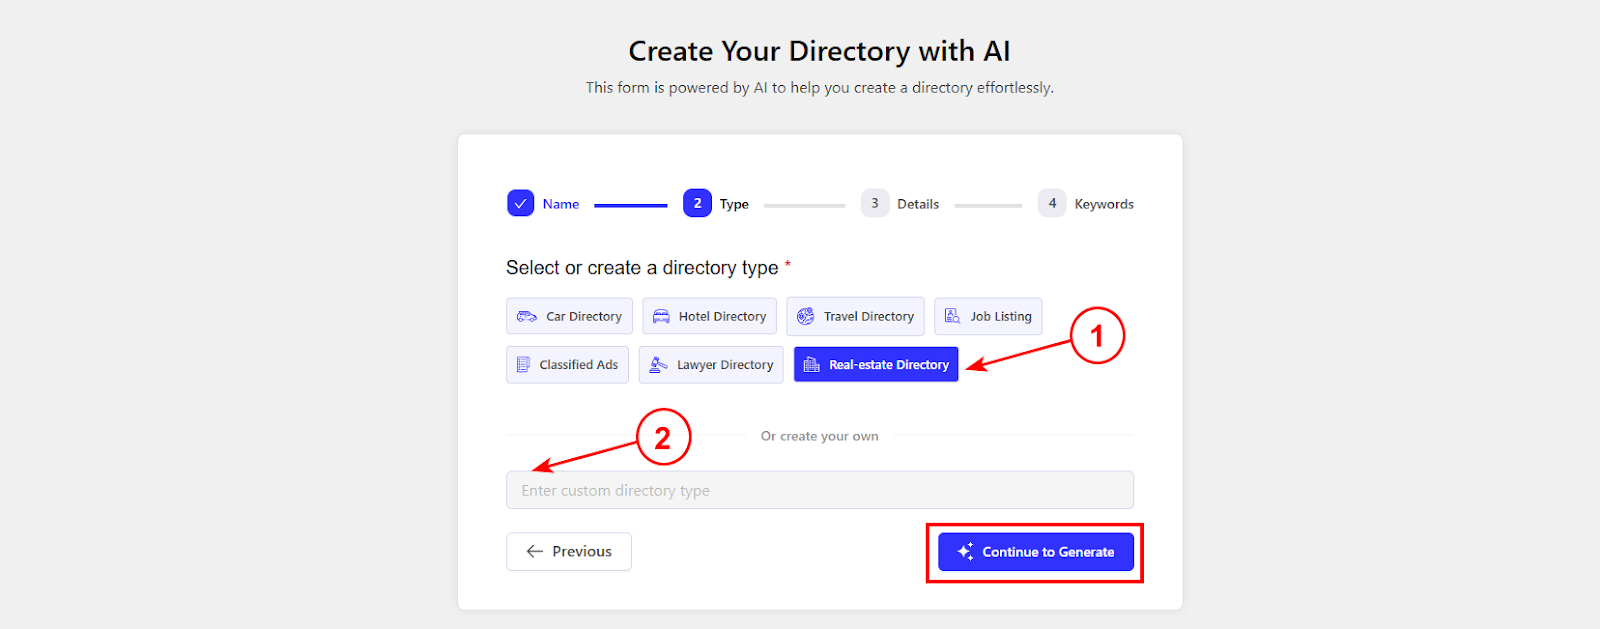
In the next tab, you need to choose the directory type. You can either choose the default option or insert a custom directory type. Then go to the next tab.
Here you need to specify the details about your directory, like writing a short description and mentioning the location. AI will automatically generate a prompt for you. You can further modify the prompt according to your preferences.

In this tab, you need to add relevant keywords for your directory form. AI will provide you some suggestions, and you need to pick the most appropriate one from them.

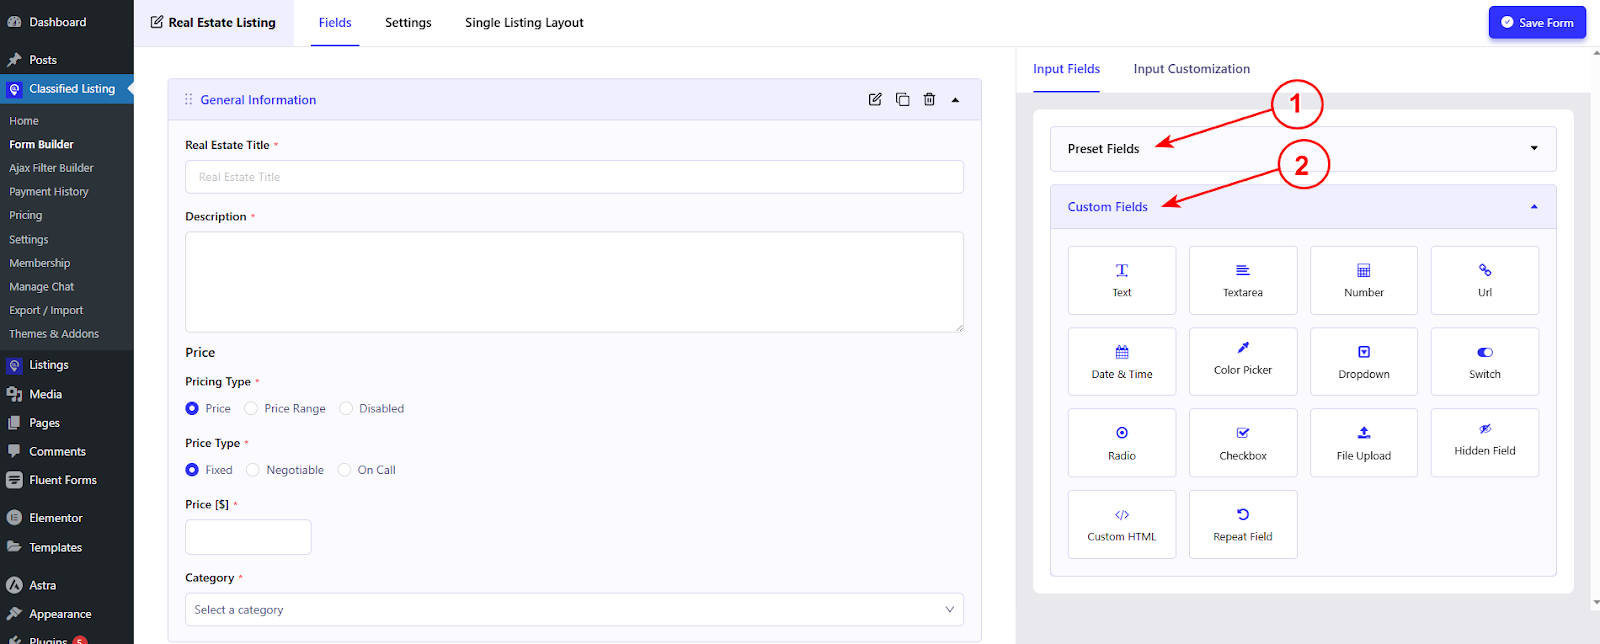
Below, you can see the newly created directory form. For further customization, you can add, remove, and modify the preset fields and custom fields.
Step 6: Customize Your Directory Site
Now, you’ve already built your own directory website. Now, it’s time to customize the site according to your brand and vision. For example, you can add your business logo and determine the primary and secondary colors to match your brand guidelines.
We’ll now show you how to personalize your directory site with the Radius Directory theme.
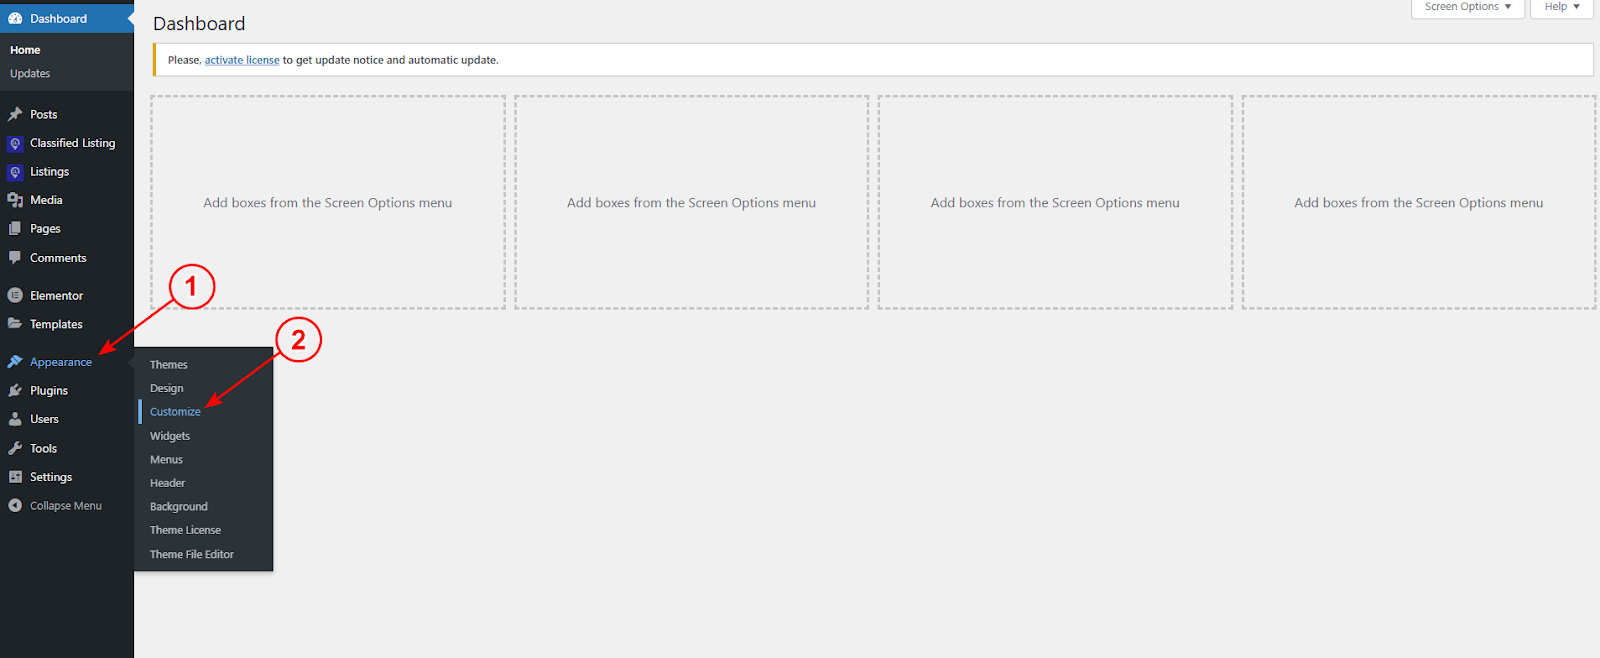
To start this process, navigate to WordPress Dashboard > Appearance > Customize.
You’ll now land on the theme customization window. On the left side, you’ll notice several tabs of settings. These include ‘General’, ‘Header’, ‘Footer’, ‘Typography’, ‘Color’, and so many options. We suggest you go through each customization tab for a better understanding.

In the general tab, you can change the logo, logo size, and add a banner image. You can also insert diverse logo types to increase the visual appearance of your site.
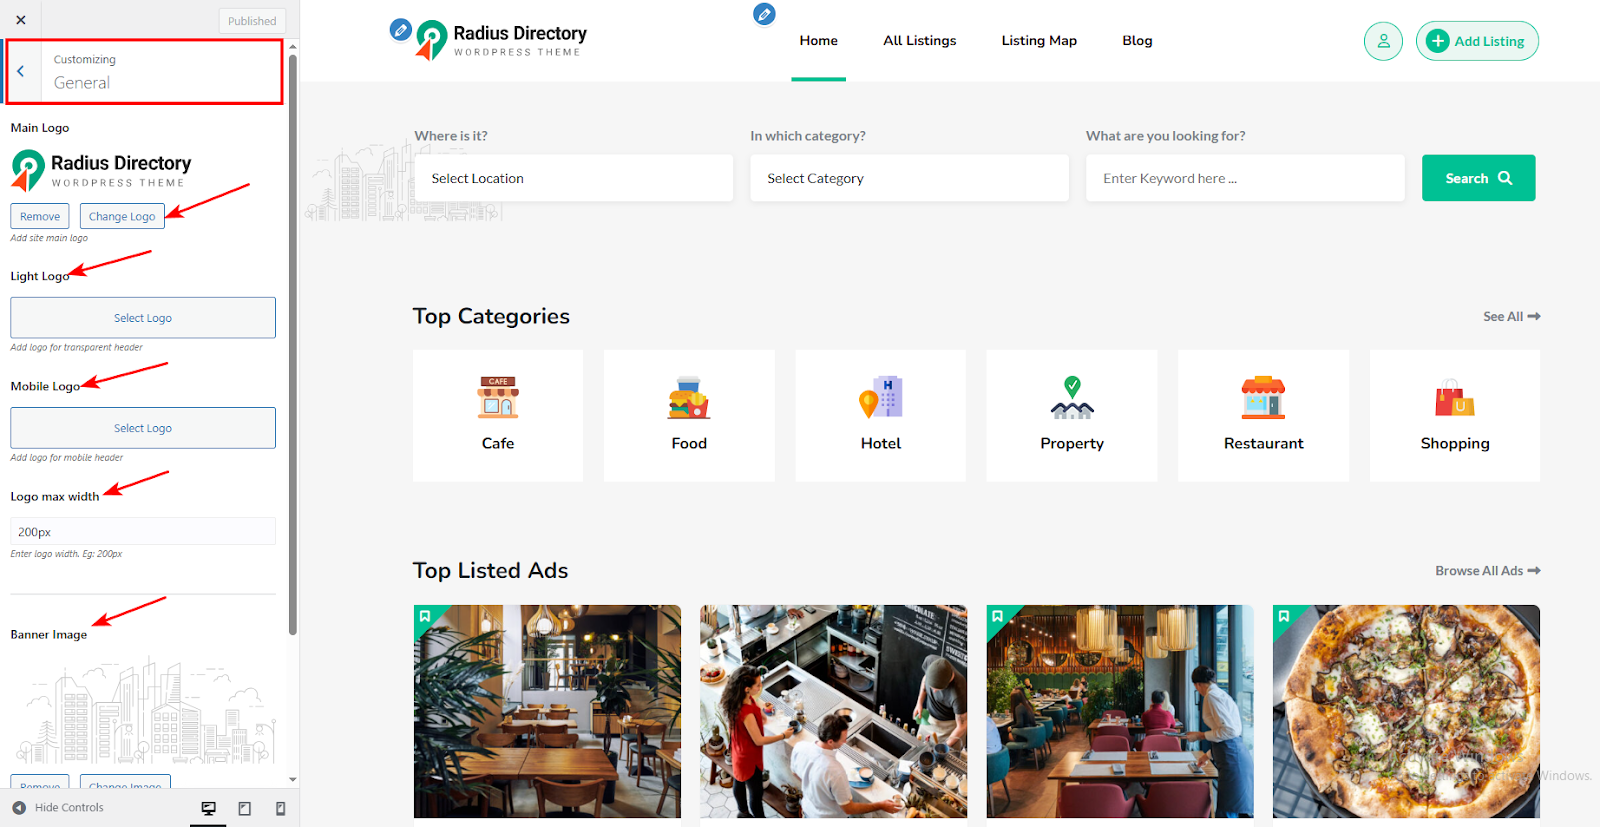
This is the process of removing the default logo and uploading your own logo. When you complete the customization process of the ‘General’ tab, you can move to other tabs to explore freely. For example, you can navigate to the ‘Color’ tab.
Here, you can effortlessly change the primary color, primary light color, secondary color, and background color.
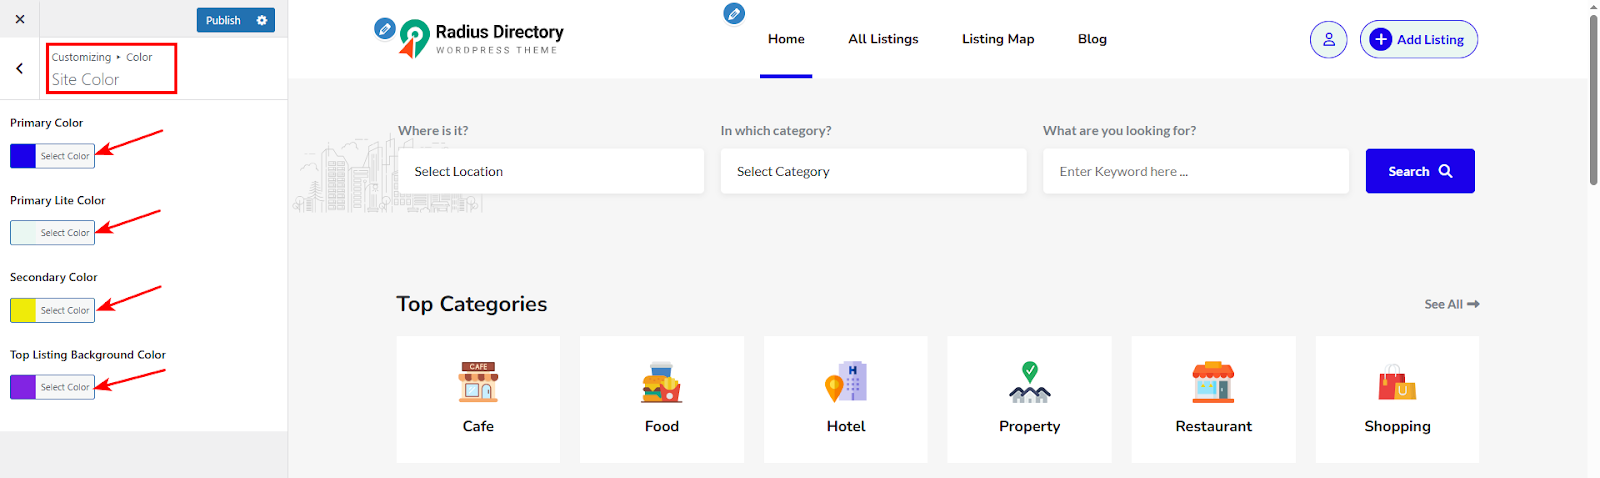
After performing all your desired customizations, you can hit the ‘Publish’ button.
Viola! Now, you have your own uniquely customized directory site. Now, let’s move to the next part.
Step 7: Create A New Listing
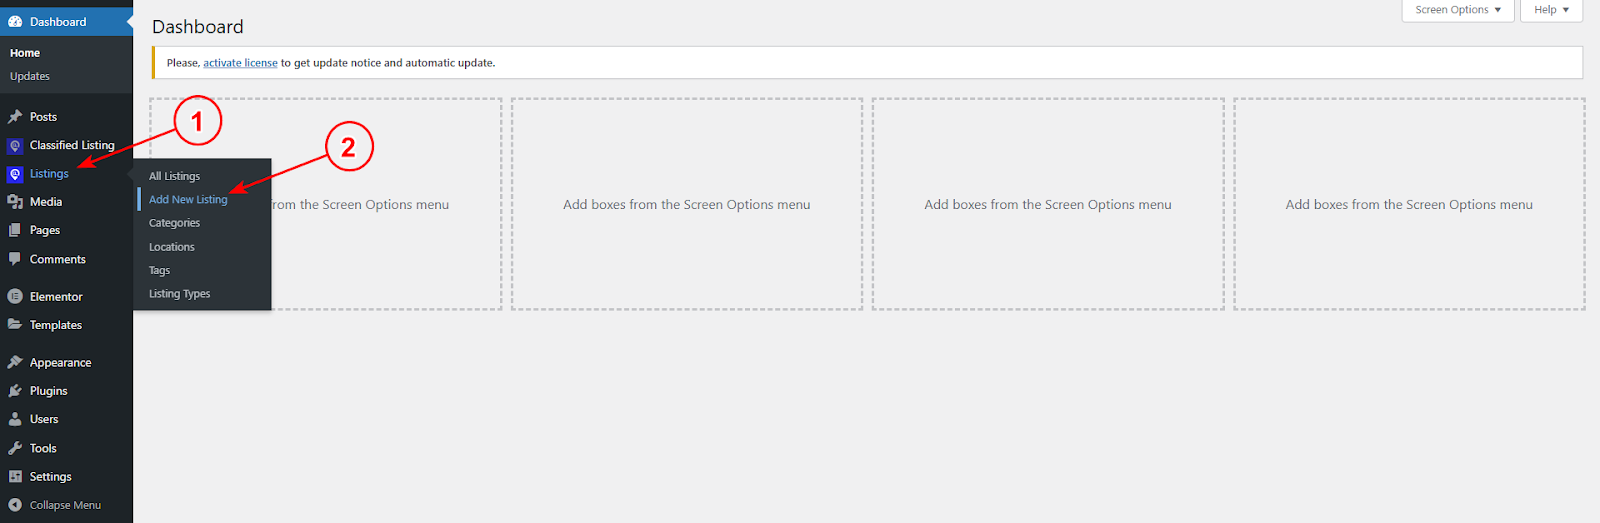
It’s time to move to the fun part of a directory site – creating new listings. In this section, we’ll demonstrate the process of creating your first listing for your directory site. To start the action, move to WordPress Admin Panel > Listings > Add New Listing.
Watch the GIF below to view how we use the listing editor to publish a new listing.
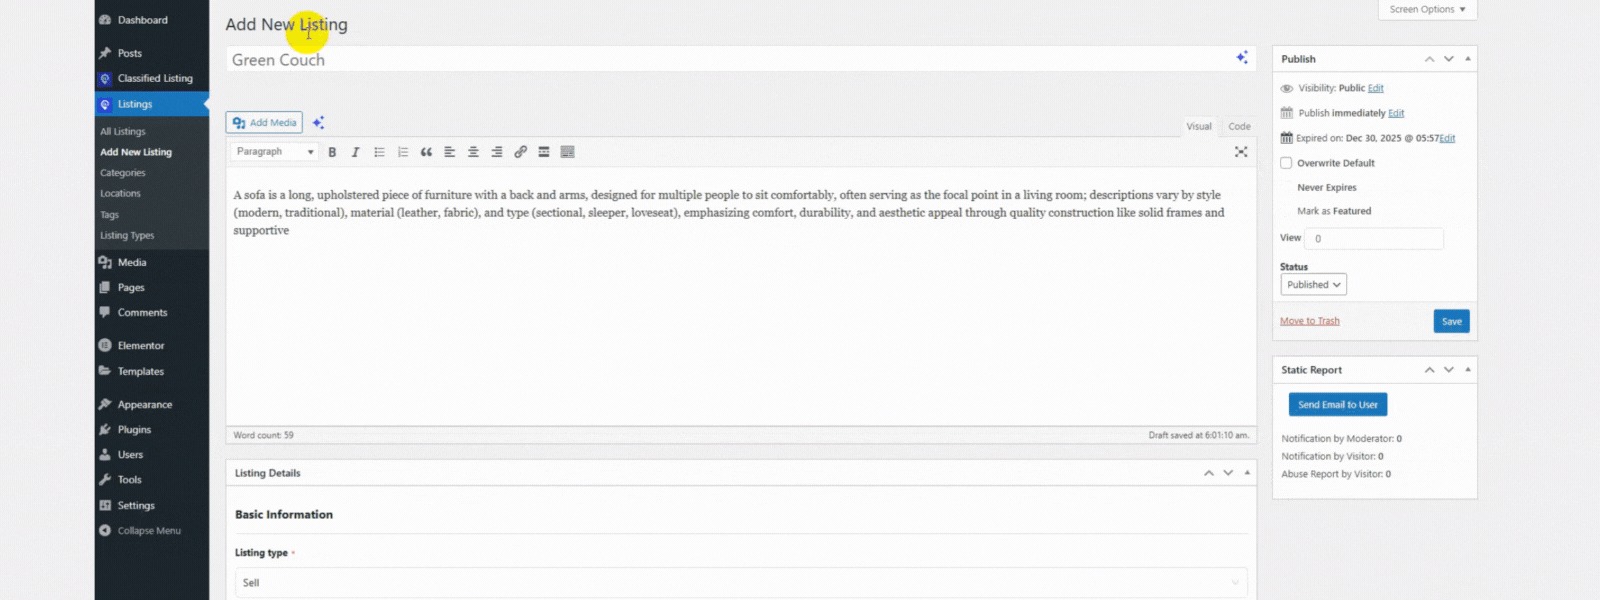
So, you are now fully aware of the steps of creating a new listing on a directory site. The new listing view will be like the image below.

Front End Listing Submission
To give you a full idea of the listing submission process, we’re also showcasing how a user can submit listings from the front end.
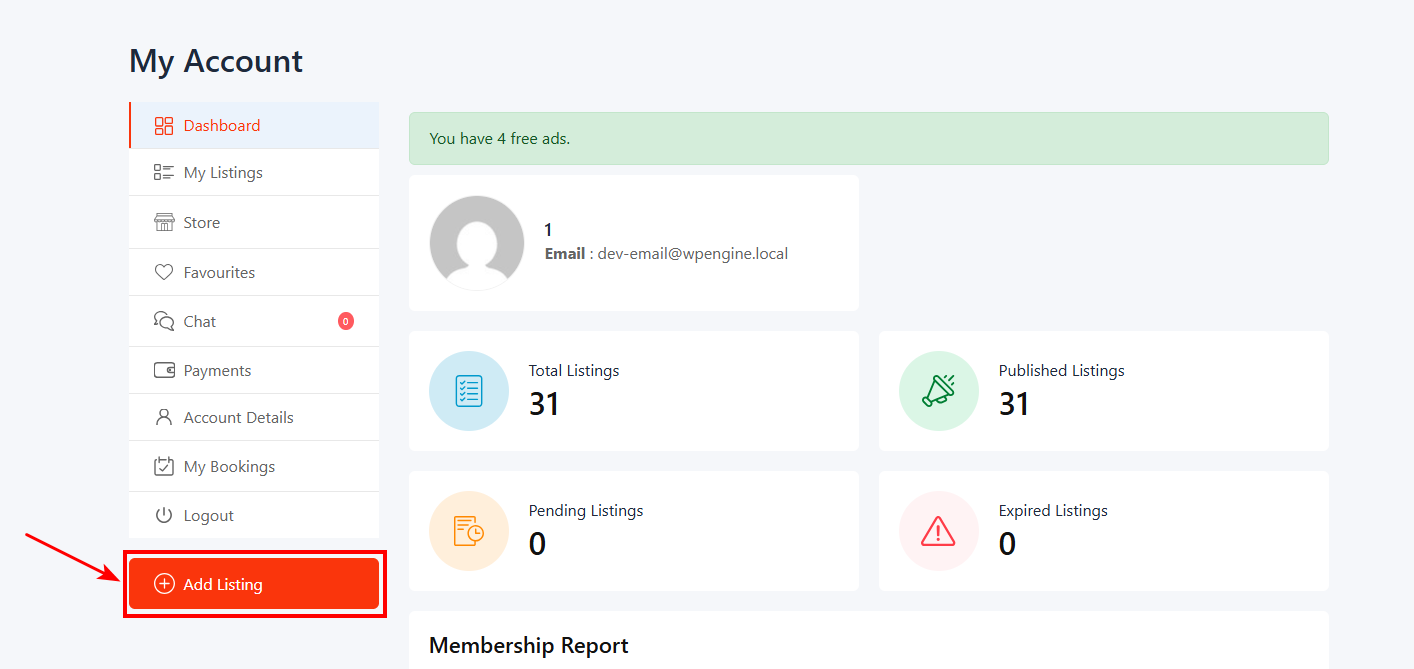
From the ‘My Account’ dashboard, users will see the ‘Add Listing’ button. They need to click the button to land on the forms tab. After that, they need to choose their preferred listing form.
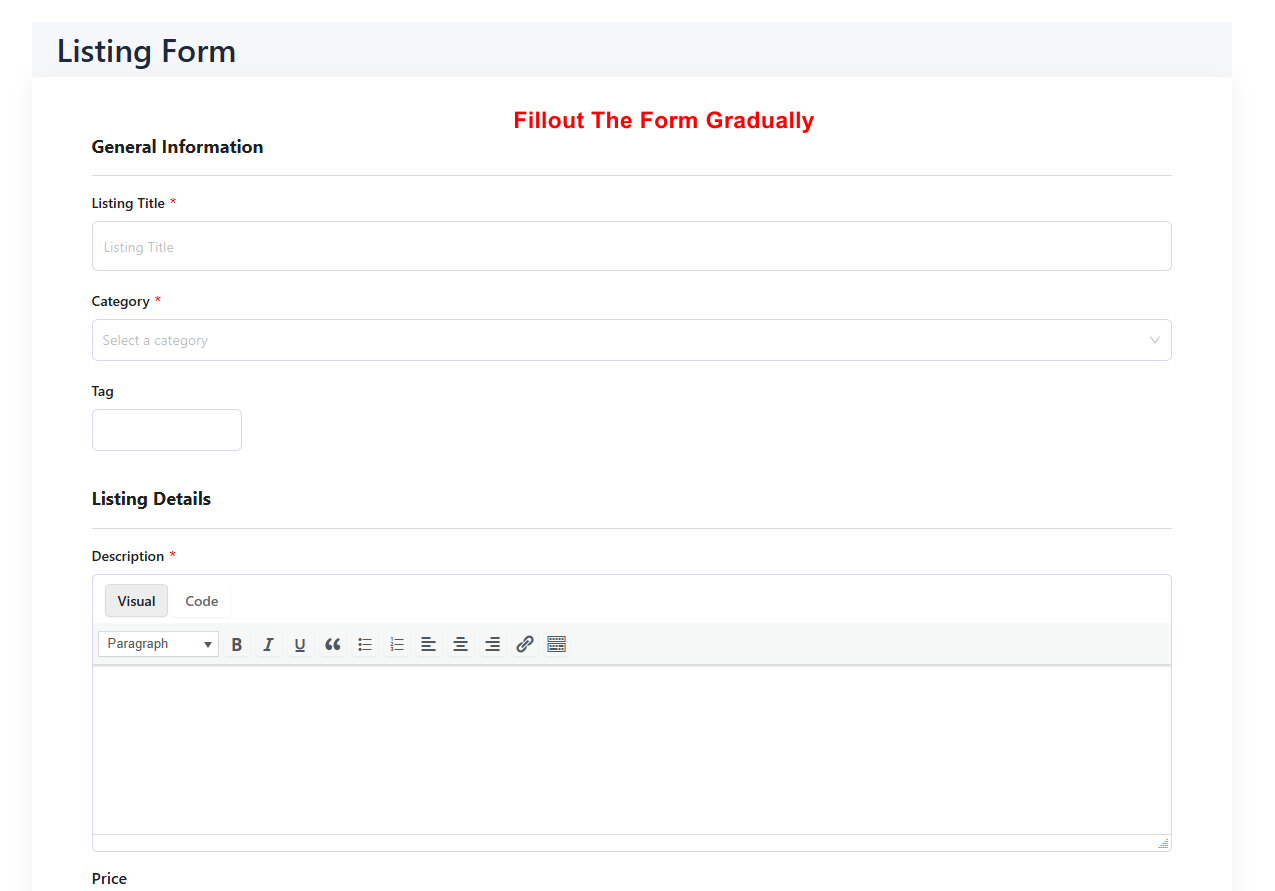
After choosing their preferred form, users will land on the form submission window. Now, they need to fill out the necessary information about their listing products.
How to Utilize The AI Features in Your Directory Website?
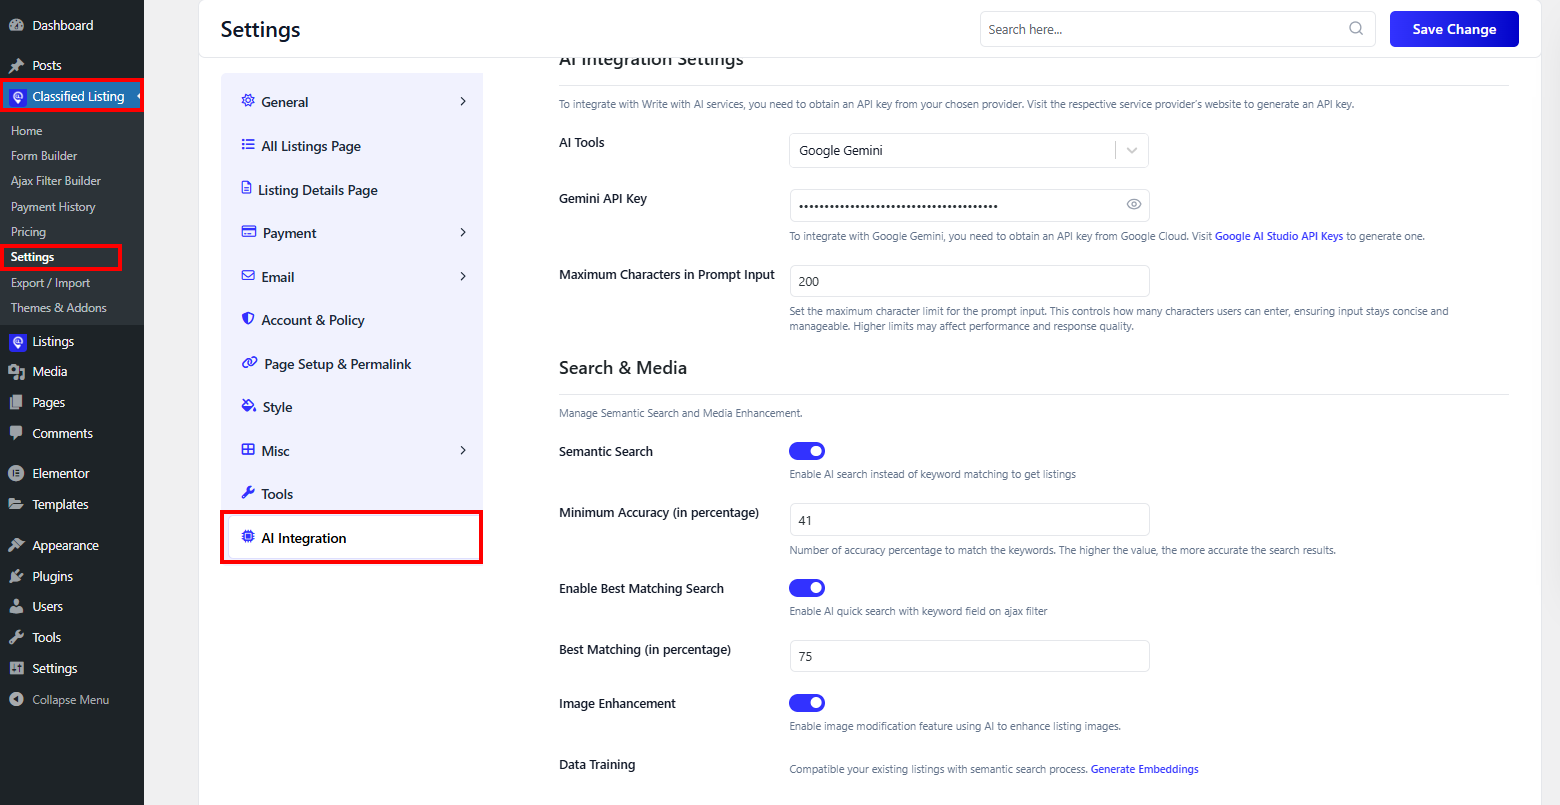
With Classified Listing, you can make the best use of AI power. To save your time and assist you in writing, this plugin integrates flawlessly with ChatGPT, Deepseek, and Gemini.
For the AI integration setup, head to WordPress Admin Panel > Classified Listings > AI Integration.
1. AI-Powered Drag & Drop Form Builder:
Generating forms for different categories can be a time-consuming task. The AI integration simplifies the workflow.
You can create custom submission forms for different listing types. This task is super easy by using AI and a drag-and-drop interface. AI can automatically generate custom forms with appropriate fields. So, you can effortlessly build a multi-directory site.
So, as a directory website owner, you can build and manage submission forms without any technical expertise.

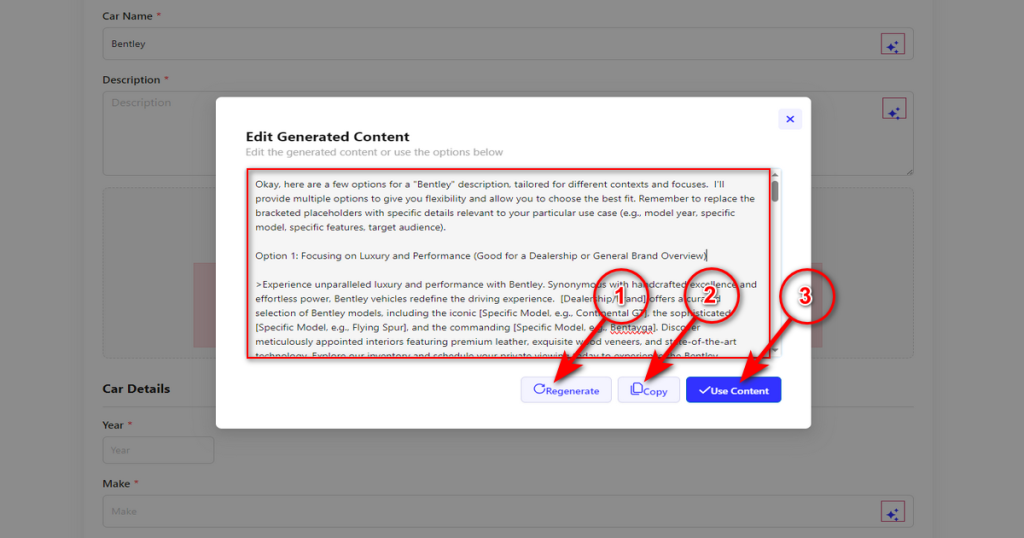
2. Write With AI/ Front End AI Integration
You can give permission to users to get help from AI during their listing submission. With the assistance of AI, users can generate high-quality titles and descriptions for their products.
Users just need to input specific details, like topic, keywords, etc, and AI instantly writes content that can attract potential customers.
This integration minimizes the obstacles of writing professional content. By improving the quality of content, this feature increases the listing engagement.
3. AI Semantic Search
Instead of a basic keyword search, Classified Listing has an embedded semantic search. This AI feature instantly understands the user’s intention and provides relevant search results.
AI semantic search utilizes natural language processing (NLP) and machine learning to decide on the context of a query.
This feature elevates user satisfaction. It assists users in finding what they need faster. This will make the directory site feel more intelligent and intuitive.

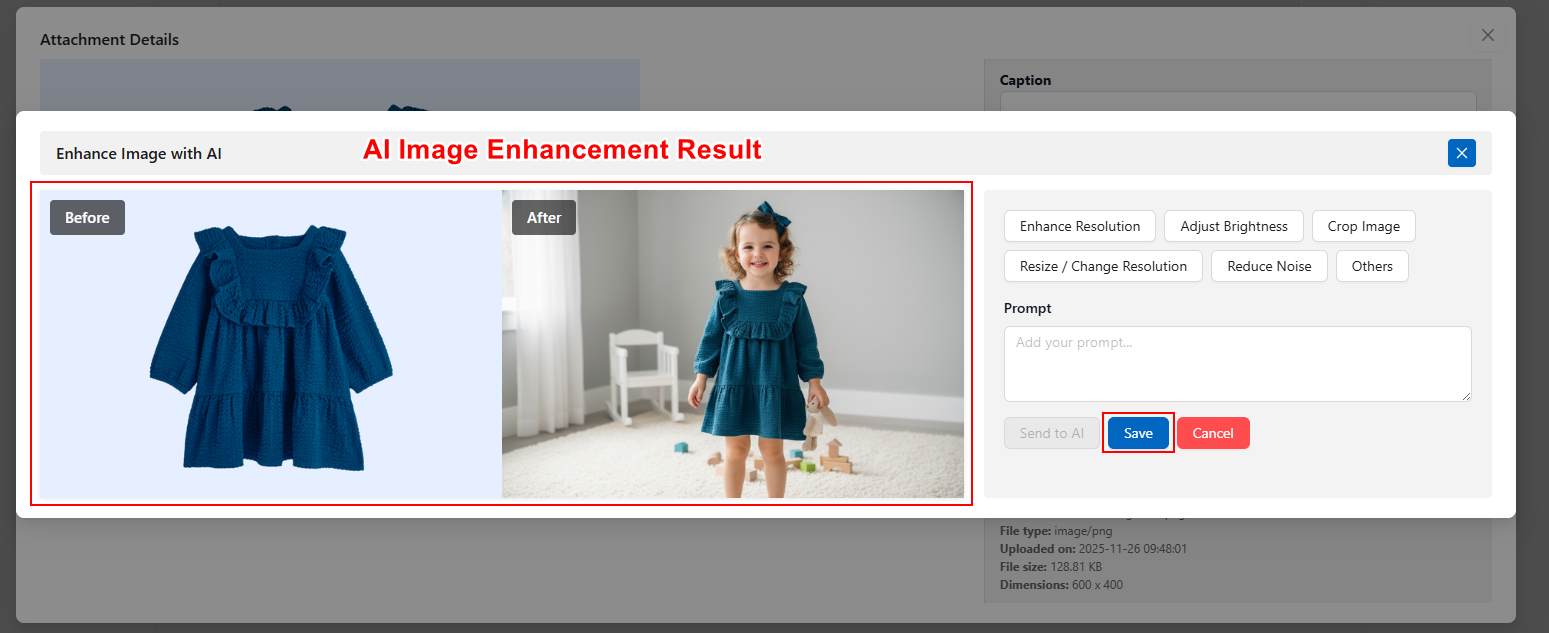
4. AI Image Enhancement
High-quality images are very important for sales and engagement. Now, you can make professional images with the AI Image Enhancement feature. This will make the listing visuals more appealing.
Note: AI Image Enhancement is a premium feature and available in Google Gemini. To avail this feature, users need a premium API key.
This feature can correct the Image’s lighting issues, sharpen the image, maintain contrast, color saturation, and many more options.
Monetize the Directory Website

Different Ways to Monetize Your Directory Site (Revenue Stream)
You can have a revenue stream from your directory site by following different systems. Here are some proven monetization models to inspire you:
Paid Listing/ Featured Listing
This is one of the most effective monetization models. You can charge users on a monthly or yearly basis to promote their listings on your site. As businesses always want extra exposure and an increase in customer engagement, they always prefer this model.
Pay-Per-Lead
You can charge businesses for every quality lead, conversion, or sale they make. This model is performance-based and highly attractive to service providers like lawyers, doctors, plumbers, etc. Businesses prefer it when you have strategies that prioritize their conversions.
Display Ads / Banner Ads
If your directory site has a reasonable traffic rate, you can create revenue by selling advertising space on your directory pages. You can implement Google AdSense on your directory site or sell ad spaces directly to the local businesses.
Affiliate Commissions
You can monetize your directory site by affiliating different programs with relevant platforms. If your directory site lists hotels and restaurants, you can integrate Booking.com affiliate links. So, when a user books a service via this link, you will get a commission.
Membership Subscriptions
You can have a recurring income stream by offering comprehensive membership tiers. For an enhanced profile, businesses are willing to pay a fixed amount monthly or annually. This premium access comes with advanced features like enhanced exposure, analytics of listings, and many other things.
👉 Good Read: Monetize Your Directory Website
Market Your Directory Site: Strategies to Drive Traffic

To boost traffic on your site, you need to promote your website aggressively. Here are a few ways through which you can get inspiration for your directory website:
1. Content Marketing (Still King)
Content marketing strategy is still ahead among others because it attracts potential customers and businesses. You can create highly localized, specific user-targeted blog posts, such as, “The 10 Best French Restaurants in New York.”
You can write “best of” lists, tutorials, overviews, interviews, product reviews, and other kinds of content. In local search results, this type of blog ranks rapidly and provides value to the readers.
2. Outreach
Direct outreach is a zero-cost method to get traffic on your site. You can personally send messages to business owners via email with time-sensitive offers and deals—businesses always like offers and discounts that will give them enhanced exposure.
This outreach method is rapid and can yield a high conversion rate. Ensure that you constantly monitor the performance of your website monetization and promotion strategies.
3. Social Media Presence
Social media is one of the most robust tools for drawing user attention. Platforms like X, Instagram, LinkedIn, YouTube, and Facebook are filled with people interacting with products, services, and businesses.
The good part of social media is that you don’t need to create new content. You only need to reorganize content from your blog, shorten it, and make it tempting for the particular social platform.
4. Create a YouTube Channel
You can create videos from your website’s blog topics. Short videos work perfectly. Also, make the videos as interesting and valuable as possible.
A 30–60 second video highlighting the best restaurant spots can go viral within a local community. These videos can redirect more users to your website.
5. SEO Basics
With core SEO features, you can get long-term visibility on your directory site. To establish relevance, you can submit your site to 40+ other reputable and niche-based directory sites.
Moreover, you can emphasize getting high-quality backlinks for your directory site. This will create a genuine relationship and encourage others to guest post.
6. Others
Other ways of promoting your website include offering contests, paid advertising, collaborations, and influencer marketing, among others.
Also, track the analytics and progress of each strategy. You can then determine what works and adjust accordingly.
👉 Good Read: How To Get Traffic To Your Business Directory Website
Frequently Asked Questions (FAQs)
It’s very easy and straightforward to create a business directory site using WordPress. By using a directory theme and a directory plugin, you can develop your own directory site in a short time.
You can easily organize listings using categories, tags, and subcategories. This will help users filter the listings and get their preferred search result.
CLDirectory, Classima, and MyListing are classified as popular themes. They come with robust features like AI integration, customization options, SEO support, and speedy performance.
Directory sites come with a revenue option if you start the monetization system. You can earn around $1k-$40k with a niche-based directory site built on WordPress.
To create a good directory website, you need to have a clear niche and an appealing website design. This will give users the best browsing experience. For better results, you need to have SEO optimization, social media integration, detailed listing information, and many other things.
Parting Shot: Creating a Directory Website with WordPress
After going through the full blog, we can assume that you’ve a clear idea on how to create a directory website with WordPress.
Following this breakdown gives you all the required information. You won’t have to search for expensive coding services. You’ll have vast options to show your creative process. If you have some ideas that you want to execute in crafting your site, this is your chance. All the best!



