


On This Page
Imagine you have a WooCommerce store, and your target customers reside in Canada. However, you display product prices in US Dollars with the $ symbol. This confuses shoppers because the Canadian and US Dollar have the same currency symbol.
Consequently, potential customers leave your store without purchasing products. You don’t want that. So, you need to change the currency symbol. Nonetheless, do you know how to change currency symbol in WooCommerce?
It isn’t that hard. You can follow three methods to accomplish this job. Keep reading this article to learn more about these methods.
Why Should You Change Currency Symbols in WooCommerce?
The following reasons might motivate you to change currency symbols in WooCommerce.
- To provide shoppers with diverse currency options
- To display product prices in your targeted customers’ local currencies
- To avoid confusion among customers
- To make customers feel more comfortable and confident while shopping
- To extend your reach to new regions without worrying about currency conversion
You now understand why you need to change currency symbols in your WooCommerce store. Let’s now see how to do it.
How to Change Currency Symbol with WooCommerce Currency Settings
Fortunately, WooCommerce has dedicated settings to change currency and its position in your store. It also lets you set the ‘Thousand’ and ‘Decimal’ separators as you wish. Here’s how you can utilize these settings.
Step 1 – Go to WooCommerce’s Settings
Log in to your WordPress Admin Dashboard and head to WooCommerce > Settings.

Ensure you are on ‘General’ tab.

Now, scroll down to “Currency Options ”section to find the default currency settings.

Step 2 – Choose Your Preferred Currency
At this point, hit ‘Currency’ drop-down menu and choose your desired currency. For example, you want to set the United States (US) dollar as a default currency for your store. Hence, select that option from the drop-down menu and hit ‘Save changes’ button.

Step 3 – Explore Other Key Settings of WooCommerce’s Currency Options
After choosing the currency you want for your WordPress store, explore other important settings, such as “Currency Position,” “Thousand separator,” “Decimal separator,” and “Number of decimals.”

Here’s a detailed dive into what each setting does.
Currency Position: This setting lets you determine where you want to show the currency symbol beside product prices. You’ll get four placement options: Left, Right, Left with space, and Right with space.
Thousand Separator: This field lets you define a thousand-separator character according to your preferences.
Decimal Separator: Utilize this setting to insert a decimal-separator character as you wish.
Number of Decimals: This setting allows you to determine how many decimal numbers you want to display after the decimal point in the product prices.
How to Change Currency Symbol in WooCommerce with Custom Code
If you are okay with the technical aspects of a website and know how to work with PHP, HTML, CSS, and Javascript, you’ll find this section exciting and fun. Easily add your custom currency and currency symbol by following the steps below.
Step 1 – Go to Theme File Editor
You need to visit the Theme File Editor from your WordPress Admin Panel. Access it from the Appearance menu if you use a Classic theme. On the contrary, you’ll find the Theme File Editor under Tools menu if you use a block theme.
Since we use a block theme, we’ll go to the WordPress Admin Dashboard > Tools > Theme File Editor.

Step 2 – Access functions.php File of Your Theme
Now, head to “Theme Files” on the right side and click “functions.php” file.

Then, scroll down to find a space to insert custom code.
Step 3 – Copy and Paste Custom Code into functions.php File
At this stage, you need to copy and paste the code below into “functions.php” file. Before you do so, read the code explanation. Then, paste this code and click “Update File” button.
/**
Change currency and currency symbols in WooCommerce.
*/
add_filter( 'woocommerce_currencies', 'add_rt_currency' );
function add_rt_currency( $rt_currency ) {
    $rt_currency['RADIUS'] = __( 'RADIUS CURRENCY', 'woocommerce' );
    return $rt_currency;
}
add_filter('woocommerce_currency_symbol', 'add_rt_currency_symbol', 10, 2);
function add_rt_currency_symbol( $radius_currency_symbol, $radius_currency ) {
    switch( $radius_currency ) {
        case 'RADIUS': $radius_currency_symbol = 'RT$'; break;
    }
    return $radius_currency_symbol;
}
Code Explanation: The first code includes the currency code (RADIUS) and its name (RADIUS CURRENCY) in the WooCommerce currency list. You need to replace them according to your preferences.
Then, the second code adds the currency symbol to the WooCommerce currency list. Replace ‘RADIUS’ with the currency code you defined in the first code part, and replace ‘RT$’ with your desired currency symbol.
Step 4 – Select Custom Currency Symbol in WooCommerce
Once you add a custom currency symbol to WooCommerce, navigate to WordPress Admin Panel > WooCommerce > Settings.
Then, head to the “Currency Options” section and click ‘Currency’ drop-down menu. Finally, search for the custom currency symbol, choose it, and click ‘Save changes’ button.

Now, visit your store to see if you notice custom currency in your WordPress store.

That’s how you add custom currency and its symbol to your favorite WooCommerce store. As you can see, this step isn’t beginner-friendly and requires meticulous attention. Therefore, we’ll discuss another easy step to change the currency symbol in WooCommerce.
This method not only allows you to change the currency symbol but also lets you add multiple currencies, set exchange rates, display currency based on customers’ location, and do many more things.
How to Change Currency Symbol in WooCommerce with Plugin
You can understand from the title of this section. We’ll now discuss how you can use a plugin to change the currency symbol in your WooCommerce store.
However, there are so many plugins for this job. Thus, it can be confusing to select the right one. Here are some criteria to follow to narrow down the perfect plugin for this job easily.
- Make sure your chosen plugin regularly fetches exchange rates from reliable sources to show accurate prices in different currencies.
- Check if it automatically detects a customer’s location and displays prices in their local currency.
- Look for a plugin that lets you easily customize currency position.
- Select a plugin that enables you to add and manage various currencies.
- Check if the plugin ensures accurate price conversions between different currencies.
- Review the support system and developer’s reputation of the plugin.
- Compare pricing (If it comes paid) with other plugins.
Select a plugin after considering the factors above. We recommend you pick ShopBuilder if you need a recommendation.
It works with Elementor and WooCommerce to help you create world-class WooCommerce stores in minutes. Let’s now see how it works.
Step 1 – Install and Activate ShopBuilder
First, you need to install and activate this plugin and then use its “Currency Switcher” module to change currency in your store.
While this plugin offers many modules and widgets for free, its “Currency Switcher” module comes only in a paid plan.
Therefore, get this plugin and download its zipped file to your computer.
Afterward, go to WP Admin Panel > Plugins > Add New Plugin.

Now, hit “Upload Plugin” button to upload the zipped plugin file you received after purchasing the ShopBuilder Pro.
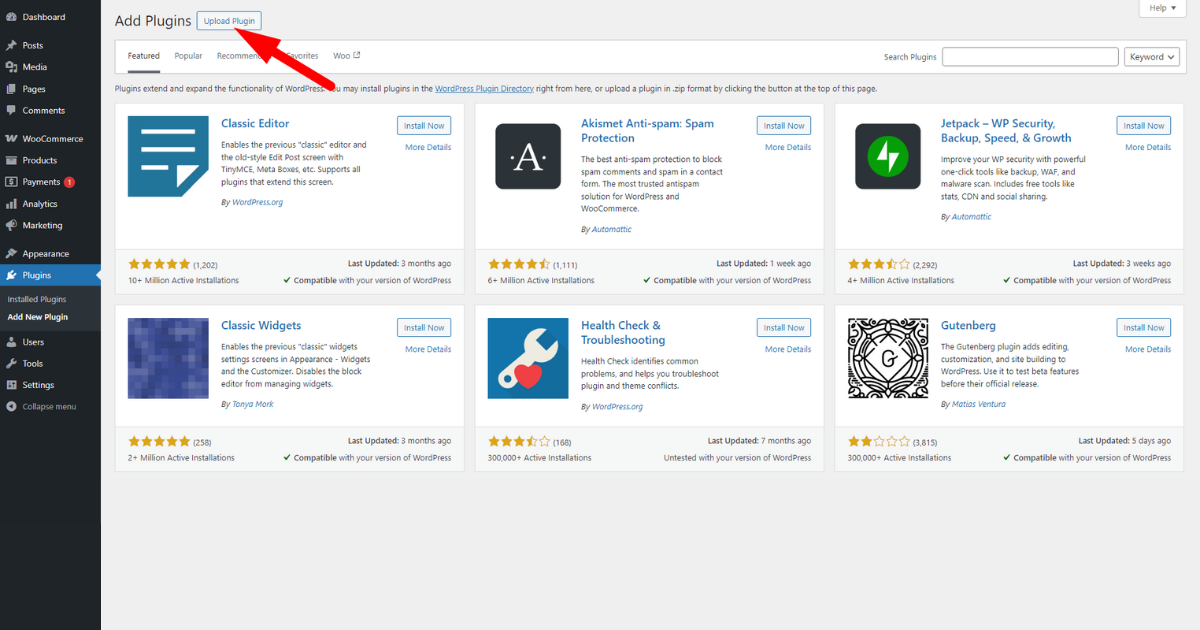
Now, click “Choose File” button to upload the plugin file and hit “Install Now” button.

At this time, click “Activate Plugin” button to activate ShopBuilder Pro.

In the plugin installer window, you’ll see a message asking you to install the free version of ShopBuilder. Click “Install ShopBuilder” button and follow the on-screen instructions to install and activate it.
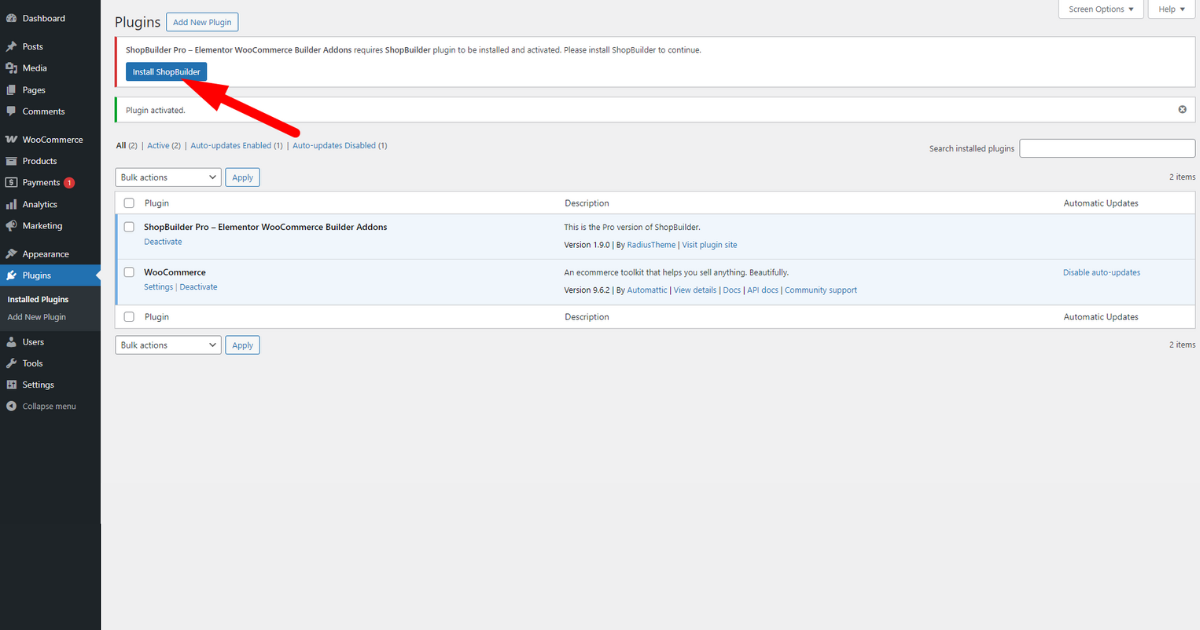
Oh! Don’t forget to install and activate Elementor as well if you haven’t yet installed and activated this plugin.
Right now, you need to insert ShopBuilder‘s license key to use its pro features. To do so, navigate to WordPress Admin Panel > ShopBuilder > License.
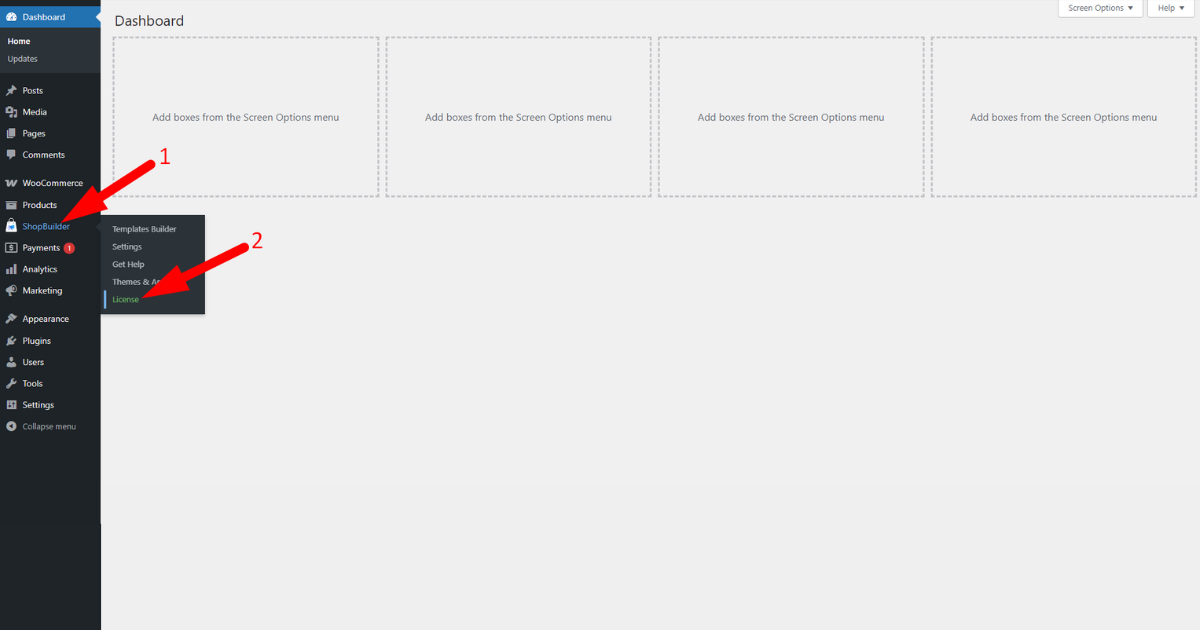
Now, insert your license key in the “Licence key” field and click “Activate License” button.
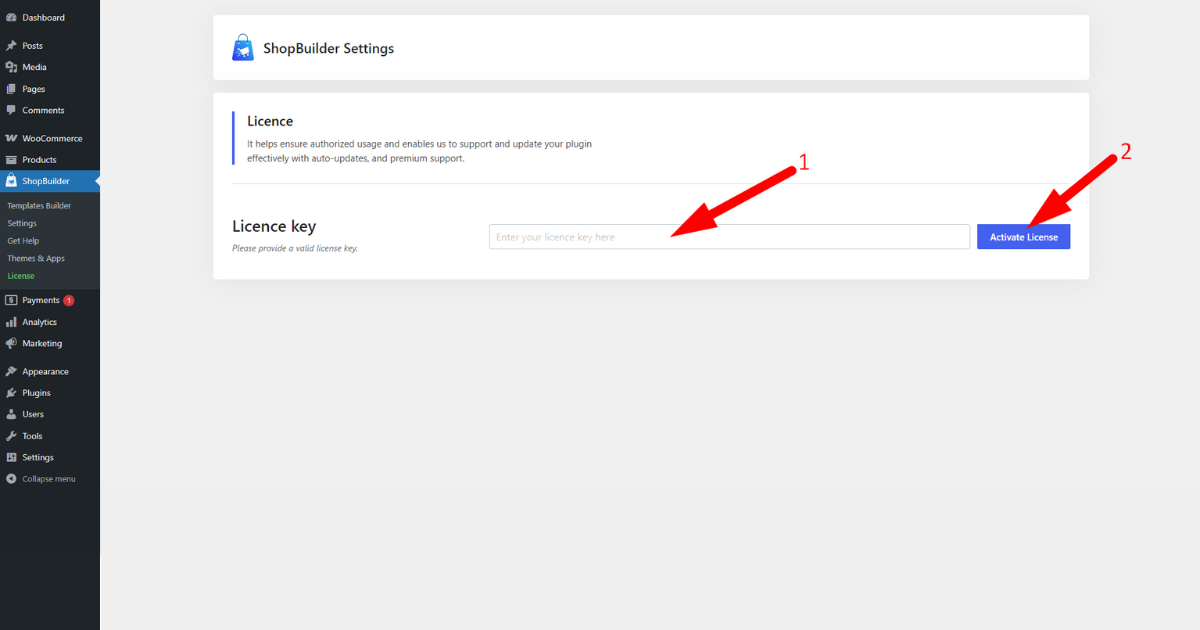
That’s it. You’ve installed and activated the ShopBuilder Pro plugin. It’s time to use its “Currency Switcher” module.
Step 2 – Enable Currency Switcher and Add a Currency
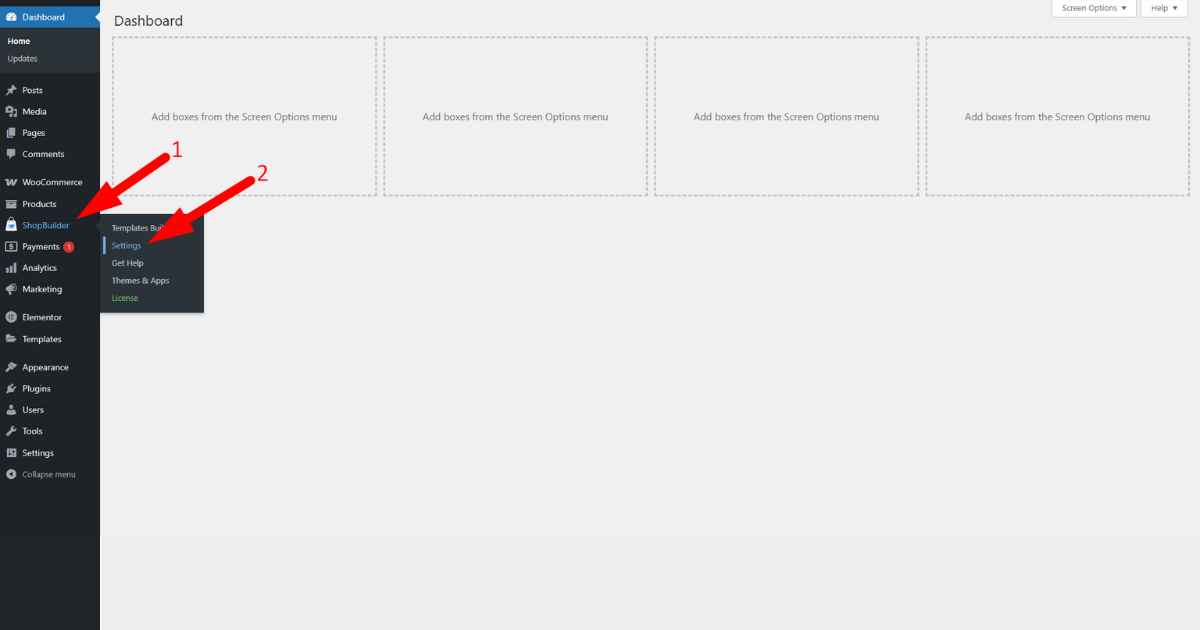
Head to WP Admin Dashboard > ShopBuilder > Settings to enable “Currency Switcher” module.
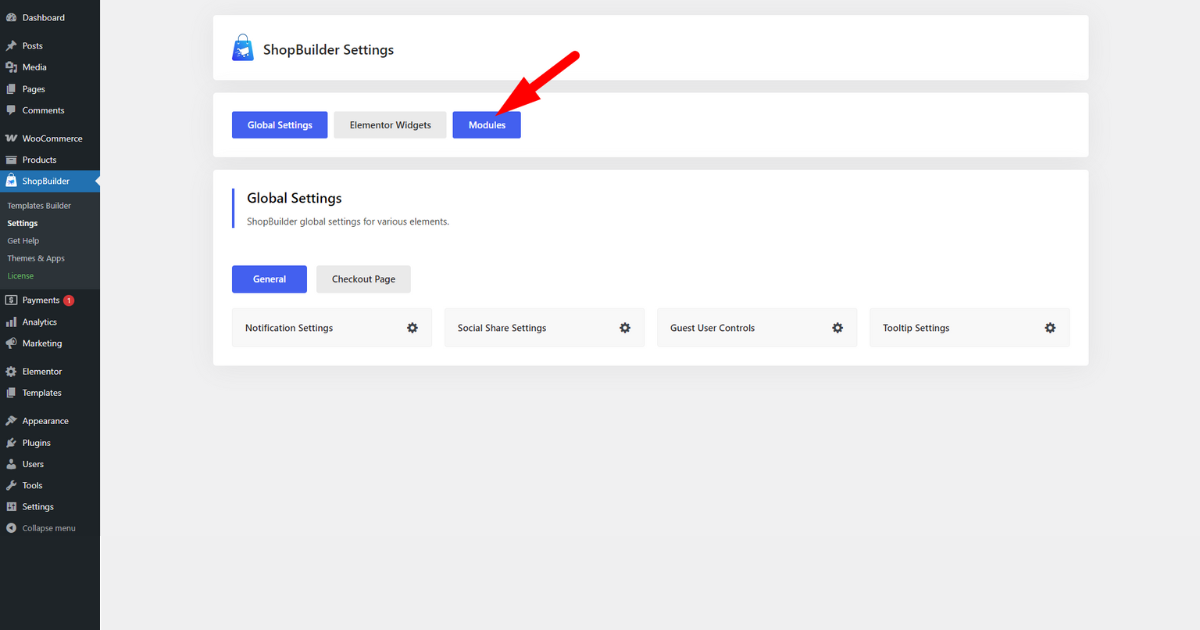
Then, click ‘Modules’ tab.
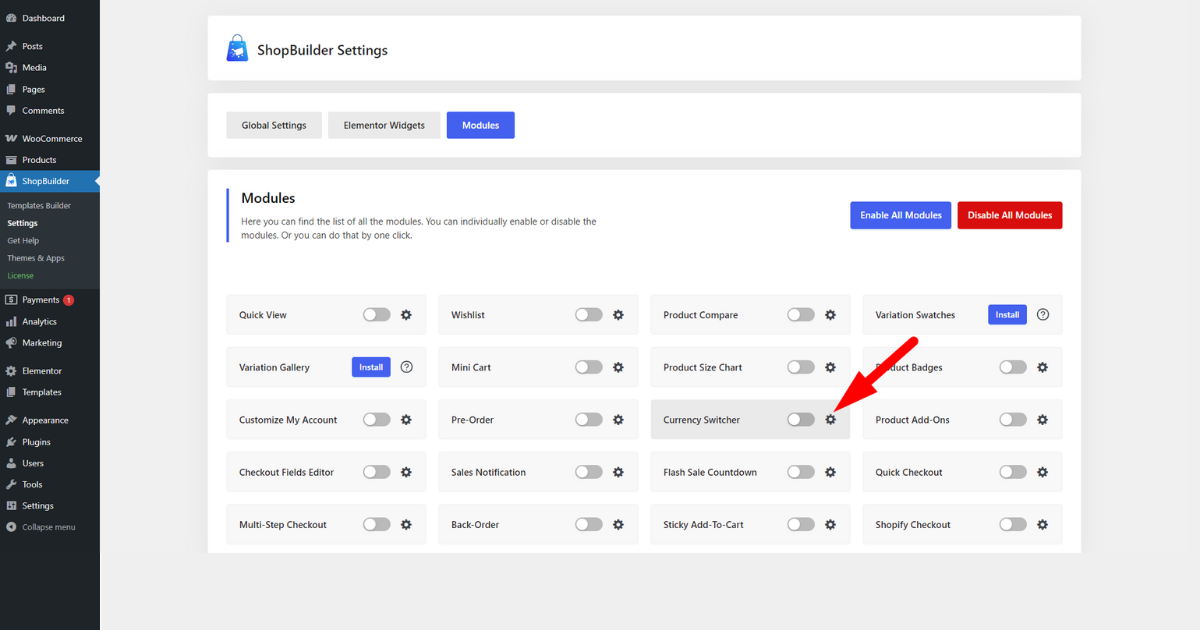
Find “Currency Switcher” module and click on it.
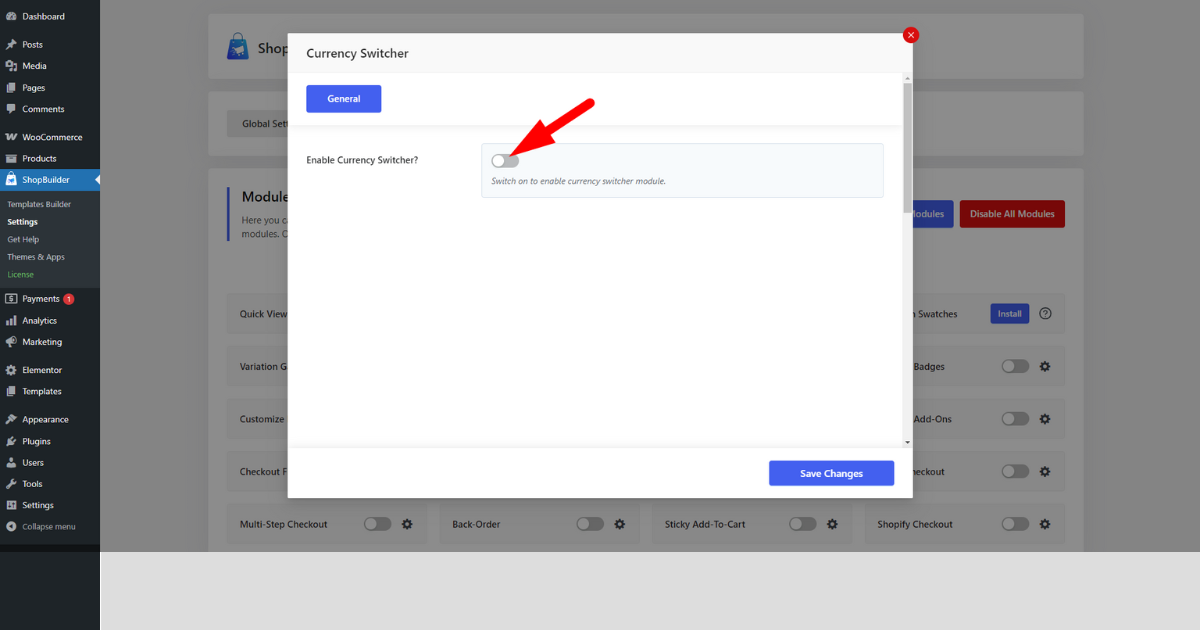
You’ll then see a pop-up. Toggle on “Enable Currency Switcher?” option.
You’ll now notice a couple of options with switches and drop-down menus. For instance, you’ll see “Display Sticky Currency Widget” that sticks to the page while displaying multiple currencies with their texts and flags.
You’ll also see options to change this sticky widget’s position and turn off or on currency flags and texts.
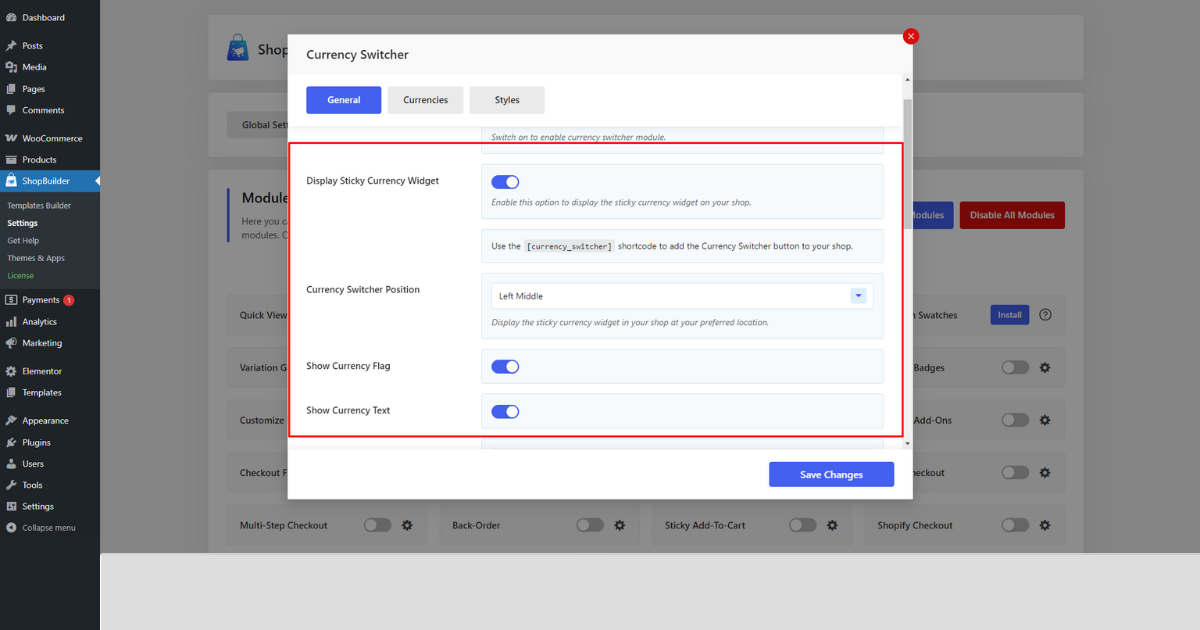
We encourage you to explore each option and read the Currency Switcher documentation to understand it better.
Add a Currency
Click ‘Currencies’ tab and then hit “Add New” button on the bottom left within that pop-up you got after clicking “Currency Switcher” module.
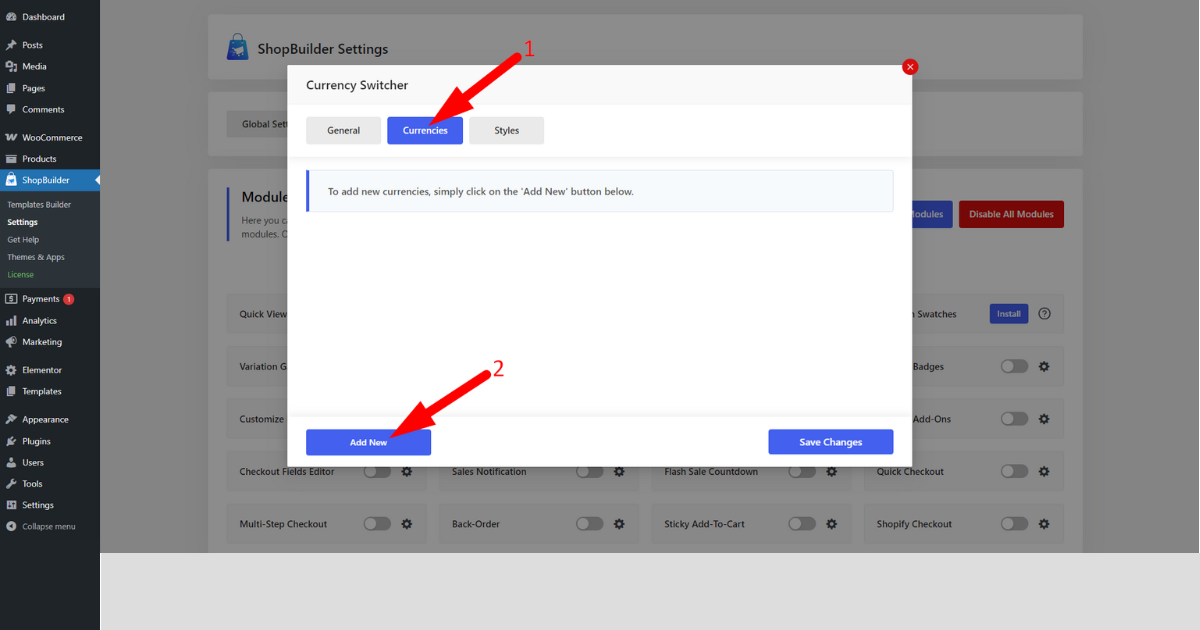
Once you do that, a currency will automatically be added. You now need to click the vertical triangle icon to edit the currency according to your requirements.

Head to “Select Currency” field, click on the drop-down menu, and select your preferred currency.

Then, scroll down to see other options. For example, the “Custom Currency Symbol” field lets you add a custom currency symbol. You can also include currency exchange rates, exchange fees, and more.
Once you have explored and learned about all these options and set your chosen currency, click “Save Changes” button.

Refollow these steps whenever you want to add a currency to your WooCommerce store with ShopBuilder’s Currency Switcher module.
Finally, visit your store to see how this Currency Switcher module displays multiple currencies in your shop.

See! How easily you can add and display multiple currencies to your WooCommerce store with this Currency Switcher module.
This module offers many more features! For example, it lets you manually or automatically set exchange rates to ensure currency conversion accuracy for global customers.
Thanks to its geolocation integration functionality, you can display users’ local currencies based on their locations. Last but not least, this module enables you to customize the currency switcher appearance to match your brand.
Bonus: Best Practices for Seamless Currency Conversion
It’s essential to offer multiple currencies and ensure accurate currency conversion in your store to attract and retain global customers. With that said, consider these tips below for seamless currency conversion.
Ensure Automatic Updates: Ensure the currency exchange rates are updated daily to reflect the current market. Most plugins, particularly ShopBuilder’s Currency Switcher module, offer the option to enable automatic updates.
Update Product Prices Regularly: Monitor products’ regular and sale prices in different currencies and update them regularly by following the up-to-date exchange rates.
Offer Multiple Currencies: To allow global customers to purchase products in their local currencies, display multiple currencies in your store. Perform this task with ShopBuilder’s Currency Switcher module.
Include Conversion Fees: Add a small conversion fee to cover any additional costs your bank may charge.
Test Regularly: Test the currency conversion process to check if the exchange rate is correctly applied and the final price is accurately shown.
Backup: It’s always wise to have a backup plan to prevent sales disruption. Get a backup in manual settings lest the automatic update might fail.
You may follow these best practices to ensure a seamless shopping experience for your global customers.
Bonus 2: General Currency Management Best Practices
Below, you’ll find the best practices to ensure a seamless WooCommerce currency management experience.
I. Set a Clear Base Currency
WooCommerce lets you set one base currency for your WordPress shop. This default currency will be used for all transactions, payouts, and WooCommerce product currency displays. Thus, choose a currency that aligns with your primary market or accounting needs.
Tip: Select a widely accepted currency (e.g., USD, EUR) to simplify accounting and payment processing. You can add a custom WooCommerce currency symbol via code if your desired currency isn’t listed.
II. Use a Currency Switcher Plugin
We recommend you use a currency switcher plugin like ShopBuilder to allow customers to switch between currencies on your store—Display WooCommerce product currency in multiple currencies.
Tip: Try a plugin that auto-detects customer location via IP address and shows prices in their local WooCommerce currency.
III. Customize Currency Display for Clarity
For your information, proper formatting of WooCommerce currency symbols and prices enhances user trust and reduces confusion, so appropriately format them. Use the correct currency position, commas, and periods, and set the number of decimals.
By implementing these best practices, you can effectively manage WooCommerce currency and provide a user-friendly experience for global customers.
Rounding Up
You can now enhance the global appeal of your WordPress store by reading this article on how to change currency symbol in WooCommerce and take action accordingly.
As you can see, we shared three methods to change currency and its symbol. Adhere to one method that you find easy and best-fit.
However, we suggest you stick to the 3rd method to avoid unwelcoming issues you may encounter while following other methods. That’s all with this article. We’ll catch you again with another helpful one.



