


On This Page
Want to enhance your WooCommerce store’s functionality, user experience, and sales? You can do it by customizing the Add to cart button text.
Do you know how to change Add to cart button text in WooCommerce?
You can change it using two methods: one without a plugin and the other with a plugin. Read on to learn more about these two methods.
Why Should You Change the Add to Cart Button Text?
The one-word answer to this question is “YES.” You should change the Add to cart button text for several reasons.
You need to rename/change it to align with your brand voice. You should replace the default Add to cart text with a more precise and compelling text to draw customer attention.
A well-crafted Add to cart button text can encourage shoppers to click and add products to their cart, potentially leading to higher sales. Sometimes, you need to change/rename this button text to align with a specific product type.
For example, you sell courses. In this case, a “Get Started” button will be more suitable than the traditional “Add to cart” text.
Again, sometimes, you need to run A/B testing on your online shop. You prefer experimenting with different button texts to see which results best. Hence, these are just a few examples outlining why you should change/rename/replace the “Add to cart” text.
Methods to Change Add to Cart Button Text in WooCommerce
We’ll show two methods to change the Add to cart button text in WooCommerce. First, we’ll discuss how to rename this button text without a plugin. Secondly, we’ll show you how to change this button text with a plugin. Let’s start.
How to Change Add to Cart Button Text in WooCommerce Without Plugin
Before you start changing this button text, we need you to know that you should be techy and carefully follow the steps we are about to show you. While utilizing this method, we’ll mostly work within the theme’s “functions.php” and “style.css” files.
Therefore, you need to know a bit of programming language, particularly PHP, and a stylesheet language: CSS. It’ll be better if you know HTML and Javascript. However, you won’t need this additional knowledge for this tutorial.
Rename the Add to Cart Button Text for the Single Product Page
Let’s change Add to cart text WooCommerce programmatically. You can do it by inserting the code snippet below within your theme’s “functions.php” file.
Nonetheless, you need to change the code snippet slightly before you add it to the theme’s function file.
Here’s how to add this code to your WordPress theme’s “functions.php” file.
If you use a block theme, you need to access this file from your theme directory, which you will find in your hosting’s cPanel.
On the other hand, if you use a classic theme, you can edit this file using the “Theme File Editor.” Hence, let’s get started and follow the steps below.
N:B: Always make changes to the child theme so your parent theme doesn’t overwrite your custom changes when it gets updated.**
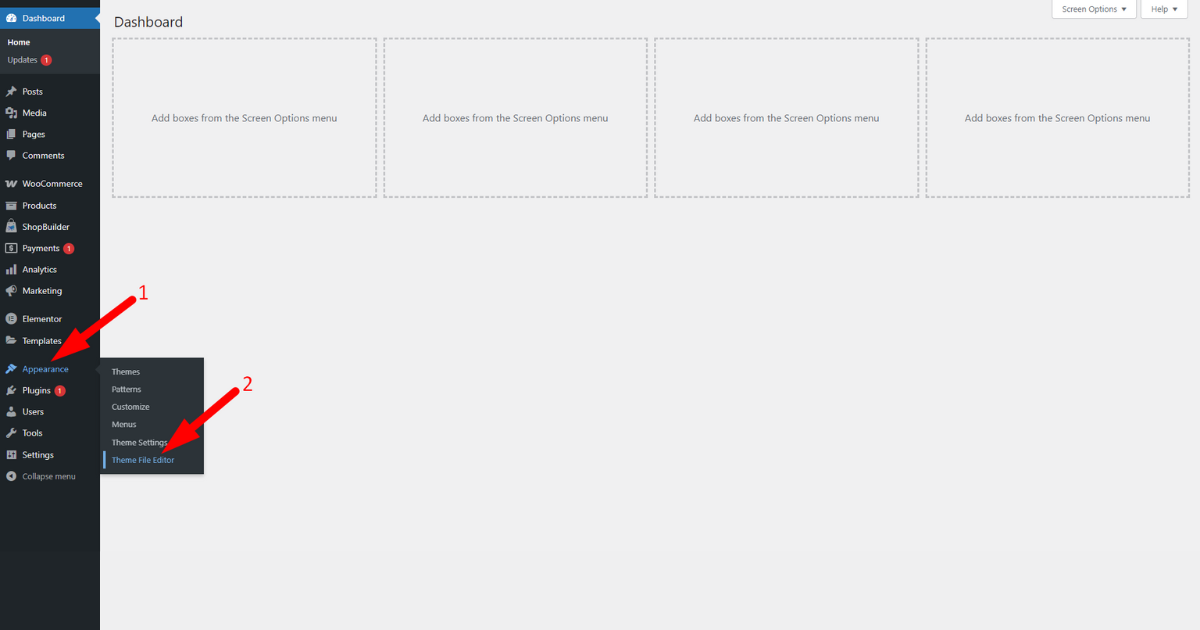
- Go to WordPress Admin Panel > Appearance > Theme File Editor.
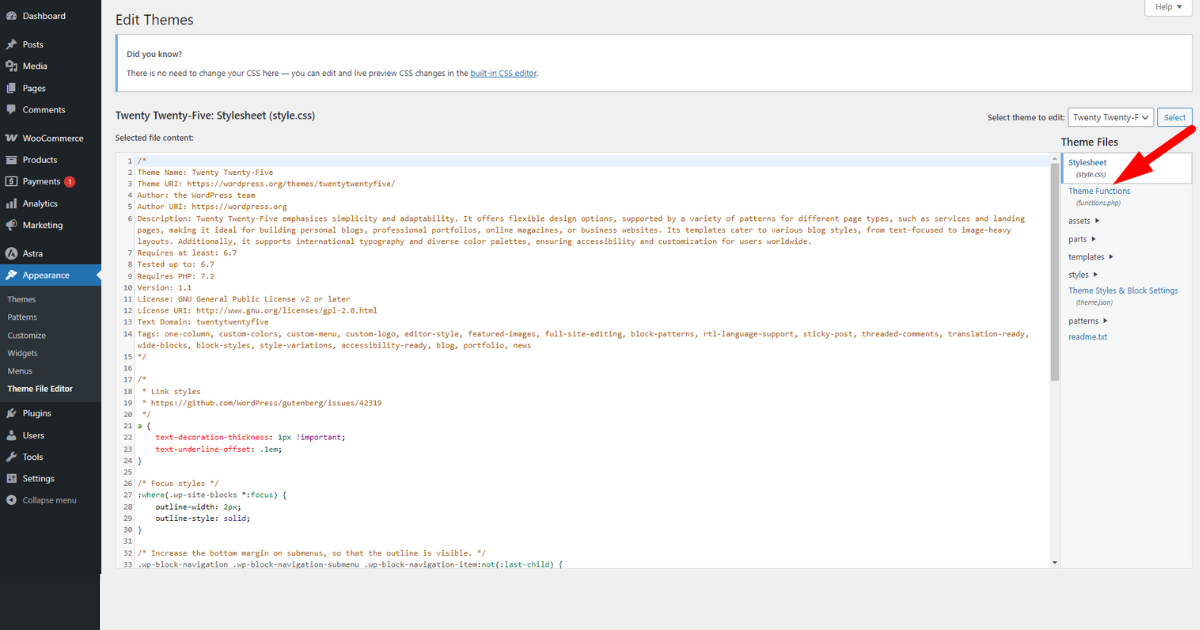
- Now, click the “functions.php” file.
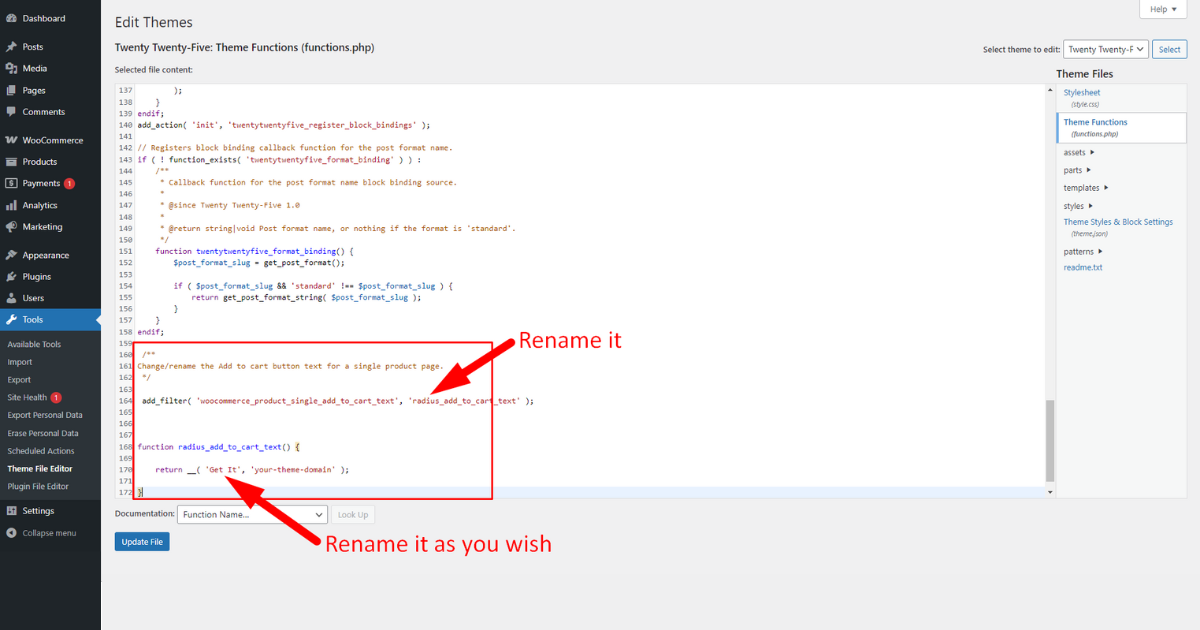
- Crucial Step: Copy and paste the code snippet below inside the “functions.php” file. But before that, change the Add to cart text (Get It) inside this code snippet to your liking. Additionally, you can rename ‘radius’ within the function as you wish.
Here’s the code snippet:
/**
Change/rename the Add to cart button text for a single product page.
*/
add_filter( 'woocommerce_product_single_add_to_cart_text', 'radius_add_to_cart_text' );

function radius_add_to_cart_text() {
    return __( 'Get It', 'your-theme-domain' );
}
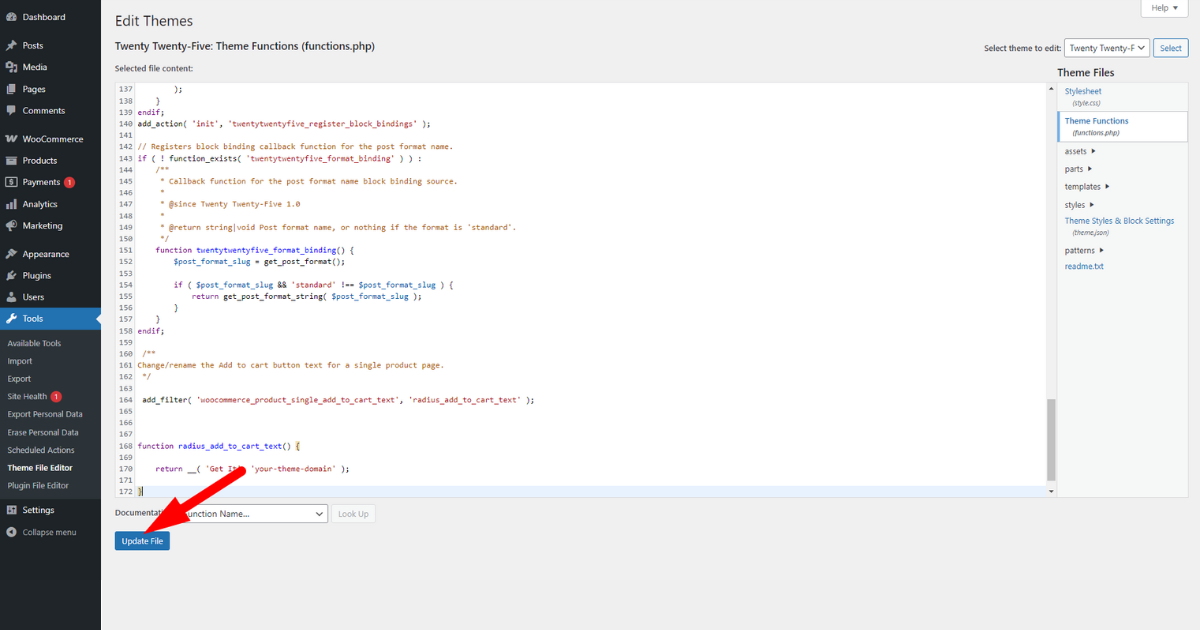
- Afterward, click “Update File” button.
- Visit a single product page to see the changes.
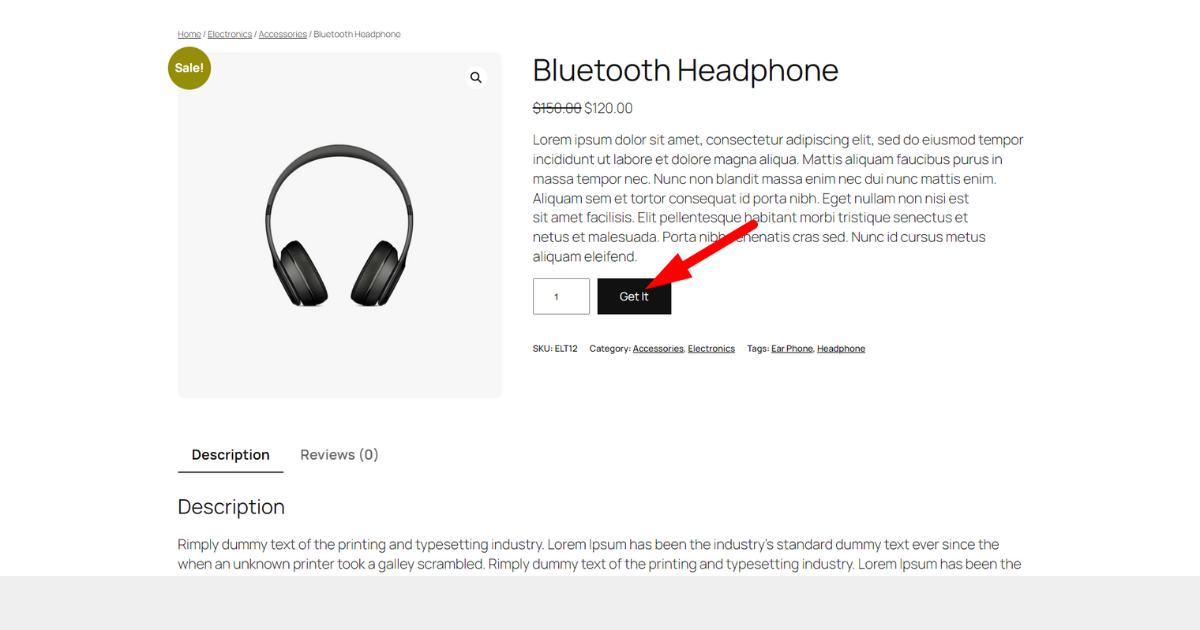
Change the Add To Cart Button Text in WooCommerce for Archive Products/Shop Page
Follow the steps below to change or rename the text on the Add to Cart button on the archive products/shop page.
- Navigate to WordPress Admin Dashboard > Appearance > Theme File Editor.
- Hit “functions.php” file.
- Copy and paste the code snippet below into the “functions.php” file. Ensure to rename Add to cart text (Choose) inside the code snippet as per your requirements.
/**
Change the Add to cart button text for the archive products/shop page.
*/
add_filter( 'add_to_cart_text', 'woo_radius_product_add_to_cart_text' );
add_filter( 'woocommerce_product_add_to_cart_text', 'woo_radius_product_add_to_cart_text' );

function woo_radius_product_add_to_cart_text() {

    return __( 'Choose', 'woocommerce' );

}
- Click “Update File” button.
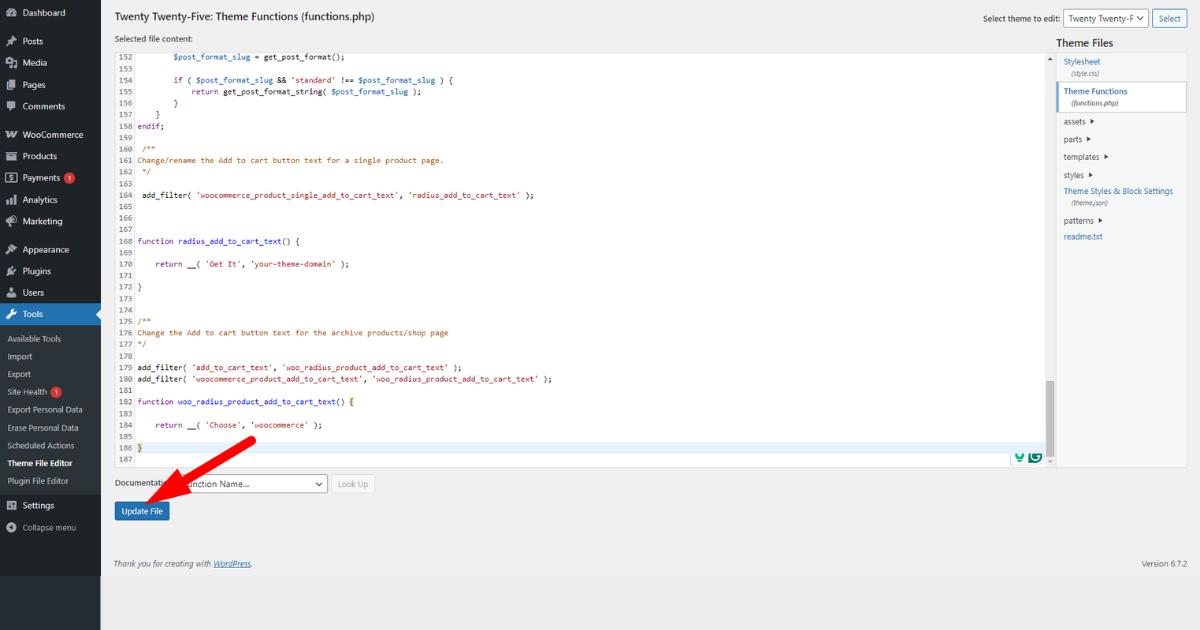
- Now, visit the shop page and see the changes.

How to Change Add to Cart Button Text in WooCommerce With Plugin
As you can guess from the title, we’ll show you how to easily change/rename the custom Add to cart button text according to your preferences using a plugin. However, which plugin to use to accomplish this job?
Research a Code Insertion Plugin
Since the WordPress plugin repository contains so many plugins for code insertion, we’ll use the criteria below to select the best one.
- Check if the plugin is compatible with our current WordPress version and theme
- Make sure it has good reviews and ratings
- Check if it has a user-friendly interface
- Examine if it has the features we need for code insertion
- Assess the availability of support channels
- Check its security features
- Inspect its documentation quality
- Compare its pricing (if it comes paid) and features with other plugins
- Make sure it gets regular updates
Okay, we chose Code Snippets to perform our desired task. Let’s install and activate it.
Install and Activate Code Snippets
Here’s how you can install and activate Code Snippets.
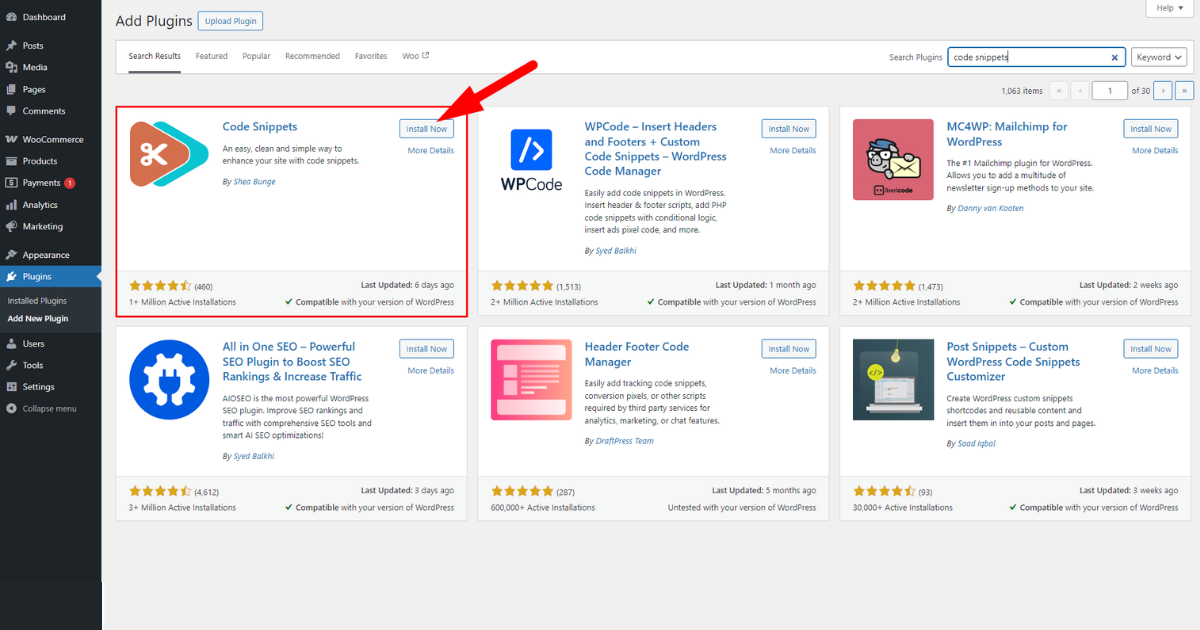
- Head to your WP Admin Dashboard > Plugins > Add New Plugin.
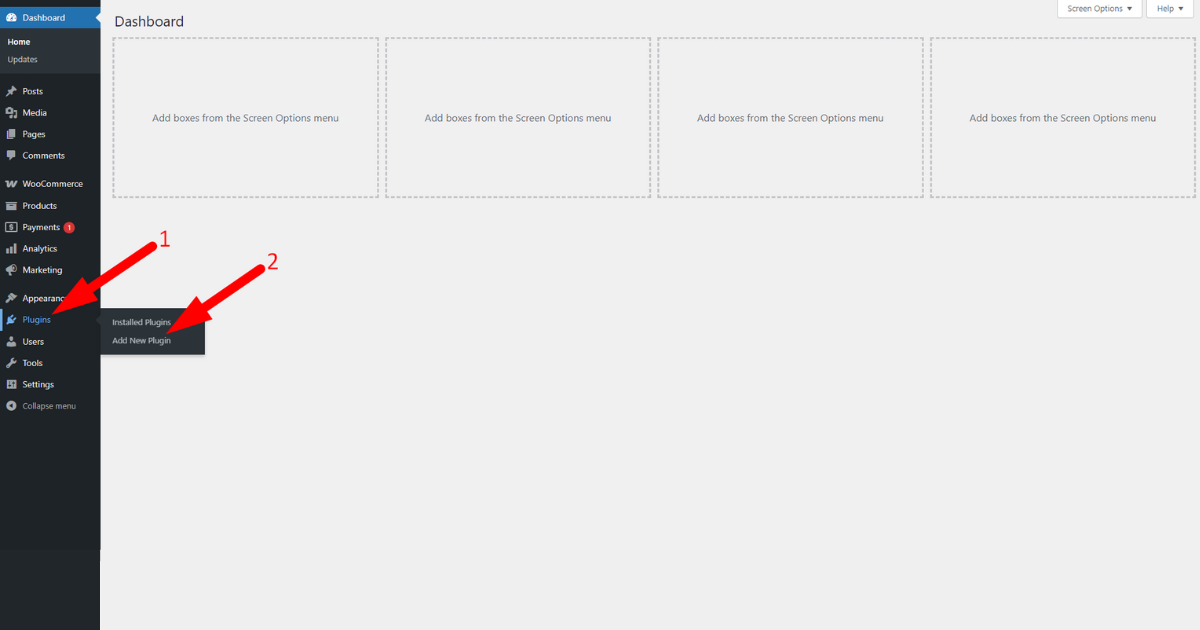
- Type “Code Snippets” in plugin search field.
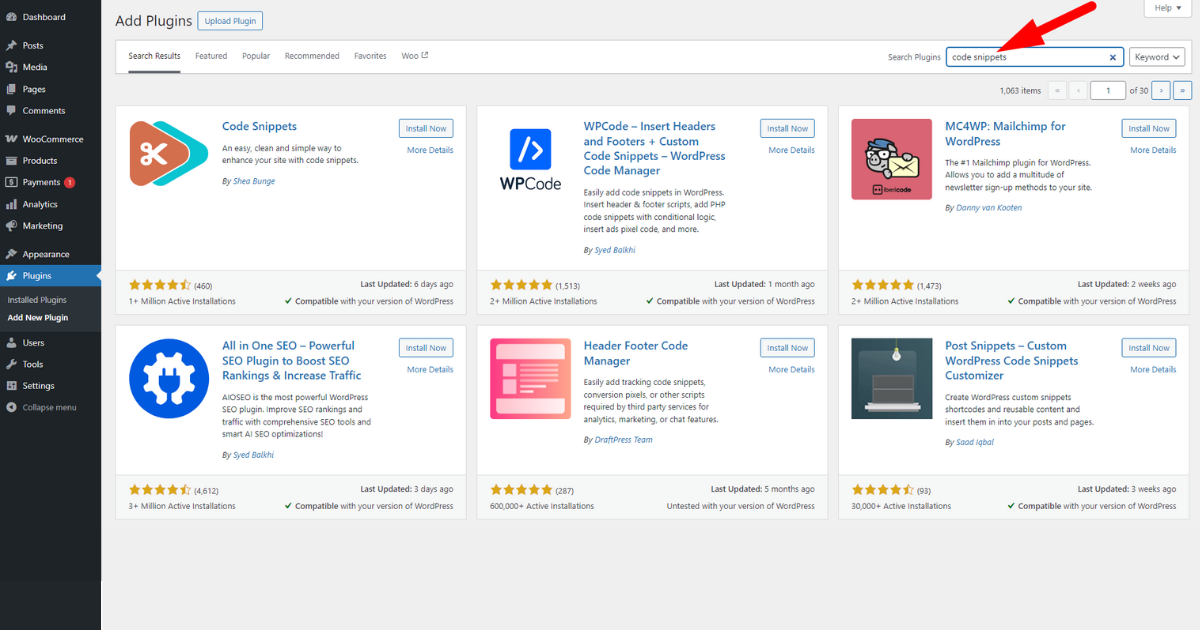
- Click “Install Now” button of the marked plugin in the screenshot below.
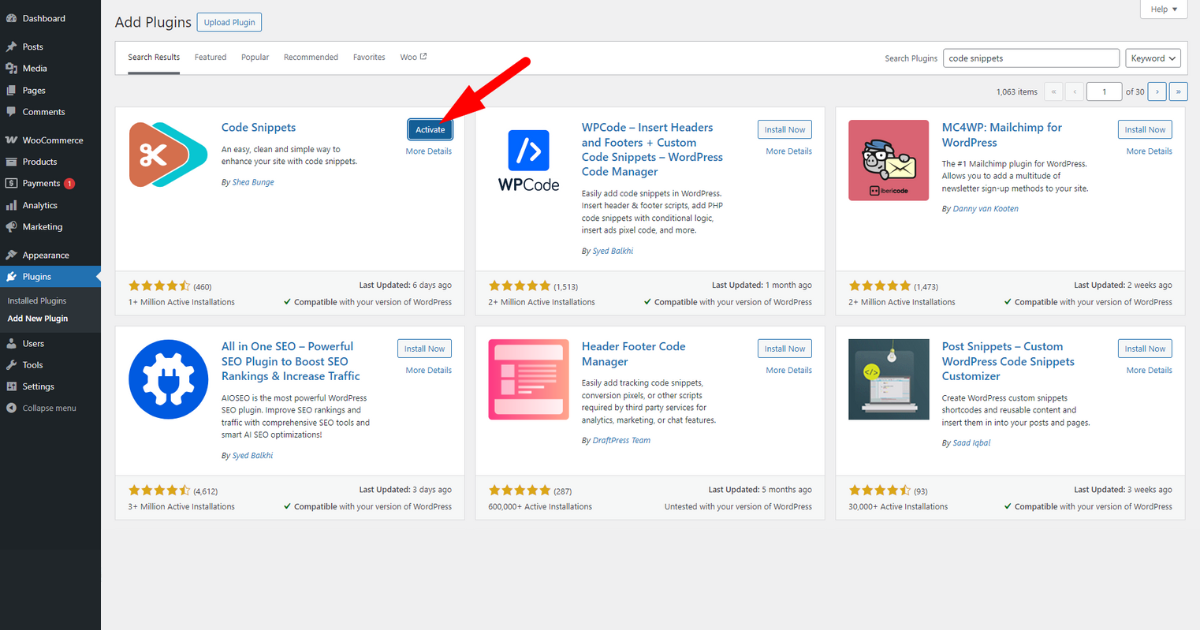
- Then, hit ‘Activate’ button.
Insert Code Snippets into the Plugin
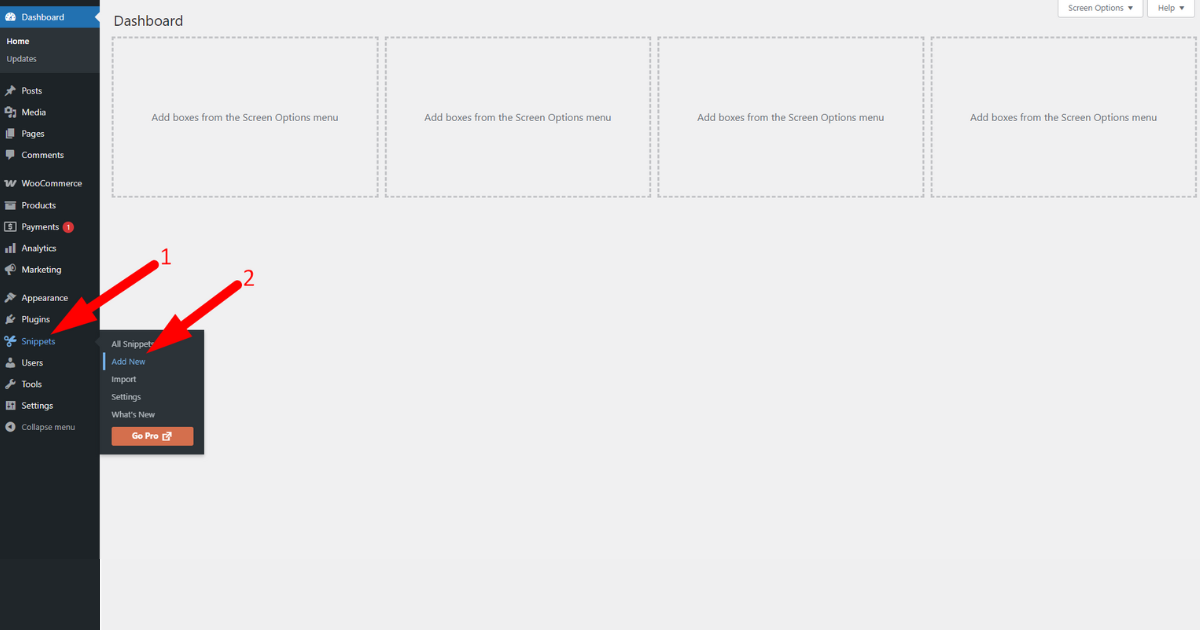
To insert a code snippet, navigate to your Admin Dashboard > Snippets > Add New.
Write your code snippet name in “Add New Snippet” field.
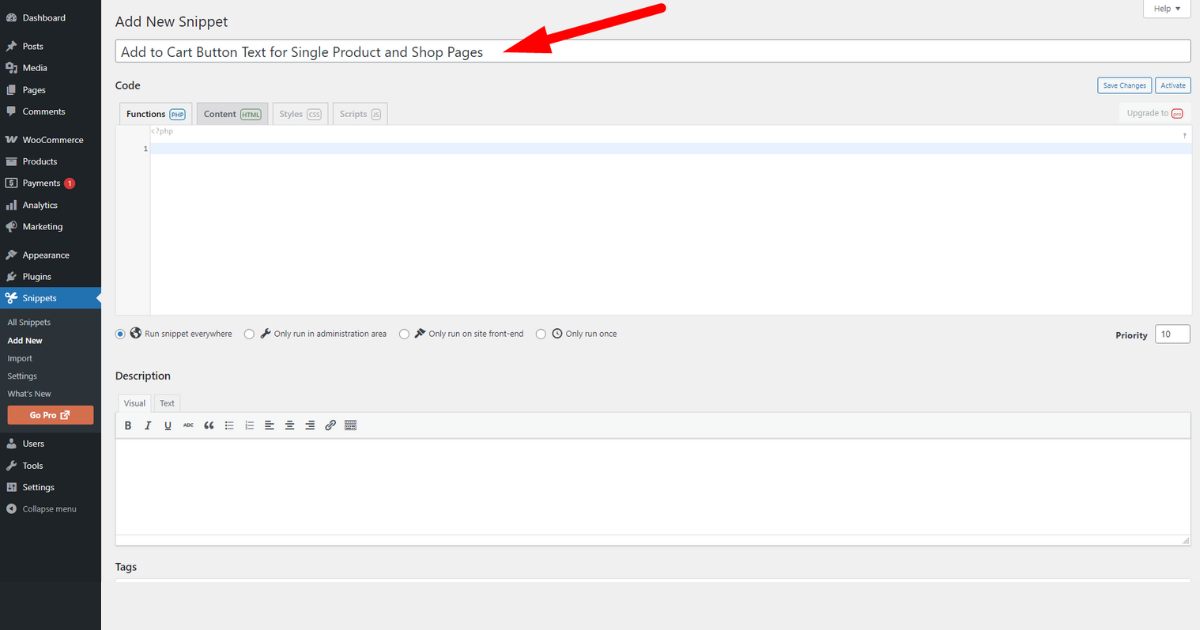
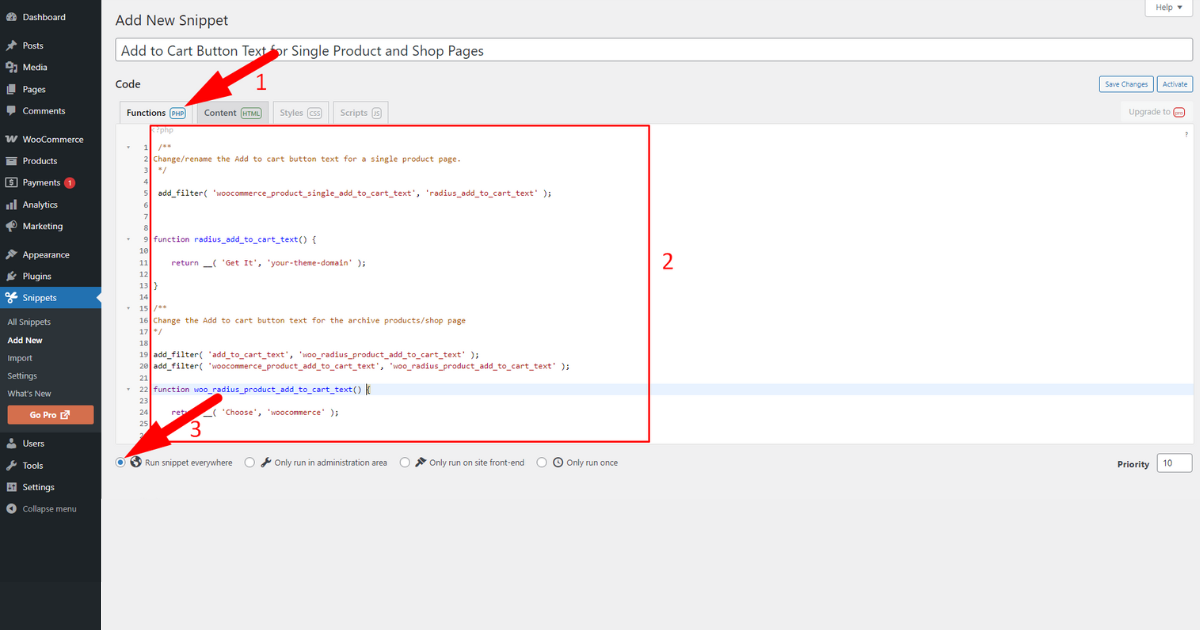
Ensure you are on “Functions PHP” tab and the “Run snippet everywhere” radio button is selected.
Now, place code snippets for changing Add to cart button text for single product and shop pages inside the “Functions PHP” box.
/**
Change/rename the Add to cart button text for a single product page.
 */
 add_filter( 'woocommerce_product_single_add_to_cart_text', 'radius_add_to_cart_text' );

function radius_add_to_cart_text() {
    return __( 'Get It', 'your-theme-domain' );
}
/**
Change the Add to cart button text for the archive products/shop page.
*/
add_filter( 'add_to_cart_text', 'woo_radius_product_add_to_cart_text' );
add_filter( 'woocommerce_product_add_to_cart_text', 'woo_radius_product_add_to_cart_text' );

function woo_radius_product_add_to_cart_text() {

    return __( 'Choose', 'woocommerce' );

}
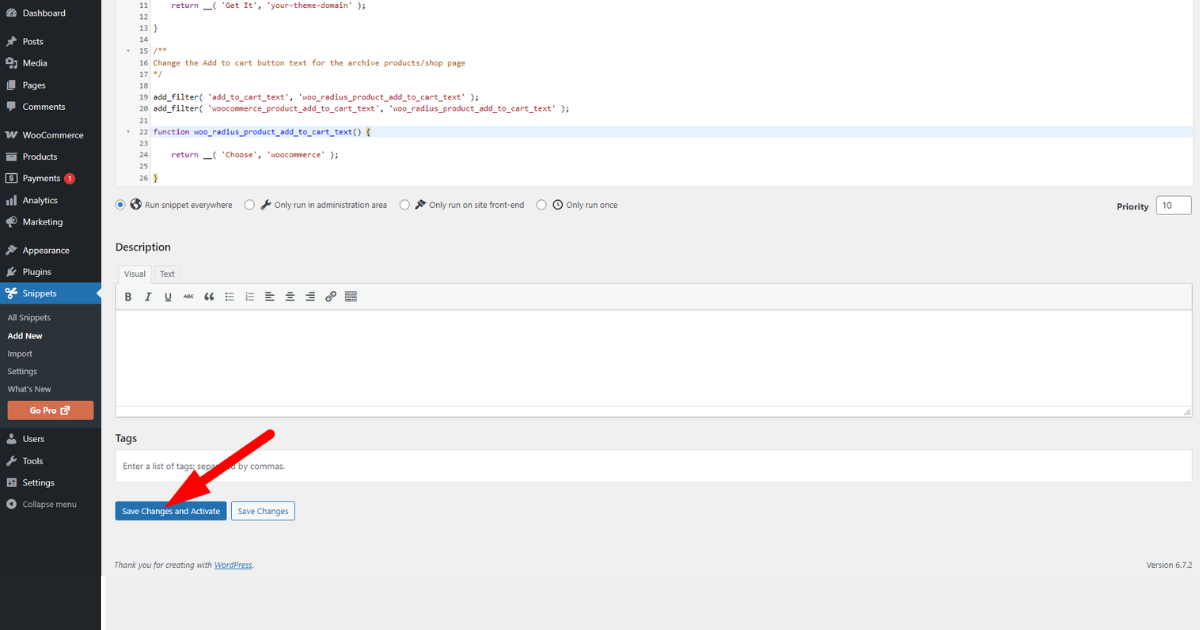
Finally, click “Save Changes and Activate” button and visit single product and shop pages to view changes.
That’s how you use a plugin to change Add to cart button text.
Bonus: Learn These Advanced Customization Options
From now on, you can easily change or rename the default Add to cart button text for a single product and shop page using one of the methods discussed in this article.
However, we want to show you more advanced customization options to enhance your store’s functionality and increase conversion rates. Let’s begin.
Add a Special Function to Increase Conversions
We’ll remove a step users usually encounter while shopping online: adding a product to their carts.
After adding a product to their carts, they visit the cart page and click the “Proceed to Checkout” button to visit the checkout page. Finally, they fill out checkout form fields and place orders.
That’s a long process to buy products. We’ll allow visitors to visit the checkout page right after clicking our store’s Add to cart button.
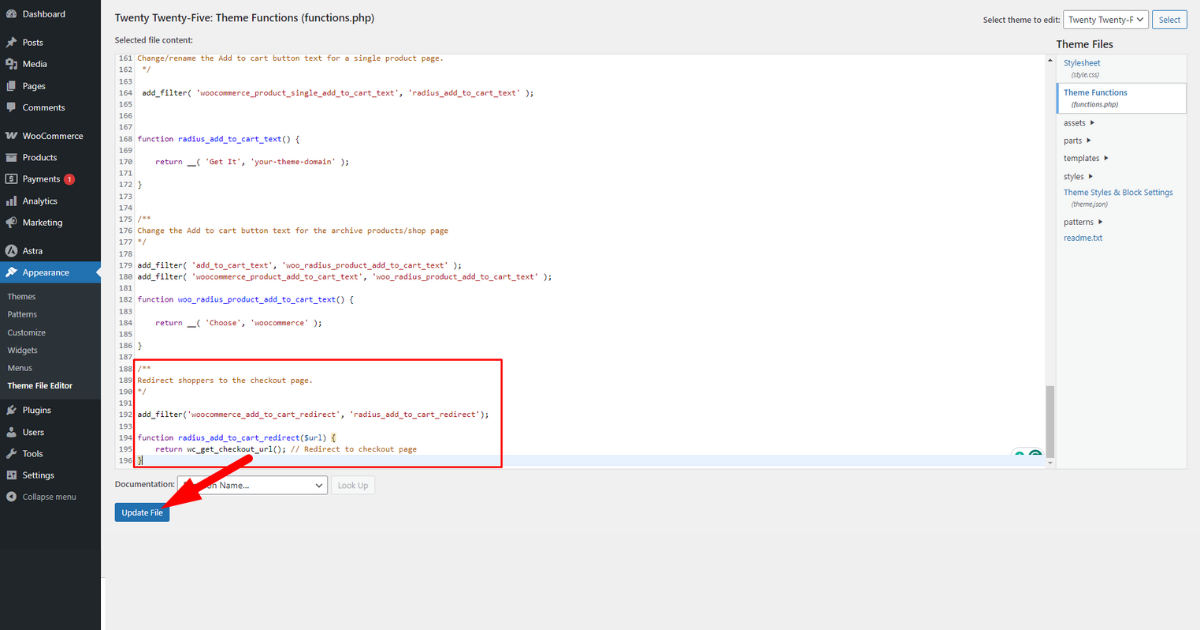
So, how do we do it? We copy and paste the code snippet below into our theme’s “functions.php” file and click the “Update File” button.
/**
Redirect shoppers to the checkout page.
*/
add_filter('woocommerce_add_to_cart_redirect', 'radius_add_to_cart_redirect');
function radius_add_to_cart_redirect($url) {
    return wc_get_checkout_url(); // Redirect to checkout page
}
You might now see the animation below to see if everything works correctly.

Note: It will only work on variable products on your shop page and all products on a single product page.
Stylize the Add to Cart Button Text
You’ve added advanced functionalities to your store’s Add to cart button. You can now change this button color and text style using CSS to match your brand. Here’s how to do it.
N:B: You need to know some CSS to stylize the Add to Cart button without a plugin.
- Head to your WP Admin Panel > Appearance > Customize.
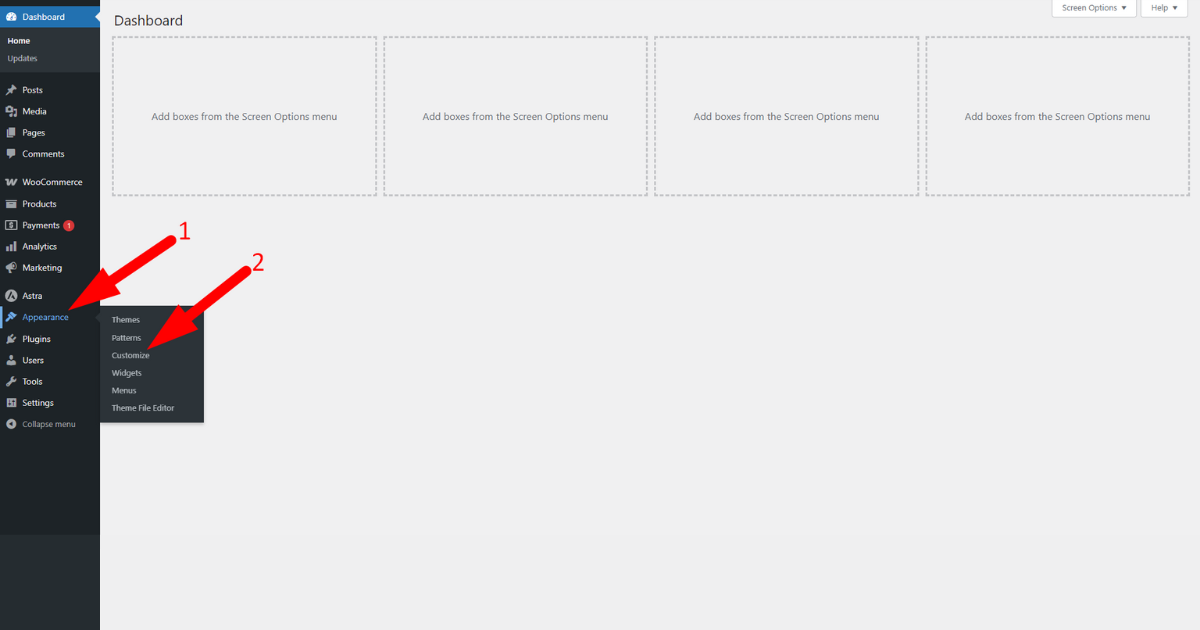
- Click “Additional CSS.”
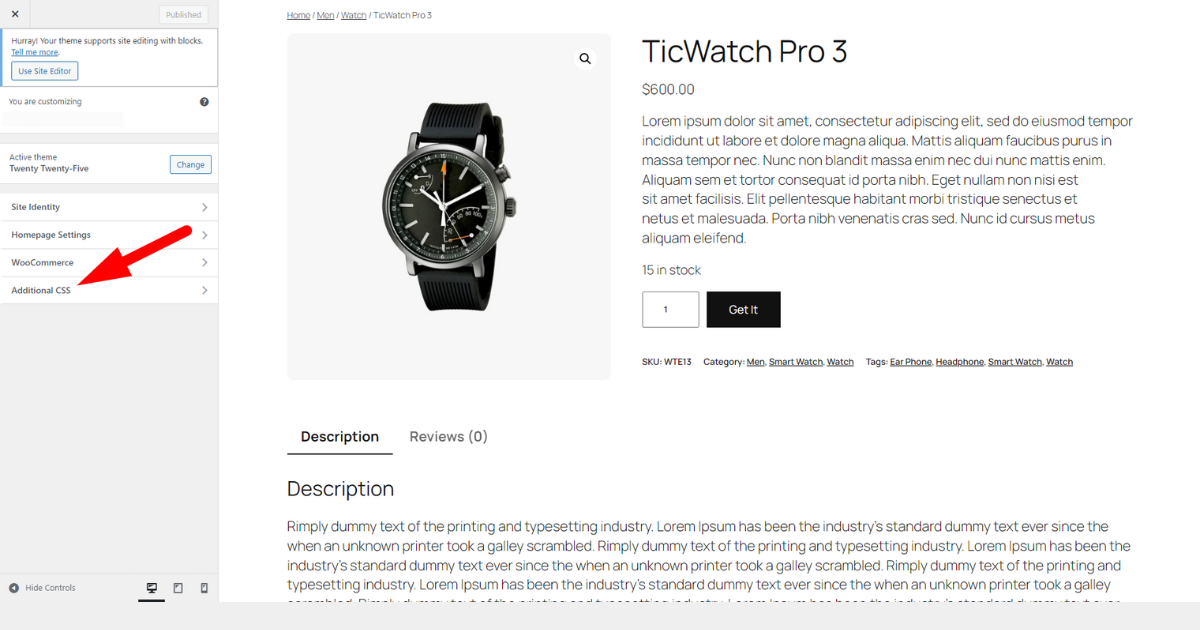
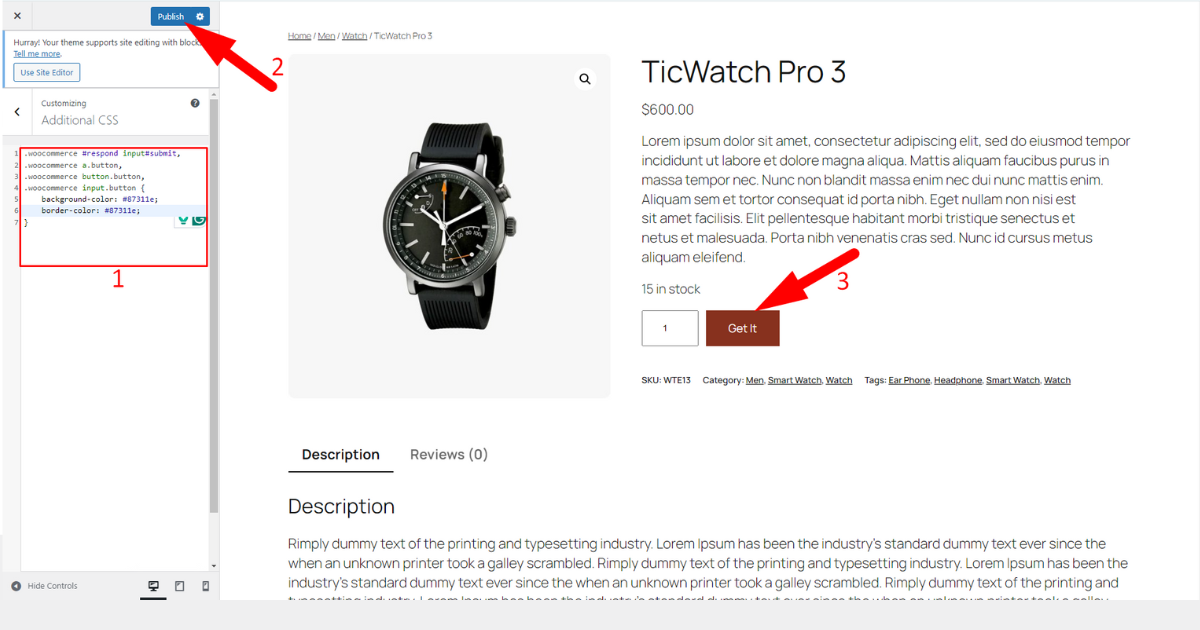
- At this point, you need to write CSS code to change the button color to align with your brand. Copy the code snippet below and replace “#HEX” with your desired hex color code. Lastly, hit ‘Publish’ button on the top.
.woocommerce #respond input#submit,
.woocommerce a.button,
.woocommerce button.button,
.woocommerce input.button {
    background-color: #HEX;
    border-color: #HEX;
}
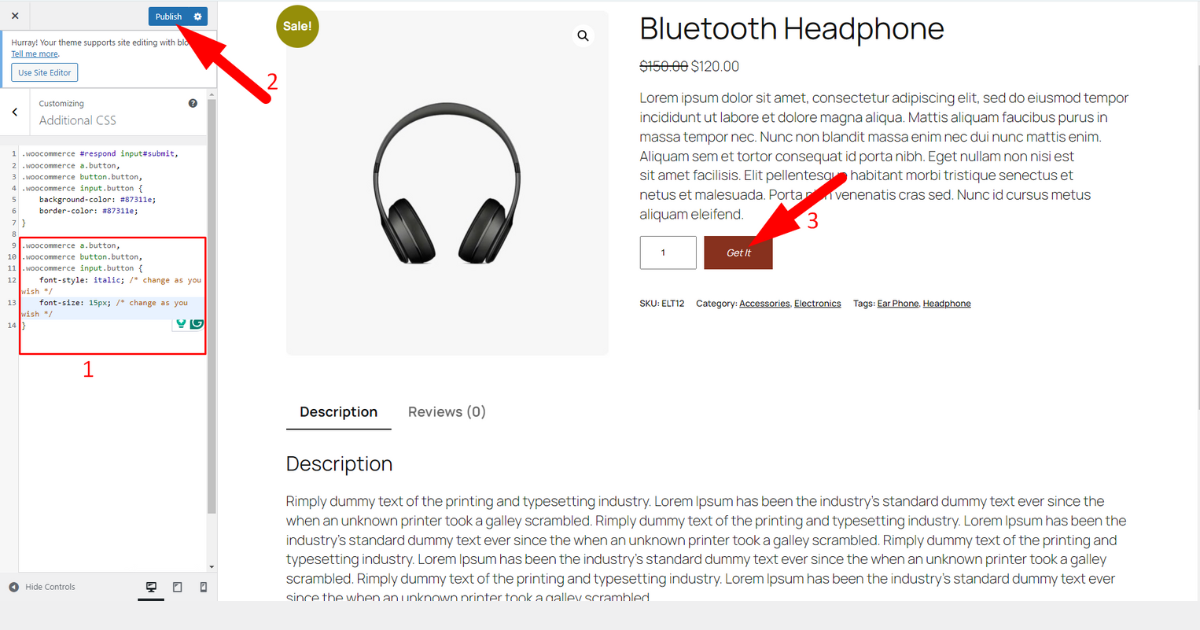
- To customize the button text style, copy and paste the CSS code below and change “font-style” and “font-size” according to your requirements. Additionally, remember to click ‘Publish’ button after inserting the CSS code.
.woocommerce a.button,
.woocommerce button.button,
.woocommerce input.button {
    font-style: italic; /* change as you wish */
    font-size: 15px; /* change as you wish */
}
Wrapping Up
You need to know how to change Add to Cart button text in WooCommerce to enhance your WordPress store’s appeal and user experience. Doing so will help you increase conversion rates.
Hence, follow everything we shared in this article to change/rename Add to cart button text and stylize it to make your store more appealing to customers and increase sales.
Remember, these steps might seem challenging if you aren’t a techie. Be patient and cautious when taking action according to our instructions. Eventually, you’ll make it.



