

On This Page
AutoTrader is one of the most visited automotive marketplaces in the world. It generates hundreds of millions of dollars in annual revenue. But it did not start as a tech giant. It started as a simple online car listing directory.
Today, you do not need a Silicon Valley engineering team or a multi-million dollar budget to replicate that model.
With WordPress and the right theme, you can launch a fully functional car listing marketplace in a single weekend. This guide shows you exactly how to build a website like AutoTrader with WordPress.
We’ll use the CLCar theme by RadiusTheme. It is a purpose-built WordPress theme designed for car dealerships, automotive classifieds, and multi-dealer marketplaces.
📊 Market Opportunity at a Glance:
The U.S. online automotive advertising market exceeds $1.5 billion annually. 68% of car buyers research online before any in-person visit. Local and niche car directory websites are capturing an increasing share of this traffic, especially with the rise of AI-powered local search.
What You Will Build
- A fully searchable car listing directory (like AutoTrader or Cars.com).
- Frontend car submission forms for dealers or private sellers.
- Location-based and category-based filtering.
- Monetization through paid listings, featured spots, and membership plans.
- A branded, SEO-optimized, mobile-responsive website — zero code required.
Why Your Domain Name Is Your First SEO Asset
Before you install WordPress, before you choose a theme, your domain name is already doing SEO and marketing work. Either for you or against you. For a car directory website, this single decision carries outsized importance.
Search engines use domain names as one of many topical relevance signals. A domain like UsedCarsDallas.com sends immediate signals to Google about what the site is, who it serves, and where it operates — before a single page of content is crawled.
Why CLCar Theme Is the Right Foundation
There are dozens of WordPress themes marketed as suitable for car websites. Most are glorified portfolio themes with a car icon slapped on the header.
CLCar by RadiusTheme is purpose-engineered for car listing directories, car rental websites and marketplaces. This theme is powered by the Classified Listing Pro plugin, which is included in the bundle.
CLCar vs. Generic WordPress Themes
| Feature | CLCar Theme | Generic Car Theme |
| Listing submission forms | Drag-and-drop builder, 20+ fields | Basic contact form only |
| Make/Model/Year filtering | Smart cascading dependency system | Manual tags only |
| Monetization | Paid listings, featured spots, memberships | None built-in |
| AI-powered features | Form generator, AI descriptions, image enhance | None |
| Multi-dealer support | Yes — unlimited dealers/agents | No |
| Demo import | One-click full demo | Varies — often manual |
| Mobile-responsive | Yes — fully responsive | Varies |
| SEO optimized structure | Schema markup, clean URLs, fast load | Varies |
Key CLCar Features That Drive SEO & Conversions
Smart Cascading Filters:
When a buyer selects a car, models update automatically. Select a model, years appear. This creates a seamless UX that keeps visitors on-page longer. This process indicates a direct positive SEO signal.
AI-Powered Listing Creation:
Auto-generate listing forms, write vehicle descriptions with AI, and enhance listing images. Compatible with ChatGPT, Gemini, and DeepSeek APIs.
Bulk Make/Model/Year Import:
Add hundreds of makes, models, and years in a single CSV upload. No need to create each entry individually by hand.
Monetization-Ready:
Charge for premium listings, featured placements, or monthly dealer memberships. WooCommerce integration is built-in.
Schema Markup & SEO Structure:
Clean semantic HTML, proper heading hierarchy, and structured data markup help search engines and AI crawlers understand your content correctly.
Step-by-Step Guide: Building Your Car Directory
Whether your goal is to build a local used-car marketplace, a niche sports car classifieds site, a dealership aggregator for a specific region, or a full multi-vendor platform with paid listings, this guide covers every step from domain strategy through to brand customization.
Follow these steps in order. By the end, you will have a fully functional, branded, SEO-optimized car listing website ready to accept submissions and generate revenue.
👉 Good Read: Car Listing Website Business Plan
⚙️ Prerequisites Before You StartYou need: (1) A domain name registered with any registrar. (2) A WordPress hosting account (recommended providers: SiteGround, Kinsta, or WP Engine). (3) WordPress installed on your hosting account. (4) A CLCar theme license from RadiusTheme.
Step 1: Choose the CLCar Theme
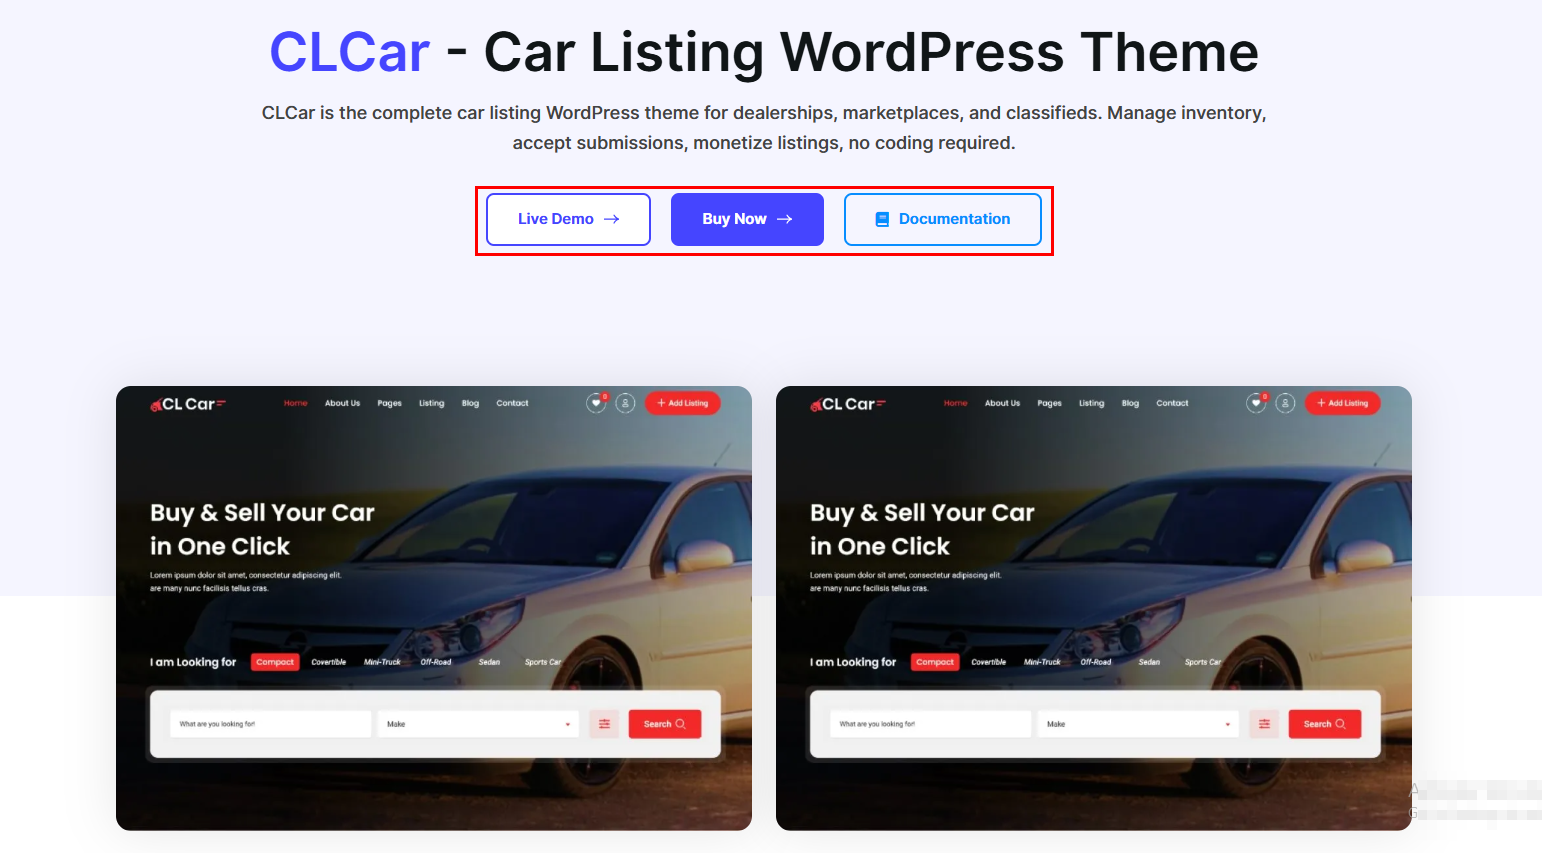
Visit the CLCar theme page at RadiusTheme: radiustheme.com/downloads/clcar-car-listing-wordpress-theme/
CLCar is a premium theme, which means it comes with the Classified Listing Pro plugin. This is the engine that powers all listing, search, and monetization functionality. You are effectively getting two premium products in one purchase.
What to Check Before Purchasing
- Review the live demo at the RadiusTheme demo site to confirm the design fits your vision.
- Check the pricing page for the correct license tier (single site vs. multi-site).
- Confirm the included plugin version.The Pro version includes monetization, AI features, and mobile apps.
- Review the changelog to ensure the theme is actively maintained.
- Read the documentation overview to understand setup requirements.
Step 2: Install the CLCar Theme
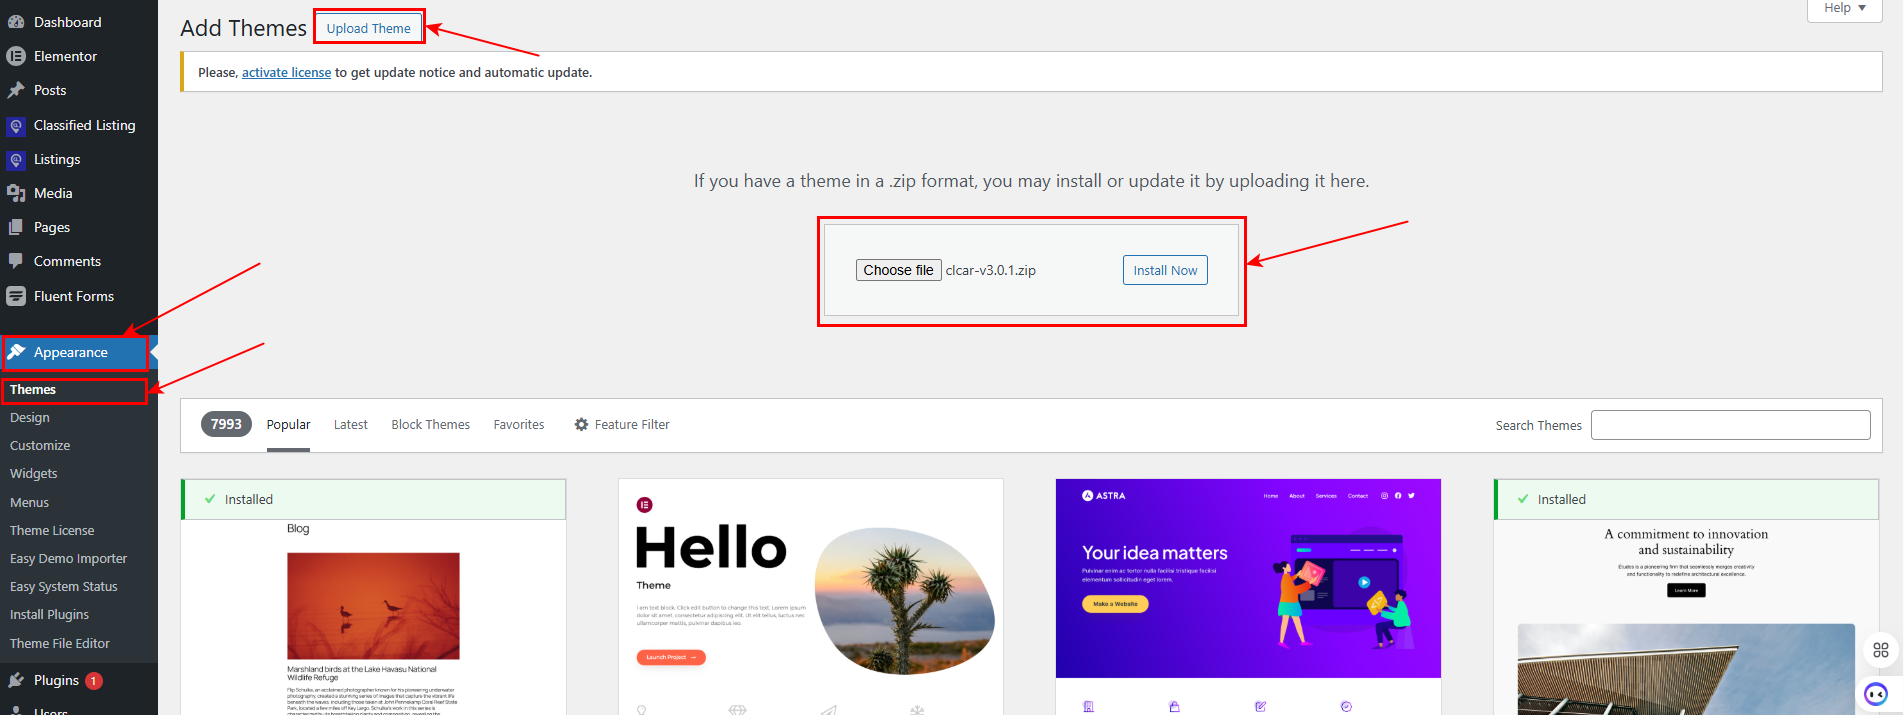
Once purchased, you will receive a download package from RadiusTheme containing the theme ZIP file and the Classified Listing Pro plugin ZIP file. Installation follows the standard WordPress theme installation process.
Install via WordPress Dashboard (Recommended)
- Log in to your WordPress admin dashboard at yoursite.com/wp-admin
- Navigate to Appearance > Themes > Add Theme > Upload Theme.
- Click Choose File, then select the clcar.zip file from your download
- Click Install Now and wait for the upload to complete.
- Click Activate once installation is complete.
Install the Required Plugins
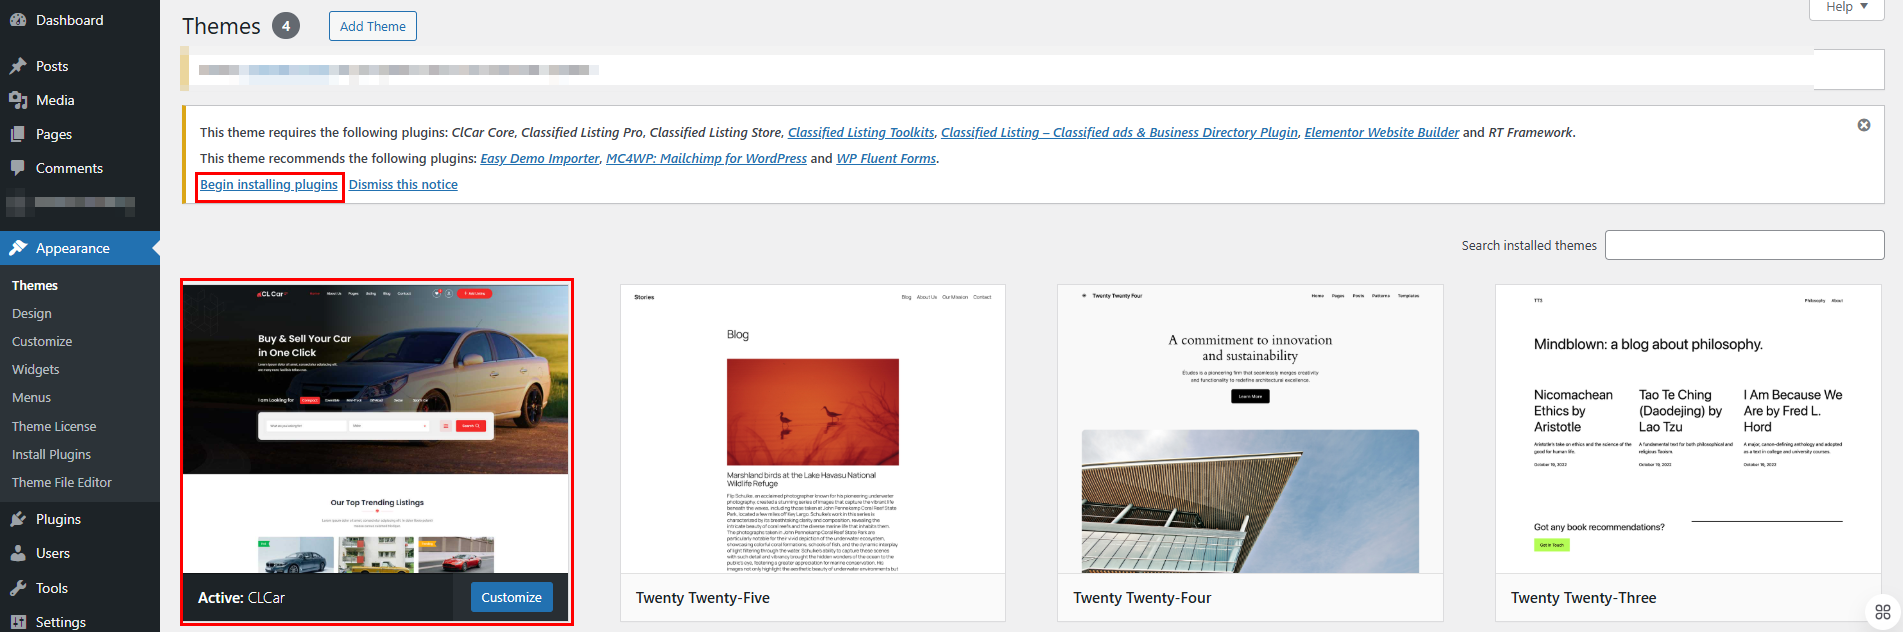
After activating the theme, WordPress will display a notice asking you to install the required plugins. This plugin is what powers the entire car listing functionality.
- Click Begin installing plugin (or navigate to Appearance > Install Plugins)
- Select Classified Listing Pro from the plugin list
- Click Install, then Activate
Step 3: Import Demo Content
One of CLCar’s biggest time-saving features is its one-click demo importer. Instead of building your site from a blank canvas, you import a fully populated demo with sample car listings, categories, pages, widgets, and settings. Then replace the demo content with your own.
How to Import the Demo
- In your WordPress dashboard, navigate to Appearance > Easy Demo Import.
- You will see several demo options. Choose the one that matches your intended site layout (full car marketplace, dealer directory, etc.)
- Click Import and confirm the action
- Wait for the import to complete. This typically takes 2-5 minutes depending on your server speed.
- Once complete, visit the front end of your site. You should see a fully styled car listing website with sample listings.
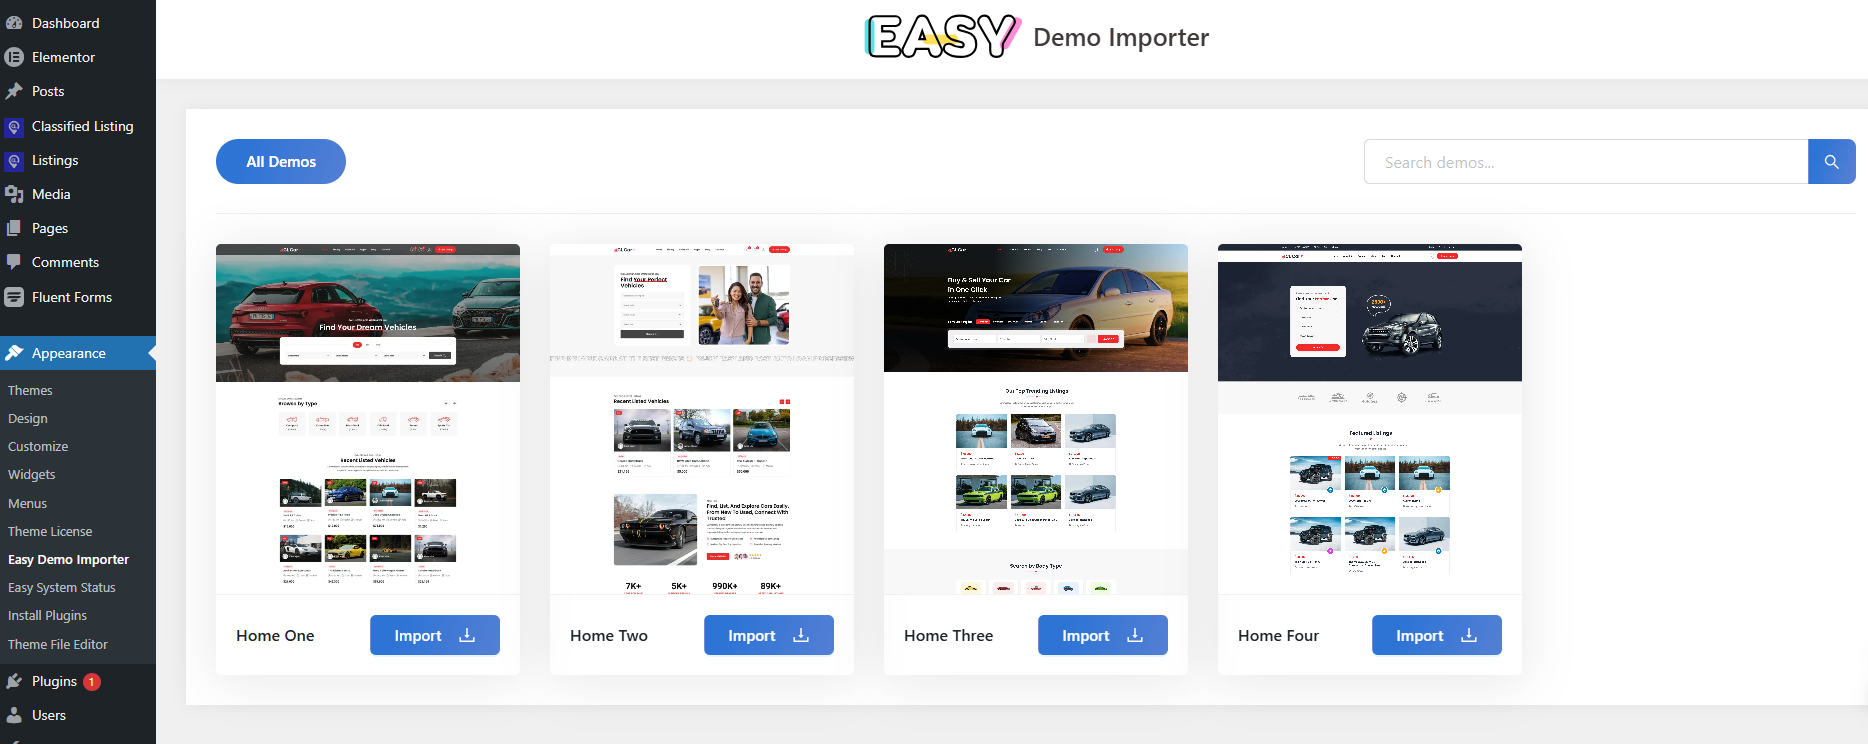
For clear understanding, you can watch this CLCar demo data import video.
Step 4: Add Locations & Categories
Locations and categories are the structural backbone of your car directory. They determine how buyers filter and find listings, how your URLs are structured, and how search engines understand your site’s topical hierarchy. Getting this right from the start is critical for both UX and SEO.
Setting Up Car Categories
Car categories organize listings by vehicle type. Well-structured categories create clean SEO-friendly URL patterns and improve internal site navigation.
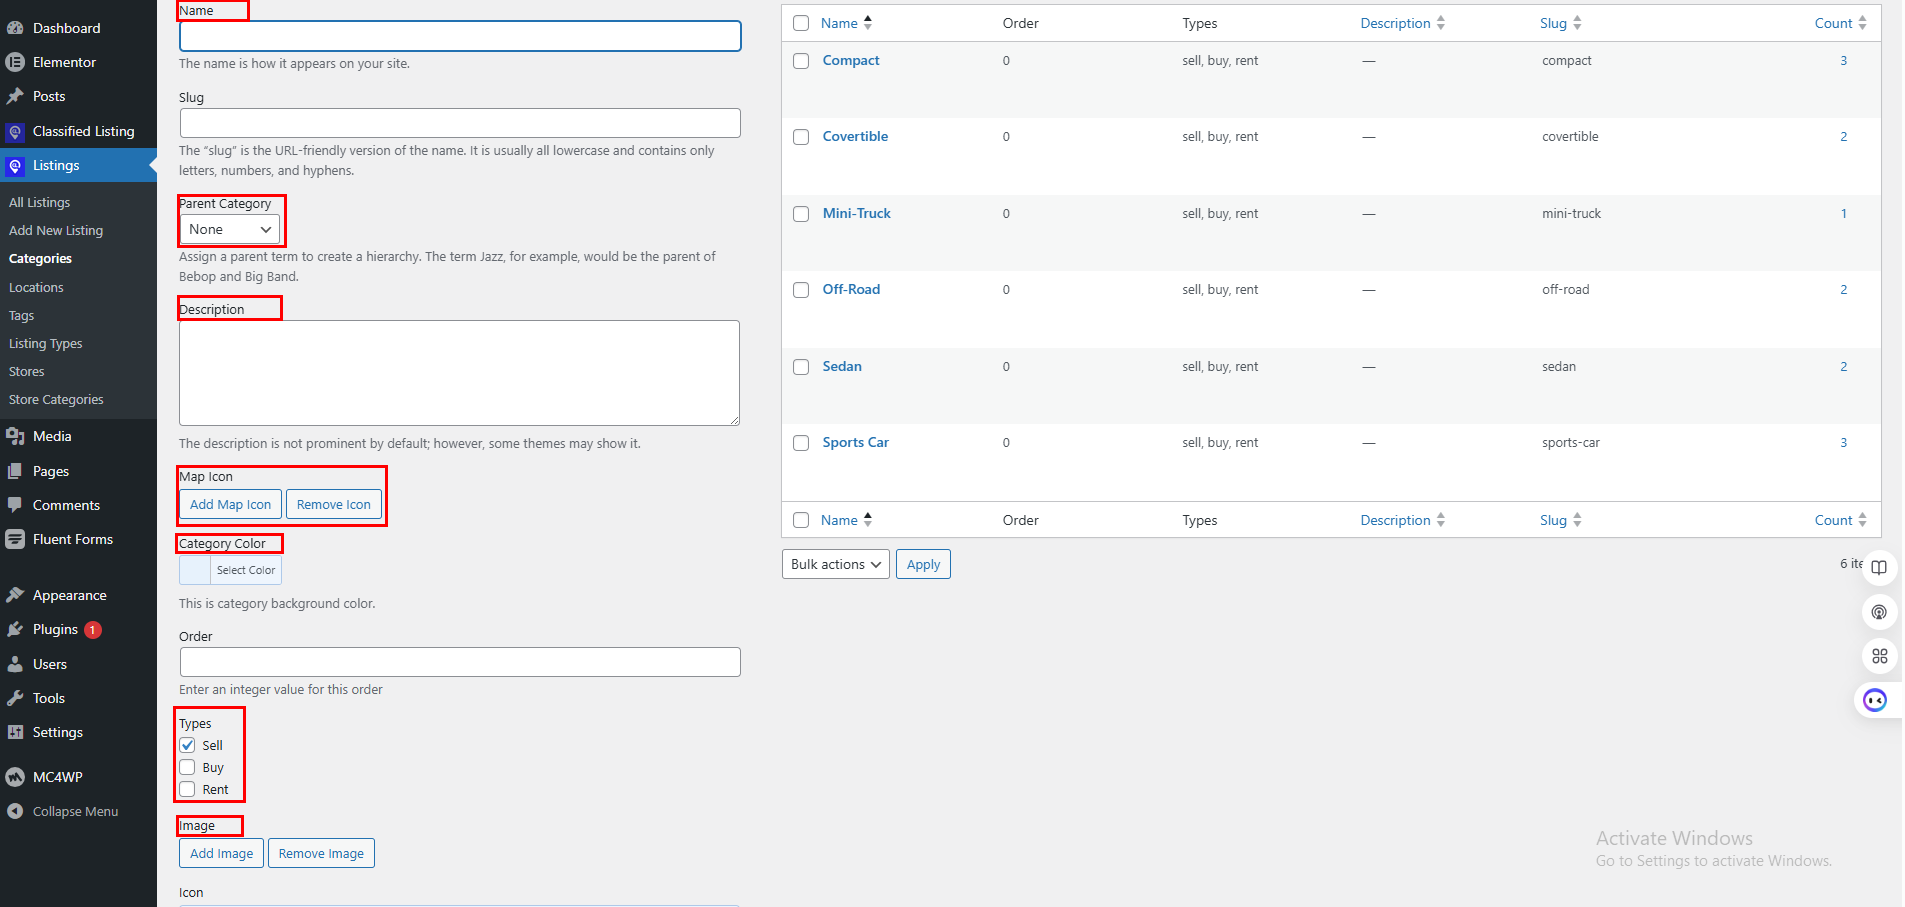
- Navigate to Listing > Categories in your WordPress dashboard.
- The demo import has pre-populated categories, review and edit them to match your market.
- To add a new category, enter the category name (e.g., ‘Electric Vehicles’), slug (e.g., ‘electric-vehicles’), and optionally assign a parent category.
- Input short description, map icon, category color, types, and category icon or image for visual navigation on the frontend.
- Click Add New Category to save.
Recommended Category Structure
| Parent Category | Suggested Sub-categories |
| Cars | Sedans, Coupes, Convertibles, Hatchbacks, Wagons |
| SUVs & Trucks | Compact SUV, Midsize SUV, Full-Size SUV, Pickup Trucks |
| Electric & Hybrid | Full Electric (BEV), Plug-in Hybrid (PHEV), Mild Hybrid |
| Luxury & Sports | Luxury Sedans, Sports Cars, Supercars, Luxury SUVs |
| Commercial | Vans, Minivans, Box Trucks, Heavy Duty |
| Classics | Pre-1980, 1980s-1990s, Muscle Cars, Vintage |
Setting Up Locations
Location taxonomy is essential for local SEO. Each location creates a unique, indexable page (e.g., yoursite.com/location/dallas/) that can rank for local car search queries.
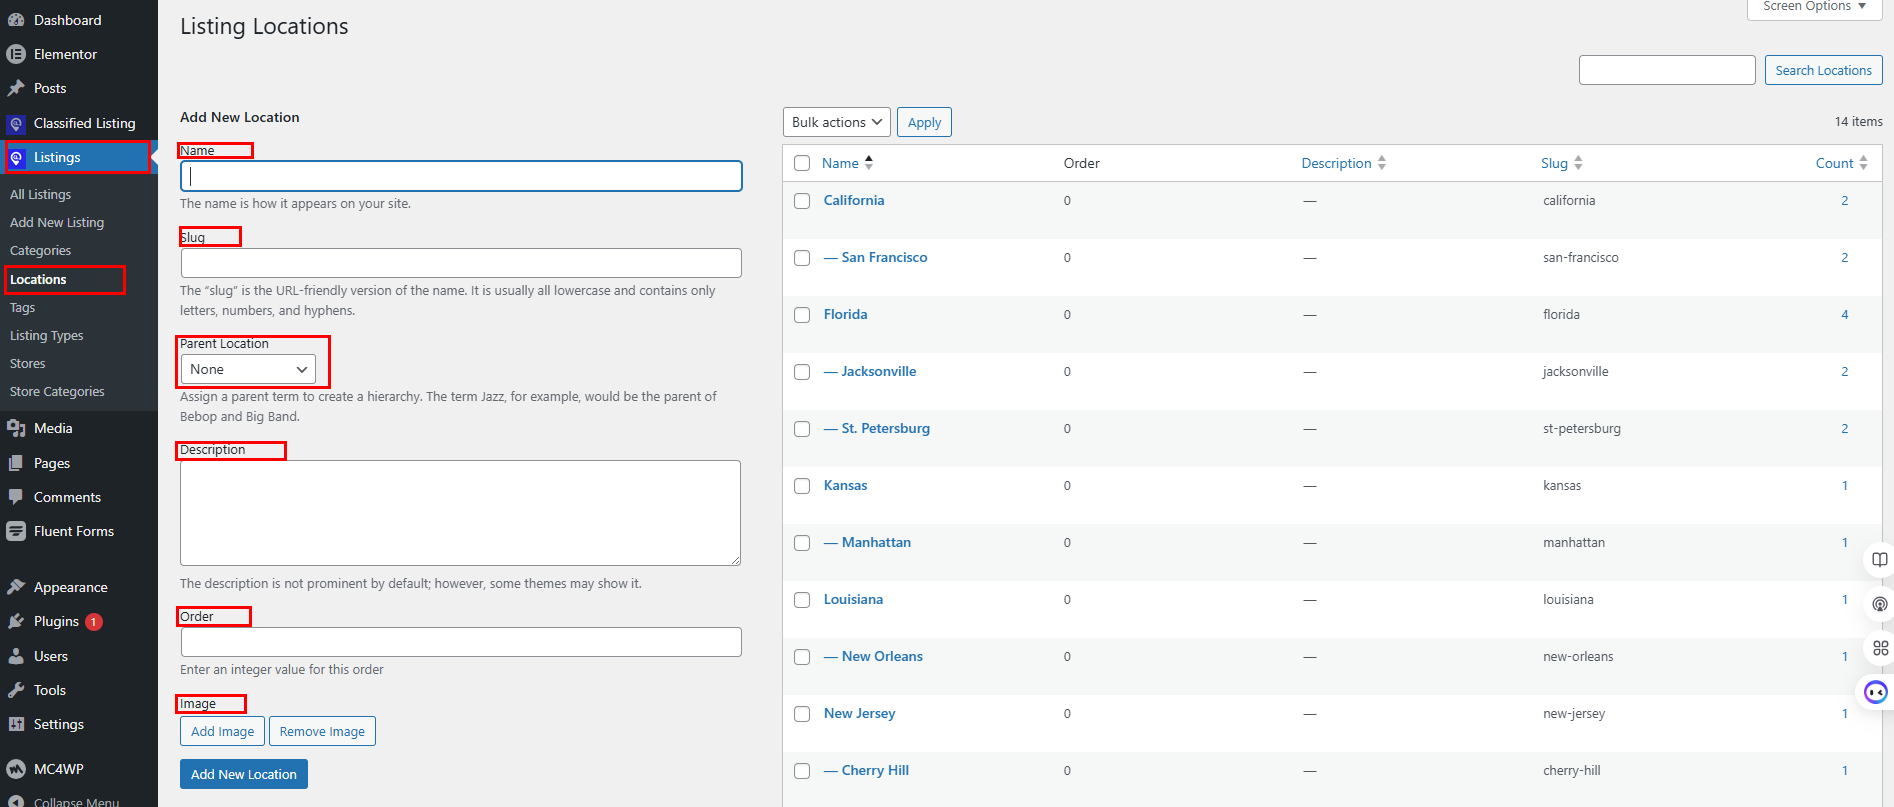
- Navigate to Listing > Locations.
- Add your country level first (e.g., New York)
- Under the location you can add the parent location.
- This hierarchical structure enables geo-filtered search and creates valuable location landing pages
Step 5: Create a Car Submission Form
The car submission form is how dealers and private sellers add their listings to your directory. CLCar’s drag-and-drop form builder lets you create a professional, fully custom submission form without writing a single line of code.
Accessing the Form Builder
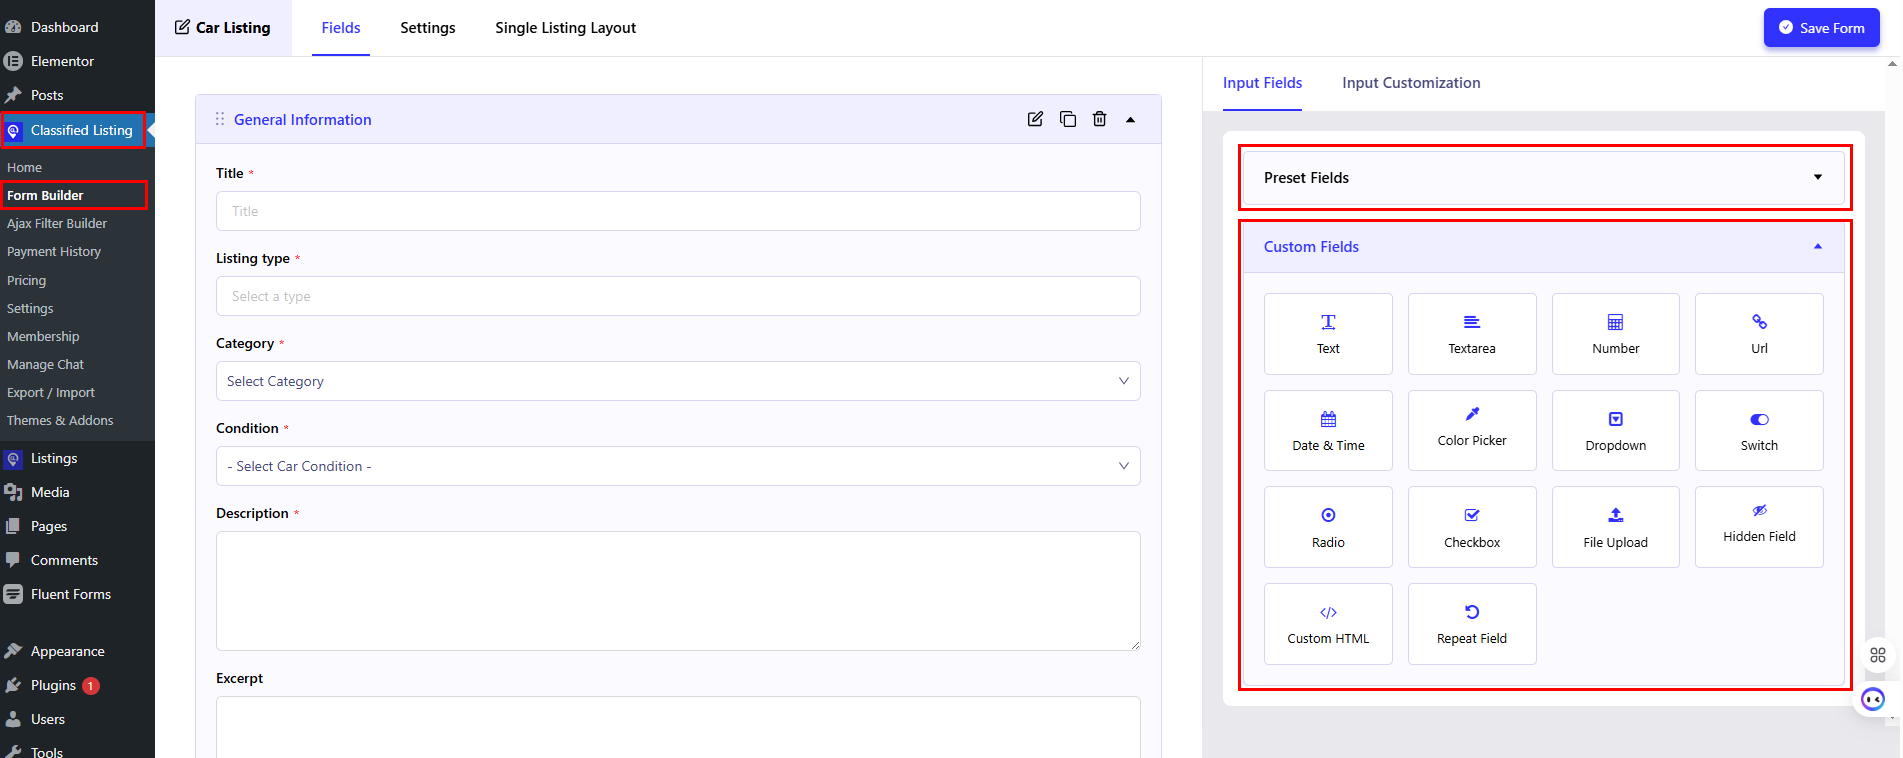
- Navigate to Classified Listing > Listing Form in your WordPress dashboard
- The demo import will have pre-created a default car submission form. You can edit this or create a new one.
- Click Edit on the existing form or click Add New to start fresh.
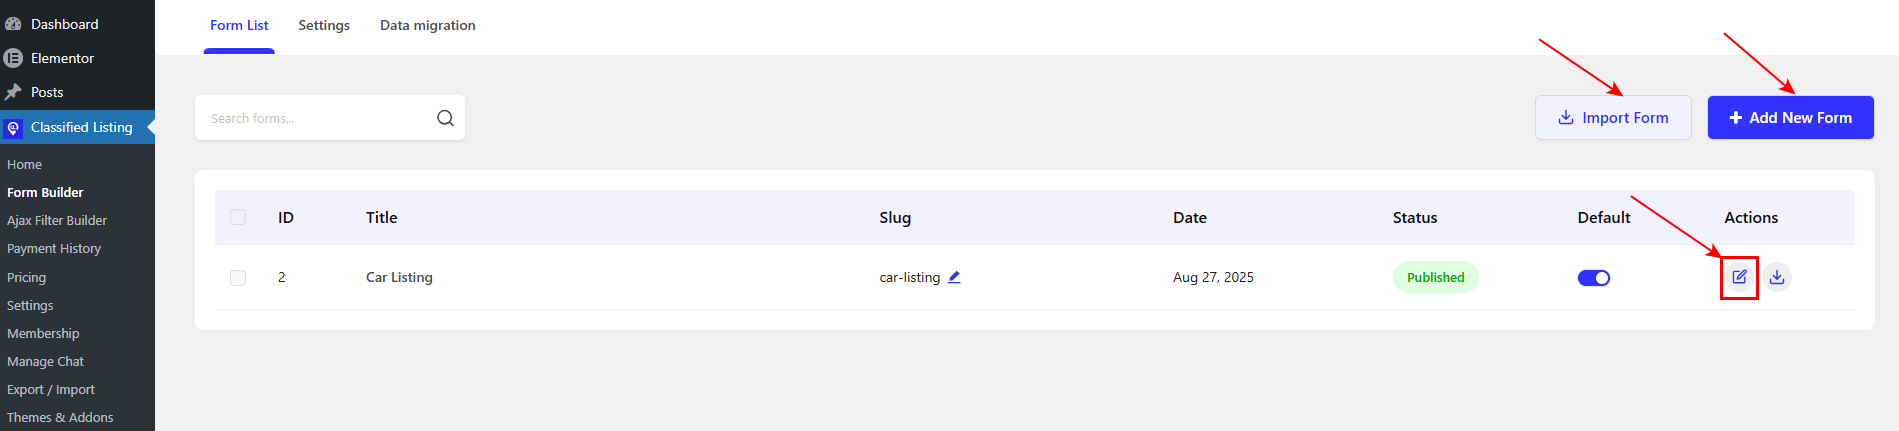
- You will see the drag-and-drop form builder interface with a field library on the right.
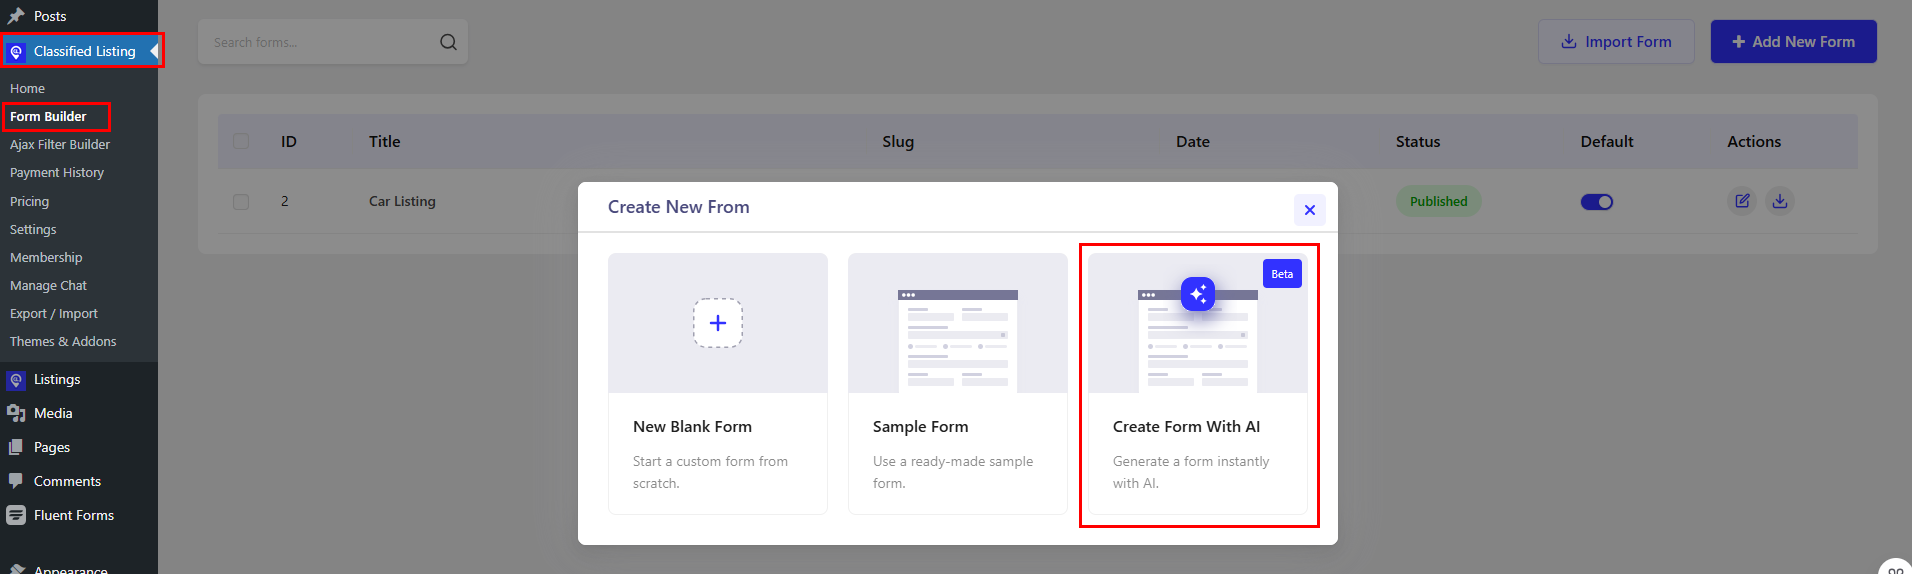
Create Form With AI
You can create a fully functional submission form with the help of AI.
When you click the ‘Add New Form’ button, a pop-up will appear. From the pop-up click on ‘Create Form With AI’ option.
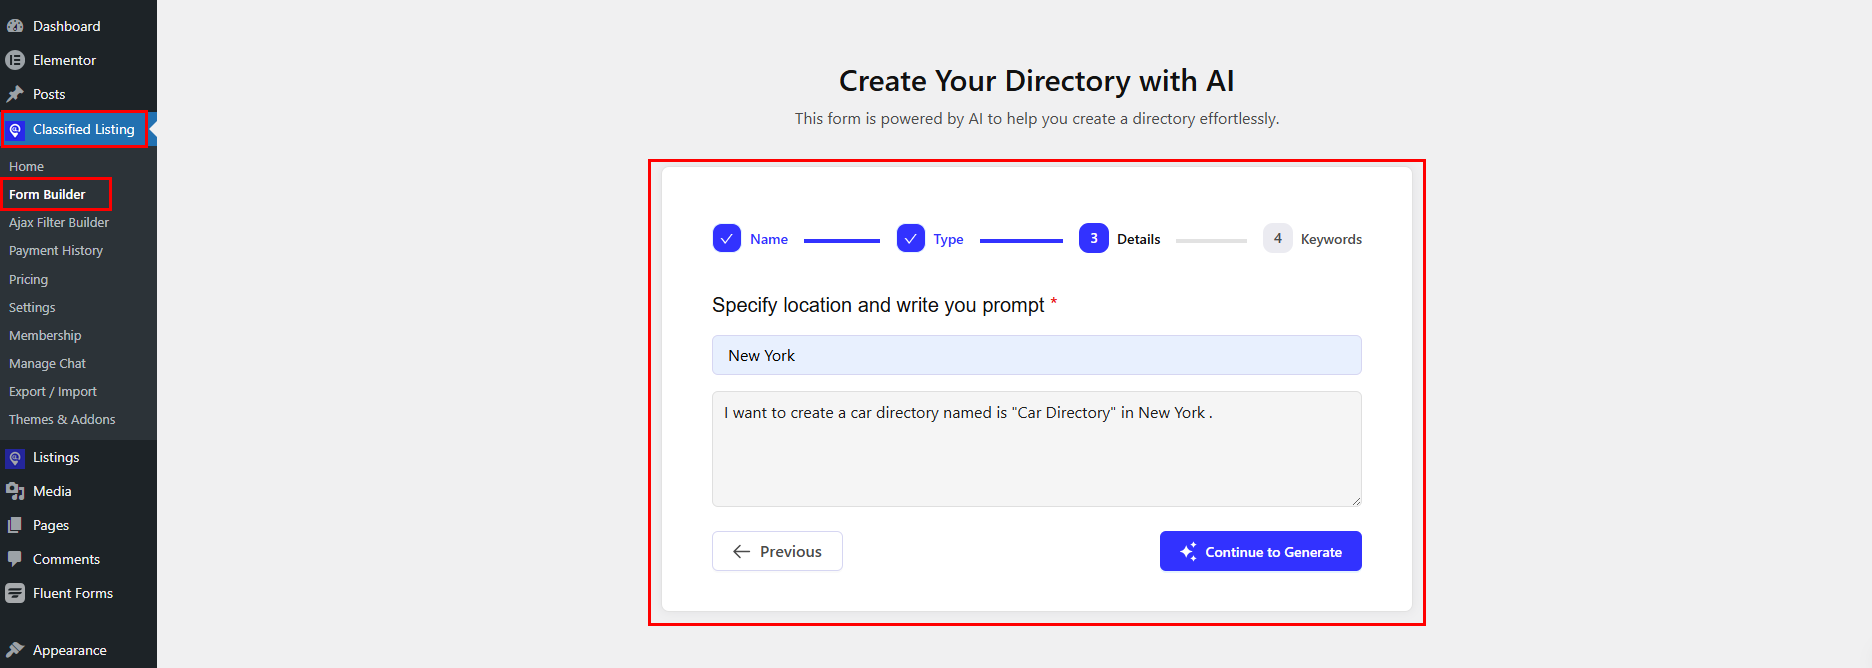
After that you need to input the form name, type, details, and keywords accordingly. When you give a successful command, AI will generate the fields and form accurately.
Lastly, you’ll get a fully functional AI-built car listing submission form generated within seconds. You can further personalize the form set-up according to your choice.
Essential Fields for a Car Listing Form
| Field | Field Type | Required? |
| Listing Title (Year Make Model) | Text | Yes |
| Vehicle Make | Dependency Select | Yes |
| Vehicle Model | Dependency Select (child) | Yes |
| Year | Dependency Select (child) | Yes |
| Price | Number / Price Range | Yes |
| Mileage | Number | Yes |
| Condition | Select (New/Used/Certified) | Yes |
| Description | Textarea / Rich Text | Yes |
| Photos | Image Upload (multiple) | Yes |
| Location | Location Picker | Yes |
| VIN Number | Text | Optional |
| Exterior Color | Color Picker / Select | Optional |
| Fuel Type | Select | Optional |
| Transmission | Select (Auto/Manual) | Optional |
| Contact Phone | Phone | Yes |
| Contact Email | Yes |
Configuring the Make/Model/Year Dependency System
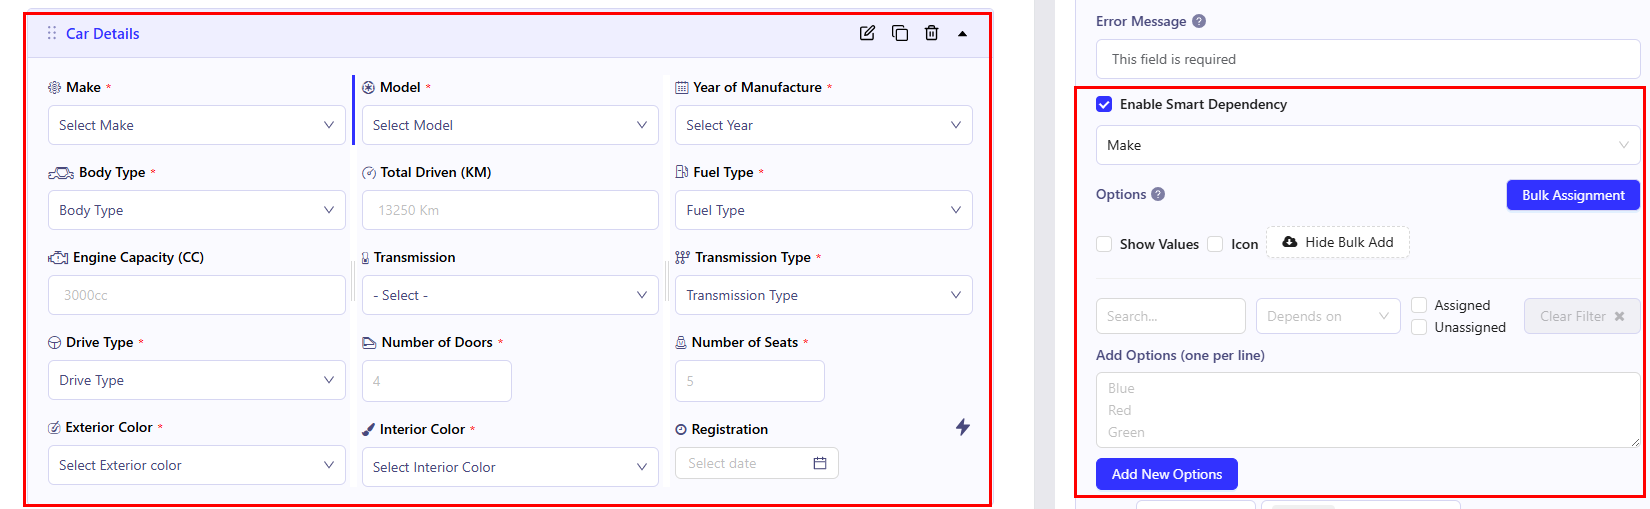
This is CLCar’s most powerful UX feature. The cascading dependency system ensures that when a seller selects ‘Toyota‘, only Toyota models appear in the next field, and when they select ‘Camry‘, only Camry model years appear. This eliminates data entry errors and standardizes your listing data.
In the form builder, add a ‘Select’ field and label it ‘Make’
- Enable the ‘Smart Dependency‘ option for this field
- Add a second ‘Select’ field labeled ‘Model’ and set its parent dependency to ‘Make’
- Add a third ‘Select’ field labeled ‘Year’ and set its parent dependency to ‘Model’
- Populate the Make field values via the bulk importer.
⚡ Use the Bulk Make/Model Importer:
Do not manually add makes and models one by one. CLCar includes a bulk import feature that lets you upload a CSV with hundreds of makes, models, and years simultaneously.
Step 6: Configure Settings
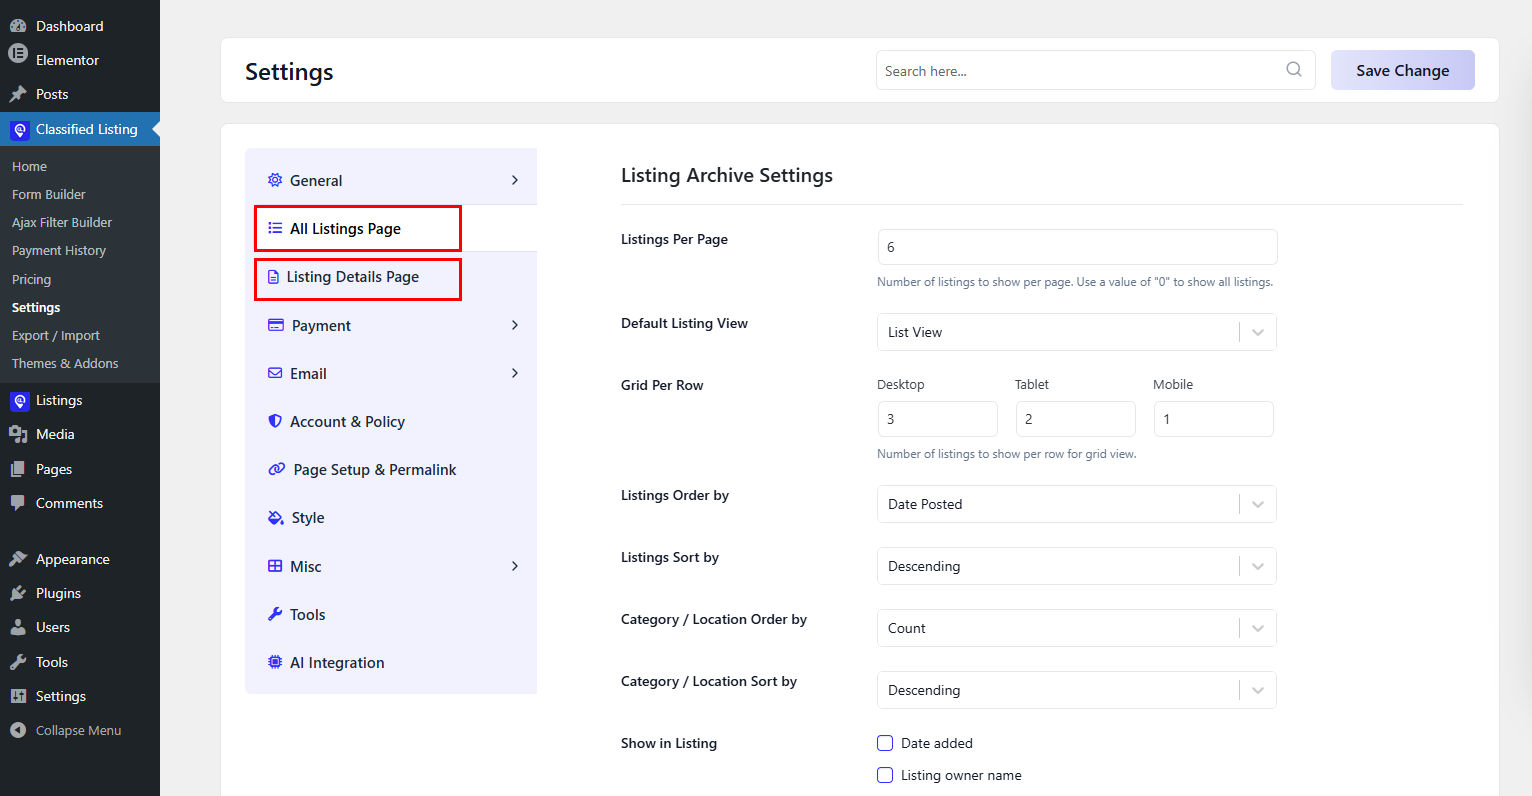
The Classified Listing Pro plugin provides a comprehensive settings panel that controls every aspect of your directory’s behaviour. From listing moderation and user roles, to payment gateways and email notifications. This section covers the most important configurations for launch.
General Settings: Configure your site’s currency, date format, and default country. These appear across the entire site wherever prices and dates are displayed.
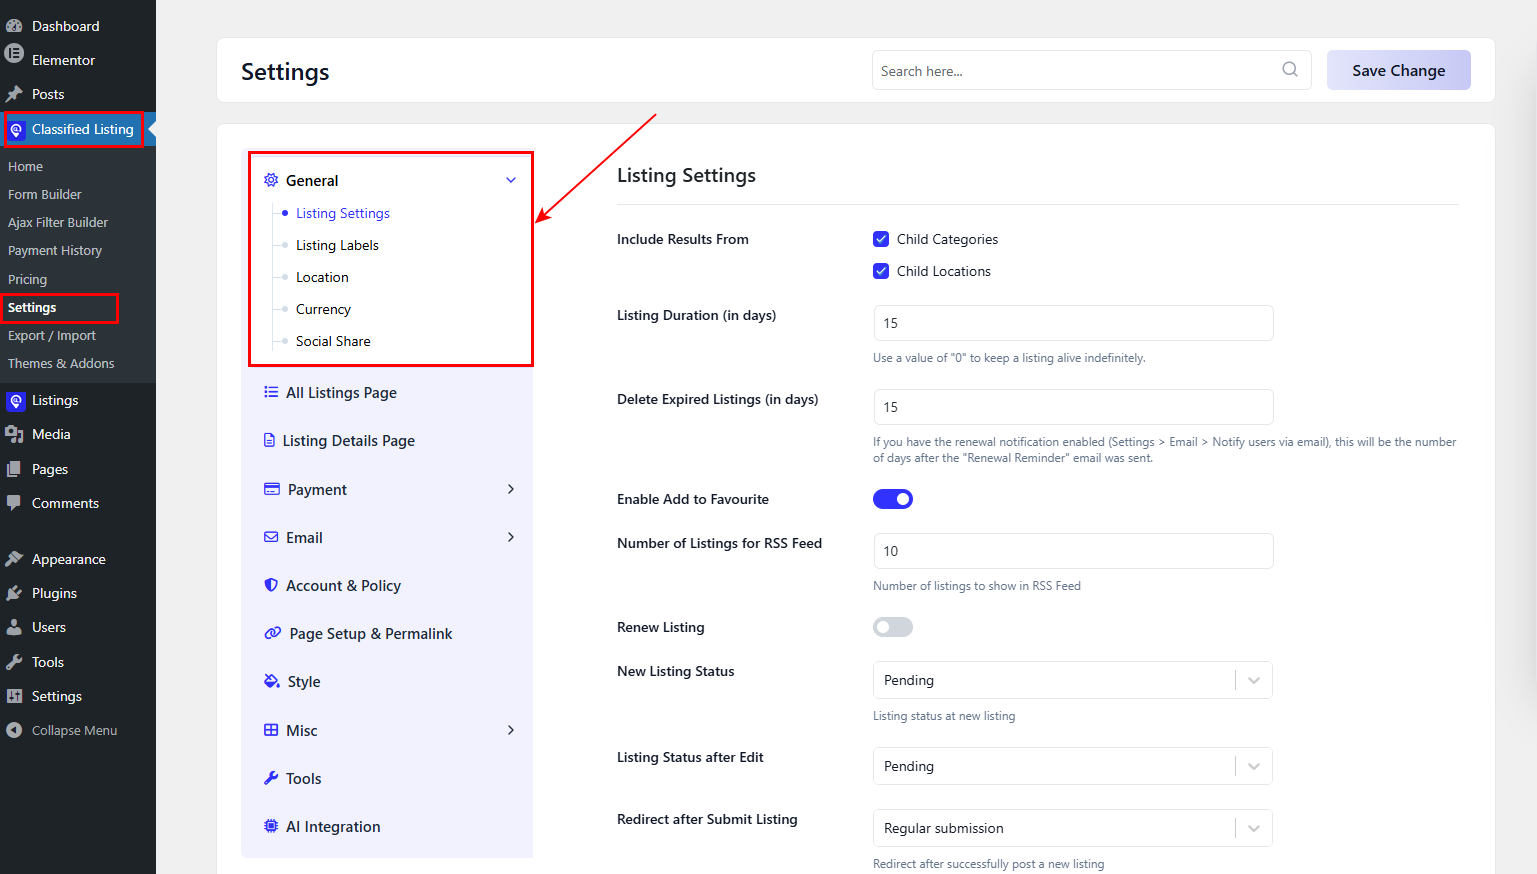
Listing Settings: Set whether listings require admin approval before going live, how many car photos users can upload, listing expiry period, and whether guests (non-registered users) can post ads.
Also control the listing pages visibility to the users.
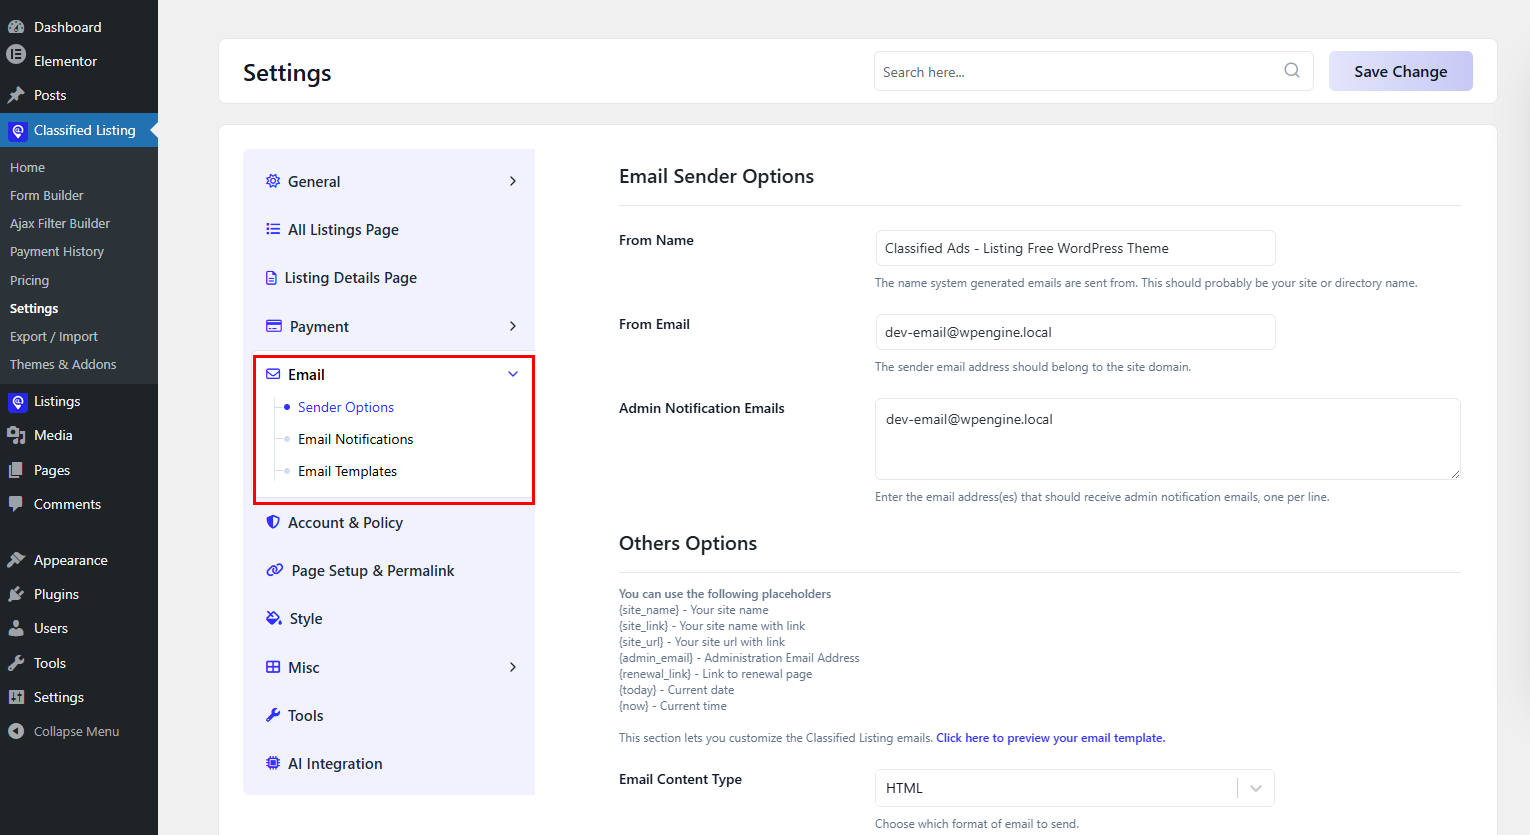
Email Settings: Setup automated emails delivered to users.These include ad posted confirmation, approval notification, expiry reminders, and contact messages. You can also personalize the email templates here.
Step 7:Payment & Monetization Settings
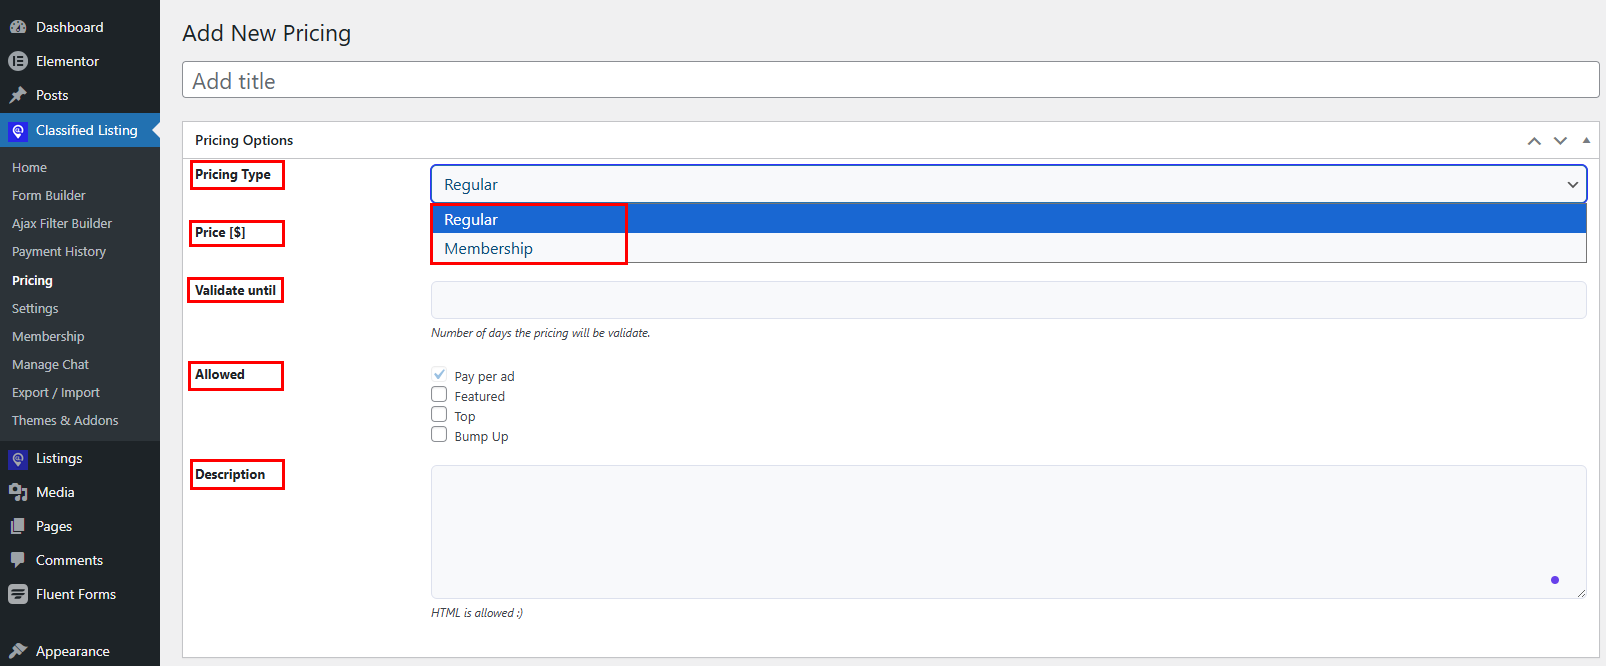
- Go to Classified Listing → Pricing.
- Click “Add New Pricing”.
- Set the pricing name (e.g., “Basic Free”, “Pro — $9/month”, “Business — $29/month”).
- Select price type, regular or membership.
- Set the price and validate date.
- Select package type Pay Per Ad or Featured.
- You can add a short description of the pricing. HTML is allowed.
| 👉 Good Read: Monetize Your Directory Website |
Step 8:Customize Your Website with Brand Colors
Your brand identity, colors, typography, logo, and tone differentiates your car directory from every other site using the same theme.
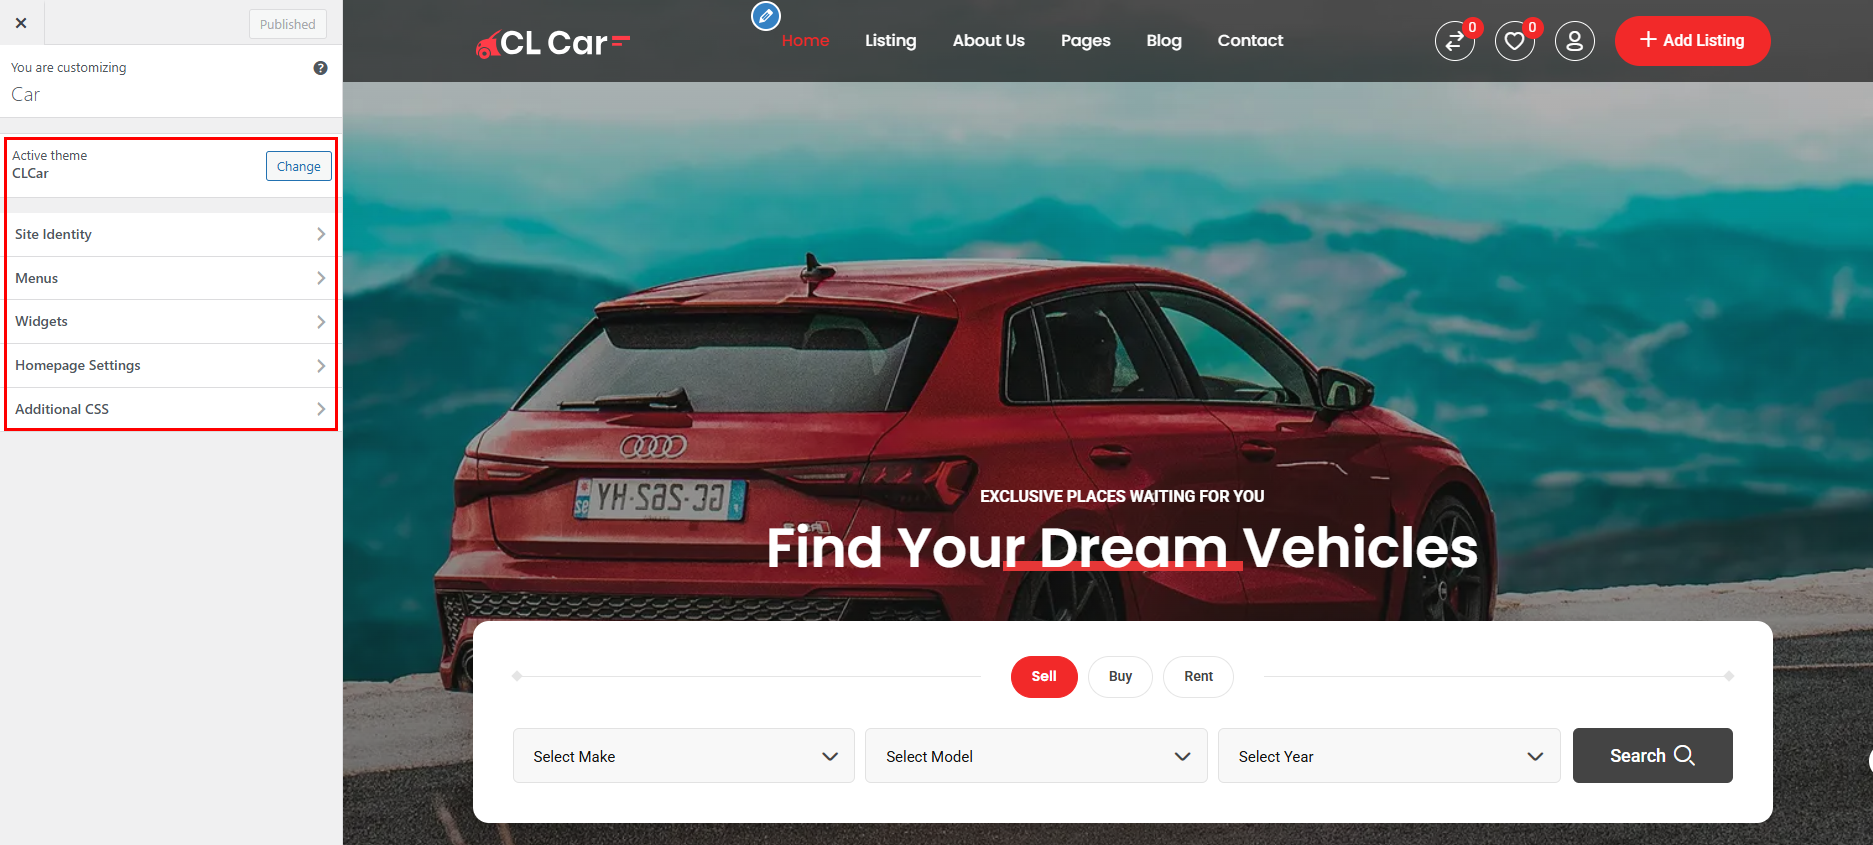
CLCar provides extensive customization through the WordPress Customizer and its own theme options panel, all without touching code.
- Navigate to Appearance > Customize in your WordPress dashboard.
- The WordPress Customizer will open with a live preview of your site on the left.
🎨 Brand Consistency Tip:
Apply your brand colors consistently across ALL touchpoints: your logo, email templates (in Classified Listing email settings), pricing plan pages, and any social media assets. Consistent visual identity builds trust and improves conversion rates by 23% according to industry benchmarks.
Frequently Asked Questions (FAQs)
No. CLCar is designed for non-technical users. All core functionality — listing forms, search filters, monetization, and customization — is managed through WordPress admin interfaces and the drag-and-drop form builder.
A custom-built car marketplace like AutoTrader would cost $50,000 to $500,000+ to develop from scratch. CLCar delivers 85% of that functionality at a fraction of the cost, typically within a few hundred dollars for the theme license plus standard hosting costs.
The fastest path to revenue is offering a free tier with limited listings (e.g., 2 free listings per month) and paid plans for dealers who need to post more.
CLCar’s clean semantic HTML, schema markup support, and structured content hierarchy create a strong foundation for AI indexing. Add JSON-LD structured data via your SEO plugin, maintain consistent NAP across the web
Your Car Directory Starts Today
Building a website like AutoTrader once required a large engineering team and years of development.
Today, WordPress + CLCar compresses that timeline to a weekend project — and gives you a platform that is genuinely competitive for local and niche car markets.
We hope you gained enough knowledge on how to build a website like AutoTrader with WordPress.



