

On This Page
How would you launch a car rental business? You’ll need a website. However, creating such a website is a complex job. One should learn about the complex architecture and other relevant technological challenges involved in making this type of website.
So does that mean there’s no simple way to build a car rental marketplace? Of course, there is WordPress. You can easily create any type of website using this CMS. But do you know how to make car rental website in WordPress?
If you don’t, keep reading this helpful article, which features detailed and easy steps to help you accomplish your goal.
How To Make Car Rental Website in WordPress
We’ll now describe how to make a car rental marketplace on WordPress. Ensure you complete this tutorial to the end.
Step 1: Pick a Domain Name for Your Car Rental Site
A domain name is essential for everyone to find and access your online marketplace. Therefore, your first task is to select a domain name for your car rental website. When selecting, keep the following criteria in mind.
- Select a short, easy-to-write, spell, pronounce, and remember domain
- Utilize various domain name generators to brainstorm ideas
- Include keywords related to your car rental business in the domain
- Make sure it’s available for registration and has no spam score
- Check the domain’s previous registration history
- Avoid using names with hyphens, numbers, or other special characters
- Inspect trademark issues before registering your domain
- Pick a popular domain name extension, such as ‘.com’
Once you choose a domain and register it using your preferred domain registrar (e.g., Namecheap), you need to connect that domain to a host.
Step 2: Set Up Your Site Hosting
Now, integrate your domain name with a host so that you can store necessary files (car photos, listing descriptions, etc.) on the web and allow visitors to access them. Therefore, select a hosting provider to host your website.
You can select any of the popular hosting providers. However, consider the criteria below to choose the best host for your car rental marketplace.
- First, determine the type of hosting you need, such as shared, WordPress, cloud, or VPS
- Check if the host ensures a high uptime, excellent bandwidth and storage
- Inspect if it provides regular and automatic backups, as well as security features such as SSL certificates and DDoS protection
- Check whether the host promotes easy migration
- Your chosen hosting provider must offer an easy and intuitive control panel
- Compare pricing with others
- Check customer reviews and the support system
Step 3: Install WordPress
At this stage, you’ll install the popular CMS, WordPress. You need to install it on your cPanel. There you’ll see the Softaculous application. Simply click the application, and you’ll notice the WordPress software.
Click on it and follow the on-screen instructions to install WordPress. If you need guidance, you can also contact the support channel of your chosen hosting provider.
Step 4 – Install a WordPress Car Theme
Once you install WordPress, you’ll visit your WordPress admin dashboard. You can explore the WordPress environment and watch some tutorials to get yourself familiarised with WordPress in case you are a novice.
Then, search for a WordPress car theme for your rental marketplace on the WordPress theme directory. We understand that finding a suitable theme can be challenging, as it’s often unclear where to start and what to look for when selecting one.
Therefore, we recommend you read this content on the best free WordPress directory themes. You can select any theme we listed in this content to start building your car rental website.
However, for demonstration purposes, we’ll use the “Radius Directory” free theme. We encourage you to watch this video tutorial to learn how to install this theme and supplementary plugins to build your car rental website.
Step 5: Customize Your Car Rental Site
Okay, you’ve installed WordPress, your preferred theme, and other necessary plugins. Now, you need to edit the website to give it a professional appearance. But what to edit is the ultimate question.
You can begin by changing the logo. Then, you can change the typography, color palette, edit the navigation menu, redesign a particular section of a webpage or rework the entire page. In essence, you have customization freedom, and you can do virtually all the tasks related to customization you can imagine.
Since the themes we recommended support Elementor page builder, you can build and redesign any webpage as you wish if you are familiar with this page builder.
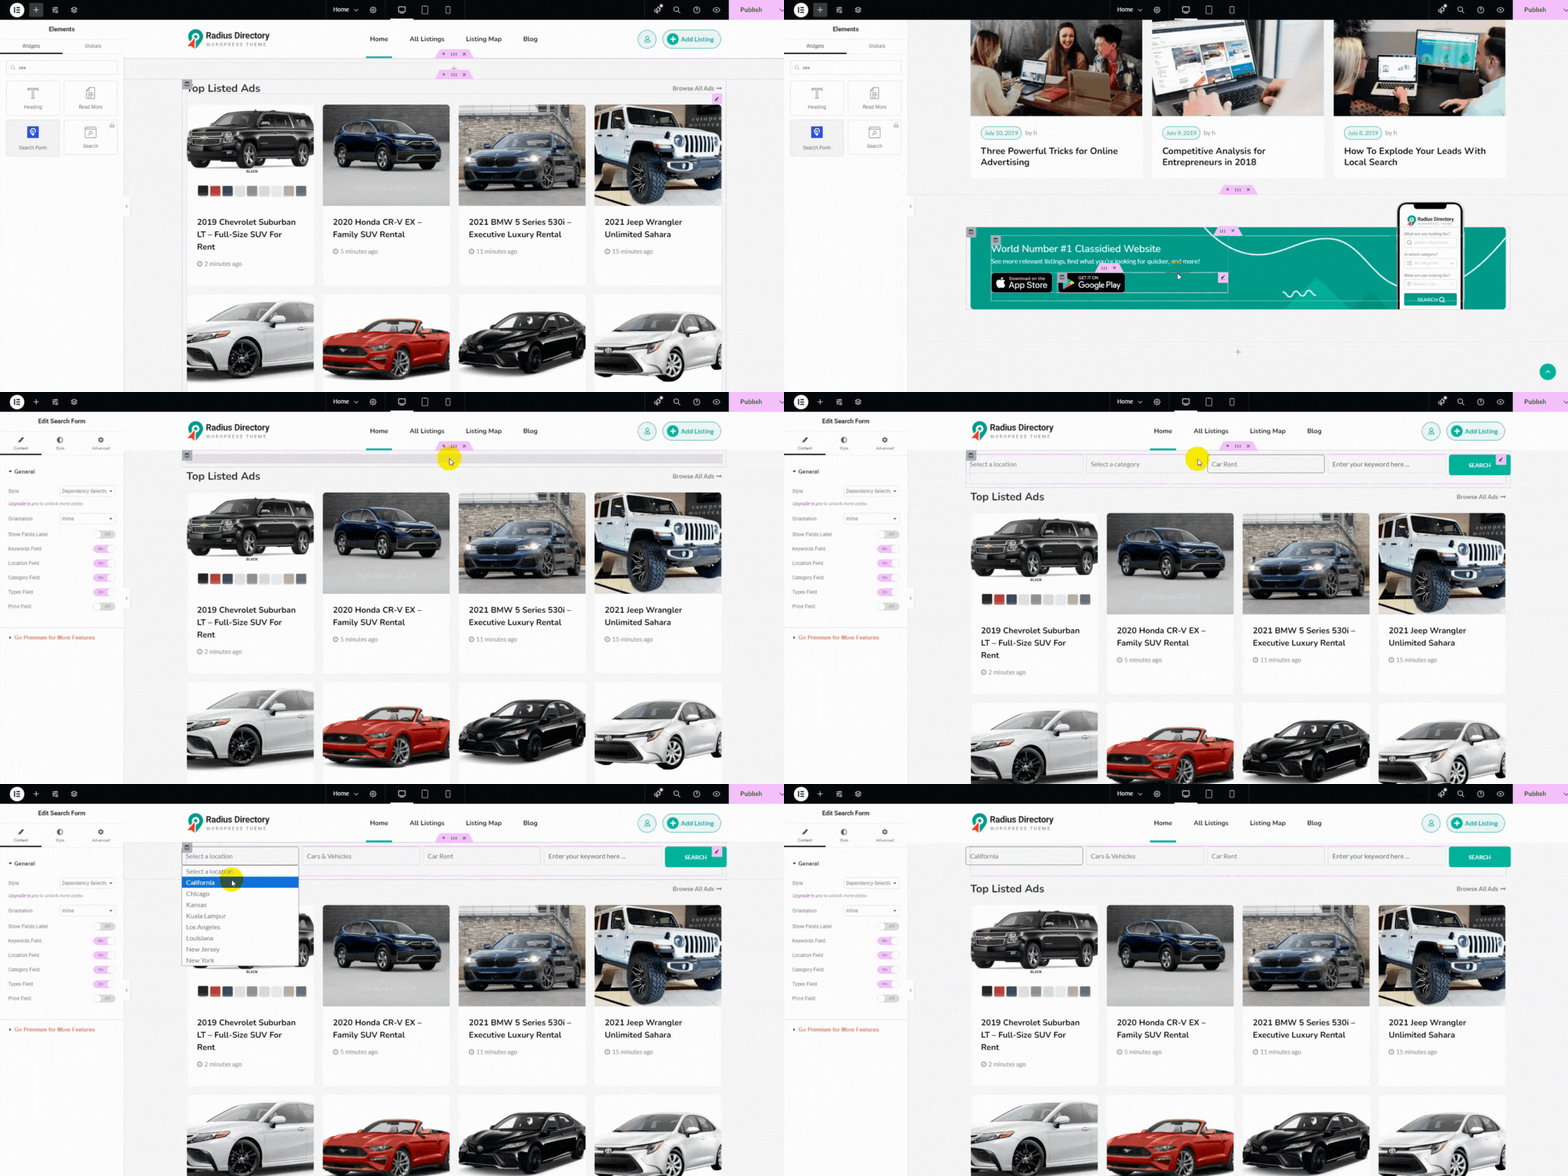
To keep this article compact, we avoid demonstrating basic tasks, such as how to open a web page with the theme customizer or Elementor. Instead, we’ll show you some basic page customization, such as removing or adding a section to a webpage, in the animation below.
Step 6: Create Necessary and Additional Web Pages
Once you’ve edited the homepage, you should build some necessary pages required for a car rental website. Here are the web pages you should create on your car rental marketplace.
Privacy Policy: This is an essential page to create if you collect customer information. You must clarify how you collect and use customer data on the Privacy Policy page. Also, you must inform visitors with cookie consent banners if your car rental marketplace uses cookies.
Terms and Conditions: Create a Terms and Conditions page describing the rules for using your services, including booking policies, cancellation criteria, and payment terms.
Rental Agreement: Showcase your rental contract terms to visitors by creating a Rental Agreement page. You should include insurance requirements, damage policies, mileage limits, and other relevant details on this webpage.
Blog: This is an optional page where you can create and publish blog posts related to your car rental business regularly. Doing so will help you reach a broad audience, increase organic visitors, and convert them into paying customers at no cost.
After building these pages, you can move on to creating listing categories and locations for your car rental website.
Step 6: Build Listing Categories and Locations
Creating a listing category and location is an easy task. Just follow the steps below.
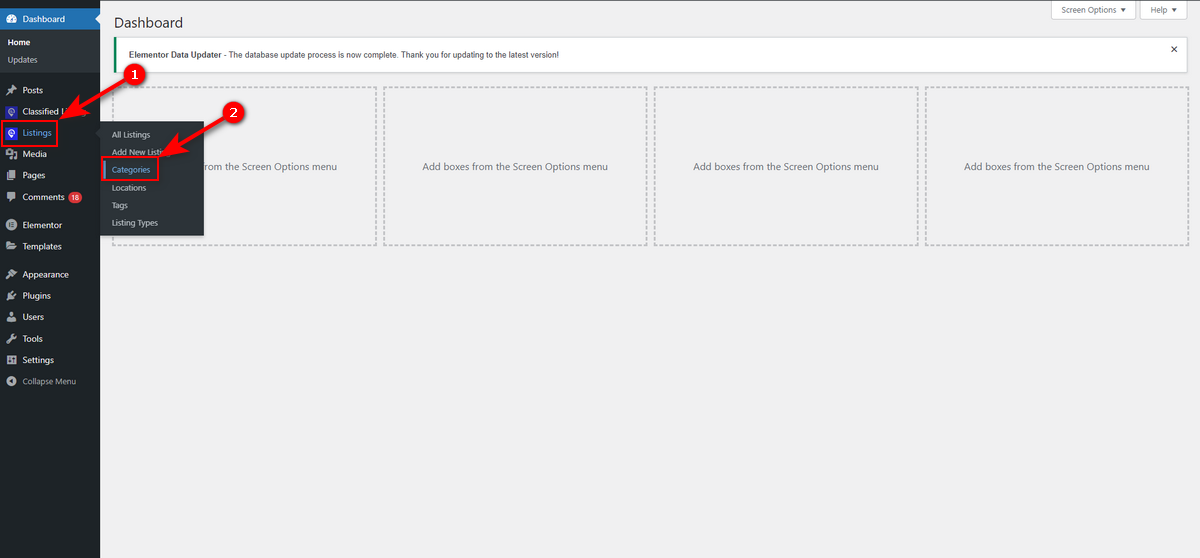
- Head to your WordPress Admin Panel. Then, move to Listings > Categories.
Now, type a category name, preferably Car, a relevant slug, a description, and hit “Add New Category” button.
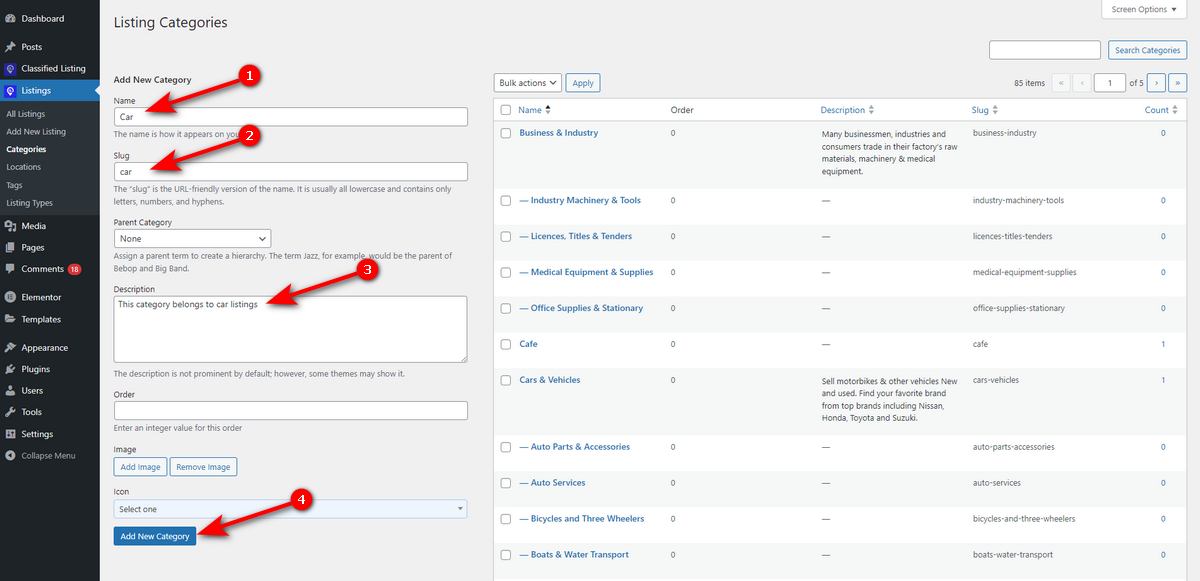
That’s it! Follow these steps to create as many categories as needed on your car rental marketplace.
Now, let’s build a listing location. Again, navigate to your WordPress Admin Panel > Listings > Locations. Here, you’ll notice the same window you saw while creating a listing category.
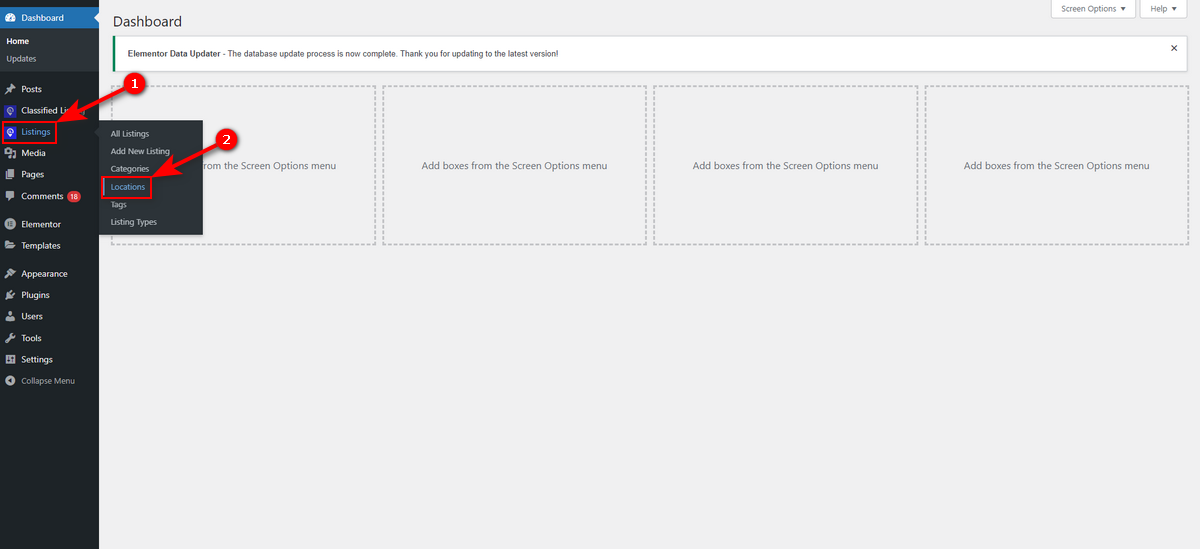
Thus, fill in all the necessary fields with the required information, such as location name, slug, and description, and then click the “Add New Location” button.
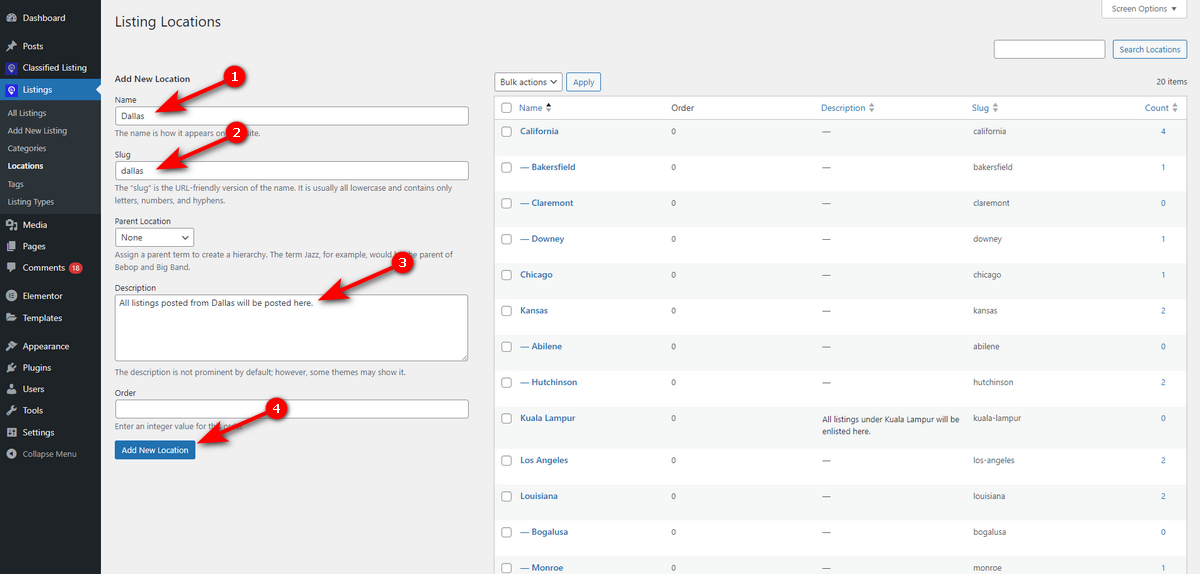
Now, follow these steps every time you want to add a listing location.
Step 7: Create a Car Rent Listing Type
Next, we’ll create a car listing type to help users select “Car Rent” as their listing type while submitting an ad on your WordPress site.
Hence, move to WordPress Admin Panel. Then, navigate to Listings > Listing Types.
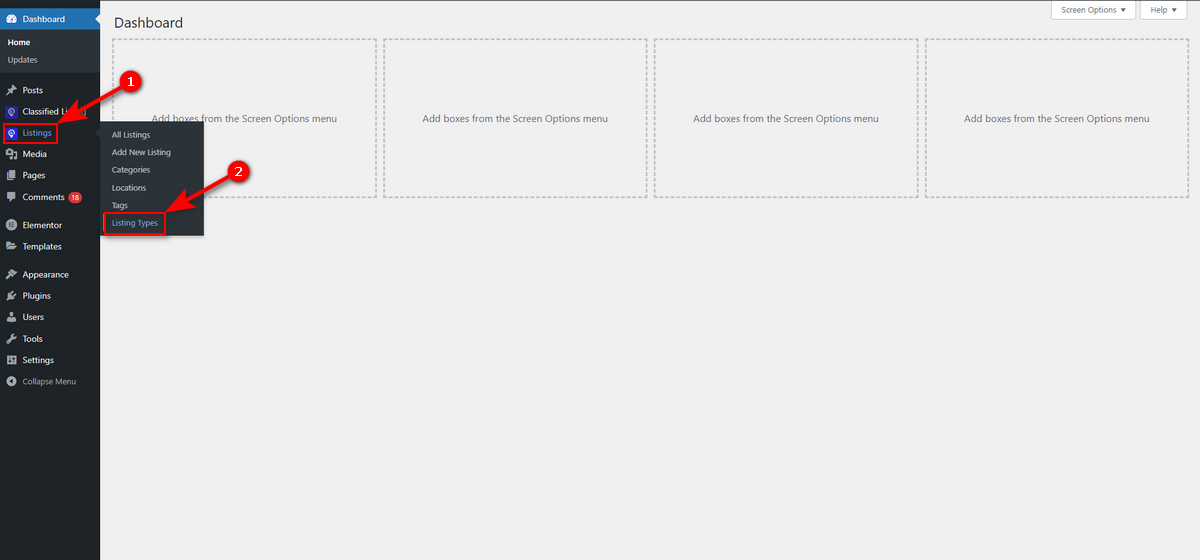
Now, type your listing type in the “Add new type” field and hit “Add Type” button.
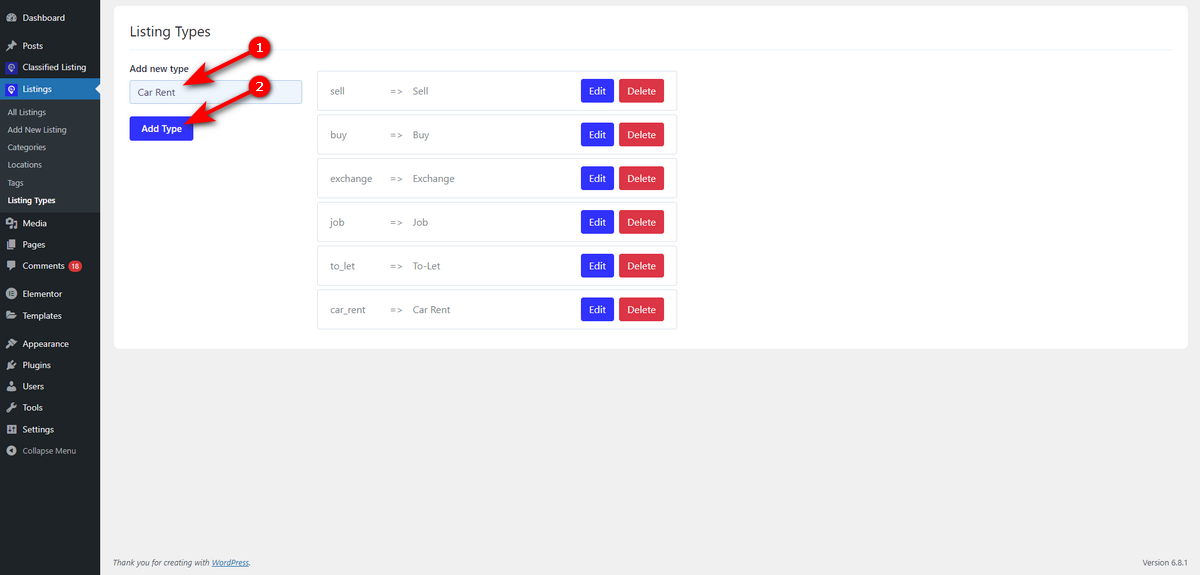
Okay, you’ve made it!
Step 8: Make a Car Listing Form with AI Form Builder
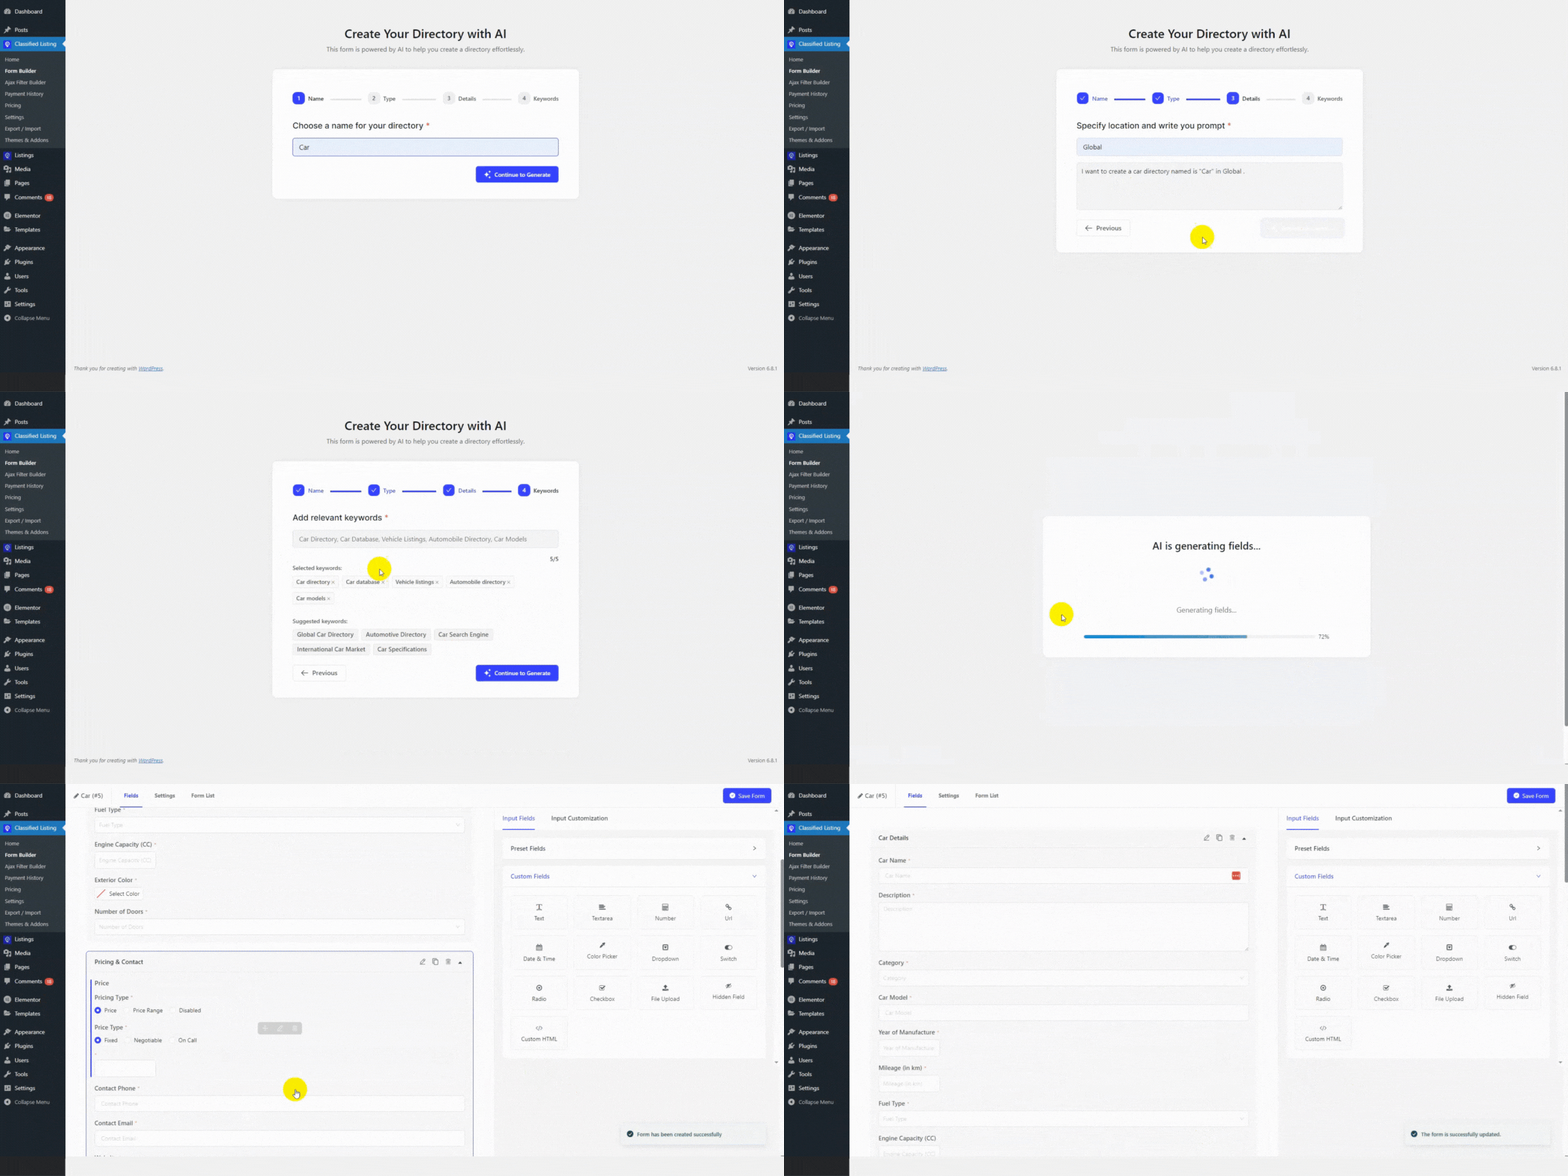
Currently, we’ll focus on building a listing form that includes all the necessary fields and boxes required to submit car listings for rental easily. We’ll use the Classified Listing AI Form Builder to create this form, eliminating the need for brainstorming automatically.
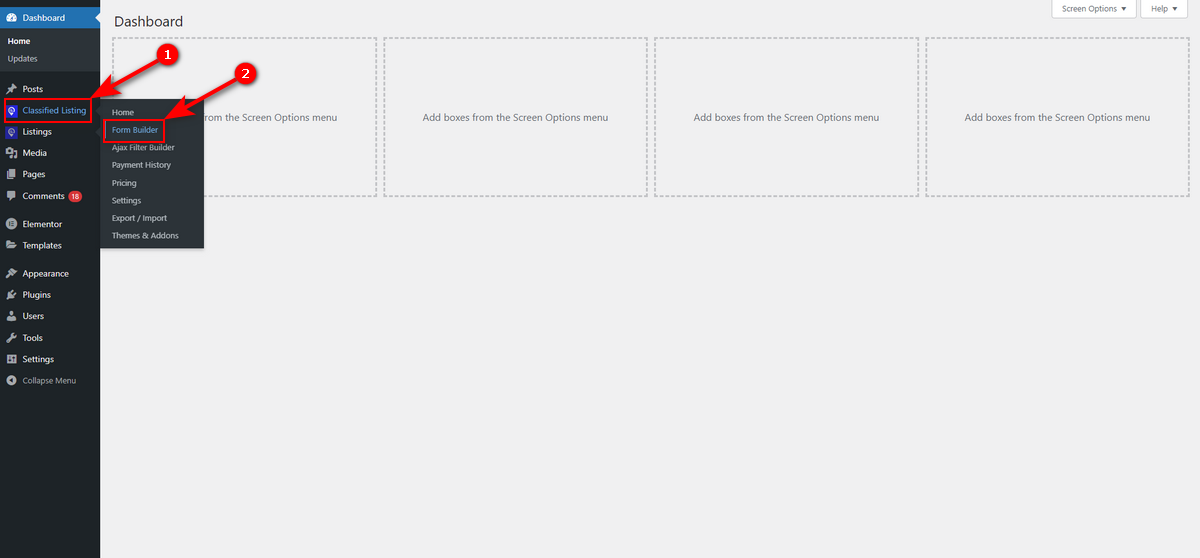
- Head to your WordPress Admin Dashboard. Then, go to Classified Listing > Form Builder.
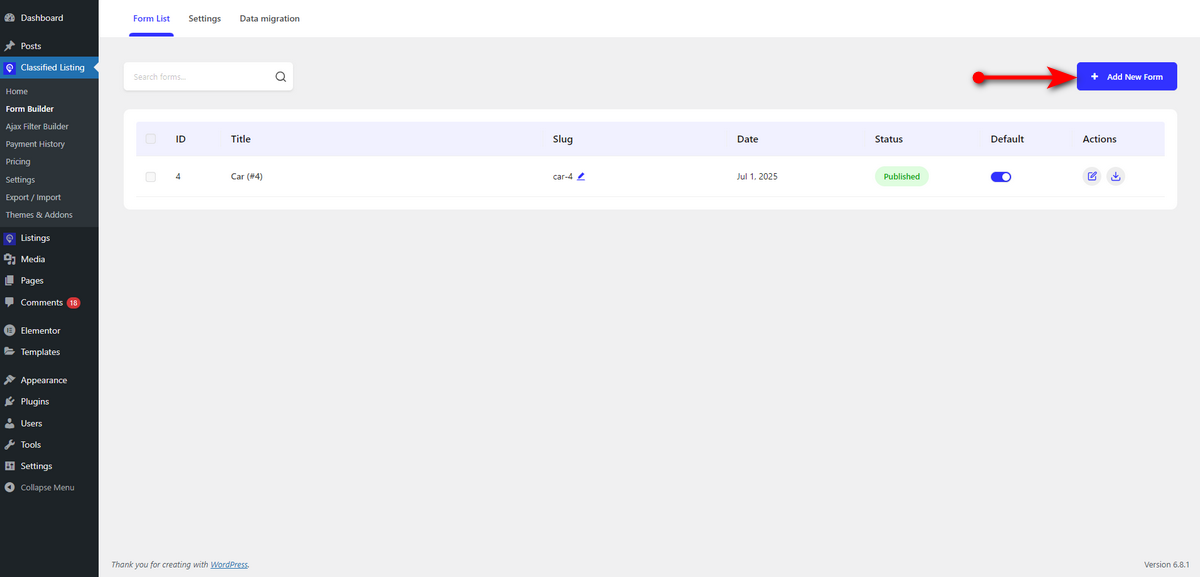
- Now, press “+ Add New Form” button.
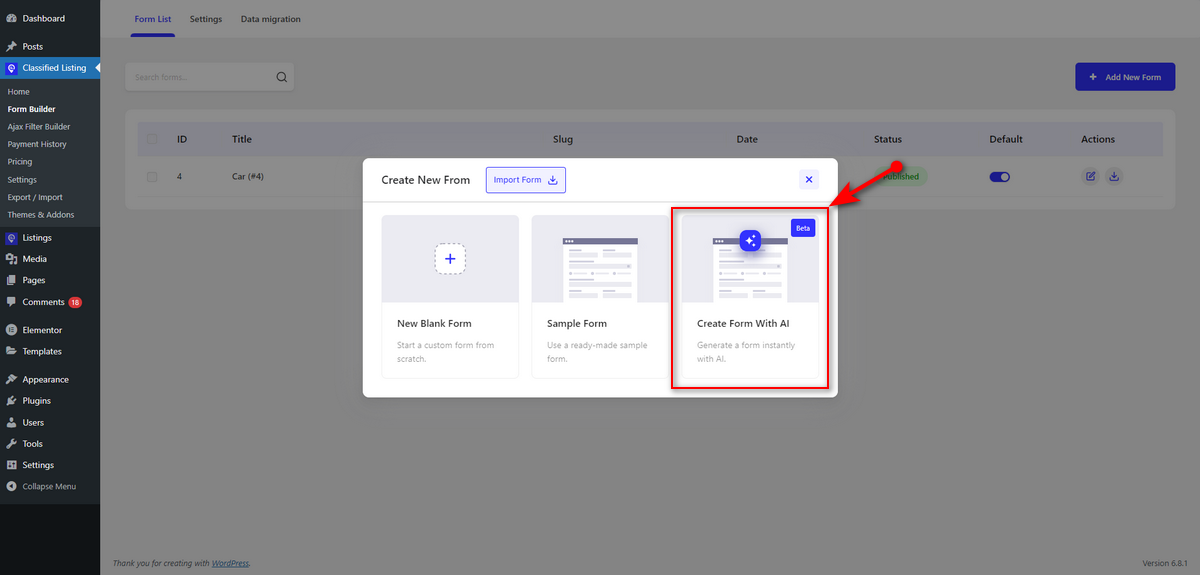
- You’ll see a pop-up with three cards. Click “Create Form With AI” card.
- Now, watch the animation below to learn how to make a listing form with Classified Listing‘s AI Form Builder.
Step 9: Install Other Essential Add-ons and Plugins
Since you are building a car rental marketplace, your website should enable users to create listings and book cars easily. That means your website must have the booking feature.
How do you integrate this feature into your WordPress website? It’s simple. Just install this Classified Listing Booking Addon. Please watch this video tutorial to learn more about this addon.
Additionally, install the Review Schema plugin to enable users to rate and review services from various car rental companies, agencies, or individuals.
This will enhance the customer satisfaction rate and will allow people to assess the car rental service before booking.
Step 10: Submit a Listing as a User
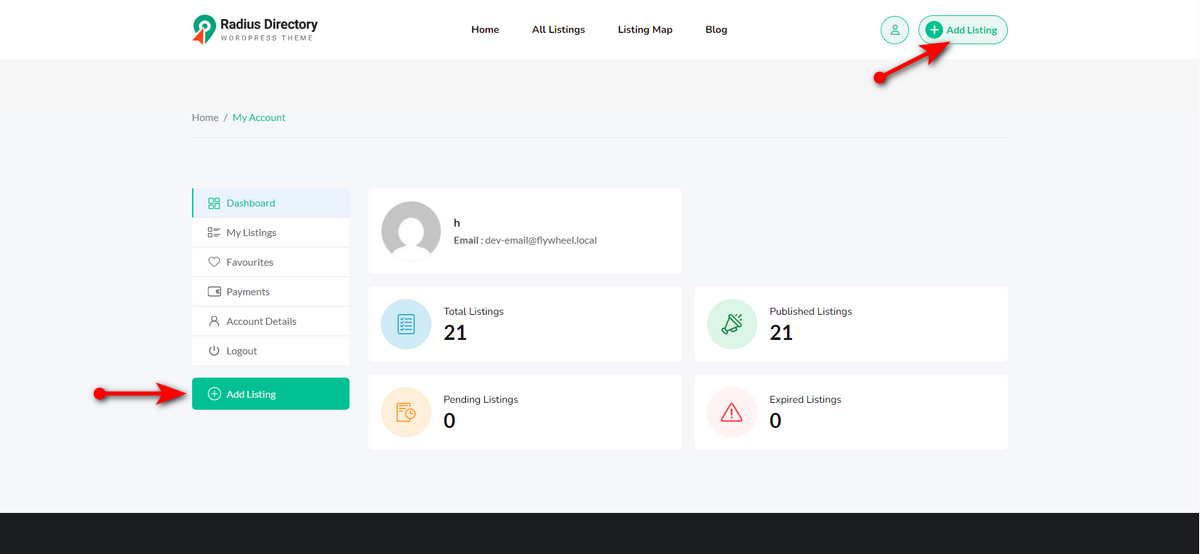
Our car rental WordPress website is now ready. We just need to publish listings as a user to see if everything works correctly. To do so, visit your My Account dashboard.
Then, click the “+ Add Listing” button in the top right corner or under the “My Account” dashboard.
We’ll now fill out the car listing form we generated with the AI Form Builder. See the animation below to know how we do it.
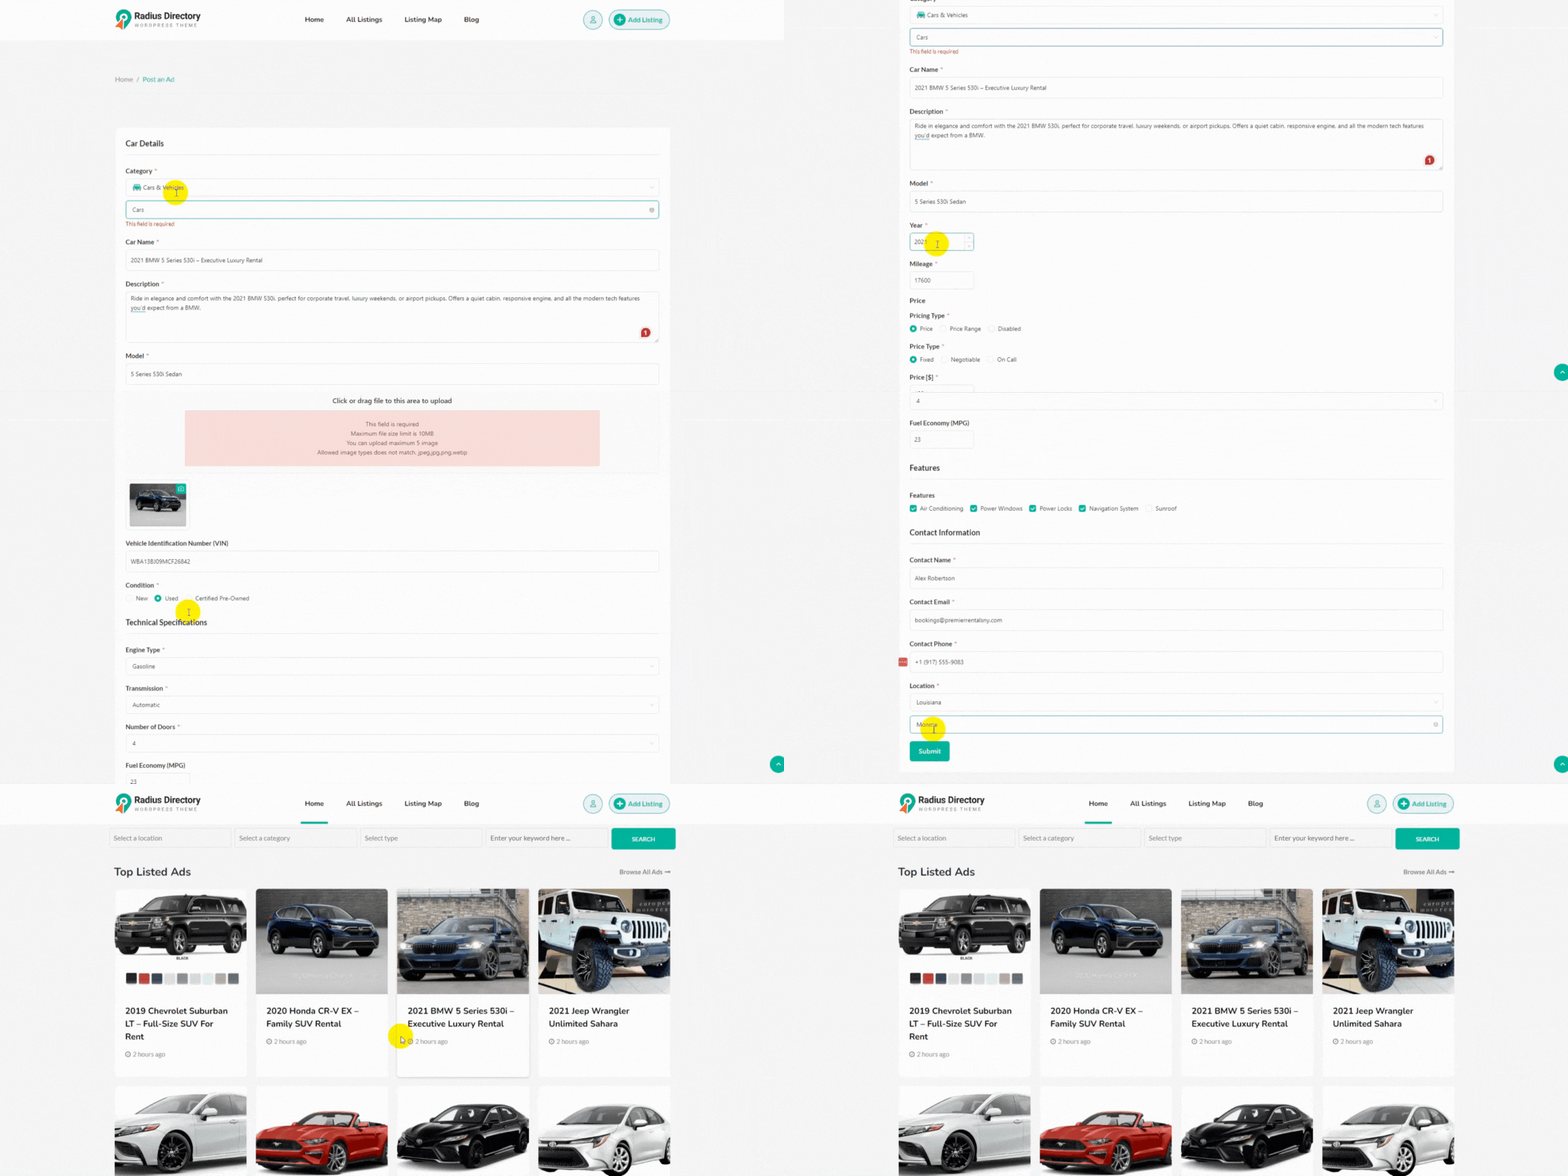
As you can see, our car rental website is ready. You now need to double-check everything and get your website reviewed by professionals if required. Then, publish the website and promote it on various social media channels.
Additionally, implement SEO strategies to gain organic traffic. Once you gain some traffic, you can charge people for posting listings on your marketplace. Classified Listing offers several monetizable streams to help you earn money.
Inspect These Best Car Rental Websites for Inspiration
Though we’ve already built a car rental website with WordPress, it’ll be better if you study some other similar websites to gather design ideas. Start with the listed ones below.
1. Kayak
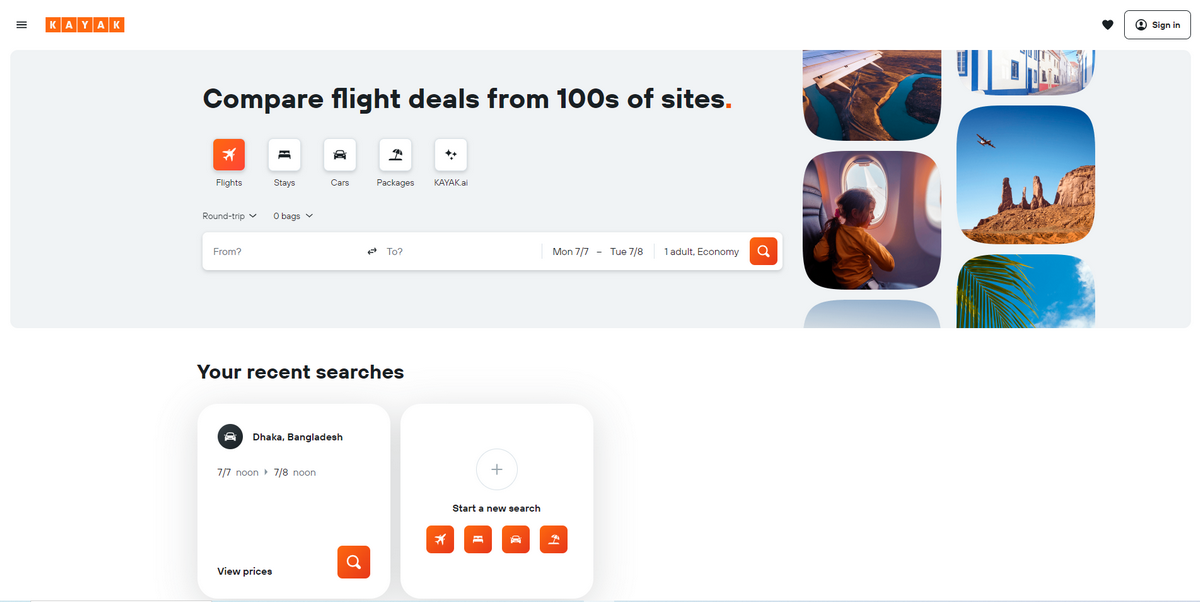
Kayak’s design is sleek and user-focused. It features a prominent search bar that anchors the homepage, inviting users to query flights, hotels, or car rentals quickly.
It features vibrant orange accents that contrast with a clean, white background. Hence, this color template creates an energetic vibe. This website displays search results in a clear, grid-like format for easy viewing.
Kayak is mobile-responsive and loads perfectly across various devices. One noticeable thing about this website is that it displays minimal listings to keep the interface uncluttered. After exploring the website, we found it simple yet engaging to browse and find travel options.
2. Expedia
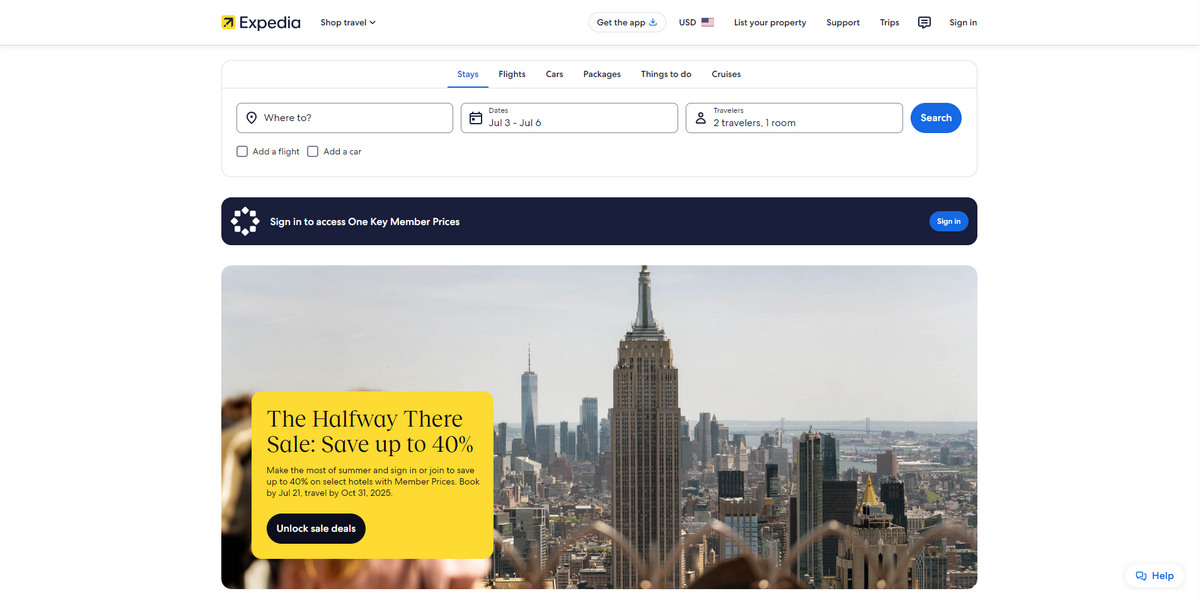
Expedia boasts a modern and inviting design. It has a central search box for flights, hotels, or car rentals. It utilizes a soothing blue and white palette to create a serene ambience.
Its layout organizes deals and options in a clean grid. Expedia is a responsive website and ensures smooth navigation across devices.
This website uses no pop-ups to keep users’ focus on booking. Some sections feel crowded with promotional offers. However, this site still manages to guide users quickly to their travel choices.
3. Rentalcars
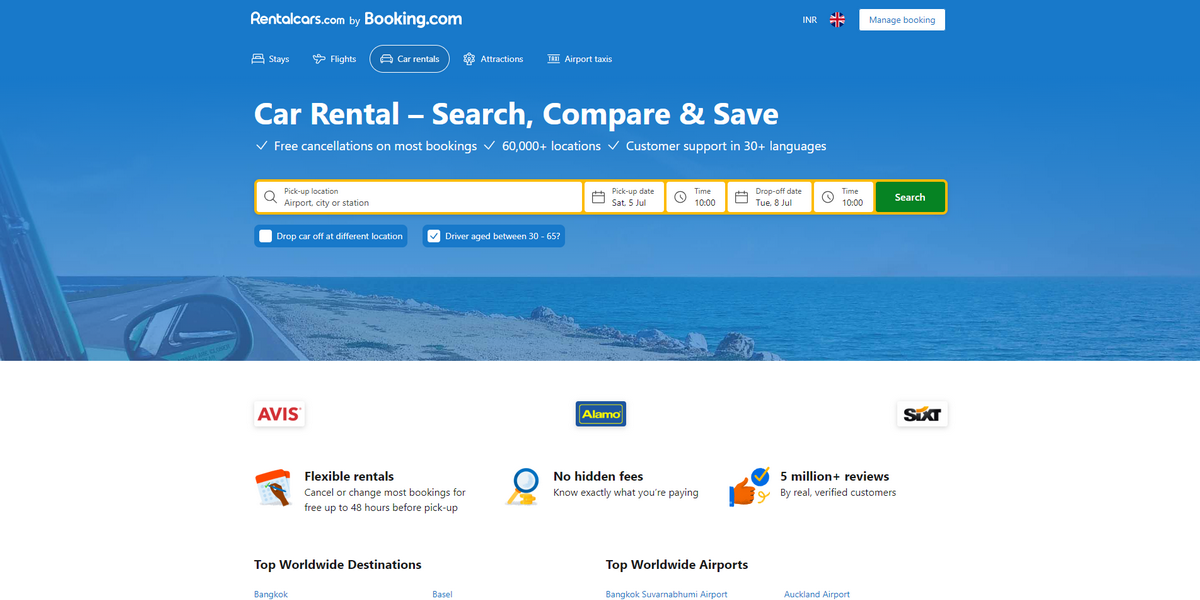
The design is functional and straightforward. A large search box takes centre stage on the homepage, making it easy to begin searching for car rentals.
The white background, accented with blue and green highlights, creates a clean and professional feel. Search results show up in a neat grid, with filters on the left for quick sorting.
The site functions smoothly on mobile devices, providing a seamless browsing experience. Ads are minimal, keeping the focus on booking, but the overall look feels outdated. It’s designed for fast, clear navigation.
4. AutoSlash
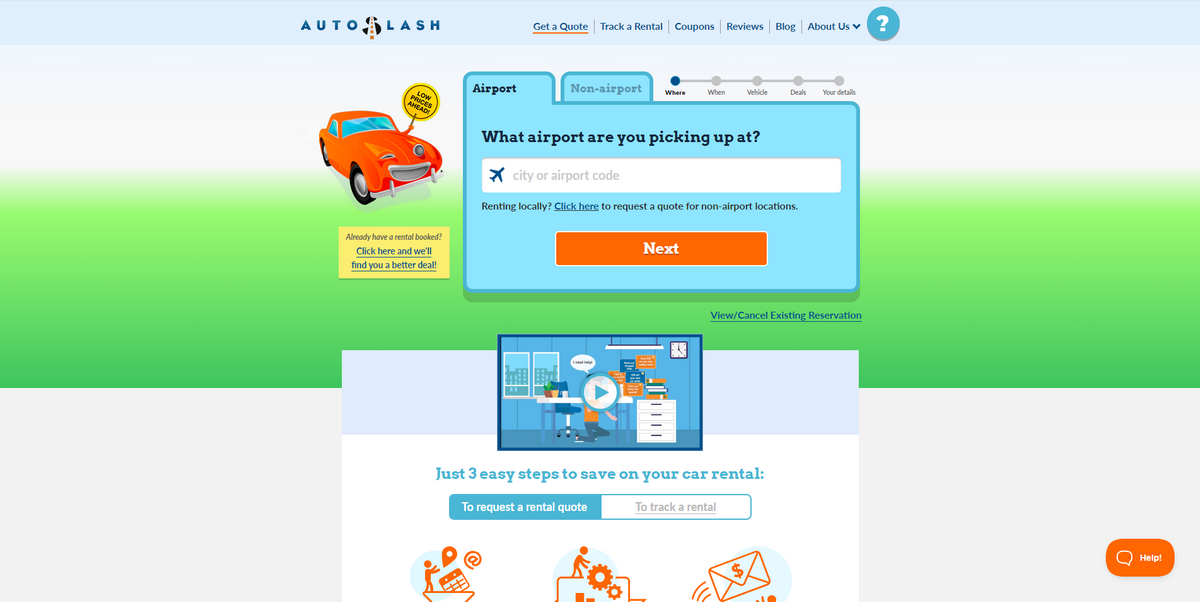
This website’s design is minimal, focusing on function over flash. It features a simple search field that sits front and center, inviting users to enter their car rental details.
It features a clean white background with blue text, which feels simple and slightly plain. The site employs a distinctive approach to maintain a clean and uncluttered interface. It displays results in emailed quotes, not on-site.
However, this approach has a downside as well. People with tech knowledge might not understand what this website is about at first glance. Therefore, we don’t recommend trying this strategy.
5. Turo
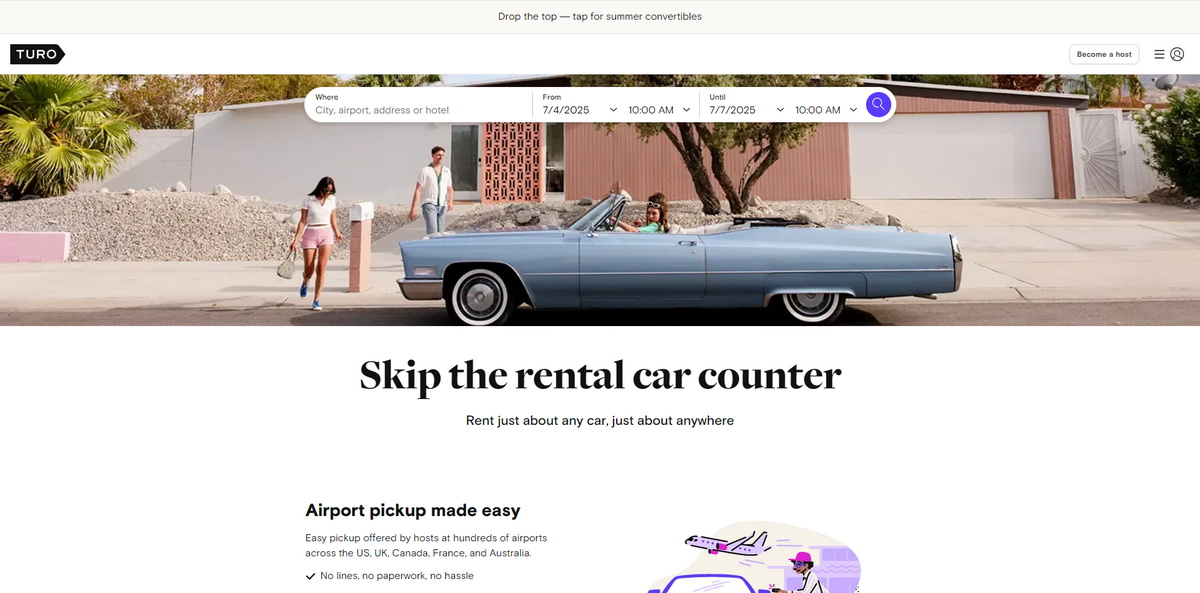
The last car rental website, precisely a peer-to-peer car rental site on this list, is Turo. It’s got a vibrant and modern design. Similar to other websites here on this list, it also comes with a bold search bar for quick car rental bookings.
Turo has a dynamic hero image that showcases a diverse range of vehicles, creating a lively feel. It displays search results in a sleek grid for easy browsing.
This responsive website offers easy navigation on any device. It doesn’t show so many ads on the result page to keep the interface uncluttered.
Overall, the design is simple, and this website prioritizes exploration and fast booking over displaying numerous ads in various styles.
Wrapping Up
These are everything you need to know regarding how to make car rental website in WordPress. We know there are many steps, and they might overwhelm you. However, this doesn’t mean that these steps are challenging to accomplish.
Read slowly, one step at a time, and take action accordingly. Then, move to the next step and take the action described in that step. This way, you’ll reach the last step and you’ll have your car rental website built in WordPress. We wish you the best of luck on your journey.



