


On This Page
Is your blog’s growing content library becoming difficult for your readers to navigate? As you publish more articles, finding specific information can become a challenge.
This is where blog filtering becomes essential. By implementing smart filtering options, such as categories, tags, and search functions, you can make your blog a user-friendly resource.
That said, this article will walk you through some more aspects regarding how blog filtering helps readers explore the right content. Let’s jump right into it.
How Does Blog Filtering Benefit Readers?
Blog filtering offers you numerous benefits. Implementing filters on your blog posts allows readers to easily and swiftly find the right content. It provides them with personalized discovery, improving navigation, and saving time.
In addition to these benefits, you and your target audience will also enjoy several further advantages after implementing filters on your blog.
Interest Matching: By applying filtering to your blog, you help readers find content directly relevant to their interests. For instance, a food blogger can utilize filters, such as “vegetarian” or “gluten-free,” to find the exact recipe type they seek.
Broad Topic Refinement: By implementing filtering, you enable readers to find more specific or niche content, rather than just receiving a general overview of a blog’s topics.
For example, when you add diverse filtering options, such as tag filtering, users can filter posts by tags and easily refine their searches.
Cognitive Load Reduction: As filtering breaks content into manageable chunks, it reduces the mental effort required to find desired information. It prevents readers from feeling overwhelmed by looking at a massive, undifferentiated list of posts.
Browsing Efficiency Facilitation: Filters help readers find their desired topic quickly and easily. Therefore, your website gets a positive impression, and you see an upward rise in your audience engagement data.
Encourages Exploration: A good filtering system enables readers to explore related content they may not have found otherwise.
When the audience clicks on a tag or a category, they find related posts, and some even read those posts, increasing your site’s dwell time.
Search Results Narrowness: Filtering becomes an invaluable tool for blogs with extensive archives. It lets readers narrow down a massive number of posts to a relevant and smaller list, saving their valuable time and effort.
Clear Hierarchy Establishment: When you build categories, you form a structural backbone for your blog. You make navigation and searches easy for readers and enable search engines to easily understand your blog’s structure, improving SEO.
These are the major benefits you get by implementing filtering on your blog. Now, let’s discuss some key filtering methods for blogs.
What Are the Key Filtering Methods for Blogs?
You can apply various filtering methods to your blog. Each method has its own benefits. Here are the filtering types/methods you can implement on your blog.
Categories: Include categories for different posts on your blog to provide your site with a structured hierarchy for the blog’s content.
Tags: Tags filtering refers to specific keywords or phrases that include further detail and context to your blog posts. These tags offer more granular filtering than categories.
Search Bar: A search bar is an essential element and an invaluable filtering method. It not only fastens the post-finding process on a blog but also enhances the overall user experience.
Date Archives: This filtering method enables readers to browse posts chronologically, such as by month or year, fulfilling their requirements.
How to Add Post Filtering on the Blog
Let’s now walk you through the implementation of diverse filtering on your WordPress blog. Here’s a rundown of the entire process before we dive deep into the step-by-step procedure.
First, you need to create some categories and tags on your WordPress blog. Then, create some helpful and SEO-optimized blog posts. Afterward, install and activate a plugin to include some advanced filtering options. That’s it. Let’s begin the whole setup.
Step 1: Add Categories and Tags for Your Blog
To include categories, go to Posts >> Categories in your WordPress Admin Panel.
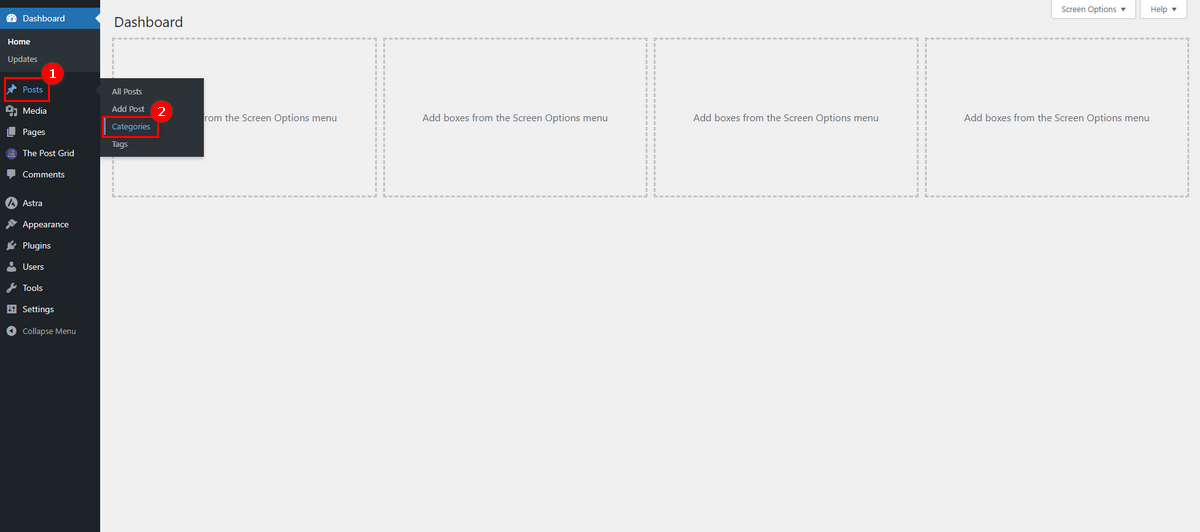
Now, write down your category name and slug. Choose a parent category if it has any. Then, write a short description, add a category color, and an image, and lastly, click Add Category button.

That’s how you add a category. You need to follow the exact category-building steps to add a tag. Hence, we skip showing you how to do so. Instead, just look at the screenshot below to understand how you can include a tag.

Step 2: Create Your Content
Now, you need to create some blog posts according to your niche, keywords, topic clusters, and content calendar. Ensure your blog posts adhere to semantic SEO principles to improve your ranking on the SERP and increase organic traffic.
Plus, make sure these blog posts are correctly assigned to relevant categories and tags that users can use as filters.
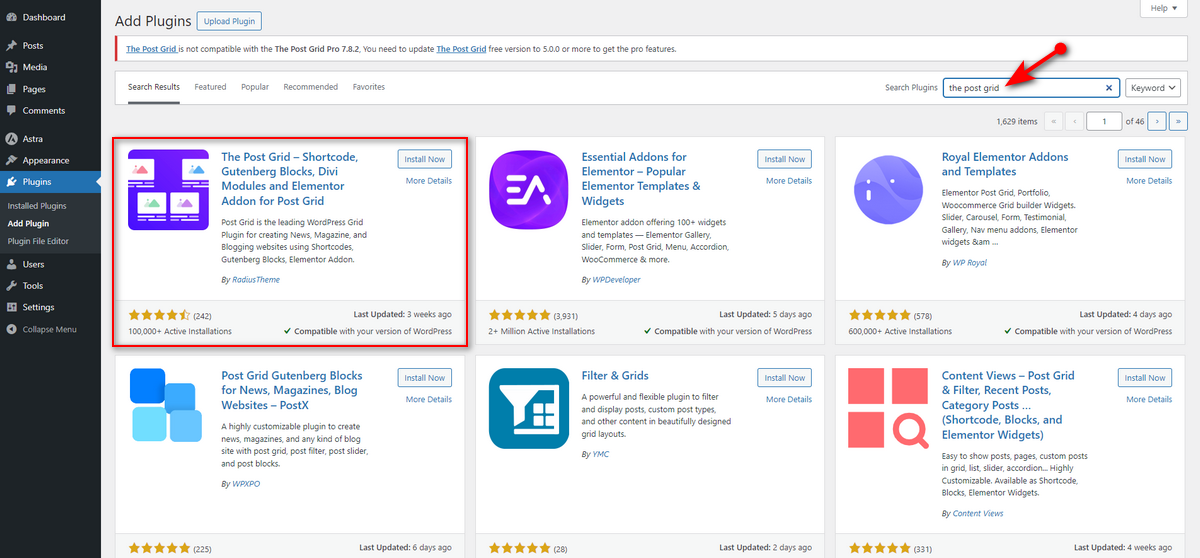
Now, let’s move on to implementing some advanced filtering options for your blog. We’ll do it using The Post Grid plugin. This plugin comes with many powerful features to help you easily build and manage blogs of any type on WordPress.
Step 3: Install and Active The Post Grid
Installation and activation of the Post Grid Pro plugin are incredibly straightforward tasks. You just need to follow a few steps, and you’re good to go. Hold on! We recommend that you install the pro version. Do you know why?
Well, you’ll reap the best benefits out of this plugin if you get the pro version. So, get it and see the animation below to learn how to install and activate this plugin.
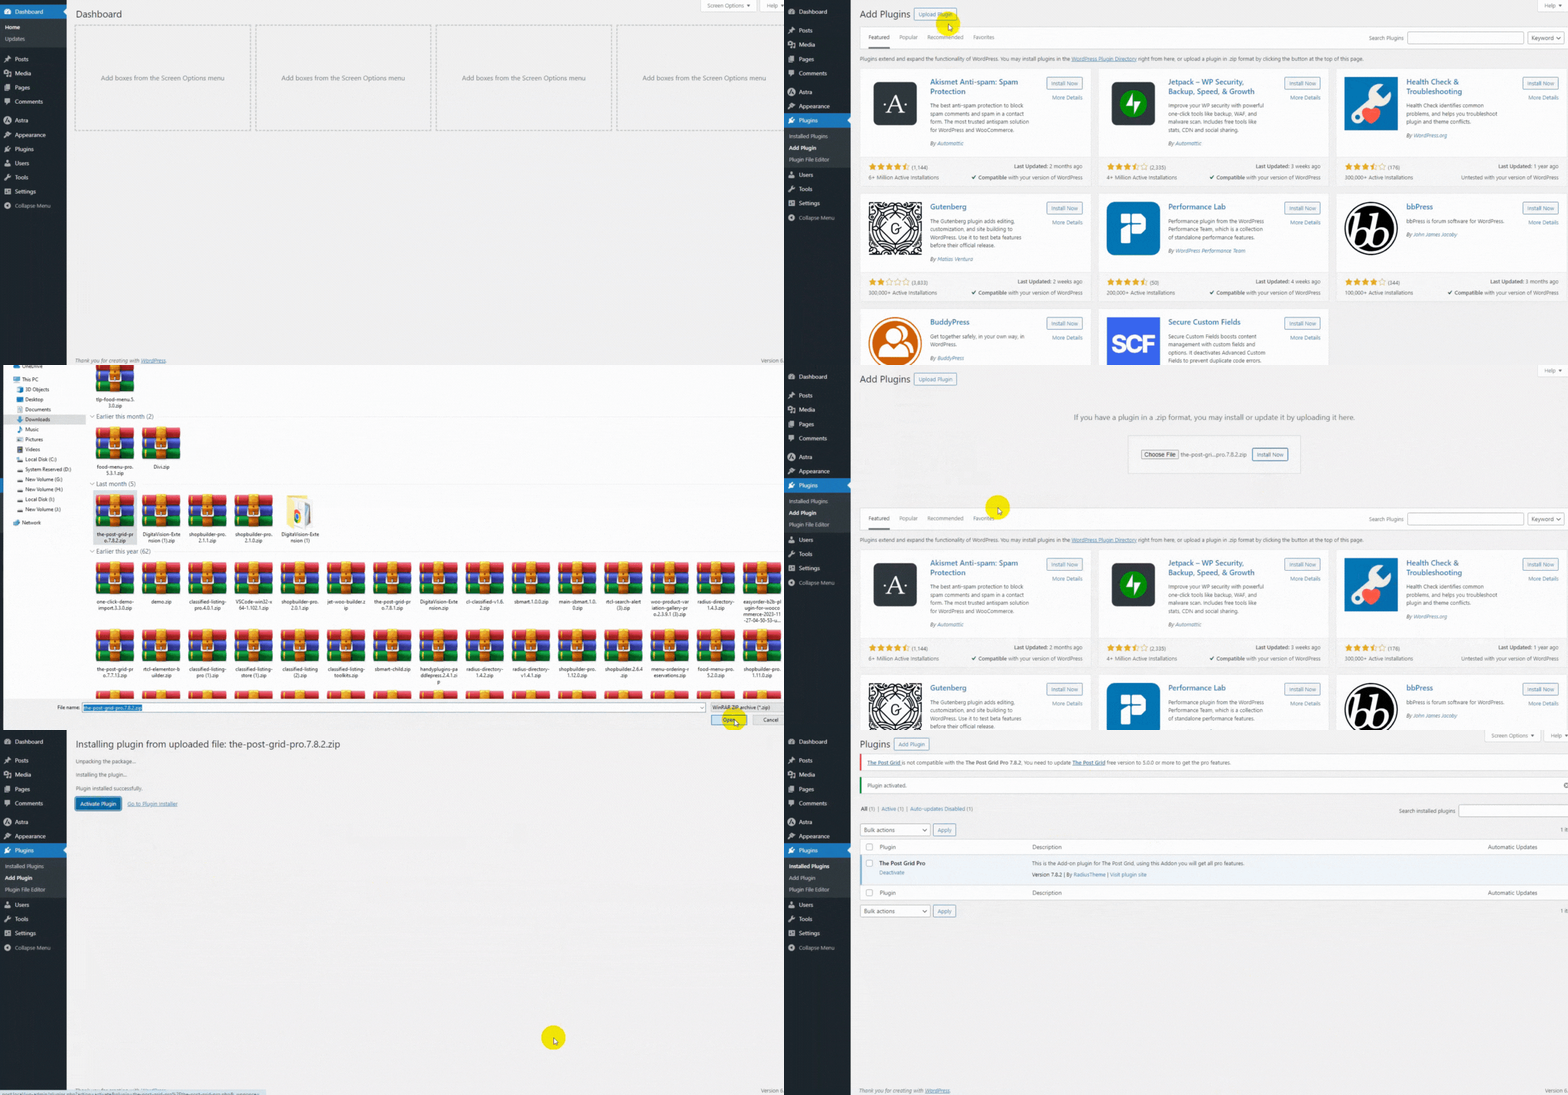
Note that after installing and activating Post Grid Pro, you also need to install its free version. Otherwise, the plugin won’t work.
Step 4: Add a New Post Grid
We’ll now create a new post grid while implementing some advanced filtering options. Let’s get started.
- Navigate to The Post Grid >> Add New Post Grid from your WP Admin Dashboard.
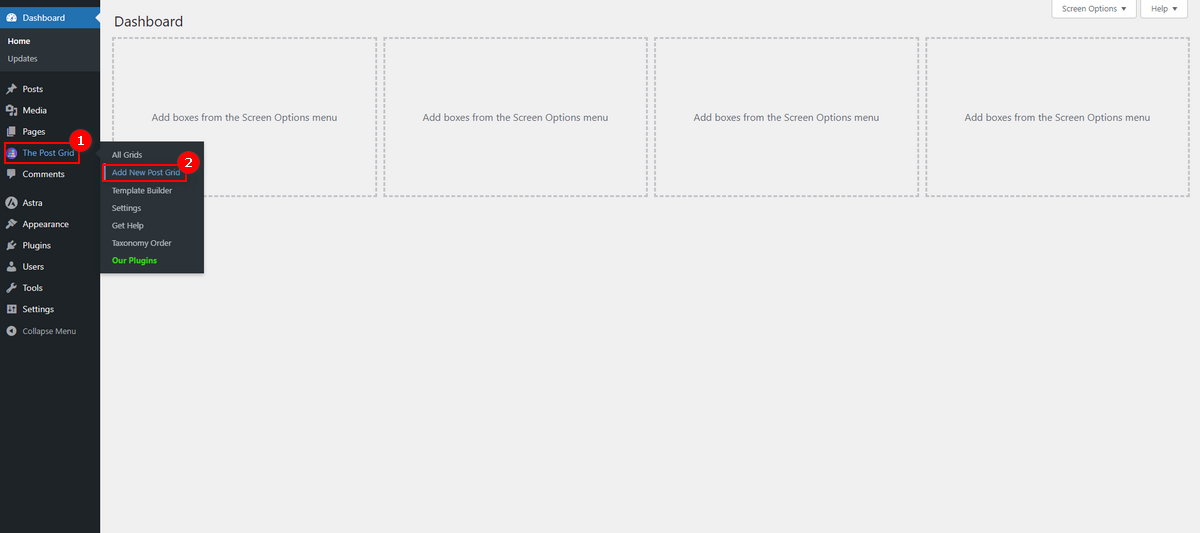
- Now, write the post grid name at the top and ensure you are on the Qurey Build tab. Here, you can see a Post Type drop-down menu, allowing you to display either a post or a page.
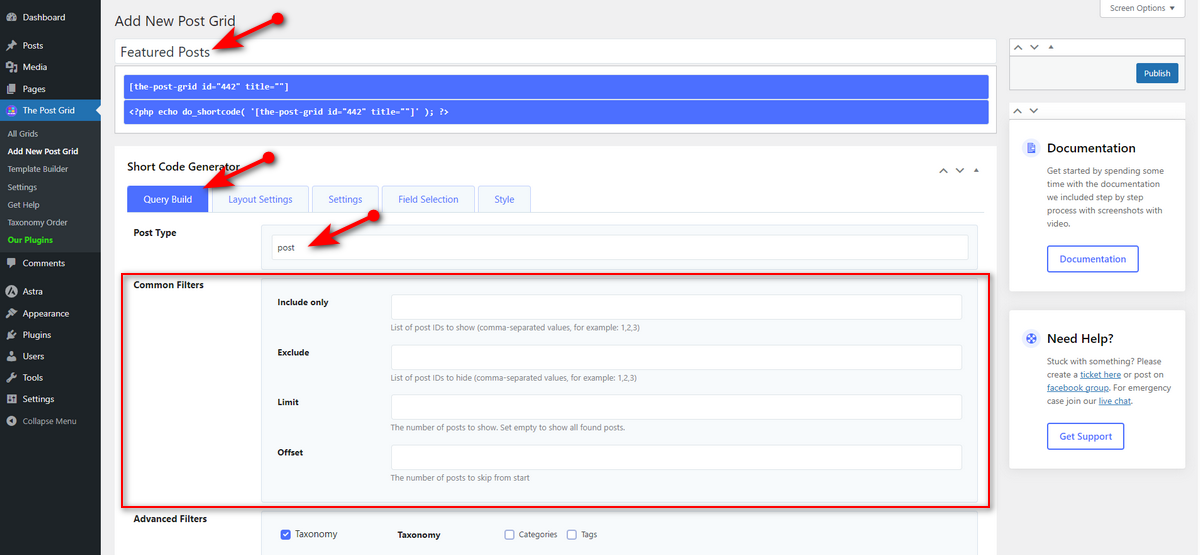
There’s also a Common Filters section, which enables you to include or exclude specific posts and set the number of posts to display and skip.
- Scroll down and you’ll see the Advanced Filters section. It helps you include post taxonomies like categories and tags. Additionally, it allows you to set post order by title, date, and other attributes.
This section allows you to include advanced filtering options, such as filtering by author, date range, and more. You can even insert a search filter, too. We encourage you to view the animation below to gain a better understanding of this section.

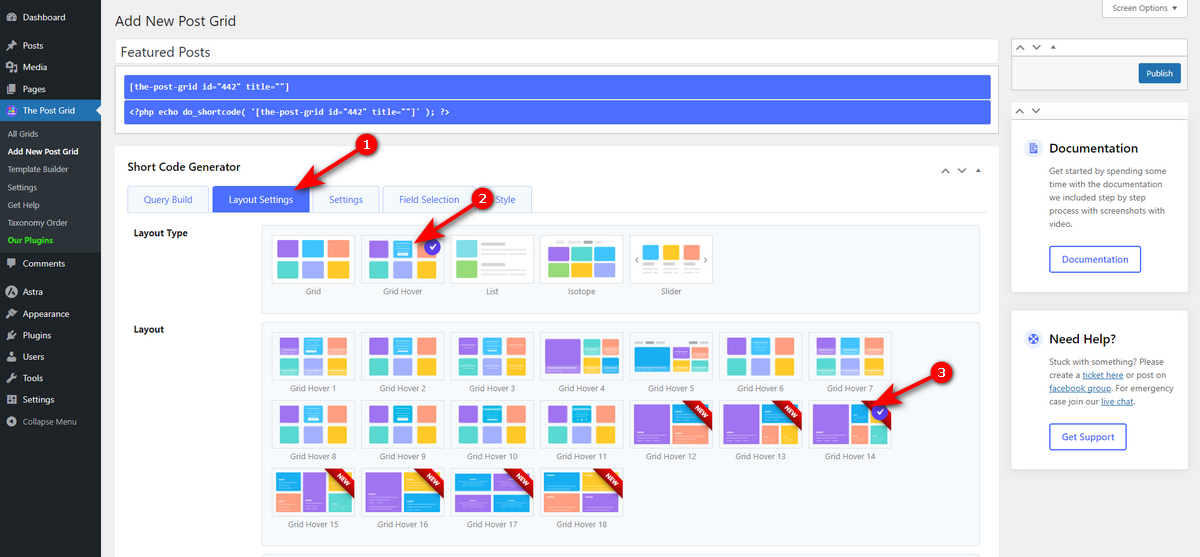
- Now, click on the Layout Settings tab and select your desired layout for all the blog posts.
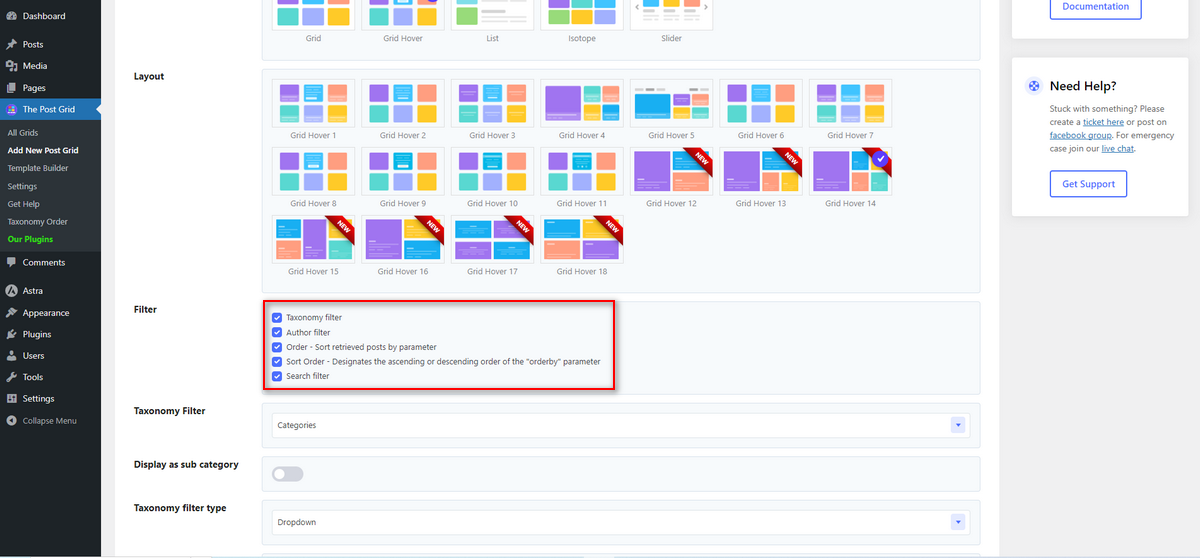
- Now, head to the Filter section and select the filters you want to display on your preferred page.
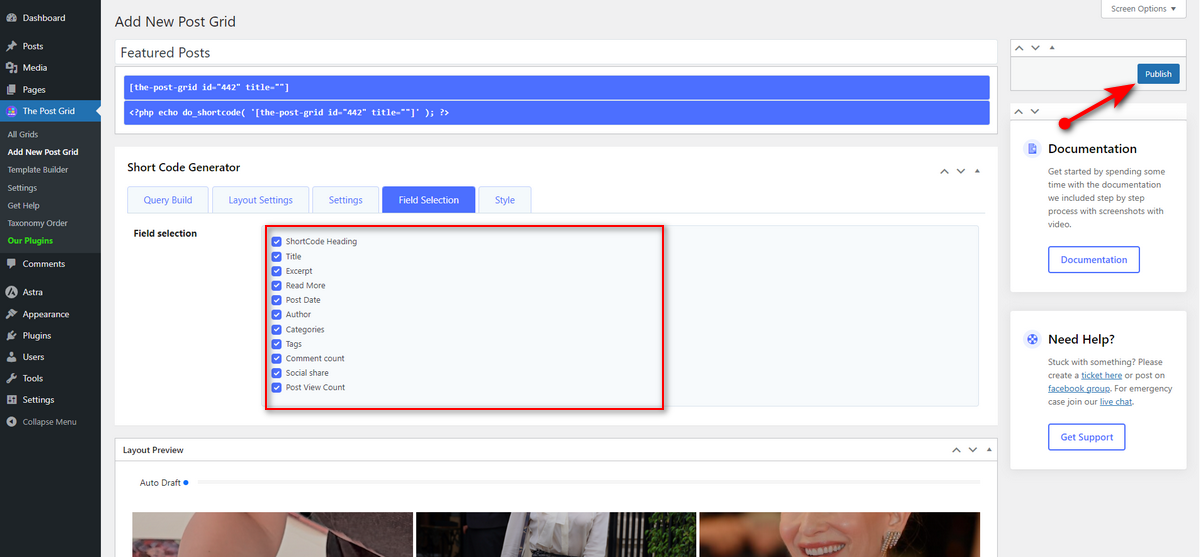
- Scroll down to explore other options, then switch to another tab and adjust its settings. We recommend reading the documentation for this plugin to learn more about it. Finally, hit the Publish button.
Step 5: Add Post Grid to a Page
Now that we’ve created a post grid with advanced filtering options, we need to display it on a page. You can show it on an existing page or create a new one. We recommend you display it on the Blog page.
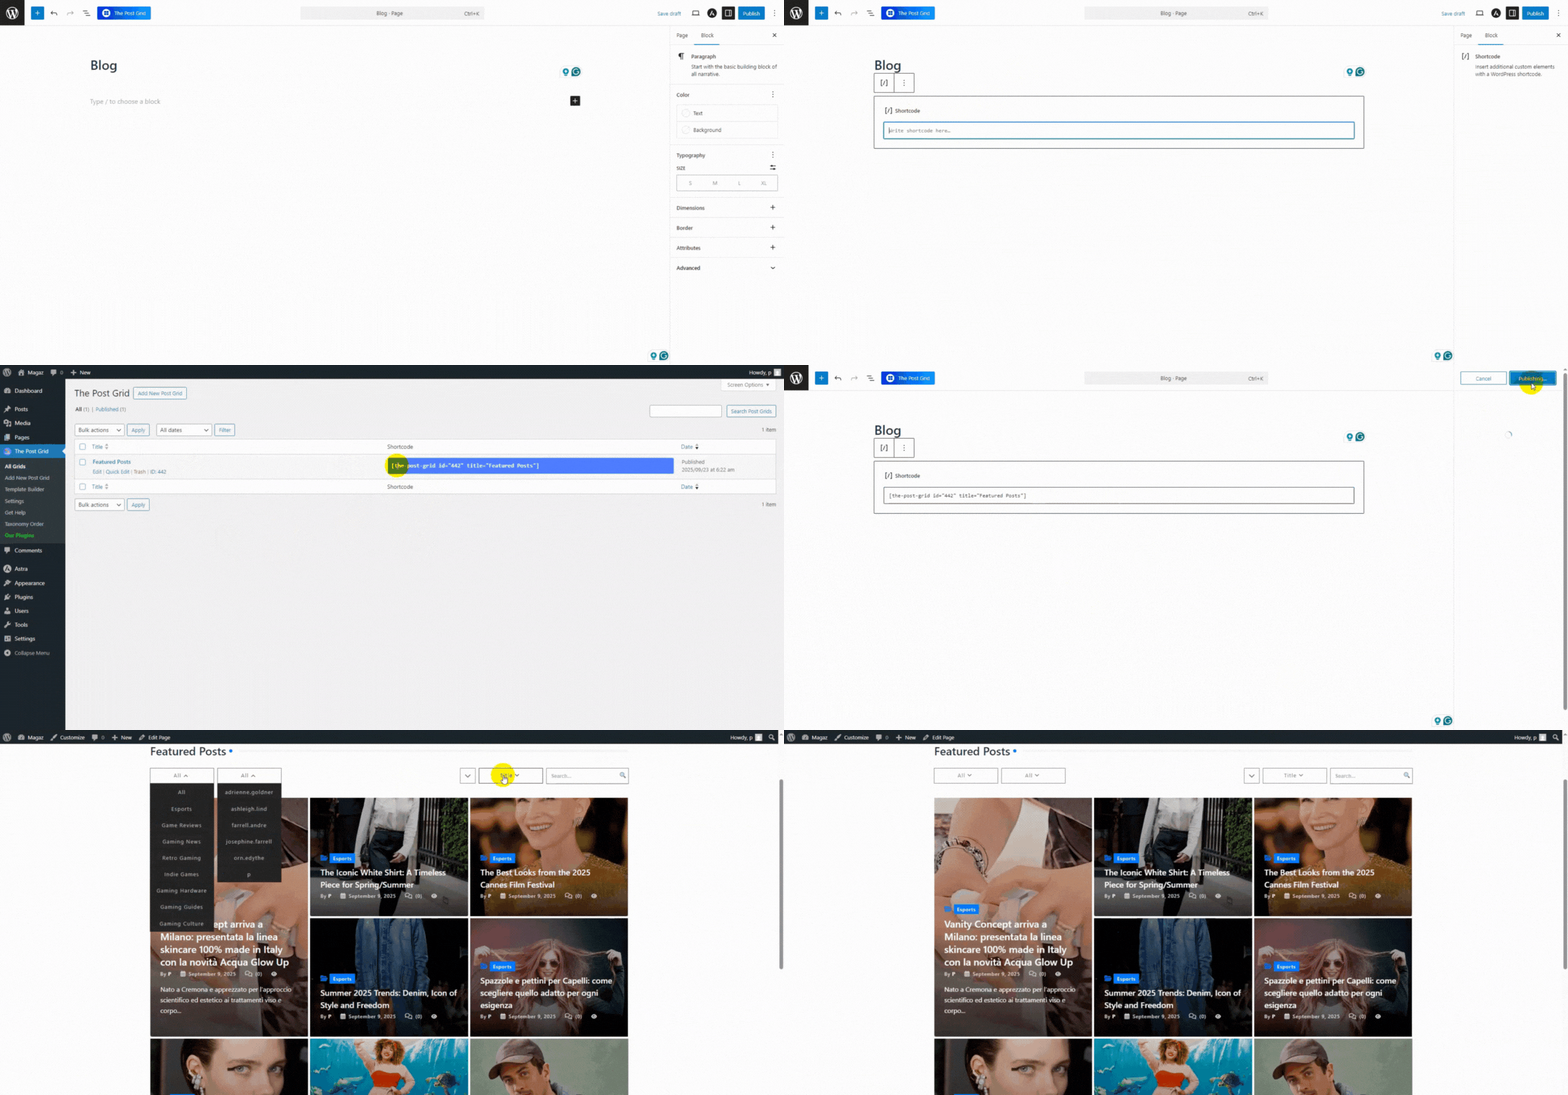
So, open your desired page in the Gutenberg editor or Elementor. Then, insert a shortcode block or element. Lastly, insert the shortcode of your post grid that you’ve just created and hit Publish. See the animation below to learn this entire process.
Blogging Best Practices to Follow to Become Successful
To become successful in blogging, first identify your audience. Research their motivations and challenges through surveys, social media listening, and competitor analysis. This allows you to create content that directly addresses their needs.
Organize your topics/keywords with a content calendar. Planning posts in advance ensures a consistent schedule and supports your business objectives. Each planned post should outline its main points and include a clear call-to-action, like signing up for a class or newsletter.
Include basic search engine optimization (SEO) to help potential clients/readers find your content. Assign a primary “target keyword” to each post and place it in your title, meta title, and meta description. Include related keywords naturally throughout the content and add descriptive alt text to all images.
Create original and helpful content. Instead of repeating existing information, write clearly to help your readers solve their problems. Address common questions you receive from readers, share personal experiences related to your practice, or interview experts to provide fresh perspectives.
Enhance posts with relevant visuals, such as photos, infographics, or videos, to break up the text and improve engagement. Use them purposefully to avoid slowing your page’s load time.
Finally, promote every post on your social media channels. Sharing your content expands its reach, drives website traffic, and helps establish your authority in your field.
Our Concluding Thoughts
Implementing blog filtering is a crucial step toward enhancing user experience. By organizing your content into categories and tags and including advanced filtering, you encourage readers to find relevant information easily.
This reduces cognitive load, boosts engagement, and improves your site’s overall structure for both users and search engines.
Including these filtering methods helps you create a navigable, successful, and reader-friendly blog. You ensure that valuable content receives the visibility it deserves and keeps your audience engaged.



