

On This Page
A cloud kitchen lives or dies by one thing: how smoothly orders come in. There’s no dining room, no waiter to recommend the special, no walk-in traffic. Every sale starts with someone tapping “order” on a screen. So if your online ordering setup is clunky, slow, or buried inside a third-party app that skims 30% off the top, you’re not just losing convenience — you’re losing the business.
The good news? Setting up your own online ordering system is far simpler than it was even two years ago. You don’t need a developer, a custom app, or a fat monthly software bill. If your kitchen runs on WordPress (or you’re willing to spin up a simple site), you can have a fully working ordering system live in an afternoon.
This guide walks you through the whole thing — from planning your menu to taking your first commission-free order — with practical detail at each step.
First, What Exactly Is a Cloud Kitchen?
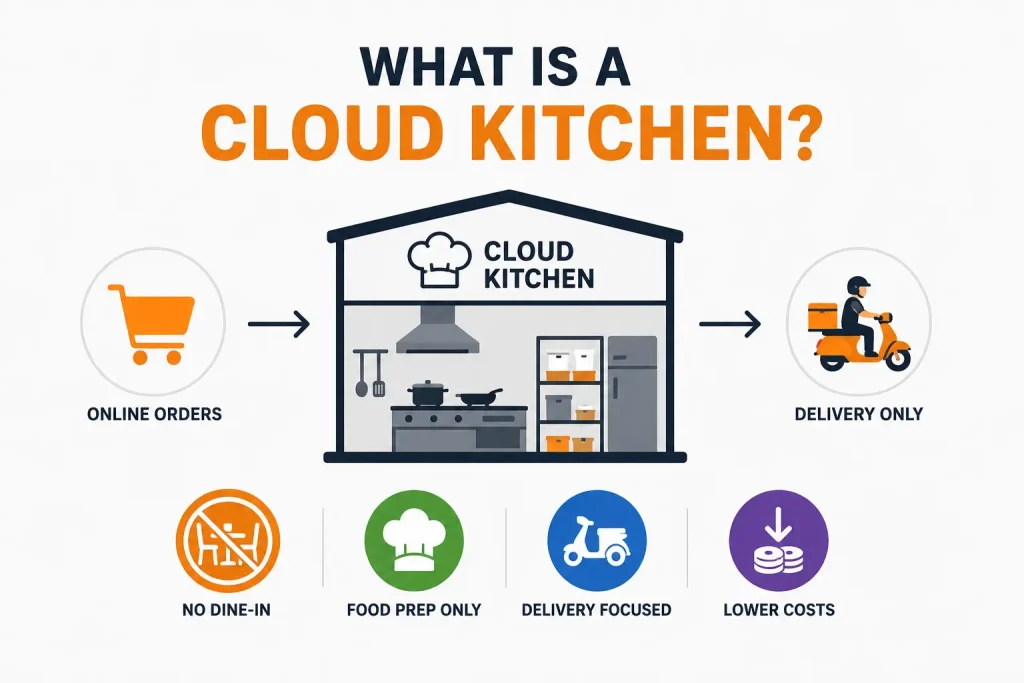
Quick refresher, because the terminology gets muddy. A cloud kitchen — also called a ghost kitchen, dark kitchen, or virtual restaurant — is a food business built entirely around delivery and takeout. There’s no seating and no storefront for customers to visit. Food gets prepared in a commercial (or sometimes home) kitchen, and it goes straight out the door to the customer.
The model exploded for good reasons: lower rent, no front-of-house staff, and the flexibility to run several “brands” out of one kitchen. The global cloud kitchen market was valued at roughly $71 billion in 2023 and is projected to more than double by the early 2030s. Plenty of first-time food entrepreneurs are starting here instead of signing a lease on a full restaurant.
But that lean model comes with a catch. Since there’s no dine-in revenue, your entire income depends on order flow. That’s exactly why the ordering system isn’t a “nice to have” — it’s the engine of the whole operation.
Why You Shouldn’t Rely Only on DoorDash, Uber Eats, or Grubhub
Here’s the trap almost every new cloud kitchen falls into. You sign up for the big delivery aggregators, orders start trickling in, and it feels like success. Then you look at the numbers.
Delivery platforms typically charge 25% to 35% commission on every single order. On a $40 order, that’s up to $14 gone before you’ve paid for ingredients, packaging, or rent. Run the math across a month and it’s often the difference between a profitable kitchen and one that’s quietly bleeding out.
There’s a second, quieter cost too: you don’t own the customer. The aggregator holds the data. They decide where you rank in search. When they raise fees or tweak their algorithm, you have no say. Brands that survive long term are the ones that build a direct ordering channel alongside the aggregators.
The smart play isn’t to ditch the platforms entirely — they’re great for discovery, helping new customers find you. The play is to use them to get discovered, then gently push repeat customers to your own website where you keep 100% of the sale. That’s the setup we’re building toward.
Step 1: Plan Your Menu Before You Touch Any Software
It’s tempting to jump straight to the tech. Resist. A messy menu makes for a messy ordering system.
Start with a focused menu — most successful cloud kitchens launch with 15 to 20 items, not 60. A tight menu is easier to prep consistently, cheaper to stock for, and less overwhelming for the customer scrolling on their phone.
A few things to sort out on paper first:
- Which dishes travel well. Delivery food sits in a bag for 20 to 40 minutes. Bowls, wraps, baked dishes, and sturdy burgers hold up. Delicate plated items and anything that goes soggy do not.
- Your categories. Group items the way a hungry customer thinks: Starters, Mains, Sides, Drinks, Desserts. Clean categories make for a clean menu layout later.
- Add-ons and extras. Extra cheese, a choice of sauce, upgrade the side. These small upsells quietly lift your average order value, so plan them now.
- Pricing that accounts for reality. Whatever you charge, remember packaging and (if you use them) delivery costs eat into it. Price with margin in mind from day one.
Get this right and the software step becomes almost mechanical — you’re just entering decisions you’ve already made.
Step 2: Choose Your Ordering System
This is the fork in the road. Broadly, you have three options:
Option A — Aggregators only. Easiest to start, but you’re renting your business from someone else and paying dearly for it. Fine for discovery, dangerous as your only channel.
Option B — A monthly SaaS ordering platform. These work, but many charge a recurring fee forever, and some still take a cut per order. Costs stack up as you grow.
Option C — Your own website with a self-hosted ordering plugin. You own the site, the customer data, and every dollar of every order. Pay once (or a modest yearly fee), no per-order commission. This is the route most independent cloud kitchens land on once they understand the economics.
If you go with Option C on WordPress — which powers a huge share of small business sites for exactly this kind of reason — you’ll want a restaurant menu and ordering plugin that handles the whole flow. This is where a tool like Food Menu Pro fits in. It’s a WordPress plugin built specifically for restaurants and cloud kitchens: it turns your site into a full menu with online ordering through WooCommerce, and it’s set up so you don’t need to write a line of code. Because it runs on your own site, there’s no commission skimmed off your orders — a meaningful difference when you’re trying to protect thin delivery margins.
We’ll use it as the reference point for the setup steps below, but the general logic applies whichever self-hosted route you choose.
Step 3: Build Your Digital Menu
With your dishes and categories already planned, this part moves fast.
The goal is a menu that’s easy to scan and genuinely appetizing on a small screen. A wall of plain text won’t do it — people order with their eyes. Good menu plugins give you ready-made layouts (grids, lists, sliders) so you’re not designing from scratch; you pick a style, drop in your items, and it looks professional immediately. Food Menu Pro, for instance, ships with 20+ layouts and works with both Elementor and the standard WordPress block editor, so you can arrange things visually.
As you build each item, include:
- A clear photo — ideally your own, since real food shots convert better than stock images.
- A short, honest description (mention key ingredients and anything spicy, vegan, or allergen-related).
- The price, and any size or variation options.
- Add-ons where they make sense — this is where those upsells you planned come to life.
If you’re running multiple virtual brands out of one kitchen, look for multi-location or multi-brand support so each brand gets its own clean menu while you manage everything from a single dashboard.
👉 Good Read: How To Create Restaurant Food Menu in WordPress Website
Step 4: Turn On Ordering, Cart, and Checkout
A menu that just displays food is a brochure. To take orders, you need the shopping-cart machinery behind it.
On WordPress, that machinery is usually WooCommerce — the free e-commerce engine that handles carts, checkout, and payments. A restaurant plugin like Food Menu Pro plugs into WooCommerce so your menu items become orderable products automatically. Once connected, customers can add dishes to a mini cart, adjust quantities without leaving the menu, and check out normally.
While you’re here, set up:
- Payment methods. Connect a payment gateway (Stripe and PayPal are the common starting points) so you can accept cards directly. This is what lets you skip the aggregator’s payment cut.
- Tipping at checkout. A simple tip prompt — fixed amount or percentage — adds income for you or your drivers with zero extra effort.
- Custom checkout fields. Collect exactly what your kitchen needs: allergies, buzzer codes, special instructions. Capturing this upfront prevents a lot of phone-tag later.
Step 5: Configure Pickup and Delivery
Cloud kitchens live on their delivery radius, so this step matters more than most.
Set up your pickup and delivery options clearly. If you offer both, let the customer choose at checkout. The key settings to nail down:
- Delivery zones. Define how far you’ll deliver. Going too wide means cold food and unhappy reviews; a tight, realistic radius keeps quality high.
- Time slots and schedules. Set your operating hours, and — importantly — your closed days and holidays, so customers can’t place orders you can’t fulfill.
- Prep and delivery timing. Give honest estimates. Under-promising and over-delivering on time builds trust; the reverse kills repeat business.
A good plugin lets you manage weekly schedules and holiday closures without touching code, which saves you from awkward “sorry, we’re actually closed” refunds.
👉 Good Read: How to Enable Online Pickup & Delivery
Step 6: Set Up Order Management and Your Kitchen Workflow
Once orders start flowing, chaos is the enemy. A cloud kitchen with orders scattered across sticky notes and three tablets is an order-error factory.
Bring everything into one view. Modern restaurant plugins now include tools that used to require expensive standalone systems:
- A kitchen monitor (KDS). Orders appear on a screen in real time, in priority order, replacing lost paper tickets. Staff mark each as they go. This one change dramatically cuts mistakes and speeds up prep.
- Order tracking and timelines. Give customers a live view of their order — “Prepping,” “Ready,” “Out for delivery.” Fewer “where’s my food?” messages, happier customers.
- POS / kitchen printing. Auto-print kitchen slips the moment an order lands, so the cooks aren’t glued to a screen.
- Inventory management. Track stock so you’re not selling a dish you ran out of two hours ago.
- Role management. Give kitchen staff, managers, and drivers the right level of access — no more, no less.
Food Menu Pro bundles these into a front-end dashboard, meaning your team can run the whole operation without ever logging into the WordPress admin area — a genuinely useful thing when it’s a busy dinner rush and you just need staff to see and process orders fast.
Step 7: Add QR Code and Notification Touches
Two smaller features punch above their weight for cloud kitchens.
QR code ordering. Even delivery-first kitchens use QR codes — on packaging inserts, flyers, or a pickup counter. A customer scans, lands straight on your menu, and orders again without hunting for your website. It’s a frictionless path back to your channel instead of the aggregator’s.
SMS and WhatsApp notifications. Real-time updates sent by text or WhatsApp — order confirmed, food ready, driver on the way — feel personal and keep customers informed on the channels they already check. This is exactly the kind of touch that turns a one-time order into a regular.
Step 8: Launch, Test, and Then Promote
Before you announce anything, place a few test orders yourself. Order as a customer would, on your phone. Does the menu load fast? Is checkout smooth? Do notifications fire? Does the kitchen screen show the order correctly? Fix the friction before real customers meet it.
Once it’s solid, drive traffic to your ordering page:
- Set up a Google Business Profile so you show up in local searches and maps.
- Keep your website simple and mobile-first — most food orders happen on a phone.
- Use the aggregators for discovery, then include a flyer or QR insert in every bag nudging customers to order direct next time (a small discount for doing so works wonders).
- Lean on reviews and repeat customers. Without a physical space, your reputation is built entirely online.
Then watch your data. Which items sell? When are your peak hours? What’s your average order value? A self-hosted system keeps all of that in your hands, so you can cut the dead-weight dishes and double down on winners.
A Realistic Word on Timelines and Cost
Can you really launch in an afternoon? The ordering system itself — menu, cart, checkout, delivery settings — genuinely can go live in a few hours once your menu is planned and your site exists. What takes longer is the stuff around it: licenses and food-safety permits (these vary by city and can take weeks, so start early), payment gateway approval, and photographing your menu properly.
On cost, a self-hosted plugin approach is usually the most economical path once you account for aggregator commissions avoided. You’re typically looking at a modest yearly or one-time plugin fee plus standard hosting, versus giving up a quarter to a third of every order indefinitely. For a kitchen doing steady volume, that math tends to favor owning your channel fairly quickly.
Final Thoughts
A cloud kitchen is a pure operations game. There’s no ambiance to lean on and no waiter to smooth things over — the ordering experience is the customer experience. Get it right and you’ve got a lean, scalable food business that keeps its own margins and owns its own customers.
The core move is simple: use the big delivery platforms to get discovered, but build your own commission-free ordering channel so the profit and the customer relationship stay with you. A WordPress setup with a purpose-built menu and ordering plugin like Food Menu gives you that channel without a developer, an app, or a permanent commission bill — which is exactly what a margin-conscious cloud kitchen needs.
Plan your menu, wire up ordering and delivery, tidy your kitchen workflow, and take that first direct order. Once it’s live, every improvement compounds — and every sale is fully yours.



