


On This Page
The number of people buying and selling goods and services online is increasing. That’s why C2C marketplaces like OfferUp have gained worldwide popularity and generated a whopping revenue.
Creating such a marketplace is a good business idea. But do you know how to build a website like OfferUP?
Do you want to know how to create this kind of marketplace easily by following a few steps? If so, we encourage you to read this comprehensive guide and take action accordingly.
What is OfferUp?
OfferUp is one of the biggest mobile-first C2C (consumer-to-consumer) marketplaces for local customers, sellers, and small businesses. OfferUp prioritizes in-person transactions rather than promoting online transactions.
It’s a marketplace website like Craigslist, Facebook Marketplace, and more that allows sellers and buyers to post and see listings and communicate with each other. But send and take payments for products/services outside the marketplace.
What Features to Include If I Want to Build a Website Like OfferUp
Before creating a website like OfferUP, you must thoroughly study this marketplace. Examine its layouts and features that helped it gain immense popularity.
Then, note your findings and apply what you have learned on your new website. To smoothen your path to website creation like OfferUP, we’ve outlined some key features below that you must include to create a site like OfferUp.
I. Search
Search is an essential feature of a marketplace website. As you know, people will search for items/listings/ads that interest them.
So, your website must have a search feature that helps users find their preferred items and narrow down the results by categories and locations.
II. Registration
The next must-have feature for your marketplace website is the registration facility. You need to add this valuable feature to your website to allow users to register on your marketplace, create profiles, and buy and sell products/services.
III. Product listings
Since you want to build a marketplace, your website must have the feature to let users create listings and display their products. Without this essential feature, your marketplace will be incomplete.
IV. Chat
Chat is another essential feature that your marketplace should offer. It is handy when users need to communicate with each other for buying and selling purposes. So, include a chat feature to let users easily communicate and improve the overall user experience.
V. Multilingual and Multi Currency Support
Once you build and promote a marketplace, your website will have users worldwide. Therefore, it’s essential to include multilingual and multi currency support to enable them to utilize your marketplace hassle-free.
Integrating multilingual and multi currency support will allow you to expand your business worldwide without restricting users by language or currency barriers.
How to Build a Website Like OfferUp – A Step-by-Step Guide
Here are the steps to creating a website like OfferUp. Follow these steps correctly to build a fully functional C2C marketplace.
Step 1 – Research the Market and Pick Your Niche

Before starting any business (online or offline), you must research the existing market in your niche. Also, examine competitors and customer needs. See how successful marketplaces operate their businesses. What are they doing well, and what are they missing?
You need to find the gap and fill it with your marketplace. Once you do, identify potential customer needs and pain points. Then, study your target buyers’ and sellers’ personas.
Think about your unique selling proposition, which sets you apart from your competitors. When finalizing a niche, consider all these factors.
Step 2 – Think About the Legal Requirements
After choosing a niche, check specific legal requirements for your business. These legal requirements can vary significantly based on the business type and location. Usually, you need to follow some laws and regulations and get the following documents (more or less).
- Business License
- Business Insurance
- User Agreements
- Taxation Laws
- Copyright Notices
- Vendor Agreements
- Privacy and Cookie Policies
The information shared above is for example purposes. It’s essential to seek experts’ advice to fully understand the legal requirements for launching a business.
Step 3 – Build a Business Model and Consider the Platform’s Features
At this step, think about how you’ll generate revenue. Usually, most marketplaces generate revenues through transaction fees, listing fees, subscriptions, or a combination of all these earning methods.
Then, outline the key features and functionality that your platform needs. We have already discussed the key features to include in a C2C marketplace.
Besides those features mentioned earlier, you will need a secure payment system, review and rating systems, and a shipping management system (optional).
Step 4 – Research and Choose a Domain
You now need to find a domain name for your C2C marketplace. In case you need to know what a domain is, here is your info:
“A domain in a website indicates a unique, human-readable web address that people type into web browsers to access a particular website.”
For example, radiustheme.com is a website address. Here, “radiustheme” is the domain name. We believe you now understand a domain name better. Let’s discuss what to consider before choosing a domain name for a C2C marketplace like OfferUp.
- First, brainstorm a few domain name ideas (Use domain name generators for help)
- Focus on keeping the name short, easy to type and spell, and memorable
- Ensure the domain name is relevant to your niche and feature keywords related to your industry
- Avoid choosing a domain name with hyphens, numbers, or any special characters
- Check the availability of your preferred domain using a domain registrar
- Also, see if social media handles with your domain name are available
- Check if your chosen domain name infringes any trademark
- Ensure your domain doesn’t have a past registration history and has no spam score
- Pick a domain that aligns with your brand image and target audience
- Choose the appropriate domain extension like .com, .shop, .market, etc.
These are the criteria to consider before picking and registering a domain with the best domain name registrar.
Step 5 – Connect Your Domain with a Hosting Provider

After securing the domain, you need to connect it to a hosting provider. Otherwise, people can’t access your marketplace and see its content. Here are some factors to consider when choosing the best hosting provider for your C2C marketplace.
- Learn about the hosting type (Shared, VPS, Cloud, WordPress, etc.) and select one according to your needs
- Ensure your selected hosting provider guarantees excellent performance, bandwidth, storage, and a high uptime of at least 99.99%
- Check if the hosting has a scalability feature because you never know when your marketplace traffic can spike
- Regular backups are essential, so pick a hosting company that offers regular and automatic backups
- Make sure your chosen hosting provider offers SSL certificates, DDoS, malware, and other security protection
- Go with a hosting company that provides 24/7, unparalleled customer support
- Check if the hosting provider has integration capabilities, as you may need to use diverse marketing tools, accounting software, etc.
- Research the hosting providers’ reputation
- Make sure it comes with an easy-to-use cPanel
- Compare pricing with other hosting providers before finalizing it
👉 Also read: Best Hosting For Classified and Directory Listing Website
Once you consider these factors, choose a hosting provider and connect your domain. Then, choose the best website builder or content management system to create a site like OfferUp.
You need to consider several factors before choosing a website builder or content management system for your marketplace. We won’t talk about those factors here. Instead, we recommend using the most popular content management system – WordPress.
It has everything you need to build a fully functional C2C marketplace like OfferUP. So, install it on your hosting and start building your site.
Step 6 – Install a C2C Marketplace Friendly Theme
After installing WordPress, you need to choose, install, and activate a marketplace-friendly theme. Here are some things to consider when choosing a theme.
- Ensure it is lightweight and responsive
- The theme should provide excellent customer support
- It will be better if your chosen theme comes with features such as product listing, multiple payment gateway integration, subscription module, and more
- Your chosen theme needs to be SEO-optimize
- Choose a theme that supports page builder
After careful consideration, we select the Radius Directory, a free WordPress theme. This theme comes with all the essential features you need to build a website like OfferUp and meet the above-mentioned criteria.
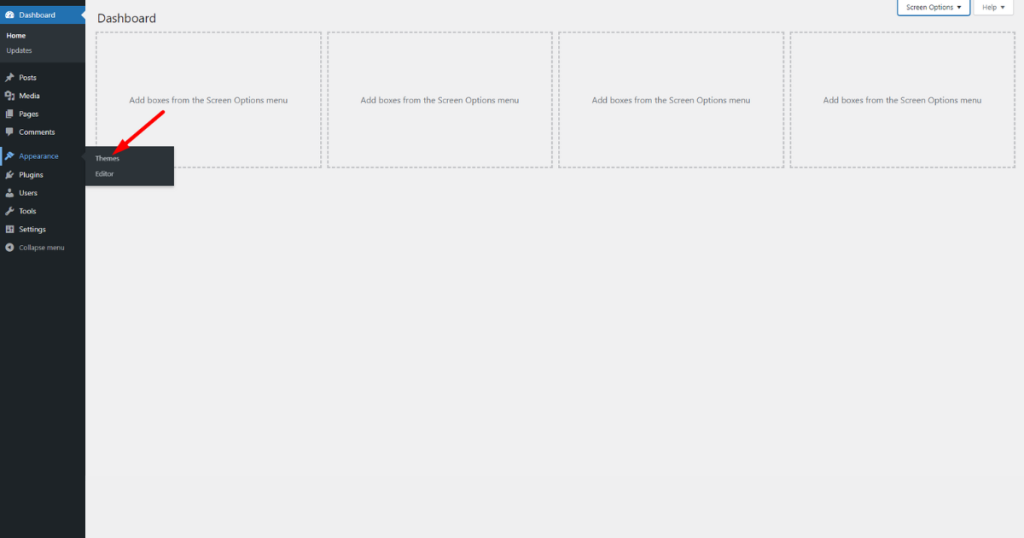
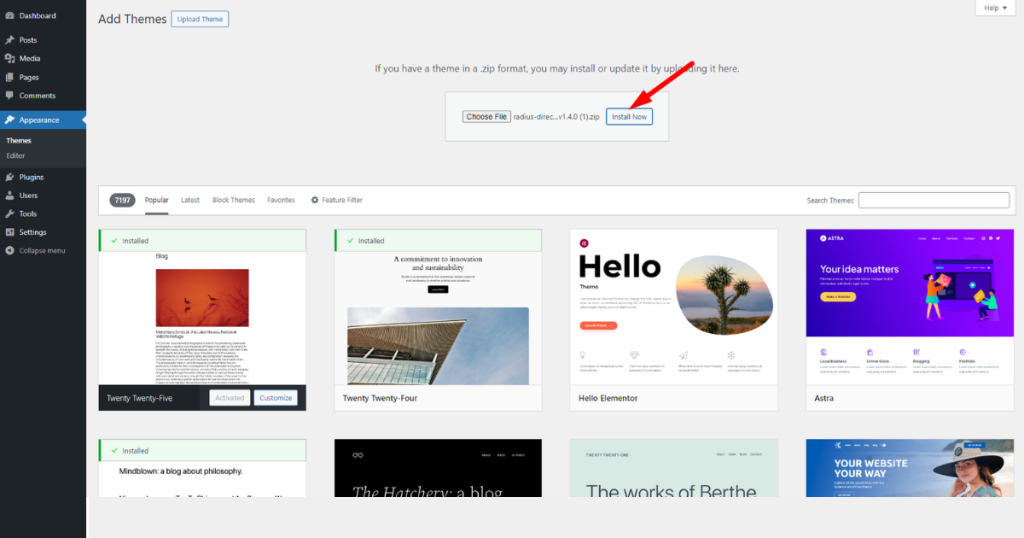
Hence, first download the Radius Directory to your computer. Then, go to your WordPress Admin Panel > Appearance > Themes.
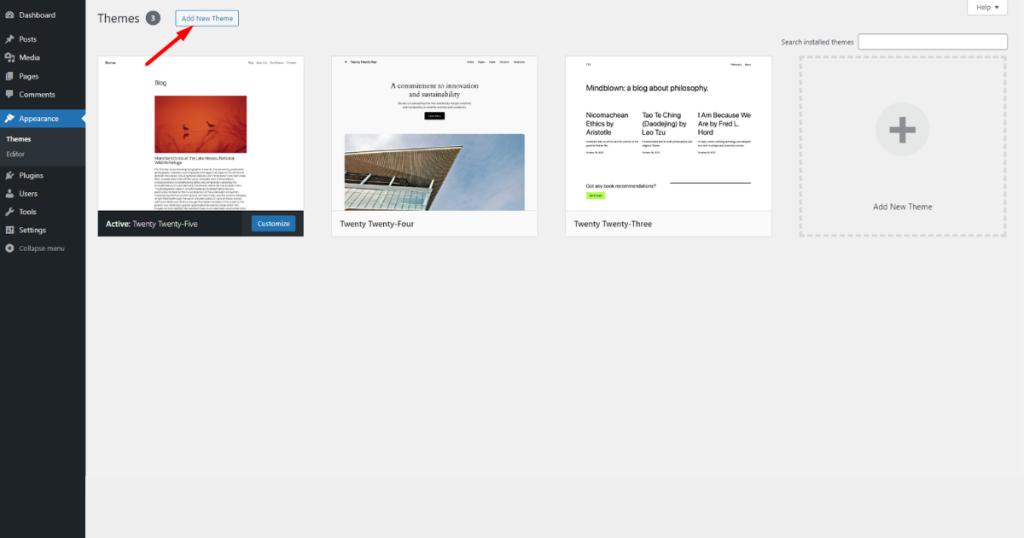
Afterward, click the “Add New Theme” button.
Now, hit the “Upload Theme” button.
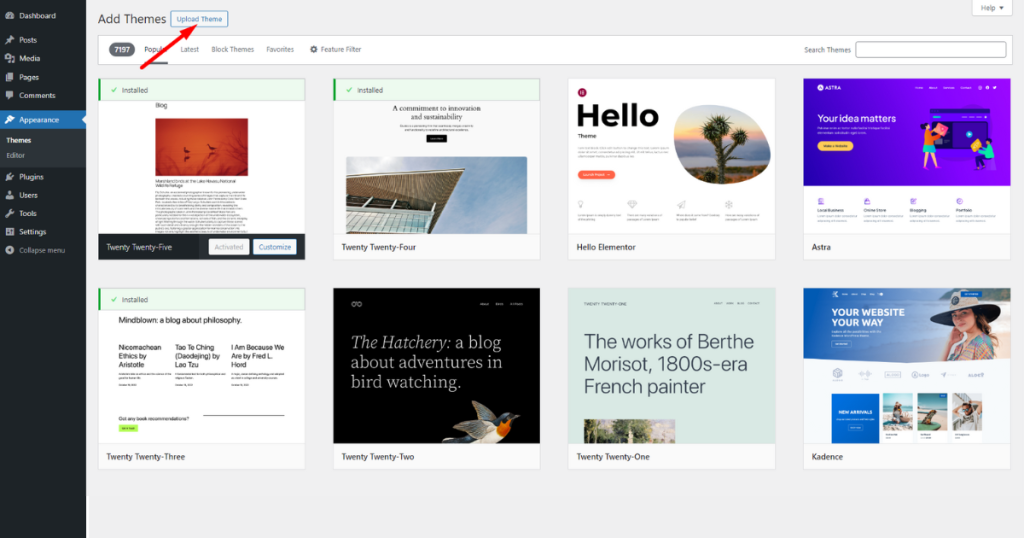
Then, choose the Radius Directory theme zip file and click the “Install Now” button.
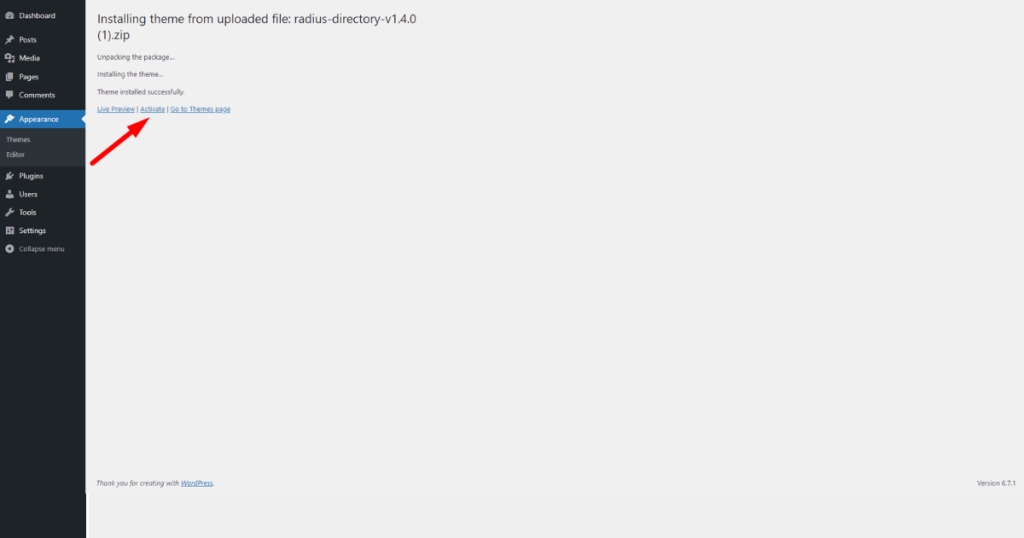
Right now, hit the ‘Activate’ option.
Step 7 – Install Necessary Plugins and Import Demo Content
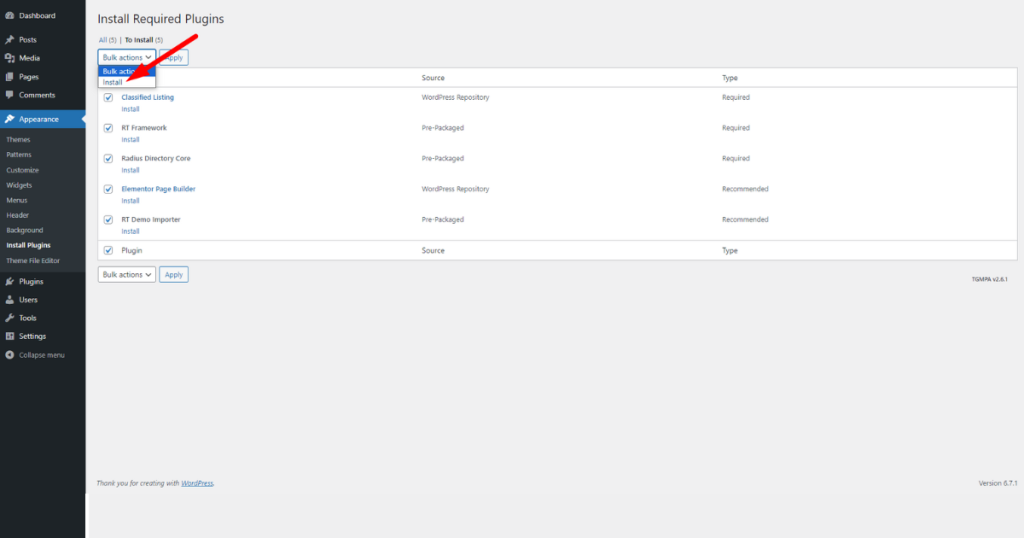
Once you install and activate the Radius Directory Theme, you’ll see a notification asking you to install a few plugins: Classified Listing, Radius Directory Core, RT Demo Importer, RT Framework, and Elementor.
Just click the “Begin installing plugins” option.

After that, select all the plugins, choose ‘Install’ from the “Bulk actions” drop-down menu, and hit the ‘Apply’ button. Wait a while……………….
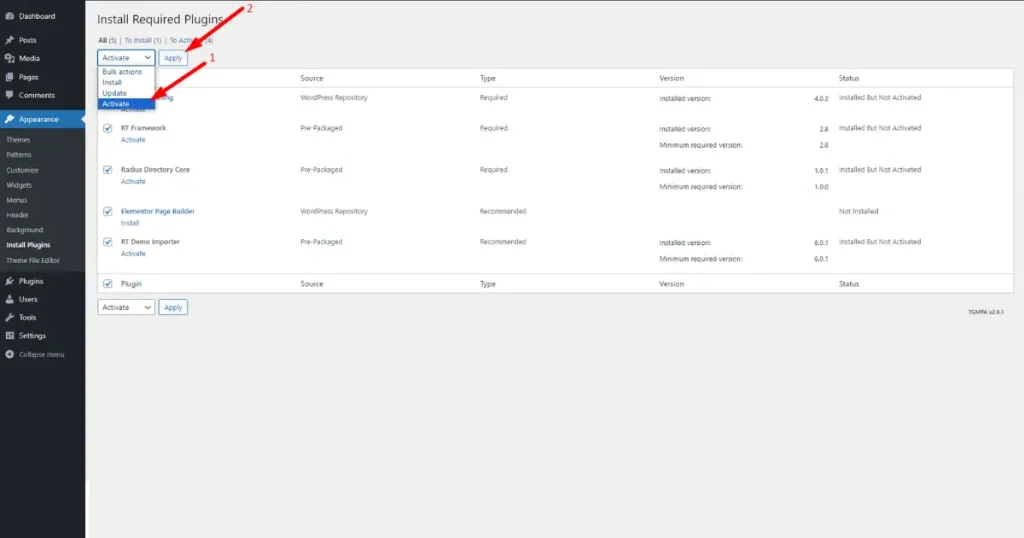
In the same way, checkmark all the plugins, select ‘Activate’ from the “Bulk actions,” and click the ‘Apply’ button.
Import Demo Content
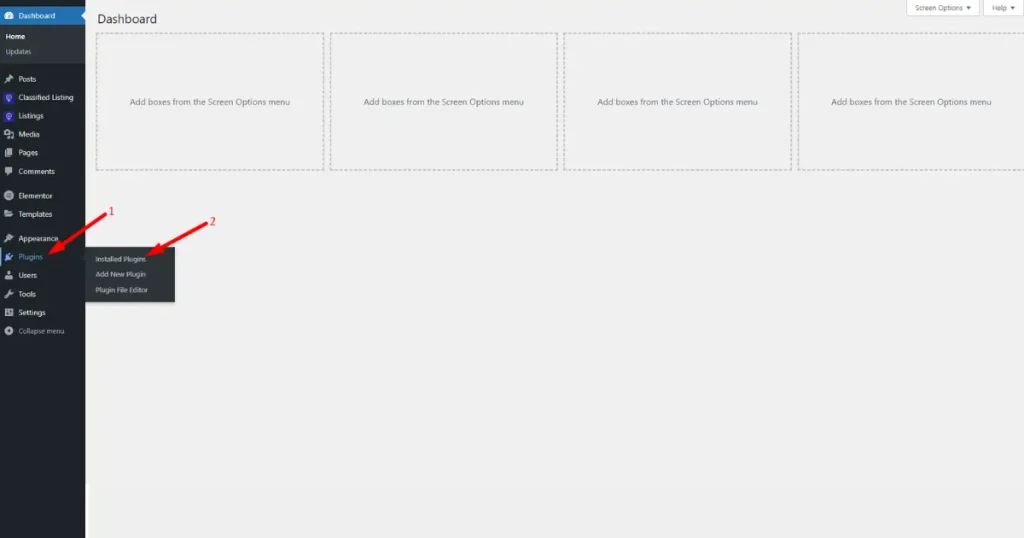
Okay, we’ve installed all the plugins. Let’s now import demo content to appear as a professional C2C marketplace. Head to WordPress Admin Panel > Plugins > Installed Plugins.
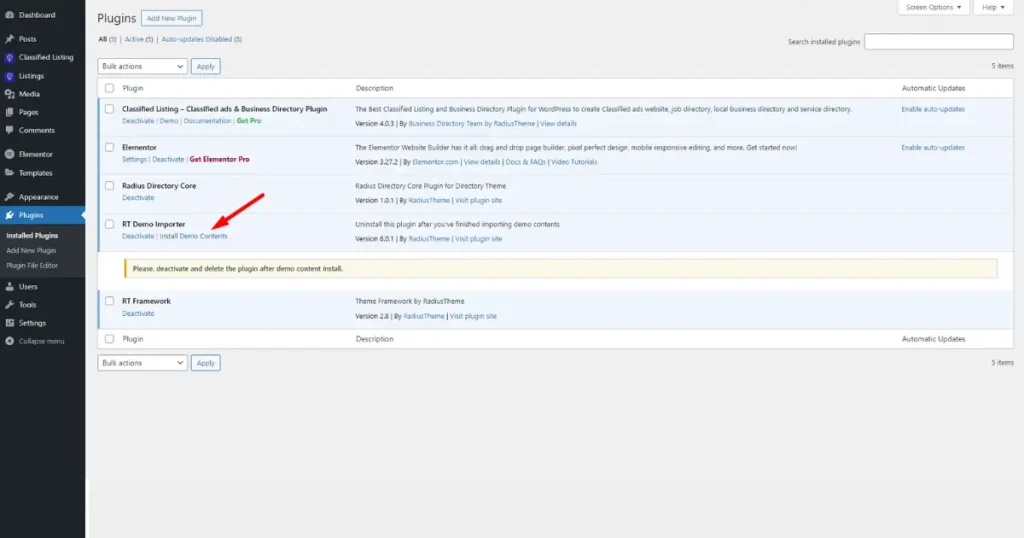
Then, navigate to “RT Demo Importer” and click “Install Demo Contents.”
You’ll now notice a “Demo Content Install” window. Hit the ‘Install’ button.
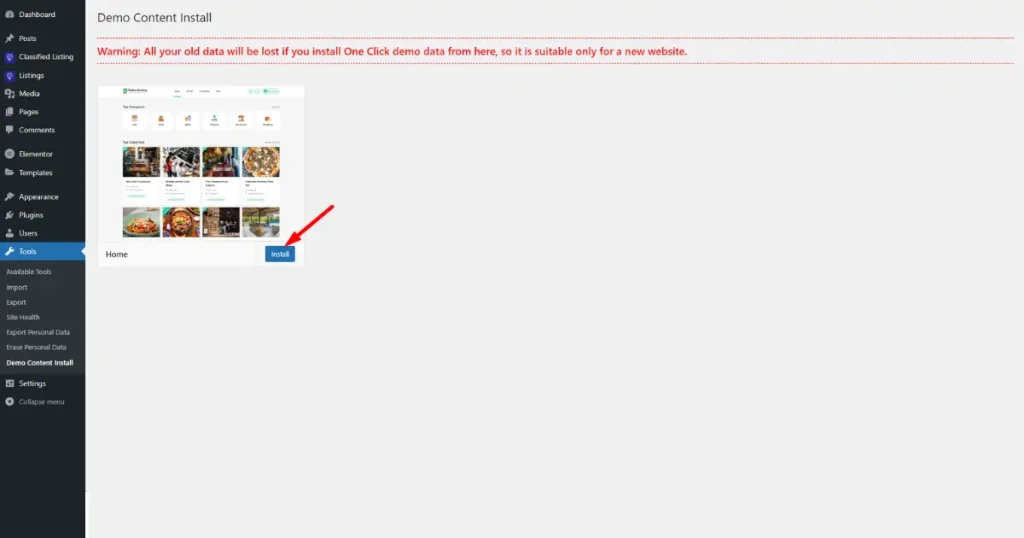
You’ll then see a warning pop-up telling you that this installation will delete all of your website’s existing data and content. Click ‘OK’ if you are okay with it and wait for the demo content importation.

Voila! You’ve created a website like OfferUP. Now, visit your website. Here’s what our one looks like.

Step 8 – Customize Your Website
Although we’ve built a marketplace like OfferUp, we need to customize it to our needs. We will start by modifying the listing form, which we can do using the Form Builder feature. Here’s how.
Utilize the Form Builder
Go to WordPress Admin Dashboard > Classified Listing > Form Builder.
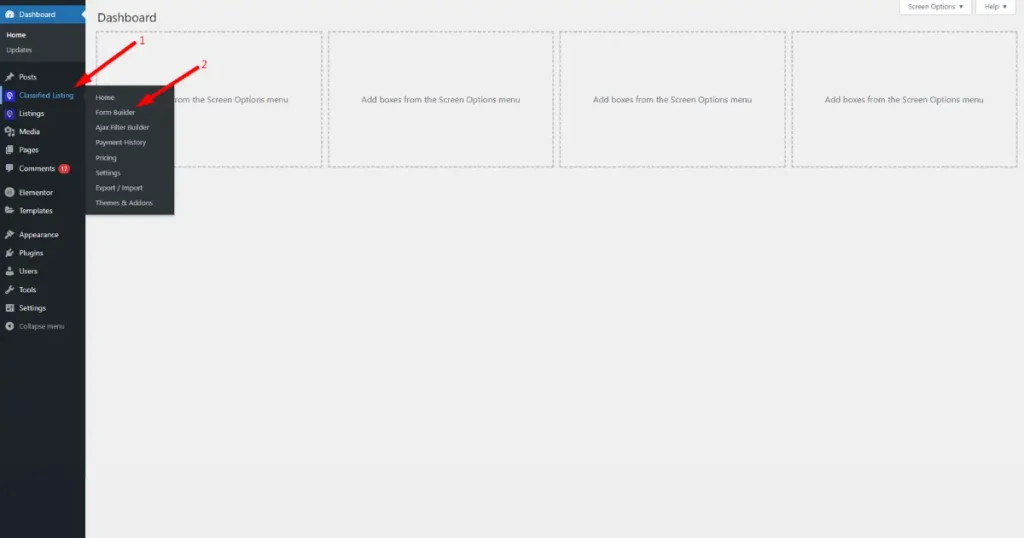
Go to Form Builder
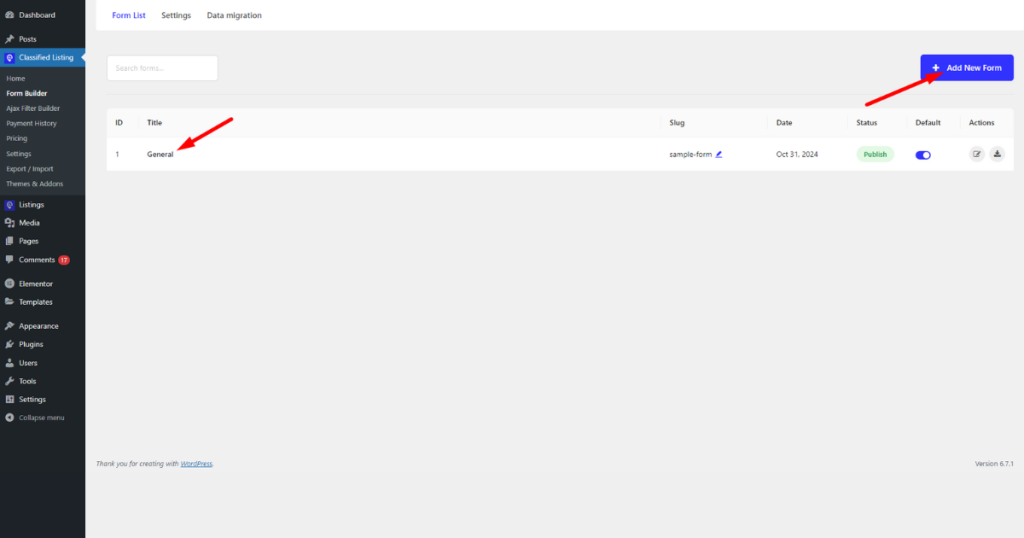
You’ll now notice that a sample form titled ‘General’ has already been created for you. You can either edit this existing form or build a new one by clicking the “+ Add New Form” button.
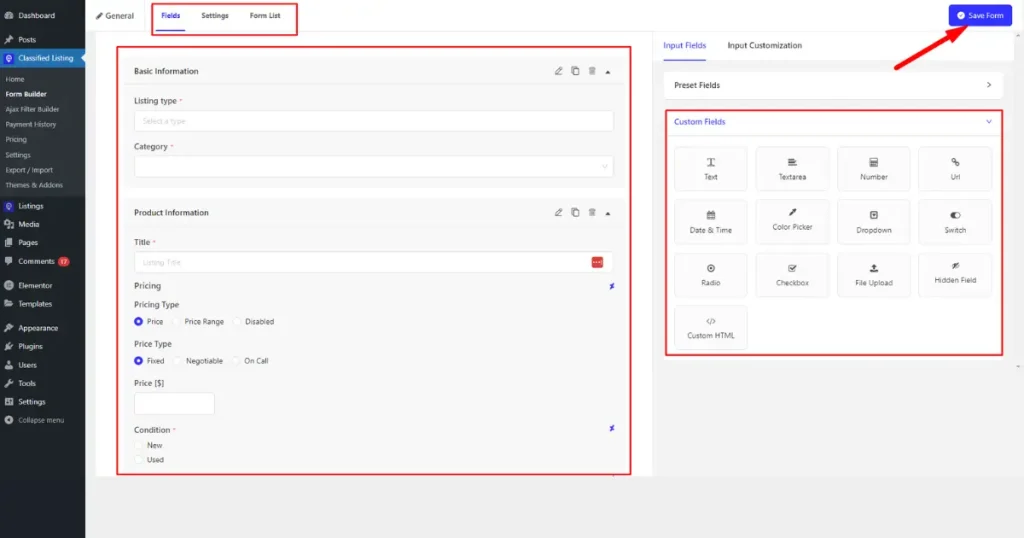
You’ll now notice the form fields. Edit each field, add new ones, remove unnecessary fields, explore input fields, and customize the listing form to align with your business. Then, hit the “Save Form” button.
Create Listing Categories
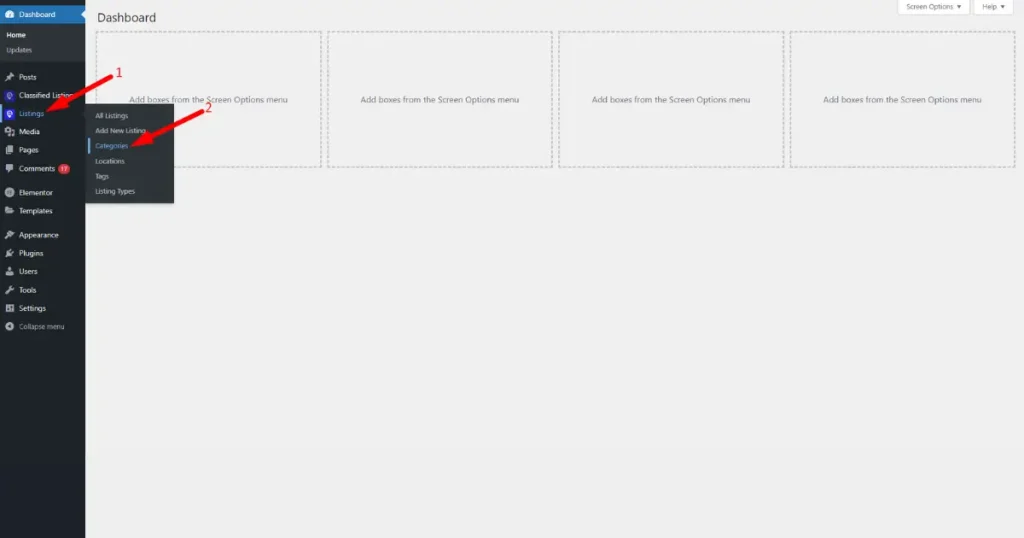
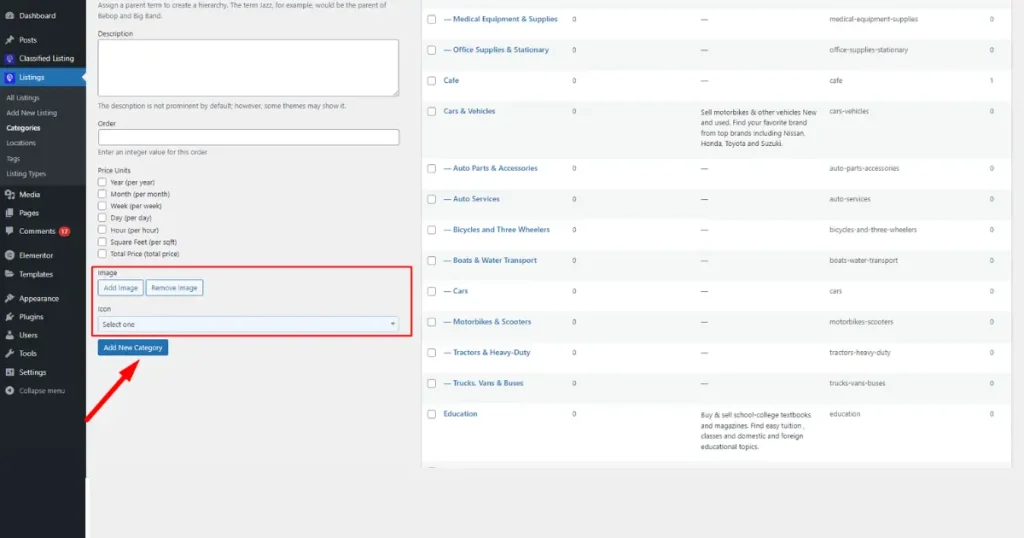
Head to your WordPress Admin Dashboard > Listings > Categories to create a listing category.
You’ll now see all existing categories created when you import demo content. You can edit these old categories or create a new one that suits your business. Hence, to build a new category, fill in all the necessary fields.
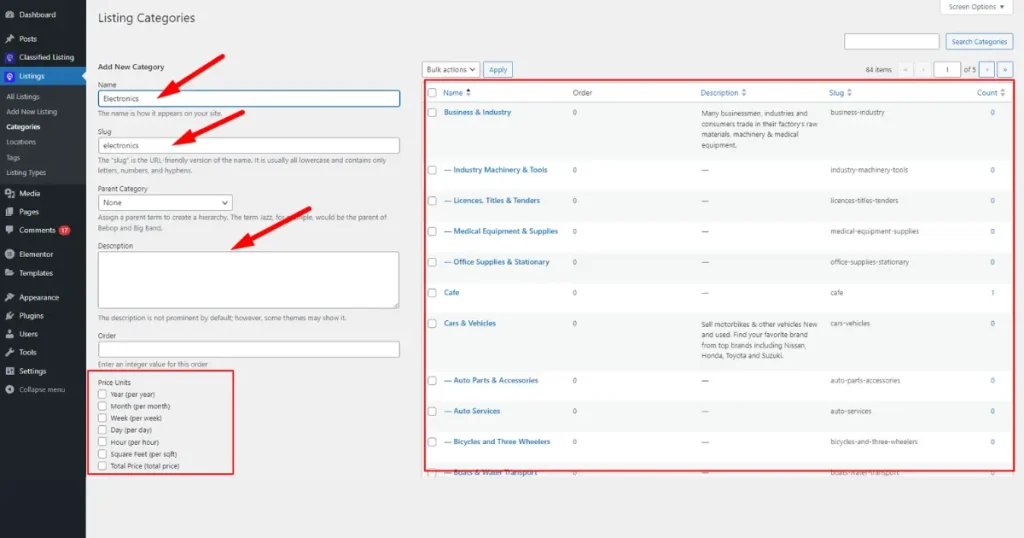
Afterward, set an image and an icon for your listing category; it’s optional. Finally, click the “Add New Category” button. There, you’ve just created a new listing category.
Add a Listing Location
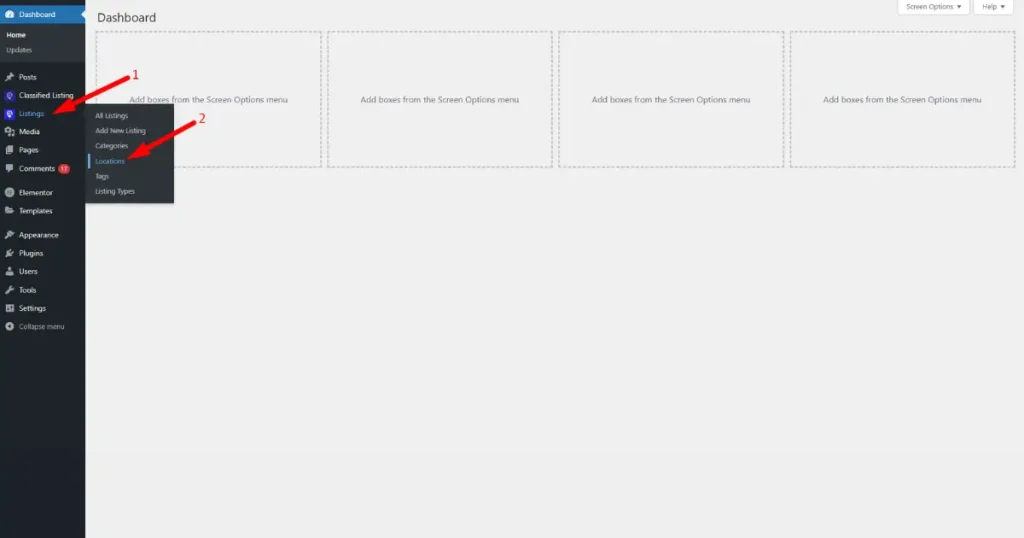
Adding a listing location is easy with this Radius Directory theme. Just navigate to WordPress Admin Panel > Listings > Locations.
Then, fill in the necessary fields as you did while creating a listing category. Also, you can edit the existing locations. Once you’ve created or edited a location, hit the “Add New Location” button. That’s it.
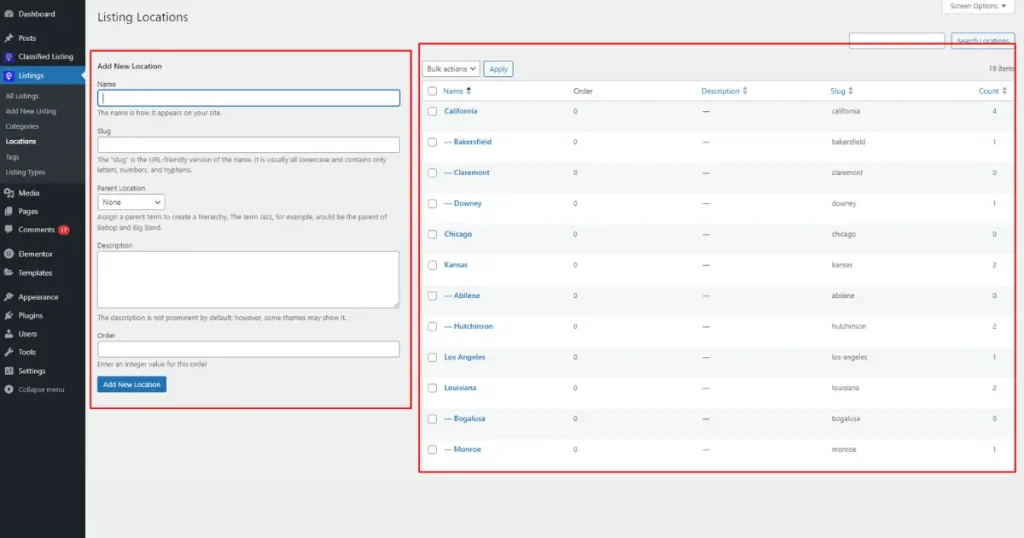
After building a listing form, creating listing categories, and adding listing locations, we encourage you to explore other essential features of the Classified Listing plugin that comes with the Radius Directory theme. Also, read its documentation to understand this plugin better.
Enable Registration Facility
Allow users to create accounts on your website by enabling the account registration facility. To do so, head to the WordPress Admin Dashboard > Classified Listing > Settings.
Then, click the “Account & Policy” tab and check mark the “Account Creation” option. That’s it.

Customize Header, Footer, and Other Web Pages
You now need to customize your website’s header and footer sections. Include your C2C marketplace logo and add your site name in the header. Share your marketplace’s short description of what it is in the footer area.
The footer should include social media links, contact addresses, and other necessary information. You can also redesign the header and footer sections as you wish. Afterward, you can edit other essential inner pages according to your needs.
N:B: To keep the article concise, we avoid showing you how to customize a specific section or a website’s entire web page. We believe you can do that independently, with or without help from external sources.
Step 9 – Integrate Multiple Payment Gateways
After designing and customizing the entire marketplace, you can integrate famous and necessary payment gateways to help users easily complete transactions. Here’s how to integrate popular payment gateways with the Radius Directory using Classified Listing.
Go to the WordPress Admin Panel > Classified Listing > Settings.
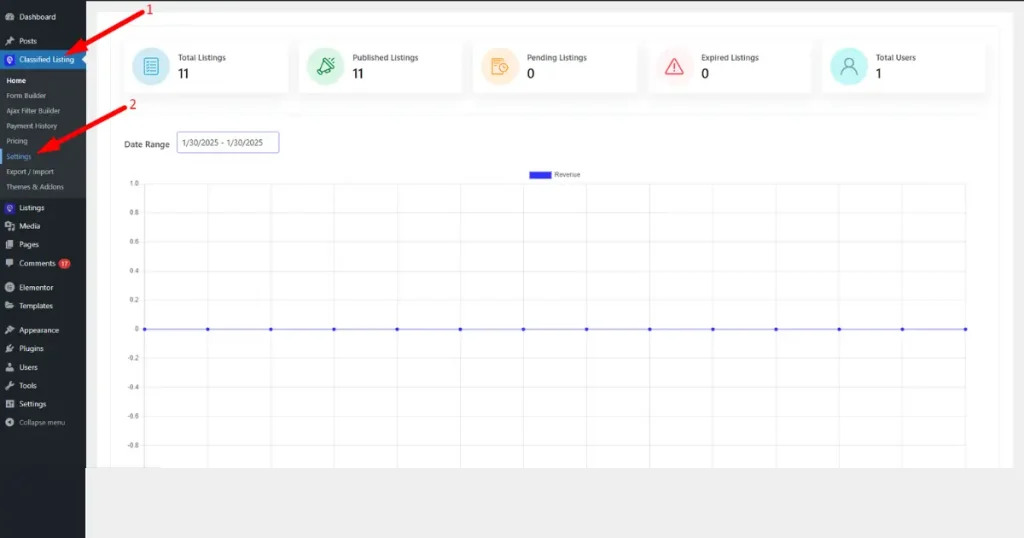
Then, hit the ‘Payment’ tab on the left side.

You can now see three tabs, including “Checkout option,” ‘Offline,’ and ‘PayPal’on the right side. Explore each tab, choose your preferred payment gateway tab, and fill in the fields with the necessary information.
For example, you want to integrate PayPal with your C2C marketplace. So, click the ‘PayPal’ tab and fill in the corresponding fields. Read our PayPal documentation to integrate this famous payment gateway with your website correctly.
You might now wonder if Classified Listing only lets you integrate a few payment gateways. If you use the premium version of Classified Listing, you can reap the benefits of other payment gateways, such as Stripe, Authorize.net, WooCommerce, Paystack, Payfast, etc.
Step 10 – Publish a Listing on Your Website Like OfferUp
Congratulations! You are all set to post ads or listings on your C2C marketplace. As an admin, you can create listing posts from both the back and front end.
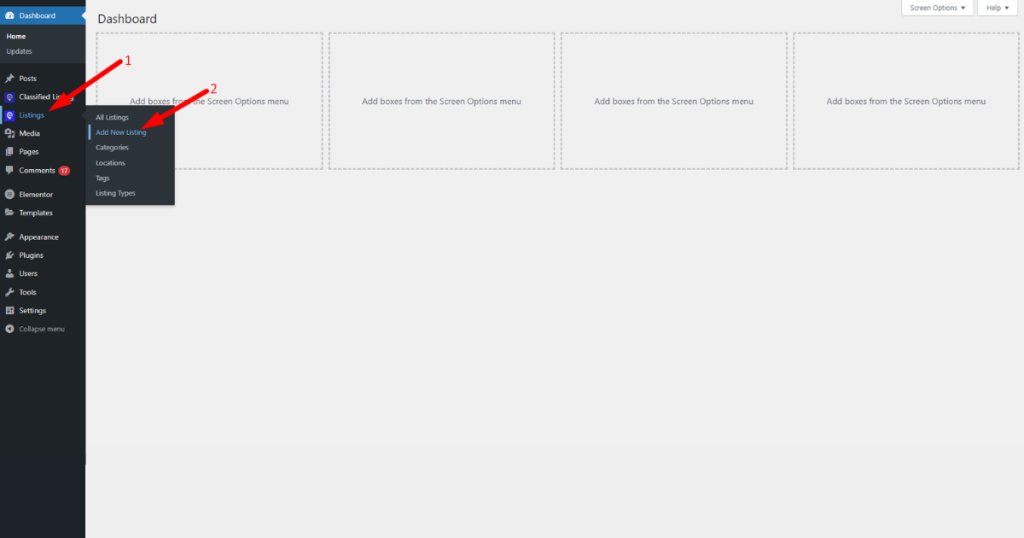
To create a listing from the back end, go to WordPress Admin Panel > Listings > Add New Listing.
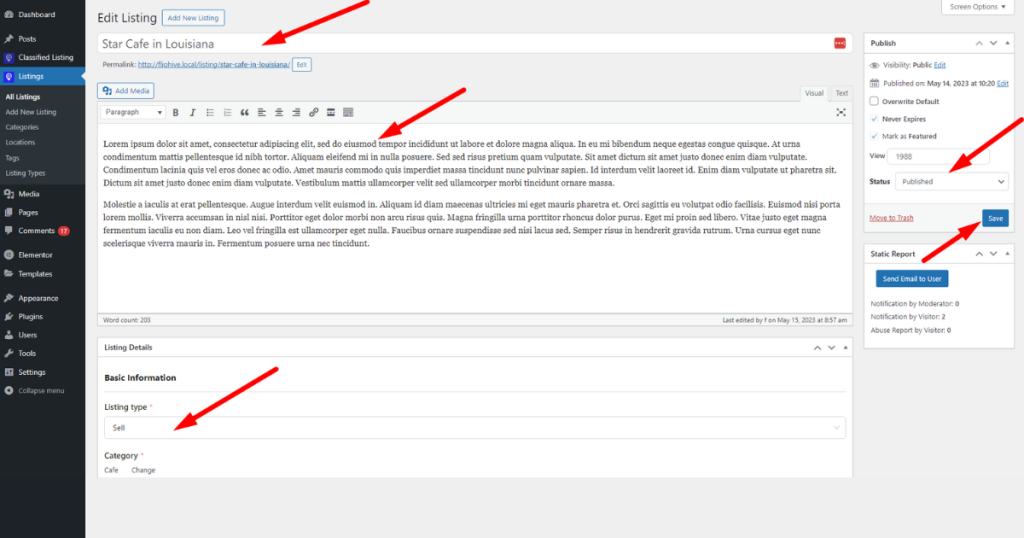
Now, give your listing name and description, set your listing type and category, include product information and pricing, add listing images and contact details, set business hours (optional), and include other necessary information.
Finally, set the listing status to ‘Publish’ and hit the ‘Save’ button.
After that, visit your website and click the “All Listings” menu to view your ads.

To create a listing from the front end, visit your website and click the “+ Add Listing” button on the top right.

Afterward, work on the listing form, scroll down, and click the ‘Submit’ button. That’s it.
That’s how you can easily build a website like OfferUp and publish ads!
Bonus: Integrate Membership Feature to Earn Money
Earn money using your C2C marketplace. How? You can generate revenue by allowing sellers to promote their listings through diverse promotional modules like featured ads, top ads, etc.
You can create customized promotional packages for your users using the Pricing menu of Classified Listing and earn money when they (sellers) promote their listings.
Not only this, but you can also create membership packages for users using our Store and Membership Addon. Limit users’ ad posting ability and allow them to create and post listings in their own stores with this fantastic add-on.
👉 Good Read: How to Generate Money from an Online Directory Website
As you can see, the earning opportunity is enormous in a C2C marketplace. Therefore, build such a website today by reading this guide. Also, watch our video tutorial on how to create free classified website in WordPress.
Rounding Up
These are the easy steps to building a website like OfferUp. From now on, you can easily create a C2C marketplace.
Our effort will pay off if you find this article helpful. If you do, you can share it with your friends or anyone seeking an easy solution to build a website like OfferUp.
That’s all with this article. We’ll meet you again soon with more informative and helpful content. Until then, keep reading our other blogs.



