


On This Page
Want to build a classified ads website like OLX, Craigslist, or Gumtree — without spending a fortune? This guide shows you exactly how to do it using WordPress and the free CLClassified theme.
No coding required. You’ll go from a blank WordPress install to a fully working classified ads platform with user submissions, location filters, categories, and monetization within an hour.
Why Build a Classified Ads Website Like OLX?
OLX generates revenue by connecting buyers and sellers of second-hand goods, real estate, jobs, and services in local markets.
People always need a place to post and discover local listings. This problem exists in every country, every city, and every niche market.The platform thrives because it solves this simple problem.
With WordPress, you can replicate this exact model for your own community, country, or (cars, real estate, electronics, pets — anything) and own 100% of the revenue.
The best part? The core tools to build classified ads websites are completely free.
What You Need Before You Start
You don’t need a developer or technical background. Here’s everything required:
| Domain Name e.g. myclassifiedsite.com (~$12/year) | WordPress Hosting Any shared host works (Hostinger, SiteGround, Bluehost) |
| WordPress Installed One-click install available on most hosts | CL Classified Theme Free on WordPress.org — no payment needed |
| Classified Listing Plugin Free version available — powers all listing features | 60 Minutes That’s all the time you need for a complete setup |
💡 Pro Tip: Most hosting providers (like Hostinger or SiteGround) offer WordPress pre-installed. Once your domain and hosting are ready, skip straight to Step 1.
👉 Good Read: Best Hosting for Classified Website
Step 1: Install the CL Classified Theme (Free)
The CL Classified theme is a purpose-built, free WordPress theme designed specifically for classified ads websites. It pairs perfectly with the Classified Listing plugin and gives you a professional OLX-style layout out of the box — completely free.
How to install the theme from your WordPress dashboard:
1. Log in to your WordPress admin dashboard at yoursite.com/wp-admin
2. Go to Appearance → Themes in the left sidebar
3. Click the “Add New” button at the top of the page
4. In the search box, type “CL Classified” and press Enter
5. When the theme appears, hover over it and click “Install“
6. After installation completes, click “Activate“
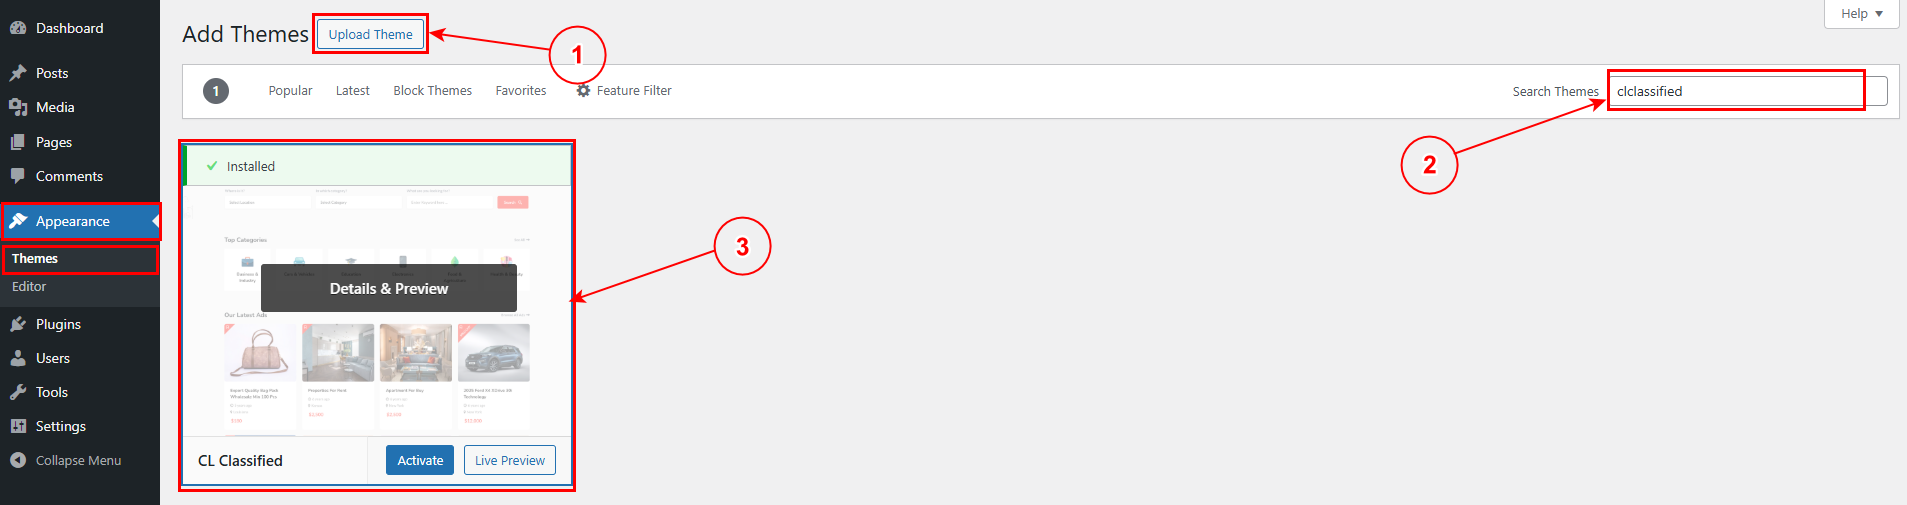
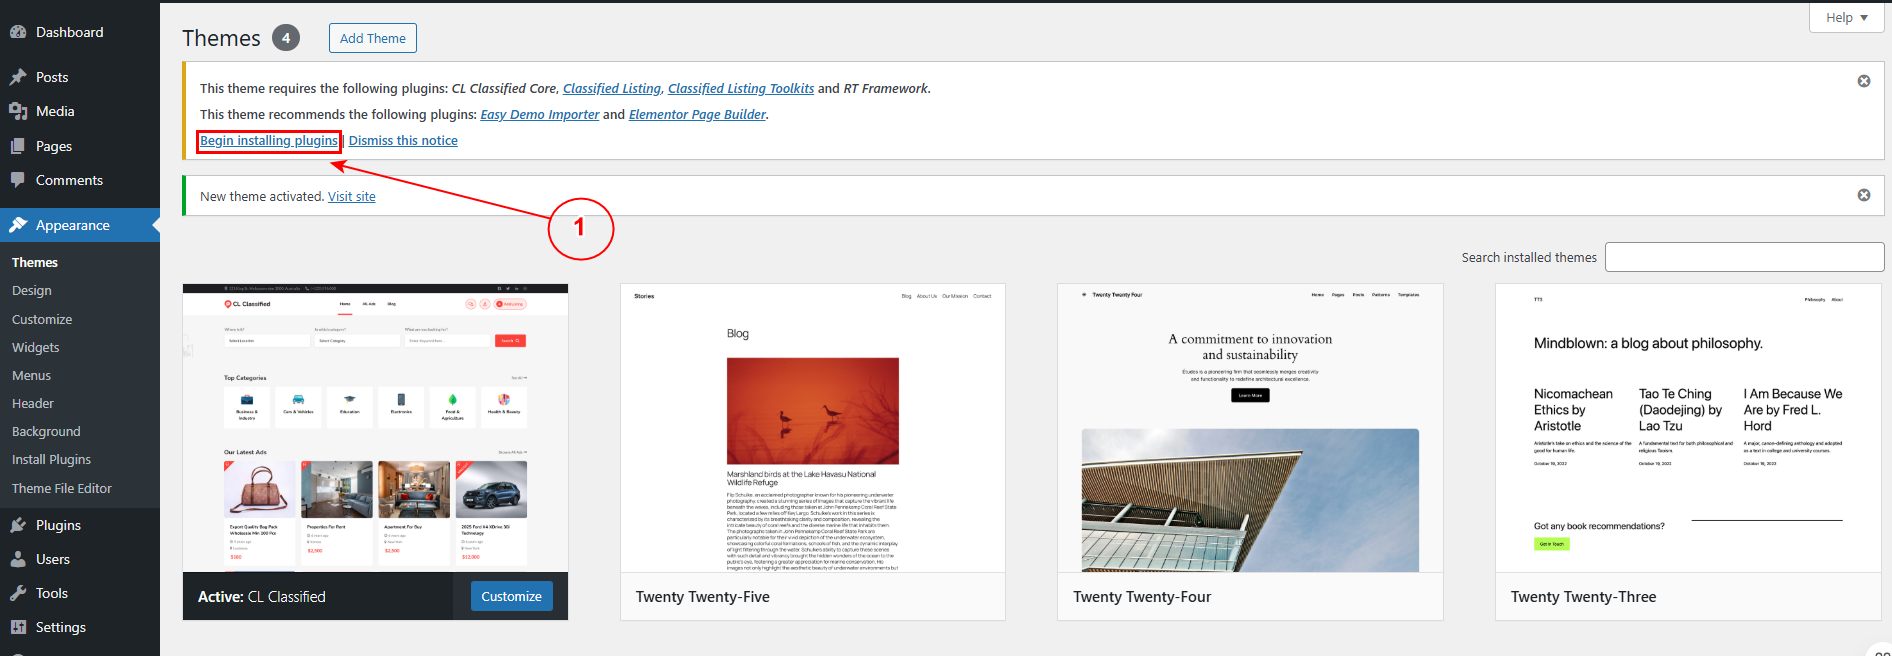
After activation, WordPress will prompt you to install the required plugins along with Classified Listing plugin. Click the prompt to install it. This plugin has all the listing features, search filters, user submissions, and more.
✅ Alternatively: You can also download the theme directly from wordpress.org/themes/cl-classified/ and upload it manually via Appearance → Themes → Add New → Upload Theme.
Step 2: Import Demo Content
Starting with demo content is the fastest way to get your site looking exactly like a real classified platform. The demo includes pre-built pages, sample listings, menu structures, homepage widgets, and sidebar layouts — essentially everything you’d spend hours building from scratch.
How to import demo content:
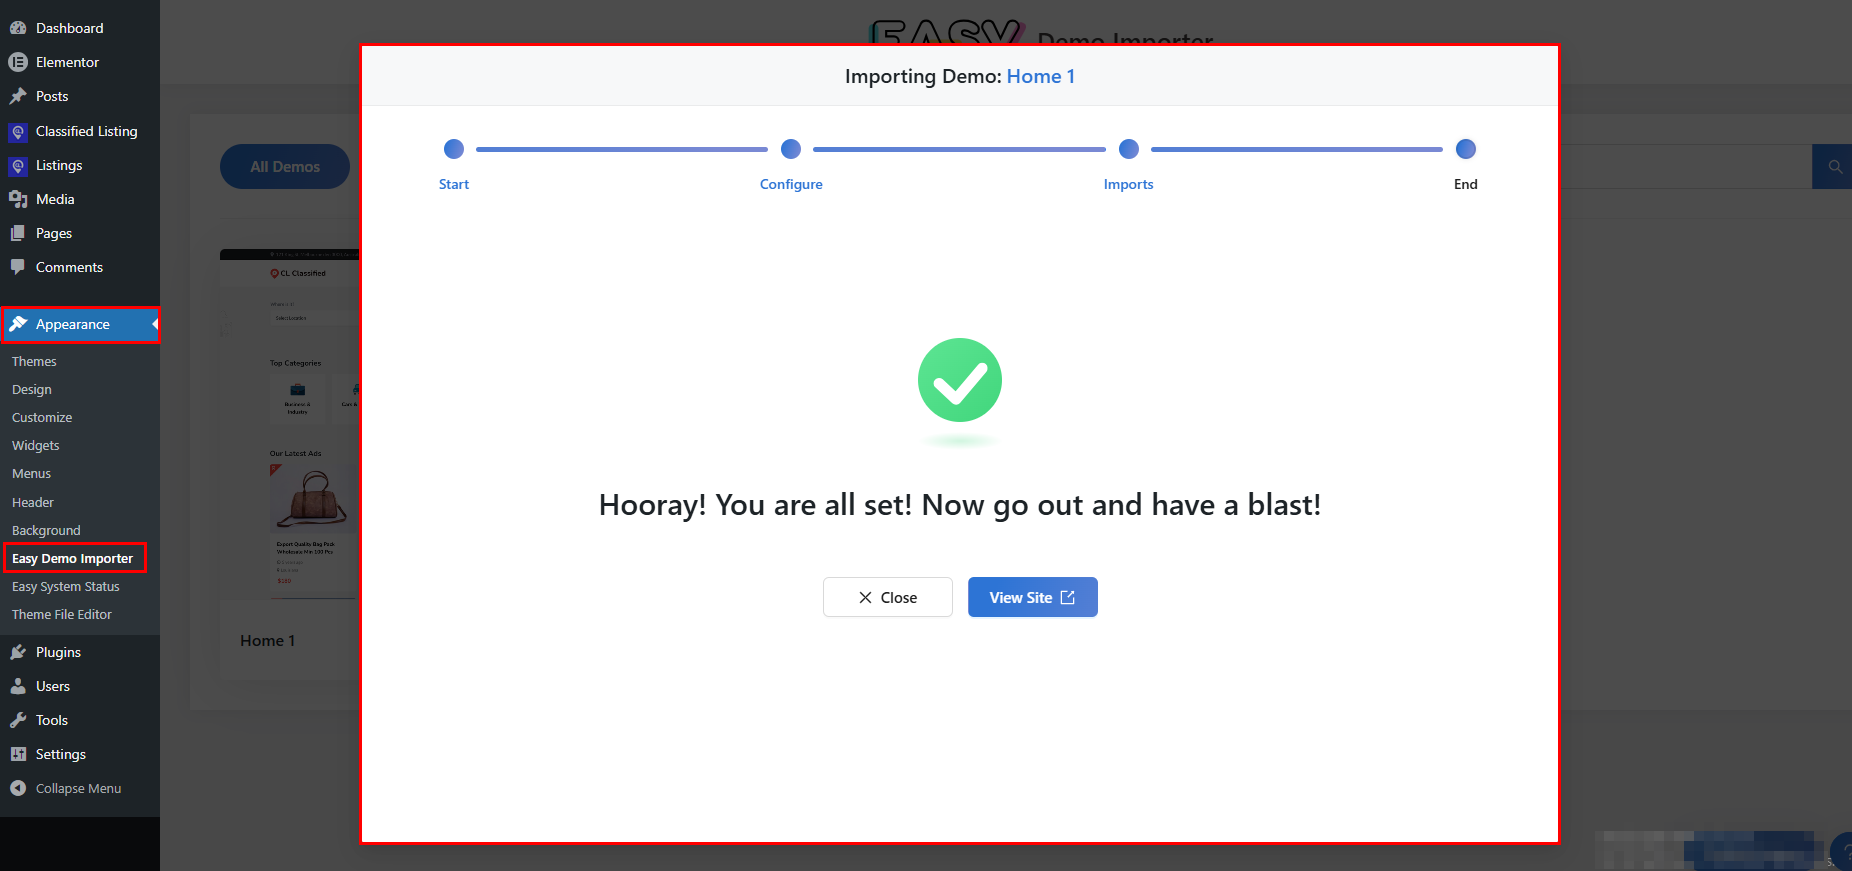
1. In your WordPress dashboard, go to Appearance → Easy Demo Import.
2. Browse the available demo layouts — choose the one that best matches your vision (e.g., a general classifieds demo or a niche-specific one).
3. Click “Import” on your chosen demo.
4. Wait for the import to complete — this usually takes 1–2 minutes.
5. Once done, you’ll see the successful demo import notification.
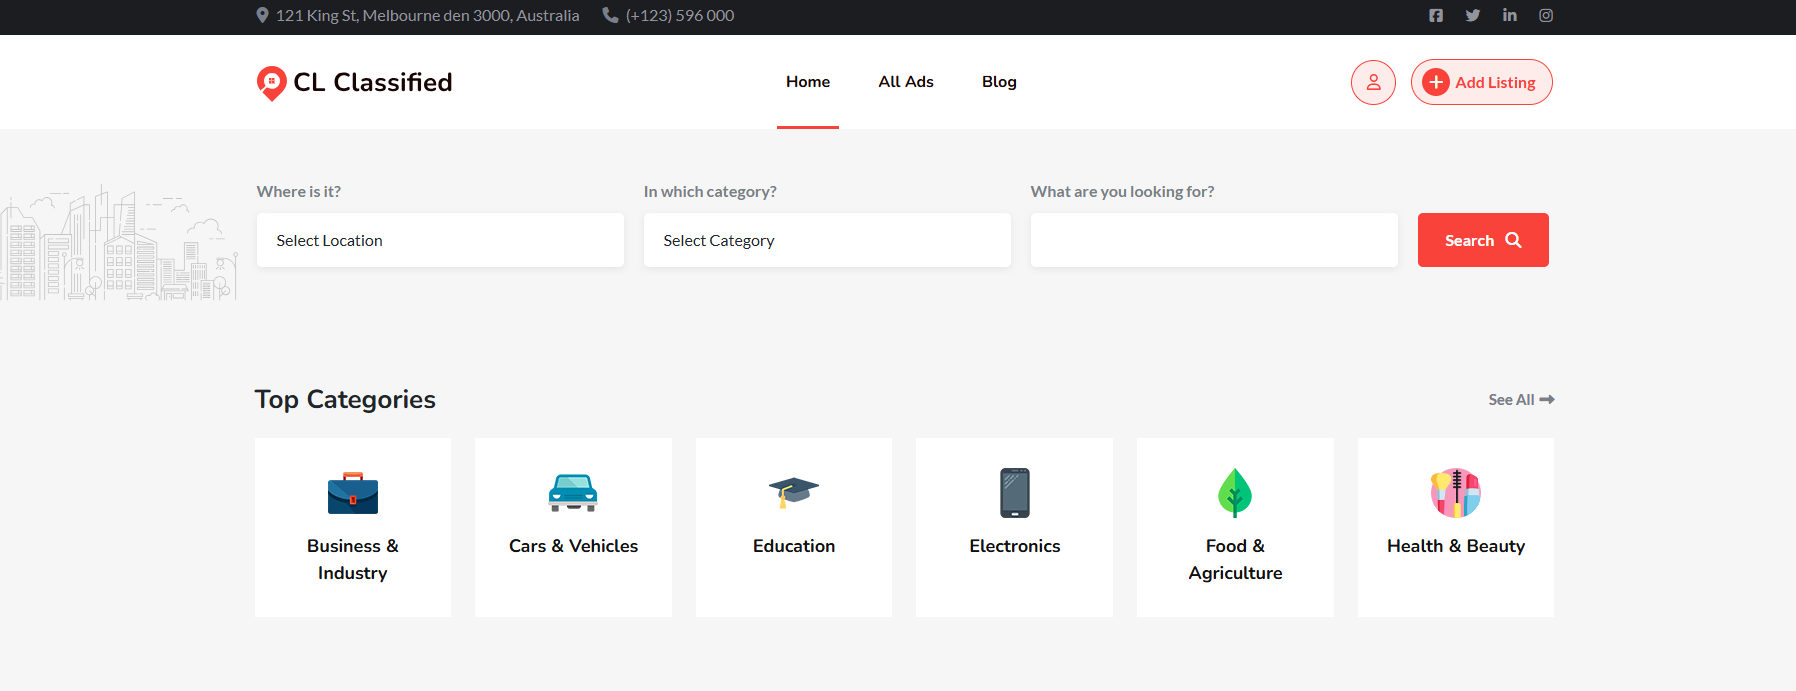
This is how your website homepage will look like after the demo import.
⚠️ Important: Demo import works best on a fresh WordPress installation. If you already have content on your site, the import might conflict with existing pages or settings. Always back up your site before importing demo content.
Step 3: Create Locations & Categories
Locations and categories are the backbone of any classified ads site. They let users filter listings by where they are and what they’re looking for. This is exactly like how OLX lets you browse “Cars in New York” or “Electronics in London.”
Creating Locations
The plugin supports hierarchical locations. You can have Countries → States/Provinces → Cities, giving you full geographic precision.
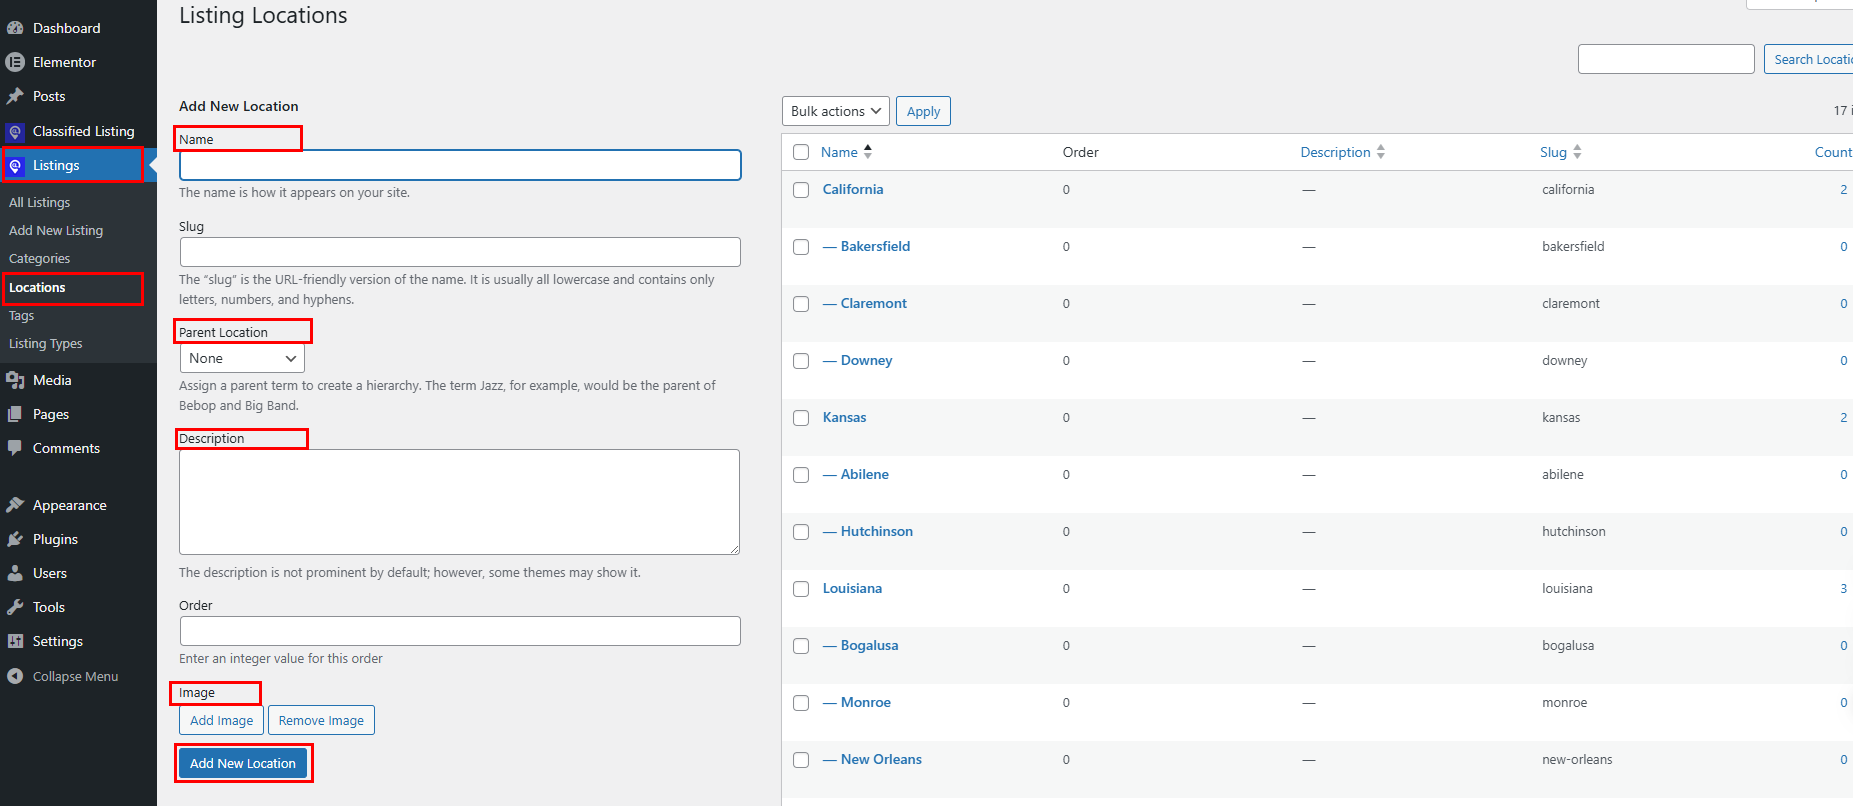
1. Go to Listing → Locations in the left menu
2. Click “Add New Location“
3. Enter the location name (e.g., “United States”)
4. Leave “Parent Location” empty for top-level (country), or select a parent to create a city/state under it.
5. Optionally you can add a short description of the location.
6. You can also add a location icon or image.
6. Click “Add Location“.
Now repeat the same process for all your target regions.
Creating Categories
Categories organize your listings by type — like “Cars & Vehicles,” “Real Estate,” “Electronics,” “Jobs,” “Pets,” and so on. You can also create sub-categories (e.g., Electronics → Mobile Phones).
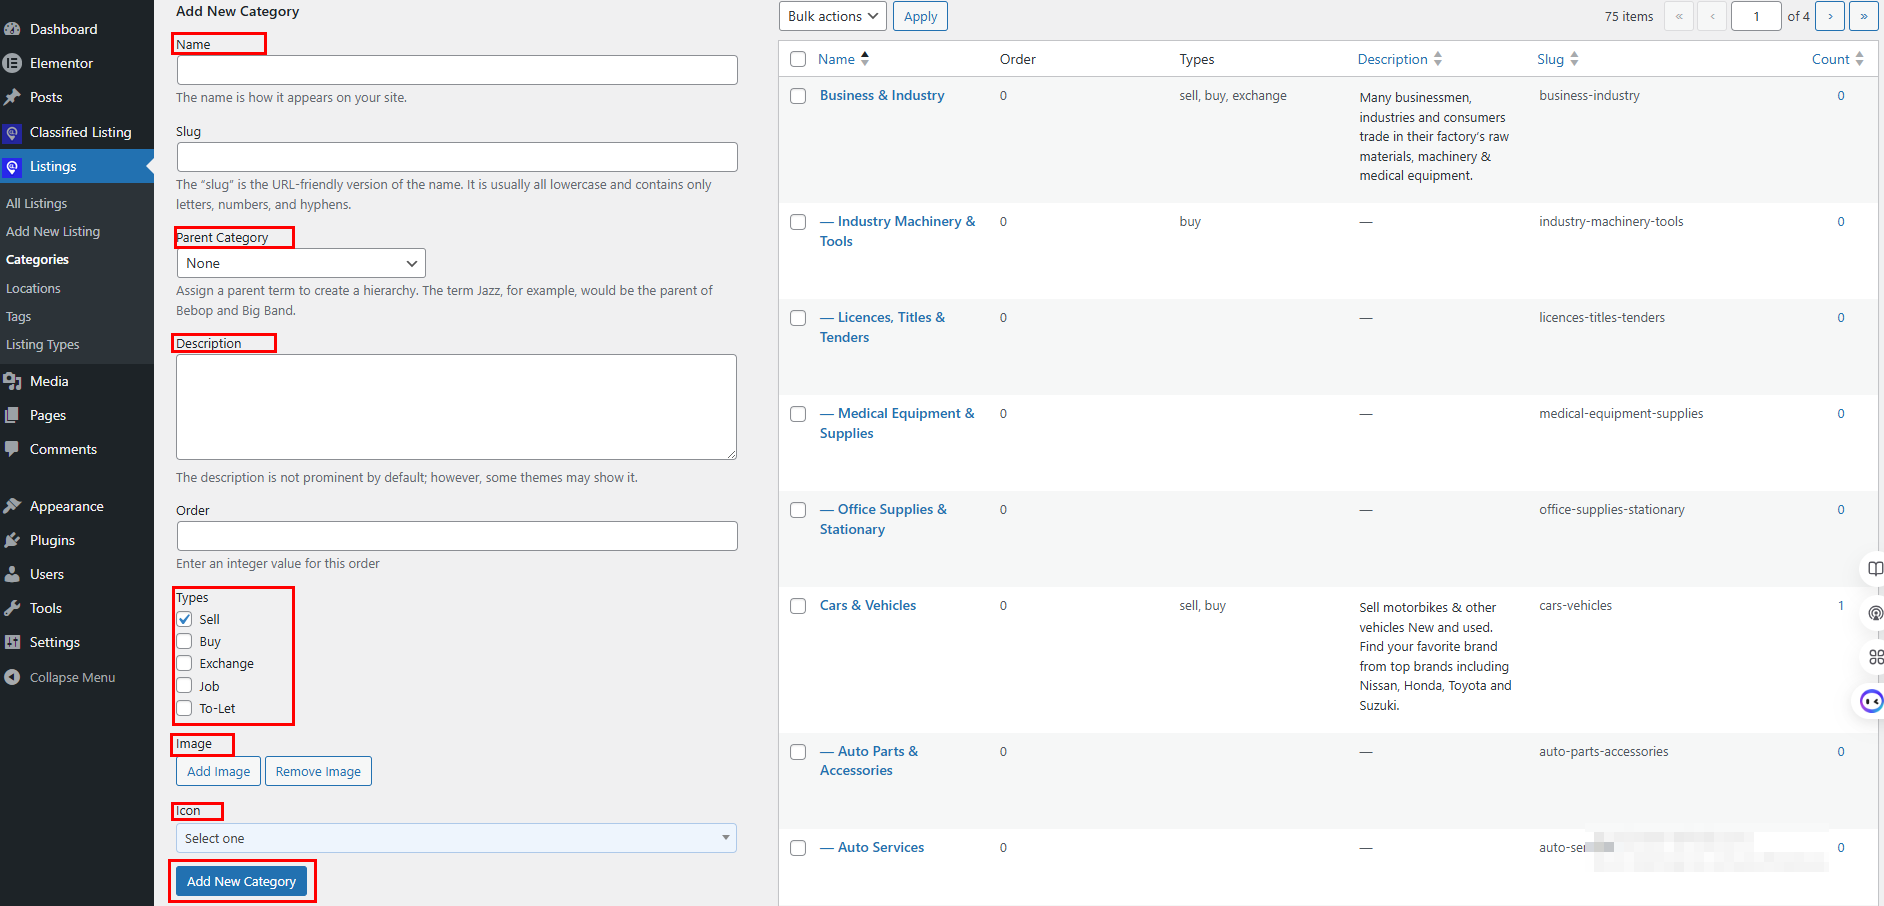
1. Go to Listing → Categories.
2. Enter a category name (e.g., “Real Estate”).
3. Set a parent category if creating a sub-category.
4. Write a short description of the category.
5. Include the types of category Sell, Buy, Exchange, Job, To-Let.
6. Upload a category icon or image to make it visually appealing on the homepage.
7. Click “Add Category“.
This is how your website homepage will look after adding the new categories in the listing.
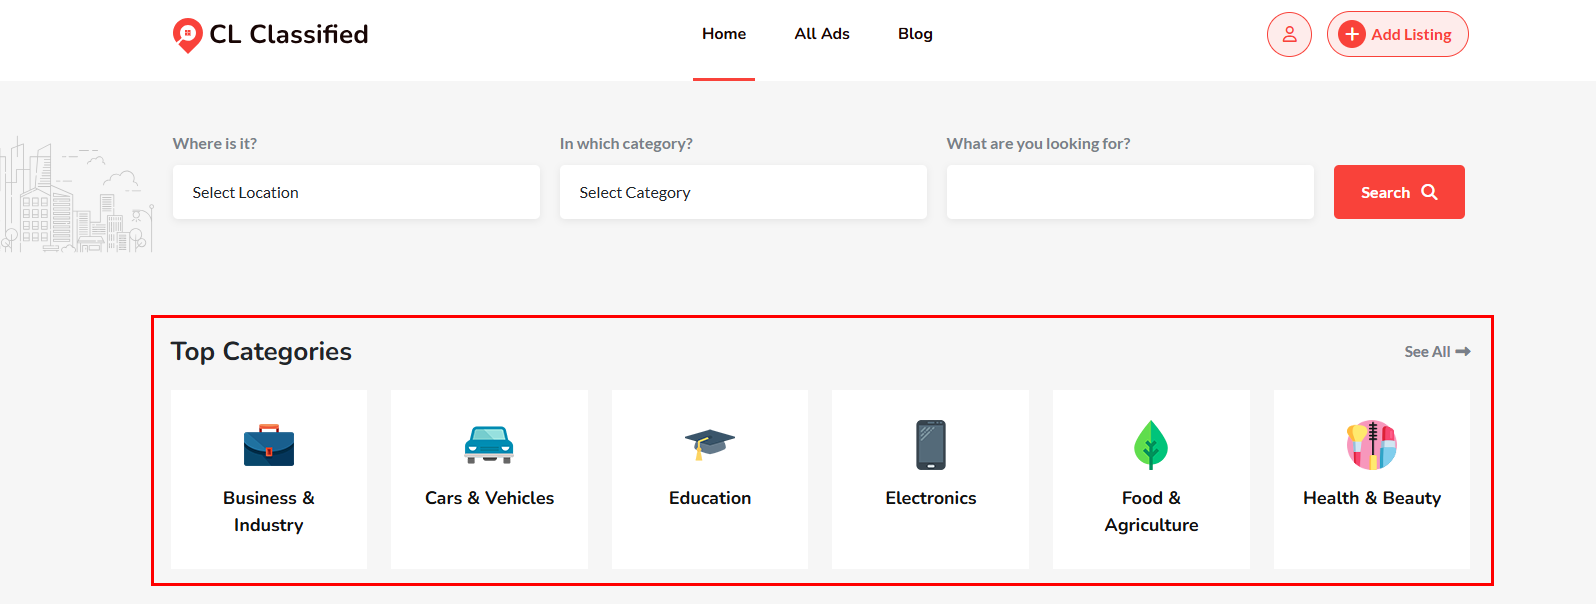
💡 Tip: Use square, consistent icons for all categories. Icon packs like Flaticon or FontAwesome work great. Consistent icon style makes your site look polished and professional.
Step 4: Build a Submission Form with the Drag-and-Drop Builder
The submission form is what users fill in to post their ads. The Classified Listing plugin includes a powerful drag-and-drop form builder. You can add, remove, and reorder fields without touching any code.
You can create different form templates for different categories. For example, a “Cars” form might have fields for Make, Model, Year, Mileage, and Fuel Type. On the other hand a “Real Estate” form has Bedrooms, Bathrooms, Square Footage, and Furnishing status.
How to build your submission form:
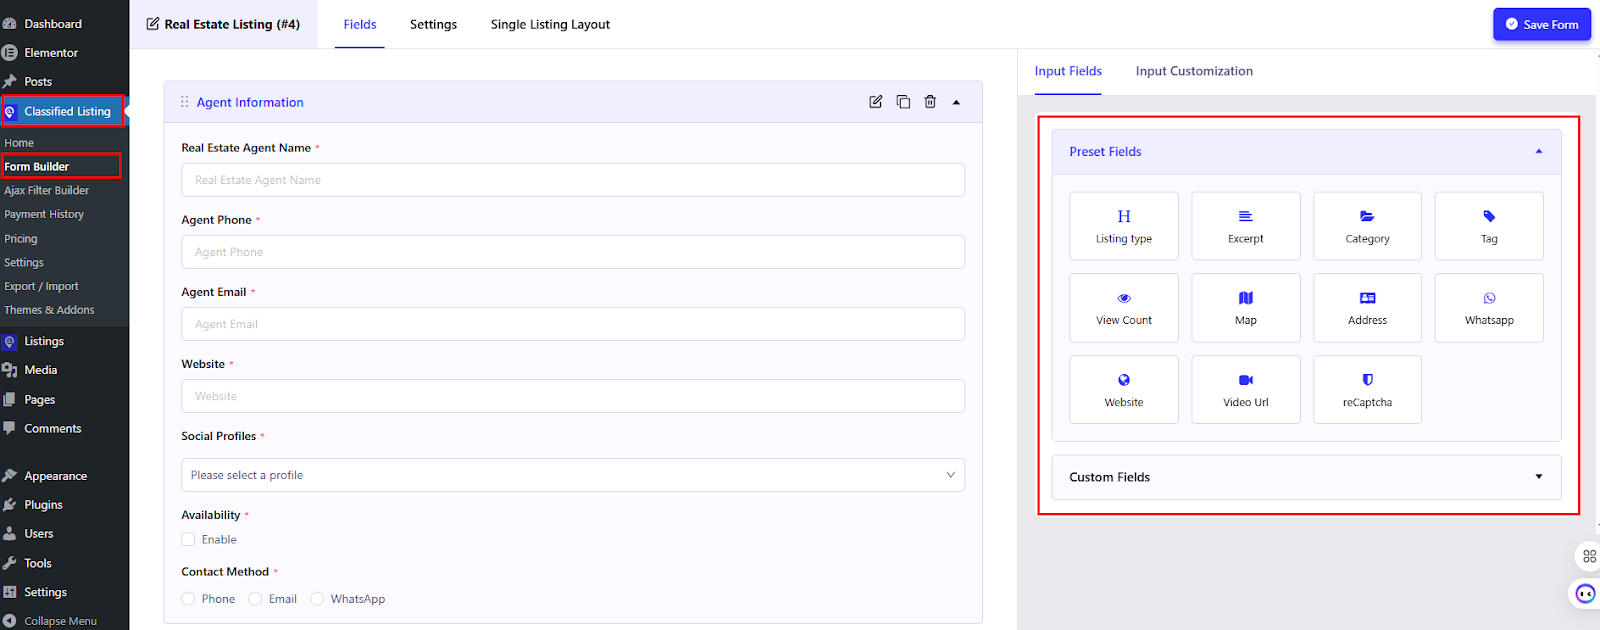
1. Go to Classified Listing → Form Builder.
2. Click “Add New Form” and give it a name. Or you can customize the General form builder.
3. Use the drag-and-drop interface to add fields from the left panel — choose from text, number, select, checkbox, radio, textarea, image upload, URL, and more
4. Configure each field: set the label, placeholder, and whether it is required
5. Drag fields to reorder them the way you want them to appear to the user
6. Click “Save” when done
7. Assign the form to your relevant categories in the category settings

Create form with AI
You can create a fully functional submission form with the help of AI.
When you click the ‘Add New Form’ button, a pop-up will appear. From the pop-up click on ‘Create Form With AI’ option.

After that you need to input the form name, type, details, and keywords accordingly.

After successful command, AI will generate the fields and form accurately.

Lastly, you’ll get a fully functional AI-built submission form generated within seconds. You can further customize the form set-up according to your preferences.
The user will see the ‘Add Listing’ button form the frontend of your site.
Recommended Fields for a General Classified Ad Form:
Title (text) · Description (textarea) · Price (number) · Category (select) · Location (select) · Contact Name (text) · Phone Number (text) · Email (email) · Images (file upload) · Condition — New/Used (radio) · Negotiable (checkbox)

Step 5: Configure Your Classified Website Settings
Before going live, you need to configure the core behavior of your classified platform. This includes user registration rules, listing approval workflow, listing expiry, and search settings. This is all handled from one central settings panel.
How to access and configure settings:
1. Go to Classified Listing → Settings in your WordPress dashboard
2. Work through each tab: General, Listing, Email, Payment, and more
Key Settings to Configure
General Settings: Set your site’s currency, date format, and default country. These appear across the entire site wherever prices and dates are displayed.
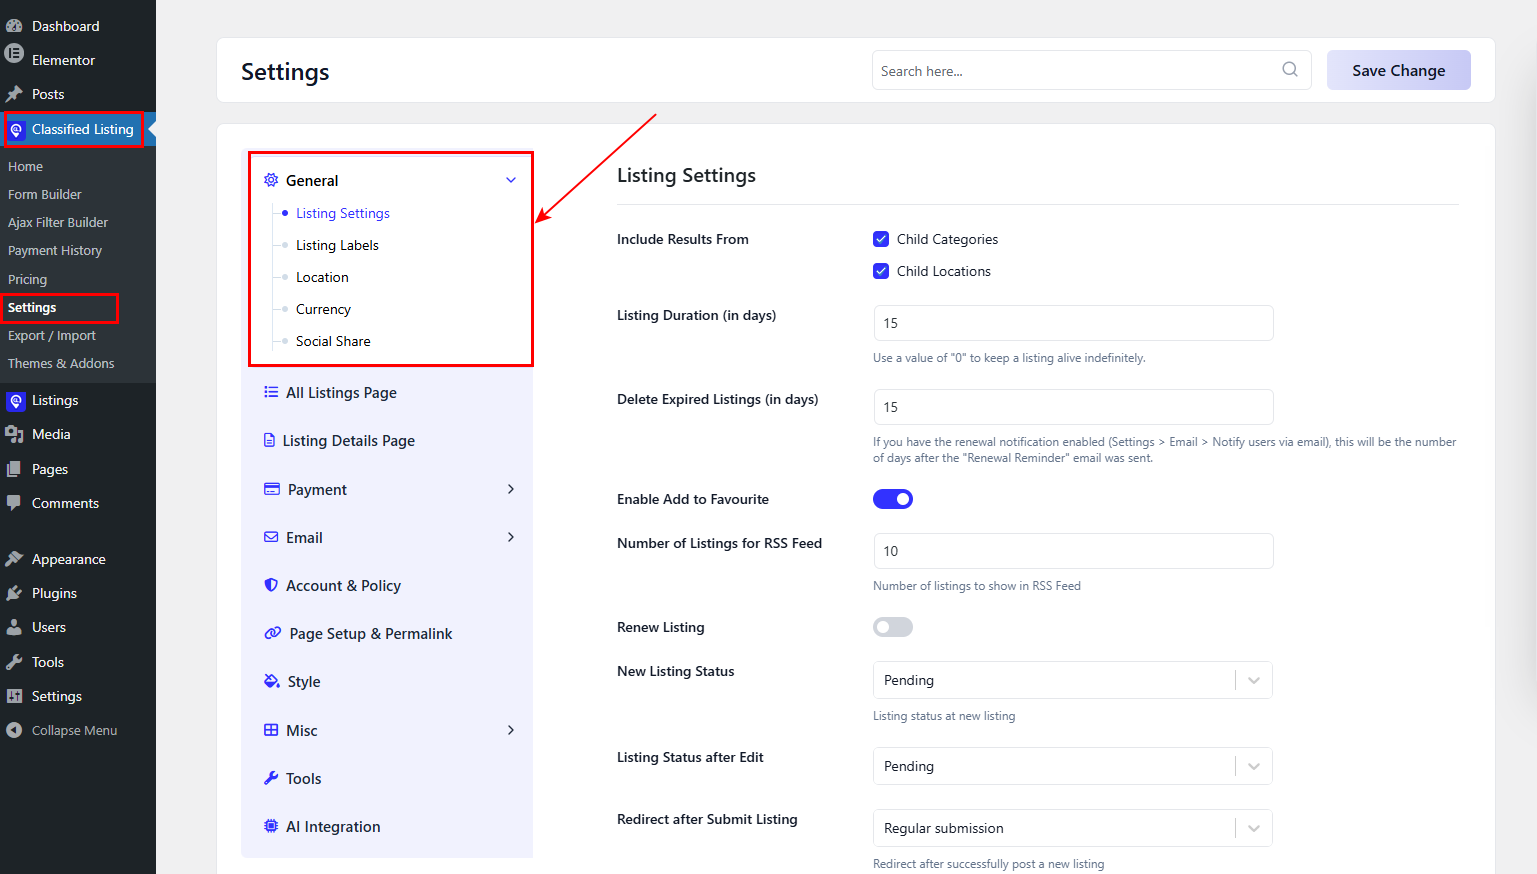
Listing Settings: Control whether listings need admin approval before going live, how many photos users can upload, listing expiry period, and whether guests (non-registered users) can post ads.
💡 Recommendation: Start with manual approval for new listings. This lets you review every ad before it goes public, which is important in the early days to maintain quality and prevent spam. You can switch to auto-approval later once you have trust in your user base.
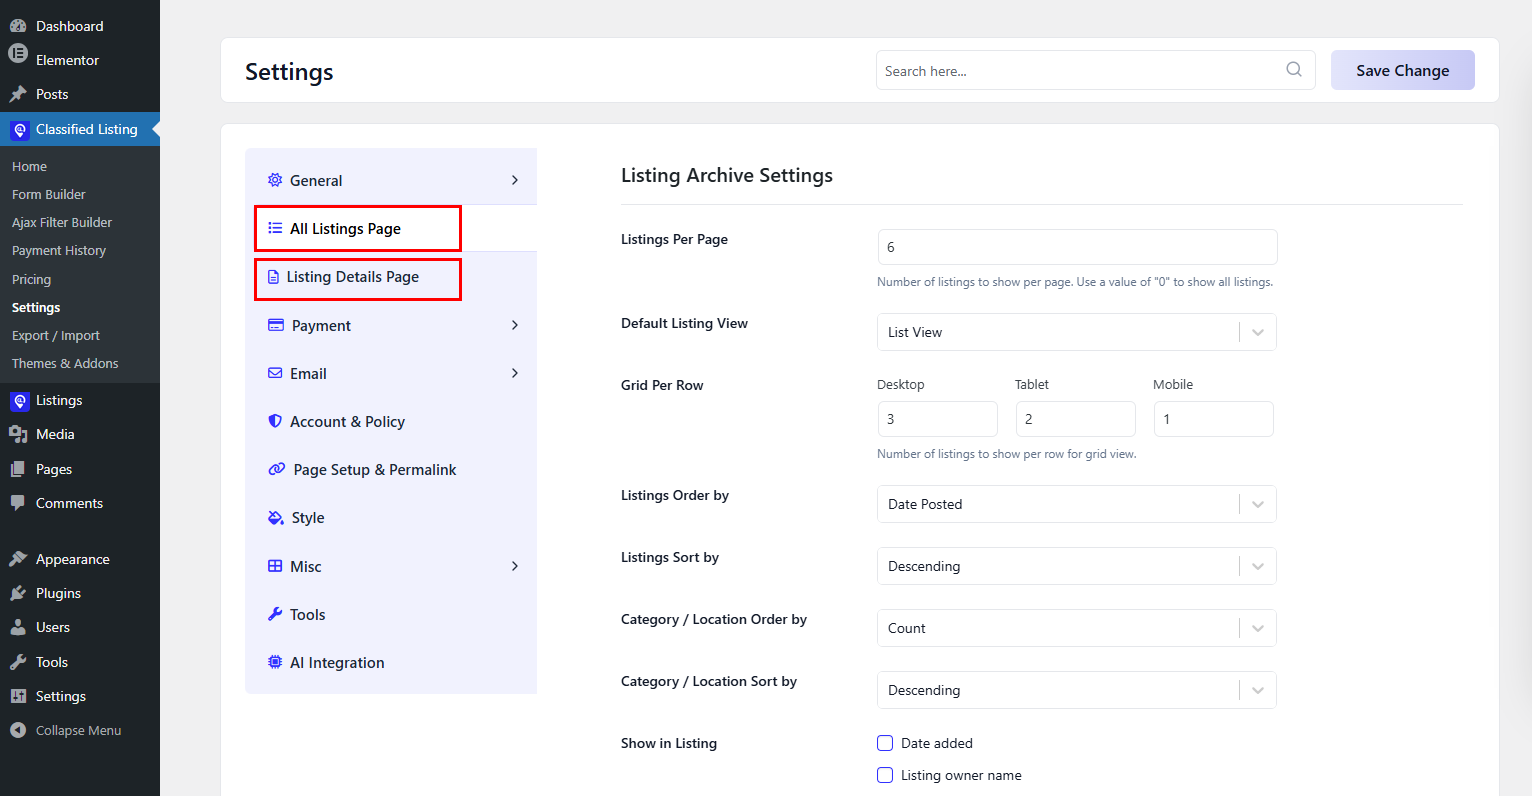
Also manage the listing pages visibility to the users.
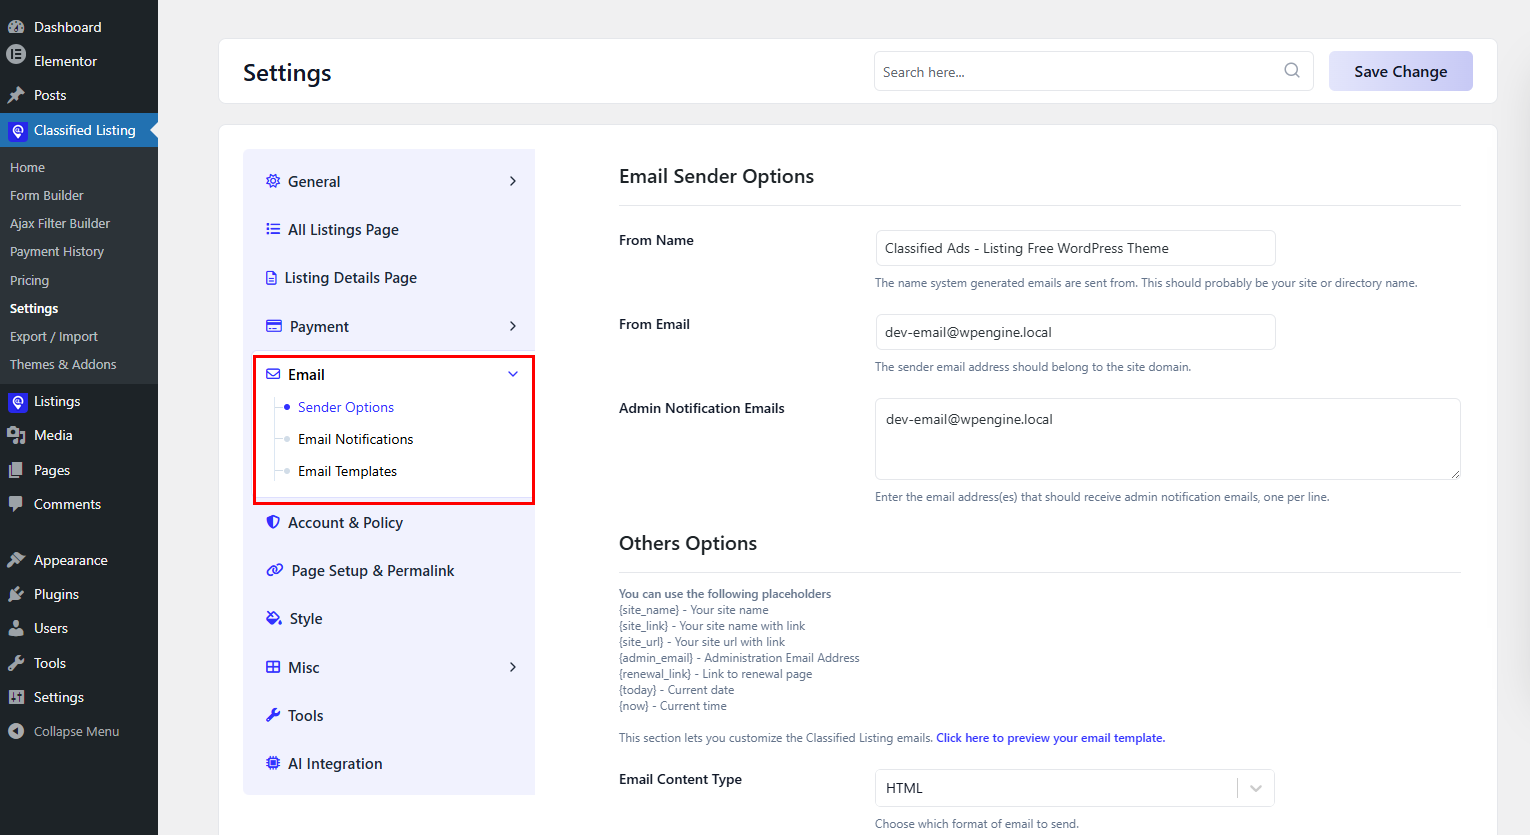
Email Settings: Configure automated emails sent to users.These include ad posted confirmation, approval notification, expiry reminders, and contact messages. You can customize the email templates here.
Step 6: Monetize Your Website to Earn Money
This is where your classified site becomes a business. The Classified Listing plugin comes with built-in monetization tools. No separate ecommerce plugin needed for the basics.
| Paid Listing Packages: Charge users a one-time or recurring fee to post a certain number of ads. Free users get 1–2 listings. Premium users get unlimited or more. | Featured Listings: Let users pay extra to get their listing pinned to the top of search results or highlighted on the homepage for more visibility. |
| Bump Up / Refresh: Allow sellers to pay to “bump” their listing back to the top after it has been pushed down by newer ads. | Subscription Plans: Offer monthly or annual subscriptions for unlimited listing access, ideal for businesses or dealers who post ads regularly. |
| Banner Advertising: Sell ad space on your site to local businesses or use Google AdSense to earn passive income from your site traffic. | Promoted Categories: Charge businesses for sponsored placement in specific categories — like a car dealership paying for top placement in the “Cars” category. |
👉 Good Read: How OLX Makes Money
Setting Up a Paid Package
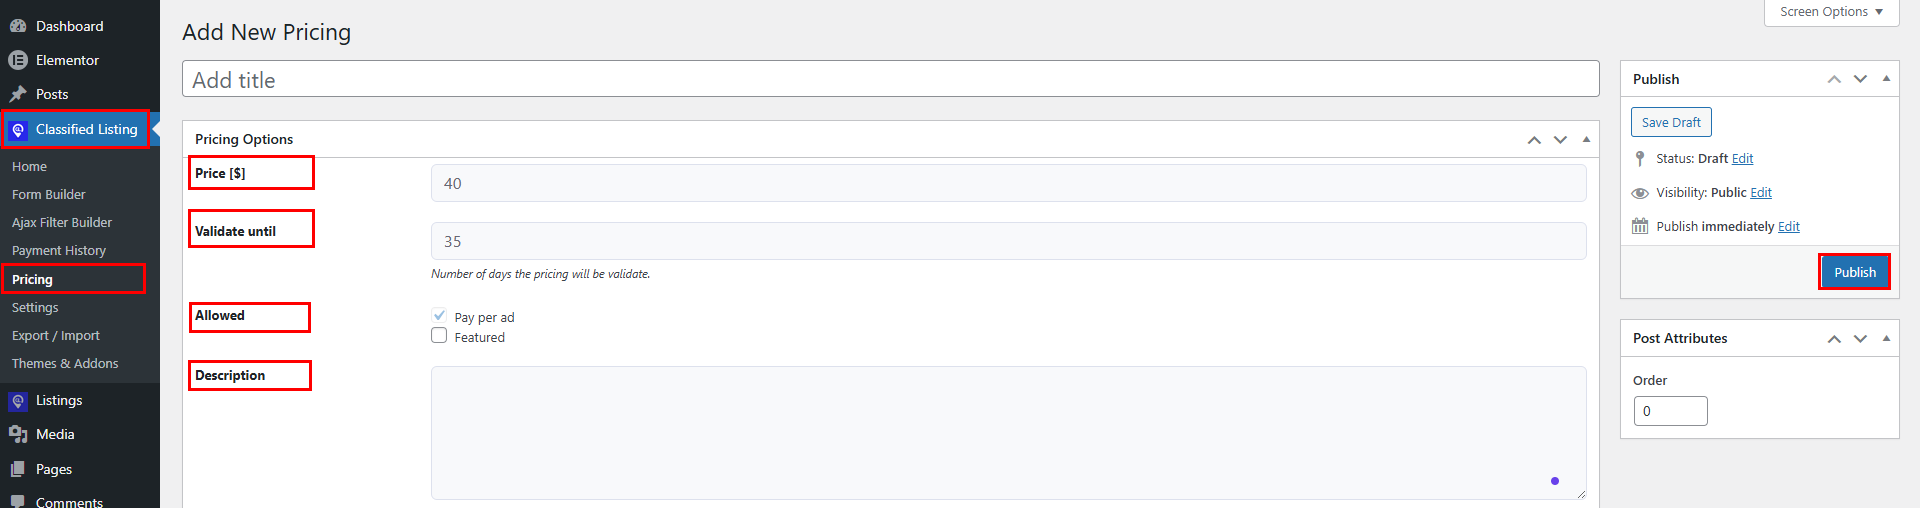
1. Go to Classified Listing → Pricing.
2. Click “Add New Pricing“.
3. Set the pricing name (e.g., “Basic Free”, “Pro — $9/month”, “Business — $29/month”).
4. Set the price and validate date
5. Select package type Pay Per Ad or Featured.
6. You can add a short description of the pricing. HTML is allowed.
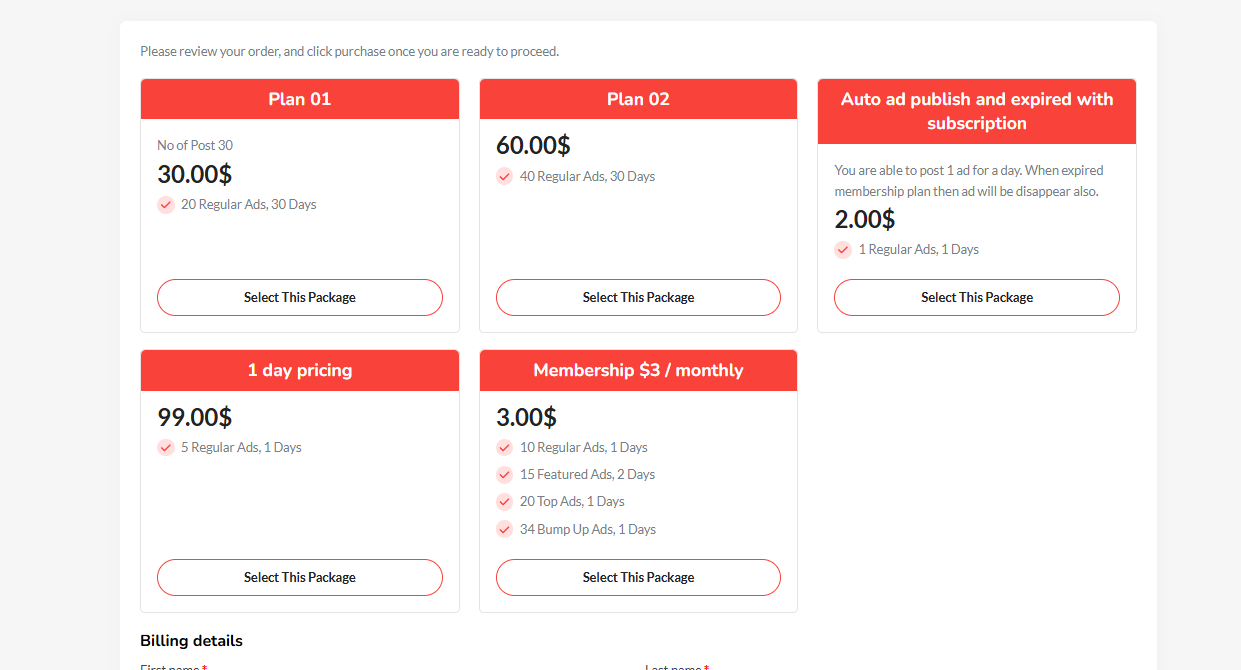
This is how the users will view the pricing plans from the frontend.
Step 7: Customize Your Website with Brand Colors
Right now your site looks like the demo. That’s fine as a starting point. But you need to update your logo, your colors, and your identity. The CLClassified theme makes this easy through the WordPress Customizer.
How to customize your brand colors:
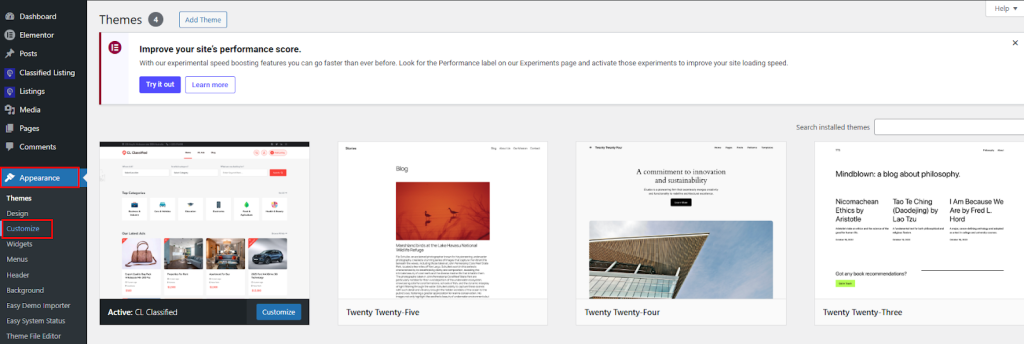
1. Go to Appearance → Customize in your dashboard.
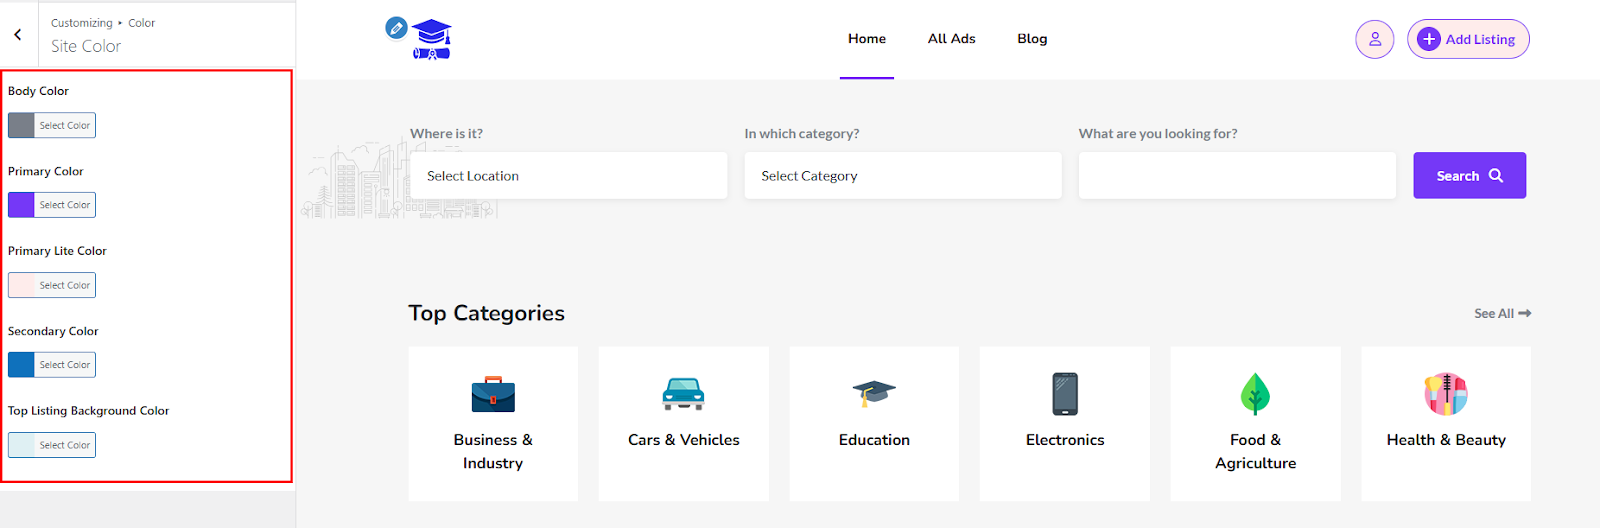
1. Look for the “Colors” panel in the Customizer sidebar.
2. Set your Primary Color. This is used for buttons, links, and highlights throughout the site.
3. Set your Secondary/Accent Color for hover states and badges.
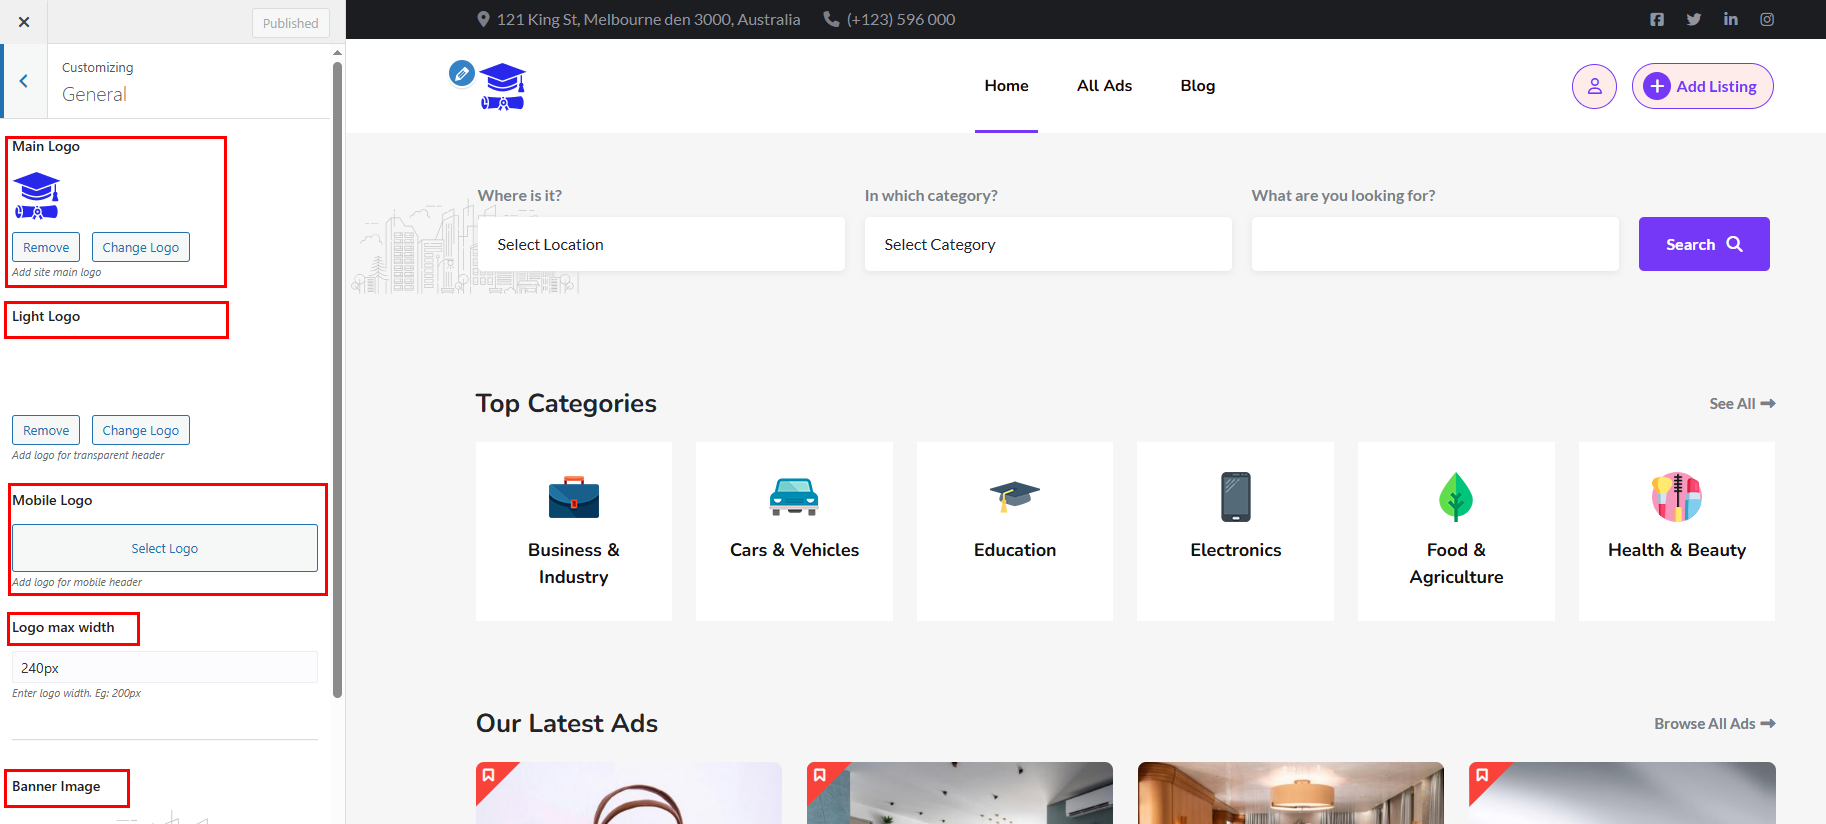
1. Upload your Logo under the General > Main Logo.
2. Upload a Favicon (the small icon that appears in browser tabs).
3. You can also select Light Logo, Mobile Logo, and Banner Image.
4. Click “Publish” to save all changes.
💡 Branding Tip: Stick to 2 main colors — a primary brand color and white/light gray for backgrounds. More than 3 colors makes a site look unprofessional. Use a free tool like Coolors.co to generate a professional color palette.
Once you’re satisfied with how your site looks and functions, it’s time to launch. Announce your new website on social media and other platforms.
Free Theme vs. Pro Upgrade — What’s the Difference?
The free CL Classified theme and Classified Listing plugin are powerful enough to launch a real classified ads business. Here’s what you get with each:
| Feature | Free Version | Pro Version |
| Listing submission & management | ✔ Yes | ✔ Yes |
| Categories & locations | ✔ Yes | ✔ Yes |
| Demo content import | ✔ Yes | ✔ Yes |
| Drag-and-drop form builder | ✔ Basic | ✔ Advanced |
| User dashboard & registration | ✔ Yes | ✔ Yes |
| Basic monetization (packages) | ✔ Yes | ✔ Yes |
| Advanced payment gateways | ✘ Limited | ✔ Stripe, PayPal, WooCommerce |
| Google Maps integration | ✘ No | ✔ Yes |
| Chat / messaging system | ✘ No | ✔ Yes |
| Mobile app (iOS & Android) | ✘ No | ✔ Available |
| Premium support | ✘ Community only | ✔ Direct support |
✅ Bottom line: Start with the free version and upgrade only when your site starts earning. Many successful classified websites have launched and grown using just the free tools.
Frequently Asked Questions
Yes. The CLClassified theme and the Classified Listing plugin both have free versions on WordPress.org. Your only costs are domain registration (~$12/year) and web hosting (~$3–10/month). The site itself, including listing submissions, categories, locations, and basic monetization, is entirely free.
CLClassified is one of the most purpose-built free WordPress themes for classified ad websites. It’s designed to work hand-in-hand with the Classified Listing plugin and delivers an OLX/Craigslist-style layout out of the box, with minimal configuration required.
No coding is needed. Everything covered in this guide is done through WordPress admin panels, the drag-and-drop form builder, and the visual Customizer. No PHP, CSS, or HTML knowledge is required to get your site live.
Using the demo import and following this guide, you can have a fully functional classified website live within 60–90 minutes from a fresh WordPress installation. Adding more categories, locations, and customizing branding takes additional time depending on how detailed you want to get.
Yes — you can configure the plugin to allow guest submissions in the settings. However, requiring registration is generally better for quality control and spam prevention, and it gives users a dashboard to manage their own listings.
Absolutely. The setup process is the same — just create a focused set of categories for your niche, build a custom submission form with fields relevant to that niche (e.g., Year, Make, Model for cars), and target your branding accordingly. Niche classified sites often outperform general ones because they attract a highly targeted audience.
Final Thoughts
Now you know how to create a website like OLX in WordPress. The CLClassified theme is the answer for many queries regarding classified plugins.
Also, you can use the Classified Listing standalone plugin. All the best as you figure out the best course of action!



