


On This Page
Custom product tabs for WooCommerce improve the customer experience, build trust, and boost conversion rate. How? These tabs let store owners effectively present additional information related to products to shoppers.
Unfortunately, every WordPress store owner lacks knowledge as to how to add custom product tabs to WooCommerce. Therefore, they struggle to showcase all the product information and lose sales.
Read this guide to avoid facing their fate and learn the practical ways to add custom product tabs to your WooCommerce store.
What Are Product Tabs in WooCommerce Websites?
Most products contain a lot of essential information that shoppers need to know about before purchasing those items. However, displaying the information together can be tricky for website owners.
They needed a less cluttered and visually appealing way to showcase all the product information. That’s when they need product tabs.
Store owners use these product tabs to accommodate and display all the information, such as short descriptions, additional information, technical specs, reviews, and more, in a single place.
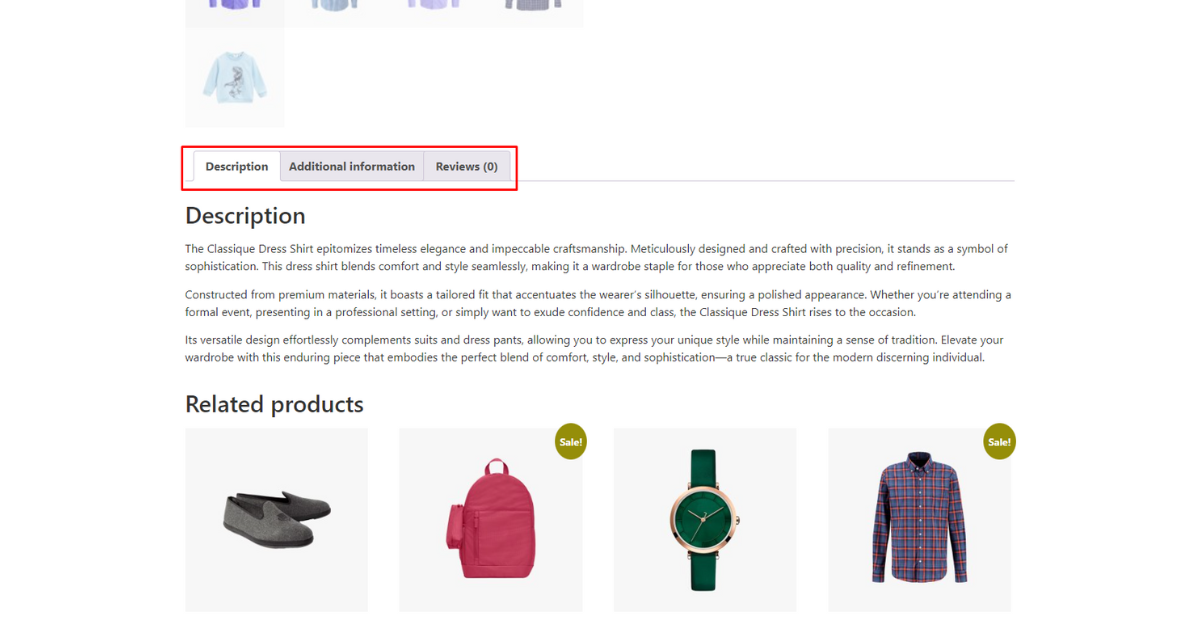
We think you now get an idea of what product tabs are. Let’s discuss why you need to add custom product tabs to your WordPress store.
Why Do You Need to Add Custom Product Tabs?
Custom product tabs offer immense benefits, some of which are as follows:
Enhanced User Experience: With custom tabs, you can present product information in a more structured, clutter-free, and organized manner. Thus, potential customers can easily learn about your products.
Spotlight Unique Selling Points: Custom tabs let you spotlight your products’ unique selling points. Therefore, you attract customers and easily make sales.
Better SEO Optimization: Custom tabs allow you to improve your product page’s search engine ranking as you can include relevant keywords within each product tab.
Flexibility to Add Diverse Content: Include various content types like videos, image galleries, or interactive elements within specific tabs.
You now know why you need to add custom product tabs to your WordPress store. However, do you know how to add them to your websites? We’ll discuss it in the next section of this article.
How to Add Custom Product Tabs to Woocommerce Without Plugins
We’ll first guide you in adding a product tab without using any plugins. This method requires you to understand HTML, CSS, Javascript, and PHP. That means you may avoid all these steps where you need to work with codes if you aren’t good at technical aspects.
N:B: Ensure you take a backup of your site before inserting any code into your theme’s functions.php file. Also, add code to the child theme to restrict the parent theme from overriding your code through updates.
Add a Custom Product Tab to All WooCommerce Products
You can easily add a custom tab to all products on your WooCommerce store. Just copy the code we shared in this section, make some changes, and paste it into your theme’s functions.php file.
Here are all the steps to follow:
Step 1 – Go to the functions.php File
Log in to your WordPress Admin Dashboard. Then, head to Appearance > Theme File Editor if you use a classic theme. You’ll find the “Theme File Editor” under ‘Tools’ menu if you use a block theme.

Now, go to the right-hand side and click “functions.php” file.

Step 2 – Insert Custom Code into Theme’s Function File
Now, copy the code below and make some changes according to your needs. What changes will you make? You can change the tab title ‘More Information’ h2 tag – <h2>More Information</h2> and p tag within this code.
Then, paste the code at the bottom of “functions.php” file and click “Update File” button.
Here’s the code –
/** * Add a Custom Product Tab to All Products */
function radius_more_info_tab($tabs) {
    $tabs['radius_info_tab'] = array(
        'title'    => __('More Information', 'your-text-domain'),
        'priority' => 60,
        'callback' => 'radius_more_info_tab_content'
    );
    return $tabs;
}
add_filter('woocommerce_product_tabs', 'radius_more_info_tab');
function radius_more_info_tab_content() {
    echo '<h2>More Information</h2>';
    echo '<p> Here, you can add extra details about the product, such as care instructions, additional materials, or warranty information.</p>';
}
Now, visit a product page to see if there’s an additional product tab.
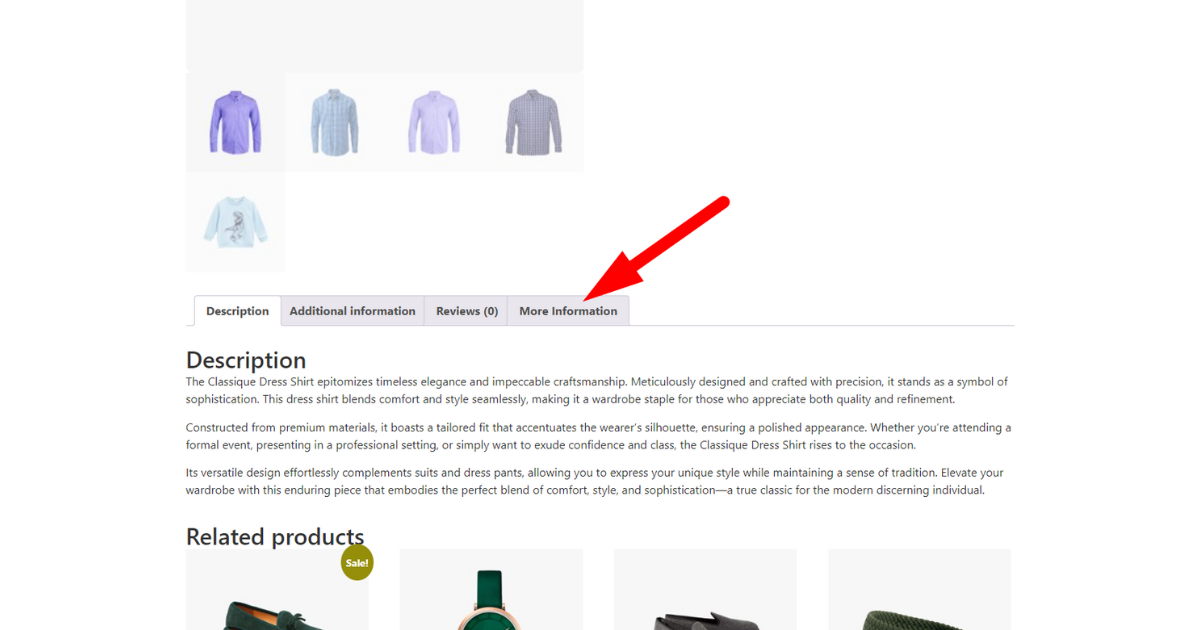
Add a Custom Product Tab to Specific Products
This method will teach you how to add a custom product tab to specific products. We’ll use code to do this. First, we need to determine the product and define it within the code.
We’ll find our chosen product ID and include it as a single value within an array of the code. First, find the product ID. Here’s how.
Step 1 – Find Product IDs in Your WooCommerce Store
Go to WordPress Admin Panel > Products > All Products.
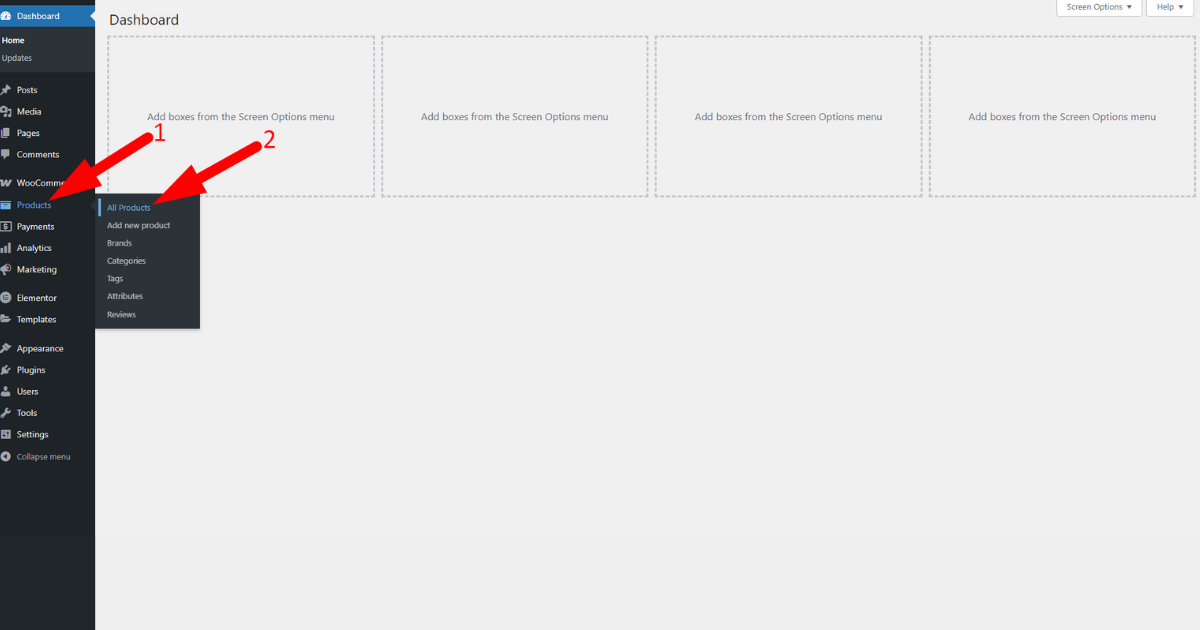
Now, determine a product to add a custom product tab. Hover the mouse pointer over the product, and you’ll see its product ID. Copy the ID to insert it into a particular area of the code.

Then, place the product ID as a single value in an array {e.g., $specific_product_ids = array(290)}.
Note that if you want to add a custom tab to multiple products, just include those product IDs with commas into that product array with multiple values of that code {e.g., $specific_product_ids = array(290, 291, 292)}.

Now, change the product tab title and other information within the code to suit your needs. The screenshot below helps you understand what and where to make changes.

You’re all set. Finally, paste the entire code into the bottom of the theme’s “functions.php” file, and hit “Update File” button.

Here’s the code –
/**
* Add a Custom Product Tab to a Specific Product
*/
function add_radius_product_tabs($tabs) {
    global $post;
    $specific_product_ids = array(290); // Replace with your product IDs

    if (in_array($post->ID, $specific_product_ids)) {
        // Add a custom tab
        $tabs['custom_tab'] = array(
            'title'    => __('Custom Tab', 'woocommerce'),
            'priority' => 50,
            'callback' => 'radius_product_tab_content'
        );
    }

    return $tabs;
}
add_filter('woocommerce_product_tabs', 'add_radius_product_tabs');
function radius_product_tab_content() {
    echo '<h2>' . __('Custom Product Information', 'woocommerce') . '</h2>';
    echo '<p>' . __('This is custom content for specific products only.', 'woocommerce') . '</p>';
}
Now, visit that chosen product page and notice the changes.

So, that’s how you add custom product tabs to your WooCommerce website without plugins. We’ll now go the extra mile and discuss how to rename, reorder, and remove product tabs without any plugins.
How to Edit, Reorder, and Remove Product Tabs in WooCommerce Without Plugins
As you’ve reached this far, the following methods for editing, reordering, and removing product tabs will seem easy.
Change each code per your requirements for particular purposes, paste it into your theme’s “ functions.php” file, and update it. Let’s begin.
Rename Product Tabs with Code
We’ll rename the “Additional information” product tab to “Product Details.”You can choose a different product tab name that aligns with your brand.

So, we’ll copy and paste the code below into the bottom part of the “functions.php” file and hit “Update File” button.
Here’s the code to rename the Additional Information tab
/**
* Rename the additional information tab to product details
*/
function rename_woocommerce_product_tab($tabs) {
    if (isset($tabs['additional_information'])) {
        $tabs['additional_information']['title'] = __('Product Details', 'your-text-domain'); // Change tab title
    }
    return $tabs;
}
add_filter('woocommerce_product_tabs', 'rename_woocommerce_product_tab', 98);
Okay, now browse a product page to see the changes.
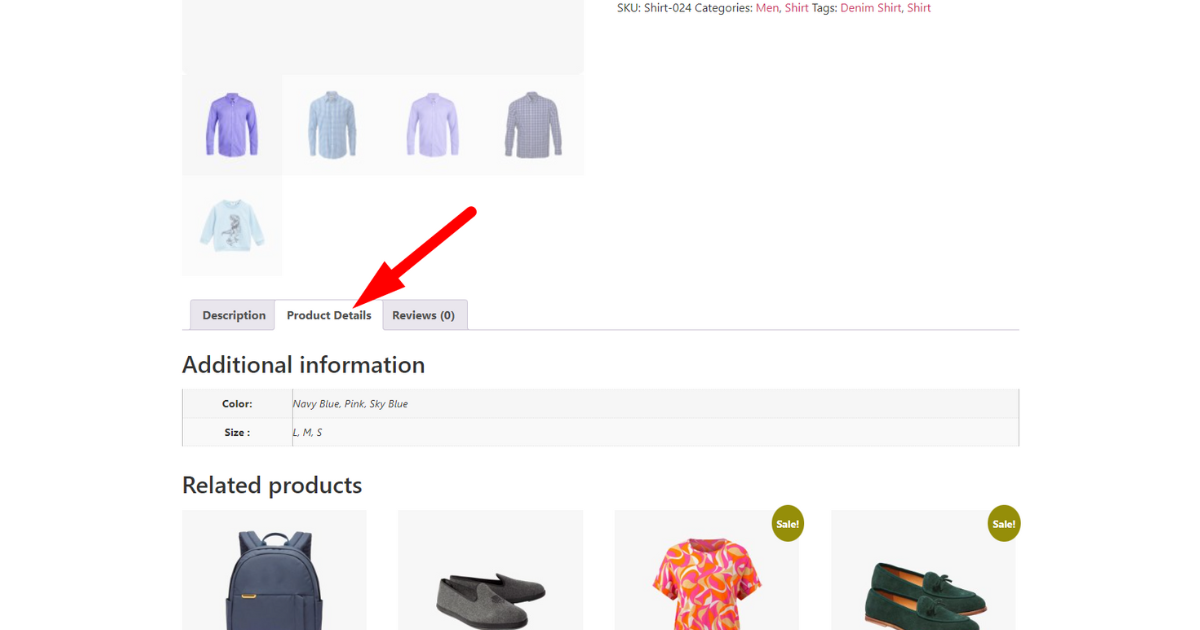
Reorder Product Tabs with Code
In order to reorder product tabs as you wish, just copy and paste the code below into the theme’s “functions.php” file and click “Update File” button.
This code will help you move the ‘Reviews’ tab to the first position, the ‘Description’ tab to the second, and the ‘Additional information’ tab to the third.
You can reorder the positions of these tabs according to your needs by changing the priority of each tab. Remember that the lower number appears earlier, and the higher number appears later.
Here’s the code to reorder product tabs –
/**
* Reorder Product Tabs in WooCommerce
*/
function reorder_woocommerce_product_tabs($tabs) {
    if (isset($tabs['reviews'])) {
        $tabs['reviews']['priority'] = 5; // Move Reviews tab to the first position
    }
    if (isset($tabs['description'])) {
        $tabs['description']['priority'] = 10; // Move Description tab to second
    }
    if (isset($tabs['additional_information'])) {
        $tabs['additional_information']['priority'] = 15; // Move Additional Info tab to third
    }
    return $tabs;
}
add_filter('woocommerce_product_tabs', 'reorder_woocommerce_product_tabs', 98);
Visit a product page and see if each product tab has been reordered.

Remove Product Tabs With Code
We’ll now remove a product tab, specifically the “Additional information” tab, from our product page. To do this, we’ll copy and paste the code below into our theme’s “functions.php” file and press the “Update File” button. That’s it.
Here’s the code to remove the additional information tab in WooCommerce
/**
* Remove the additional information tab in WooCommerce
*/
function remove_additional_info_tab($tabs) {
    unset($tabs['additional_information']); // Remove "Additional Information" tab
    return $tabs;
}
add_filter('woocommerce_product_tabs', 'remove_additional_info_tab', 98);
Let’s visit the product page to see the effects.

How to Add Custom Product Tabs to WooCommerce with a Plugin
We’ve seen how you can easily add, rename, reorder, and remove product tabs using specific codes. However, not everybody can work with raw code to add custom functionalities to their websites.
Therefore, we’ve designed this section specifically for people comfortable working with WordPress plugins. Here, we’ll show you how to use a plugin to add a custom product tab in your WooCommerce store.
We’ll skip discussing how to edit, reorder, and remove a product tab with a plugin because you can do that by following the same steps we will show you to add a product tab.
You need to insert the corresponding codes into this plugin to edit, reorder, and remove product tabs. Let’s begin.
Step 1 – Choose a Plugin to Add a Custom Product Tab to Your Store
First, we need to select a plugin that enables us to easily add codes to our website without hampering its core functionalities. Thus, we’ll check the best plugins on the market and pick the one best suited for us.
After thoroughly researching, we found Code Snippets promising. Therefore, we’ll use it to demonstrate adding a custom product tab to your WooCommerce store.
Step 2 – Install and Activate Code Snippets
Navigate to WP Admin Panel > Plugins > Add New Plugin.

Type “Code Snippets” in the plugin search field on the left-hand side.
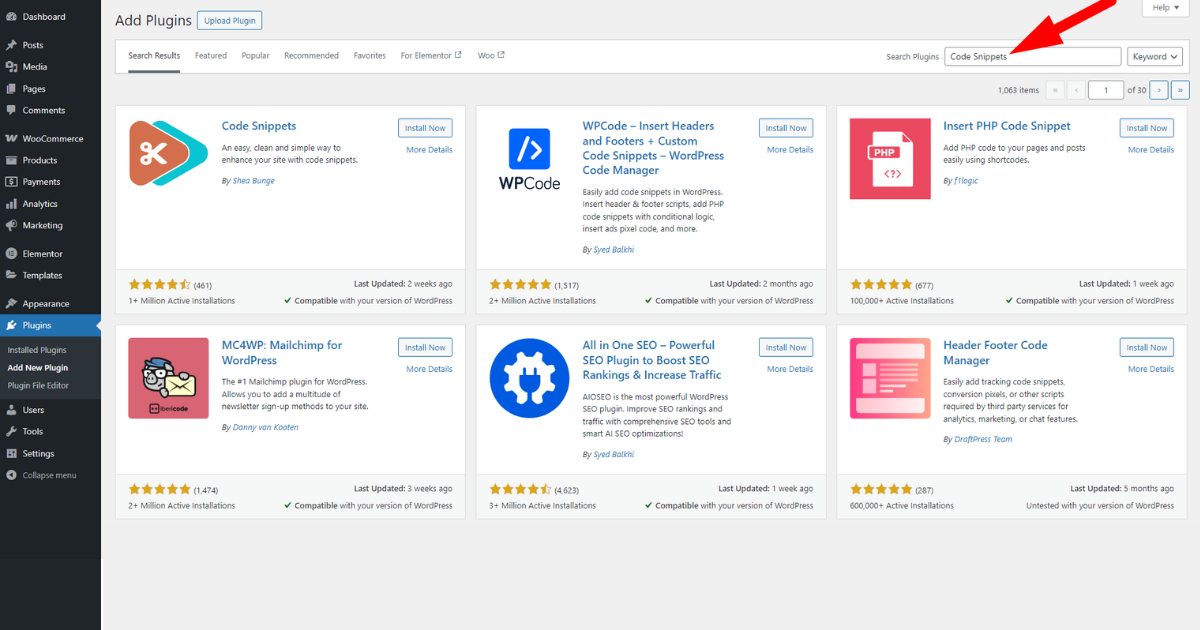
Press “Install Now” button of the marked plugin in the screenshot below.

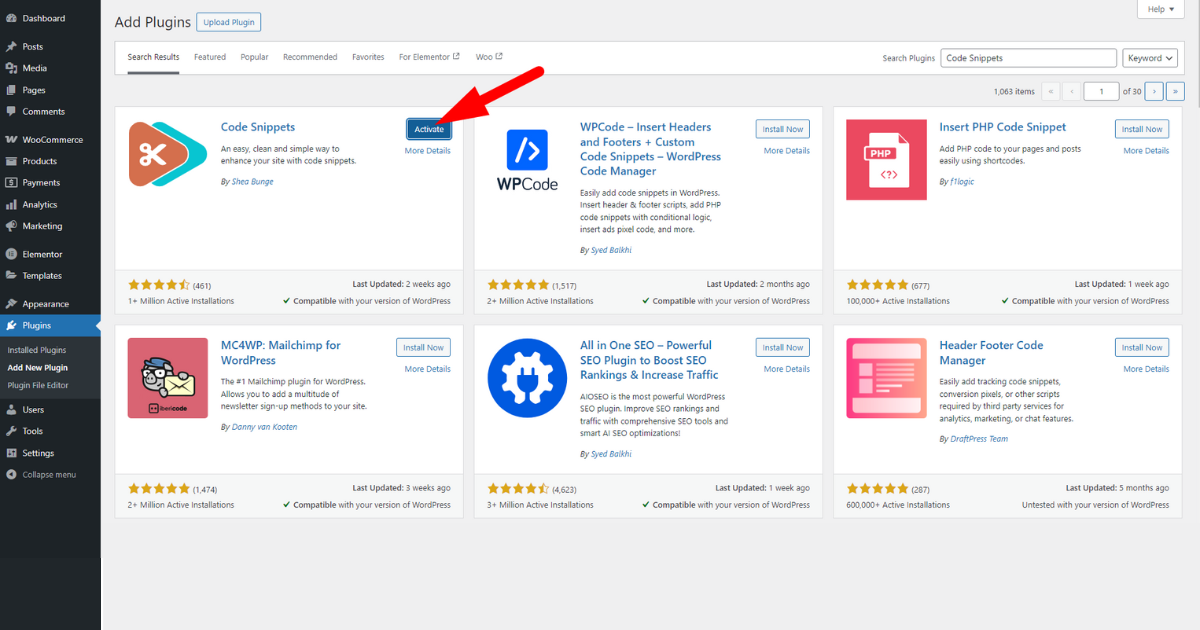
Lastly, click ‘Activate’ button of Code Snippets plugin.
Step 3 – Insert Code into Code Snippets
Go to WP Admin Panel > Snippets > Add New to insert a code into Code Snippets.
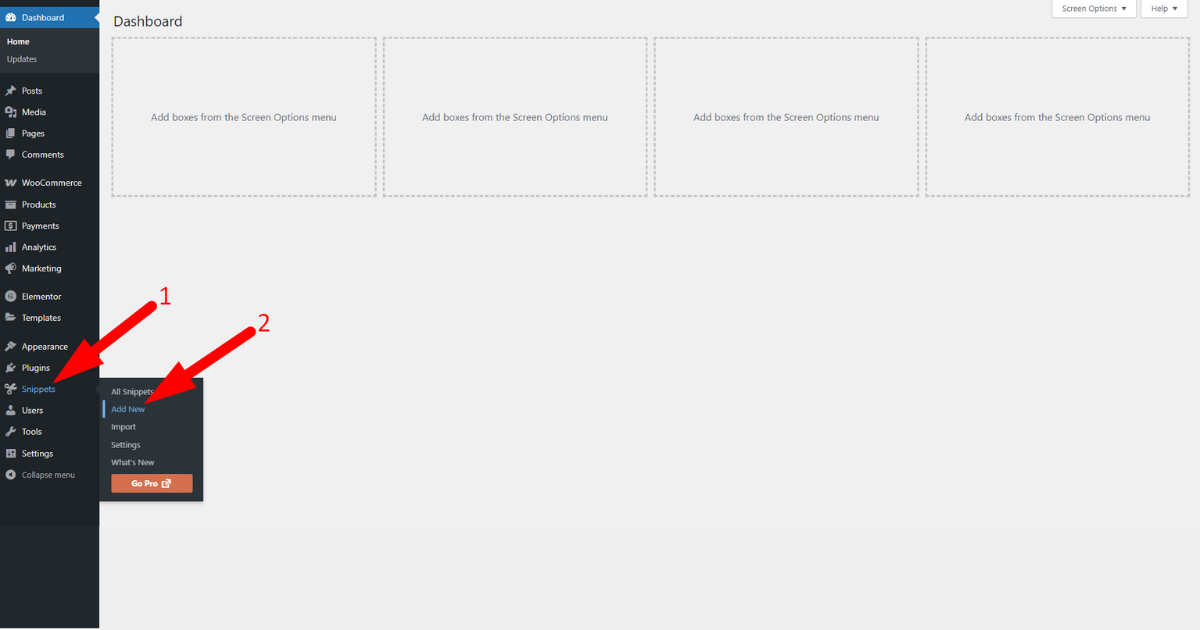
Afterward, write a snippet title in “Add New Snippet” and ensure you are on “Functions php” tab. Insert a code snippet in the “Functions php” tab.
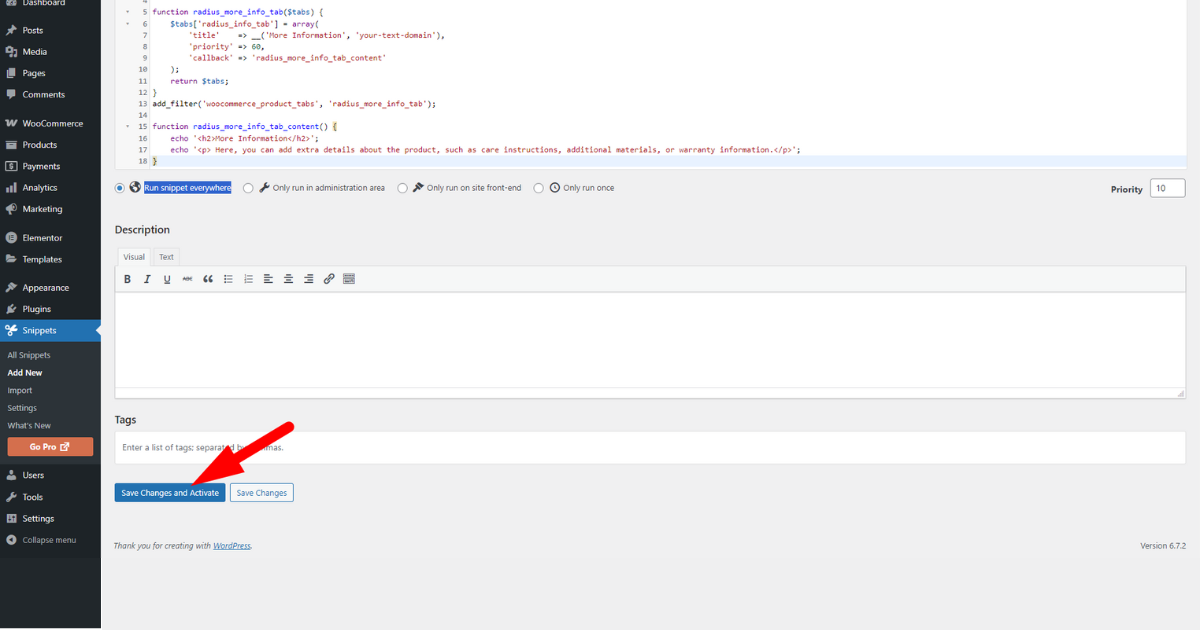
You can copy one of the code snippets we shared above to perform a particular task and paste that code snippet into this tab. For instance, we paste a code snippet to add a custom tab to all the products.
Then, make sure “Run snippet everywhere” radio button is selected. If not, select it.

Scroll down and press “Save Changes and Activate” button.
Now, visit the product pages to see if it works. This way, you can utilize Code Snippets plugin to insert code and add custom functionalities to your website. Follow these same steps when inserting code for editing, reordering, and removing product tabs.
Bonus: Tips for Managing and Updating Custom Product Tabs
Adding, editing, reordering, and removing product tabs alone will not provide shoppers with the ultimate buying experience. Hence, consider the following tips for optimum results.
Think About the User: Always consider the user when designing a custom tab or writing its description. The goal is to help users easily understand the purpose of each product tab and enhance their shopping experience.
Be Clear and Descriptive: Clearly write the product tab tile and description. Avoid using indistinct titles and descriptions. Instead, utilize straightforward ones such as “More Information,” “Product Details,” etc.
Helpful Post: 15+ eCommerce Product Description Generators
Maintain Consistency: Remember to maintain a uniform format and style across all product pages. Doing so will help shoppers navigate through your website easily.
Optimize for SEO: Add relevant keywords to the tab description to improve the ranking of all product pages on diverse search engines.
Test Thoroughly: After working on product tabs, thoroughly check them on a staging site. Make sure those product tabs are visible correctly on all devices. Then, publish your website.
Monitor User Engagement: Always monitor how users interact with each product tab. If you notice that a particular product tab receives low engagement, modify it to see if engagement increases.
Regularly Update the Product Tab Content: It’s essential to update product tab content regularly to maintain its accuracy. You need to change the product tab content based on product features, specifications, and availability changes.
These tips are for professionally displaying product tabs and making the most out of them.
Now Enhance Your Store with Custom Product Tabs
To ensure the success of your WooCommerce store, you need to present all the information related to your products correctly in front of your customers. Custom product tabs can help you easily and professionally display additional product information to boost sales.
Fortunately, thanks to this helpful guide, you know how to add custom product tabs to WooCommerce stores. We expect you’ll follow everything we shared in this content and successfully add, edit, reorder, or remove product tabs to enhance the customer shopping journey. We wish you the best of luck with your product tab customization journey.



