


On This Page
Want to know how to add wishlist in your WooCommerce store?
A wishlist is a significant feature that lets web visitors save their favorite products. It helps shoppers easily find items they want to purchase later.
Unfortunately, many WooCommerce stores lack this feature, which can lead to missed revenue opportunities. As a WooCommerce store owner, you don’t want to be in that situation.
Instead, you will have this feature available in your store. But how do you enable a wishlist on your website? You’re about to discover that once you thoroughly read this article. Let’s begin.
Why Should You Add the Wishlist to Your WooCommerce Store?
You can IMPROVE USER EXPERIENCE and BOOST SALES by adding a wishlist to your WooCommerce store.
According to the data provided by Think with Google, 40% of customers believe their shopping journey would be better if retailers provided them with a wishlist.
A wishlist feature allows shoppers to save items they like but are not ready to buy yet, which increases their chances of returning to complete their purchase.
Wishlists also facilitate sharing. Customers can send their saved items to friends or family, bringing new visitors to your store.
In addition, wishlists offer insights into what customers want. This information can help you plan promotions or stock popular products. It keep shoppers engaged, encourage sales, and help you understand customer preferences better.
How to Add Wishlist in Your WooCommerce Store – An Easy Guide
Here’s a simple step-by-step guide to help you easily add a wishlist feature to your WooCommerce store.
Step 1: Choose the Best Wishlist Plugin for WooCommerce
First, you’ll need to select the best wishlist plugin for your WooCommerce store. You might wonder why a plugin is necessary or if adding a wishlist without one is possible.
Okay, you need a plugin to add a wishlist feature to your WooCommerce store in a hassle-free manner. Also, you can accomplish this task without a plugin. But for that, you need to have coding knowledge.
That said, we recommend taking the easier route—using a top-notch wishlist plugin for WooCommerce. But here’s the big question: Which one is the best?
The WordPress plugin market contains tons of wishlist plugins. Therefore, you can easily get baffled when choosing one that meets your needs.
However, you can effortlessly pick one if you consider these facts below:
- Ensure the plugin is compatible with your current WooCommerce and WordPress versions
- Check if it supports other plugins you use, such as multi-language or currency plugins
- Look for a plugin with a user-friendly interface for both store administrators and customers
- Ensure the wishlist is easy to access, add items to, and manage
- Check if the wishlist design can align with your store’s branding
- Look for options to customize labels, buttons, and layouts
- Ensure customers can share wishlists via social media or email
- Make sure the wishlist functions well on mobile devices
- Ensure the plugin does not slow down your website
- Look for plugins with active developer support and regular updates
- Check if detailed documentation and tutorials are available for troubleshooting
- Check reviews on the WordPress plugin repository or other marketplaces to gauge user satisfaction and reliability
- Evaluate the cost against the features offered
Once you have reviewed these facts, select a plugin to add a wishlist feature to your WooCommerce store. If you need a recommendation, consider ShopBuilder.
It is one of the best wishlist plugins and meets all the criteria mentioned above. Along with adding a wishlist to your store, it provides various advanced features to help you effortlessly create and manage a professional WooCommerce store.
Step 2: Install and Activate the Best Wishlist Plugin
Once you decide to use ShopBuilder, it’s time to install this plugin. Before you install, make sure you’re using the latest version of WordPress (6.1 or later and PHP: 7.4+) and have the following plugins installed on your store.
Elementor: 3.11.1 or later
WooCommerce: 7.4.0 or later
To install this plugin, navigate to your WordPress Admin Dashboard > Plugins > Add New Plugin.
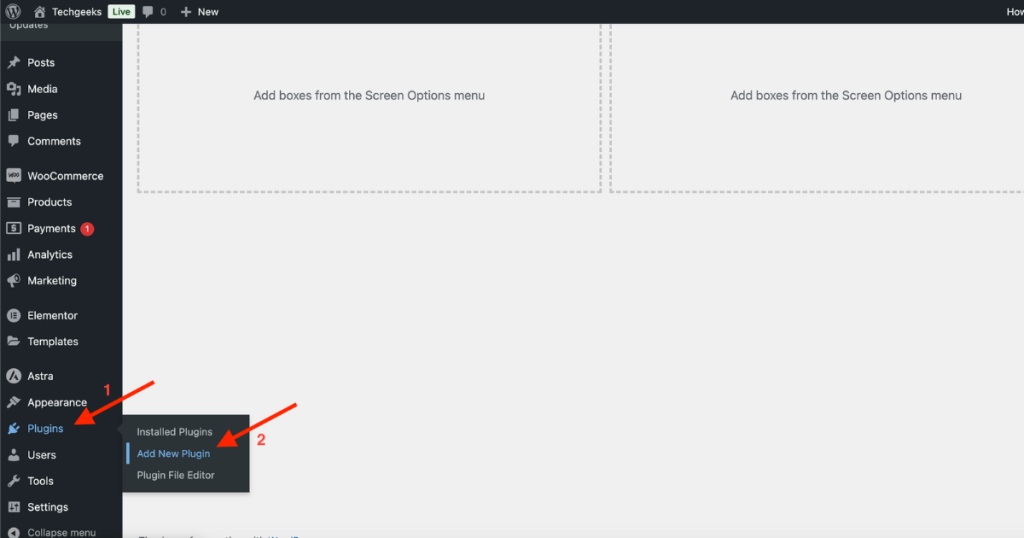
Then, type ‘ShopBuilder’ in the plugin search field.
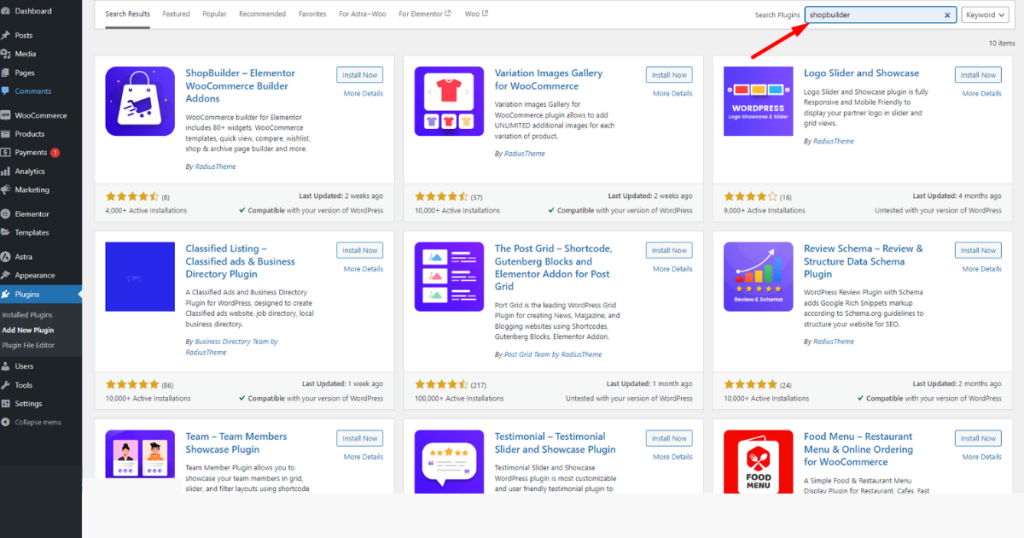
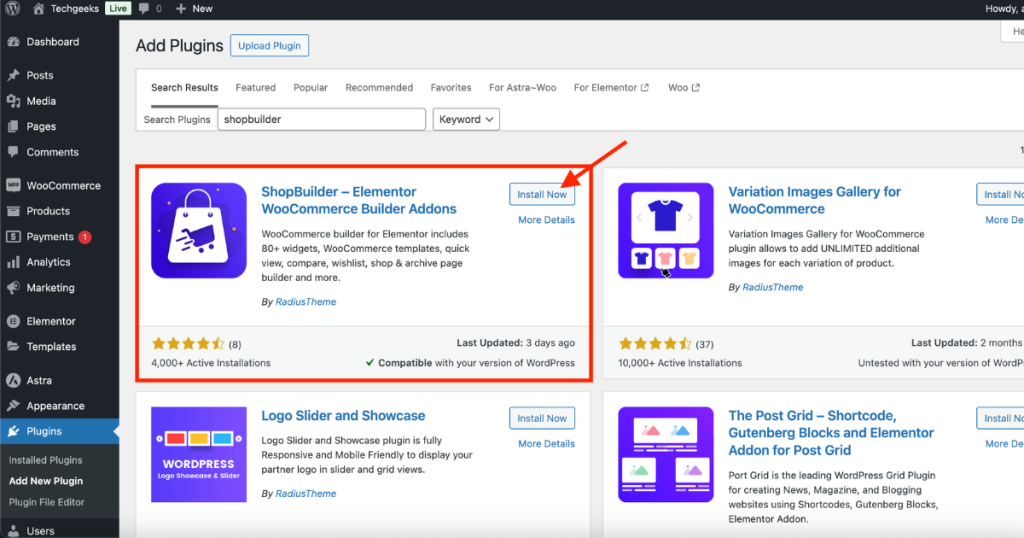
Click the “Install Now” button of the marked plugin in the screenshot below.
Afterward, hit the ‘Activate’ button.
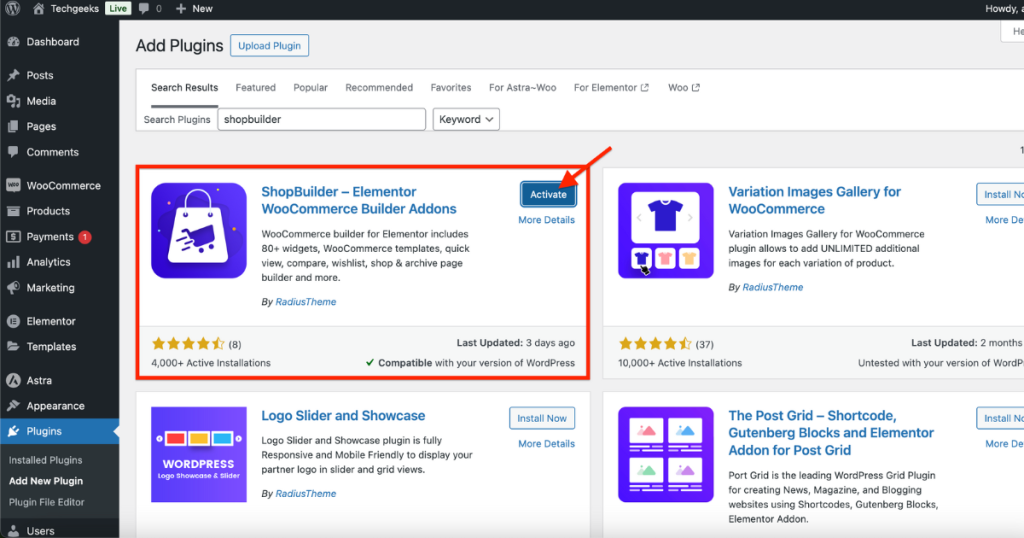
Hence, that’s how you easily install and activate the best wishlist plugin. Let’s now learn how to add wishlist in your WooCommerce store using ShopBuilder.
Step 3: Add Wishlist to Your WooCommerce Store
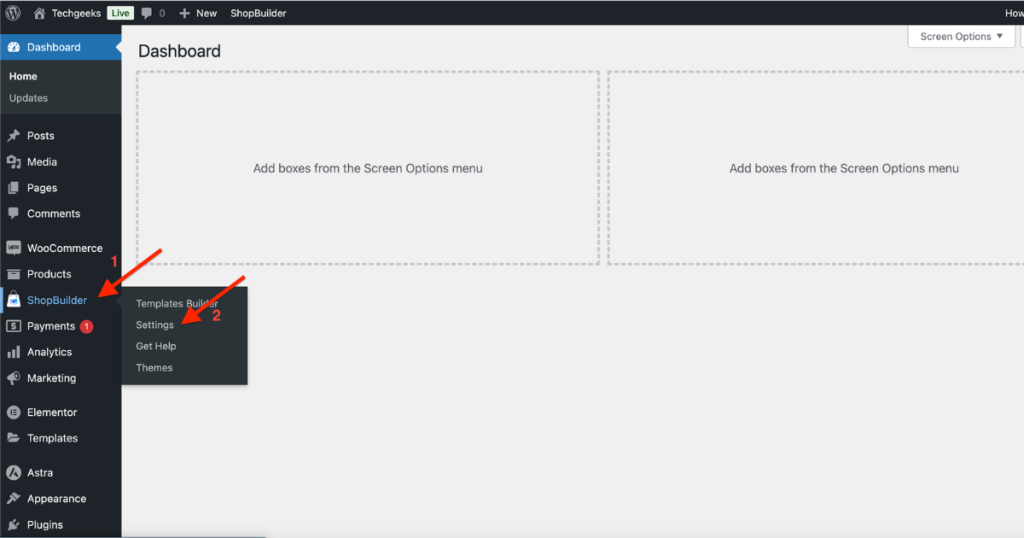
After installing this plugin, you’ll notice a ‘ShopBuilder’ menu on your WordPress Admin Panel. Head to it and then click on the ‘Settings.’
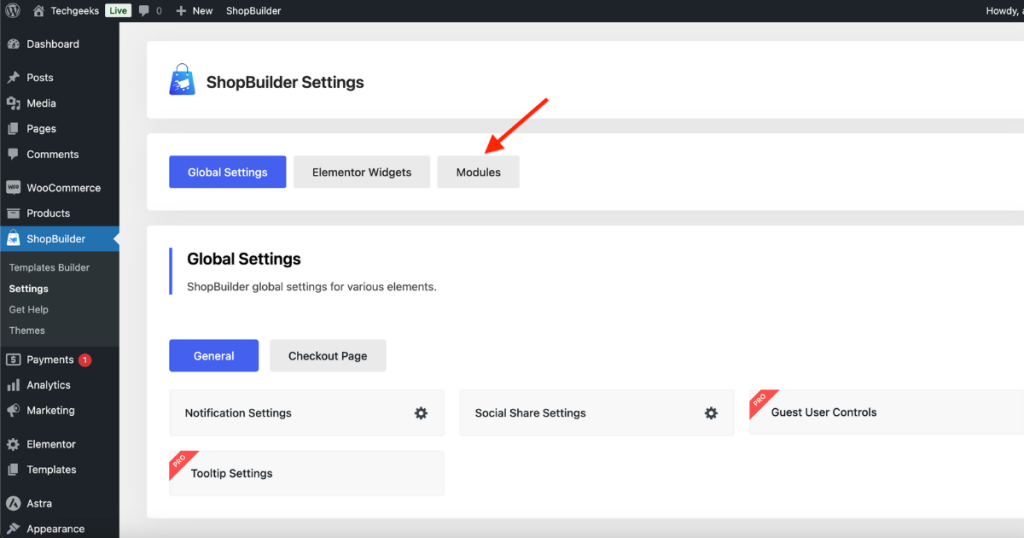
Right now, hit the ‘Modules’ tab.
Then, click the ‘Wishlist’ module to enable it if it’s not toggled on automatically.

You’ll now see a pop-up. Toggle on the “Enable Wishlist?” option.
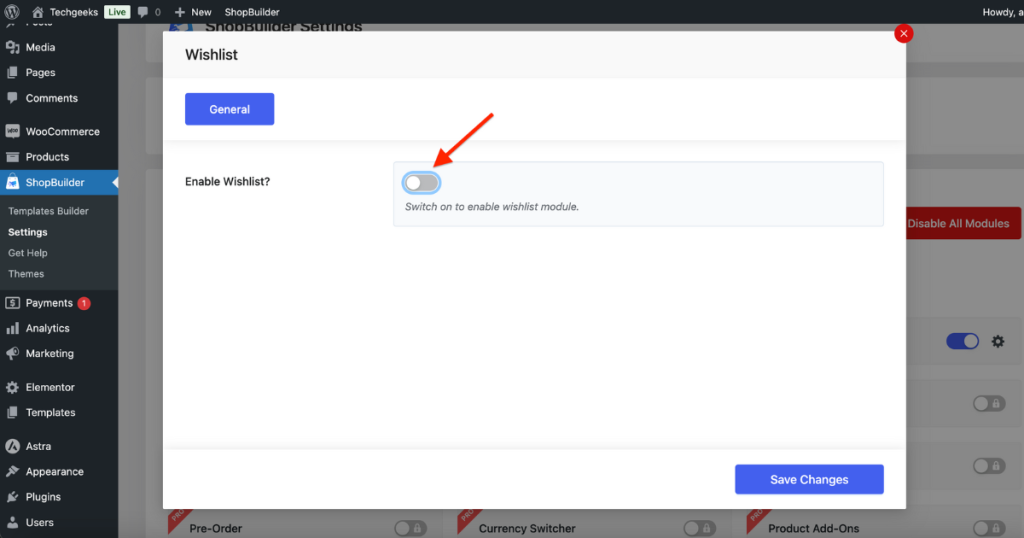
💥Boom! You’ve just enabled the wishlist feature for your WooCommerce store. But our work isn’t done yet. We’ll perform some customization to enhance the wishlist’s functionality.
So, click the ‘Button’ tab.
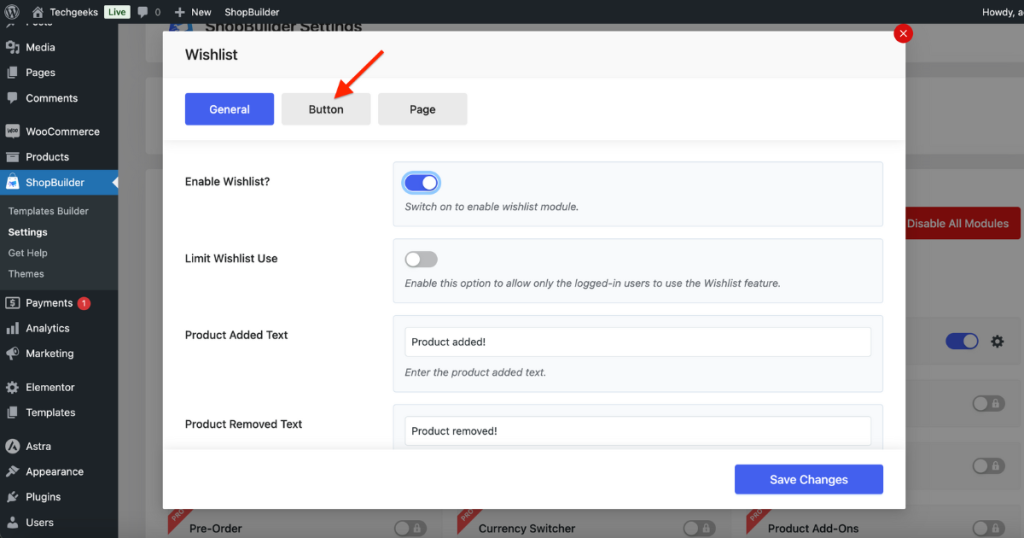
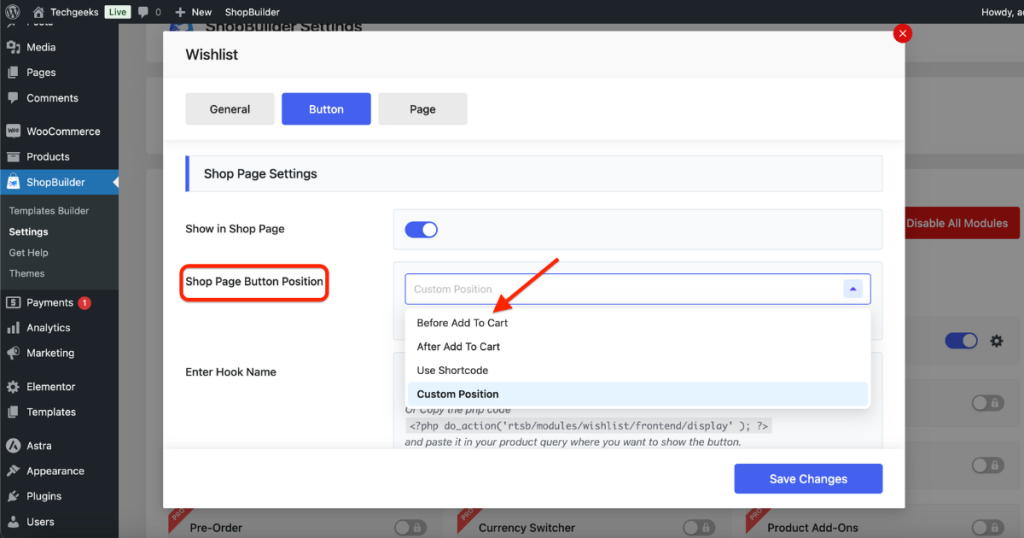
After that, navigate to the “Shop Page Button Position” field and click on it.
You’ll then see a drop-down menu with several wishlist icon positioning options. Choose one you prefer.
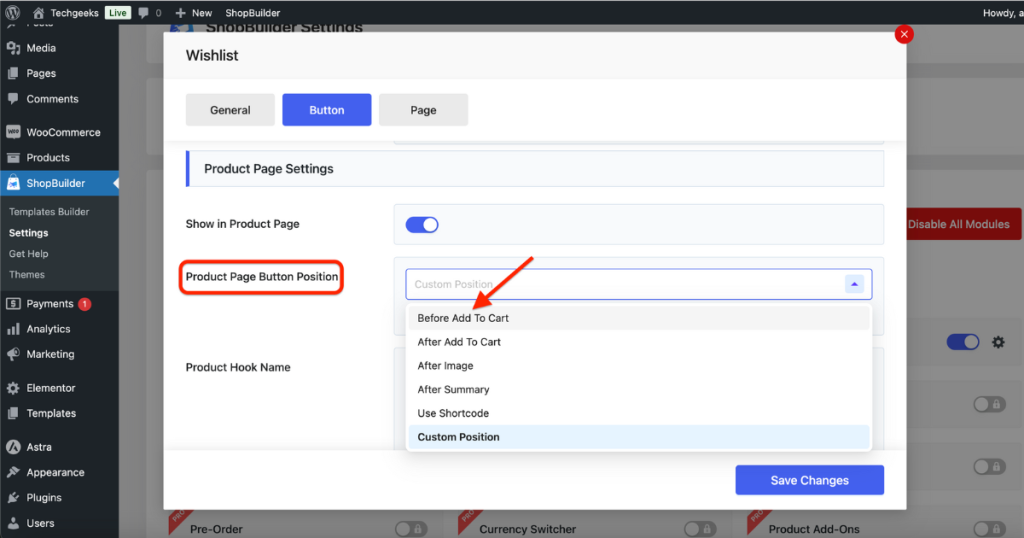
Scroll down and follow the same steps to set the “Product Page Button Position.”
Finally, hit the “Save Changes” button.

🎉🥳Congrats! You’ve successfully added the wishlist feature to your beloved WooCommerce store. Let’s now see it in action in the animation below.

Bonus: Customize the Wishlist
Customize the wishlist feature to give your targeted shoppers a smoother shopping experience. To do so, go to ShopBuilder’s ‘Settings’ and explore each setting individually.
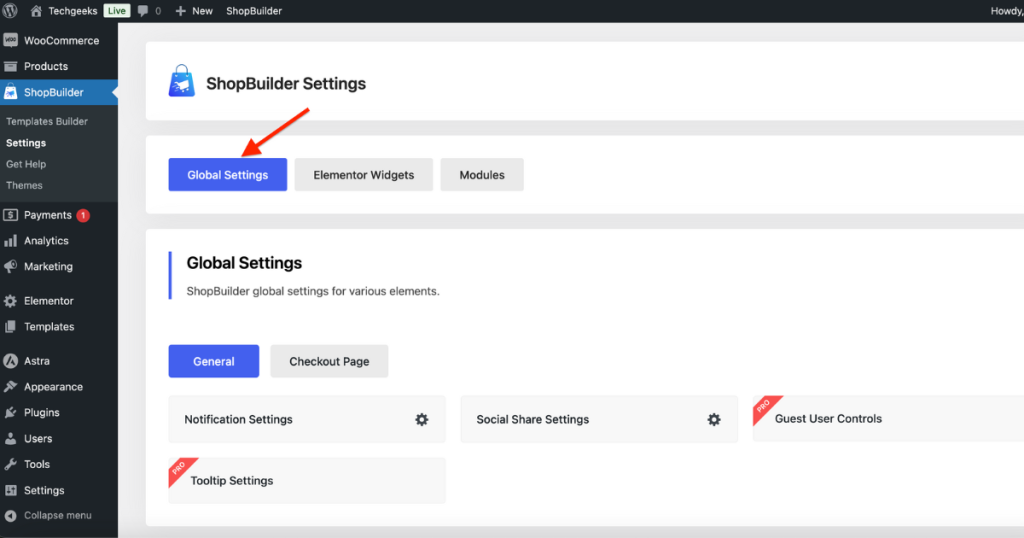
You can start by clicking the “Global Settings” tab.
Then, hit the “Notification Settings” option under the General tab to customize notifications for user actions, including adding items to the cart or wishlist and more.
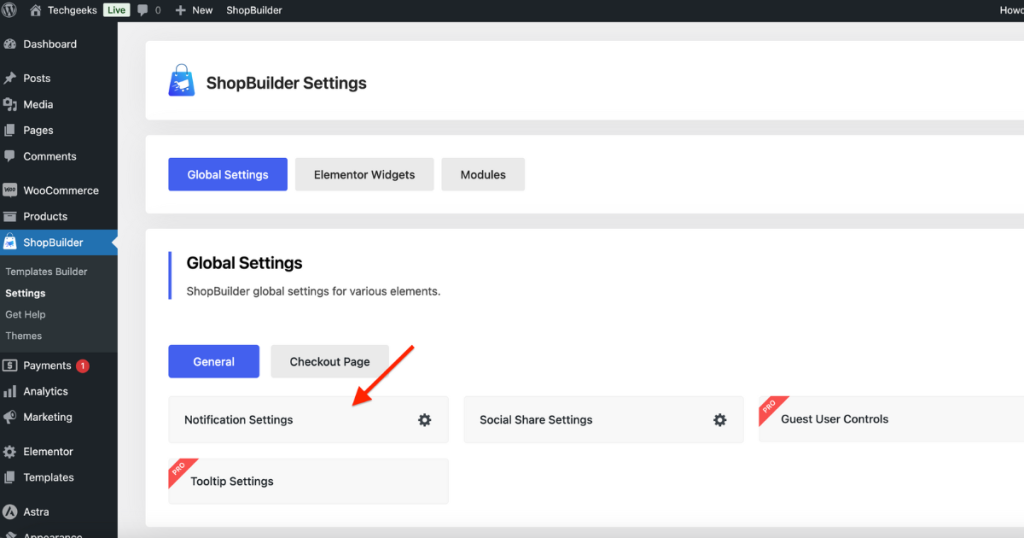
A pop-up with significant customization options will appear once you click the “Notification Settings” option. We recommend you explore all the notification settings and use them according to your needs.
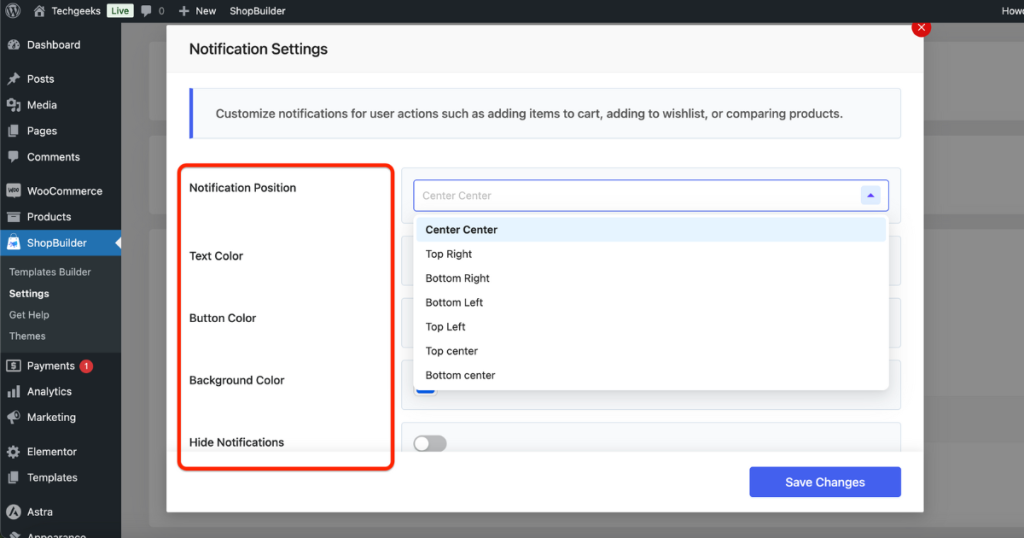
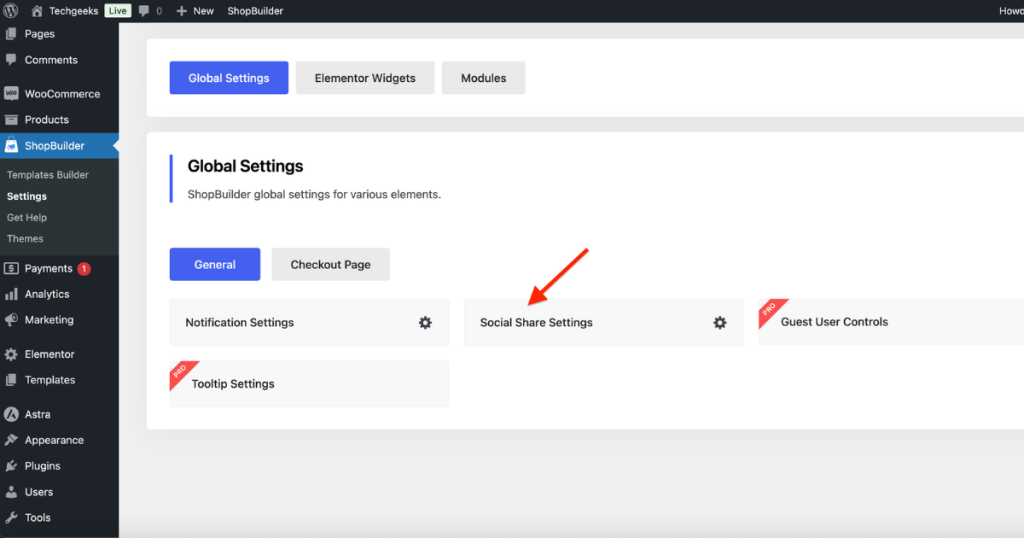
After tweaking some notification settings, you can explore the “Social Share Settings.” To do so, click on it.
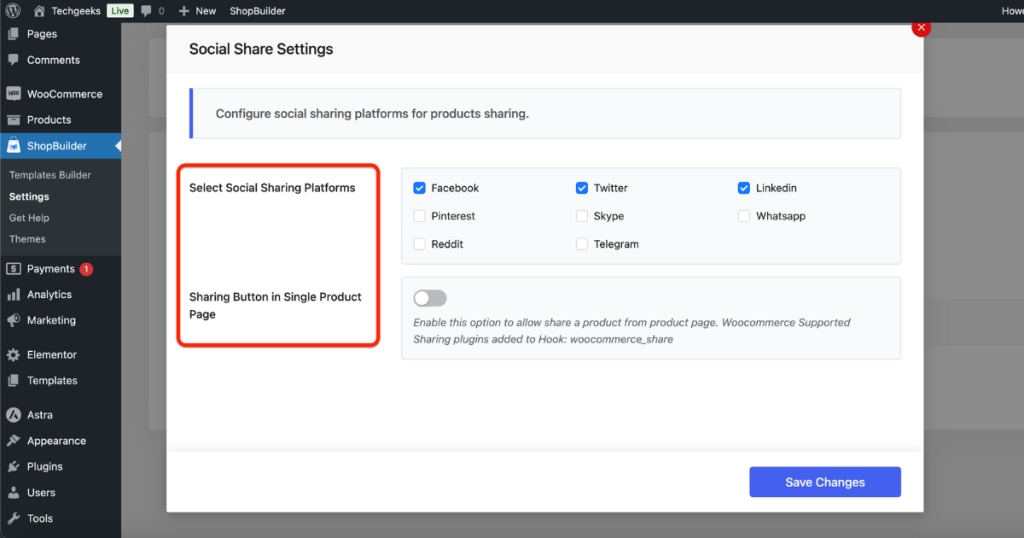
Now, check and uncheck platforms where you want or don’t want to share your products and configure other options.
You can play around with other settings of this fantastic plugin in the same way. If you need help with customization, you can read this documentation.
Does WooCommerce have a Wishlist Function?
WooCommerce doesn’t have a built-in wishlist feature. Still, you can enjoy the benefits of the wishlist by using the best wishlist plugin for WooCommerce. And that plugin is ShopBuilder.
How Do I Remove a Wishlist from WooCommerce?
If you’ve already installed and activated ShopBuilder, you can easily display or hide a wishlist in your store. Just toggle off the Wishlist module, and you and your customers will no longer see this feature.
Wrapping Up
You now know how to add wishlist in your WooCommerce store. It’s effortless. Here’s a rundown once again. Select the best wishlist plugin – ShopBuilder – for your WooCommerce website.
Then, install and activate it. Finally, enable the Wishlist module and make some tweaks to give shoppers an excellent shopping experience. That’s it.
We believe this article helped you learn about adding a wishlist feature to your WooCommerce store. If it did, you can read our other blogs to appreciate our efforts. We wish you the best of luck on your ecommerce journey.



