
To configure Custom Checkout, navigate to Food Menu → Settings → Checkout Settings → Custom Checkout from your WordPress admin dashboard.
This page lets you replace the default WooCommerce checkout with a restaurant-focused design, and control which sections and form fields are visible.
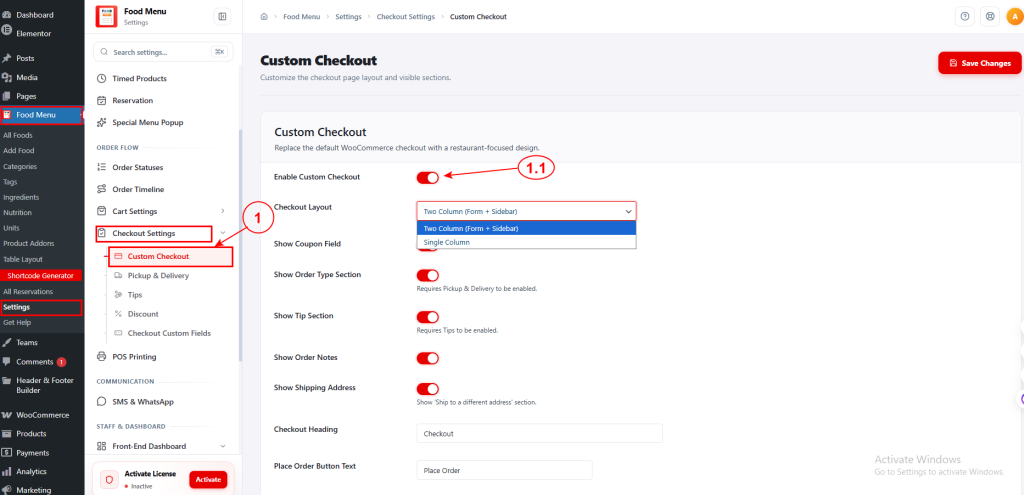
1.1 Custom Checkout #
Enable Custom Checkout: Toggle this on to activate the custom restaurant-style checkout page.
- Checkout Layout: Choose the page layout from the dropdown:
Two Column (Form + Sidebar) – Displays the checkout form alongside an order summary sidebar.
Single Column – Displays the checkout in a single full-width column.
- Show Coupon Field: Activate this to display a coupon code input on the checkout page.
- Show Order Type Section: Switch on to show the order type selector (e.g., pickup or delivery) on the checkout page. Requires Pickup & Delivery to be enabled.
- Show Tip Section: Turn on to display a tipping option on the checkout page. Requires Tips to be enabled.
- Show Order Notes: Enable this to let customers add special instructions or notes to their order.
- Show Shipping Address: Toggle this on to display a “Ship to a different address” section on the checkout page.
- Checkout Heading: Customize the main heading text shown on the checkout page (e.g., Checkout).
- Place Order Button Text: Personalize the label of the final order submission button (e.g., Place Order).
1.2 Checkout Form Fields #
This section controls the billing and shipping address fields displayed on the checkout form. Each field has three configurable options:
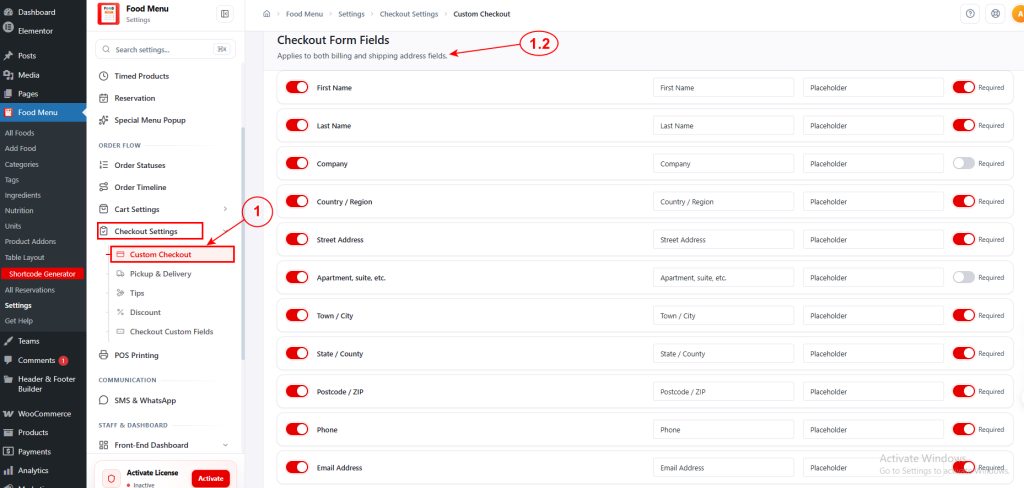
- Visibility toggle (left) – Turn a field on or off to show or hide it on the checkout form.
- Label (middle) – Customize the field label and placeholder text shown to customers.
- Required toggle (right) – Mark a field as mandatory so customers must fill it in before placing an order.
The available fields are: First Name, Last Name, Company, Country / Region, Street Address, Apartment/suite/etc., Town / City, State / County, Postcode / ZIP, Phone, and Email Address.
After configuring all settings, click the Save Changes button to apply your changes.


