On This Page
Adding 50 listings to a new directory can eat a whole weekend. You fill in the title, pick a category, set a location, type a price, upload photos, and then do it all again 49 more times.
Now picture this instead. You open Claude and type: “Add 50 used car listings in Dhaka with prices, photos and the right categories.” A few minutes later, they are live on your site.
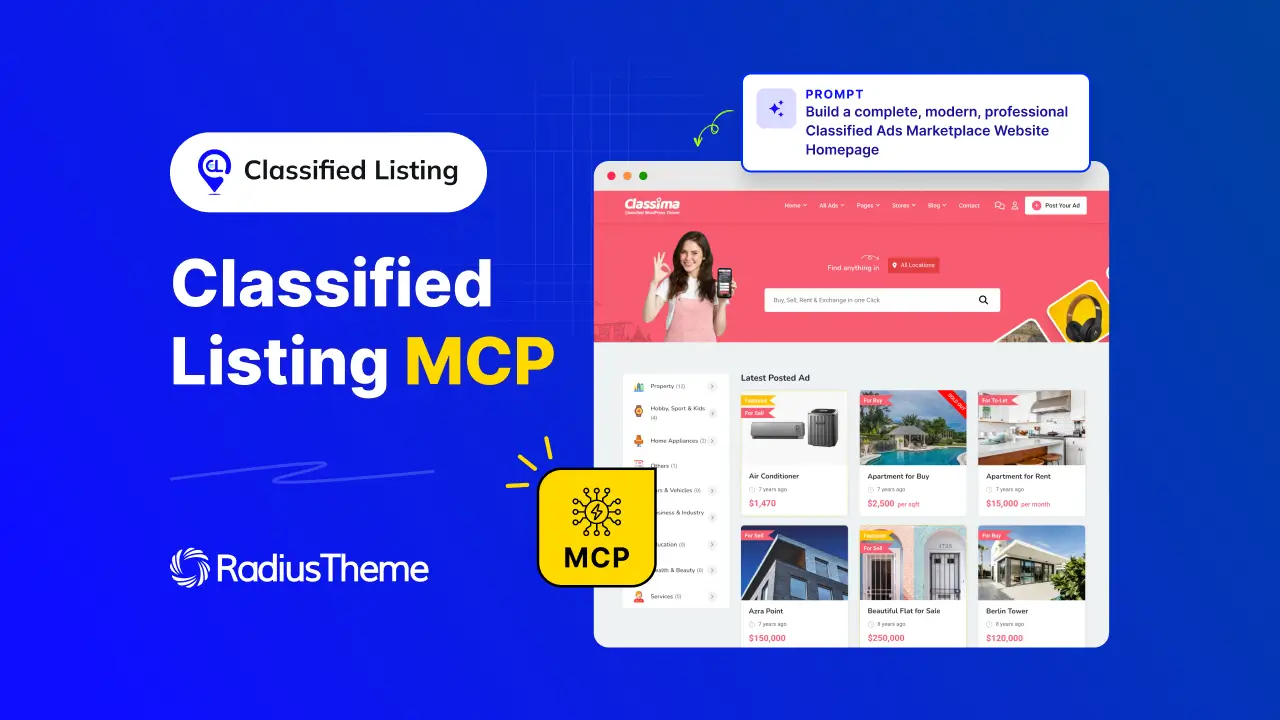
That is what the new MCP integration in Classified Listing does. It connects AI assistants like Claude straight to your WordPress directory, so you can run your site by chatting instead of clicking.
In this guide, you will learn what it is, what it can do, how it compares to managing things by hand, and how to set it up step by step.
Quick answer: Classified Listing MCP lets AI assistants such as Claude, Cursor and VS Code manage your WordPress directory through the Model Context Protocol. With it, you can create listings, categories, forms, filters and pages using plain-language prompts. Setup takes about 5 minutes. You need WordPress 6.9 or newer, the free MCP Adapter plugin and an administrator account.
What is Classified Listing MCP?
Classified Listing MCP is a built-in feature that lets AI assistants read and manage your Classified Listing directory through the Model Context Protocol (MCP). You describe a task in plain words. The AI turns it into real actions on your WordPress site.
Here is how the pieces fit together:
| Piece | What it does |
| MCP (Model Context Protocol) | An open standard that lets AI apps talk to outside tools safely. Think of it as a USB port for AI. |
| WordPress Abilities API | Added in WordPress 6.9. Plugins use it to list the actions they allow, such as “create a listing.” |
| MCP Adapter plugin | A free, official plugin from WordPress.org. It shares those actions with AI apps. |
| Classified Listing | Registers its directory actions (listings, categories, forms, filters, pages) so the AI can use them. |
| Your AI app | Claude Desktop, Claude Code, Cursor, VS Code or Codex. This is where you type your requests. |
The key point: the MCP Adapter on its own does nothing special. It only exposes what plugins register. Classified Listing is what gives the AI real directory skills.
MCP vs a chatbot plugin
Many people mix these up. A chatbot plugin sits on your site and answers visitor questions. MCP works the other way around. It lets you, the site owner, control your site from an AI app you already use. Your visitors never see it.
Why directory and marketplace owners should care
Running a directory is mostly repeat work. Adding listings, fixing categories, building forms and keeping data clean all take time away from growing your business and helping your users.
MCP moves that work into a chat. Here is how common jobs compare.
| Task | The manual way | With Classified Listing MCP |
| Add 20 listings | Fill in 20 forms, one by one | One prompt, done in minutes |
| Build a category tree | Create each parent and child by hand | “Create Electronics with Phones, Laptops and TVs” |
| Custom submission form | Drag fields, set options, add conditional logic | Describe the form and its rules in a sentence |
| Search filter | Configure each filter field manually | “Create a sidebar filter with search, category, price range, location” |
| Home page design | Build sections in Gutenberg or Elementor | Describe the layout, colors and spacing |
| Find messy data | Scroll through listings and spot errors | Ask the AI to find and fix them |
| Learning curve | Learn every settings screen | Explain what you want in plain words |
Who gets the most value
- New site owners who want a working directory with real content fast
- Agencies that launch directory sites for clients again and again
- Busy marketplace owners with hundreds of listings to keep tidy
- Non-technical owners who find form builders and settings pages confusing
The result is simple: less time in the dashboard, more time improving the experience for your buyers, sellers and visitors.
What you can do with Classified Listing MCP
Once connected, your AI assistant can work across the main parts of your directory.
Listings
- Create, edit or delete listings, one at a time or many at once
- Add listings with images
- Import listings from JSON data
- Search listings and pull up stats, such as all featured listings
Categories, locations and tags
- Build full category trees with subcategories
- Set up locations and tags
- Spot duplicates and fix messy data
Forms
- Build submission forms for cars, real estate, jobs, electronics and more
- Add smart dependent fields. For example, picking “Toyota” shows only Toyota models.
- Group fields into clear sections
Search filters
- Create sidebar filters with keyword search, category, price range and location
Pages and design
- Build pages with Gutenberg or Elementor
- Set exact colors, fonts, spacing and hover effects
Settings and languages
- Review and change directory settings
- Add translations for multilingual sites
Tip: Not sure what your AI can do? After connecting, ask it: “What can you do with my Classified Listing site?” It will list every tool it has.
How to connect Claude to Classified Listing (step by step)
Setup takes about 5 minutes and needs no coding. Classified Listing includes a built-in wizard that does most of the work for you.
What you need first
- WordPress 6.9 or newer
- Classified Listing installed and active
- An administrator account on your site
- An AI app: Claude Desktop, Claude Code, Cursor, VS Code or Codex
- Node.js (LTS) on your computer, free from nodejs.org. Claude Desktop, Cursor and VS Code need it.
Step 1: Install the MCP Adapter plugin
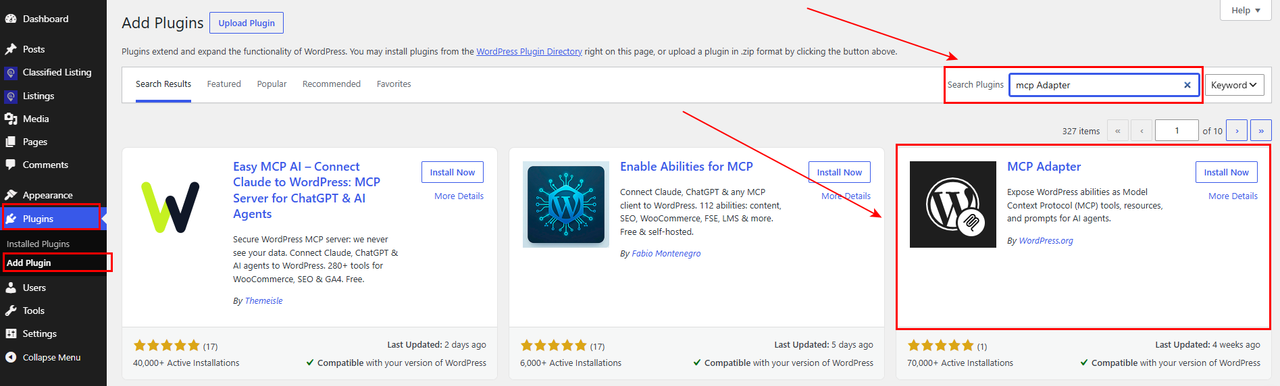
- Go to Plugins → Add Plugin.
- Search for MCP Adapter.
- Install and activate the one by WordPress.org. Other MCP plugins will show up in the search, so check the author.
Step 2: Turn on MCP in Classified Listing
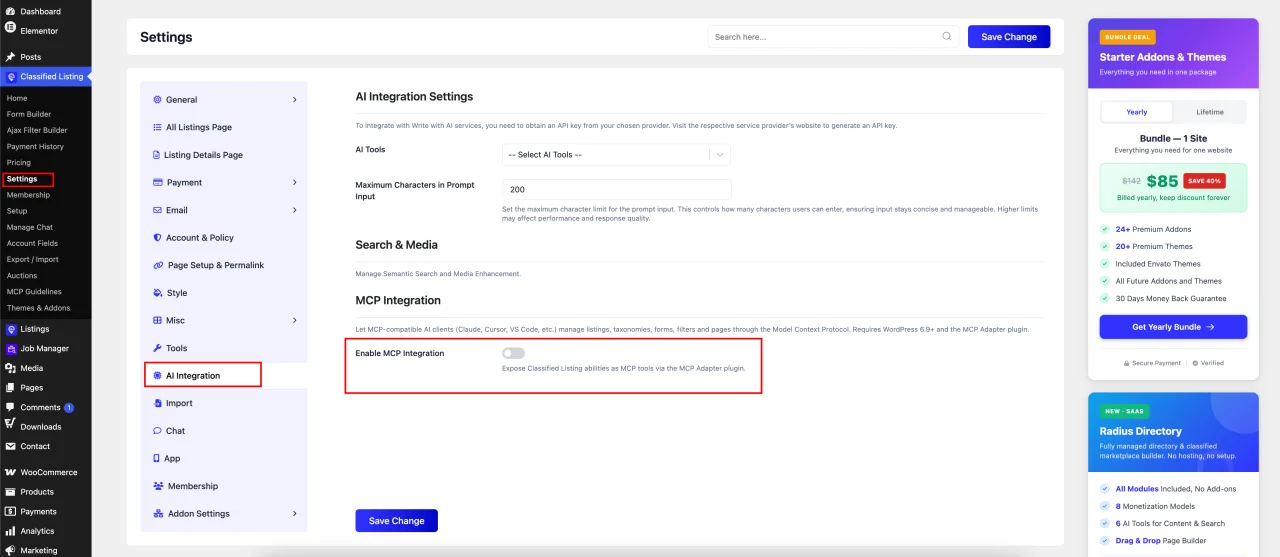
- Go to Classified Listing → Settings → AI Integrations.
- Scroll to MCP Integration and switch on Enable MCP Integration.
- Check that MCP Status says all requirements are met.
- Click Save Change, then reload the page.
A new menu called MCP Guidelines now appears under Classified Listing.
Step 3: Generate your credentials
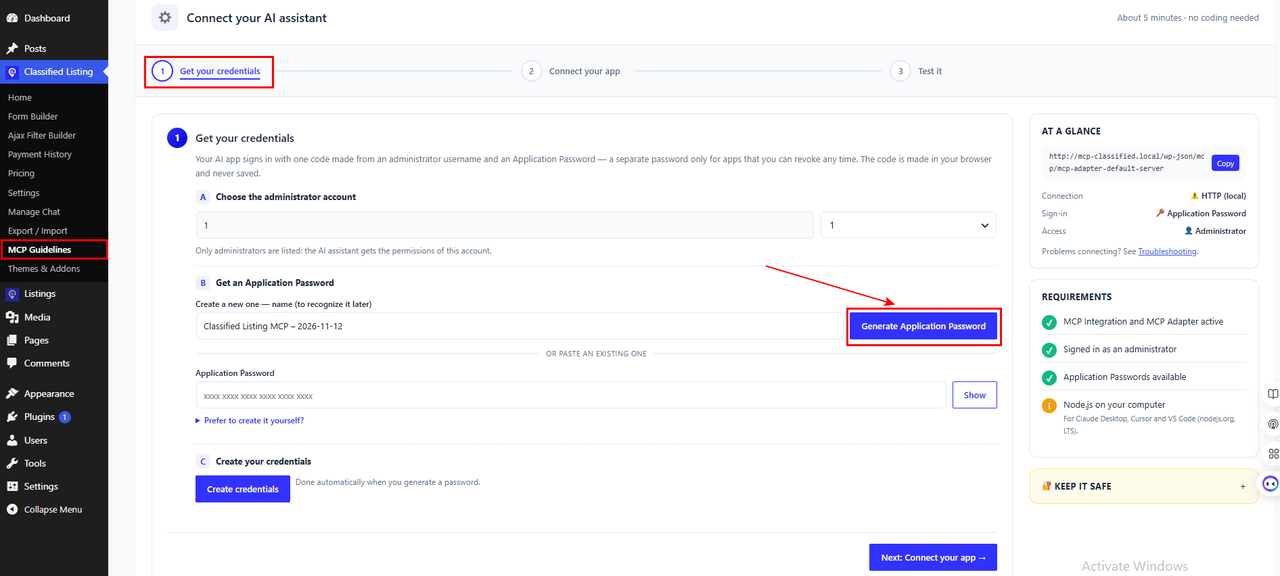
- Open Classified Listing → MCP Guidelines.
- Choose the administrator account the AI will use.
- Click Generate Application Password. Your credentials are created for you automatically.
- Click Next: Connect your app.
Step 4: Add the code to your AI app
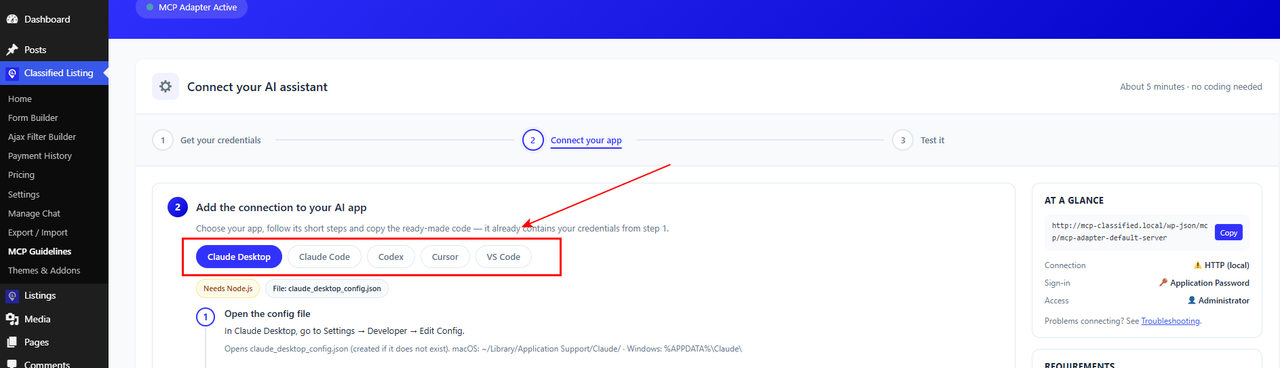
For Claude Desktop:
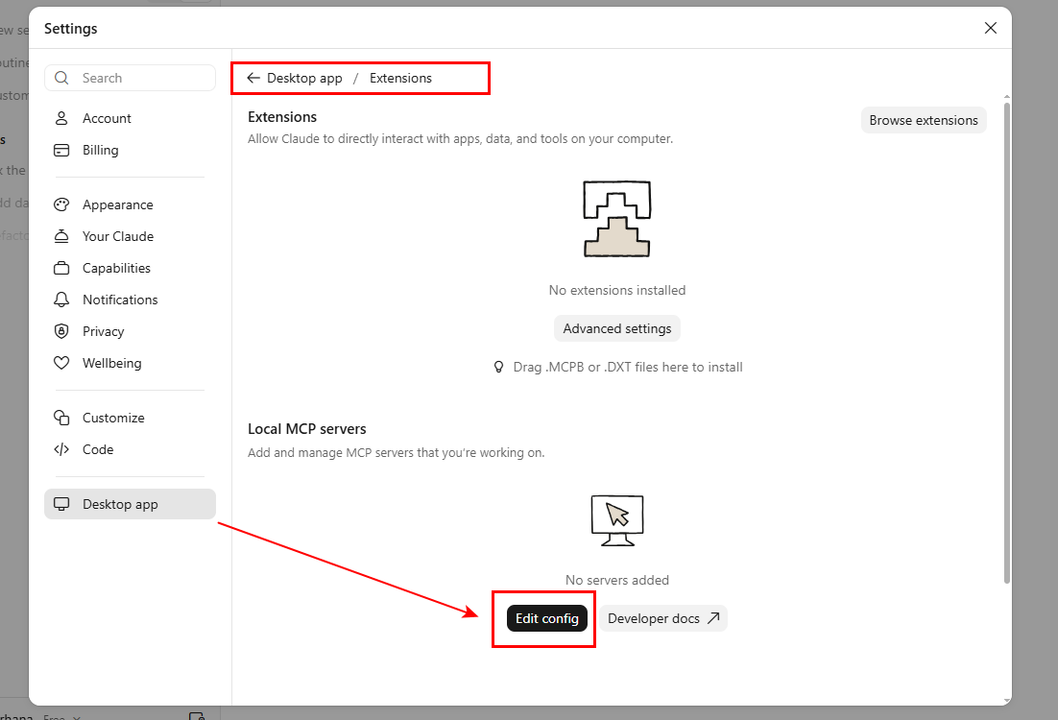
- On the wizard, pick the Claude Desktop tab and copy the configuration code.
- In Claude Desktop, open Settings → Desktop app → Extensions.
- Under Local MCP servers, click Edit config. This opens claude_desktop_config.json.
- Paste the code inside the file and save it. If the file already has other settings, add the “mcpServers” part and keep the rest.
Using a different AI app? The wizard has a tab for five more apps. Each one gives you ready-made code with your credentials already filled in.
| App | How you connect it | Needs Node.js? |
| Claude Code | Run one command in your terminal. No file to edit. | No |
| Codex | Paste a short block at the end of ~/.codex/config.toml | Yes |
| Cursor | Go to Settings → Cursor Settings → MCP and paste the code into mcp.json | Yes |
| VS Code | Run “MCP: Open User Configuration” and paste the code into mcp.json | Yes |
| Gemini CLI | Paste the code under “mcpServers” in ~/.gemini/settings.json, then type /mcp to check | Yes |
Just pick your app’s tab on the MCP Guidelines page and follow its short steps. Claude Code is the quickest if you already use it. Claude Desktop is the easiest if you don’t write code.
Step 5: Restart and test
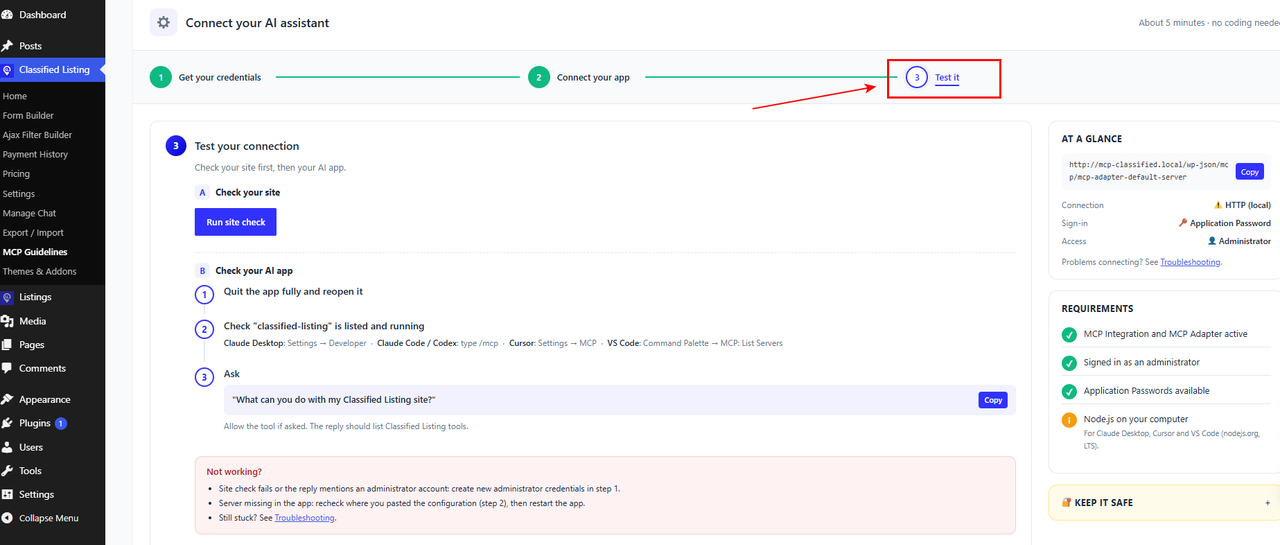
- On the wizard’s Test it step, click Run site check.
- Fully quit Claude Desktop (Cmd + Q on Mac, or Quit from the system tray on Windows) and open it again.
- Check that classified-listing shows a green Running label in Settings.
- Ask: “What can you do with my Classified Listing site?” and allow the tool when asked.
If Claude lists your directory tools, you are connected. For screenshots of every screen, see the Classified Listing MCP documentation.
Is it safe to let AI manage your directory?
This is the top question in forums and community threads about WordPress MCP. The short answer: yes, if you set it up with care. MCP is just the connection. The AI can only do what the WordPress account behind it is allowed to do.
How Classified Listing keeps you in control
- Application Passwords. The AI signs in with a separate password, not your real login. You can revoke it any time from your WordPress profile.
- WordPress permissions. Every action runs with the rights of the account you chose. Nothing more.
- Credentials made in your browser. The wizard builds your connection code in your browser and does not save it.
- You approve tool use. Claude asks for your permission the first time it uses a tool.
Best practices
- Test on a staging site first. Try big changes on a copy of your site before you touch the live one.
- Back up before bulk edits. Always have a fresh backup before you ask the AI to edit or delete many items.
- Use one password per app. Name each one clearly, like “Classified Listing MCP: Claude.” Revoke the ones you stop using.
- Keep your credentials private. Click Clear on the MCP Guidelines page before you share your screen.
- Read before you approve. Check what the AI plans to do, especially for deletes.
- Keep WordPress and plugins updated. MCP does not fix weak passwords or outdated plugins.
Common problems and quick fixes
| Problem | Fix |
| No MCP Guidelines menu | Make sure MCP Adapter is active and Enable MCP Integration is on. Save, then reload the page. |
| MCP Status shows a missing requirement | Update to WordPress 6.9 or newer and activate the MCP Adapter plugin. |
| Node.js warning in Requirements | Install the LTS version from nodejs.org, then restart your computer. |
| Site check fails | Create new administrator credentials in step 1 of the wizard. |
| Server missing in Claude | Recheck where you pasted the code, save the file, then fully quit and reopen Claude. |
| Server shows an error, not Running | Check the config file for a missing comma or bracket. Use View logs in Claude to see the error. |
Still stuck? Use the Troubleshooting link on the MCP Guidelines page, or contact RadiusTheme support.
Frequently asked questions
What does MCP stand for?
MCP stands for Model Context Protocol. It is an open standard that lets AI assistants connect to outside tools, like your WordPress site, in a safe and structured way.
Which AI apps work with Classified Listing MCP?
The setup wizard covers Claude Desktop, Claude Code, Codex, Cursor and VS Code. Other MCP-compatible apps may also work.
Do I need to know how to code?
No. The wizard creates your connection code for you. You only copy and paste it into your AI app’s settings file.
Is the MCP Adapter plugin free?
Yes. MCP Adapter is a free plugin from WordPress.org. It is part of WordPress’s official AI Building Blocks project.
Why do I need Node.js?
Claude Desktop, Cursor and VS Code use a small tool called mcp-remote to reach your site. It runs on Node.js, so you need it installed on your computer.
Can I use it on a local test site?
Yes. The integration works with local sites that use plain HTTP, which makes it easy to test before going live.
Start running your directory with AI
Classified Listing MCP turns hours of clicking into a few clear sentences. You can launch a new directory with real content, build smart forms and design pages, all from a chat window.
The best part is that you stay in charge. The AI works only when you ask, uses only the access you give it, and you can switch it off in seconds.
Ready to try it?
- Update to the latest version of Classified Listing.
- Install the free MCP Adapter plugin.
- Follow the wizard under Classified Listing → MCP Guidelines.
Start with one small task, like creating a category. Once you see how it works, you will never want to add listings by hand again.