• Classified Listing Docs
    • Classified Listing Plugin
    • Classified Listing All Addons
    • Classified Listing Mobile App
    • Classima Mobile APP
    • Listygo Mobile App
    • Homlisti Mobile App
  • Woocommerce Plugins Docs
    • ShopBuilder Elementor Addon
    • Woo Variation Swatches
    • Woo Variation Gallery
    • Zilly Mobile App
  • General Plugins Docs
    • The Post Grid
    • Testimonial Slider
    • Team Members
    • Food Menu
    • Review & Schema
    • Portfolio
    • Business Review
  • Our Plugins
    • The Post Grid
    • Classified Listing
    • ShopBuilder
    • Food Menu
    • Team
    • Portfolio
    • Testimonial Slider
    • Review & Schema
    • See All Plugins
  • Get Pro
×
  • Classified Listing Docs
    • Classified Listing Plugin
    • Classified Listing All Addons
    • Classified Listing Mobile App
    • Classima Mobile APP
    • Listygo Mobile App
    • Homlisti Mobile App
  • Woocommerce Plugins Docs
    • ShopBuilder Elementor Addon
    • Woo Variation Swatches
    • Woo Variation Gallery
    • Zilly Mobile App
  • General Plugins Docs
    • The Post Grid
    • Testimonial Slider
    • Team Members
    • Food Menu
    • Review & Schema
    • Portfolio
    • Business Review
  • Our Plugins
    • The Post Grid
    • Classified Listing
    • ShopBuilder
    • Food Menu
    • Team
    • Portfolio
    • Testimonial Slider
    • Review & Schema
    • See All Plugins

Getting Started

3
  • Getting Started
  • System Requirements
  • Installation

Plugin Settings

2
  • General Settings
  • Detail Page Control

Features

5
  • Taxonomy Order [Pro]
  • Add / Edit Skills
  • Add / Edit Department
  • Add / Edit Designation
  • Add / Edit Team Member

Shortcode Generate

9
  • Layout
  • Filtering
  • Fields Selection
  • Styling
  • Create Grid Layout
  • Create Grid Filter Layout [Pro]
  • Create List Layout
  • Create Isotope Filter Layout
  • Create Carousel Slider Layout

Use Shortcode in Page

3
  • Use Shortcode in Page
  • Use Direct Shortcode
  • Use Gutenberg Addon

Elementor Addons

13
  • Team Details Page Builder[Pro]
  • Elementor Addons
  • Grid Layouts
  • – Grid Layouts Settings
  • – Grid Layouts Style
  • List Layouts
  • – List Layouts Settings
  • – List Layouts Style
  • Slider Layouts
  • – Slider Layout Settings
  • – Slider Layouts Style
  • Isotope Filters Layouts
  • ShortCodes

Import/Export

1
  • Import/Export Team Member[Pro]
  • Home
  • Docs
  • Getting Started
  • Installation
View Categories

Installation

2 min read

Install Free Version #

The Free version of the Team Plugin is available in the WordPress.org plugin directory. You can install it from your WordPress dashboard. Follow the following steps:

1) Go to your WordPress Dashboard

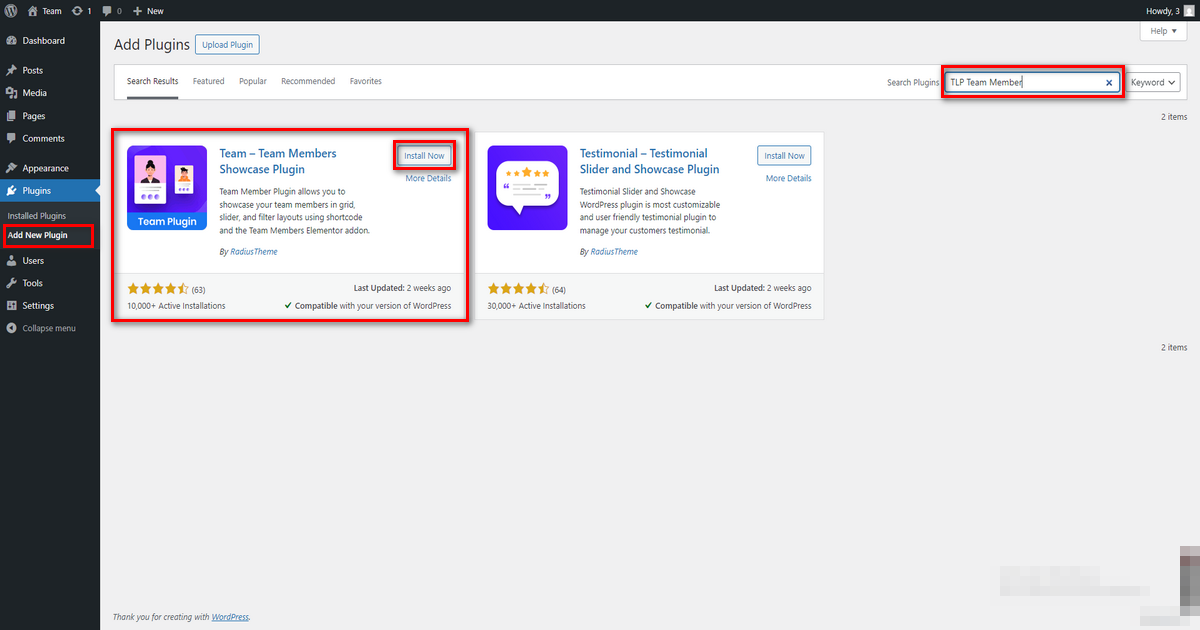
2) Navigate to Plugins > Add New, then type “Team by RadiusTheme” or “TLP Team Members” in the plugin search box

3) Find “Team – WordPress Team Members Showcase Plugin” from the list and click on the “Install Now“ button.

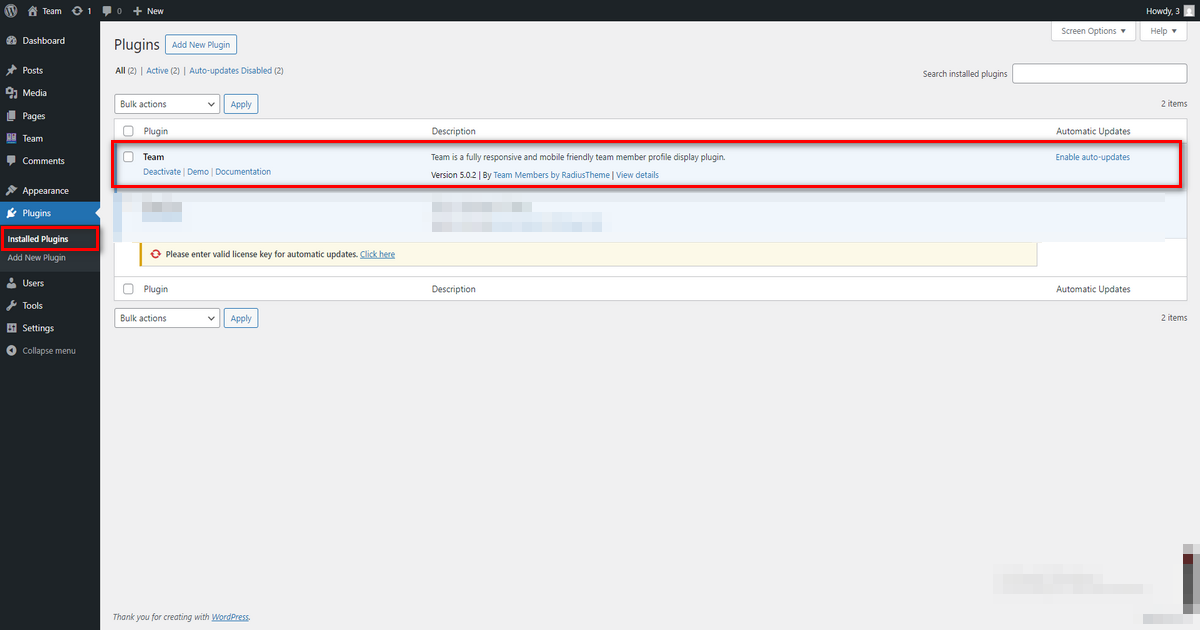
4) After the completion of installation, click the  “Activate” button.
After activating the plugin you will get the “Team” menu in WordPress admin navigation.
Installing the Pro Version #

The Pro version of the “Teamr” plugin is a zip file. After purchasing the Pro version you will get a download link in your purchase receipt email with which you can acquire the plugin files. If not, you can log in to RadiusTheme, then go to Purchase History. See below

After the download, you’ll find the files in the zip folder on your computer. You then need to install the “tlp-team-pro.zip”. Once you download the zip file. Please follow the following steps to install the “Team Member Pro” version.

Note: Install & activate the “Team Plugin FREE” version to work PRO version from Version 3.5.4

1) Go to your WordPress website Dashboard. Navigate to Plugins > Add New.

2) Now check the options on the top right beside “Add Plugins” for the “Upload Plugins” option. Click on this.

3) Once you click the “Upload Plugin” button, you will get the plugin upload option from your computer. Now select the “tlp-team-pro.zip” file from your computer and click on the “Install Now” button.
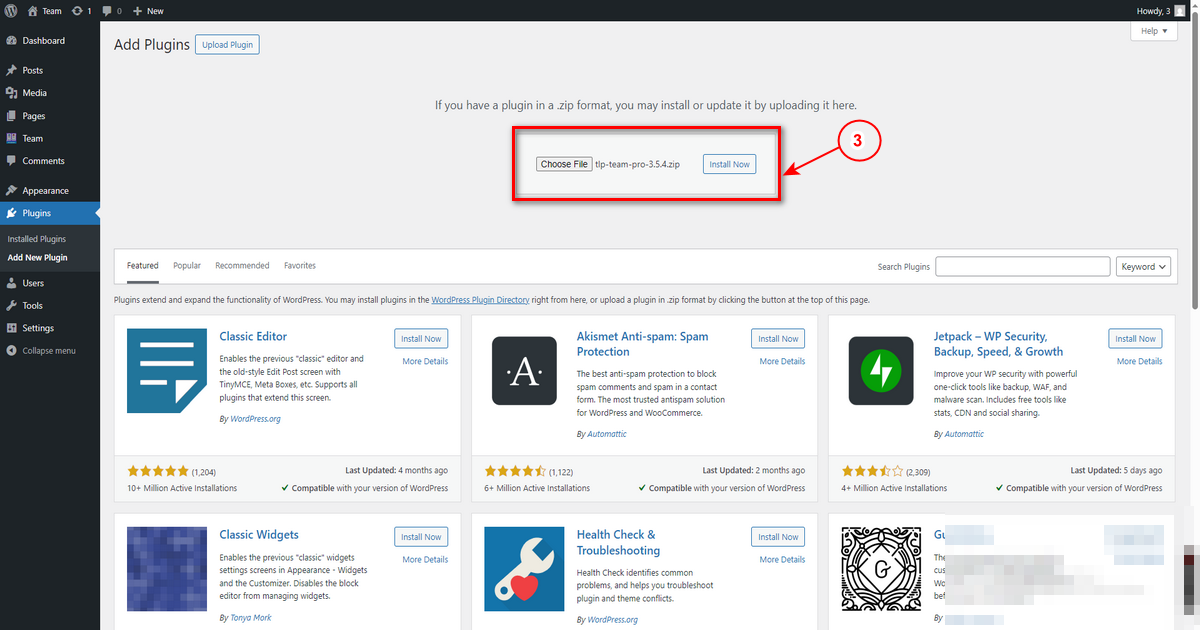
After installing and activating the Pro version, you will get the plugin on your website.

After activating the plugin, you need to activate the plugin again using the license key. You will get the license key in your “Purchase Email” or go to login RadiusTheme.com, then go to purchase history and click on the “License Key“.

What are your Feelings

Share This Article :

  • Facebook
  • X
  • LinkedIn
  • Pinterest
Still stuck? How can we help?

How can we help?

Updated on June 18, 2025
System RequirementsGetting Started
Table of Contents
  • Install Free Version
  • Installing the Pro Version
Copyright© 2026 RadiusDocs by RadiusTheme