
Let customers build their own bundle by choosing products from a curated selection you define. Instead of a fixed set, shoppers pick and match their favorites to create a personalized bundle at a discounted price. Best for stores selling variety packs, gift boxes, or “build your own” offers where customer choice drives higher engagement and conversions.
When to Use This Bundle #
Use Mix & Match when you want customers to build their own bundle by choosing from products you define. Instead of selling a fixed set, you let shoppers pick their favorites — creating a personalized bundle at a discounted price.
Perfect for “Build Your Own Box” offers, variety packs, gift sets, “Pick Any 3” deals, or any promotion where customer choice increases engagement and conversions.
Setting up a Mix & Match bundle follows a 4-step wizard: Products → Discount → Display → Review.
Step 1: Products #
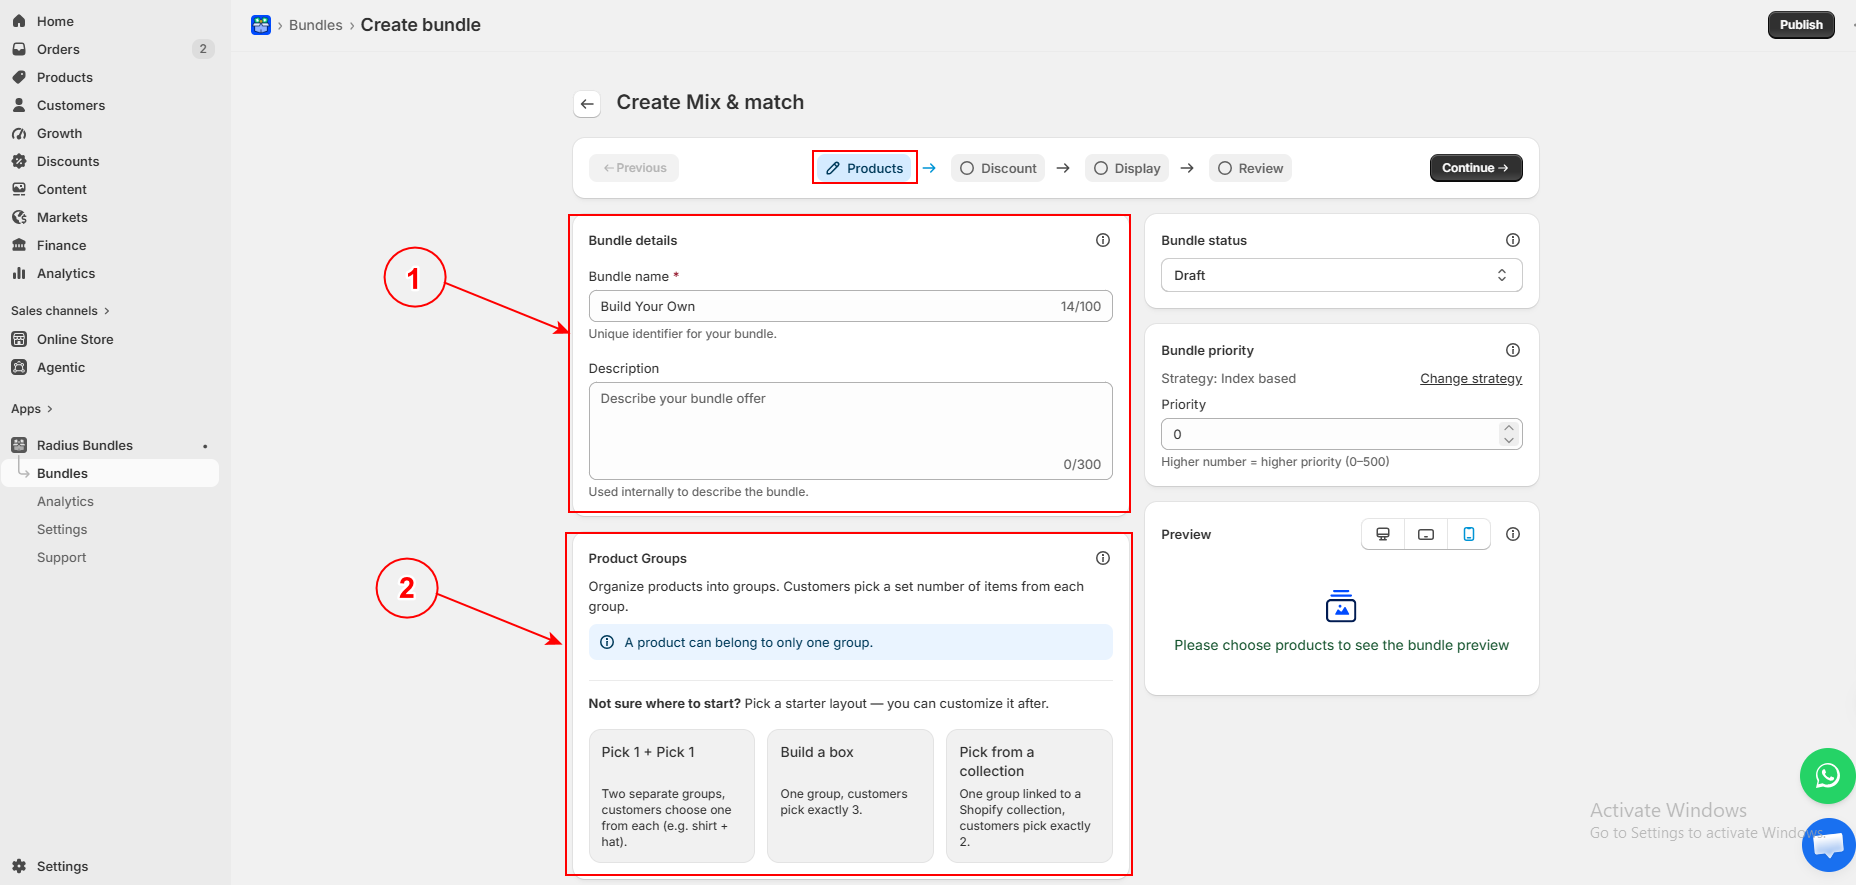
1. Bundle Details #
Give your bundle a name (e.g., “Build Your Own”) and an optional description for internal reference.
2. Product Groups #
Mix & Match organizes products into groups. Customers pick a set number of items from each group. A product can belong to only one group.
Three starter layouts help you get started quickly:
- Pick 1 + Pick 1 — Two groups, customers choose one from each (e.g., pick a shirt + pick a hat).
- Build a Box — One group, customers pick exactly 3 items.
- Pick from a Collection — One group linked to a Shopify collection, customers pick exactly 2.
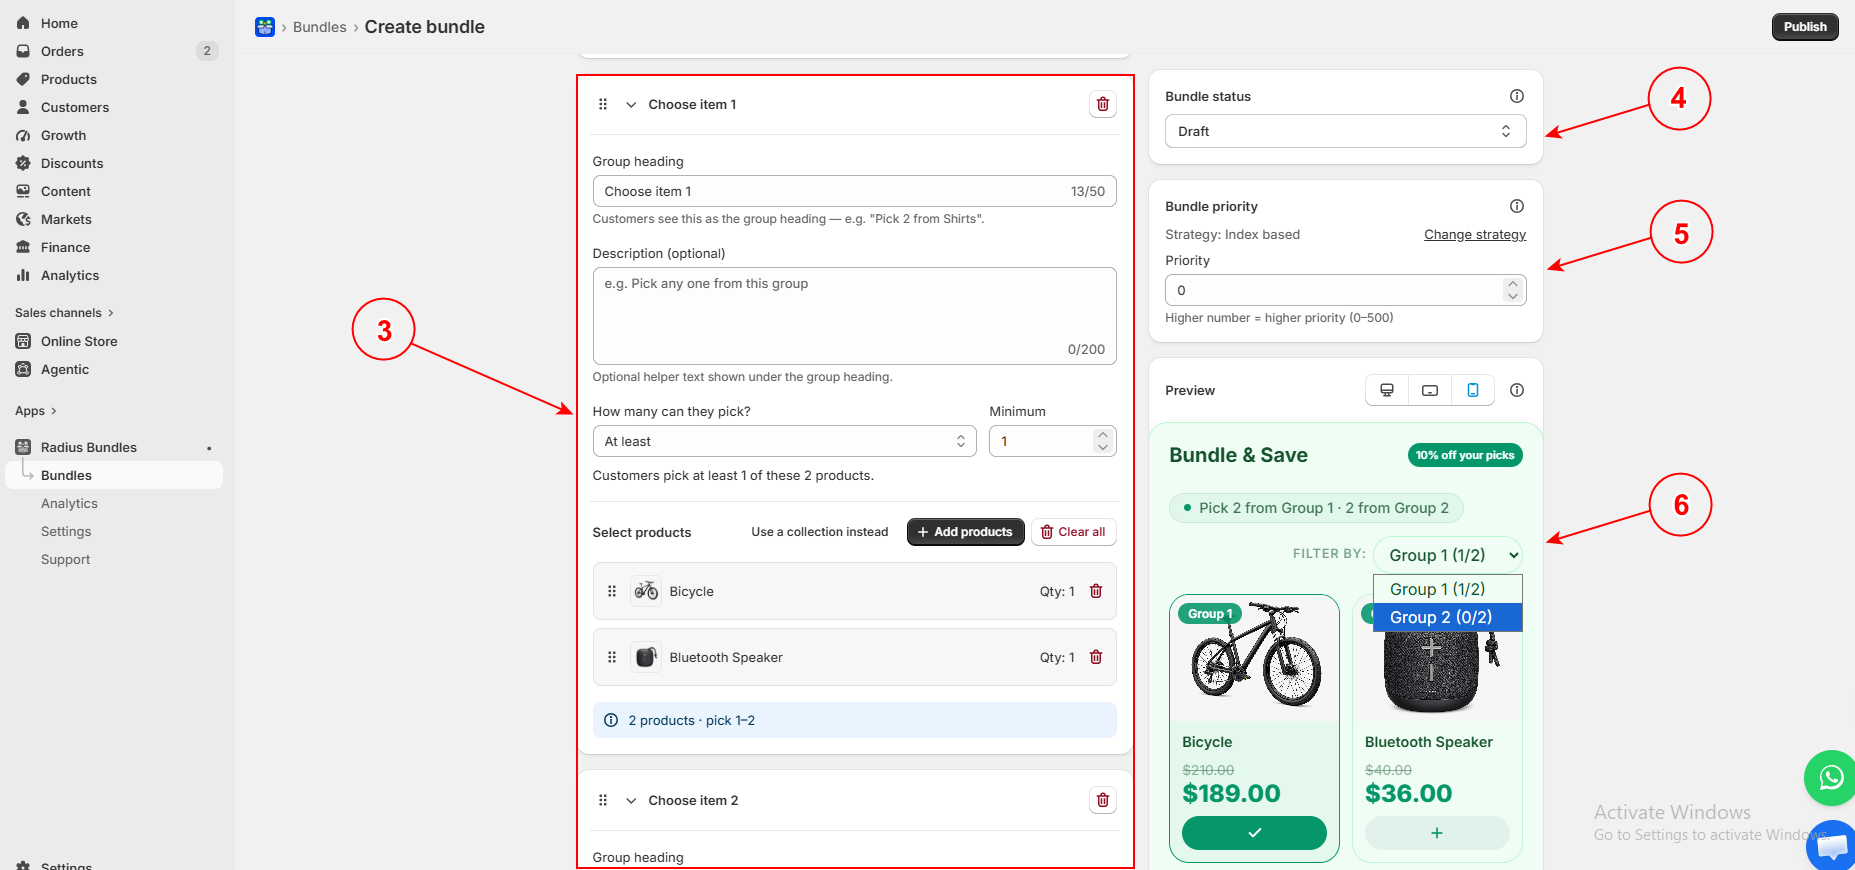
3. Group Settings #
Each group has its own configuration:
- Group heading — The label customers see (e.g., “Pick 2 Shirts,” “Choose Your Snacks”).
- Description — Optional helper text shown below the heading.
- How many can they pick? — Set the selection rule (e.g., “At least 1,” “Exactly 3,” or “Up to 5”) and the minimum quantity.
4–6. Status, Priority & Preview #
Set status to Draft while building. Set priority (0–500) to control which bundle shows when a product appears in multiple offers. The live preview shows “You Buy” and “10% Off” badges on the correct products.
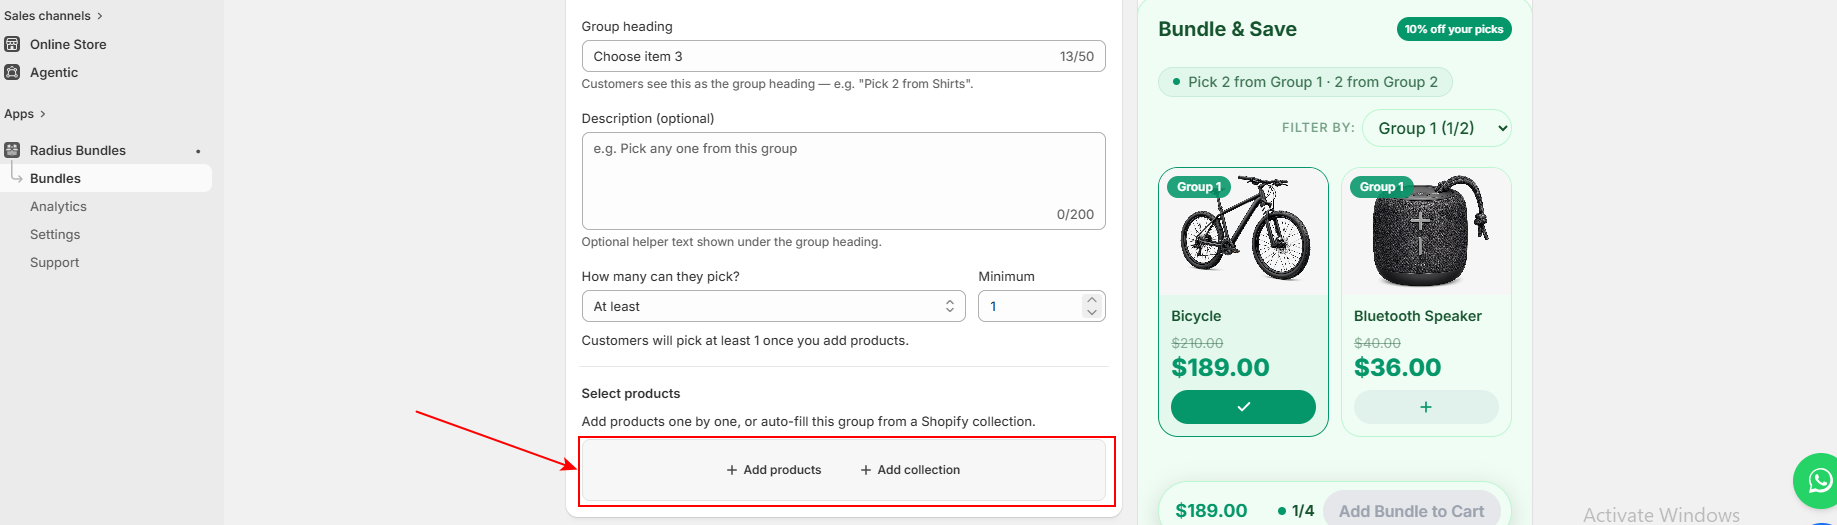
Adding Products to a Group #
You have two options:
- + Add products — Pick individual products one by one. Best when you want full control over exactly which items appear (e.g., 5 specific t-shirts from your catalog).
- + Add collection — Link an entire Shopify collection to the group. All products in that collection automatically appear as options. Best for large selections — for example, link your “Summer Dresses” collection so customers can pick any 2 dresses from 30+ options without you adding each one manually.
Tip: Using collections keeps your bundle updated automatically. When you add a new product to the collection in Shopify, it appears in the bundle instantly — no manual editing needed.
Step 2: Discount #
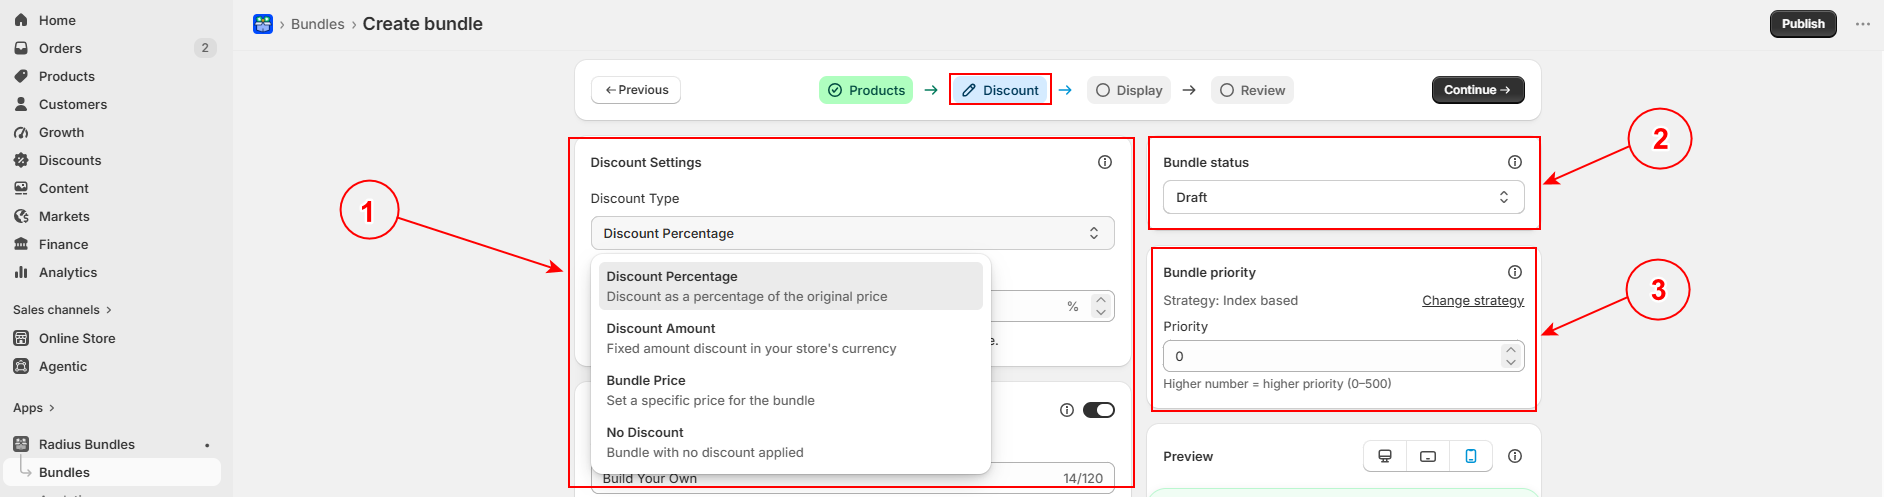
1. Discount Settings #
Choose from four discount types:
- Discount Percentage — A percentage off the original price (e.g., 10% off).
- Discount Amount — A fixed amount off in your store’s currency (e.g., $5 off).
- Bundle Price — Set one specific price for the entire bundle regardless of what customers pick.
- No Discount — Bundle products together with no price reduction.
2–3. Status & Priority #
Same controls accessible throughout every step.
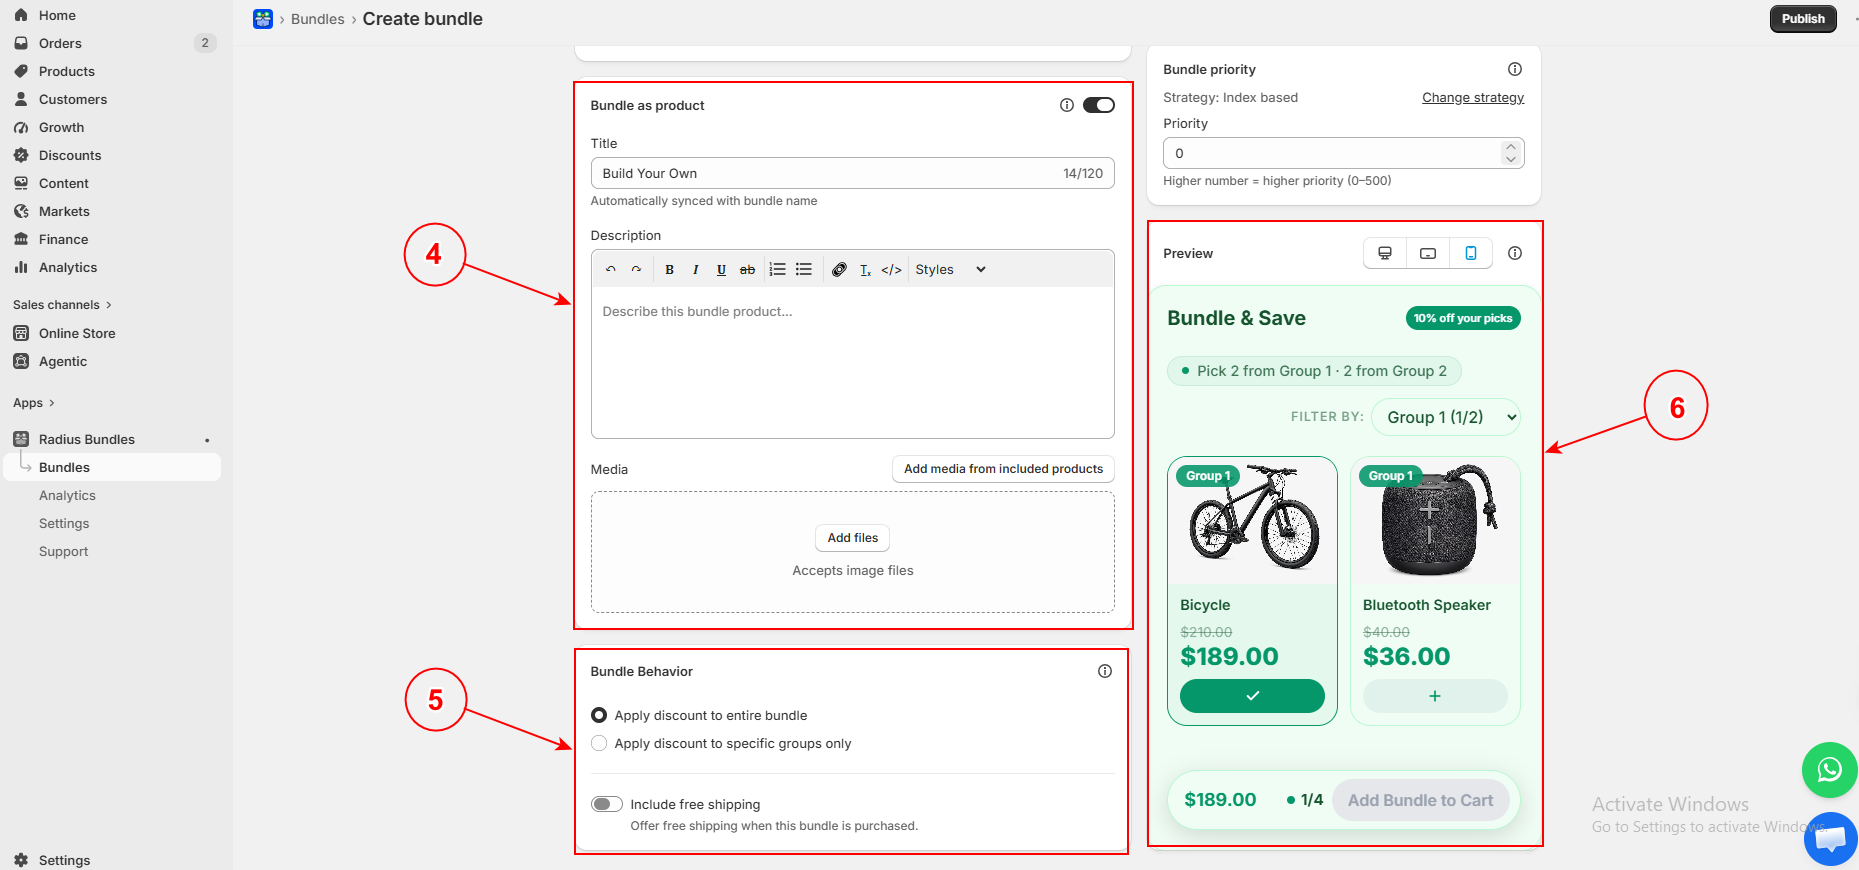
4. Bundle as Product #
Toggle ON to create a standalone Shopify product for this bundle. Set a title, description, and upload media for collections and search visibility.
5. Bundle Behavior #
- Apply discount to entire bundle — Discount spreads across all selected products.
- Apply discount to specific groups only — Only products from chosen groups get discounted.
- Include free shipping — Toggle ON to offer free shipping with this bundle.
6. Preview #
Same controls accessible throughout every step.
Step 3: Display #
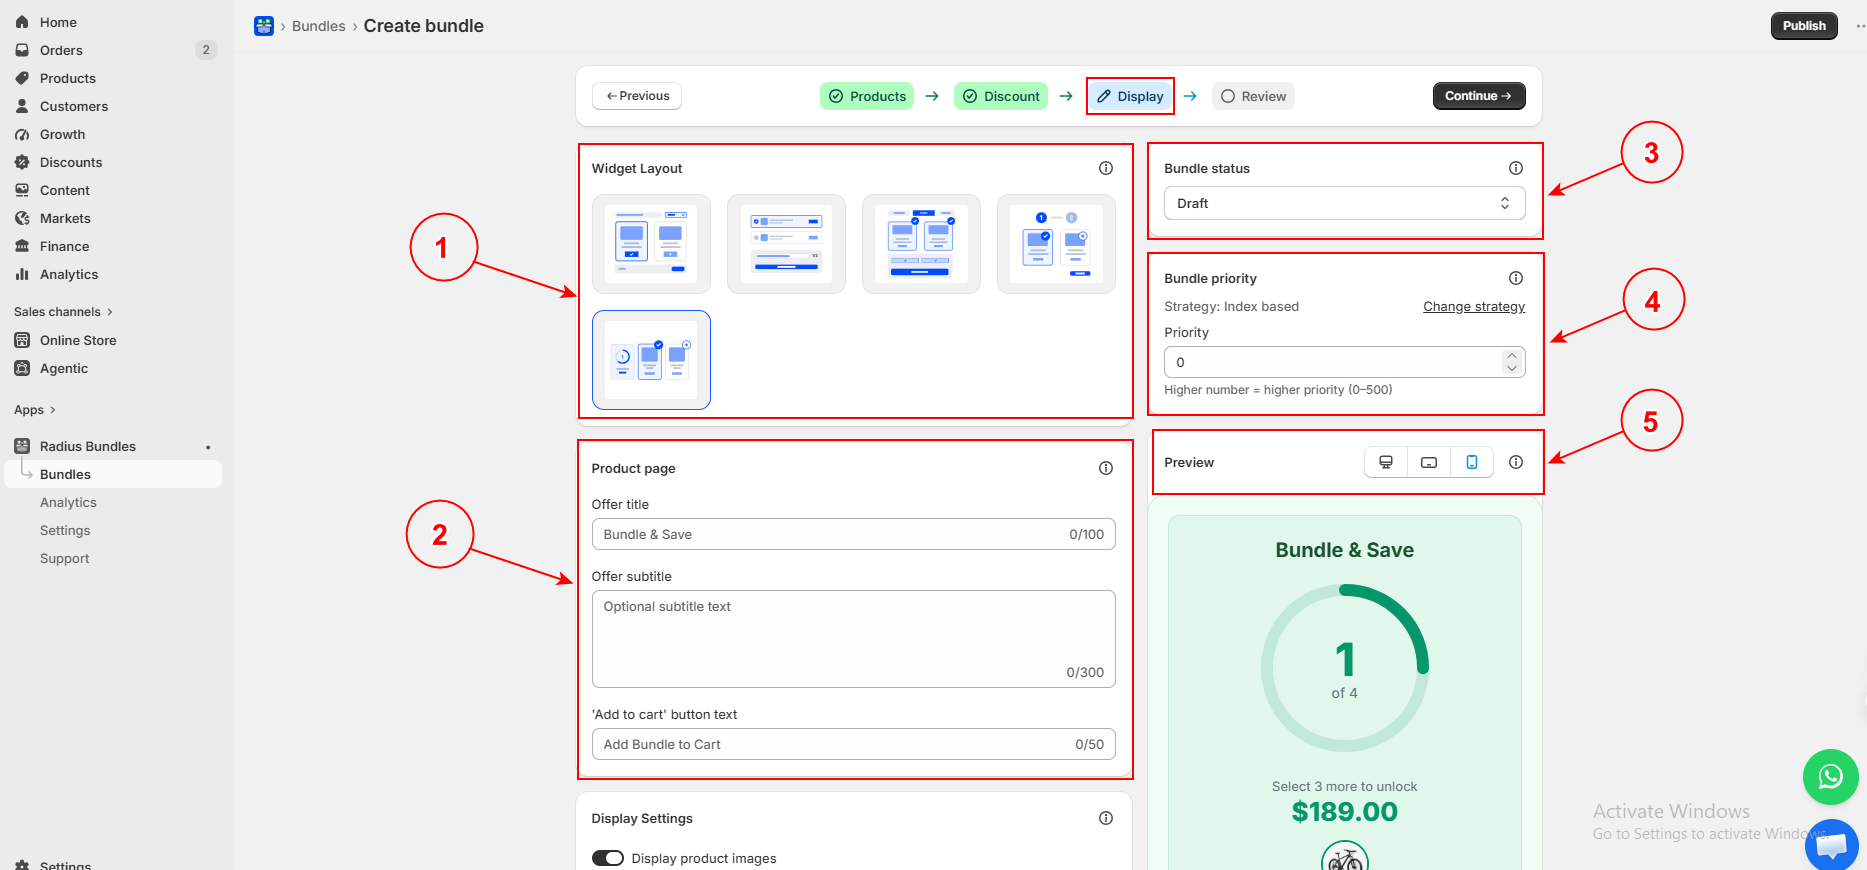
1. Widget Layout #
Choose from 5 layouts for your Mix & Match widget:
Grid with Progress Ring — Products displayed in a grid with a circular progress indicator showing how many items the customer has picked (e.g., “1 of 4”). Best for visually driven stores where the progress ring motivates customers to complete their selections.
List with Sidebar — Products listed vertically with group navigation on the side. Best for bundles with many groups where customers need to browse step by step.
Compact Grid — A tighter grid layout without the progress ring. Takes up less space on the product page. Best for simple bundles with fewer products.
Tabbed Groups — Each group displays as a separate tab. Customers switch between tabs to pick from each group. Best for bundles with 3+ groups where you want a clean, organized layout.
Horizontal Stepper — A step-by-step flow where customers move through groups one at a time. Best for guided “build your own” experiences where you want customers to focus on one group before moving to the next.
2. Product Page #
Set the offer title customers see (e.g., “Bundle & Save”), an optional subtitle, and custom add-to-cart button text for this bundle.
3–5. Status, Priority & Preview #
Set bundle status (Draft, Active, or Scheduled). Set priority (0–500) for overlap control. The live preview shows the progress ring, pricing, and “Select X more to unlock” messaging in real time.
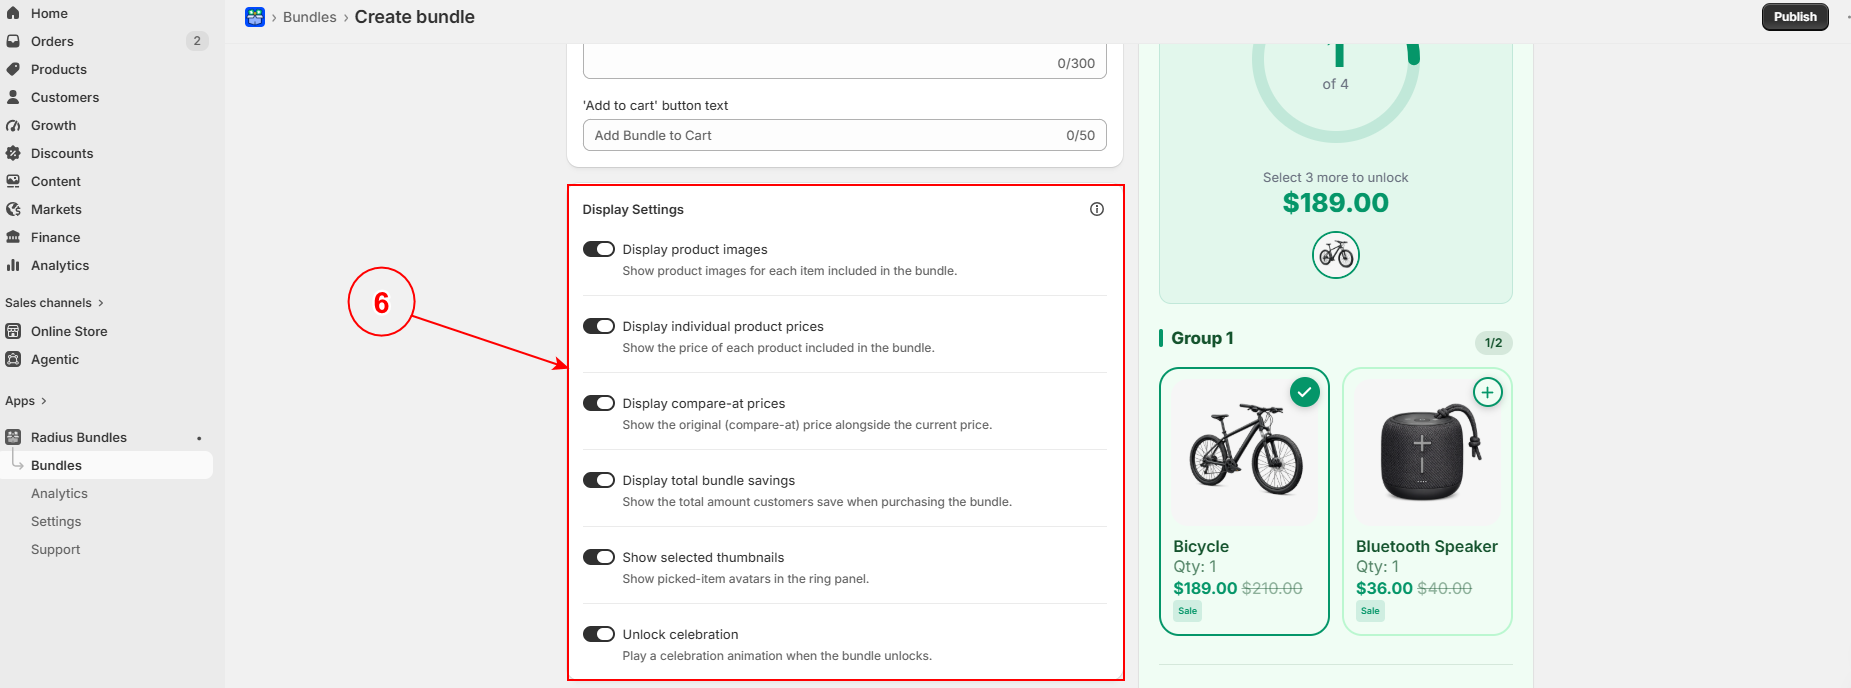
6. Display Settings #
Toggle what customers see:
- Product images — Show or hide product photos.
- Individual product prices — Show each item’s price.
- Compare-at prices — Show original crossed-out prices.
- Total bundle savings — Show total amount saved.
- Show selected thumbnails — Display picked-item avatars in the progress ring panel.
- Unlock celebration — Play a celebration animation when the customer completes their selections and the bundle unlocks.
Step 4: Review #
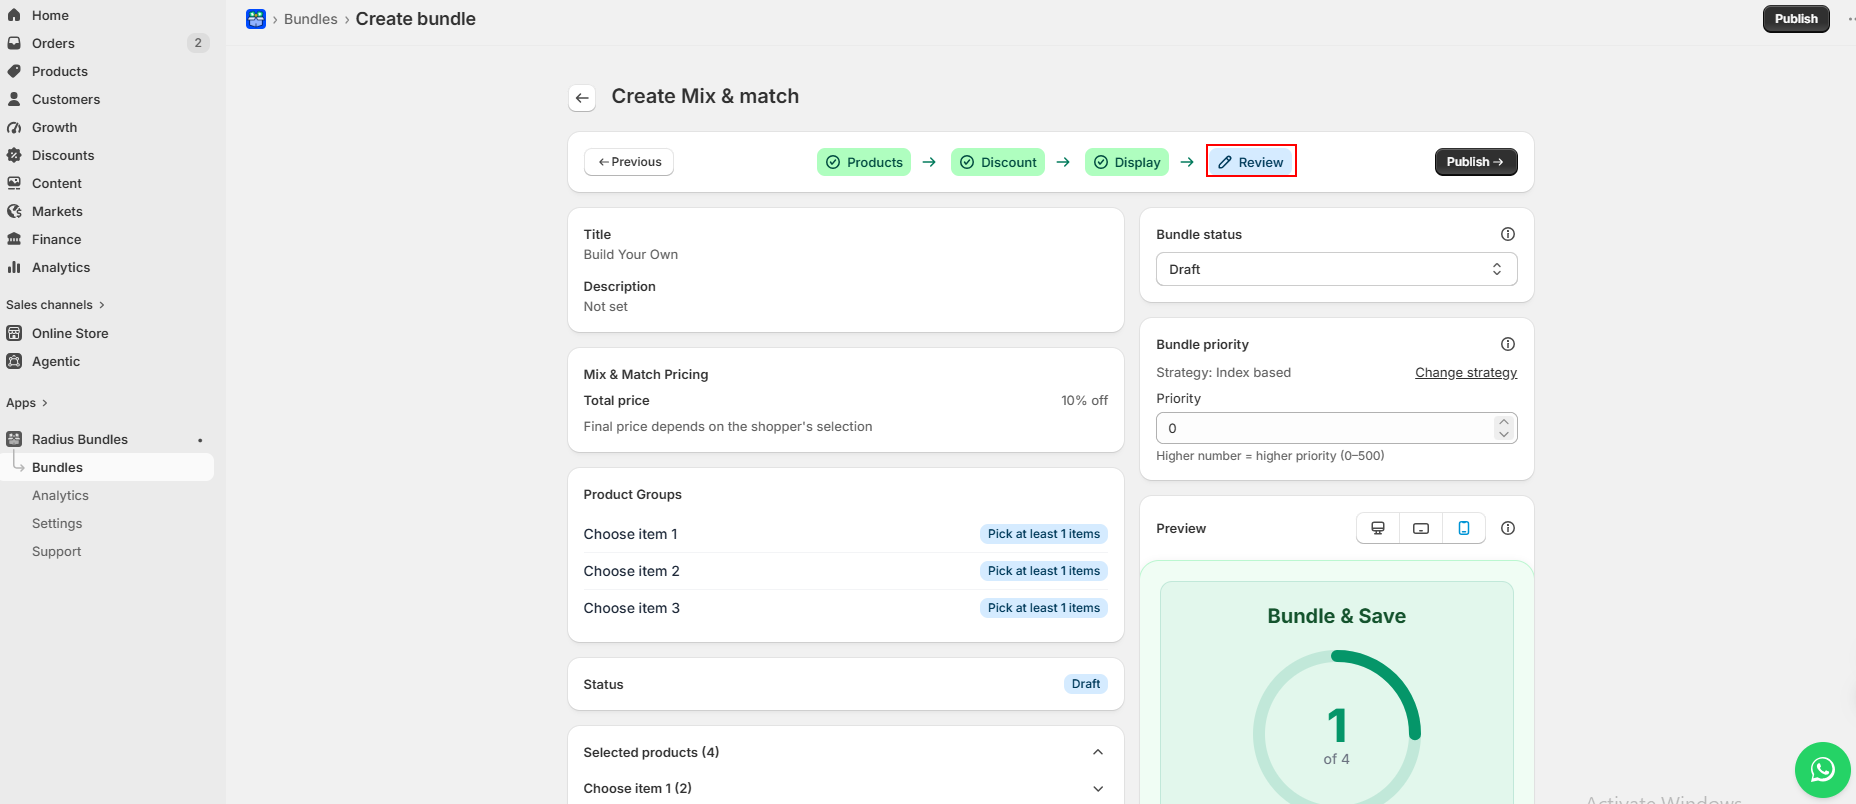
A complete summary before publishing. Verify:
- Title and description
- Mix & Match Pricing — Discount type and value (note: final price depends on the shopper’s selection)
- Product Groups — Each group listed with its selection rule (e.g., “Pick at least 1 items”)
- Status
- Selected products — All products organized by group
The live preview shows the progress ring (“1 of 4”), group filter dropdown, and the add-to-cart button. Click Publish when ready.
Tip: The progress ring is a powerful conversion driver — it shows customers how many more items they need to pick to unlock the deal, creating a sense of momentum that encourages them to complete the bundle.


