1. Introduction
Listpress WordPress Theme Documentation
Thank you for choosing the Listpress WordPress theme.
1.1. Requirements
This theme requires WordPress version 5.4.2 or higher. For the best performance and security, we strongly recommend using the latest stable release of WordPress to ensure all known issues and vulnerabilities are addressed. Additional requirements include:
- PHP version 5.6 or higher. For optimal performance, we recommend using PHP version 7.4 or above.
- MySQL version 5.6 or higher, or MariaDB version 10.0 or higher.
- A WordPress memory limit of at least 128 MB.
Server Requirements: https://make.wordpress.org/hosting/handbook/handbook/server-environment
1.2. What's Included
After downloading the Listpress theme, you will receive a complete package that includes the following files:
- Listpress Theme: An installable WordPress theme ZIP file.
- Listpress Child Theme: A child theme ZIP file along with a readme.txt containing details about the child theme.
- Documentation: A link to this user guide.
2. WordPress Installation
Please follow the video instructions below to learn how to install WordPress on your hosting environment:
- For local host: https://www.youtube.com/watch?v=snFzbPm_RUE
- For cPanel: https://www.youtube.com/watch?v=t-YBqV2ReR0
3. Upload and Activate Theme
Before installing the theme, you need to upload the theme files and then activate the theme. There are two ways to upload the theme files:
3.1. Using Theme Uploader
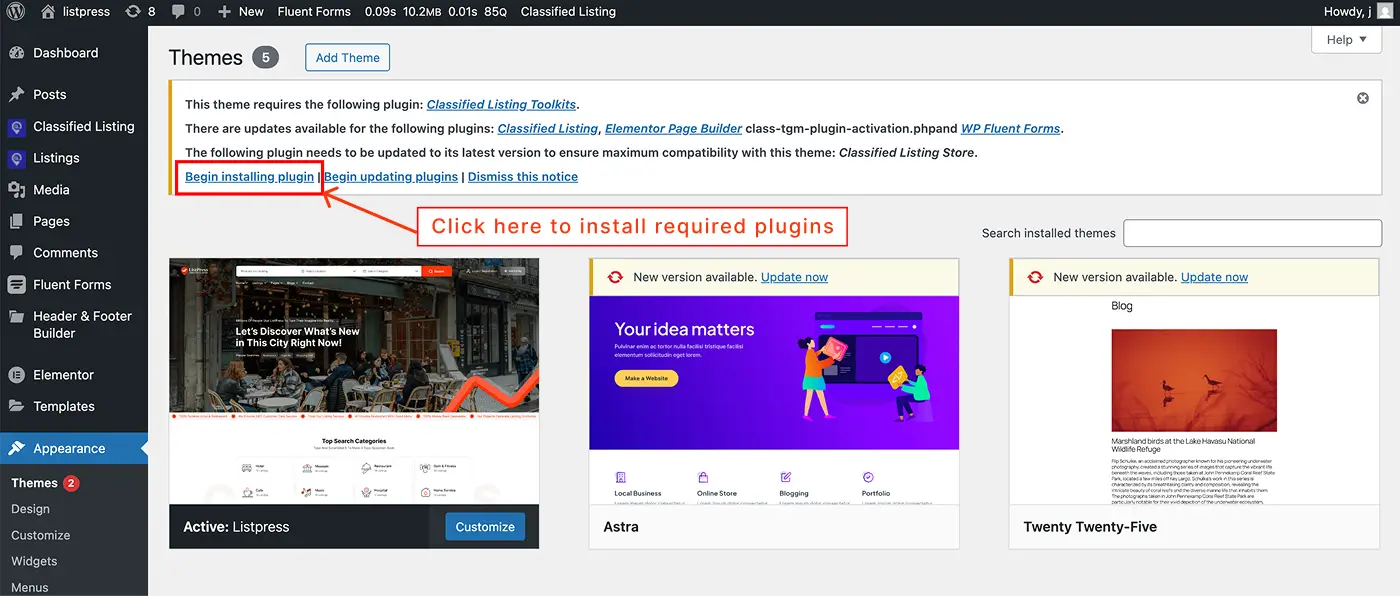
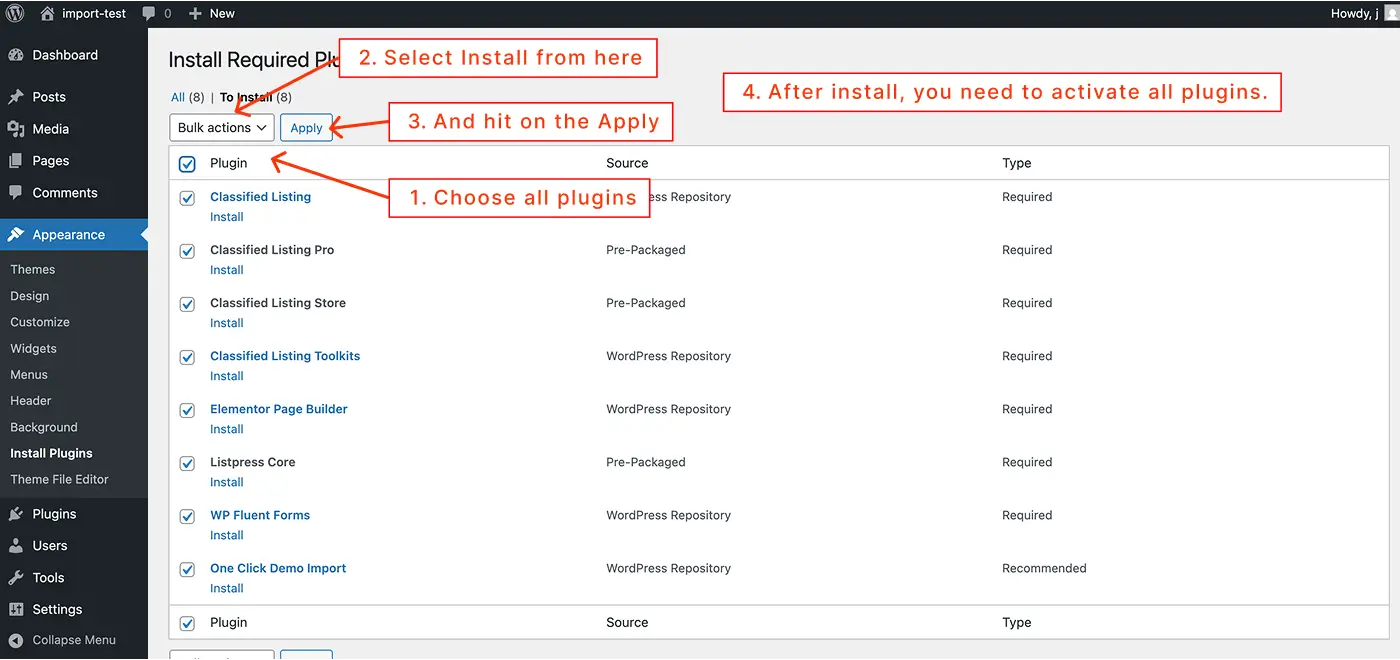
Next, install and activate the following pre-packaged plugins:
- Classified Listing Free: Required. This plugin must be installed.
- Classified Listing Pro: Required. This plugin must be installed.
- Classified Listing Store: Optional. Install only if you need store functionality.
- Classified Listing Toolkits: Required. Install only if you need store functionality.
- Listpress Core: Required. This plugin must be installed.
- Elementor Website Builder: Required. This is the page builder plugin.
- One Click Demo Import: Required if you wish to import demo content. You may deactivate it after the import is complete.
- WP Fluent Forms: Optional. Install if you want to use contact forms.
Note: All required plugins must be installed and activated for your site to match the demo exactly.
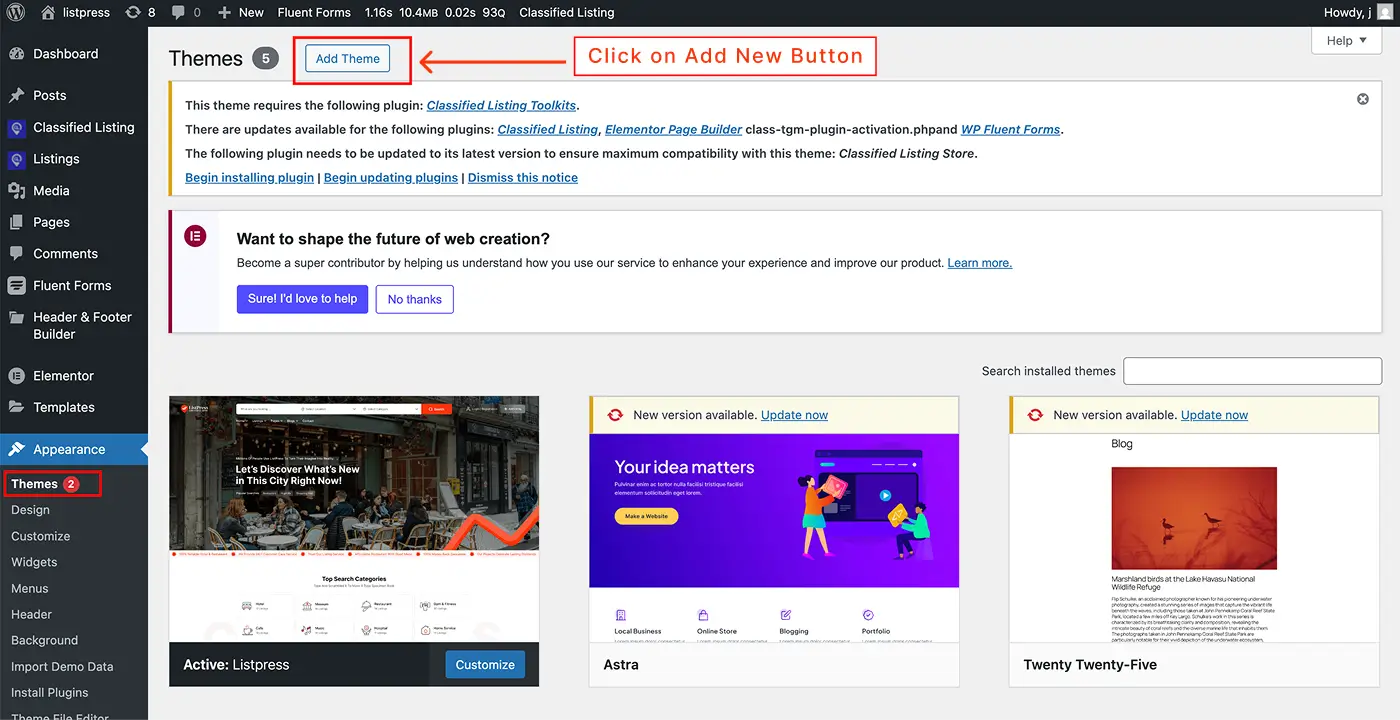
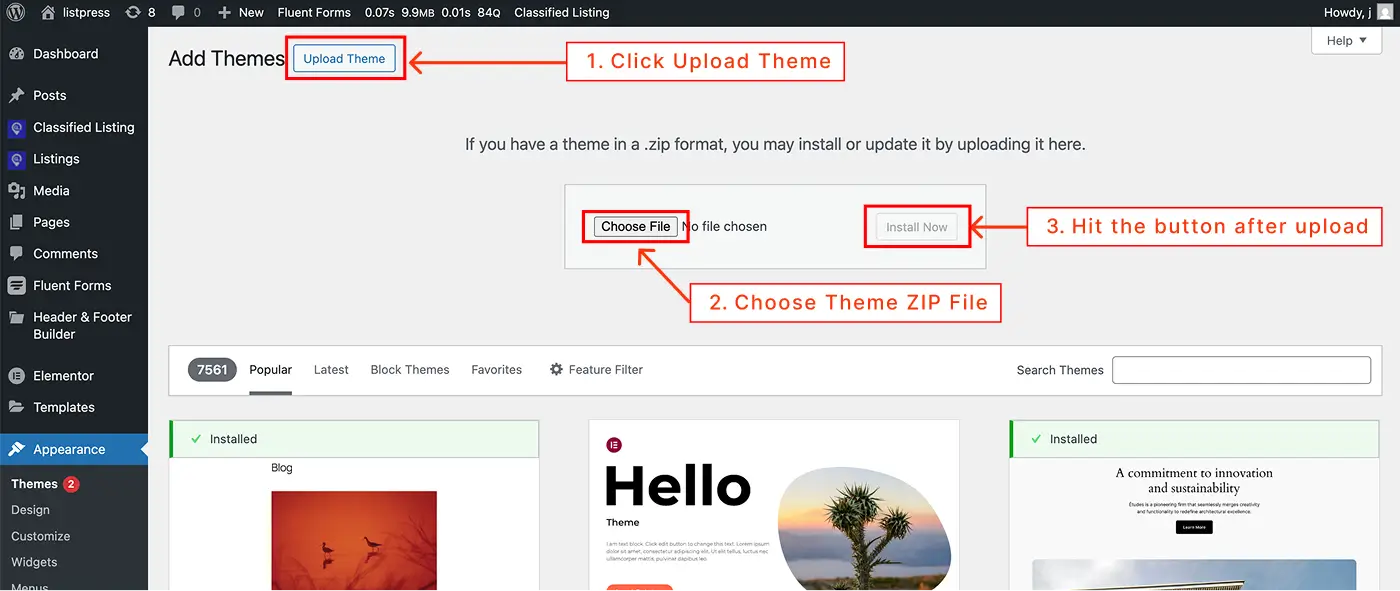
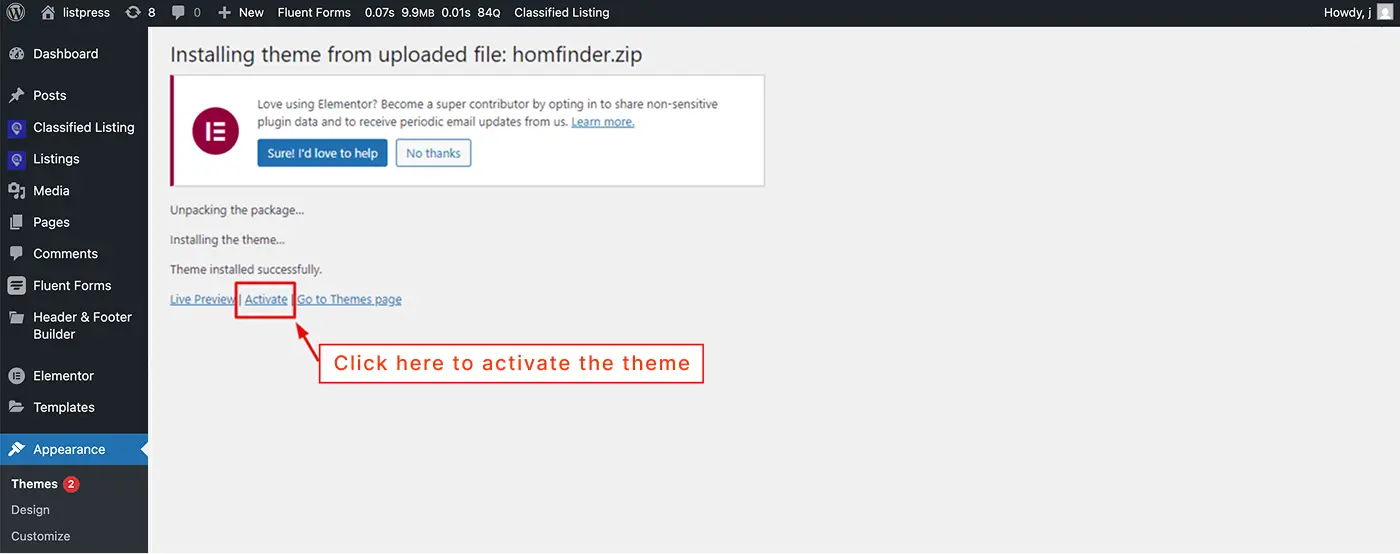
Follow the steps as illustrated in the images below:
3.2. Using FTP Clients
Follow these steps to upload your theme using an FTP client:
- Open an FTP client (e.g., FileZilla) and connect to your WordPress installation directory.
- Navigate to the
/wp-content/themes/folder and upload the theme folder. - Log in to your WordPress Admin Dashboard and go to the Appearance > Themes section.
- The Listpress theme will appear in the list of available themes. Click Activate to enable it.
4. Importing Demo Contents
One Click Demo Import:
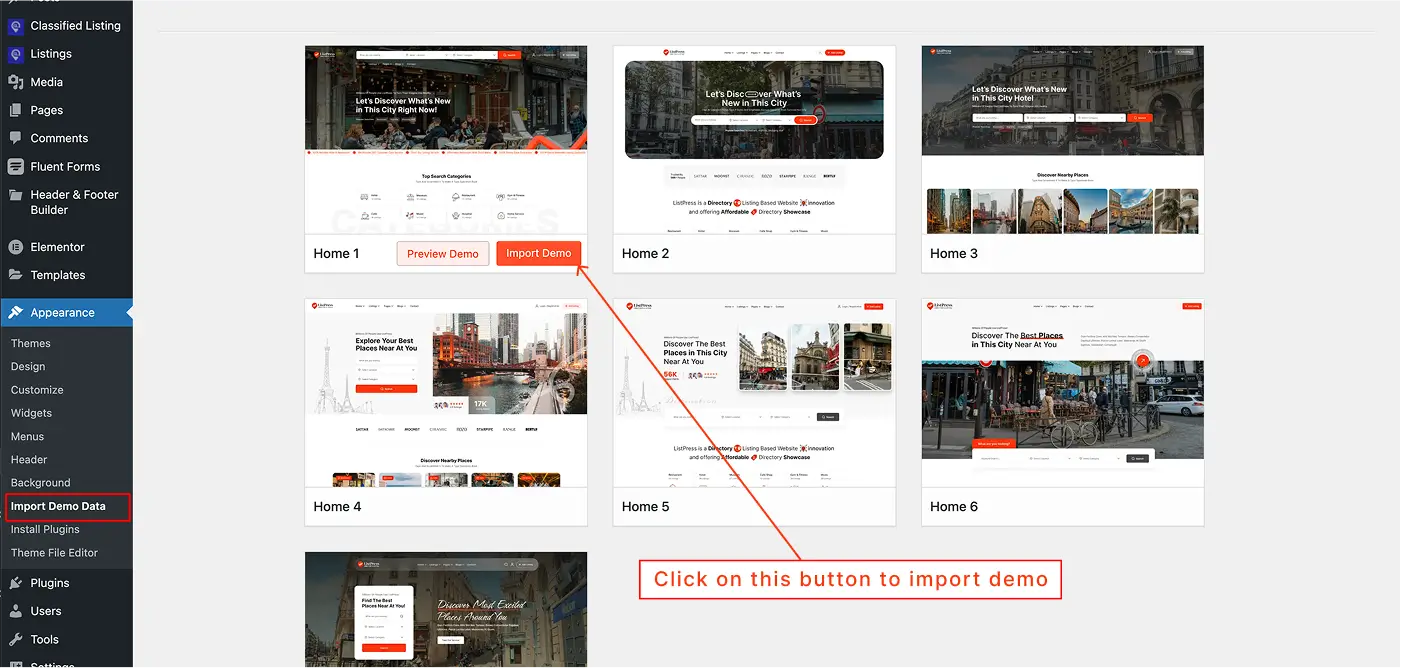
We use the One Click Demo Import plugin to import demo content. Please follow the steps below to complete the import process:
- Install and activate the One Click Demo Import plugin. This plugin is already recommended within the theme package. If you haven’t installed it yet, you can download it here: https://wordpress.org/plugins/one-click-demo-import/
- Go to Appearance > Import Demo Data. You will see all the available demos on this page. Hover over your preferred demo and click the Import Demo button.
- Next, click the Continue & Import button. The import process will then begin, so please do not close the window until it has been fully completed.
Here are a screenshots for further reference:
5. Set Home and Blog Page
Note: If you have already imported the demo content, you can skip this section because the homepage and blog page are pre-selected in the demo. However, if you wish to change them, please follow the steps below.
To set the default Home and Blog pages, log in to your WordPress Admin Dashboard and navigate to Dashboard > Settings > Reading.
- Under the Your homepage displays option, select A static page.
- From the Homepage dropdown, choose the page you want to set as your Home page.
- From the Posts page dropdown, choose the page you want to display your Blog posts.
- Click Save Changes to apply the settings.
6. Directory / Listing Setup
We use the Classified Listing Pro plugin to manage directory and listing functionalities, and the Classified Listing Store plugin to handle membership features. For detailed guidance, please refer to the official plugin documentation and tutorials.
Documentation link: https://www.radiustheme.com/docs/classified-listing/Video tutorial:
Watch the Full Playlist on YouTube
7. Customize Menu
To customize the menu, navigate to Appearance > Menus and follow these steps:
- Create two menus: a Primary Menu and a Topbar Menu.
- Add your desired menu items to each menu.
- Scroll down to the Menu Settings section and assign the menus accordingly:
- Select the Primary Menu as the Primary menu.
- Select the Topbar Menu as the Topbar menu.
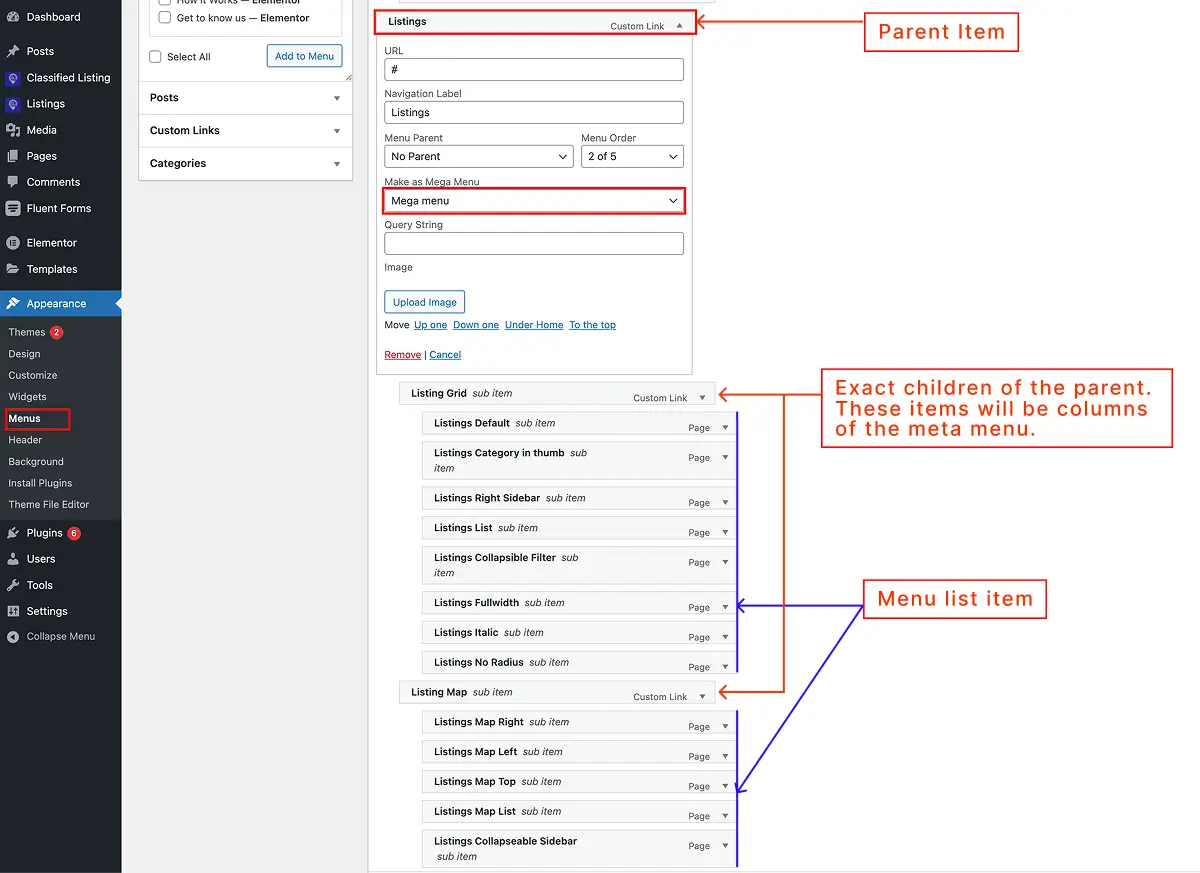
7.1 Mega Menu / Multi-Column Menu
- Collapse a parent menu item and select the Mega Menu option from the Make as Mega Menu dropdown.
- Create several child menu items under the parent menu, depending on the number of columns you want. For example, to create 4 columns, add 4 child menu items under the parent menu.
- Add additional menu items under each second-level (child) menu item as needed.
The Mega Menu structure will appear as follows:
-
Mega Menu
- 1. Column 1
- 1. Menu item
- 2. Menu item
- 3. Menu item
- 2. Column 2
- 1. Menu item
- 2. Menu item
- 3. Menu item
- 3. Column 3
- 1. Menu item
- 2. Menu item
- 3. Menu item
- 1. Column 1
Here are a screenshots for further reference:
8. Change Site Title and Favicon
To update your site title and favicon, navigate to Dashboard > Appearance > Customize > Site Identity. Then, follow these steps:
- In the Site Title field, enter your desired site name.
- In the Tagline field, enter a short description or slogan for your site (optional).
- To change the favicon (site icon), click Select site icon and upload your preferred image. The recommended size is 512x512 pixels.
- Click Publish to save your changes.
9. Site Colors Settings
To update the global colors of your site, navigate to Dashboard > Appearance > Customize > Colors. You will find several color groups, such as Site Color, Top Bar Color, Header Colors, and more. Select your desired colors from these options to customize the appearance of your website.
10. Logo Settings
To update the site logo, navigate to Dashboard > Appearance > Customize > Site Identity. We have added additional fields for logo customization:
- Upload the Main Logo, which should be the darker version of your logo.
- Optionally, upload a Light Logo and a Mobile Logo for specific use cases.
- If you prefer to use the same logo across the site, you only need to upload the Main Logo.
- You can also adjust the logo size manually using the Main Logo Dimension textbox.
11. Typography Settings
To customize the typography of your site, navigate to Dashboard > Appearance > Customize > Typography. You will find typography settings grouped by Body, Headings, and Menu for easier management.
12. Customizer Options
12.1 Site Identity
To update the site logo, navigate to Dashboard > Appearance > Customize > Site Identity. Additional fields are available for logo customization:
Available Options:- Main Logo
- Light Logo
- Mobile Logo
- Logo Dimensions
- Favicon
12.2 General Settings
To modify General Settings, navigate to Appearance > Customize > General.
Available Options:- Container Width
- Enable SVG Upload
- Back to Top
- Remove Admin Bar
- Disable Image Srcset
- Preloader
- Full Site Image Blend
- Site Radius
- Button Radius
12.3 Header Settings
To customize the header options, navigate to Appearance > Customize > Header.
Available Options:- Main Menu Section
- Topbar Section
- Nav Drawer Section
12.5 Typography Settings
To customize the typography of your site, navigate to Dashboard > Appearance > Customize > Typography.
Available Typography:- Body
- Headings
- Menu
12.7 Site Colors Settings
To update the global colors of your site, navigate to Dashboard > Appearance > Customize > Colors.
Available Options:- Site Color
- Top Bar Color
- Header Colors
- Banner Color
- Footer Color
12.8 Blog Settings
To configure blog archive settings, navigate to Appearance > Customize > Blog Settings.
Available Options:- Meta Settings
- Title Above Meta
- Read More
- Multiple Category Colors
- Blog Style
- Grid Columns
- Content Limit
- Pagination
- Masonry
- Choose Meta
12.9 Blog Details Settings
To customize the blog post details page, navigate to Appearance > Customize > Post Details Settings.
Available Options:- Meta Style
- Banner Title
- Meta, Tags, Share Icon, Author Profile, Caption, Post Navigation Visibility
- Related Posts
To add a new social icon, insert the following code in your child theme’s functions.php file:
add_filter('listpress_social_sharing_icons', function ($social_icon, $url='', $title=''){
	$social_icon['instagram'] = [
		'url'  => "https://www.instagram.com/?{$url}",
		'icon' => 'fab fa-instagram'
	];
	return $social_icon;
});
12.10 Listing Settings
To customize the listing archive page, navigate to Appearance > Customize > Listing Archive.
Available Options:- Listing Style
- Make Italic
- Enable collapsable sidebar
- Archive container width
- Price Display Format: Price Shorthand. Eg. K, M, B, T, Lac, Cr etc
12.11 Listing Details Settings
To customize the listing details page, navigate to Appearance > Customize > Listing Details.
Available Options:- Layout
- Listing Gallery Style
- Separate Gallery Video
- Gallery Height
- Enable thumbs gallery
- Slider Columns
12.12 Layout Settings
To configure page layouts, navigate to Appearance > Customize > Layout Settings.
Available Options:- Page Layout
- Blog Layout
- Single Post Layout
- Error Layout
- Listing Archive Layout
- Listing Single Layout
12.14 Error Page
To customize the Error Page settings, navigate to Dashboard > Appearance > Customize > Error Page.
Available Options:- Error Image
- Error Text
- Error Button Text
13. Elementor Widgets
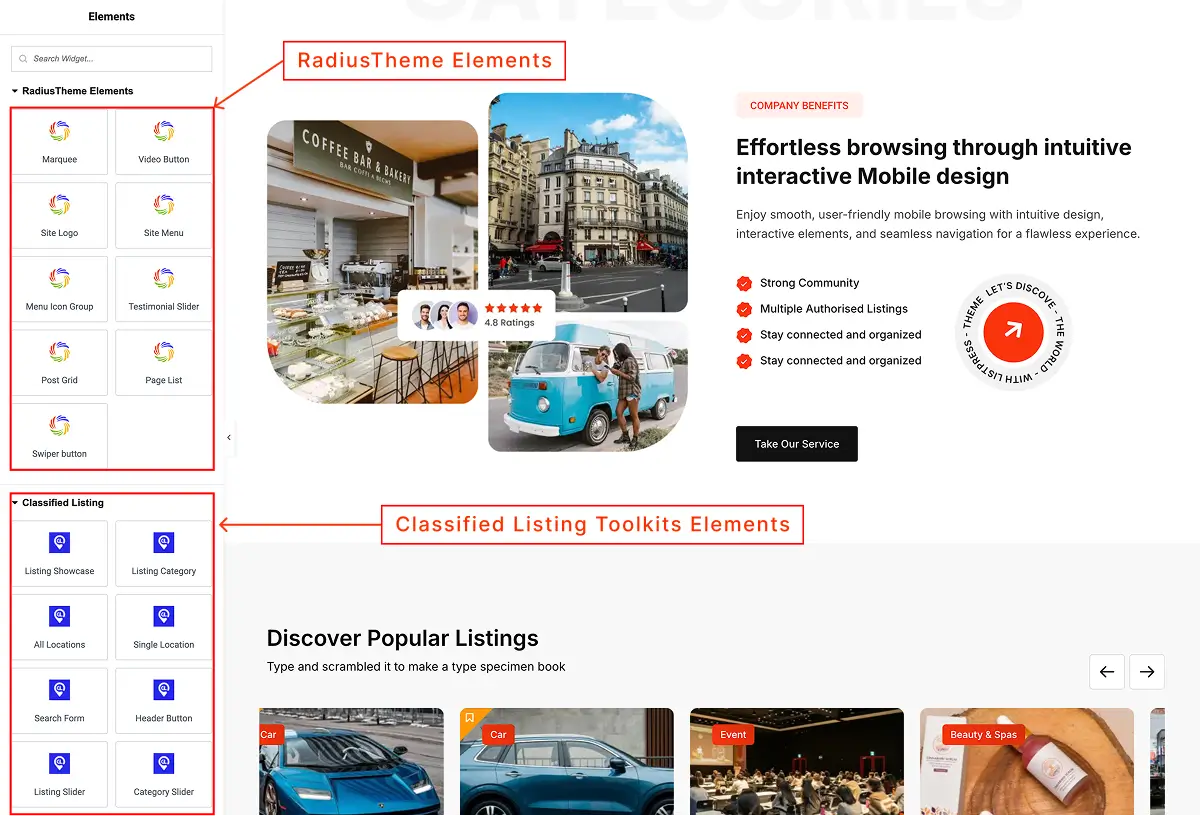
Elementor Page Builder comes with many built-in widgets by default. For added convenience, we have created several custom Elementor Widgets to extend your website's functionality. You can find them under the RadiusTheme Elements section in Elementor edit mode.
Additionally, we have integrated the Classified Listing Toolkits to provide Elementor widgets specifically for listing and directory functionality.
14. Contact Form
We are using plugin WP Fluent Forms for contact functionality. You can see their documentation for better understanding.
If you don't want to go through all the troubles to check their documentation and just want to use the default contact form we provided with this theme, please at least set up the default emails in contact form settings.
15. Built-in CSS Classes (Advanced)
You can use the following built-in CSS classes as needed:
- .primary-color: Apply the primary color.
- .secondery-color: Apply the secondary color.
- .bg-primary: Set the background to the primary color.
- .bg-secondery: Set the background to the secondary color.
- .site-radius: Applies a site-wide 12px border radius.
- .btn-radius: Applies a 5px border radius to buttons.
- .pointer-events-none: Disables pointer events for the element.
- .height-100: Sets the height to 100% (useful for images in Elementor).
- .center-center: Centers the item within its Elementor container.
- .mobile-hide: Hides the element on mobile devices.
- .listpress-negative-150: Applies a negative margin of 150px left and right (values like 200, 300px also work; effective only on screens wider than 1400px).
16. Translating Theme
You can translate this theme into another language easily. To ensure your website functions properly, translate the following components:
- Theme: Listpress
- Plugin: Listpress Core
- Plugin: Classified Listing Pro
- Plugin: Classified Listing Store
There are many tools available for translation, but the easiest way is to use the Loco Translate plugin. This plugin allows you to translate any WordPress theme or plugin that supports translation.
Here's a quick video tutorial on how to use Loco Translate:
Plugin Link: https://wordpress.org/plugins/loco-translate/
17. Updating Theme
Occationally we provide updates which includes new features and bugfixes. Updating WordPress theme is standard WordPress functionality.
Before Updating Theme:
You can use this plugin to keep the backup: https://wordpress.org/plugins/wp-theme-plugin-download/
There are few ways to update WordPress theme. You can follow any of the methods described below:
Method 1: Automatic Update by Using Envato Market Plugin
- Install and activate the "Envato Market" plugin manually. Here's the plugin zip file: https://www.envato.com/lp/market-plugin/
- From WordPress Admin Panel, navigate to "Envato Market" menu.
- In this page, you'll find a field for insering Envato Token. Insert your Envato Token
Code from there. You can generate this code from this link: https://build.envato.com/create-token/?purchase:download=t&purchase:verify=t&purchase:list=t.
Remember, while generating the token, you have to login using the same envato id which you used to purchase theme. - After completed the above steps successfully, Navigate to Appearance -> Themes. Here you'll see an "Update now" link beside your theme. Click on that link and your theme will be updated automatically.
Here's a quick video tutorial explaining this method:
Method 2: By Uploading ZIP File
- From the WordPress Admin Panel, navigate to Appearance > Themes.
- Click the Add Theme button at the top of the page, then select Upload Theme.
- Upload the Listpress update ZIP file and install it.
- Once the installation is complete, you may see the message "Destination folder already exists". Click "Replace installed with uploaded" to update the current theme with the new version.
Method 3: By FTP
- Using your FTP client, navigate to "/wp-content/themes/" folder on your server and delete the "listpress" folder from there.
- Now upload the latest non-zipped theme folder into that "/wp-content/themes/" folder .
After Updating Theme:
** After updating the theme please update all plugins which come with the theme.
18. Demo Content installation failed
This is a hosting issue. In most hostings demo installation will work fine. But some hostings block certain permissions which may cause this issue. If this happens to you, you can contact your hosting provider or alternatively send a support request to support@radiustheme.com and we will help you to fix this.
19. 404 Error in all pages
If you face this type of issue, please update your permalink. To update permalink, navigate to Settings -> Permalink and then click on Save Settings button.
20. Contact
If you face any issue please contact us at support@radiustheme.com. We provide 15 hours real-time support for our customers.
Thank you for purchasing our theme.
21 Where is My Purchase Code?
To learn about how to find your purchase code. When you buy a product from envato you get a purchase code. visit the following link:
https://help.market.envato.com/hc/en-us/articles/202822600-Where-Can-I-Find-my-Purchase-Code