1. Introduction
Clplace WordPress Theme Documentation
We would like to thank you for choosing Clplace WordPress theme.
1.1. Requirements
You need at least WordPress version 6+ installed for this theme to work properly. It is strongly recommended that you always use the latest stable version of Wordpress to ensure all known bugs and security issues are fixed. Other requirements:
- PHP version 7+ or greater. Tested PHP version 8.
- MySQL version 8.
- WordPress memory limit of 128 MB or greater.
Server Requirements: https://make.wordpress.org/hosting/handbook/handbook/server-environment
1.2. What's Included
After downloading Clplace theme, the entire theme package which contains the following files:
- Clplace theme: An Installable WordPress Theme zip file.
- Clplace child-theme: A child-theme zip file and a readme.txt note about the child-theme.
- Documentation: A link to this documentation.
2. WordPress Installation
Please follow the instructions in the video to see how you can install WordPress on your hosting:
- For local host: https://www.youtube.com/watch?v=snFzbPm_RUE
- For cPanel: https://www.youtube.com/watch?v=t-YBqV2ReR0
3. Upload and Activate Theme
When you are ready to install a theme, you must first upload the theme files and then activate the theme itself. The theme files can be uploaded in two ways:
3.1. Using Theme Uploader
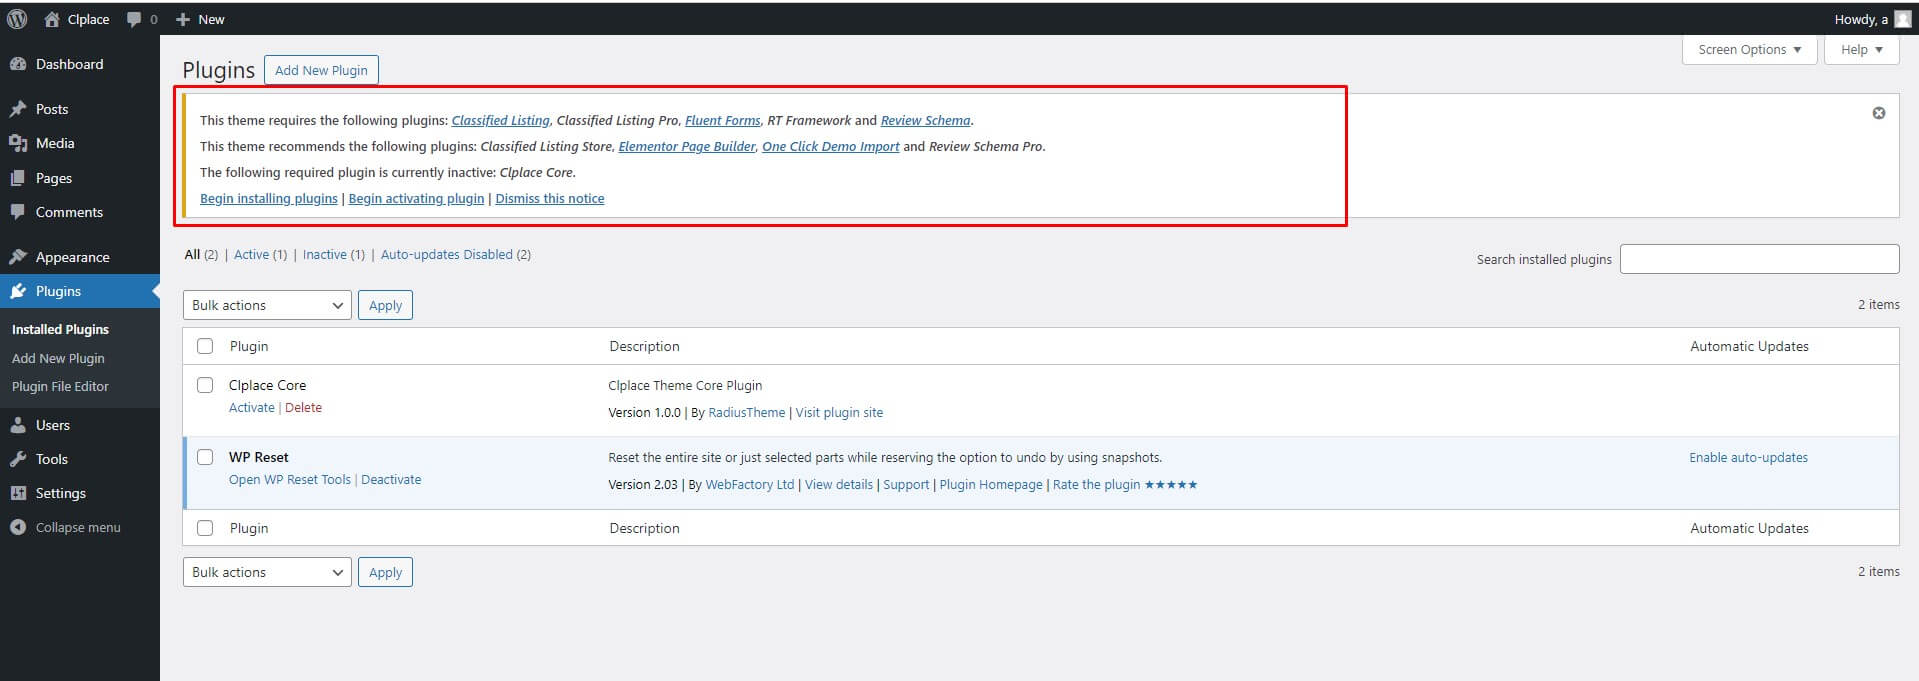
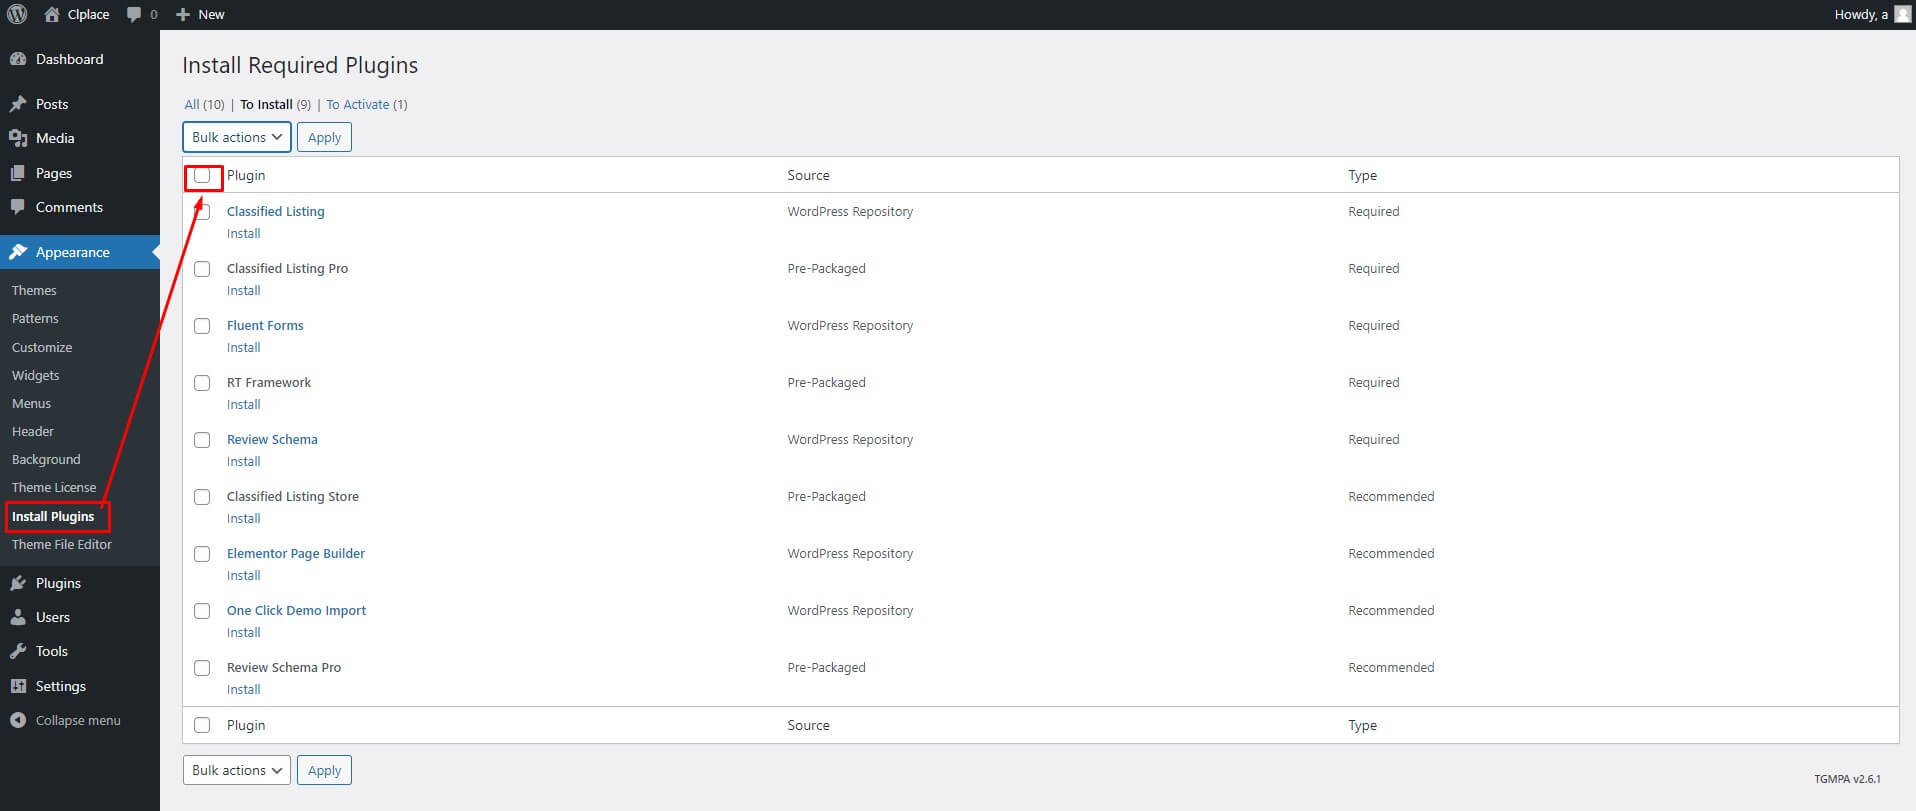
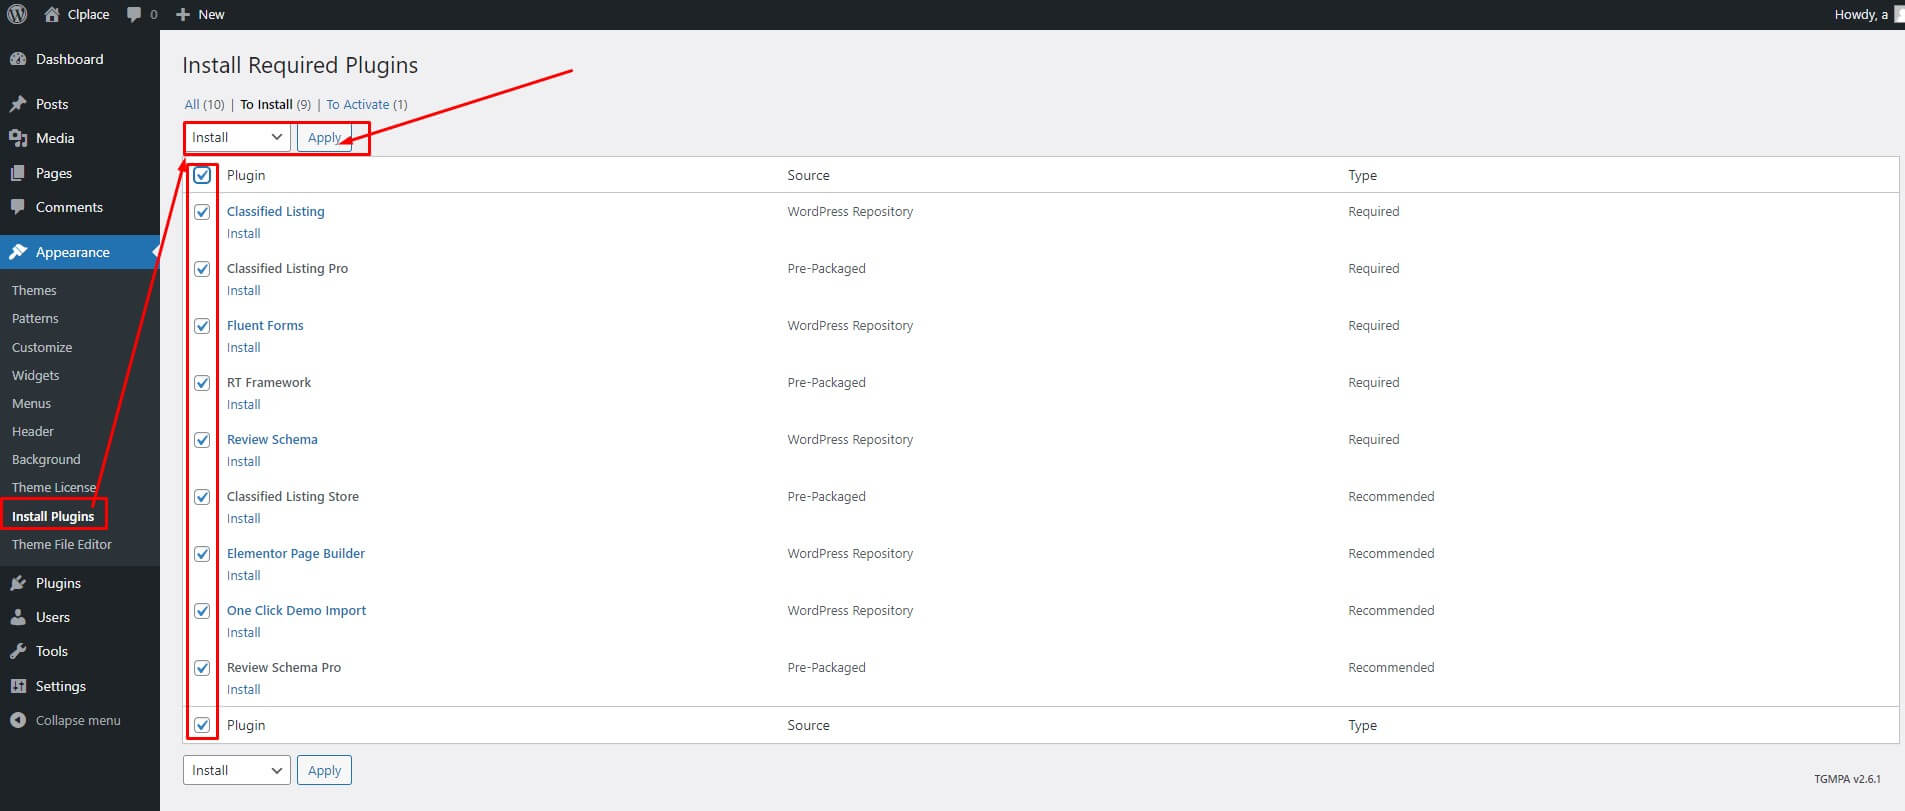
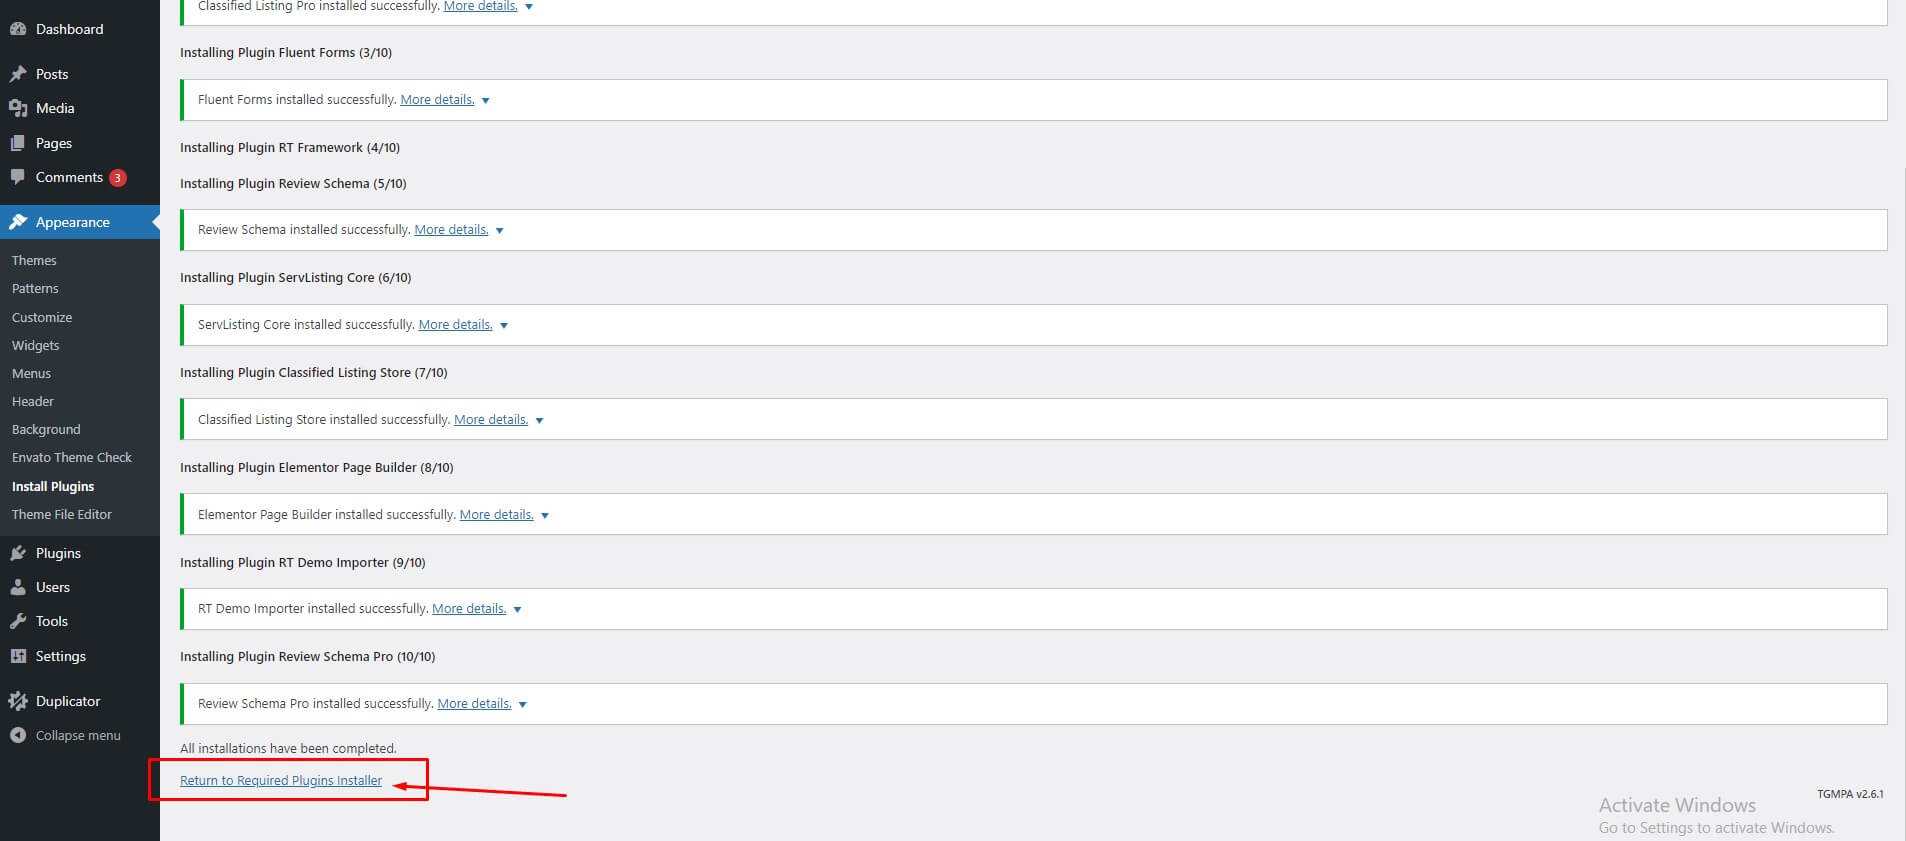
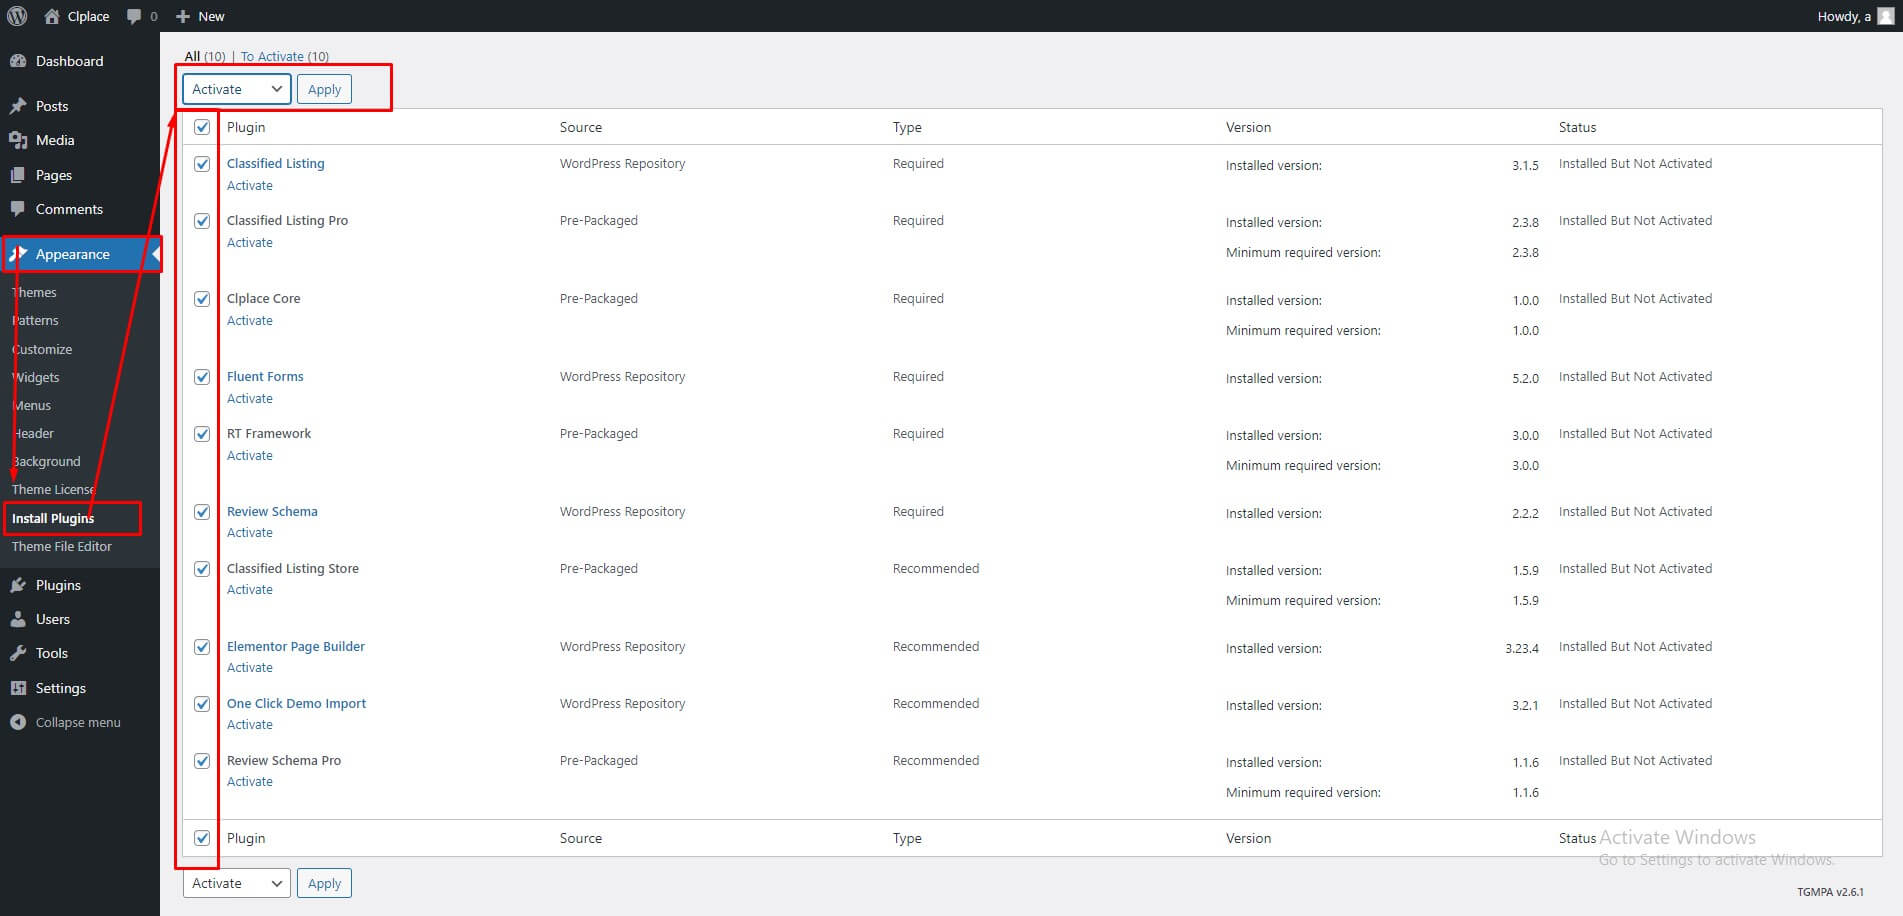
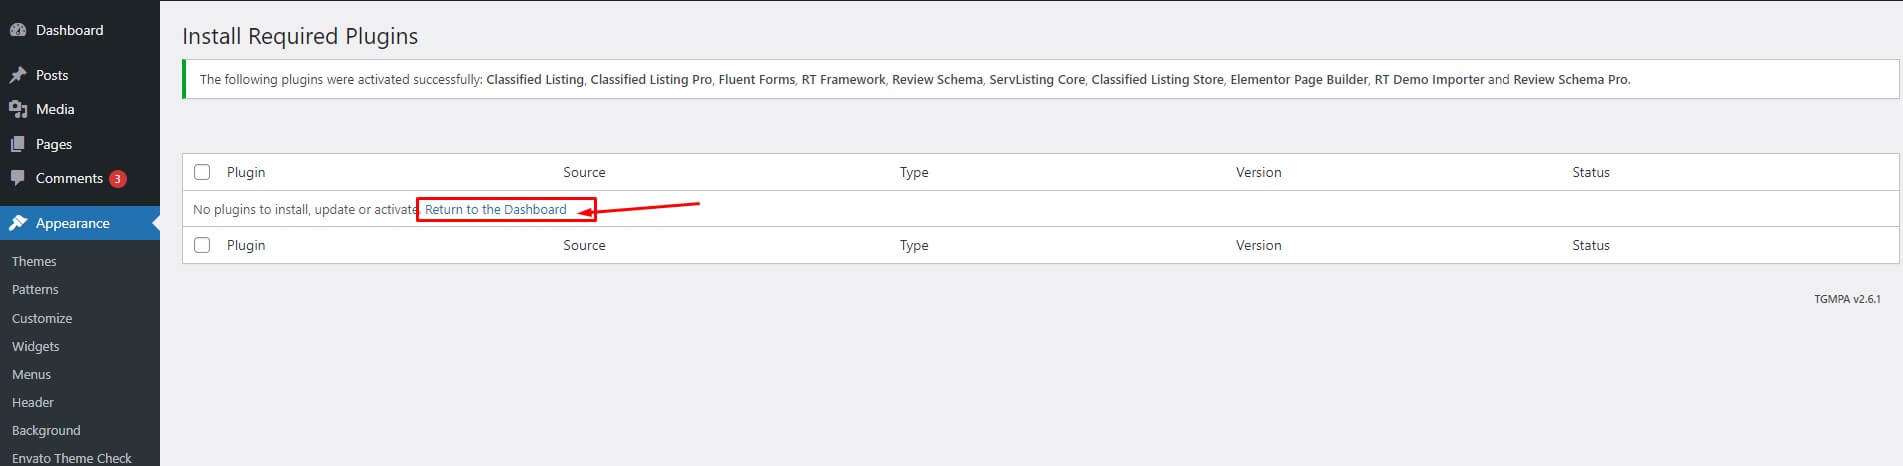
After that you need to install and activate the following pre-packaged plugins:
- Classified Listing Pro: Required and must install plugin.
- Classified Listing Free: Required and must install plugin.
- Clplace Core: Required and must install plugin.
- Elementor Website Builder: Required. Page builder plugin.
- RT Framework: Required and must install plugin.
- Review Schema: The most comprehensive multi-criteria Review & Rating.
- Review Schema Pro: This is a pro version of Review Schema Plugin.
- WP Fluent Forms: Optional. Install if you want to use contact form.
N.B: All plugins must be installed and activated if you want your site to look exactly like demo.
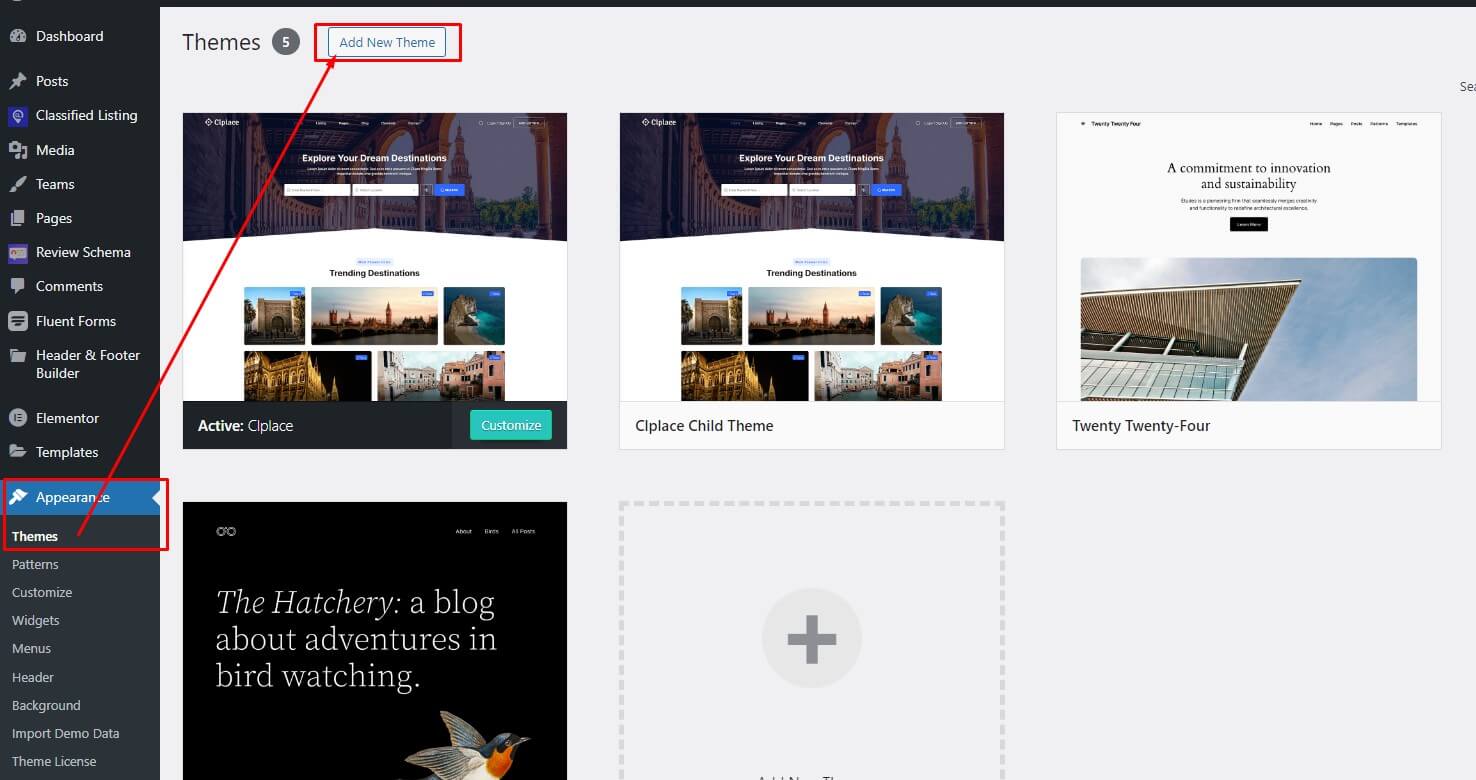
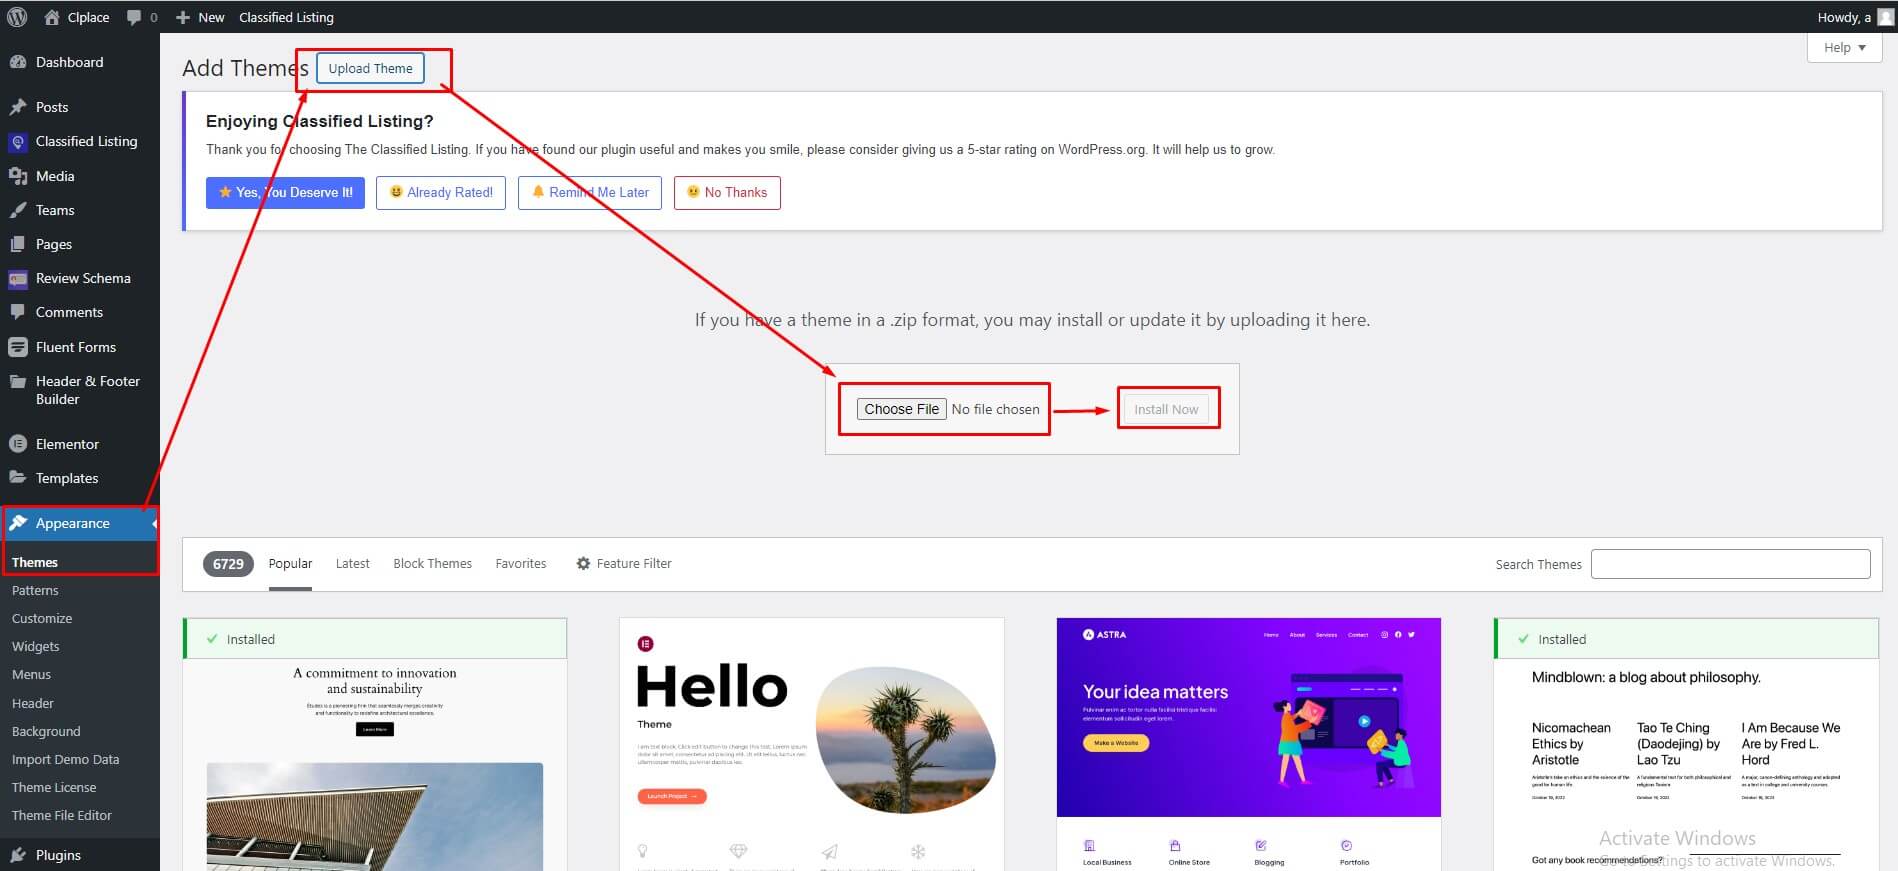
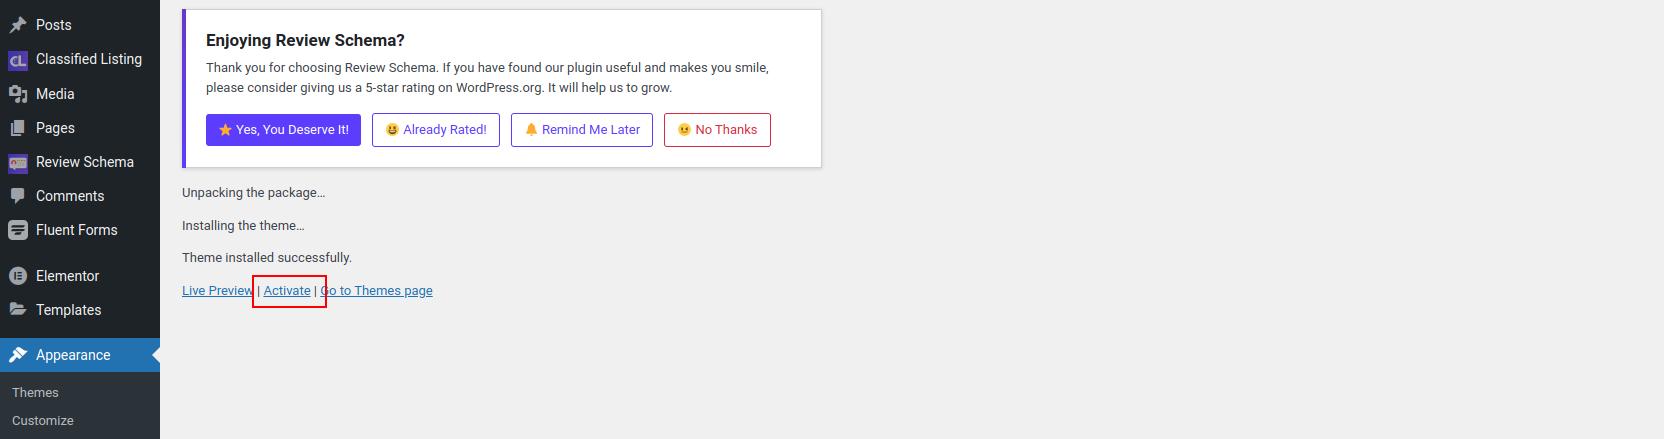
Follow the steps as instructed in the images below:
3.2. Using FTP Clients
Follow the following steps to upload your theme using FTP clients:
- Use an FTP such as FileZilla and go to your WordPress installation director.
- Navigate to /wp-content/themes/ folder and upload the theme folder there.
- Log in to your WP Admin Dashboard and open the 'Appearance / Themes' menu.
- You will now see Clplace Theme listed among the other themes. Click on activate and you’re done!
4. Importing Demo Contents
We are providing you two methods for importing demo contents: Automatic and Manual. You can follow either one of these methods.
- Automatic (Recommended): This method will not remove all your existing data, so use this method only in fresh website, otherwise content will be duplicate. This procedure will be faster because you just have to do one click and then everything will happen automatically. If you want an exact clone of demo website without doing any manual configuration after importing data then this method is appropiate for you.
- Alternative: Use this method only if:
- Automatic demo import method fails ( Only few of our customers like 5% have experienced this issue due to their hosting limits, in that case we also provide free demo importing service if you contact with us).
- You already have a working website with existing contents(eg. posts, pages etc).
4.1 Automatic Import
Want to build your site like the demo? You can do it by only one click!
** Note: Before proceeding, please remember that when you are done with the demo import, all existing settings and contents will not removed and placed by the demo contents. So it is highly recommended that you should only do this in fresh site. **
First please make sure that Clplace Parent Theme is activated on your site.
From admin menu, navigate to Appearance -> Import Demo Data.
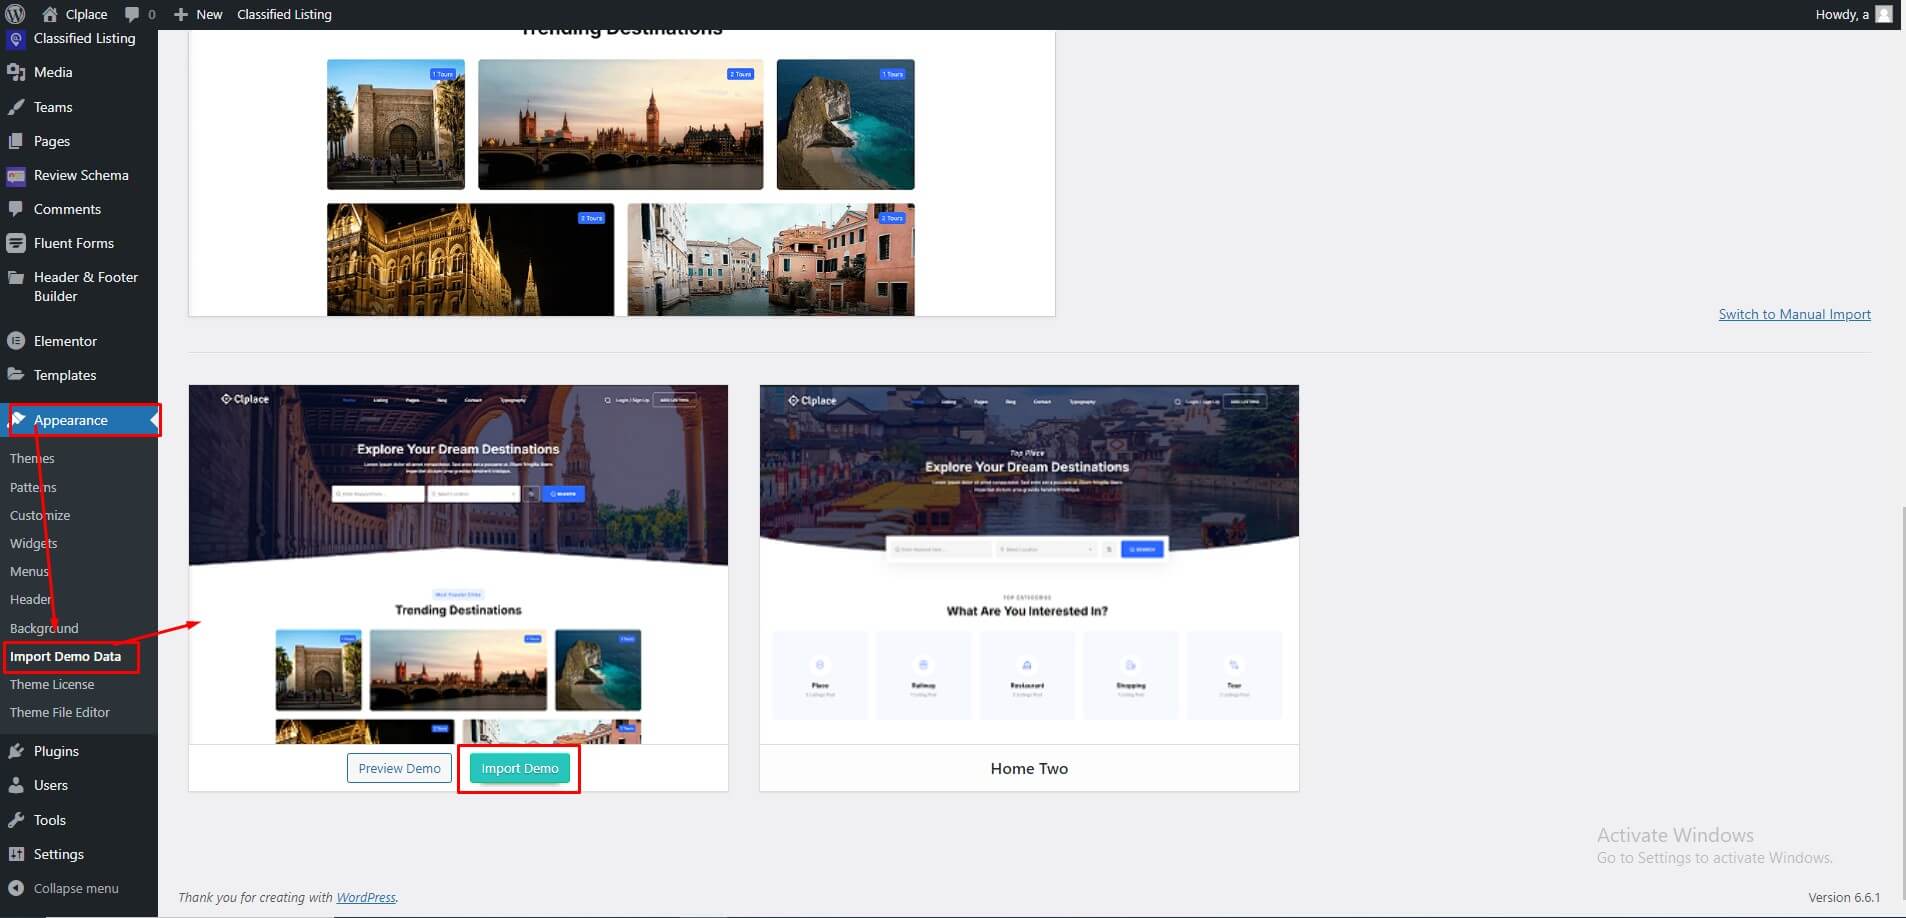
In this page, Click on the Import Demo button for installing the demo.
It will take some time for importing the demo contents.
After importing demo data, please update your permalink. To update permalink, navigate to Settings -> Permalink and then click on Save Settings button.
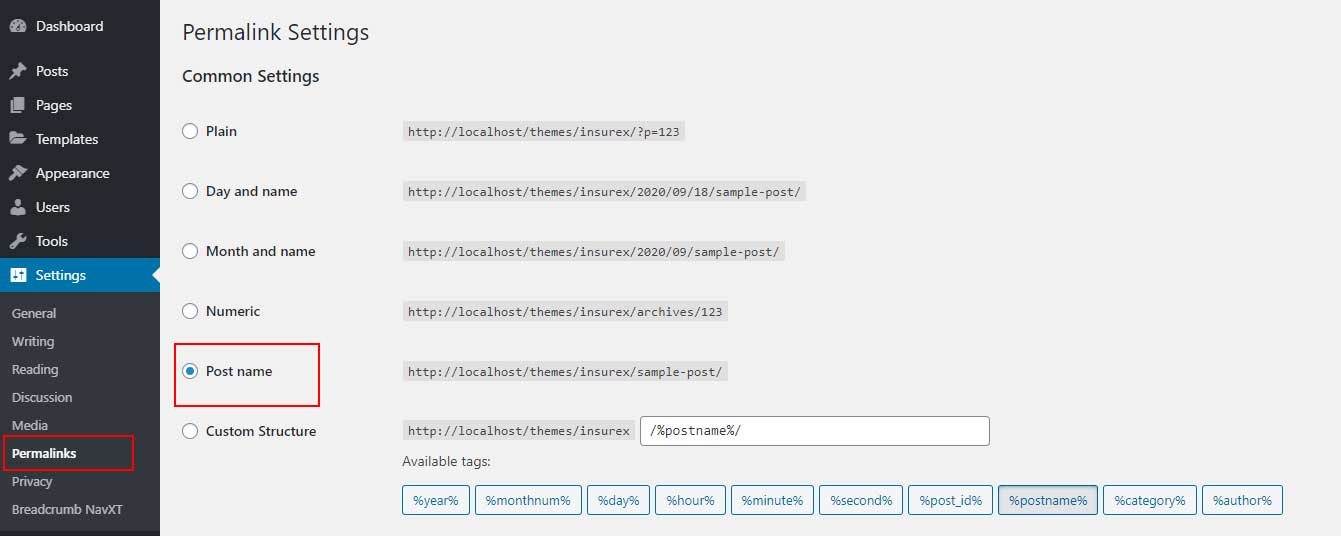
If you face any issue in demo installation process please check the Troubleshooting Section(18) from here
4.2 Manual Import
Here's the steps:
- First install and activate plugin One Click Demo Import. Here's the plugin link: https://wordpress.org/plugins/one-click-demo-import/
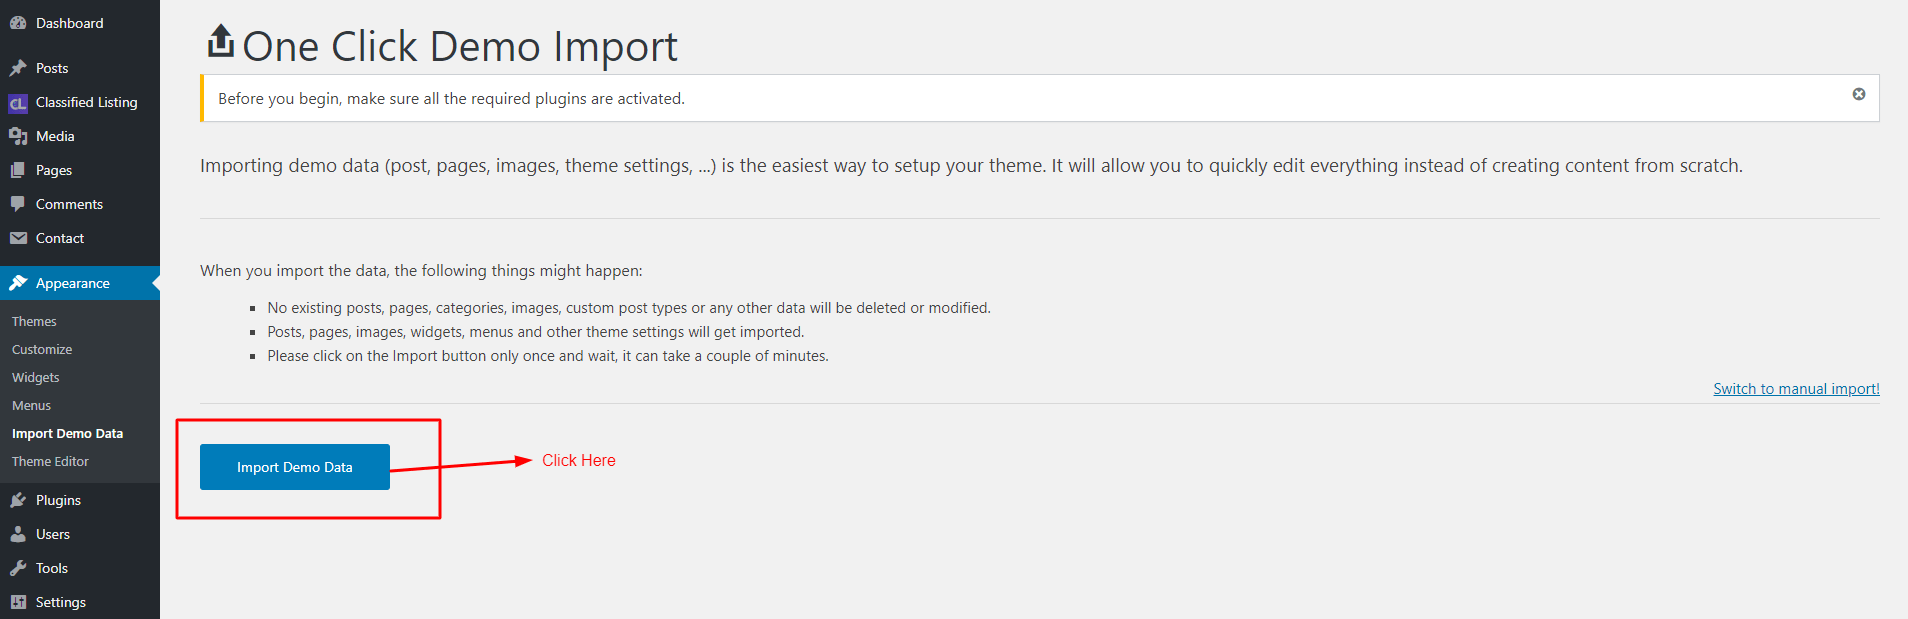
- From Admin menu, navigate to Appearance -> Import Demo Data.
- On this page, click on the "Import" button for installing any demo. It will take some
time for importing the demo contents.
- After importing demo data, please update your permalink. To update
permalink, navigate to Settings -> Permalink and then click on Save
Settings button.
5. Classified Listing Plugin Setup
We are using plugin Classified Listing Pro here for listing functionalities and you can check the plugin documentations and tutorials from the plugin website.
Here's the documentation link: https://www.radiustheme.com/docs/classified-listing/And here's a video tutorial:
5.1 Form Builder Settings
For listing form settings, set the from Classified Listing > Form Builder
See Form Builder Documentation Form Builder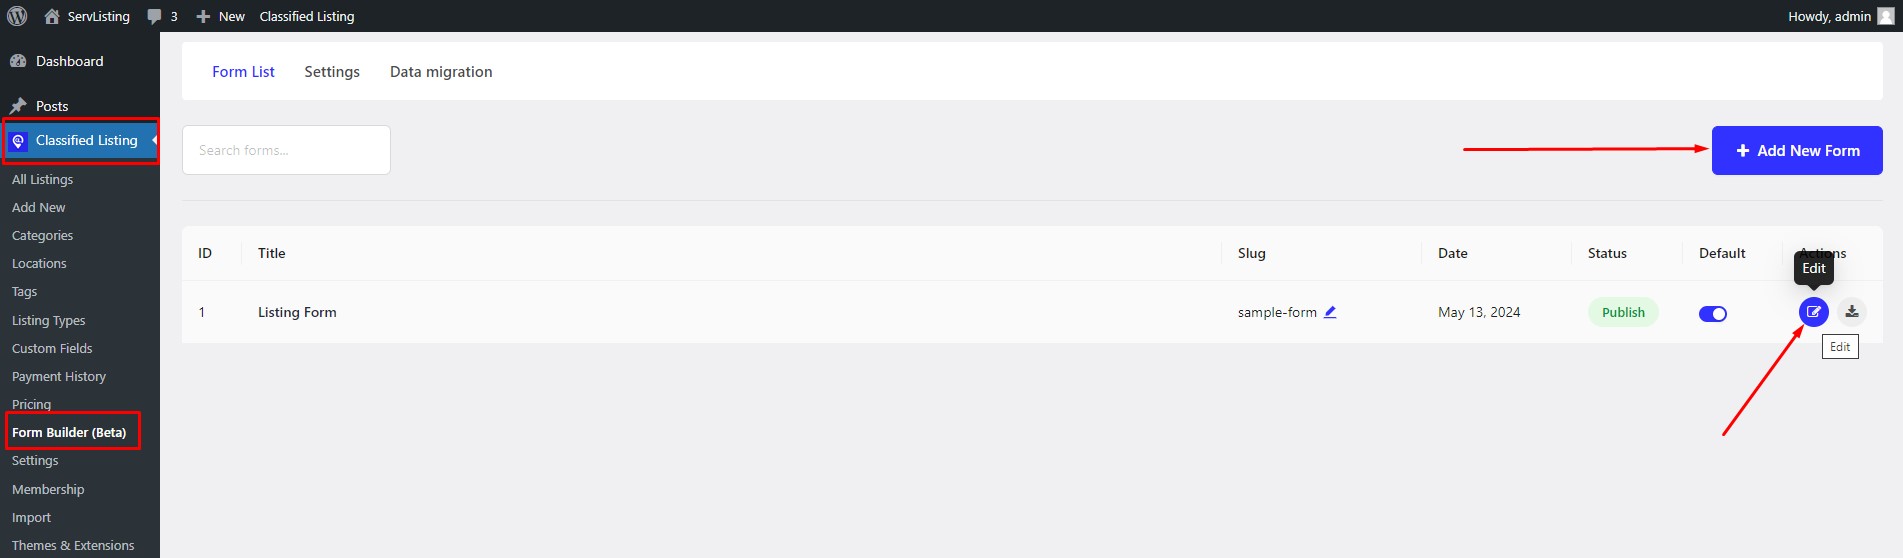
Fields Settings
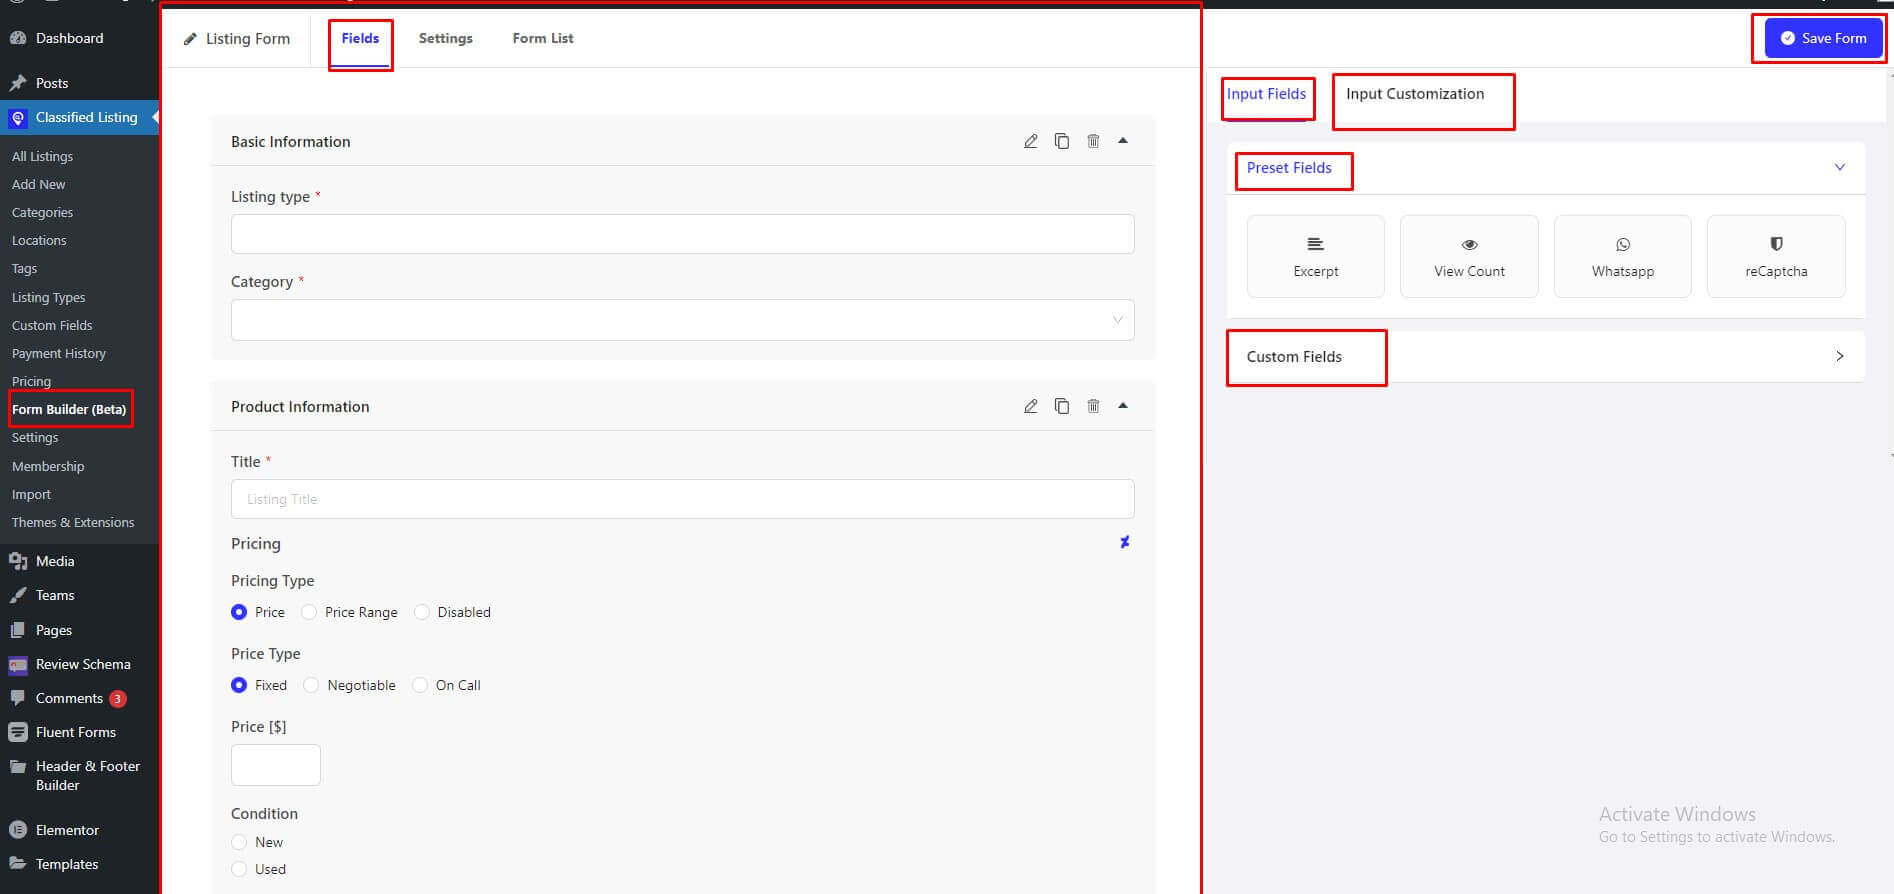
Custom Fields Settings
Custom Fields Settings: Before create custom fields by form builder, please read documentation carefully and follow the steps below.
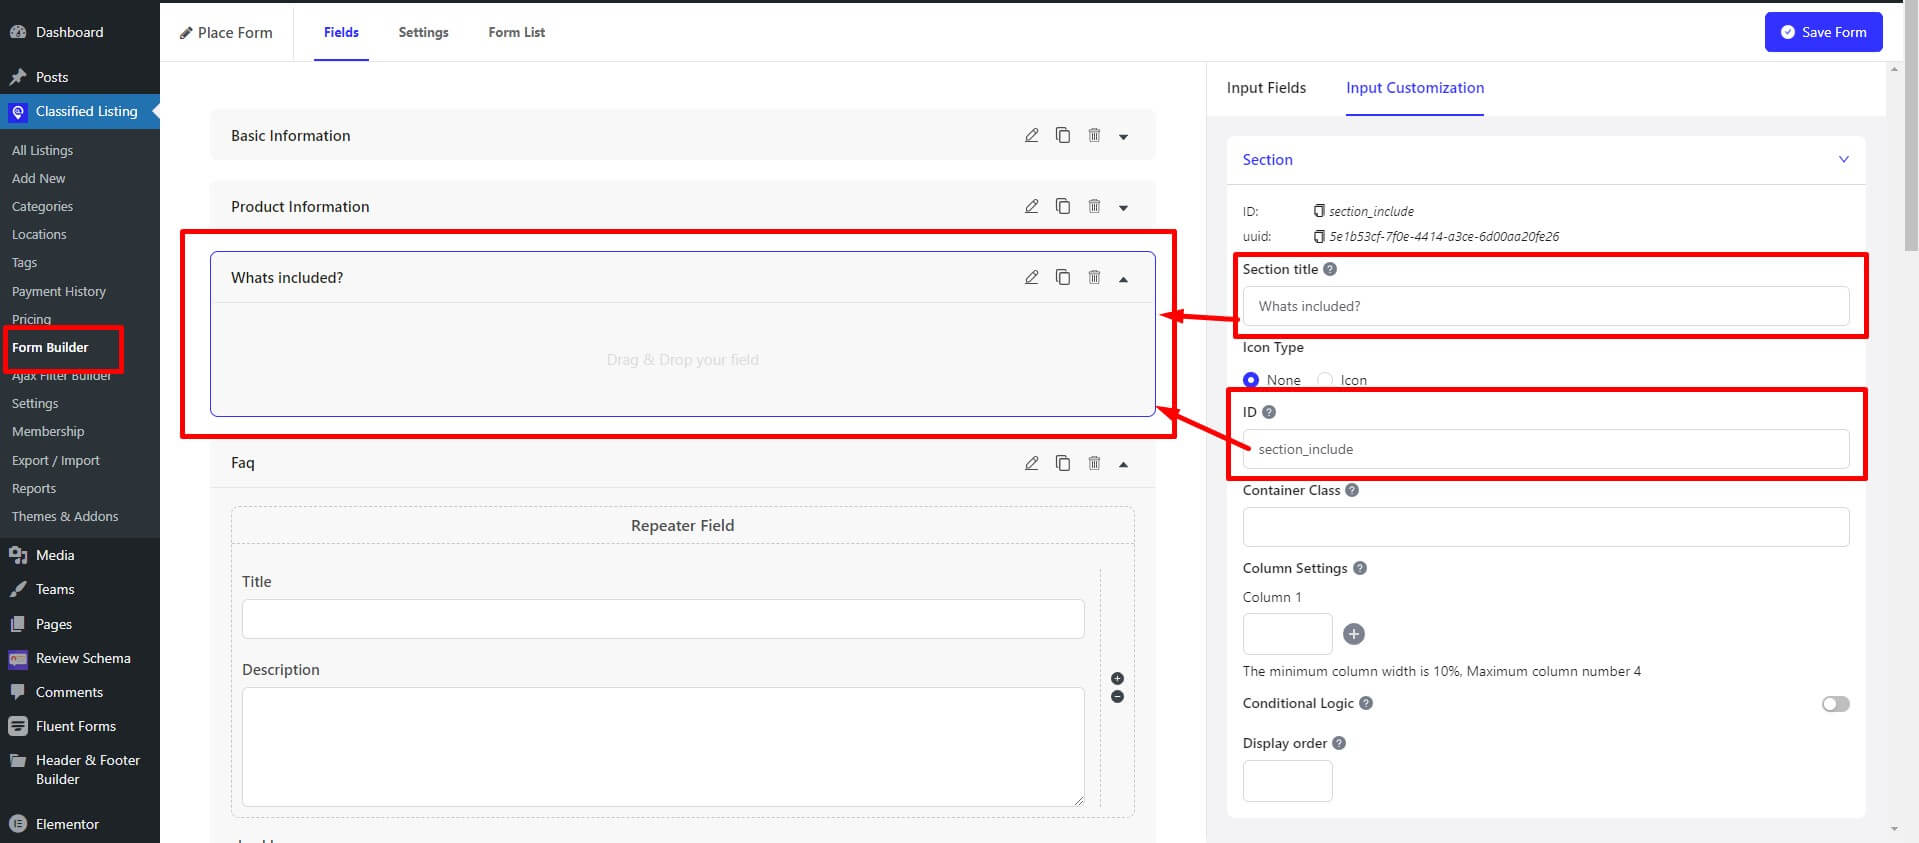
Step 2: Add section information. Important: When you create section for custom fields, you need start section like this section_{your section name here} like section_aminities. You custom field section ID must start with section_
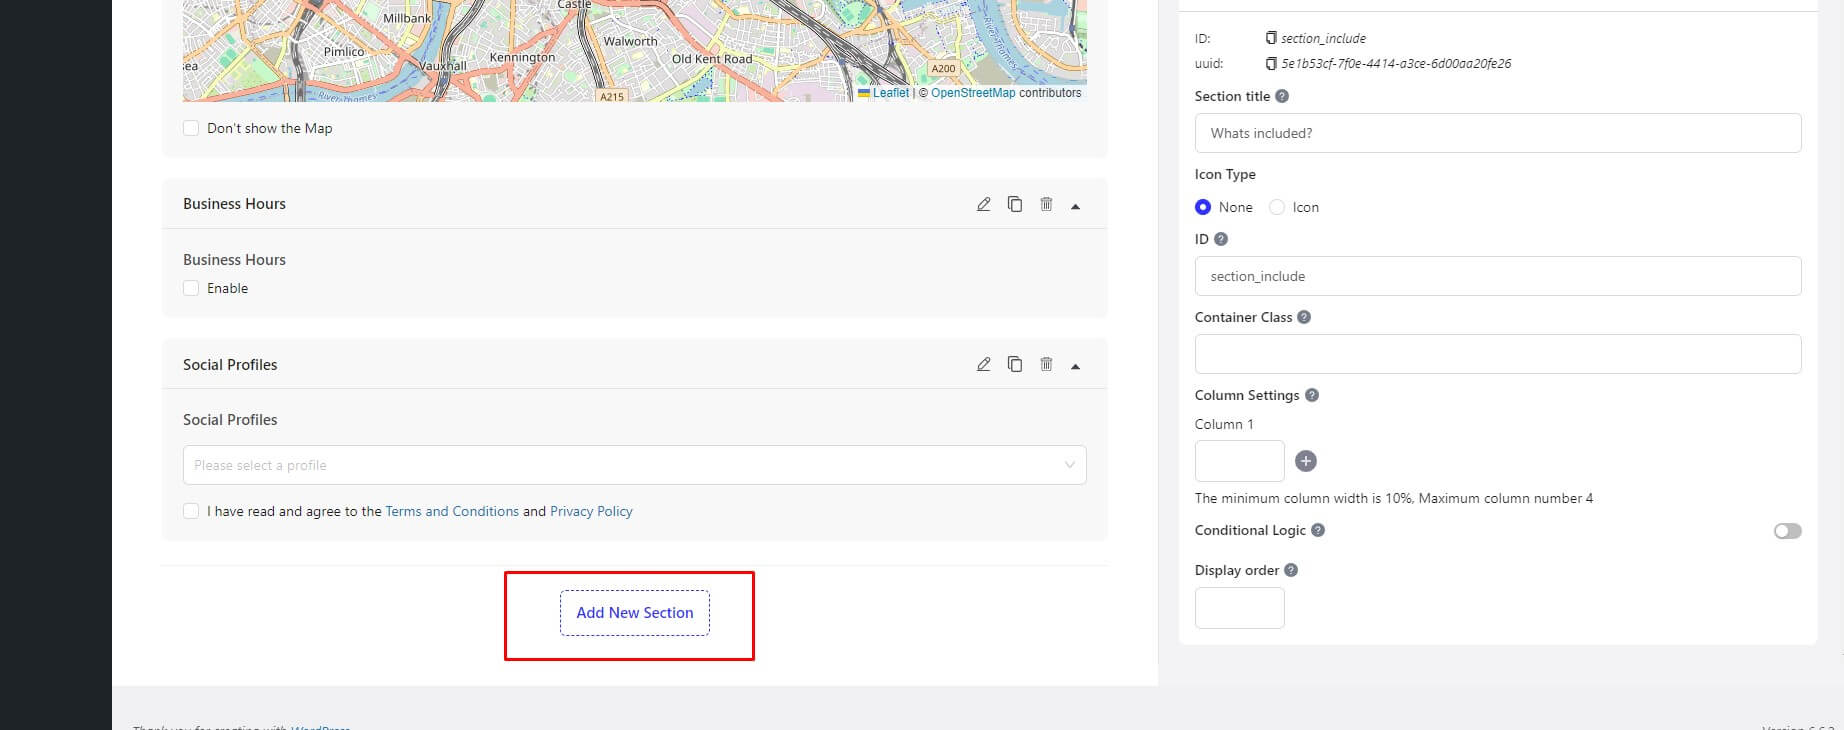
Step 1: Add Section
Step 2: Settings Section
Step 3: Settings Fields
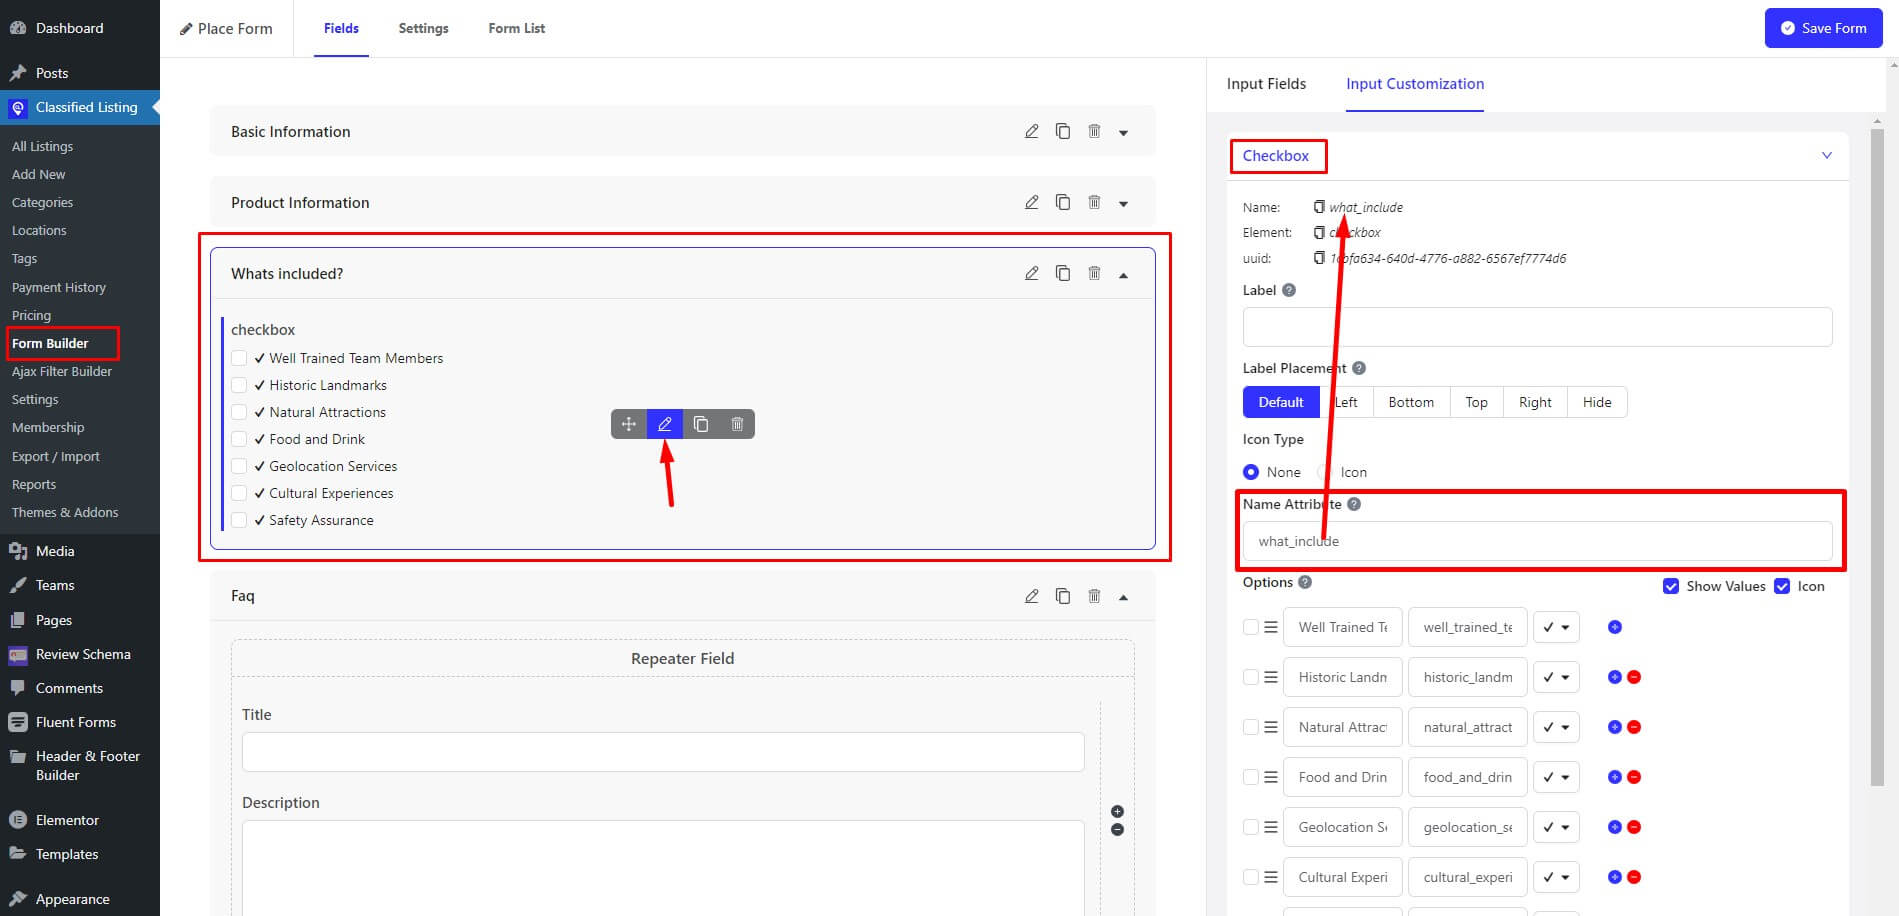
Note:You should custom fields set in custom section. You should not add preset fields in custom section and custom fields not set in preset fields sections.
For more information about form builder go to the documentation link: https://www.radiustheme.com/docs/shortcodes/listing-submission-form/6. Set Home and Blog Page
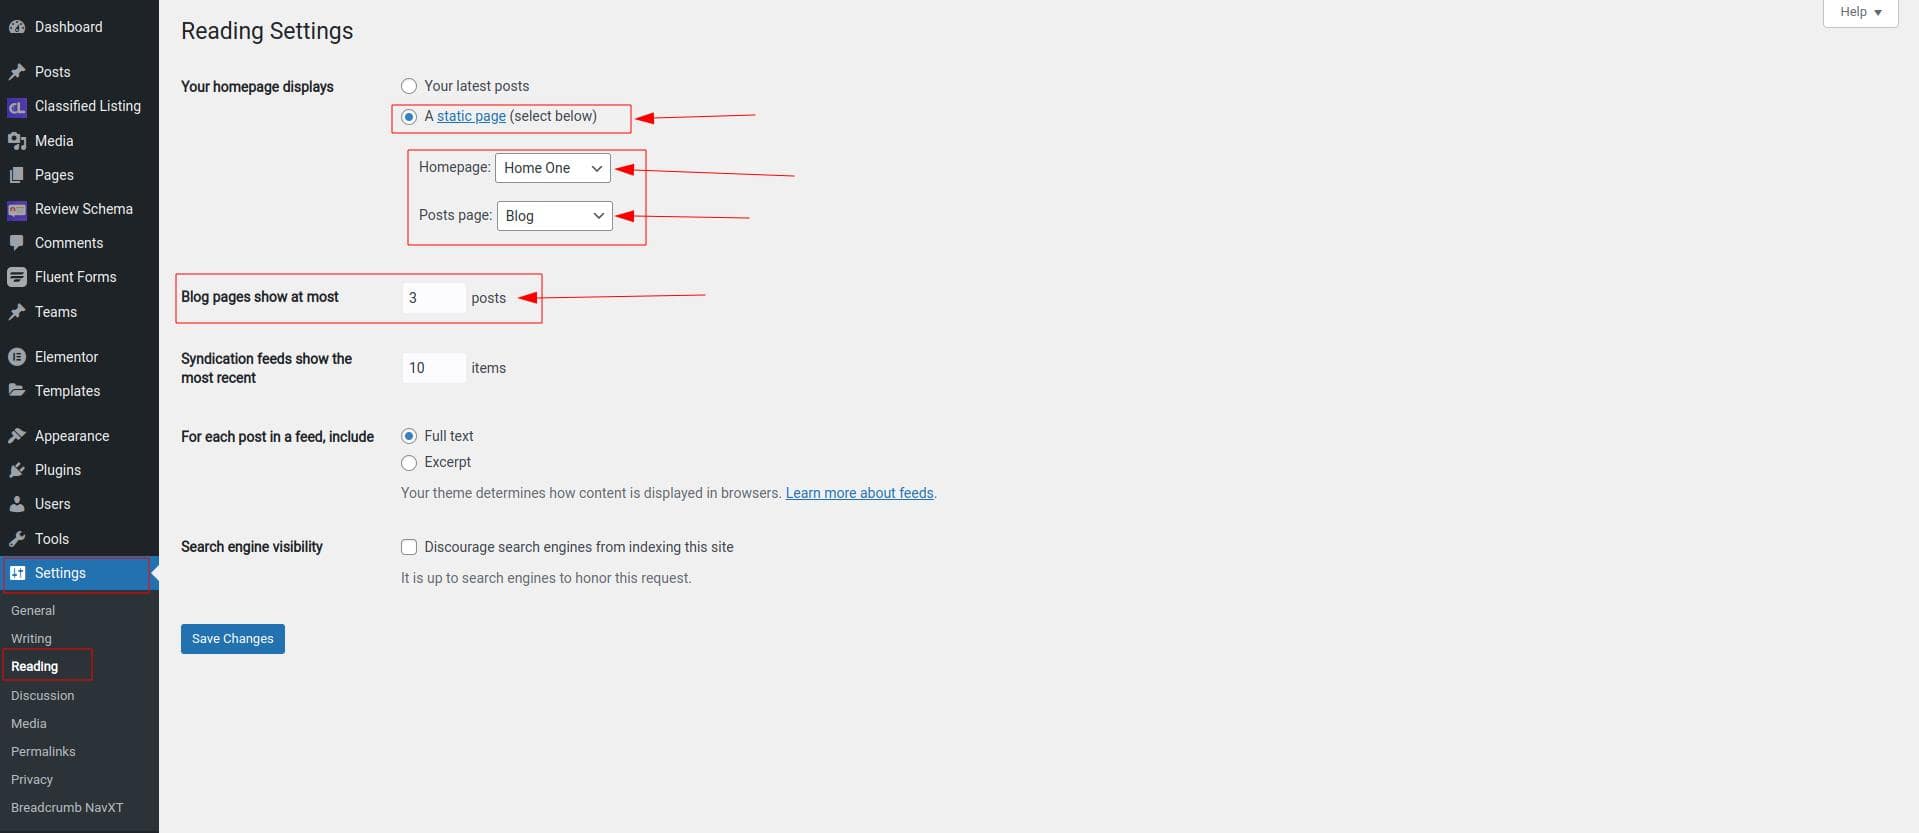
To set the default Home and Blog page please login to wp-admin and navigate to Dashboard > Settings > Reading
7. Customize Menu
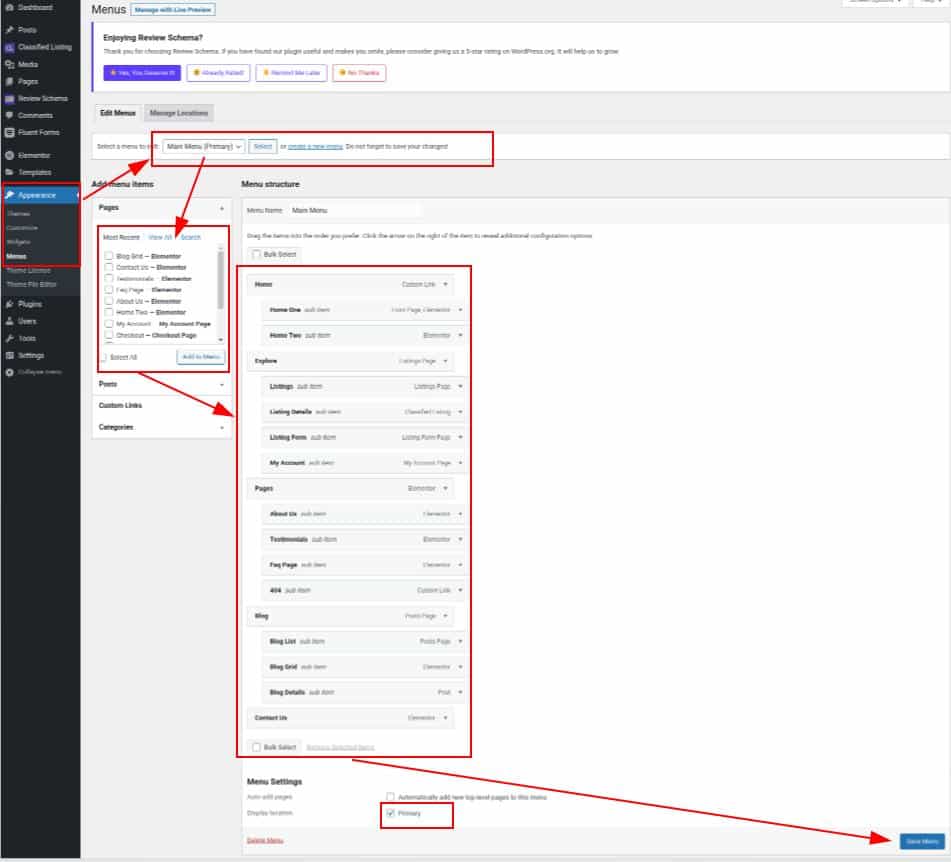
To customize the menu please login to wp-admin and navigate to Appearance > Menus and follow the following steps:
8. Change Site Title and Favicon
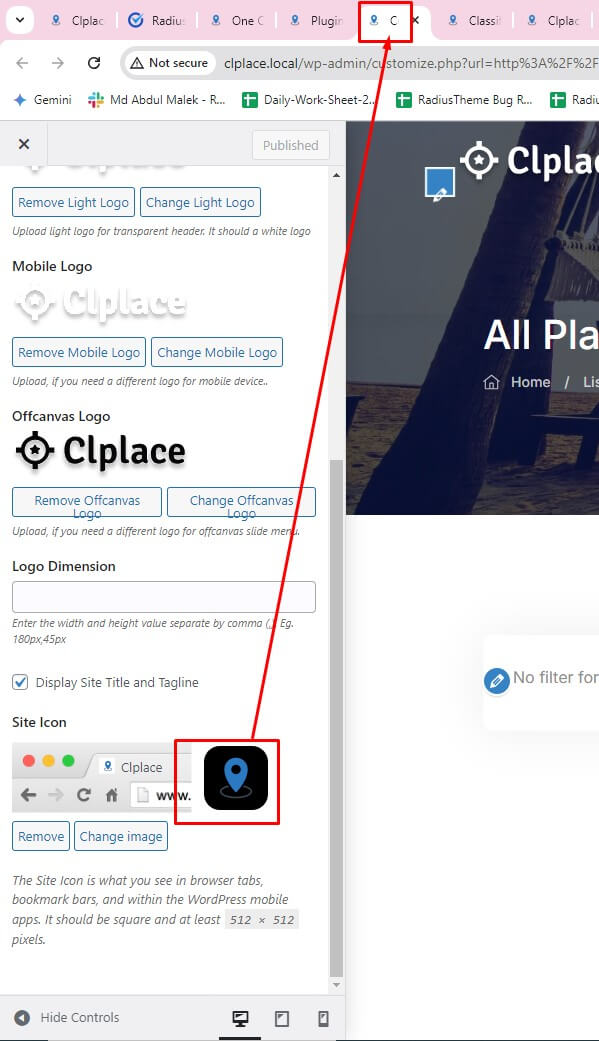
To change your Site title and Favicon login to wp-admin and navigate to Dashboard > Appearance > Customize > Site Identity and follow the following steps:
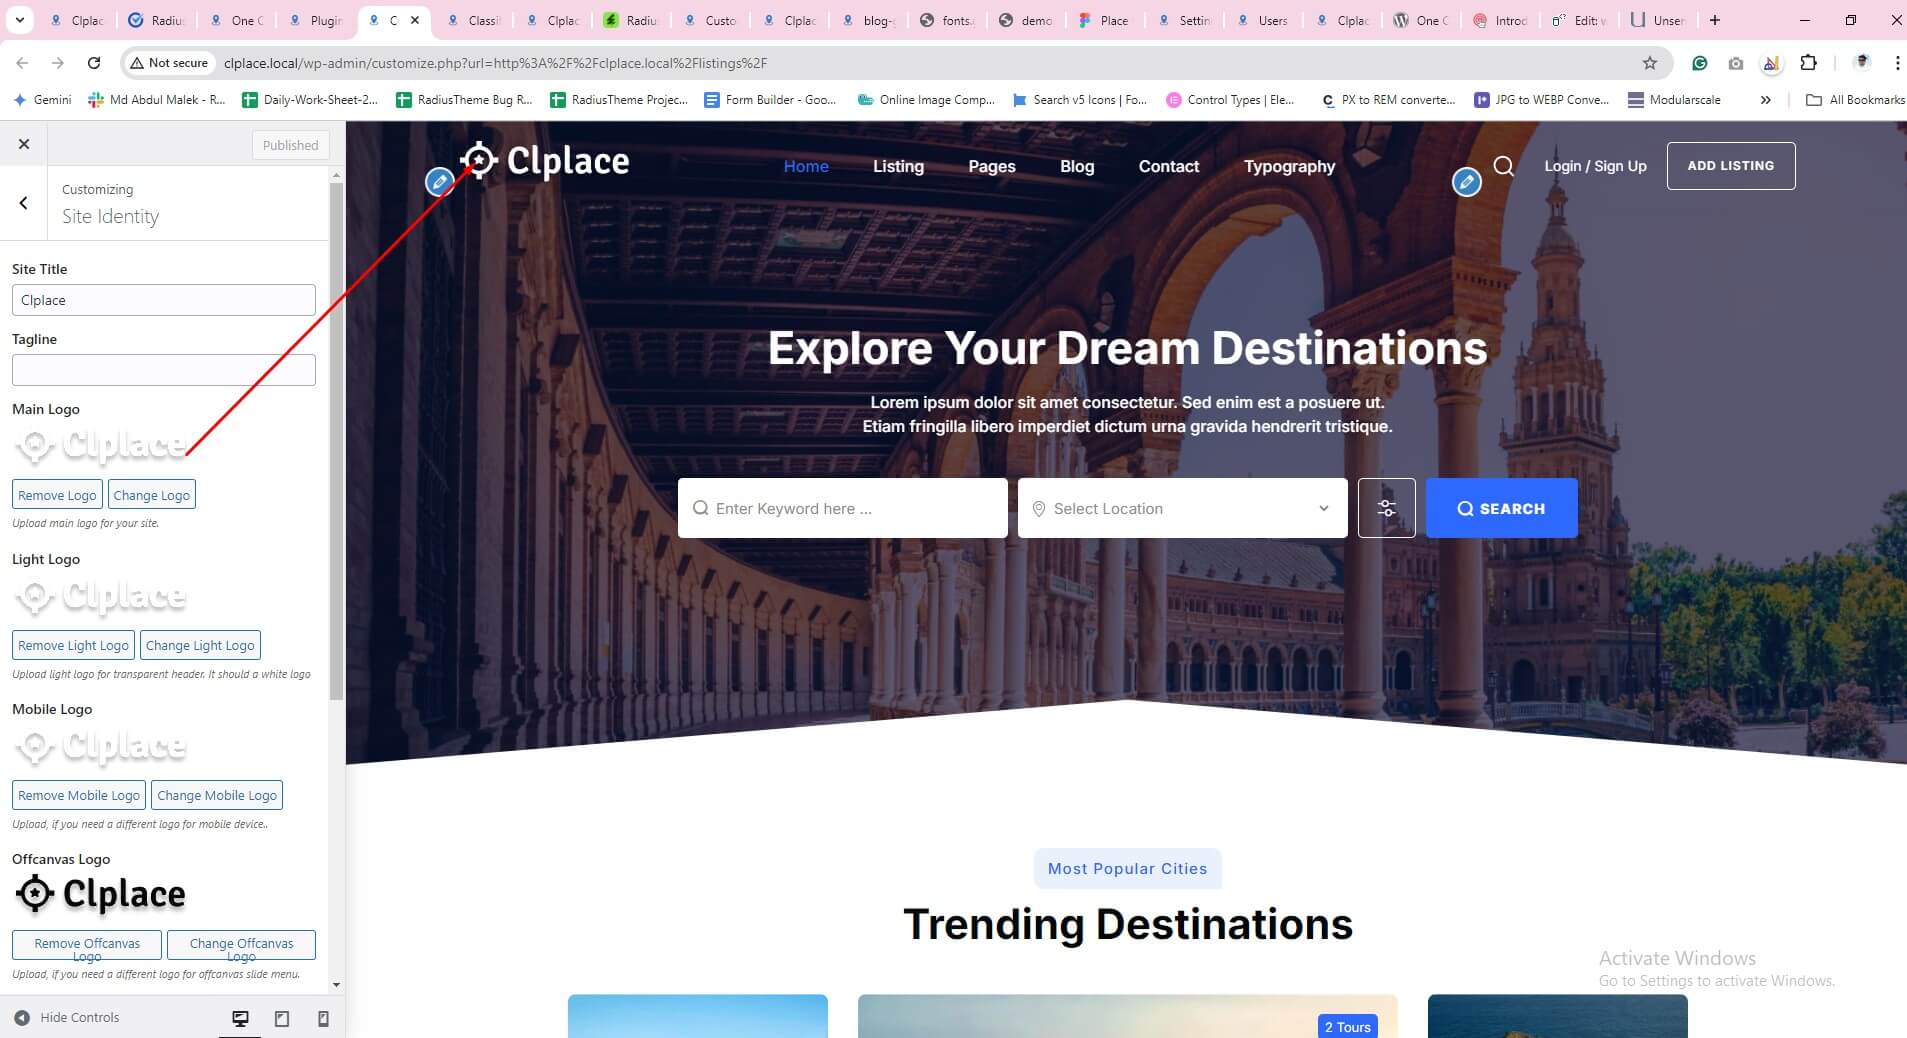
9. Change Logo
To change the site logo login to your wp-admin and navigate to Dashboard > Appearance > Customize > General and follow the following steps:
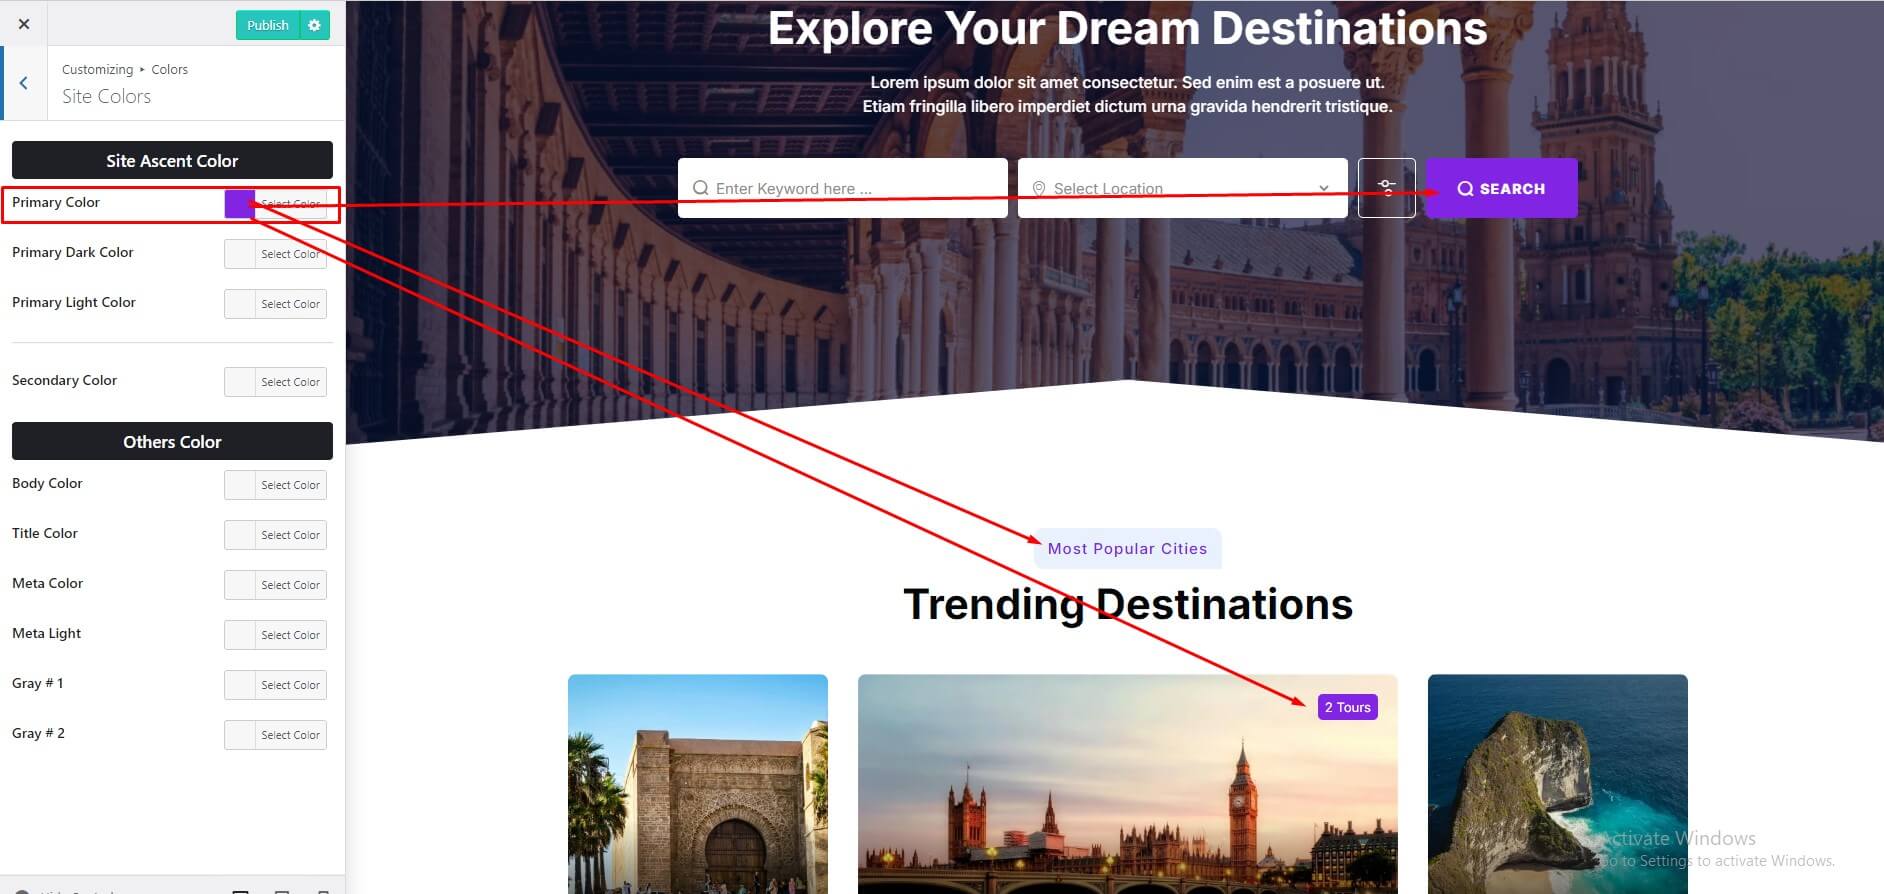
10. Change Global Colors
To change all global colors login to wp-admin and navigate to Dashboard > Appearance > Customize > Color and follow the following steps:
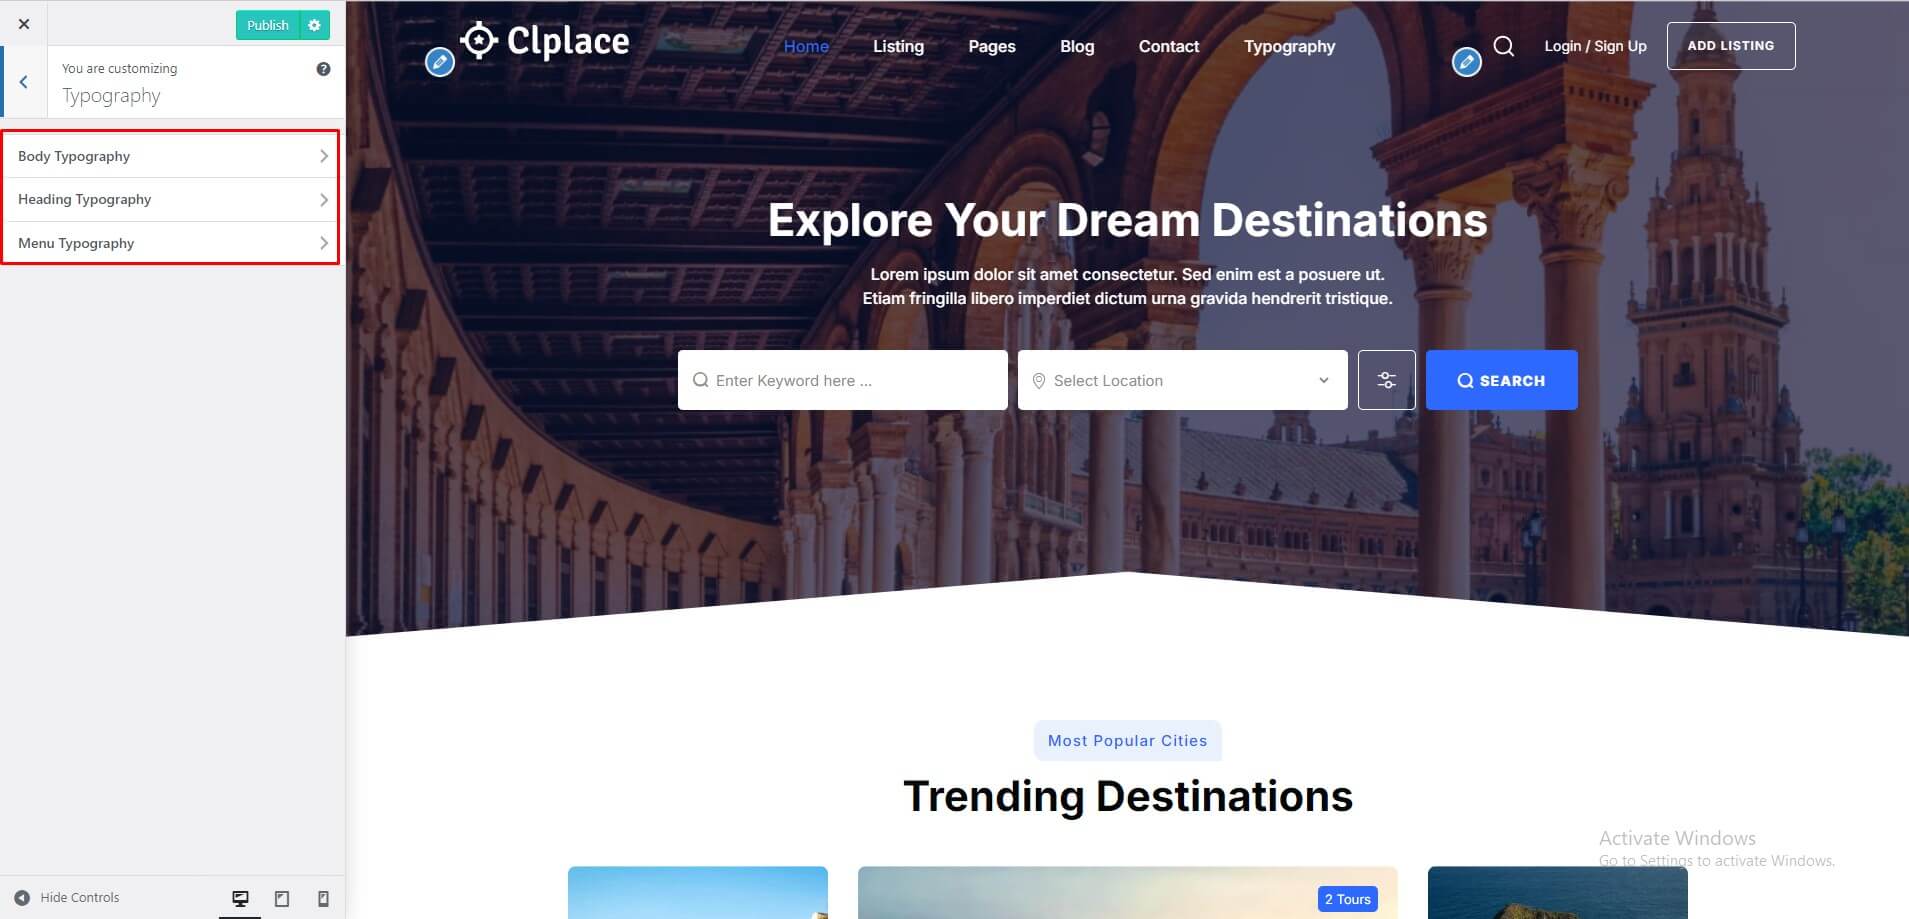
11. Change Typography
To change the typography of your site navigate to Dashboard > Appearance > Customize > Typography
12. Customizer Settings
To change ovarall theme settings Appearance > Customizel
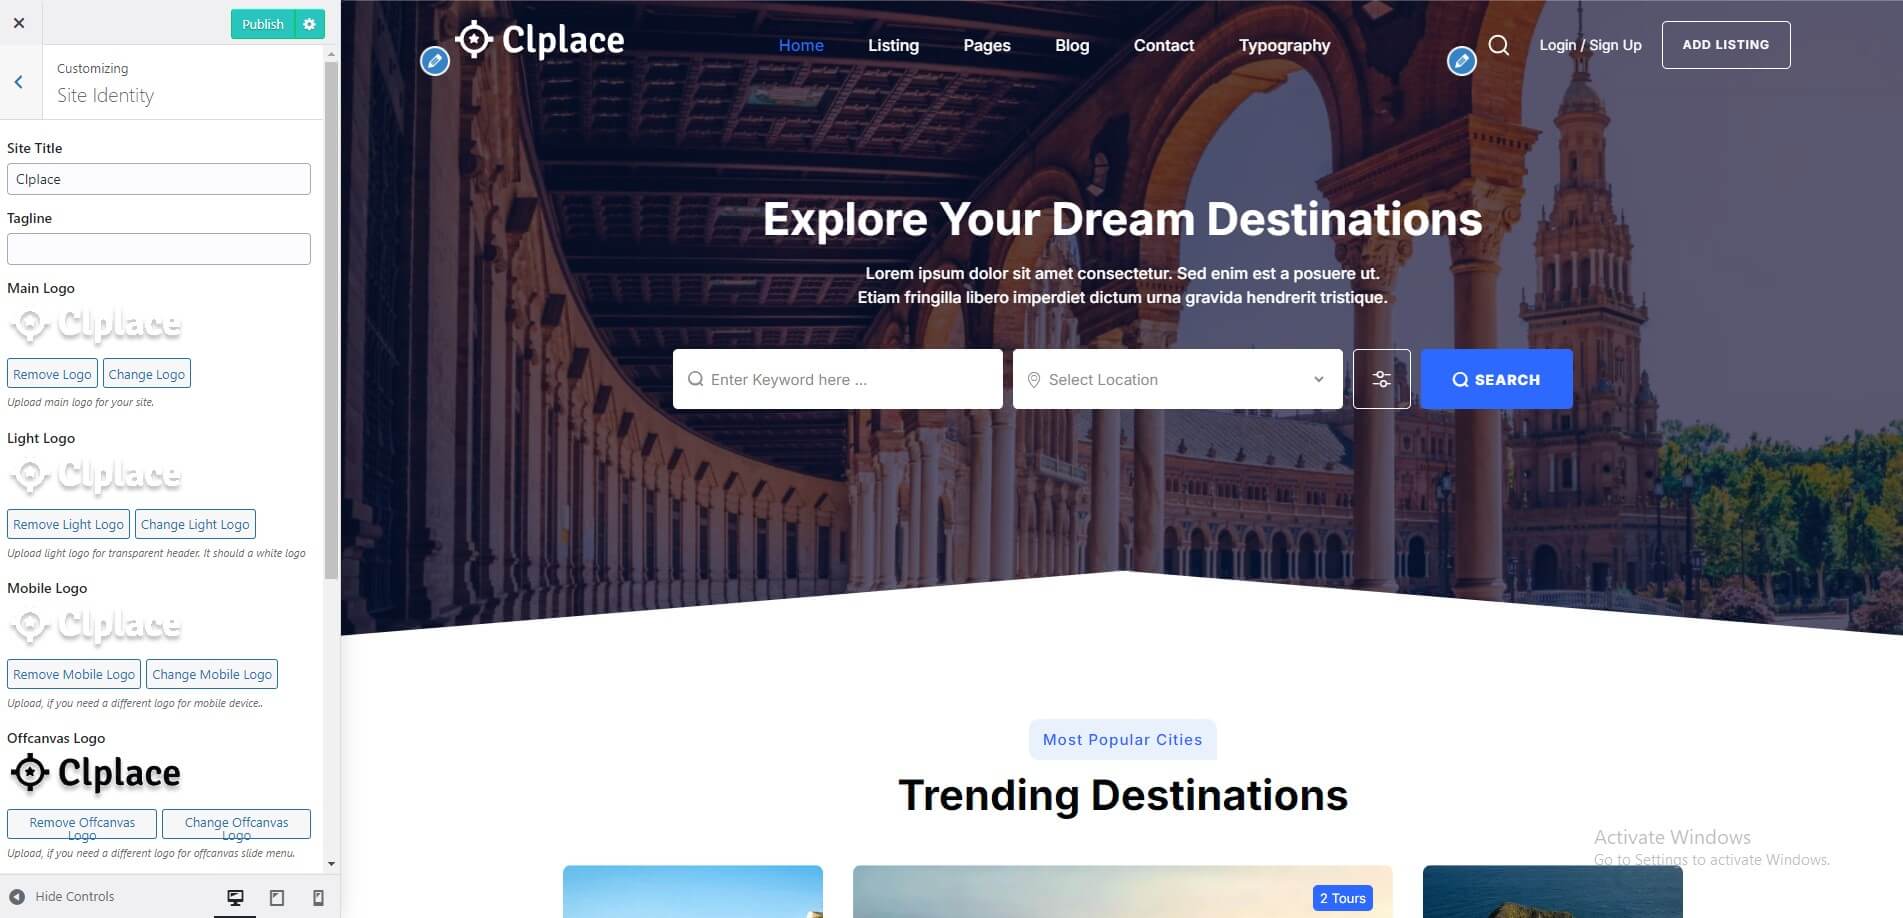
12.1 Site Identity
To change General Options navigate to Appearance > Customize > Site Identity
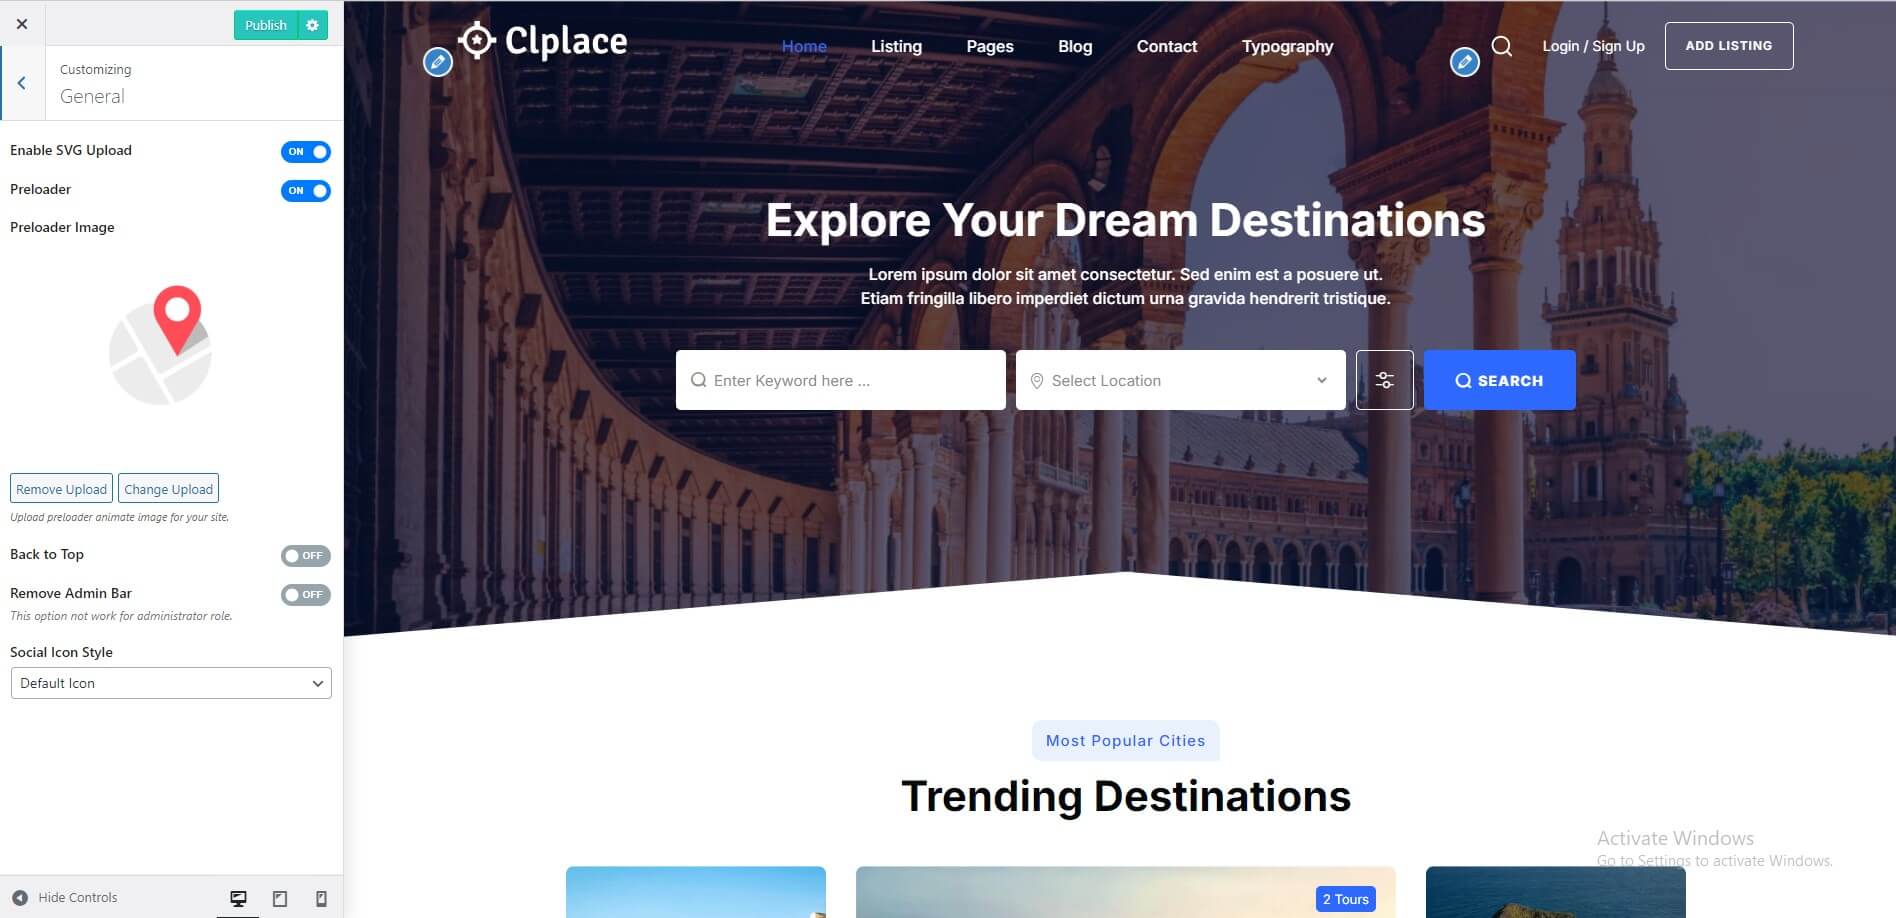
12.2 General
To change Header Options navigate to Appearance > Customize > General
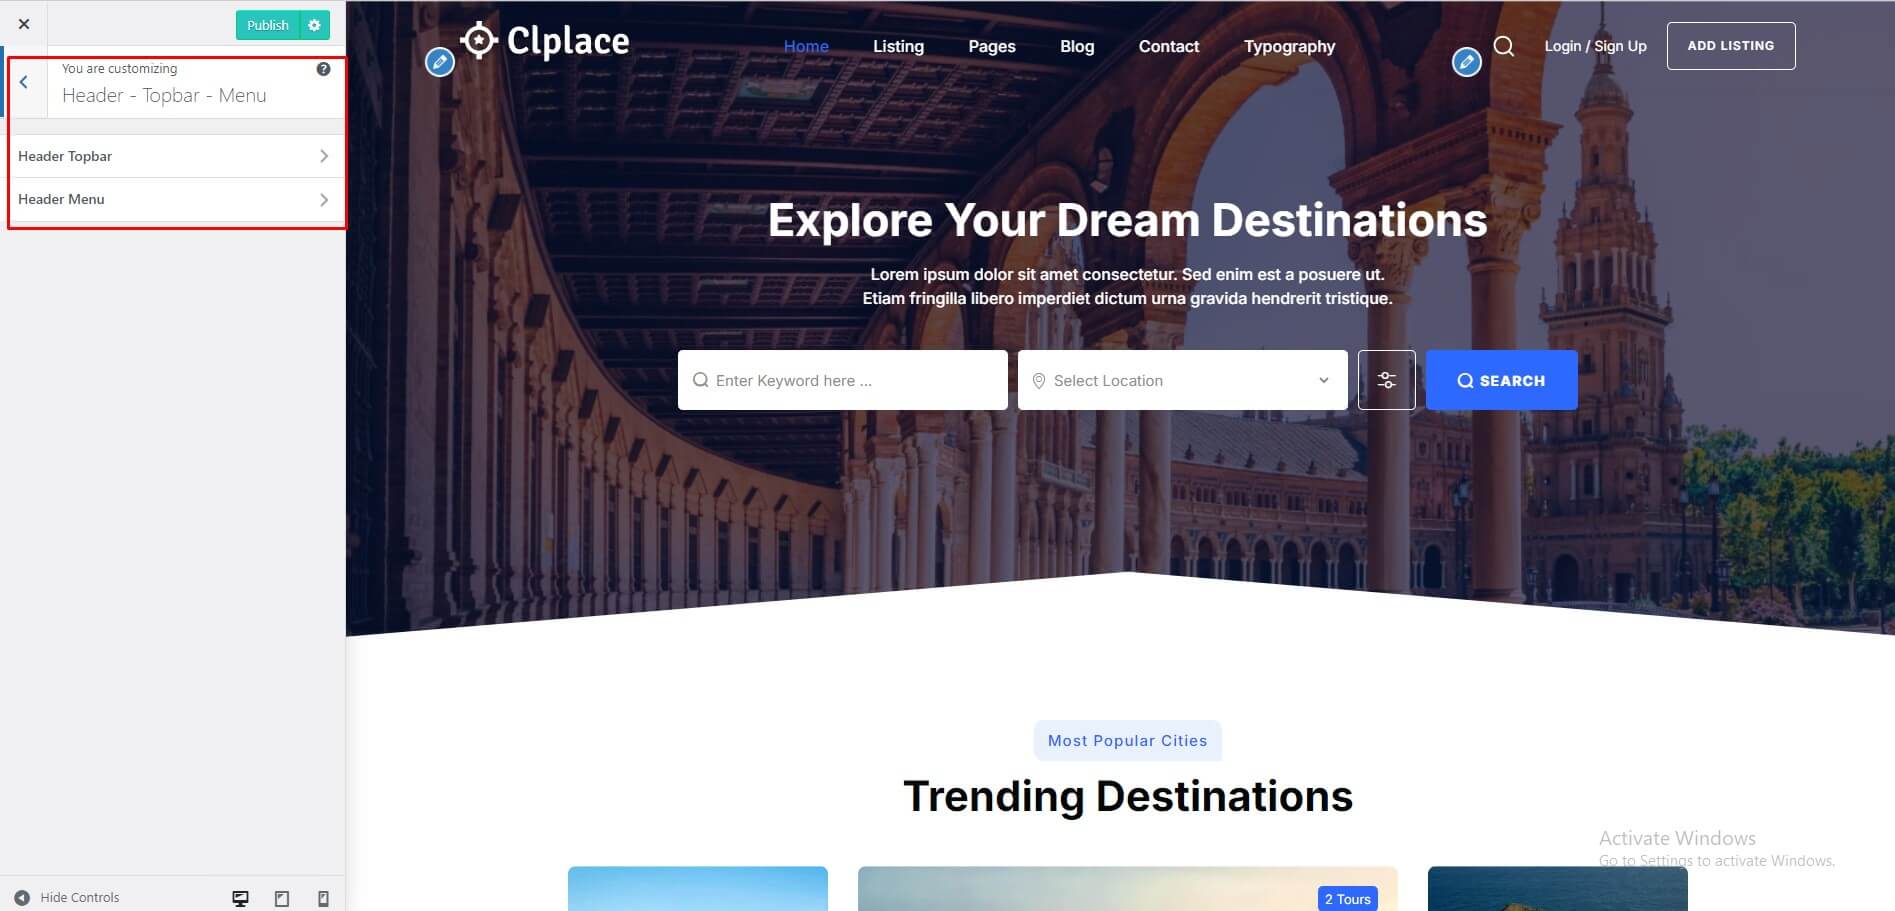
12.3.1 Header
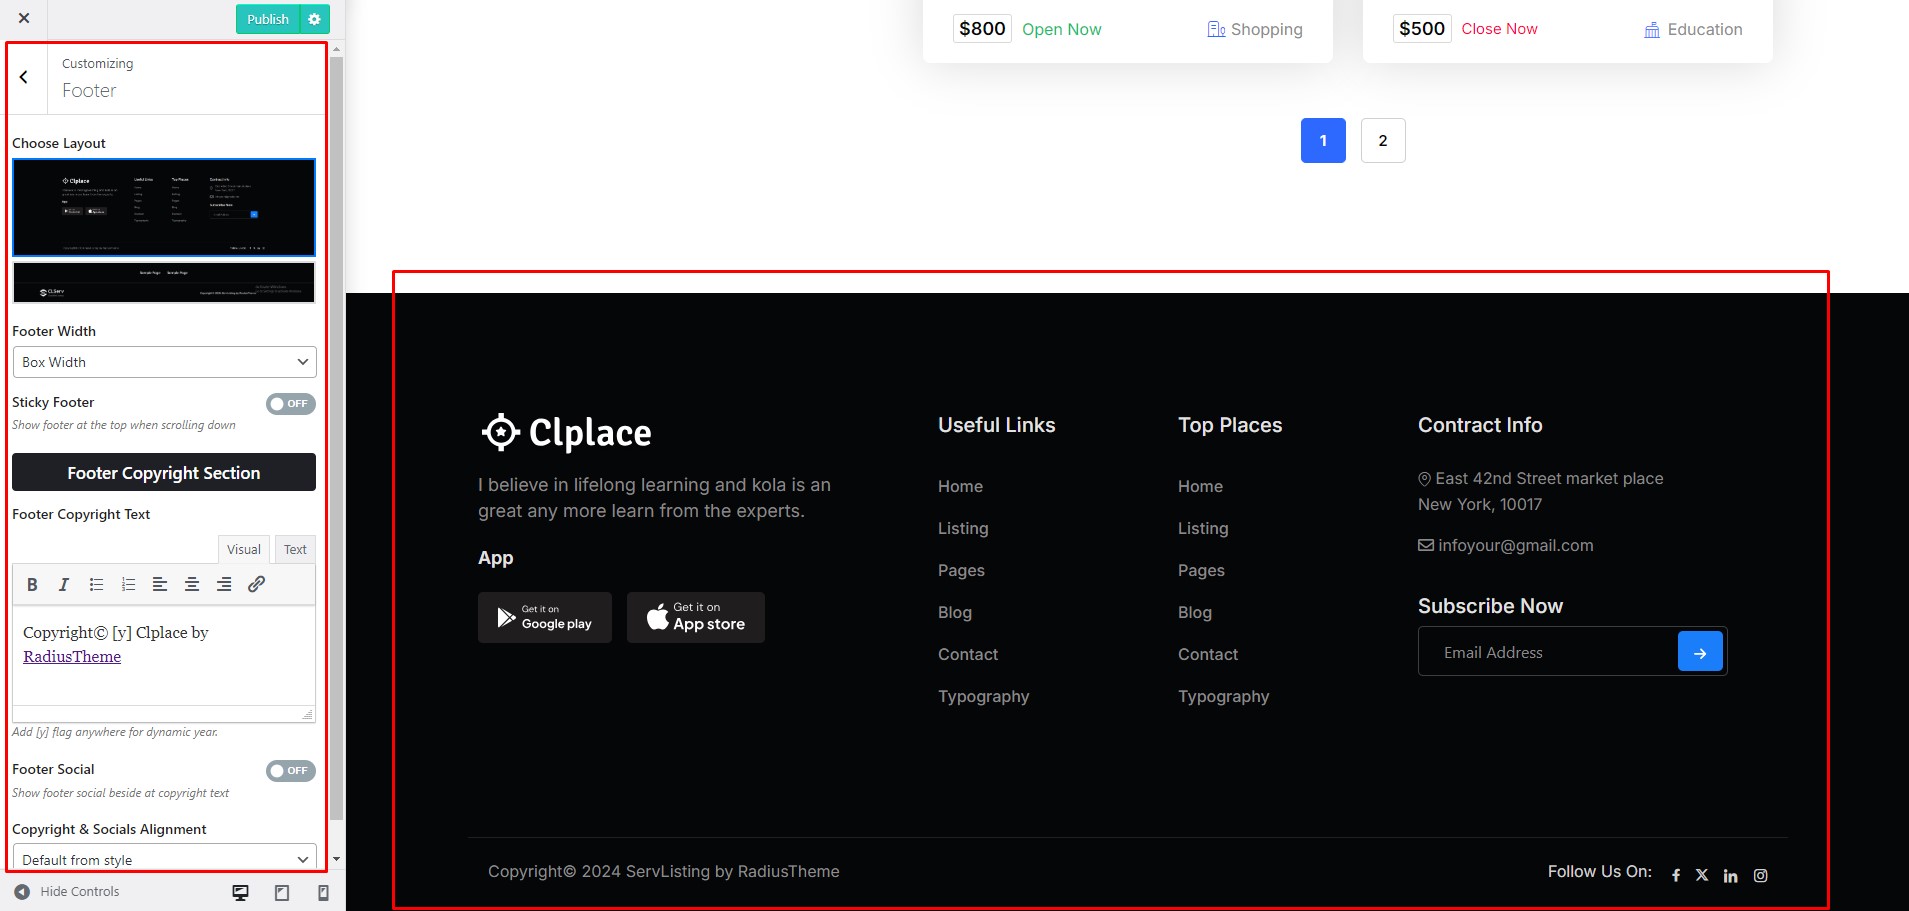
To change footers options navigate to Appearance > Customize > Header. Please check all tabs.
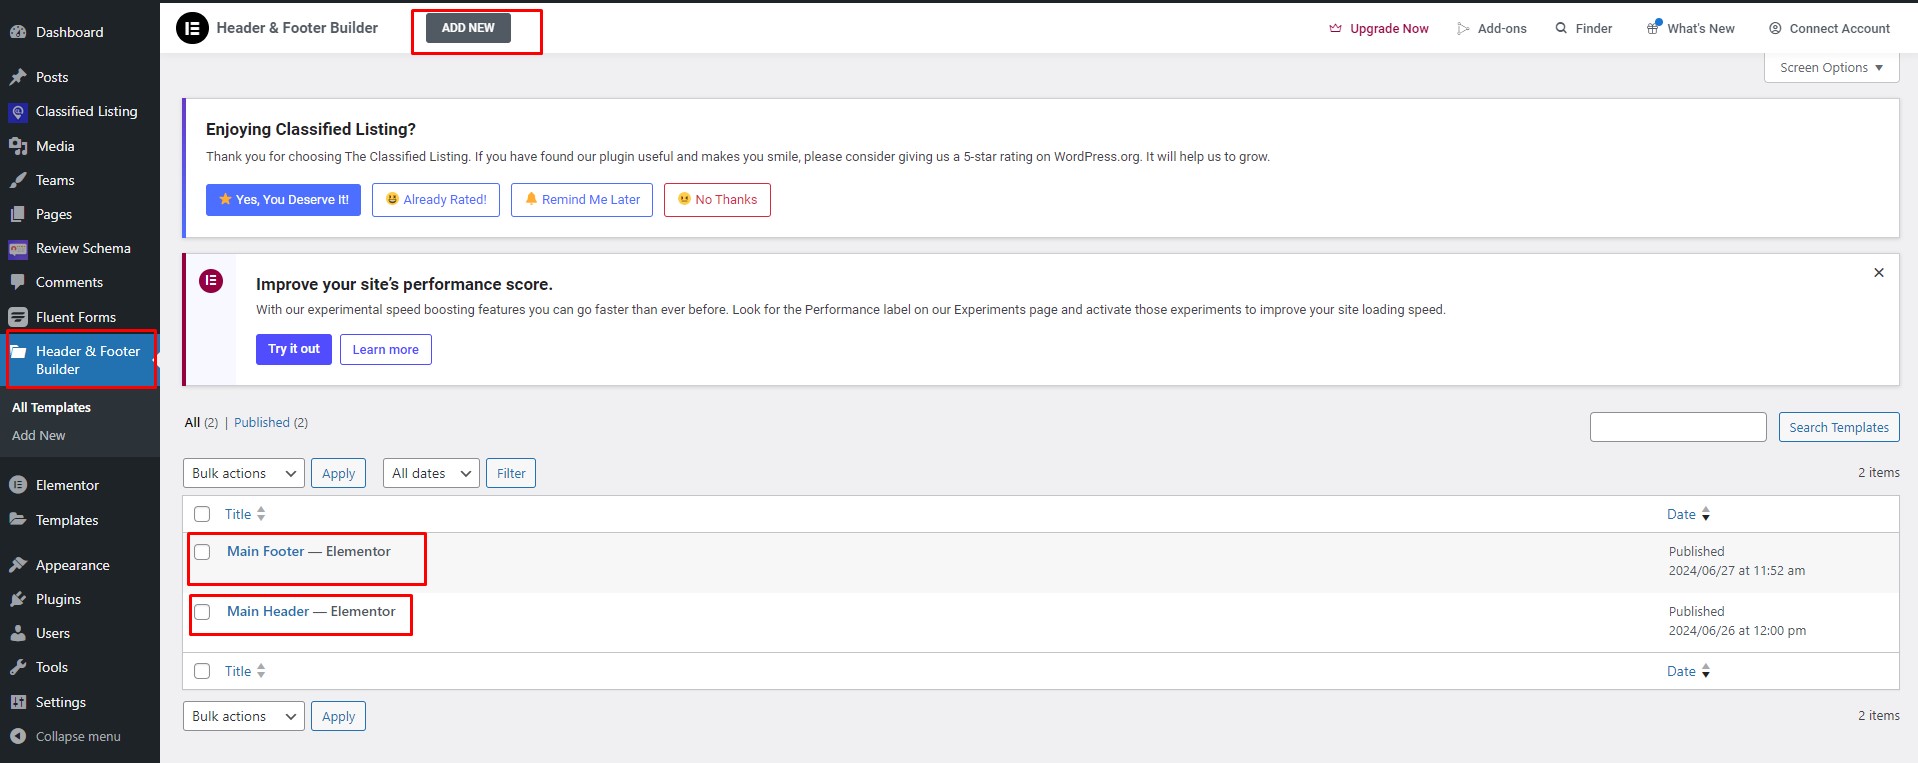
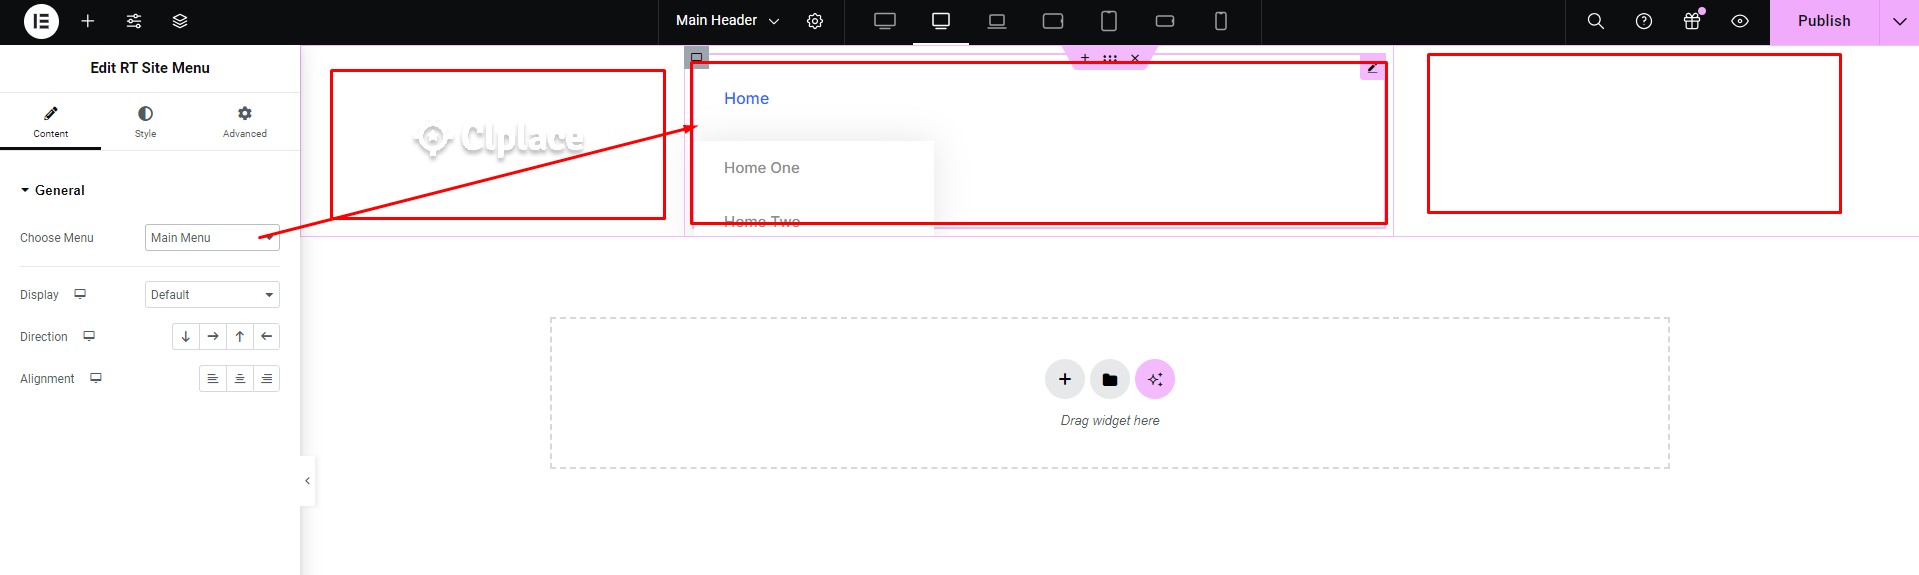
12.3.2 Header Builder
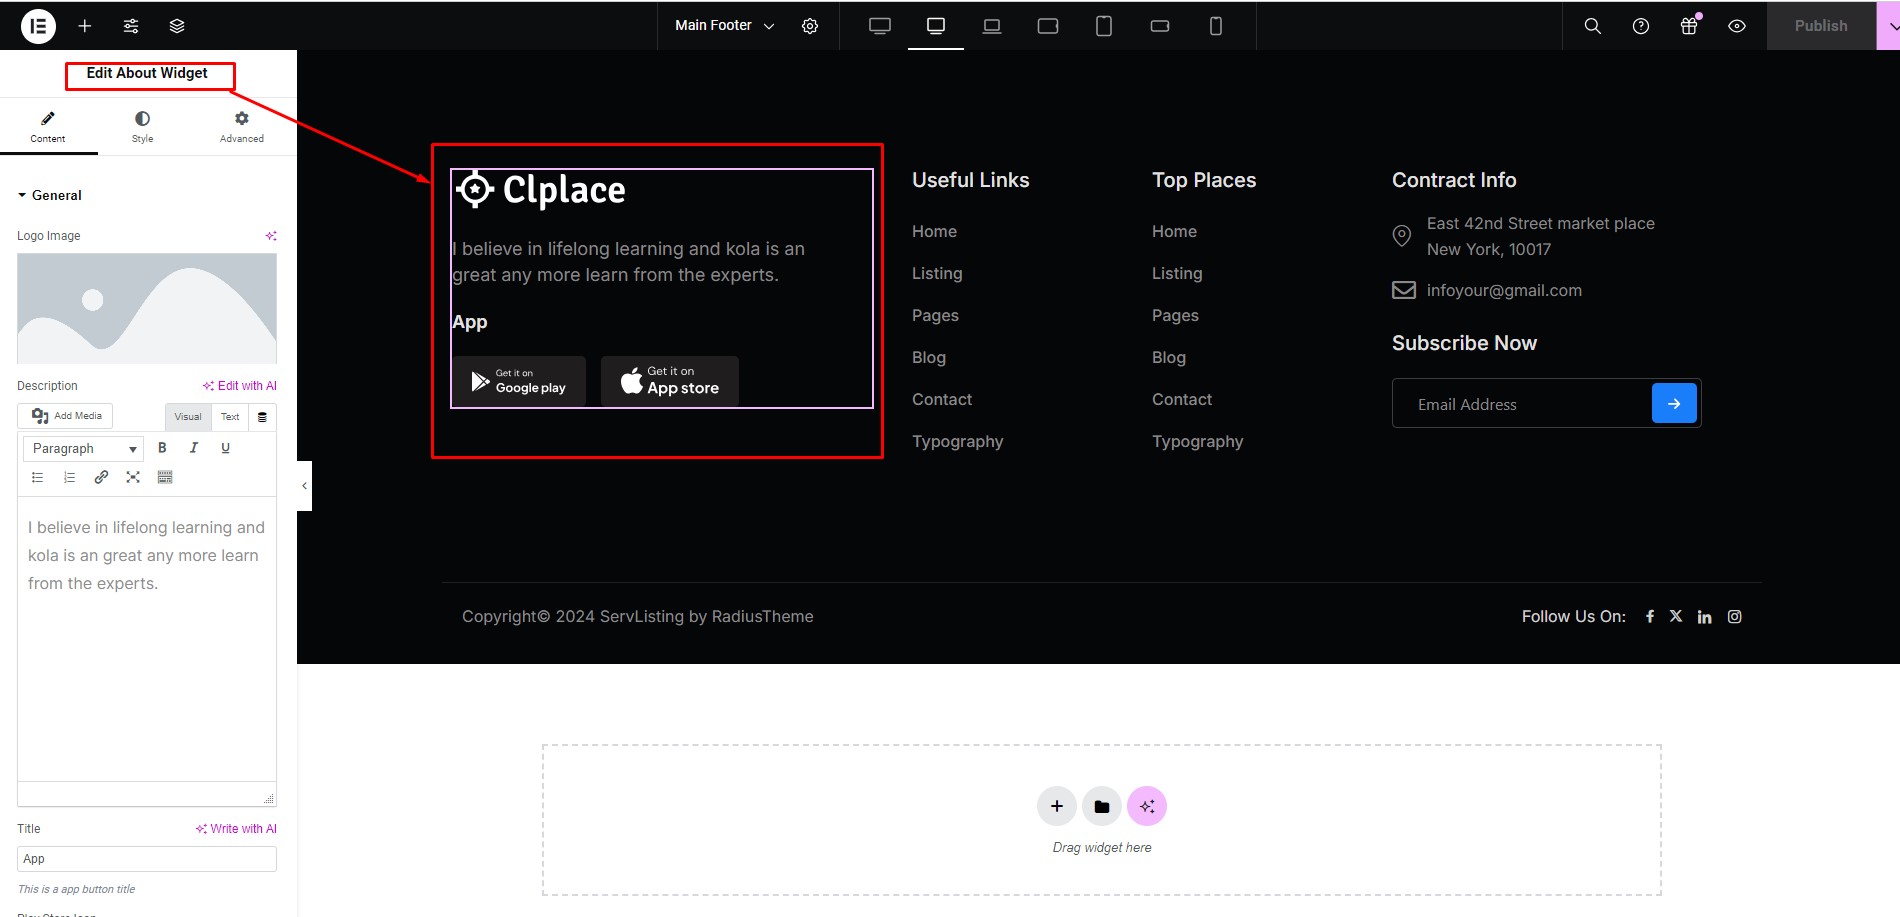
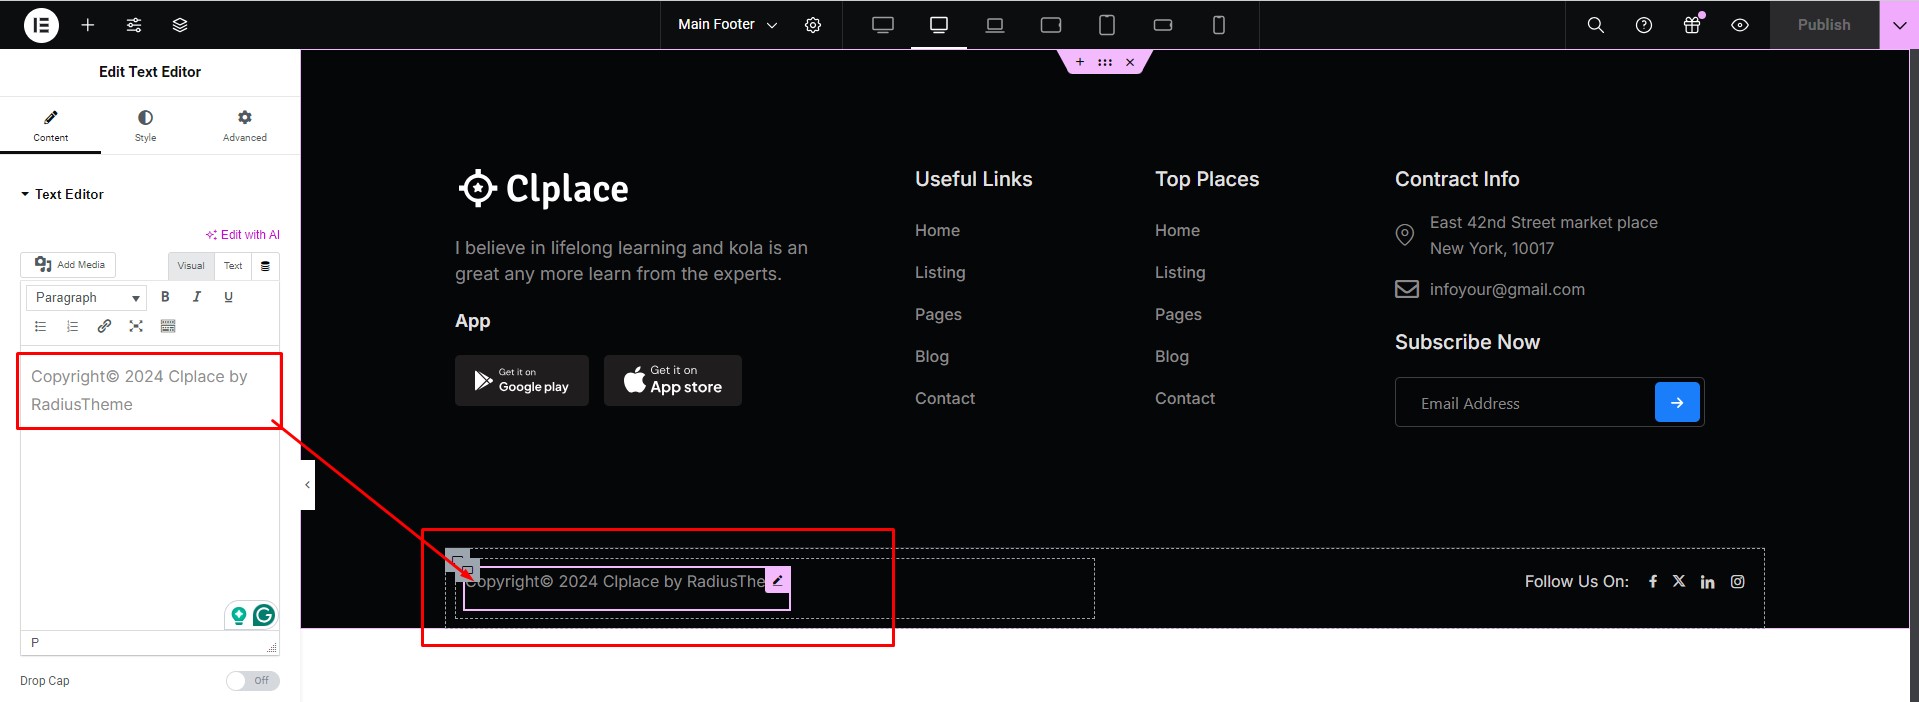
From Admin menu, navigate to Header & Footer Builder
12.3.4 Footer
12.3.5 Footer Builder
12.4.1 Page Layout
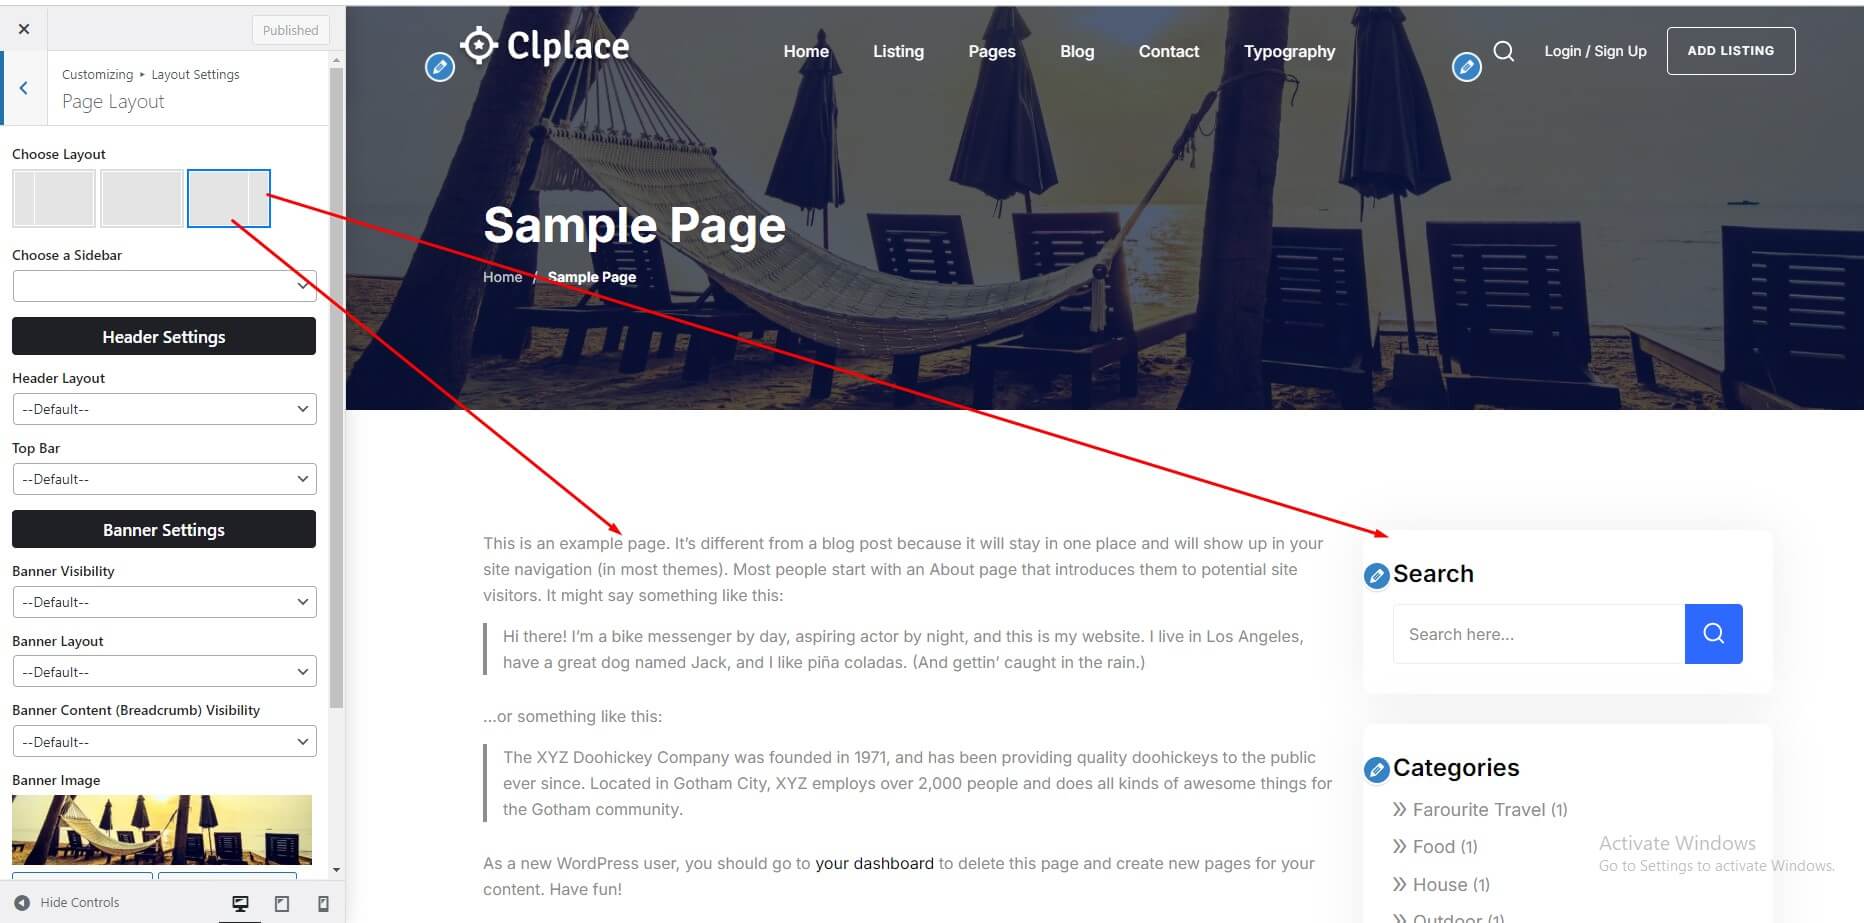
To change Page Layout navigate to Appearance > Customize > Layout Settings > Pages Layout.
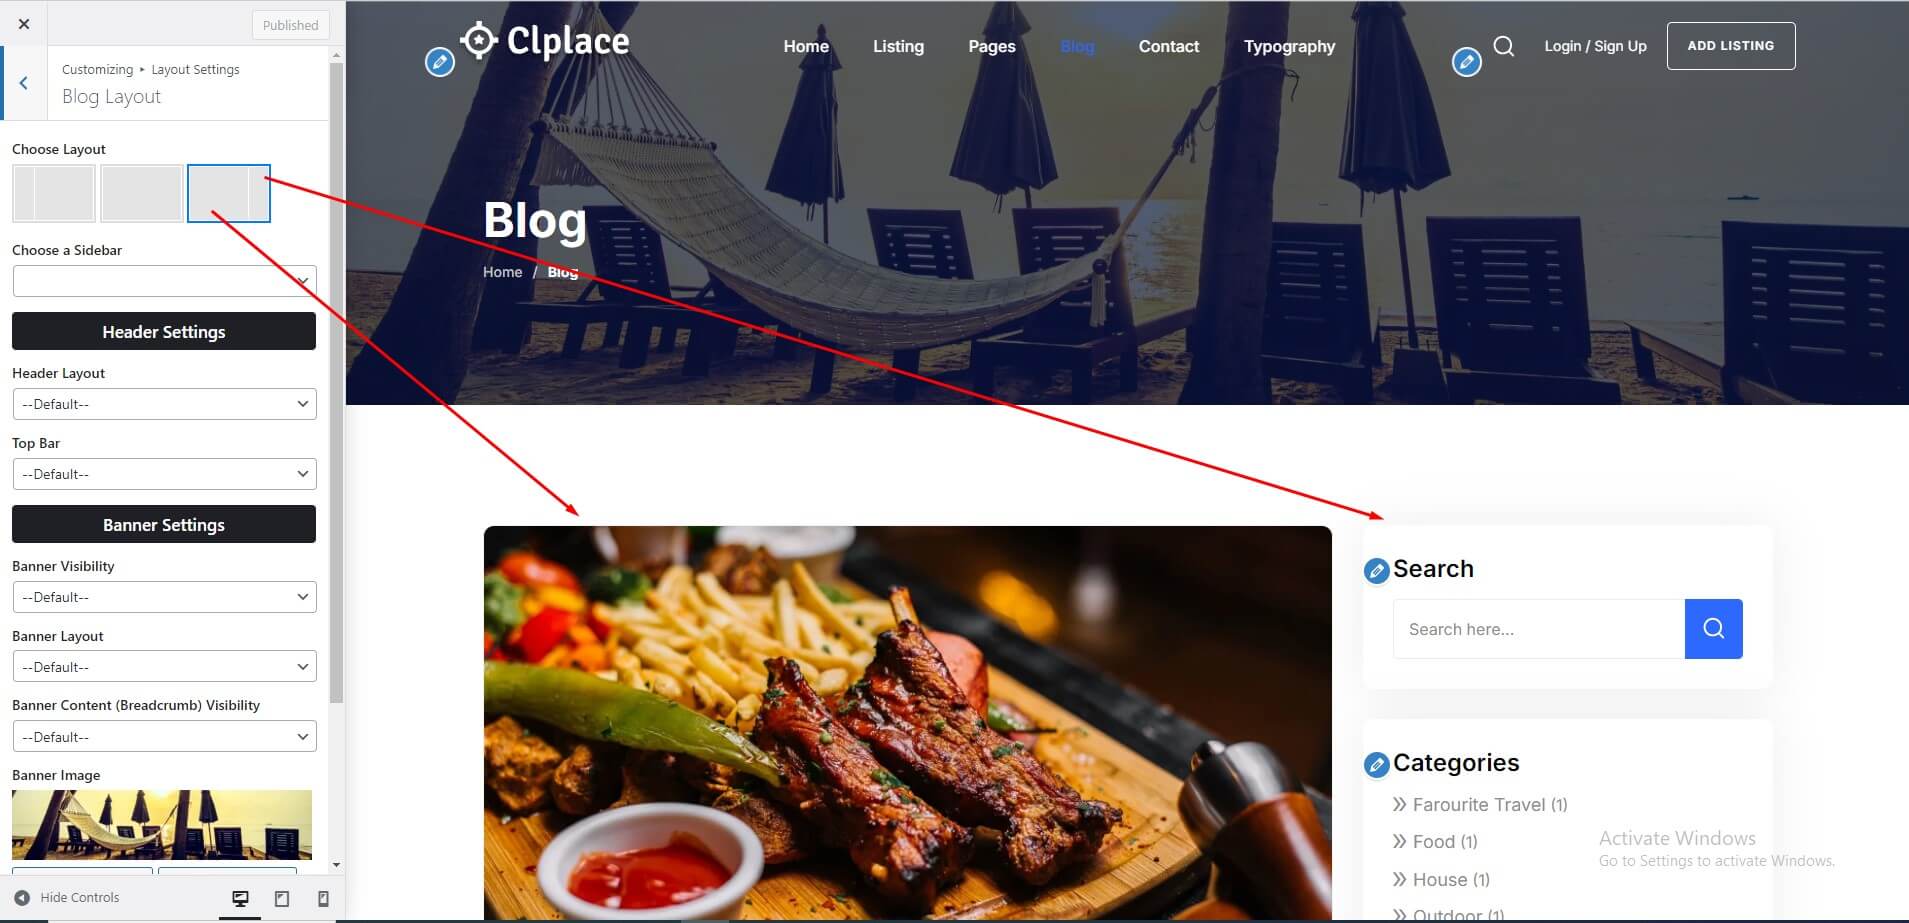
12.4.2 Blog Layout
To change Blog Layout navigate to Appearance > Customize > Layout Settings > Blog Layout.
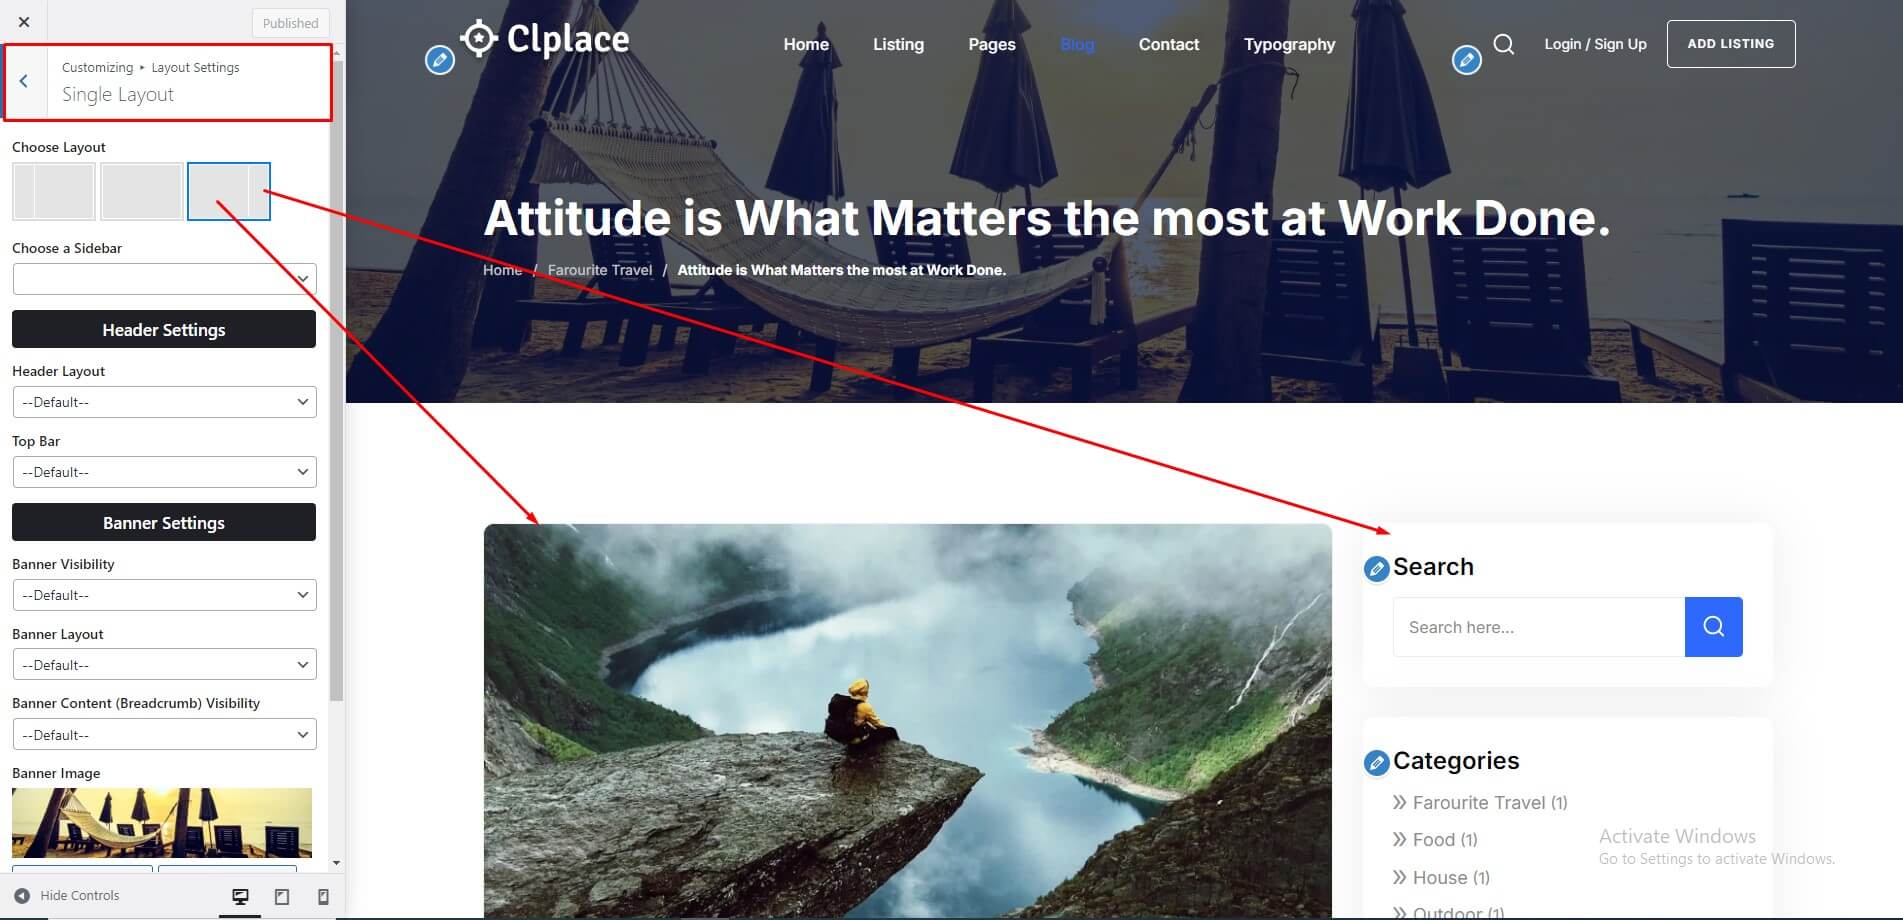
12.4.3 Single Post Layout
To change Sinlge Post Layout navigate to Appearance > Customize > Layout Settings > Single Post Layout.
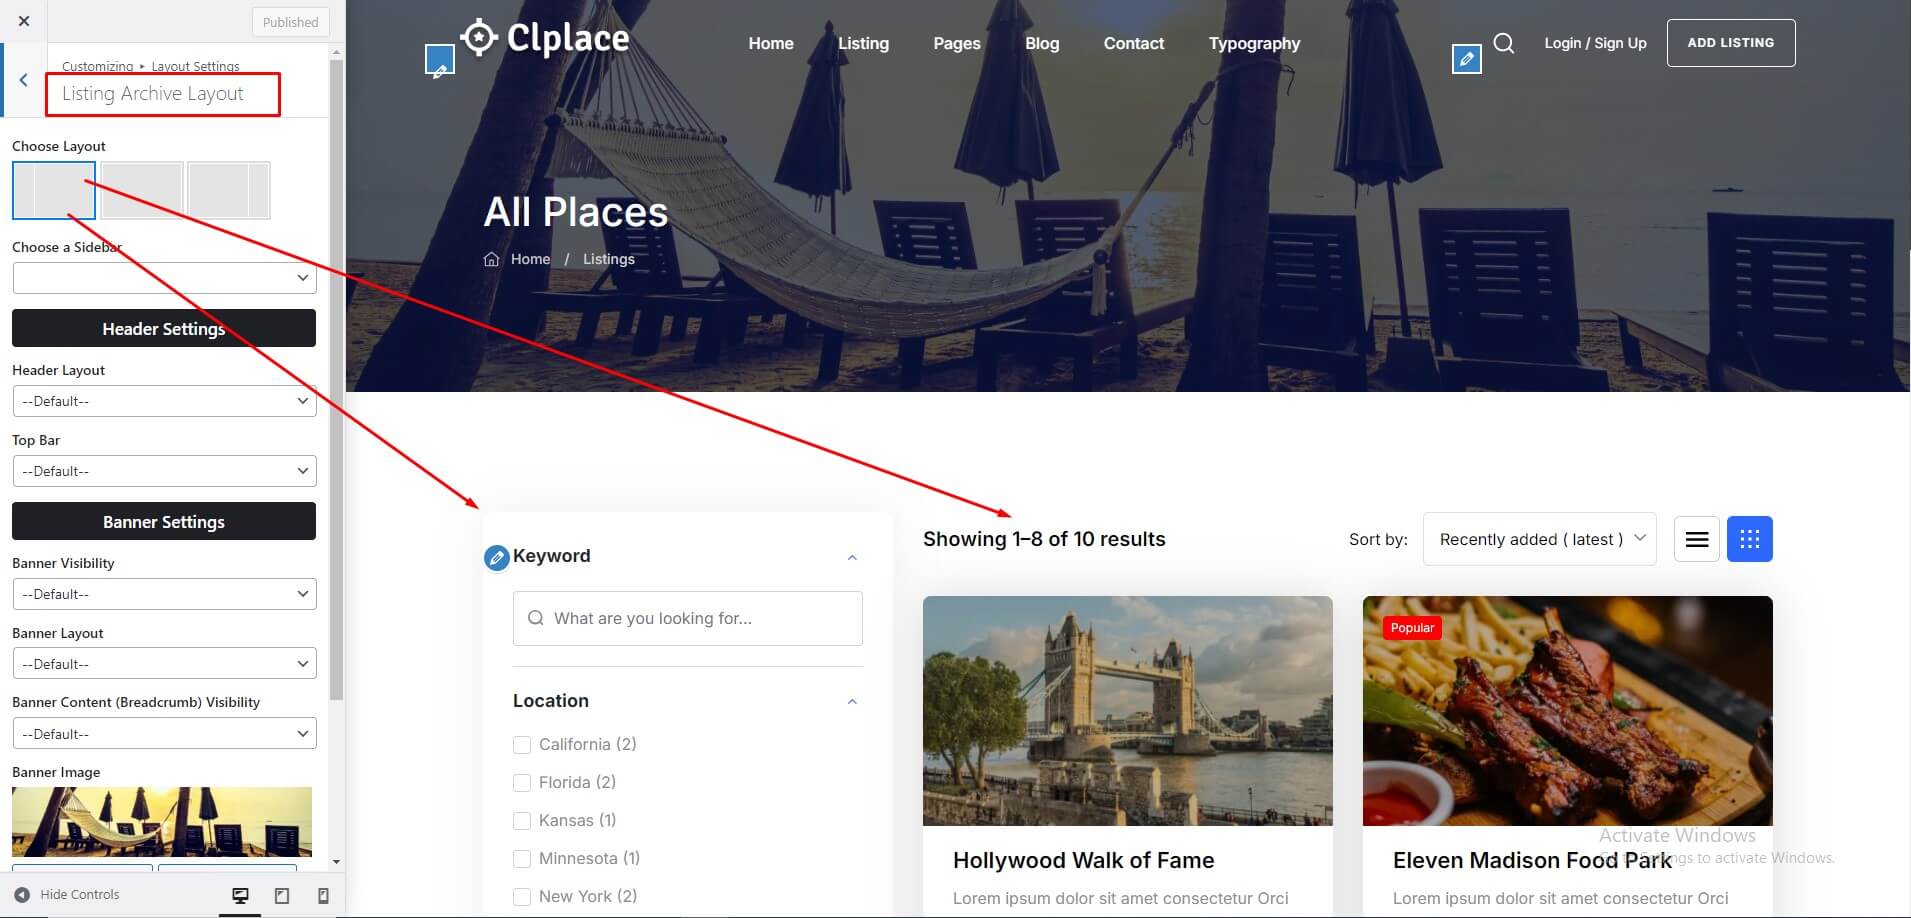
12.4.4 Listing Archive Layout
To change Listing Archive Layout navigate to Appearance > Customize > Layout Settings > Listing Archive Layout.
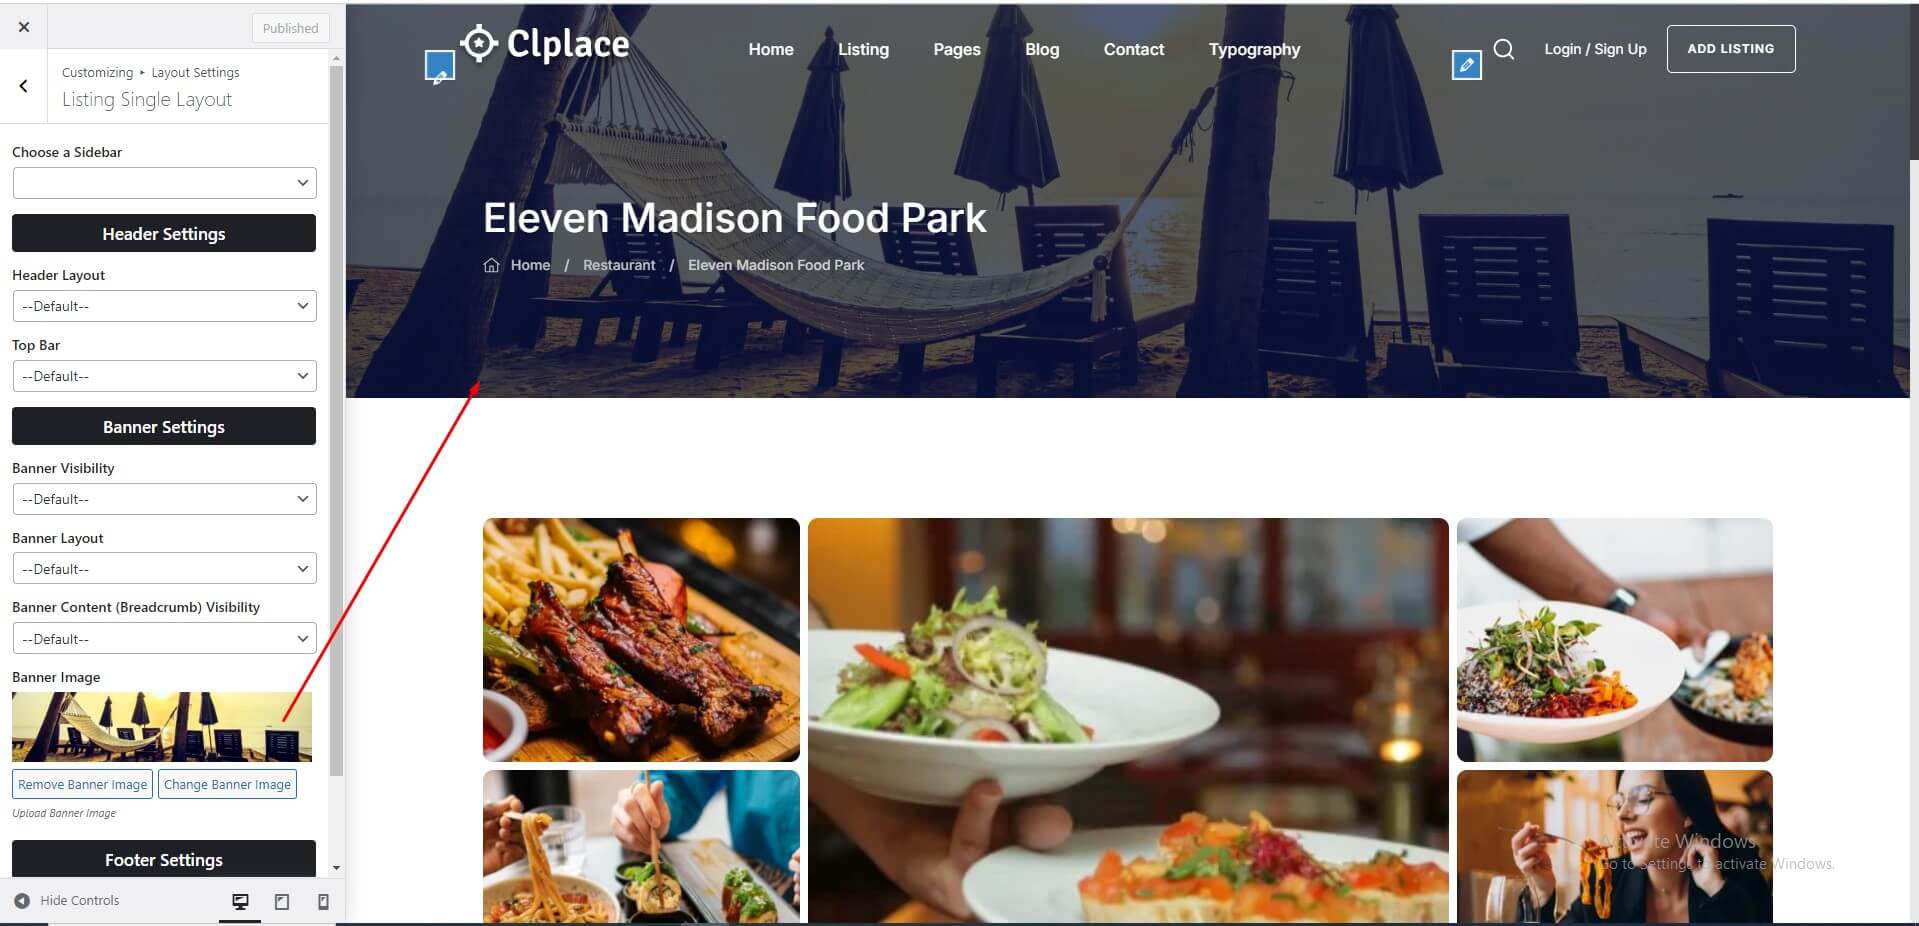
12.4.5 Listing Single Layout
To change Listing Single Layout navigate to Appearance > Customize > Layout Settings > Listing Single Layout.
12.5.1 Blog Settings
To change Blog Settings navigate to Appearance > Customize > Blog Settings.
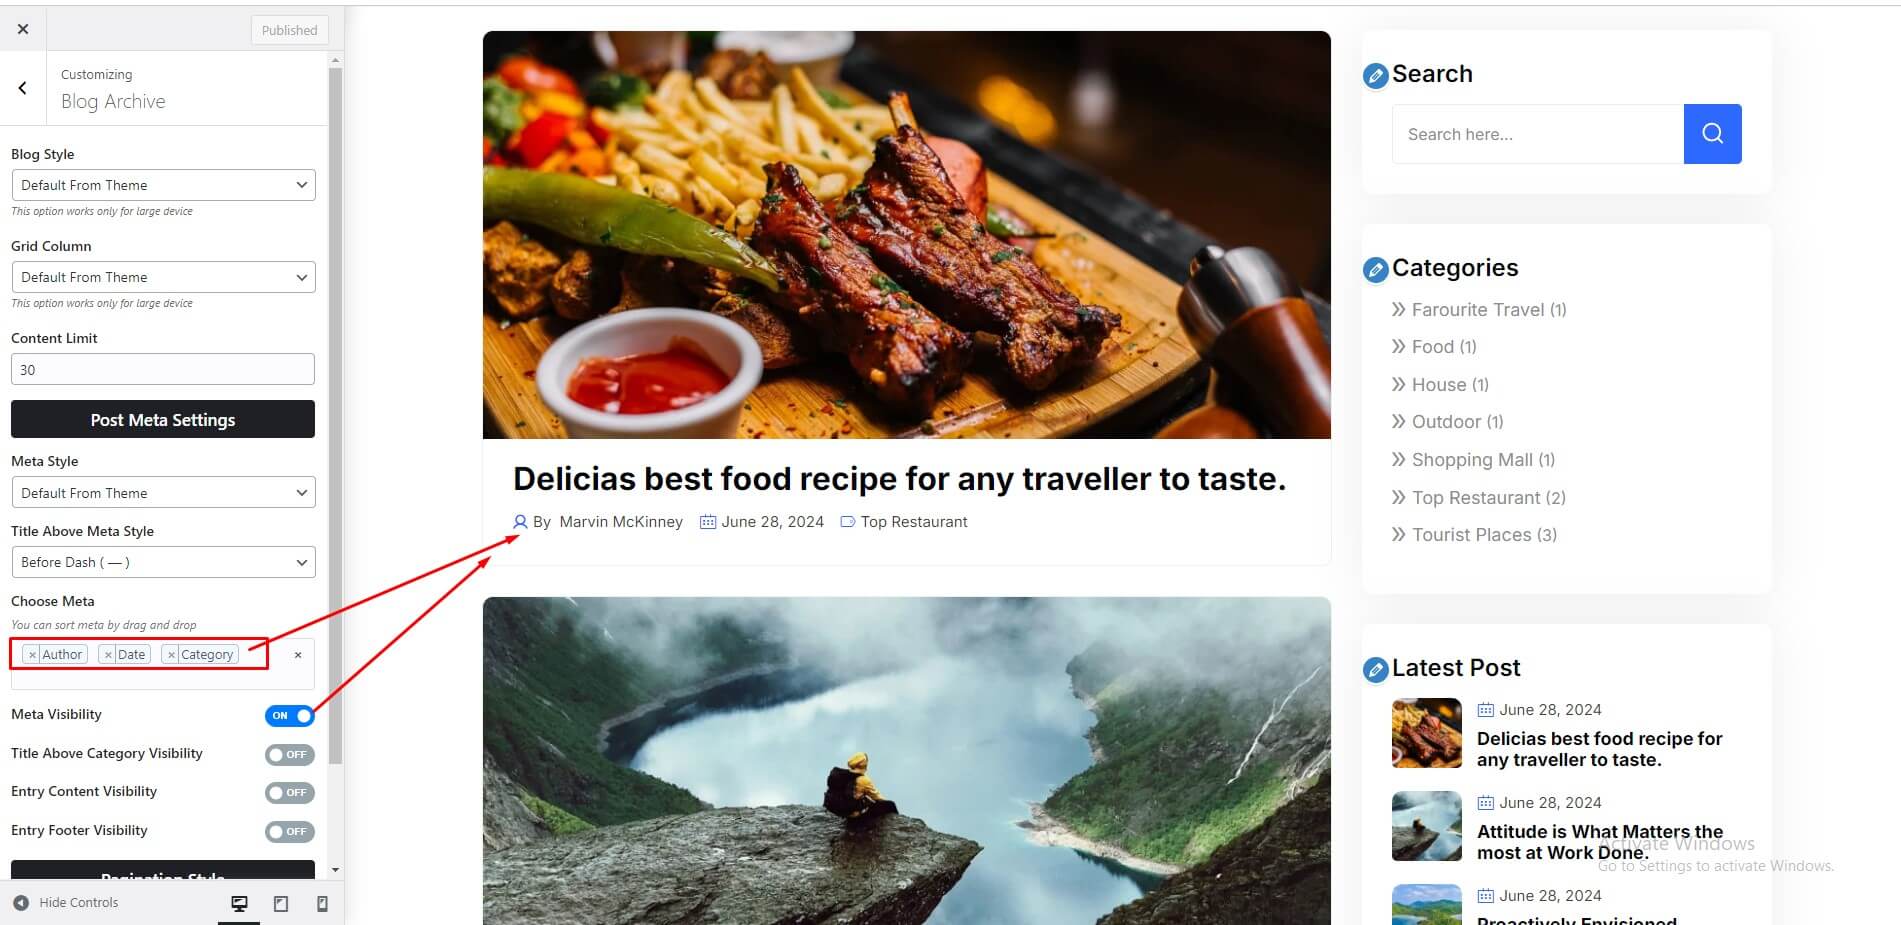
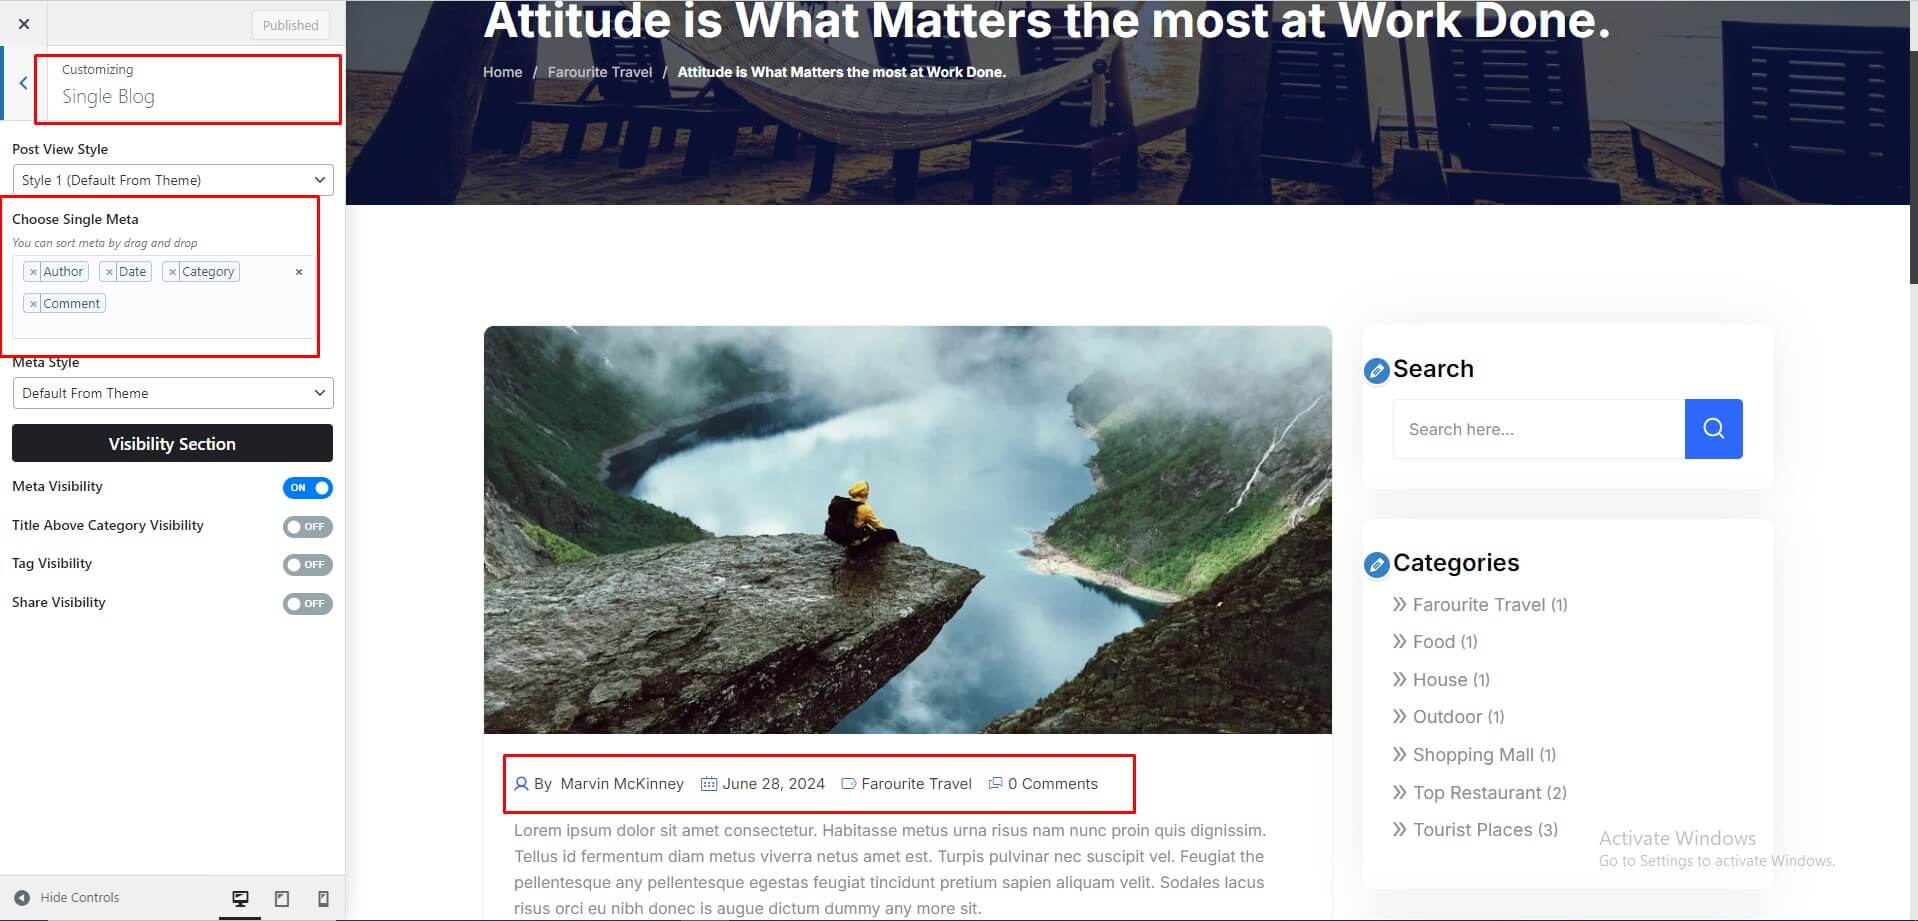
12.5.2 Post Settings
To change Single Post Settings navigate to Appearance > Customize > Post Settings.
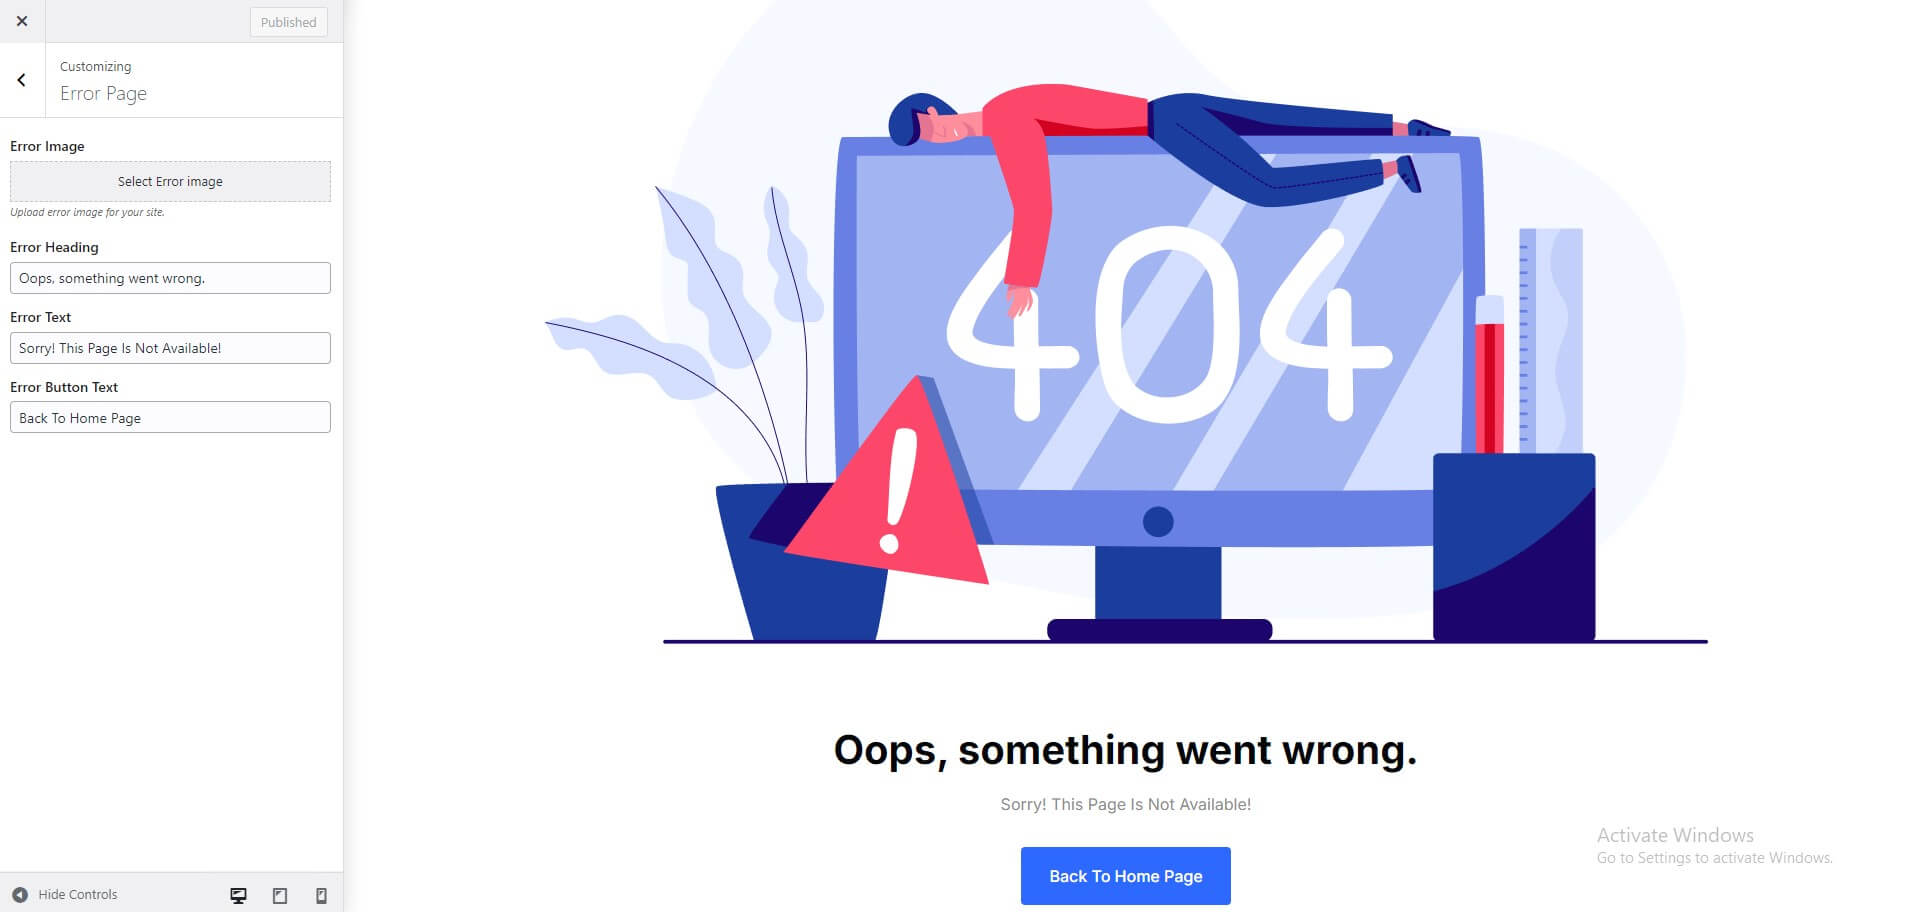
12.6.1 Error Page Settings
To change 404 page settings navigate to Dashboard > Appearance > Customize > Error Page.
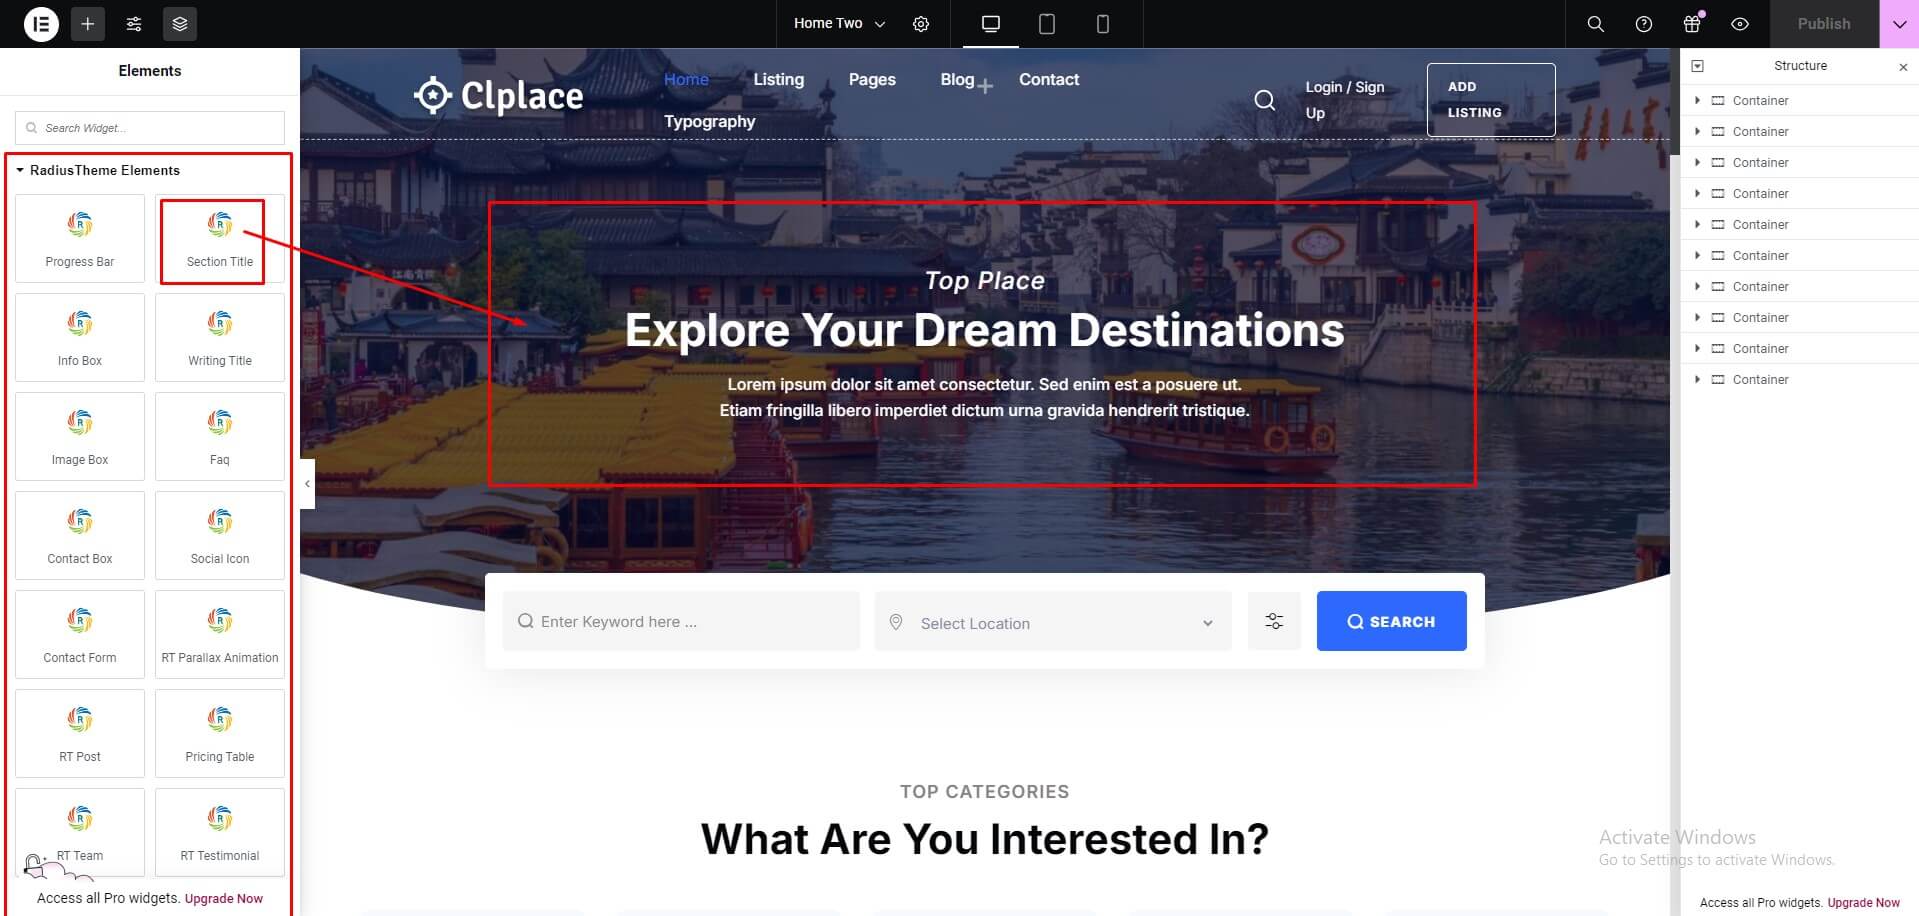
13. Elementor Widgets
Elementor Page Builder has a lot of built-in widgets by default. But for your convenience we've created several custom Elementor Widgets that you can use in your website and extend website functionality. You can find them under Clplace Elements section on Elementor edit mode.
14. Setting up Contact Form
We are using plugin WP Fluent Forms for contact functionality. You can see their documentation for better understanding.
If you don't want to go through all the troubles to check their documentation and just want to use the default contact form we provided with this theme, please at least set up the default emails in contact form settings. To do that, please follow the steps below:
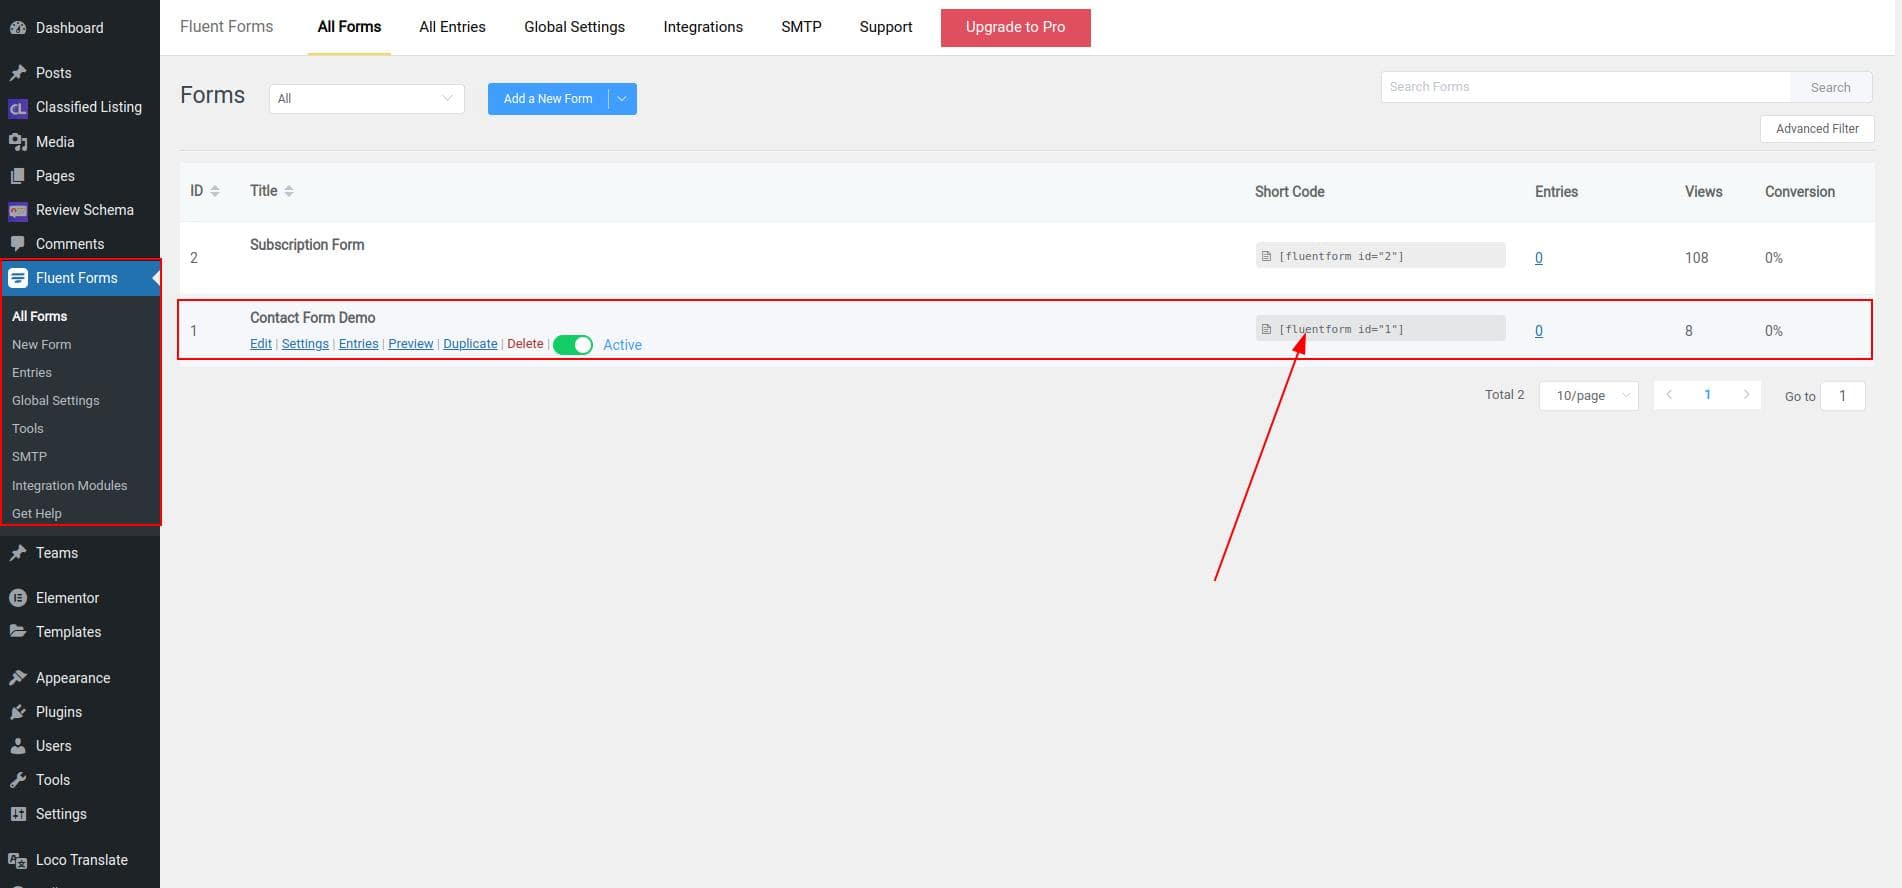
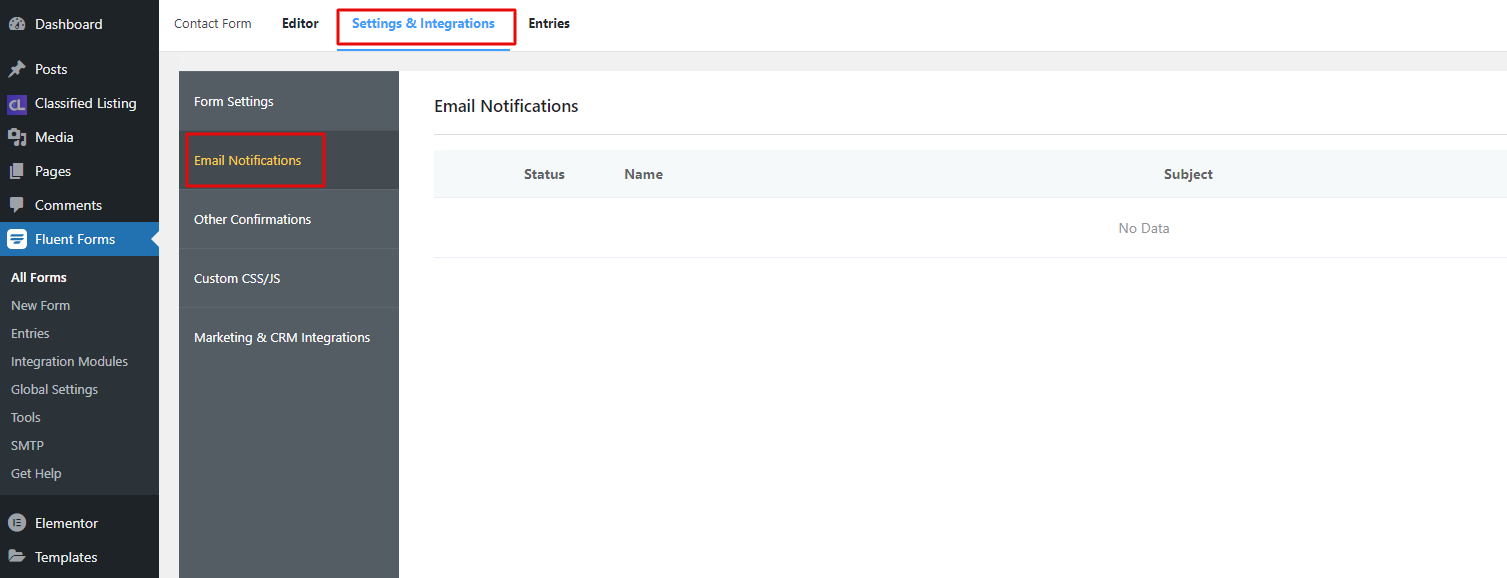
Step 1: Navigate to Fluent Forms Menu, then click on any contact form settings and go to Email Notification tab. Then click on Add Notification button.
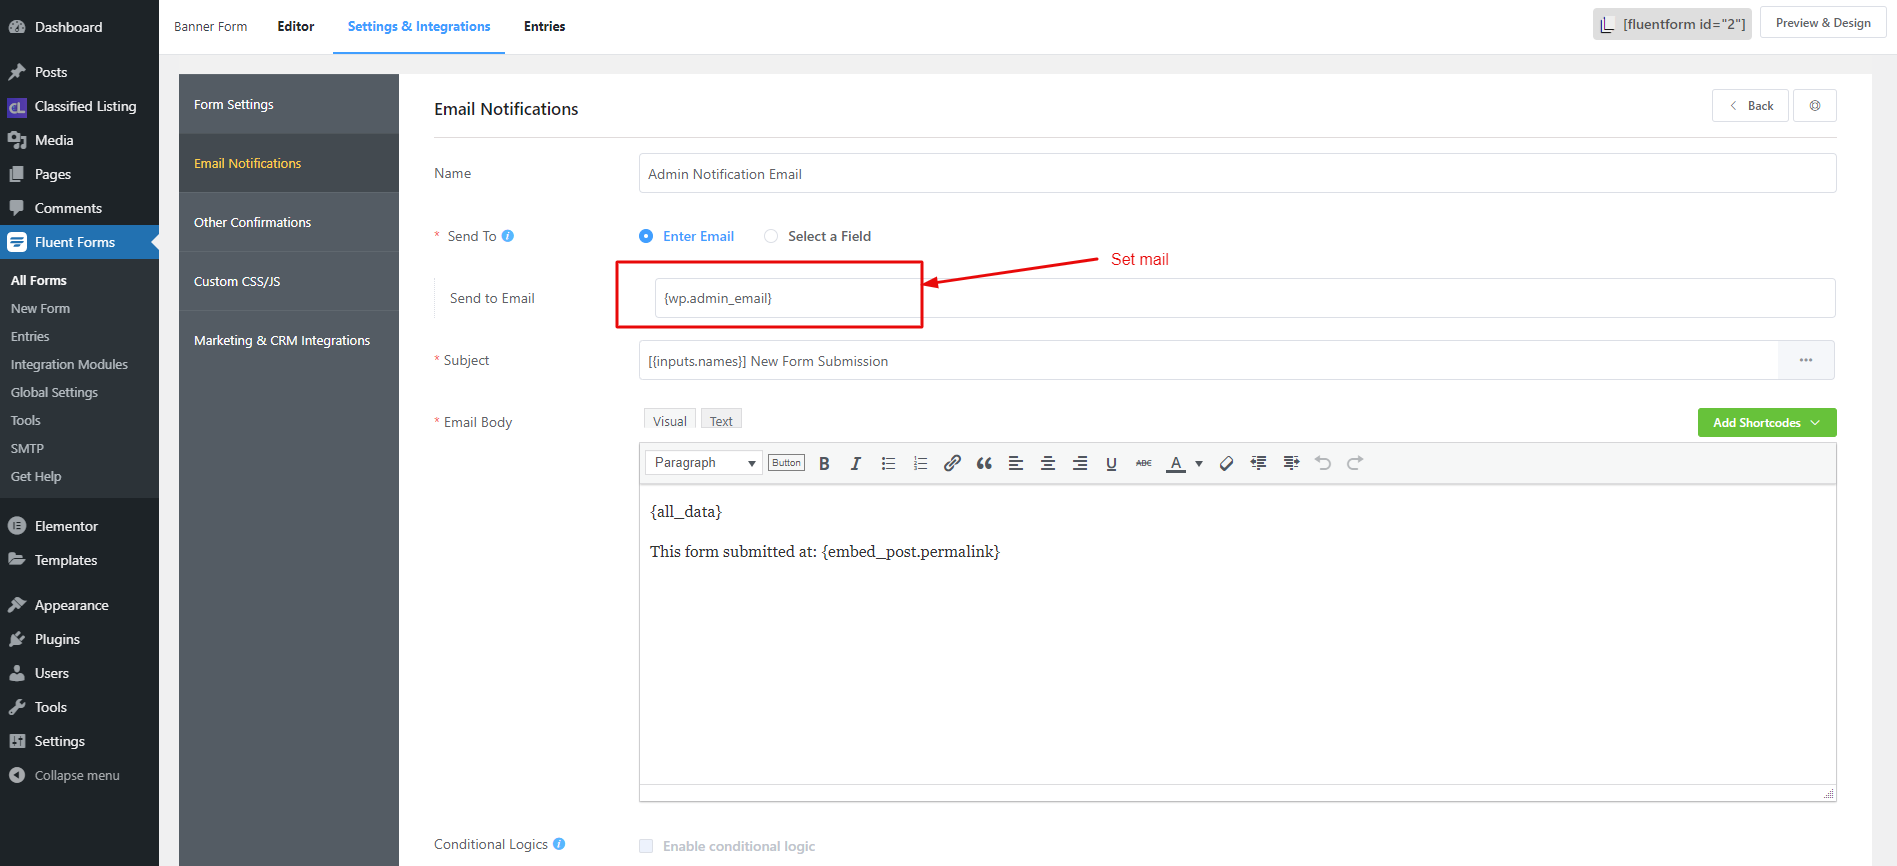
Step 2: Here you should set your own email address where you want to get notification user submitted forms. You can also check this link
Step 3: Please submit some dummy forms from Contact page to make sure that it's working properly.
15. Translating Theme
You can translate this theme to another language easily. You have to translate several things for your website to work properly:
- Theme: Clplace
- Plugin: Clplace Core
- Plugin: Classified Listing Pro
There are many tools available for translation. But the easiest way is to use plugin "Loco Translate". Using this plugin, you can literally translate any WordPress themes or plugins if it supports translation.
--- Here's a step by step tutorial about translating any themes and plugins using "Loco Translate":
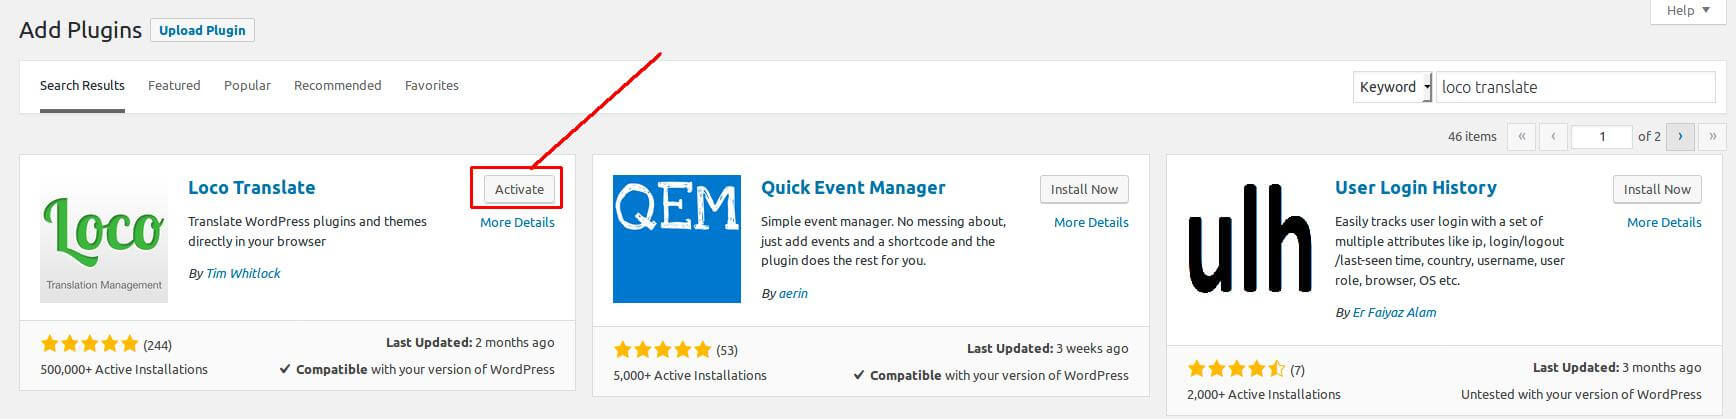
Step 1: Install and activate plugin "Loco Translate".
Step 2: Select the Theme or Plugin you want to translate from "Loco Translate" menu.
Step a: Theme/Plugin Translate
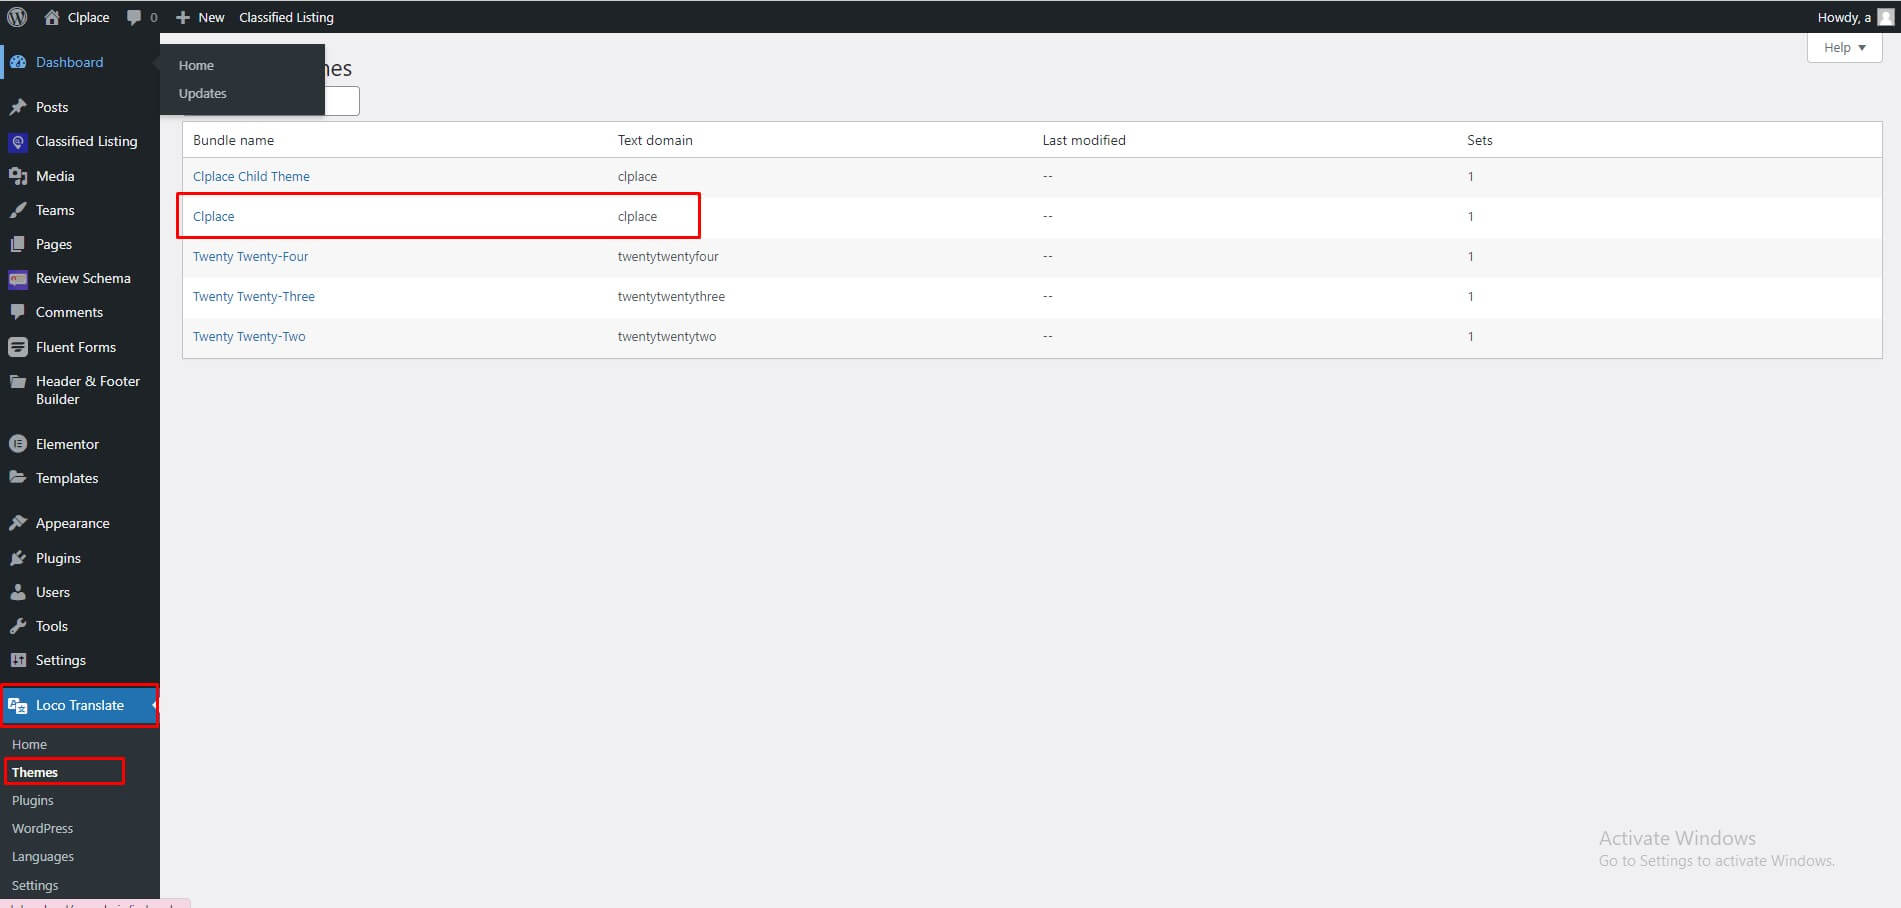
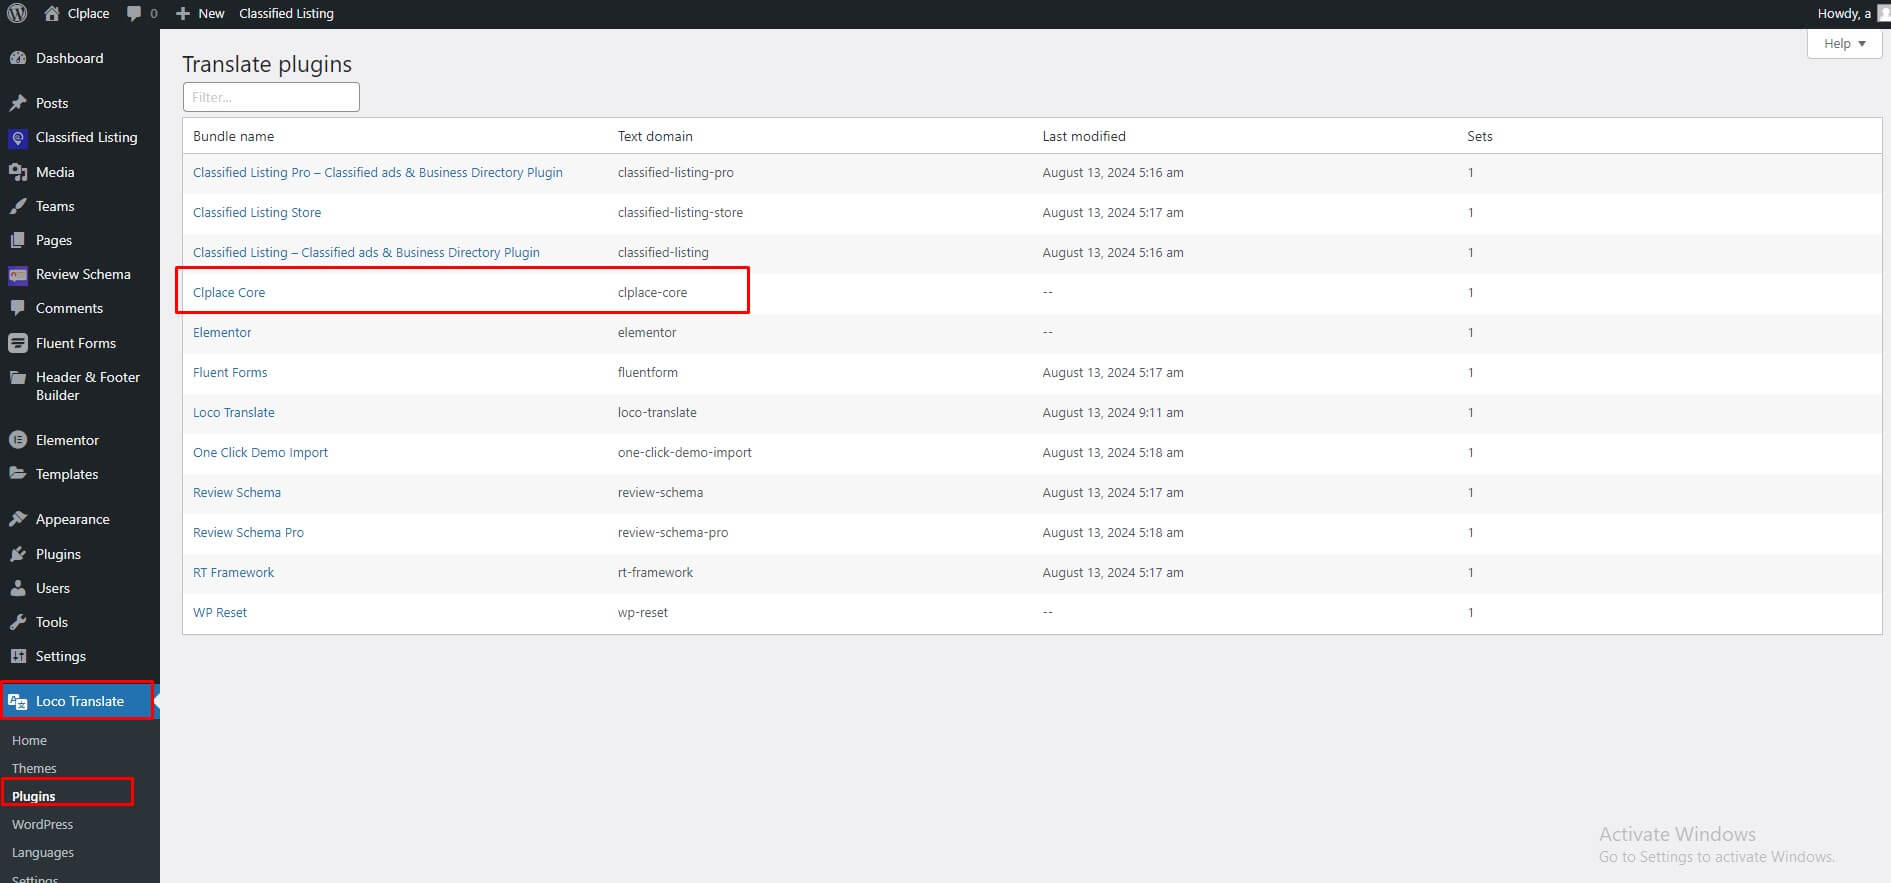
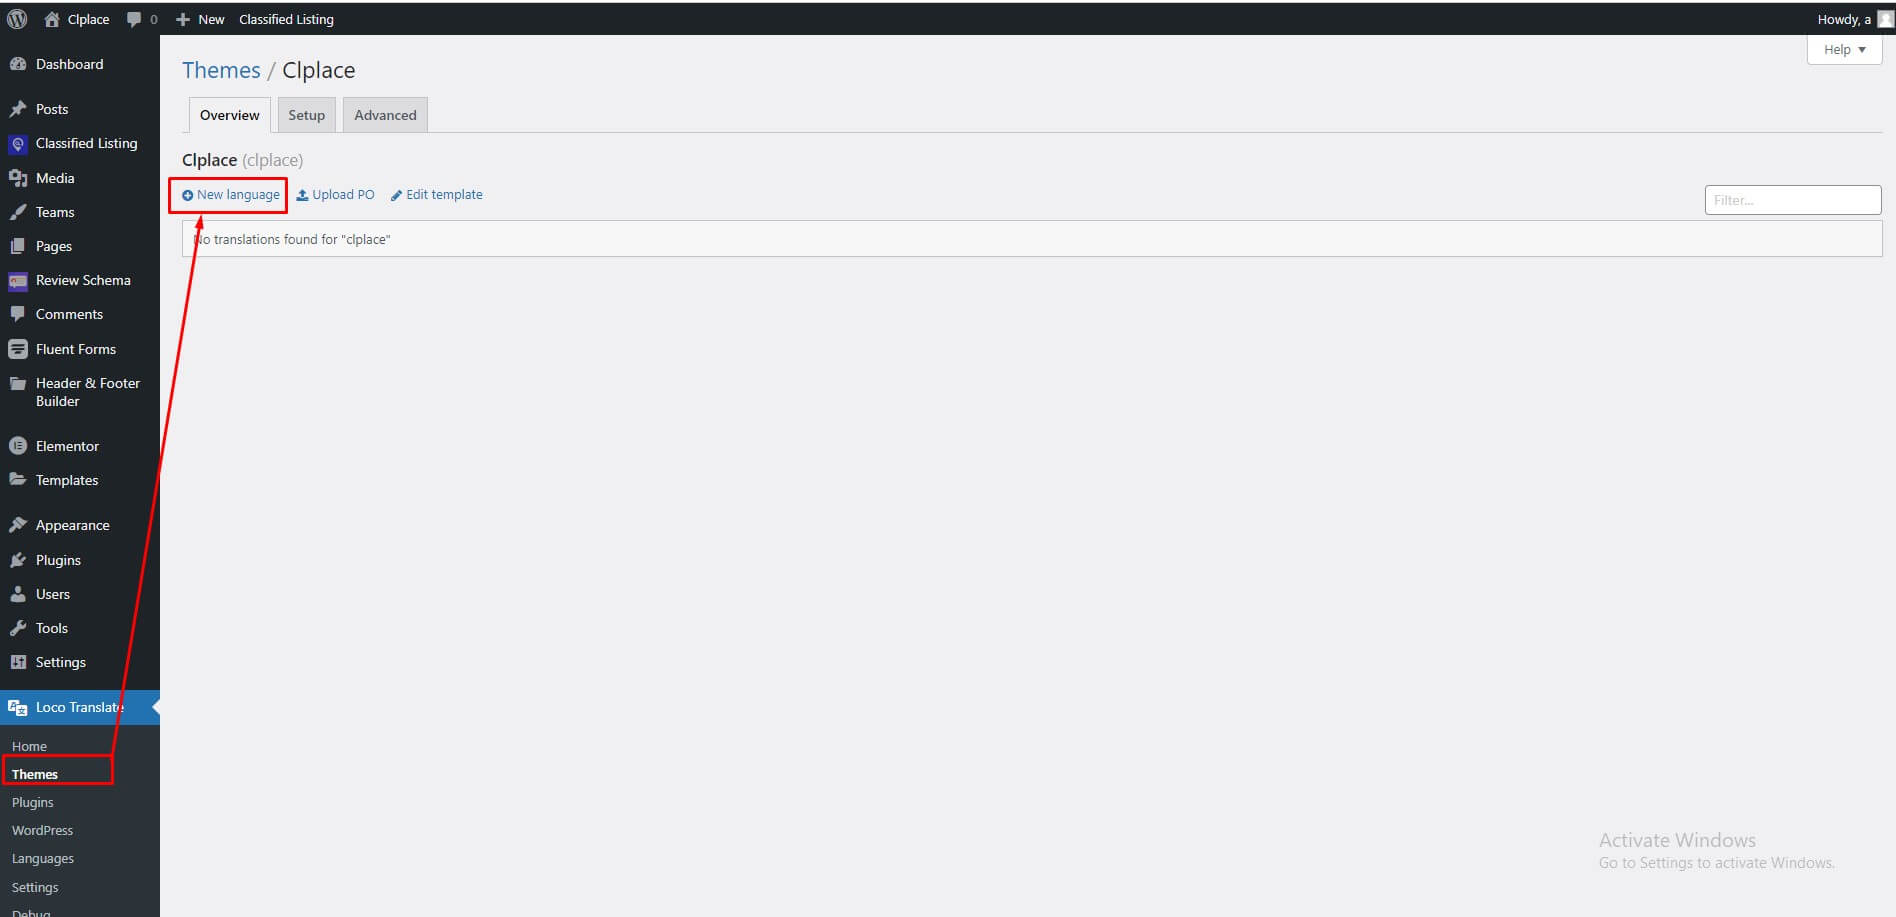
Step 3: Click on New language link.
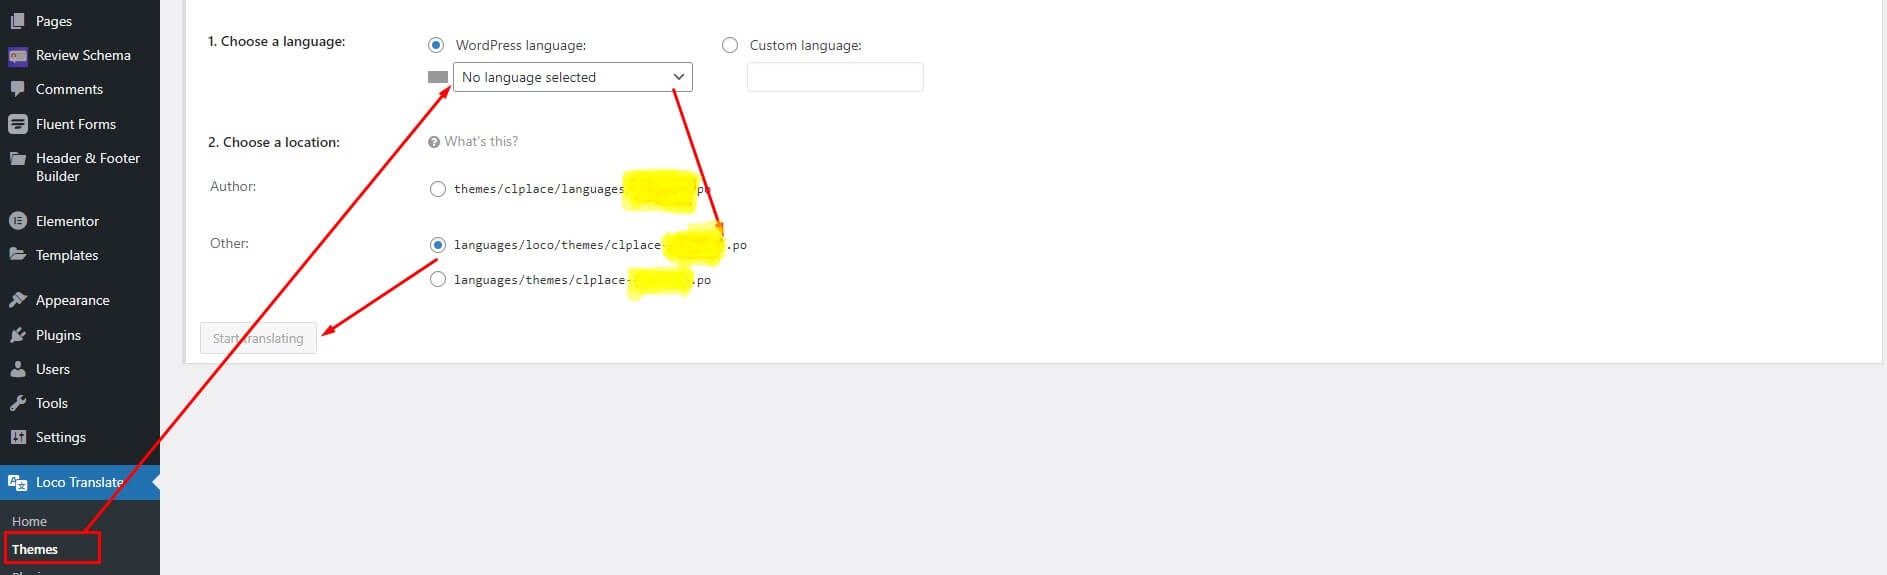
Step 4: Select your preferred language, and also select your location as "System". Then click on "Start Translating" button.
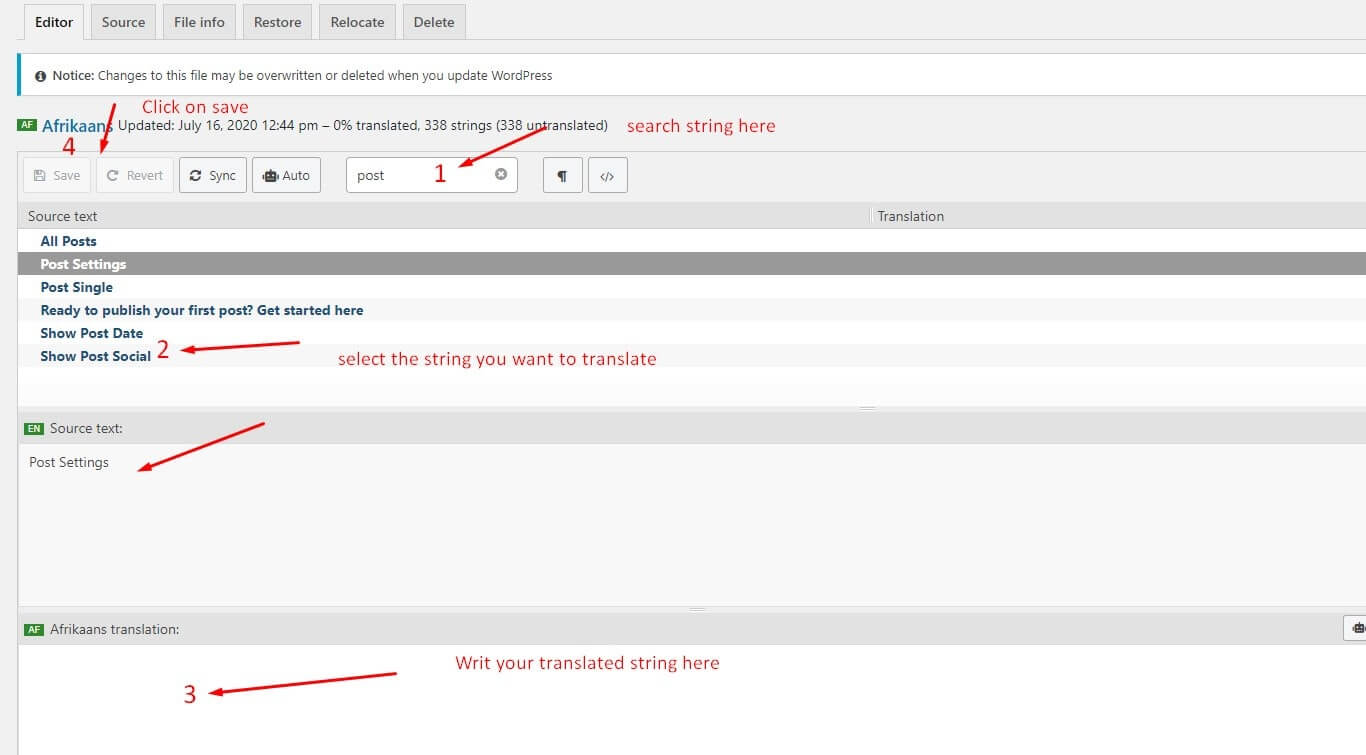
Step 5: Click on the "Sync" button for the first time. Then start translating strings like the image below.
Here's a quick video tutorial about how to use Loco Translate:
16. Updating Theme
Occationally we provide updates which includes new features and bugfixes. Updating WordPress theme is standard WordPress functionality.
Before Updating Theme:
You can use this plugin to keep the backup: https://wordpress.org/plugins/wp-theme-plugin-download/
There are few ways to update WordPress theme. You can follow any of the methods described below:
Method 1: By Uploading zip File
- From WordPress Admin Panel, Navigate to Appearance -> Themes.
- Activate any other theme (eg. Twenty Seventeen) than the current one.
- Delete Clplace Theme.
- Now you have to upload the updated theme zip file. To do this, Navigate to Appearance -> Themes -> Add New -> Upload. Go to browse, and select the zipped theme folder. Hit "Install Now" and the theme will be uploaded and installed.
Method 2: By FTP
- Using your FTP client, navigate to "/wp-content/themes/" folder on your server and delete the "Clplace" folder from there.
- Now upload the latest non-zipped theme folder into that "/wp-content/themes/" folder .
After Updating Theme:
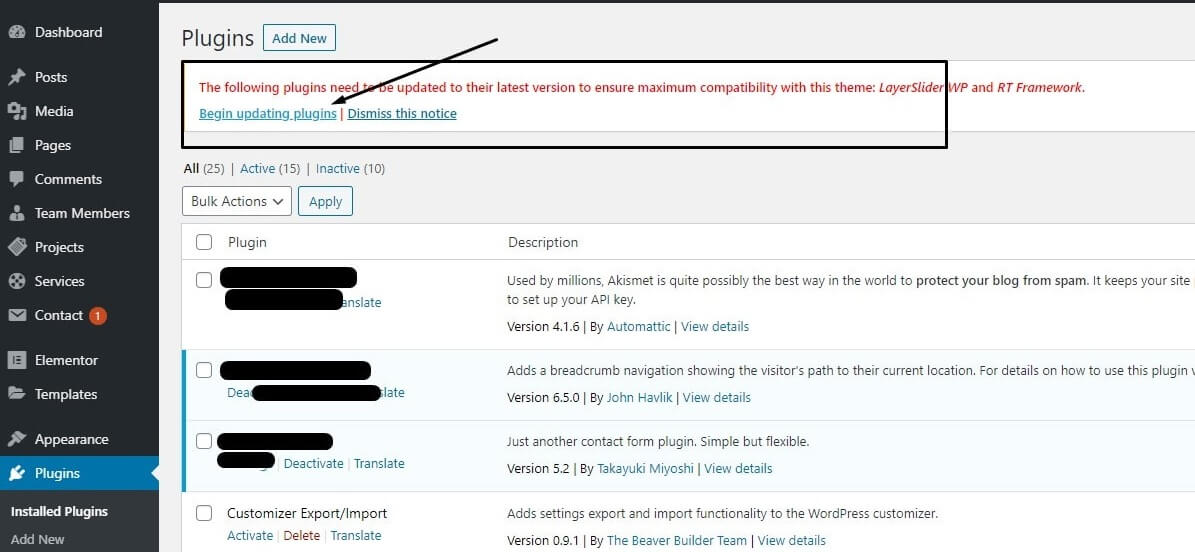
** After updating the theme please update all plugins which come with the theme.
17. Demo Content installation failed
This is a hosting issue. In most hostings demo installation will work fine. But some hostings block certain permissions which may cause this issue. If this happens to you, you can contact your hosting provider or alternatively send a support request to support@radiustheme.com and we will help you to fix this.
18. 404 Error in all pages
If you face this type of issue, please update your permalink. To update permalink, navigate to Settings -> Permalink and then click on Save Settings button.
19. Contact
If you face any issue please contact us at support@radiustheme.com. We provide 15 hours real-time support for our customers.
Thank you for purchasing our theme.